0. 整体结构
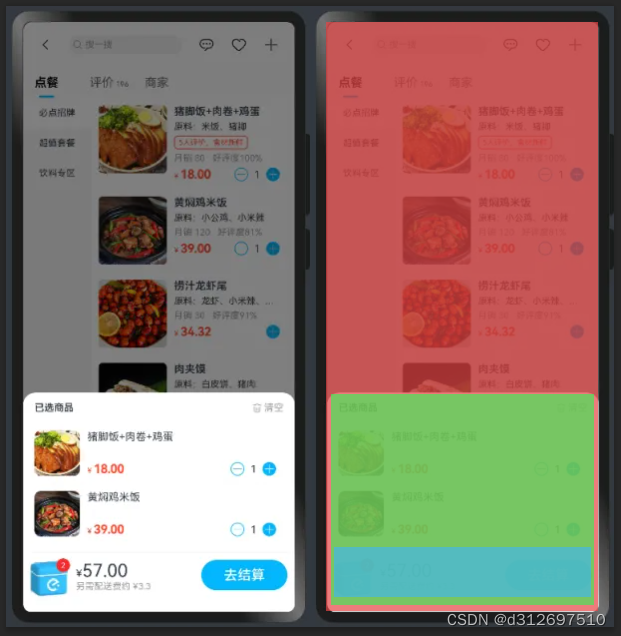
整体划分3部分。店铺部分,购物车部分,金额统计部分。使用 Stack 把3部分堆叠
0.1 整体页面 Index.ets
修改 Index.ets ,使用堆叠布局,并居底部对齐
import { ElShop } from '../components/ElShop'
import { ElShoppingCart } from '../components/ElShoppingCart'
import { ElSubtotal } from '../components/ElSubtotal'@Entry
@Component
struct Index {build() {Column() {Stack({ alignContent: Alignment.Bottom }) {ElShop()ElShoppingCart()ElSubtotal()}}.width("100%").height("100%")}
}
0.2 创建 ElShop 组件
创建 ElShop 店铺部分组件
@Component
export struct ElShop {build() {Column() {}.width("100%").height("100%").backgroundColor(Color.Red)}
}
0.3 创建 ElShoppingCart 组件
创建购物车部分组件
@Component
export struct ElShoppingCart {build() {Column() {}.width("100%").height(300).backgroundColor(Color.Green)}
}
0.4 创建 ElSubtotal 组件
创建金额统计部分组件
@Component
export struct ElSubtotal {build() {Column() {}.width("100%").height(80).backgroundColor(Color.Blue)}
}
0.5 创建 model
创建 models 文件夹,创建 Product.ets 文件
export class Product {id: number = 0name: string = ""positive_reviews: string = ""food_label_list: string[] = []price: number = 0picture: string = ""description: string = ""tag: string = ""monthly_sales: number = 0
}export class SelectedProduct extends Product {count: number = 0
}export class Category {id: number = 0name: string = ""foods: Product[] = []
}
1. 店铺部分
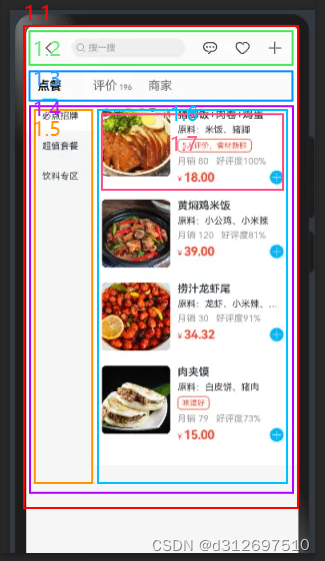
1.1 修改 ElShop 组件
划分 header,tabbar,body 三部分
Column [ ElShopHeader,ElShopTabbar,ElShopBody ]
import { ElShopHeader } from './ElShopHeader'
import { ElShopTabbar } from './ElShopTabbar'
import { ElShopBody } from './ElShopBody'@Component
export struct ElShop {build() {Column() {ElShopHeader()ElShopTabbar()ElShopBody()}.width("100%").height("100%").backgroundColor(Color.White)}
}
1.2 创建 ElShopHeader 组件
Row [ 返回图标,(搜索图标,文字),消息图标,喜欢图标,加号图标 ]
@Component
export struct ElShopHeader {build() {Row() {Image($r("app.media.left")).width(20).height(20).fillColor("#191919")Row() {Image($r('app.media.search')).width(14).aspectRatio(1).fillColor('#555').margin({ right: 5 })Text('搜一搜').fontSize(12).fontColor('#555')}.width(150).height(30).backgroundColor('#eee').borderRadius(15).padding({ left: 5, right: 5 })Image($r('app.media.message')).width(20).fillColor("#191919")Image($r('app.media.favor')).width(20).fillColor("#191919")Image($r("app.media.add")).width(20).fillColor("#191919")}.width('100%').height(60).backgroundColor('#fbfbfb').padding(10).justifyContent(FlexAlign.SpaceAround)}
}
1.3 创建 ElShopTabbar 组件
Row [ 点餐,评价,商家 ]
每一个tab用 @Builder 函数创建
@Component
export struct ElShopTabbar {@BuilderTabItem(active: boolean, title: string, subtitle?: string) {Column() {Text() {Span(title)if (subtitle) {Span(' ' + subtitle).fontSize(10).fontColor(active ? '#000' : '#666')}}.layoutWeight(1).fontColor(active ? '#000' : '#666').fontWeight(active ? FontWeight.Bold : FontWeight.Normal)Column().width(20).height(3).borderRadius(5).backgroundColor(active ? '#02B6FD' : 'transparent')}.alignItems(HorizontalAlign.Center).padding({ left: 15, right: 15 })}build() {Row() {this.TabItem(true, '点餐')this.TabItem(false, '评价', '196')this.TabItem(false, '商家')}.width("100%").height(40).justifyContent(FlexAlign.Start).backgroundColor('#fbfbfb')}
}
1.4 创建 ElShopBody 组件
这里分为左边分类列表,右边商品列表
Row [ 分类列表,商品列表 ]
import { ElShopCategory } from './ElShopCategory'
import { ElShopProduct } from './ElShopProduct'@Component
export struct ElShopBody {build() {Row() {ElShopCategory()ElShopProduct()}.width('100%').layoutWeight(1).alignItems(VerticalAlign.Top)}
}
1.5 创建 ElShopCategory 组件
分类列表,每一项是分类文字
import { Category } from '../models/Product'@Component
export struct ElShopCategory {@State categoryList: Category[] = [{ id: 1, name: '必点招牌', foods: [] },{ id: 2, name: '超值套餐', foods: [] },{ id: 3, name: '杂粮主食', foods: [] },]@State categoryIndex: number = 0build() {Column() {ForEach(this.categoryList, (item: Category, index: number) => {Text(item.name).width('100%').height(40).textAlign(TextAlign.Center).fontSize(12).backgroundColor(this.categoryIndex === index ? '#fff' : 'transparent').onClick(() => {this.categoryIndex = index})})}.width(90).height('100%').backgroundColor('#eee')}
}
1.6 创建 ElShopProduct 组件
商品列表,每一项是商品项
import { ElProductItem } from './ElProductItem'@Component
export struct ElShopProduct {build() {List({ space: 20 }) {ForEach([1, 2, 3, 4, 5, 6, 7, 8, 9], () => {ListItem() {ElProductItem()}})}.layoutWeight(1).backgroundColor('#fff').padding({ left: 10, right: 10 })}
}
1.7 创建 ElProductItem 组件
商品的每一项
Row [ 图片,内容 ]
@Component
export struct ElProductItem {build() {Row() {Image('https://gimg2.baidu.com/image_search/src=http%3A%2F%2Fsafe-img.xhscdn.com%2Fbw1%2F67ba10b0-b4a0-4dd7-b343-31830e01b616%3FimageView2%2F2%2Fw%2F1080%2Fformat%2Fjpg&refer=http%3A%2F%2Fsafe-img.xhscdn.com&app=2002&size=f9999,10000&q=a80&n=0&g=0n&fmt=auto?sec=1711612969&t=b2102c0d151f8225ba531caadf26dd6f').width(60).aspectRatio(1).borderRadius(8)Column({ space: 5 }) {Text('猪脚+肉卷+鸡蛋').fontSize(14).textOverflow({overflow: TextOverflow.Ellipsis}).maxLines(1)Text('用料:猪脚,肉卷,鸡蛋').fontSize(12).fontColor('#999').textOverflow({overflow: TextOverflow.Ellipsis}).maxLines(1)Row() {Text() {Span('¥ ').fontColor('#FF4B33').fontSize(10)Span('38.65').fontColor('#FF4B33').fontWeight(FontWeight.Bold)}// 商品数量操作}.justifyContent(FlexAlign.SpaceBetween).width('100%')}.layoutWeight(1).alignItems(HorizontalAlign.Start).justifyContent(FlexAlign.SpaceBetween).padding({ left: 10, right: 10 }).height(60)}.alignItems(VerticalAlign.Top)}
}
2. 金额统计部分
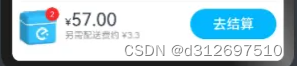
2.1 修改 ElSubtotal 组件
Row [ 购物车图标,金额文字,结算按钮 ]
@Component
export struct ElSubtotal {build() {Row() {Badge({count: 1,position: BadgePosition.RightTop,style: { badgeSize: 20 }}) {Image($r("app.media.shopping_cart_icon"))}.width(50).height(50).margin({ right: 10 })Column() {Text() {Span('¥').fontSize(14)Span('0').fontSize(24)}Text('另需配送费约 ¥3.3').fontSize(12).fontColor('#999')}.layoutWeight(1).alignItems(HorizontalAlign.Start)Button('去结算').fontSize(18).backgroundColor('#02B6FD').padding({ left: 30, right: 30 })}.width('100%').height(80).padding(10).alignItems(VerticalAlign.Center).backgroundColor(Color.White).border({color: "#f5f5f5",width: {top: "1"}})}
}
3. 购物车部分

给购物车内容的外层嵌套一个透明的遮罩
外层遮罩 Column [ Colunm( 标题,已选商品列表 ) ]
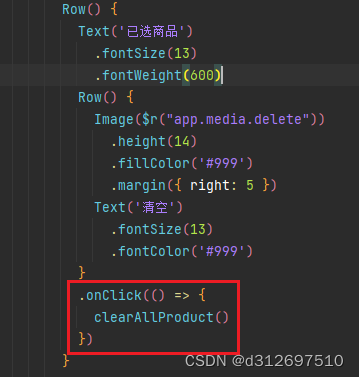
3.1 修改 ElShoppingCart 组件
import { ElProductItem } from './ElProductItem'@Component
export struct ElShoppingCart {build() {Column() {Column() {Row() {Text('已选商品').fontSize(13).fontWeight(600)Row() {Image($r("app.media.delete")).height(14).fillColor('#999').margin({ right: 5 })Text('清空').fontSize(13).fontColor('#999')}}.width('100%').justifyContent(FlexAlign.SpaceBetween).padding(15)List({ space: 20 }) {ForEach([1, 2, 3, 4], () => {ListItem() {ElProductItem()}})}.divider({strokeWidth: 1,color: '#ddd'}).padding({ left: 15, right: 15, bottom: 100 })}.backgroundColor('#fff').borderRadius({topLeft: 16,topRight: 16})}.width('100%').height('100%').justifyContent(FlexAlign.End).backgroundColor('rgba(0,0,0,0.5)')}
}
3.2 修改购物车显示隐藏
当点击底部统计部分才显示购物车部分
修改 Index.ets ,添加 showShoppingCart 属性
@Entry
@Component
struct Index {@State showShoppingCart: boolean = falsebuild() {Column() {Stack({ alignContent: Alignment.Bottom }) {ElShop()if (this.showShoppingCart) {ElShoppingCart()}ElSubtotal({ showShoppingCart: $showShoppingCart })}}.width("100%").height("100%")}
}
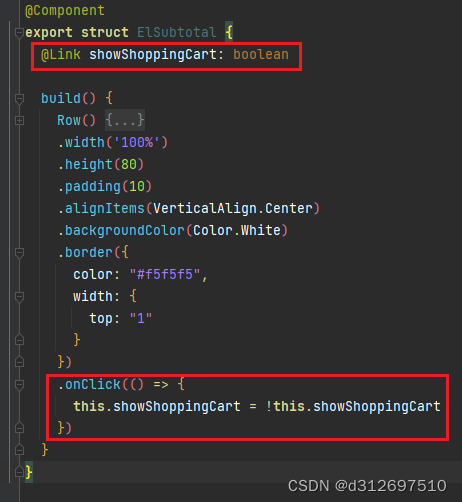
修改 ElSubtotal 金额统计部分组件,接受 showShoppingCart 属性
@Link showShoppingCart: boolean修改 ElSubtotal 组件,添加点击事件修改 showShoppingCart 值
.onClick(() => {this.showShoppingCart = !this.showShoppingCart
}) 
4. 渲染商品数据
4.1 安装 live-server
使用 npm 全局安装 live-server 包
npm i live-server -g在 elshop.json 文件夹启动 live-server
live-server4.2 安装 axios
在项目中安装 axios
ohpm install @ohos/axios4.3 获取 elshop.json 数据
修改 Index.ets,获取json数据
@Entry
@Component
struct Index {@State showShoppingCart: boolean = false@Provide categoryList: Category[] = []@Provide categoryIndex: number = 0aboutToAppear() {this.getData()}async getData() {const res = await axios.get("http://127.0.0.1:8080/elshop.json")const category = res.data.category.map(item => {const foods = item.foods.map(food => {return { ...food, count: 0 }})return { ...item, foods }})this.categoryList = category}
}
4.4 修改 ElShopCategory 组件
修改从祖先组件获取分类数据
@Component
export struct ElShopCategory {@Consume categoryIndex: number@Consume categoryList: Category[]
}
4.5 修改 ElShopProduct 组件
修改从祖先组件获取分类数据,循环分类下的商品,并把 product 传给 ElProductItem 组件
import { Category, SelectedProduct } from '../models/Product'
import { ElProductItem } from './ElProductItem'@Component
export struct ElShopProduct {@Consume categoryIndex: number@Consume categoryList: Category[]build() {List({ space: 20 }) {ForEach(this.categoryList[this.categoryIndex]?.foods ?? [], (product: SelectedProduct) => {ListItem() {ElProductItem({ product })}})}.layoutWeight(1).backgroundColor('#fff').padding({ left: 10, right: 10 })}
}
4.6 修改 ElProductItem 组件
修改 ElProductItem 组件,接收 product 数据
import { SelectedProduct } from '../models/Product'@Component
export struct ElProductItem {product: SelectedProductbuild() {Row() {Image(this.product.picture).width(60).aspectRatio(1).borderRadius(8)Column({ space: 5 }) {Text(this.product.name).fontSize(14).textOverflow({overflow: TextOverflow.Ellipsis}).maxLines(1)Text(this.product.description).fontSize(12).fontColor('#999').textOverflow({overflow: TextOverflow.Ellipsis}).maxLines(1)Row() {Text() {Span('¥ ').fontColor('#FF4B33').fontSize(10)Span(this.product.price.toString()).fontColor('#FF4B33').fontWeight(FontWeight.Bold)}// 商品数量操作}.justifyContent(FlexAlign.SpaceBetween).width('100%')}.layoutWeight(1).alignItems(HorizontalAlign.Start).justifyContent(FlexAlign.SpaceBetween).padding({ left: 10, right: 10 }).height(60)}.alignItems(VerticalAlign.Top)}
}
5. 商品数量操作
5.1 创建 utils/productUtil.ets 文件
为了持久化保存已选择的商品,把选中的商品保存到 AppStorage 中
- 声明保存到 AppStoreage 的 key
- 添加已选的商品 addProduct
- 删除已选的商品 removeProduct
- 清空已选的商品 cleartAllProduct
import { Product, SelectedProduct } from '../models/Product'export const SHOPPING_CART_KEY = "SHOPPING_CART"// 添加商品
export const addProduct = (product: Product) => {const products = JSON.parse(AppStorage.Get<string>(SHOPPING_CART_KEY) || '[]') as SelectedProduct[]const selectedProduct = products.find(item => item.id === product.id)if (selectedProduct) {selectedProduct.count++} else {products.push({ ...product, count: 1 })}AppStorage.Set<string>(SHOPPING_CART_KEY, JSON.stringify(products))
}// 删除商品
export const removeProduct = (id: number) => {const products = JSON.parse(AppStorage.Get<string>(SHOPPING_CART_KEY) || '[]') as SelectedProduct[]const index = products.findIndex(item => item.id === id)const selectedProduct = products[index]if (selectedProduct && selectedProduct.count > 0) {selectedProduct.count--if (selectedProduct.count <= 0) {products.splice(index, 1)}}AppStorage.Set<string>(SHOPPING_CART_KEY, JSON.stringify(products))
}// 清空商品
export const clearAllProduct = () => {AppStorage.Set<string>(SHOPPING_CART_KEY, "[]")
}
5.2 修改 Index.ets 文件
在 Index.ets 页面初始化持久化的数据
import { SHOPPING_CART_KEY } from '../utils/productUtil'PersistentStorage.PersistProp(SHOPPING_CART_KEY,"[]")添加持久化的json数据属性,并监听更新变化
@StorageLink(SHOPPING_CART_KEY)@Watch("update")productListJson: string = "[]"@Provide selectedProductList: SelectedProduct[] = []update() {this.selectedProductList = JSON.parse(this.productListJson)}5.3 修改 ElShoppingCart 组件
接收已选中商品数据 selectedProductList
export struct ElShoppingCart {@Consume selectedProductList: SelectedProduct[]
}
并修改列表渲染,把 product 传给 ElProductItem 组件
List({ space: 20 }) {ForEach(this.selectedProductList, (product: SelectedProduct) => {ListItem() {ElProductItem({ product })}})
}
给清空按钮添加事件
.onClick(() => {clearAllProduct()
})
5.4 创建 ElProductCount 商品数量组件
import { SelectedProduct } from '../models/Product'@Component
export struct ElProductCount {product: SelectedProductbuild() {Row({ space: 8 }) {Image($r('app.media.minus_circle')).width(14).aspectRatio(1).fillColor("#02B6FD")Text('0').fontSize(14)Image($r('app.media.plus_circle')).width(14).aspectRatio(1).fillColor("#02B6FD")}}
}
5.5 修改 ElProductItem 组件
在金额旁边添加数量组件
ElProductCount({ product:this.product })
5.6 修改 ElProductCount 组件
- 接收 product 数据
- 接收 selectedProductList 数据
- 获取该商品的数量
- 给图标绑定添加商品,删除商品的事件
import { SelectedProduct } from '../models/Product'
import { addProduct, removeProduct } from '../utils/productUtil'@Component
export struct ElProductCount {@Consume selectedProductList: SelectedProduct[]product: SelectedProductgetCount() {const selectedProduct = this.selectedProductList.find(item => item.id === this.product.id)return selectedProduct?.count || 0}build() {Row({ space: 8 }) {Image($r('app.media.minus_circle')).width(14).aspectRatio(1).fillColor("#02B6FD").onClick(() => {removeProduct(this.product.id)})Text(`${this.getCount()}`).fontSize(14)Image($r('app.media.plus_circle')).width(14).aspectRatio(1).fillColor("#02B6FD").onClick(() => {addProduct(this.product)})}}
}
5.7 修改 ElSubtotal 组件
- 接收已选中商品 selectedProductList
- 添加商品总数据方法
- 添加商品总金额方法
@Component
export struct ElSubtotal {@Link showShoppingCart: boolean@Consume selectedProductList: SelectedProduct[]getTotalCount() {return this.selectedProductList.reduce((count, item) => {return count + item.count}, 0)}getTotalPrice() {return this.selectedProductList.reduce((price, item) => {return price + (item.count * item.price * 100)}, 0) / 100}
}
6. 文件
elshop.json文件
https://download.csdn.net/download/d312697510/89141677
icon图标
https://download.csdn.net/download/d312697510/89141683
git仓库地址
https://github.com/webdq/ElShop