4.SpringBoot集成Kafka开发
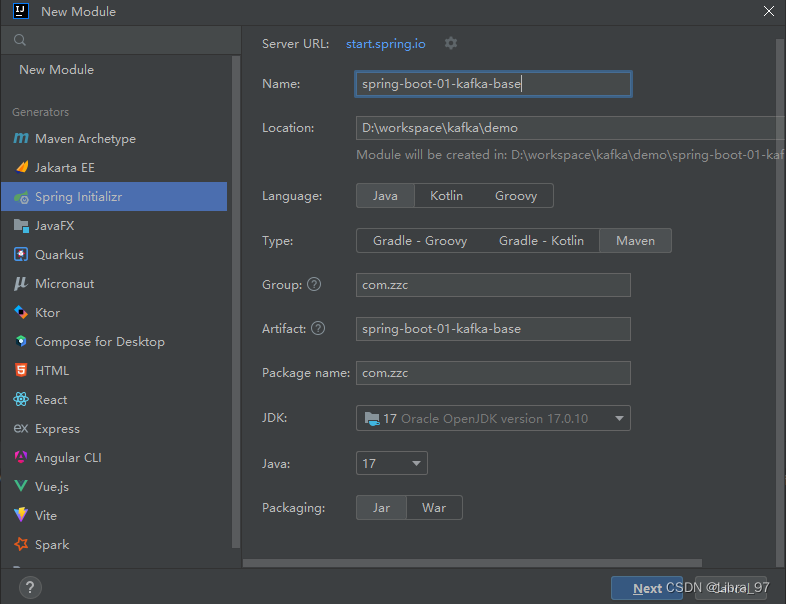
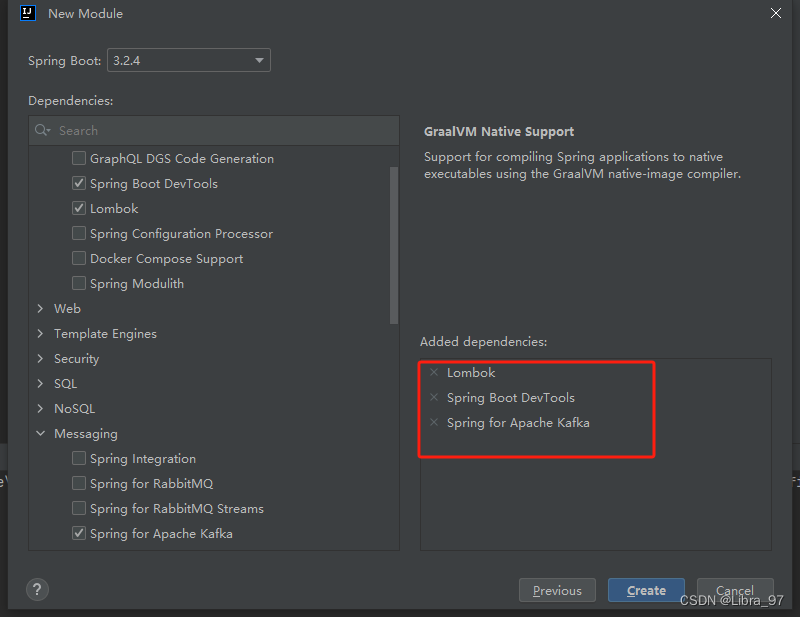
4.1 创建项目
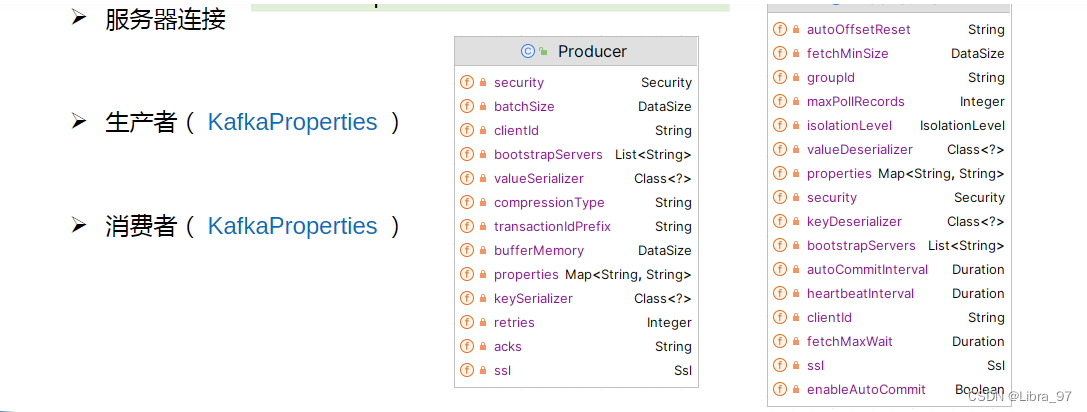
4.2 配置文件
application.yml
spring:application:name: spring-boot-01-kafka-basekafka:bootstrap-servers: 192.168.2.118:9092
4.3 创建生产者
package com.zzc.producer;import jakarta.annotation.Resource;
import org.springframework.kafka.core.KafkaTemplate;
import org.springframework.stereotype.Component;@Component
public class EventProducer {@Resourceprivate KafkaTemplate<String, String> kafkaTemplate;public void sendEvent(){kafkaTemplate.send("hello-topic", "hello kafka");}
}
4.4 测试
package com.zzc.producer;import jakarta.annotation.Resource;
import org.springframework.kafka.core.KafkaTemplate;
import org.springframework.stereotype.Component;@Component
public class EventProducer {@Resourceprivate KafkaTemplate<String, String> kafkaTemplate;public void sendEvent(){kafkaTemplate.send("hello-topic", "hello kafka");}
}
hello-topic中已存放一个消息

4.5 创建消费者
package com.zzc.cosumer;import org.springframework.kafka.annotation.KafkaListener;
import org.springframework.stereotype.Component;@Component
public class EventConsumer {// 采用监听的方式接收事件(消息、数据)@KafkaListener(topics = {"hello-topic"}, groupId = "hello-group")public void onEvent(String event){System.out.printf("读取到的事件:" + event);}
}
启动springboot,发现并没有读取到之前的消息

此时使用测试类调用生成者再发送一个消息,此时消费者成功监听到刚生产的消息

4.6 Kafka的几个概念
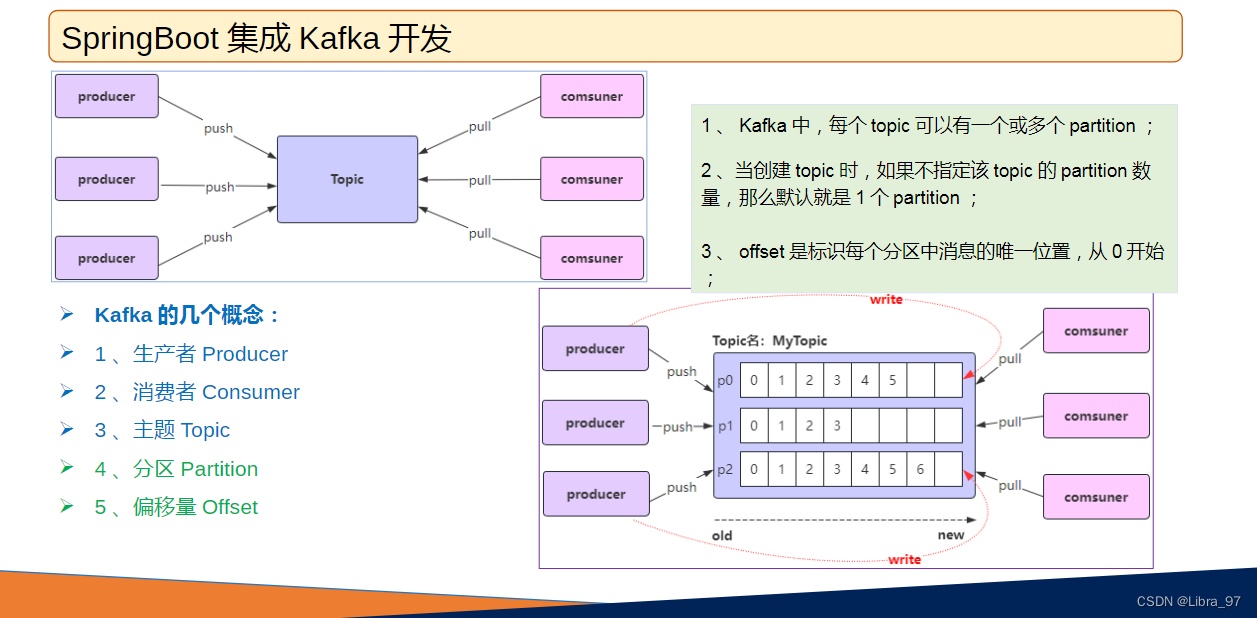

- 默认情况下,当启动一个新的消费者组时,它会从每个分区的最新偏移量(即该分区中最后一条消息的下一个位置)开始消费。如果希望从第一条消息开始消费,需要将消费者的 auto.offset.reset 设置为 earliest ;
- 注意: 如果之前已经用相同的消费者组 ID 消费过该主题,并且 Kafka 已经保存了该消费者组的偏移量,那么即使你设置了 auto.offset.reset=earliest ,该设置也不会生效,因为 Kafka 只会在找不到偏移量时使用这个配置。在这种情况下,你需要手动重置偏移量或使用一个新的消费者组 ID ;
4.7 消息消费时偏移量策略的配置
spring:
kafka:
consumer:
auto-offset-reset: earliest
- 取值: earliest 、 latest 、 none 、 exception
- earliest :自动将偏移量重置为最早的偏移量;
- latest :自动将偏移量重置为最新偏移量;
- none :如果没有为消费者组找到以前的偏移量,则向消费者抛出异常;
- exception :向消费者抛出异常;( spring-kafka 不支持)
4.7.1 测试修改配置后能否消费之前的消息
修改配置重启服务后,并没有消费之前的消息

修改消费者组ID,再次重启服务进行测试
@Component
public class EventConsumer {// 采用监听的方式接收事件(消息、数据)@KafkaListener(topics = {"hello-topic"}, groupId = "hello-group-02")public void onEvent(String event){System.out.println("读取到的事件:" + event);}
}
成功读取到之前的消息

4.7.2 手动重置偏移量
修改为读取最早的消息
./kafka-consumer-groups.sh --bootstrap-server <your-kafka-bootstrap-servers> --group <your-consumer-group> --topic <your-topic> --reset-offsets --to-earliest --execute修改为读取最新的消息
./kafka-consumer-groups.sh --bootstrap-server <your-kafka-bootstrap-servers> --group <your-consumer-group> --topic <your-topic> --reset-offsets --to-latest --execute
执行命令
./kafka-consumer-groups.sh --bootstrap-server 127.0.0.1:9092 --group hello-group-02 --topic hello-topic --reset-offsets --to-earliest --execute

报错:提示我们不能在活跃的情况下进行修改偏移量,需要先停止服务
再次执行命令,已经重置偏移量成功

此时启动服务,读取到之前的消息了

4.8 生产者发送消息参数(生产者客户端向Kafka的主题topic中写入事件)
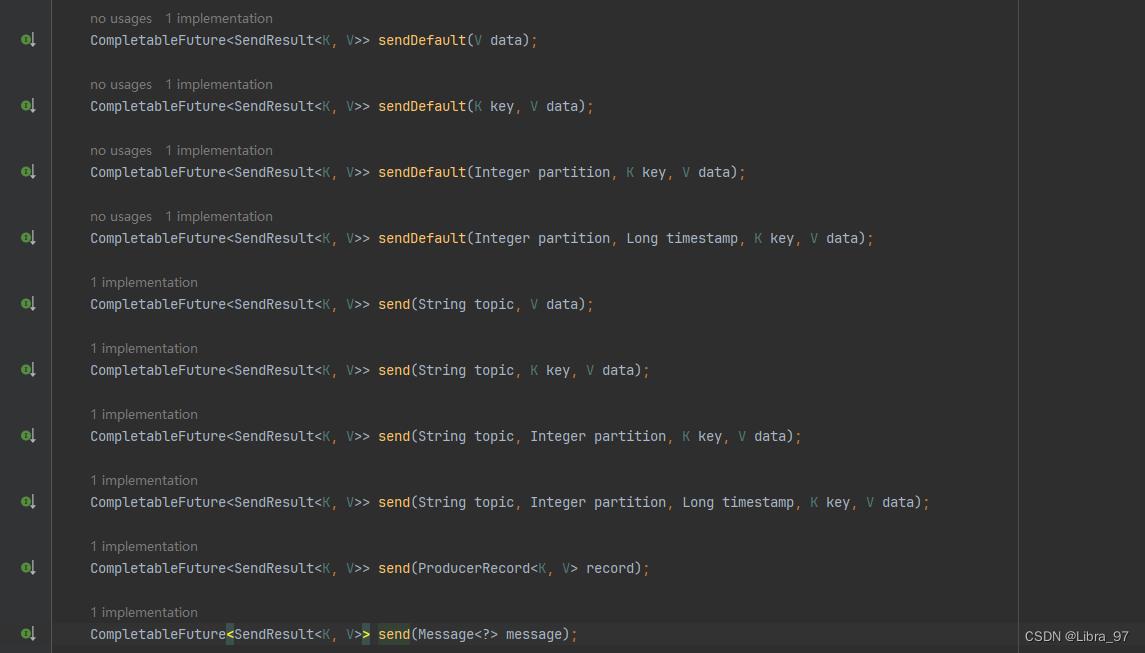
4.8.1 message对象参数
/*** 使用message对象发送消息*/public void sendEvent02(){// 通过构建器模式创建Message对象Message<String> message = MessageBuilder.withPayload("hello kafka")// 在header中放置topic的名字.setHeader(KafkaHeaders.TOPIC, "test-topic-02").build();kafkaTemplate.send(message);}
测试是否发送消息到topic中
@Test
public void test02(){eventProducer.sendEvent02();
}
成功发送消息到test-topic-02中

4.8.2 producerRecord对象参数
/*** 使用ProducerRecord对象发送消息*/public void sendEvent03(){// Headers里面是放一些信息(信息是key-value键值对),到时候消费者接收到该消息后,可以拿到这个Headers里面放的信息Headers headers = new RecordHeaders();headers.add("phone", "13698001234".getBytes(StandardCharsets.UTF_8));headers.add("orderId", "12473289472846178242873".getBytes(StandardCharsets.UTF_8));ProducerRecord<String, String> producerRecord = new ProducerRecord<>("test-topic-02",0,System.currentTimeMillis(),"k1","hello kafka",headers);kafkaTemplate.send(producerRecord);}
测试
@Test
public void test03(){eventProducer.sendEvent03();
}
成功向test-topic-02中发送一条消息

4.8.3 send最多参数构造方法
public void sendEvent04() {// String topic, Integer partition, Long timestamp, K key, @Nullable V datakafkaTemplate.send("test-topic-02",0,System.currentTimeMillis(),"k2","hello kafka");}
测试
@Test
public void test04(){eventProducer.sendEvent04();
}
成功向test-topic-02中发送一条消息

4.8.4 sendDefault最多参数构造方法
public void sendEvent05(){kafkaTemplate.sendDefault(0, System.currentTimeMillis(), "k3", "hello kafka");
}
测试
@Test
public void test04(){eventProducer.sendEvent04();
}
执行测试方法,报错提示 topic不能为空
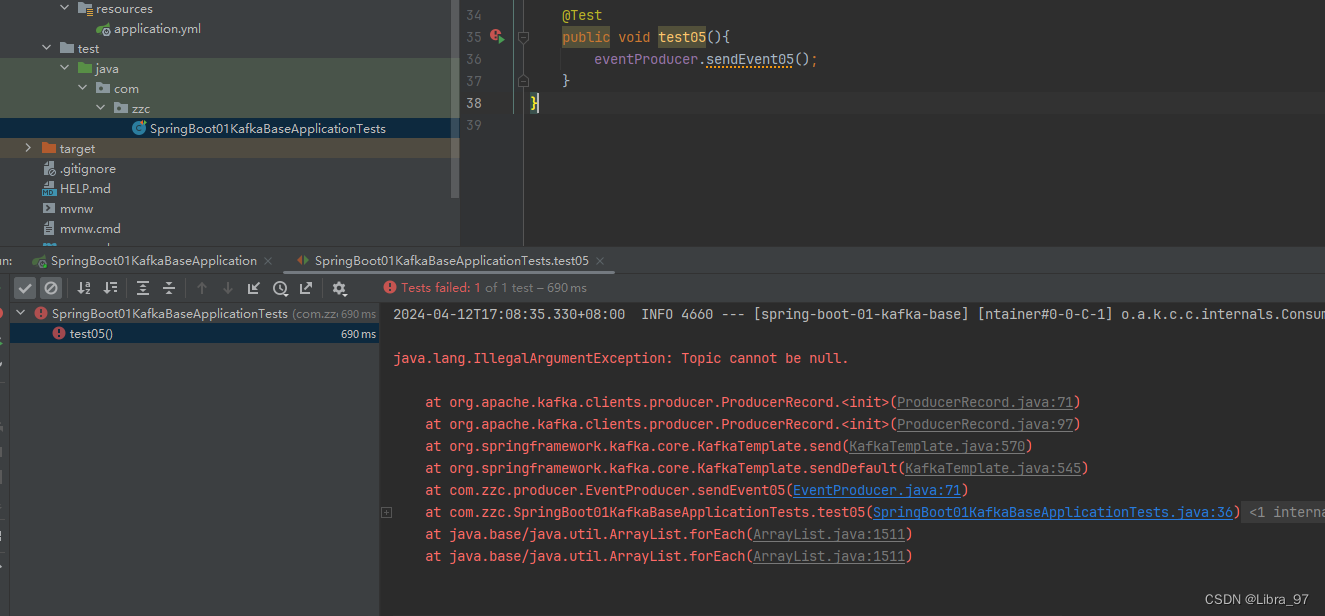
需要在配置文件中添加配置
spring:application:name: spring-boot-01-kafka-basekafka:bootstrap-servers: 192.168.2.118:9092consumer:auto-offset-reset: earliest# 配置模板默认的主题topic名称template:default-topic: default-topic
再次执行测试方法,成功向default-topic中发送消息

4.9 KafkaTemplate.send()和KafkaTemplate.sendDefault()的区别
- 主要区别是发送消息到 Kafka 时是否每次都需要指定主题 topic;
- kafkaTemplate.send(…) 该方法需要明确地指定要发送消息的目标主题 topic ;
- kafkaTemplate.sendDefault() 该方法不需要指定要发送消息的目标主题 topic ;
- kafkaTemplate.send(…) 方法适用于需要根据业务逻辑或外部输入动态确定消息目标 topic 的场景;
- kafkaTemplate.sendDefault() 方法适用于总是需要将消息发送到特定默认 topic 的场景;
- kafkaTemplate.sendDefault() 是一个便捷方法,它使用配置中指定的默认主题 topic 来发送消息;
- 如果应用中所有消息都发送到同一个主题时采用该方法非常方便,可以减少代码的重复或满足特定的业务需求;
4.10 获取生产者消息发送结果
-
.send() 方法和 .sendDefault() 方法都返回 CompletableFuture<SendResult<K, V>> ;
-
CompletableFuture 是 Java 8 中引入的一个类,用于异步编程,它表示一个异步计算的结果,这个特性使得调用者不必等待操作完成就能继续执行其他任务,从而提高了应用程序的响应速度和吞吐量;
-
方式一:调用 CompletableFuture 的 get() 方法,同步阻塞等待发送结果;
-
方式二:使用 thenAccept(), thenApply(), thenRun() 等方法来注册回调函数,回调函数将在CompletableFuture 完成时被执行;
4.10.1 调用 CompletableFuture 的 get() 方法,同步阻塞等待发送结果
/*** 通过get方法同步阻塞等待发送结果*/public void sendEvent06(){CompletableFuture<SendResult<String, String>> completableFuture =kafkaTemplate.sendDefault(0, System.currentTimeMillis(), "k3", "hello kafka");try {// 1.阻塞等待的方式拿结果SendResult<String, String> sendResult = completableFuture.get();if (sendResult.getRecordMetadata() != null){// kafka服务器确认已经接收到了消息System.out.println("消息发送成功:" + sendResult.getRecordMetadata().toString());}System.out.println("producerRecord: " + sendResult.getProducerRecord());} catch (Exception e) {throw new RuntimeException(e);}}
测试,成功获取到结果和发送的消息信息
@Test
public void test06(){eventProducer.sendEvent06();
}
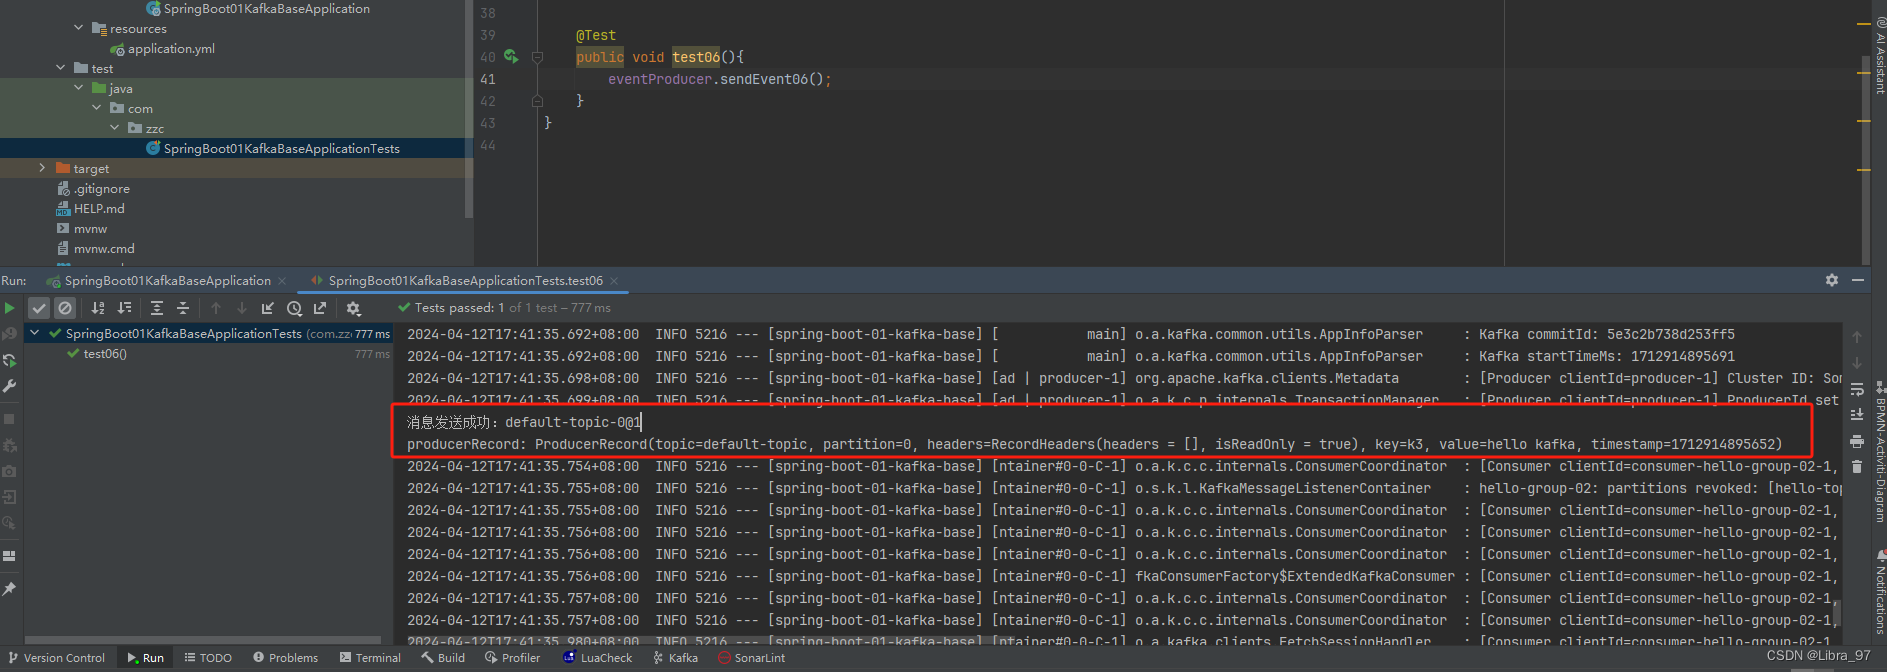
4.10.2 使用 thenAccept()方法来注册回调函数,回调函数将在CompletableFuture 完成时被执行
/*** 通过thenAccept方法注册回调函数*/public void sendEvent07(){CompletableFuture<SendResult<String, String>> completableFuture =kafkaTemplate.sendDefault(0, System.currentTimeMillis(), "k3", "hello kafka");completableFuture.thenAccept(sendResult -> {if (sendResult.getRecordMetadata() != null){// kafka服务器确认已经接收到了消息System.out.println("消息发送成功:" + sendResult.getRecordMetadata().toString());}System.out.println("producerRecord: " + sendResult.getProducerRecord());}).exceptionally( throwable -> {// 做失败的处理throwable.printStackTrace();return null;});}
测试,成功获取到结果和发送的消息信息
@Test
public void test07(){eventProducer.sendEvent07();
}

4.11 生产者发送对象消息
4.11.1 创建User对象
@Builder
@AllArgsConstructor
@NoArgsConstructor
@Data
public class User {private int id;private String phone;private Date birthDay;
}
4.11.2 注入新的kafkaTemplate对象,因为之前的key和value泛型都是String类型
/**
* 发送对象消息
*/
@Resource
private KafkaTemplate<String, Object> kafkaTemplate2;
private KafkaTemplate<String, Object> kafkaTemplate2;
public void sendEvent08(){User user = User.builder().id(1200).phone("13698981234").birthDay(new Date()).build();// 分区编号为 null ,交给 kafka 自己去分配kafkaTemplate2.sendDefault(null, System.currentTimeMillis(), "k4", user);
}
4.11.3 测试发送消息
报错 说不能将value转成StringSerializer
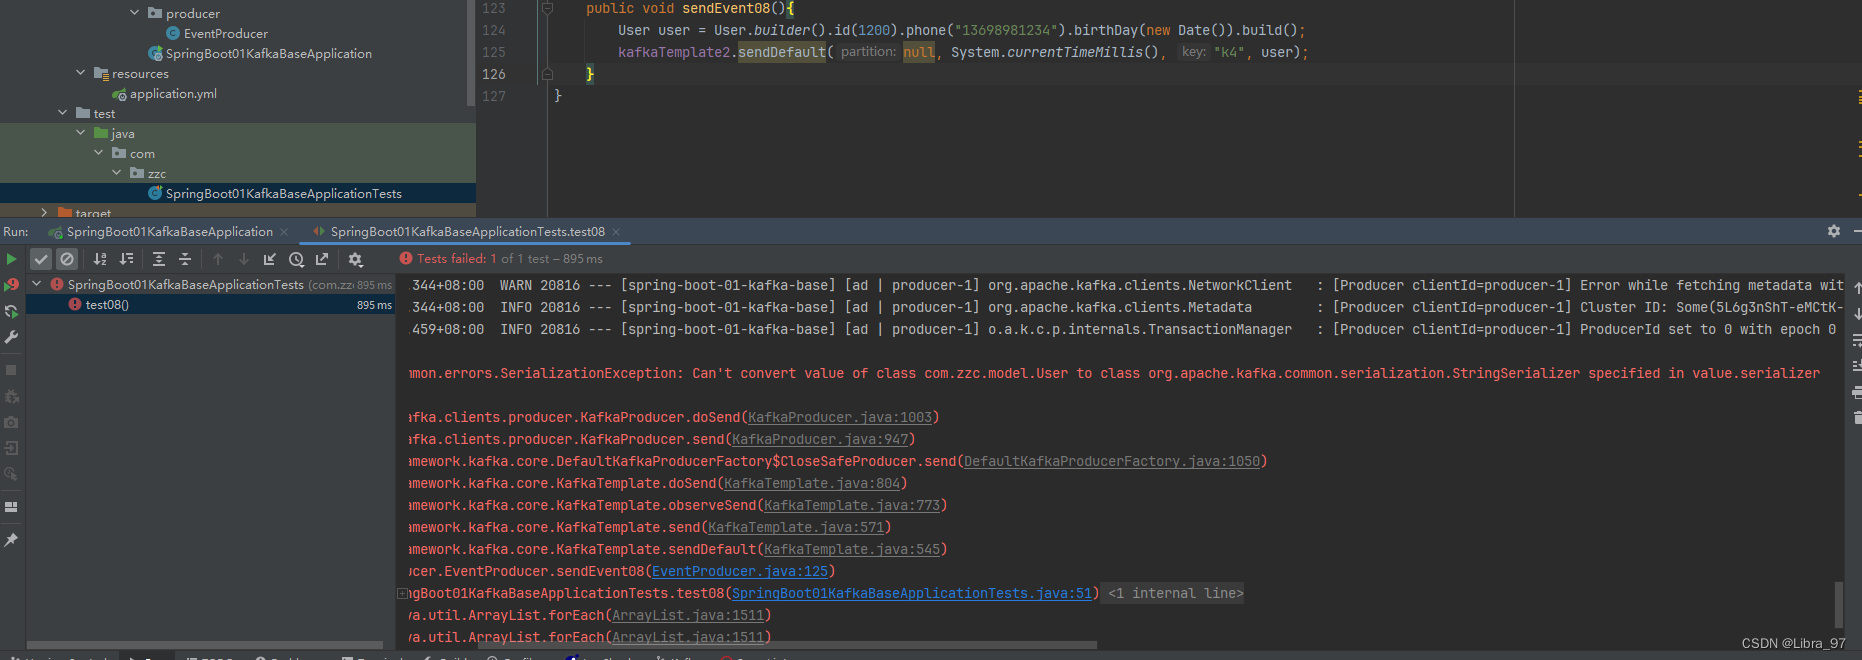
需要在配置文件中指定value的Serializer类型
producer:# key和value都默认是StringSerializervalue-serializer: org.springframework.kafka.support.serializer.JsonSerializer
再次执行测试,执行成功

defalut-topic中新增一条消息

4.12 Kafka的核心概念:Replica副本
- Replica :副本,为实现备份功能,保证集群中的某个节点发生故障时,该节点上的 partition 数据不丢失,且
Kafka 仍然能够继续工作, Kafka 提供了副本机制,一个 topic 的每个分区都有 1 个或多个副本; - Replica 副本分为 Leader Replica 和 Follower Replica :
- Leader :每个分区多个副本中的“主”副本,生产者发送数据以及消费者消费数据,都是来自 leader 副本
- Follower :每个分区多个副本中的“从”副本,实时从 leader 副本中同步数据,保持和 leader 副本数据的同
步, leader 副本发生故障时,某个 follower 副本会成为新的 leader 副本;
- 设置副本个数不能为 0 ,也不能大于节点个数,否则将不能创建 Topic ;
4.12.1 指定topic的分区和副本
4.12.1.1 方式一:通过Kafka提供的命令行工具在创建topic时指定分区和副本
./kafka-topics.sh --create --topic myTopic --partitions 3 --replication-factor 1 --bootstrap-server 127.0.0.1:9092
创建成功

4.12.1.2 方式二:执行代码时指定分区和副本
- kafkaTemplate.send(“topic”, message);
- 直接使用 send() 方法发送消息时, kafka 会帮我们自动完成 topic 的创建工作,但这种情况下创建的 topic 默认只有一个分区,分区有 1 个副本,也就是有它自己本身的副本,没有额外的副本备份;
- 我们可以在项目中新建一个配置类专门用来初始化 topic ;
@Configuration
public class KafkaConfig {// 创建一个名为helloTopic的Topic并设置分区数为5,分区副本数为1@Beanpublic NewTopic newTopic(){// 副本不能设置为0 也不能超过节点数return new NewTopic("helloTopic", 5, (short) 1);}
}
创建成功

4.12.2 测试重启服务会不会重置消息,先向helloTopic中发送一个消息
public void sendEvent09(){User user = User.builder().id(1200).phone("13698981234").birthDay(new Date()).build();kafkaTemplate2.send("helloTopic",null,System.currentTimeMillis(),"k9",user); }
测试代码
@Test
public void test09(){eventProducer.sendEvent09();
}
成功向helloTopic中发送一个消息
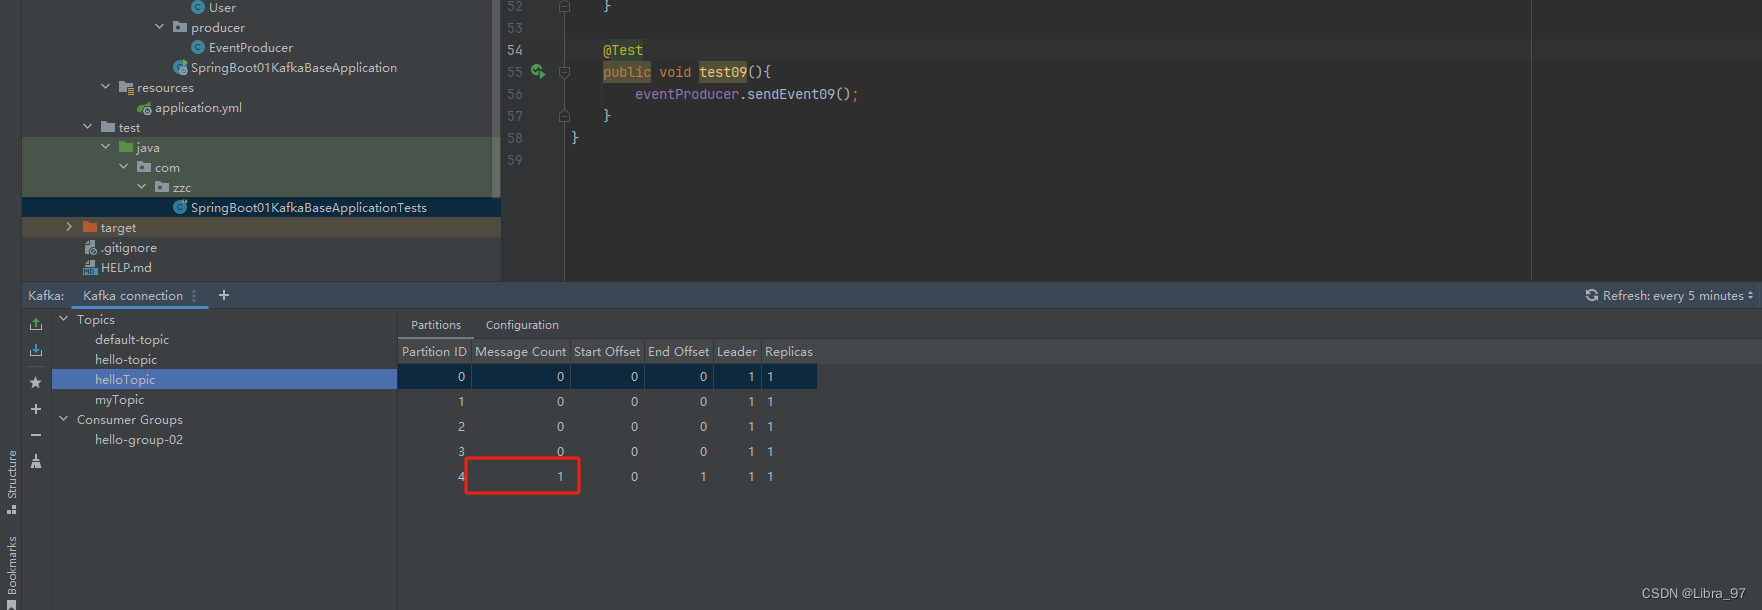
重启服务后,并没有重置消息

4.12.3 修改分区数
配置类中增加更新配置代码
@Configuration
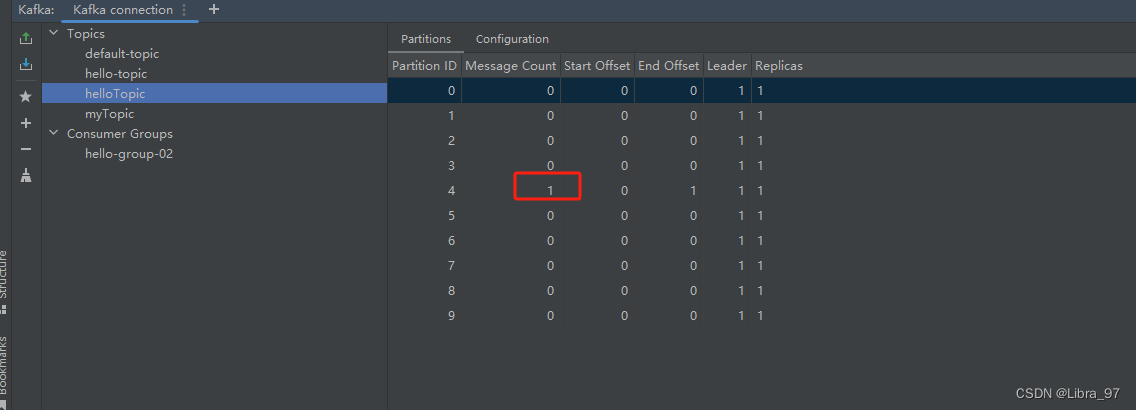
public class KafkaConfig {// 创建一个名为helloTopic的Topic并设置分区数为5,分区副本数为1@Beanpublic NewTopic newTopic(){return new NewTopic("helloTopic", 5, (short) 1);}// 如果要修改分区数,只需修改配置值重启项目即可,修改分区数并不会导致数据的丢失,但是分区数只能增大不能减少@Beanpublic NewTopic updateTopic(){return new NewTopic("helloTopic", 10, (short) 1);}
}
重启项目,分区数更新为10,消息的位置也没发生变化
4.13 生产者发送消息的分区策略(消息发到哪个分区中?是什么策略)
- 生产者写入消息到topic,Kafka将依据不同的策略将数据分配到不同的分区中
如果指定了分区,那将发送消息到指定分区中

执行测试代码
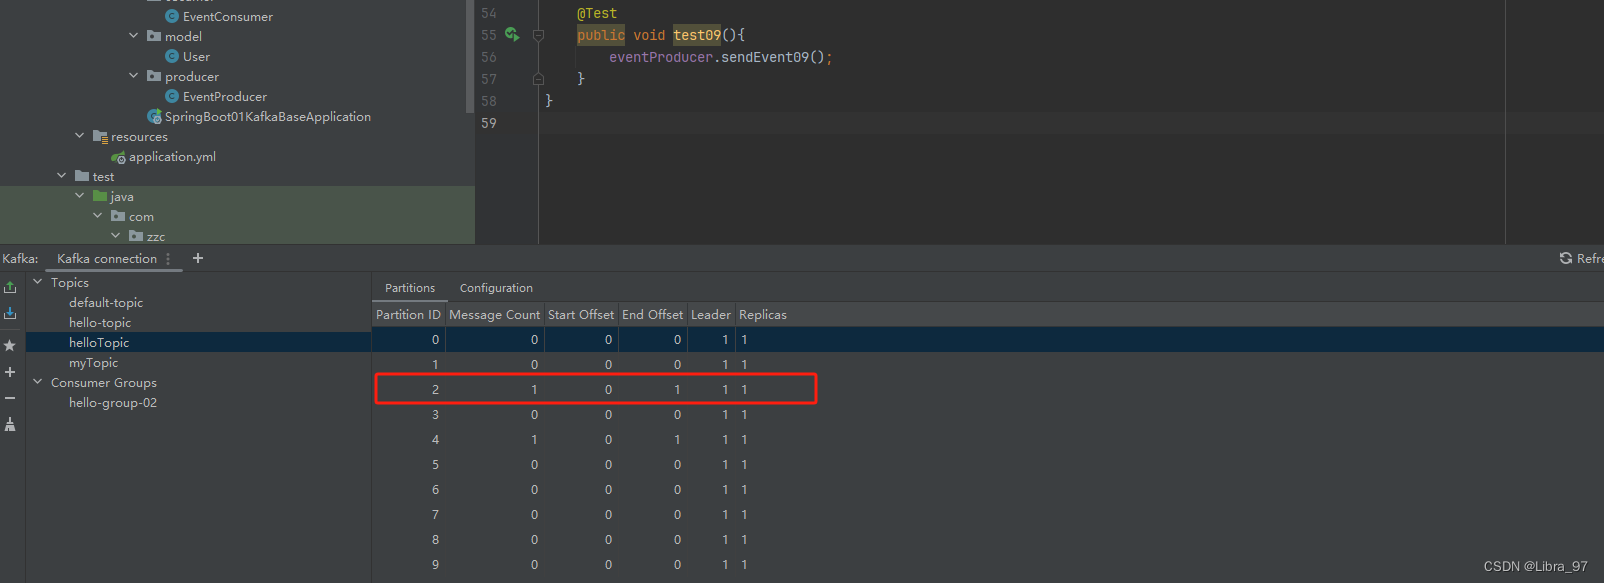
看send方法源代码可以看到

- 默认分配策略:BuiltInPartitioner
- 有key:Utils.toPositive(Utils.murmur2(serializedKey)) % numPartitions;
- 没有key:使用随机数 % numPartitions
- 轮询分配策略:RoundRobinPartitioner(实现的接口:Partitioner)
- 自定义分配策略:我们自己定义
4.13.1 轮询分配策略
yml配置文件
spring:application:name: spring-boot-01-kafka-basekafka:bootstrap-servers: 192.168.2.118:9092producer:# key和value都默认是StringSerializervalue-serializer: org.springframework.kafka.support.serializer.JsonSerializerkey-serializer: org.apache.kafka.common.serialization.StringSerializerconsumer:auto-offset-reset: earliest# 配置模板默认的主题topic名称template:default-topic: default-topic
配置类
package com.zzc.config;import org.apache.kafka.clients.admin.NewTopic;
import org.apache.kafka.clients.producer.ProducerConfig;
import org.apache.kafka.clients.producer.RoundRobinPartitioner;
import org.springframework.beans.factory.annotation.Value;
import org.springframework.context.annotation.Bean;
import org.springframework.context.annotation.Configuration;
import org.springframework.kafka.core.DefaultKafkaProducerFactory;
import org.springframework.kafka.core.KafkaTemplate;
import org.springframework.kafka.core.ProducerFactory;import java.util.HashMap;
import java.util.Map;@Configuration
public class KafkaConfig {@Value("${spring.kafka.bootstrap-servers}")private String bootstrapServers;@Value("${spring.kafka.producer.value-serializer}")private String valueSerializer;@Value("${spring.kafka.producer.key-serializer}")private String keySerializer;/*** 生产者相关配置* @return*/public Map<String, Object> producerConfigs(){HashMap<String, Object> props = new HashMap<>();props.put(ProducerConfig.BOOTSTRAP_SERVERS_CONFIG, bootstrapServers);props.put(ProducerConfig.KEY_SERIALIZER_CLASS_CONFIG, keySerializer);props.put(ProducerConfig.VALUE_SERIALIZER_CLASS_CONFIG, valueSerializer);props.put(ProducerConfig.PARTITIONER_CLASS_CONFIG, RoundRobinPartitioner.class);return props;}public ProducerFactory<String, Object> producerFactory(){return new DefaultKafkaProducerFactory<>(producerConfigs());}/*** KafkaTemplate 覆盖相关配置类中的kafkaTemplate* @return*/@Beanpublic KafkaTemplate<String, Object> kafkaTemplate(){return new KafkaTemplate<>(producerFactory());}// 创建一个名为helloTopic的Topic并设置分区数为5,分区副本数为1@Beanpublic NewTopic newTopic(){return new NewTopic("helloTopic", 5, (short) 1);}// 如果要修改分区数,只需修改配置值重启项目即可,修改分区数并不会导致数据的丢失,但是分区数只能增大不能减少@Beanpublic NewTopic updateTopic(){return new NewTopic("helloTopic", 10, (short) 1);}
}
执行测试代码
public void sendEvent09(){User user = User.builder().id(1200).phone("13698981234").birthDay(new Date()).build();kafkaTemplate2.send("helloTopic",user); }
@Test
public void test09(){for (int i = 0; i < 5; i++) {eventProducer.sendEvent09();}
}
debug模式,是进入到RoundRobinPartitioner类中
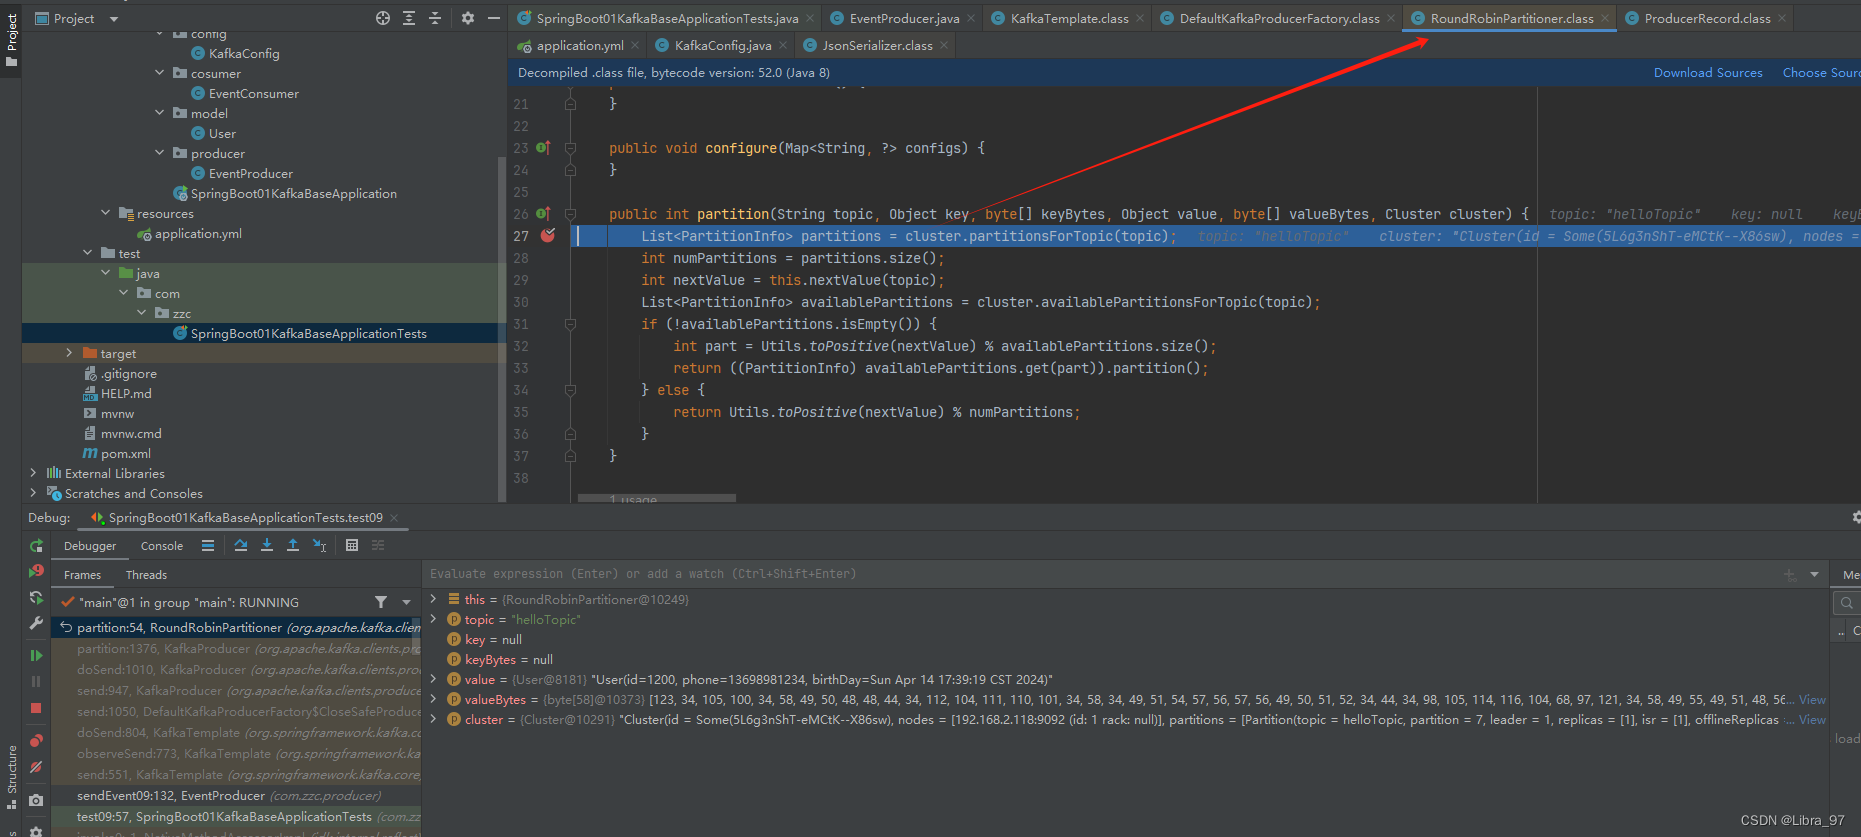
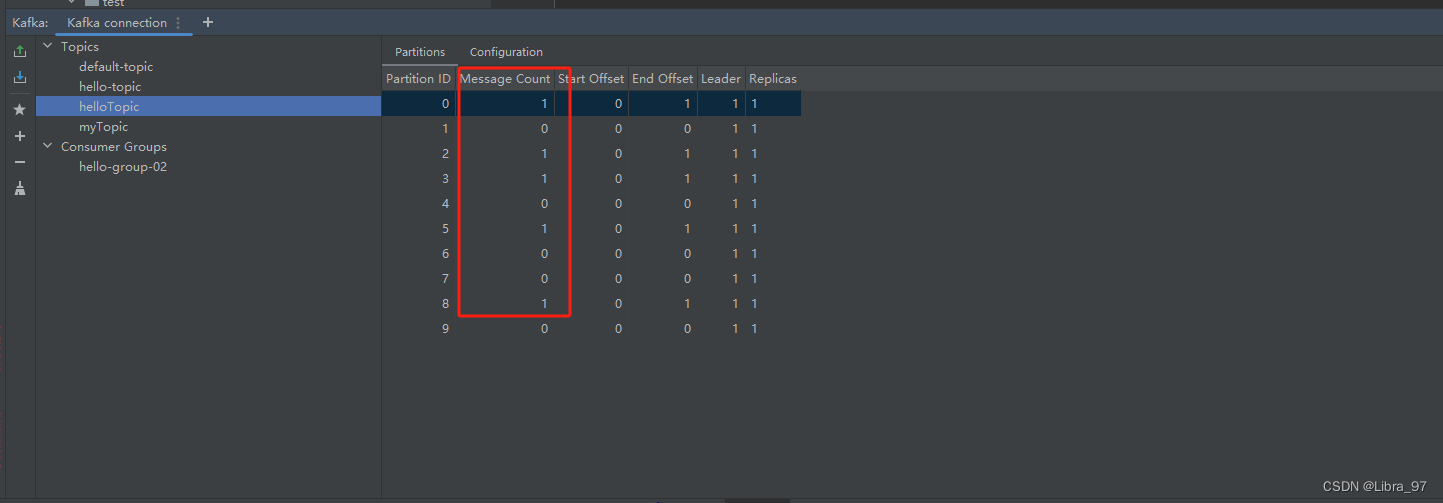
查看消息的分区情况,发现并没有完全的轮询,有点误差
4.13.2 自定义分配策略
创建自定义分配策略类实现Partitioner接口
public class CustomerPartitioner implements Partitioner {private AtomicInteger nextPartition = new AtomicInteger(0);@Overridepublic int partition(String topic, Object key, byte[] keyBytes, Object value, byte[] bytes1, Cluster cluster) {List<PartitionInfo> partitions = cluster.partitionsForTopic(topic);int numPartitions = partitions.size();if (key == null){// 使用轮询方式选择分区int next = nextPartition.getAndIncrement();// 如果next大于分区的大小,则重置为0if (next >= numPartitions){nextPartition.compareAndSet(next, 0);}System.out.println("分区值:" + next);return next;}else {// 如果key不为null,则使用默认的分区策略return Utils.toPositive(Utils.murmur2(keyBytes)) % numPartitions;}}@Overridepublic void close() {}@Overridepublic void configure(Map<String, ?> map) {}
}
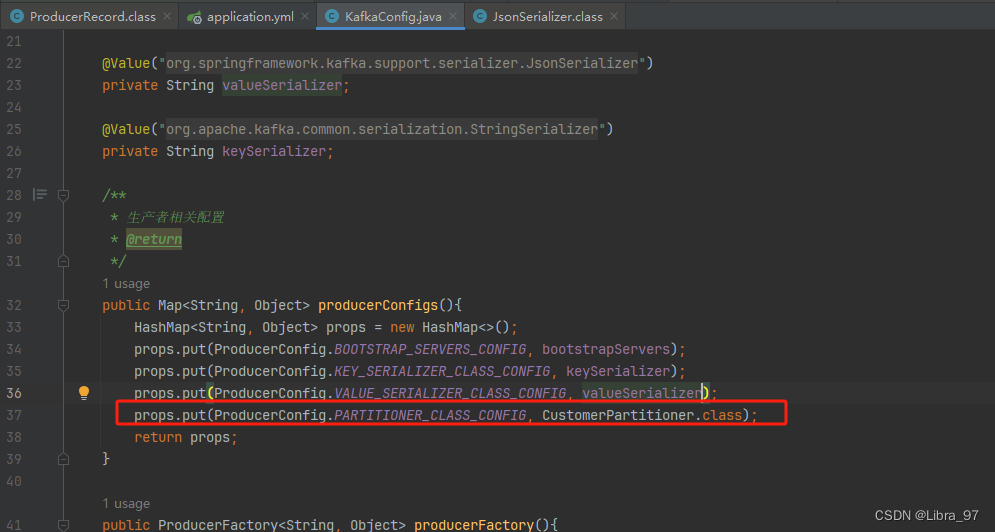
配置类代码中将分配策略修改为自定义分配策略
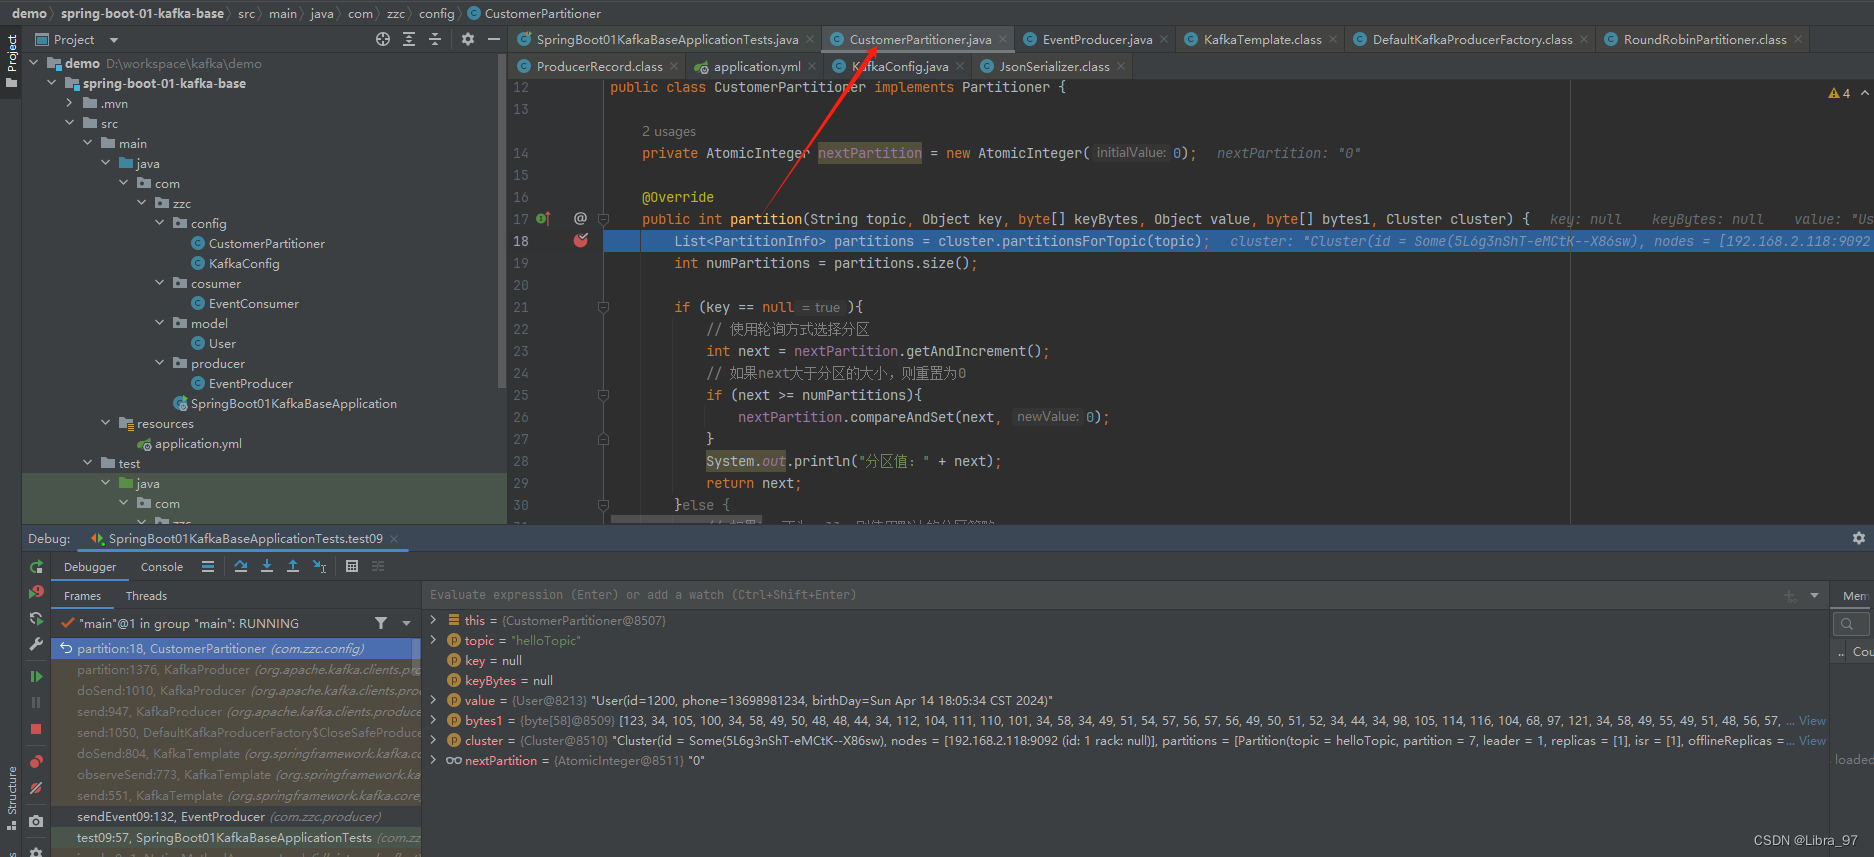
使用debug模式执行测试代码,成功执行到我们自定义的分配策略类中
执行结果
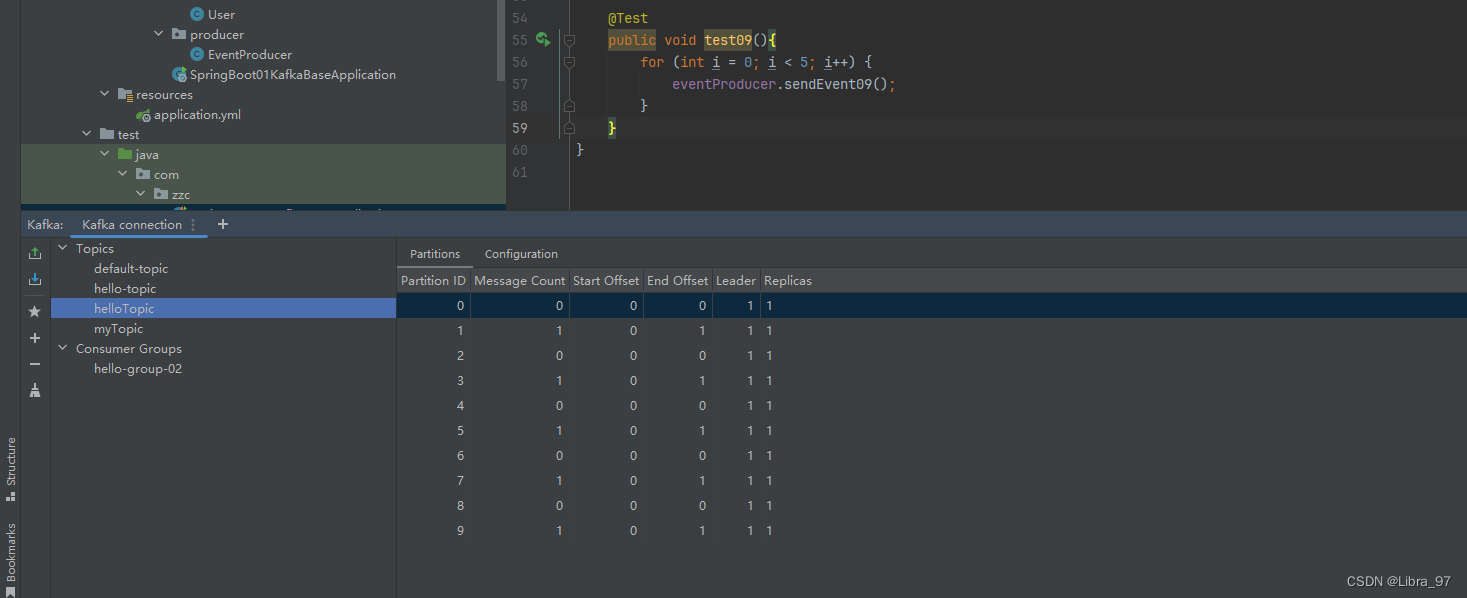
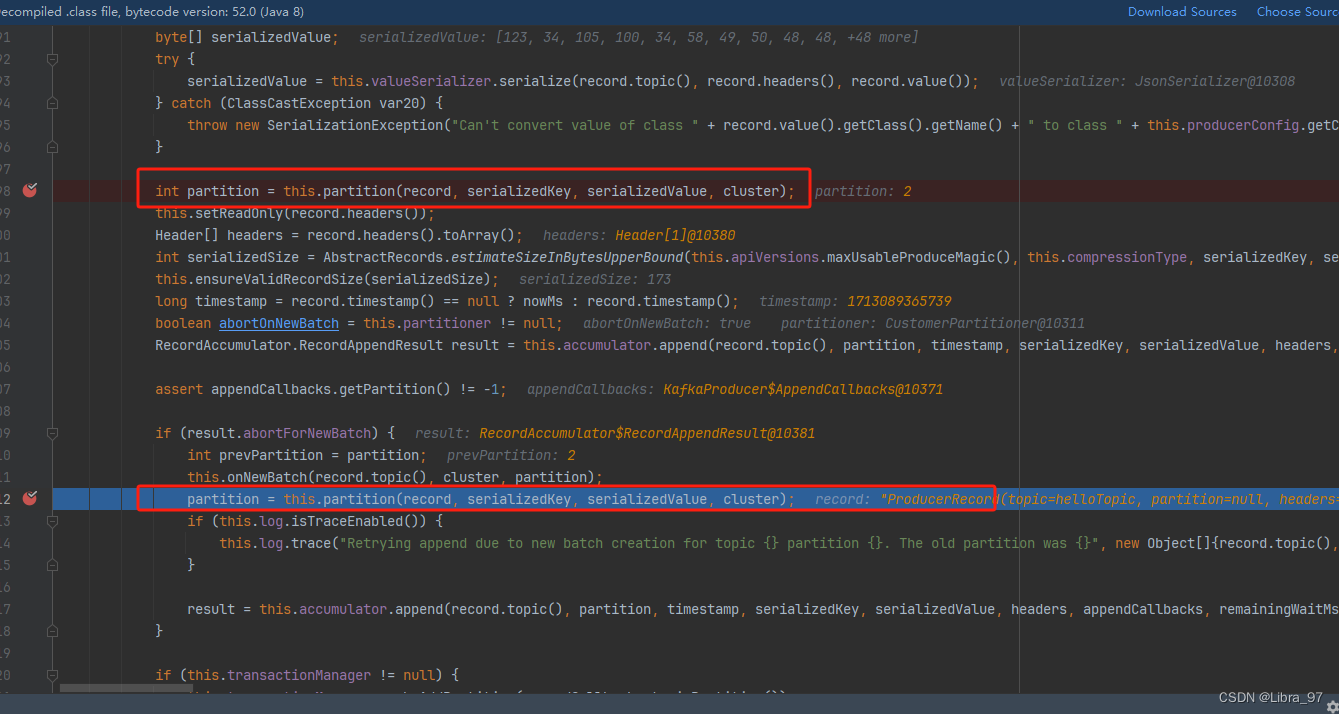
为什么是每隔一个存一个分区呢?查看源代码发现进行了二次计算partition
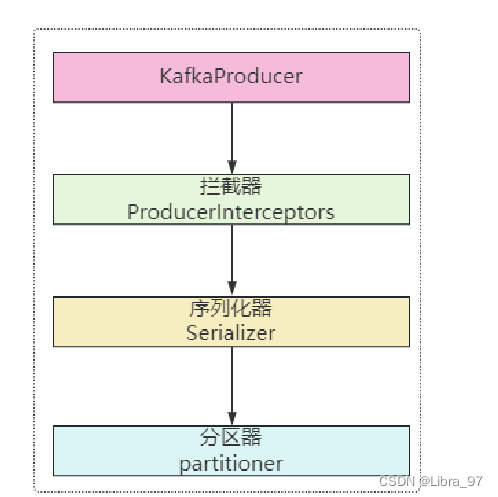
4.13 生产者发送消息的流程
4.13.自定义拦截器拦截消息的发送
实现ProducerInterceptor接口,创建CustomerProducerInterceptor类
package com.zzc.config;import org.apache.kafka.clients.producer.ProducerInterceptor;
import org.apache.kafka.clients.producer.ProducerRecord;
import org.apache.kafka.clients.producer.RecordMetadata;import java.util.Map;public class CustomerProducerInterceptor implements ProducerInterceptor<String, Object> {/*** 发送消息时,会先调用该方法,对信息进行拦截,可以在拦截中对消息做一些处理,记录日志等操作...* @param producerRecord* @return*/@Overridepublic ProducerRecord<String, Object> onSend(ProducerRecord<String, Object> producerRecord) {System.out.println("拦截消息:" + producerRecord.toString());return producerRecord;}/*** 服务器收到消息后的一个确认* @param recordMetadata* @param e*/@Overridepublic void onAcknowledgement(RecordMetadata recordMetadata, Exception e) {if (recordMetadata != null){System.out.println("服务器收到该消息:" + recordMetadata.offset());}else {System.out.println("消息发送失败了,exception = " + e.getMessage());}}@Overridepublic void close() {}@Overridepublic void configure(Map<String, ?> map) {}
}
配置类中添加拦截器

执行测试,发现报错了
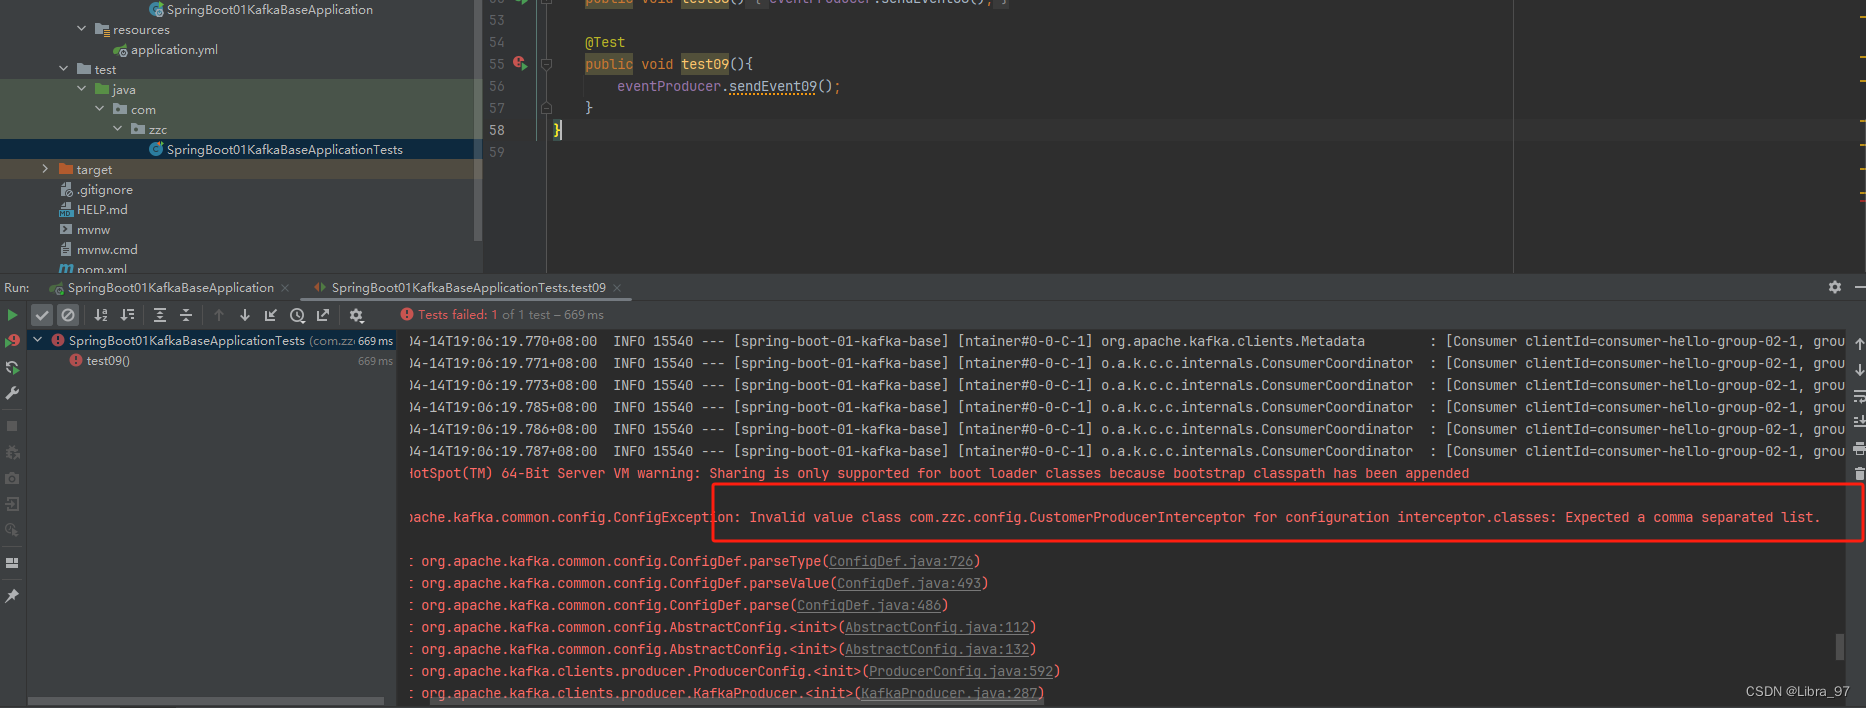
需要配置类中添加拦截器的名字

再次执行测试,成功执行了
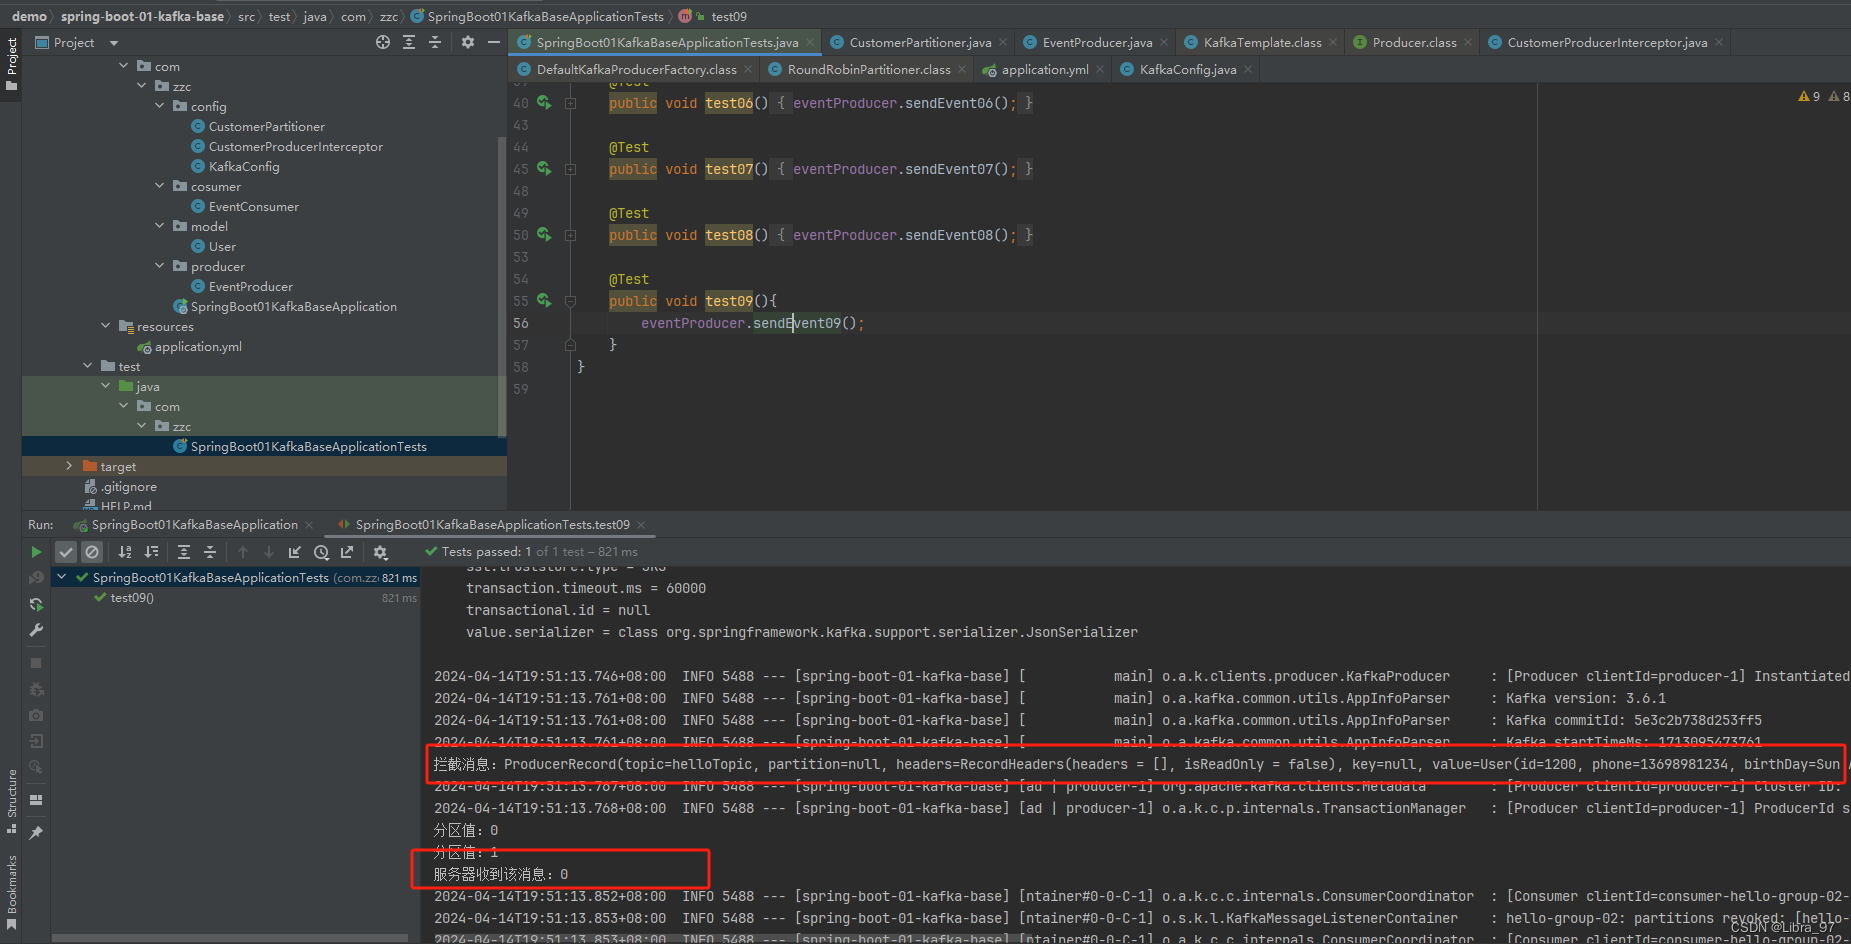
4.14 获取生产者发送的消息
之前模块内容比较多,重新创建一个模块
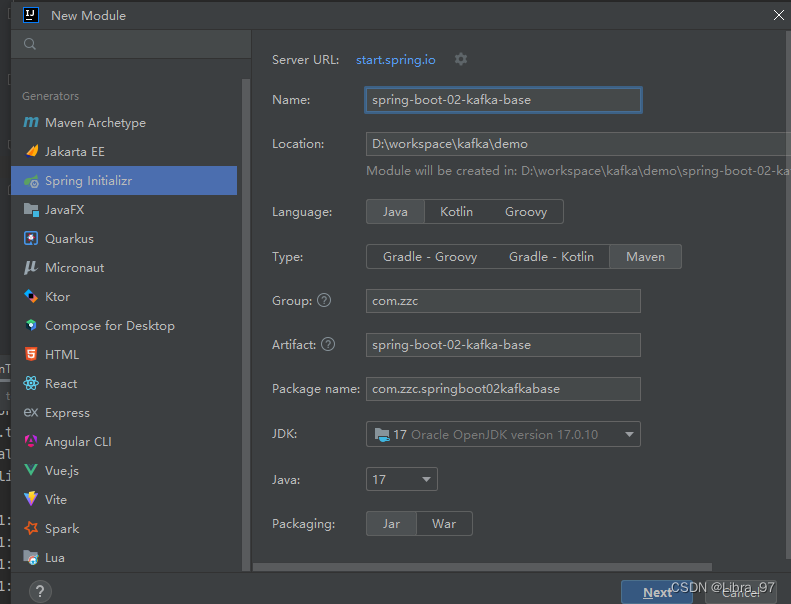
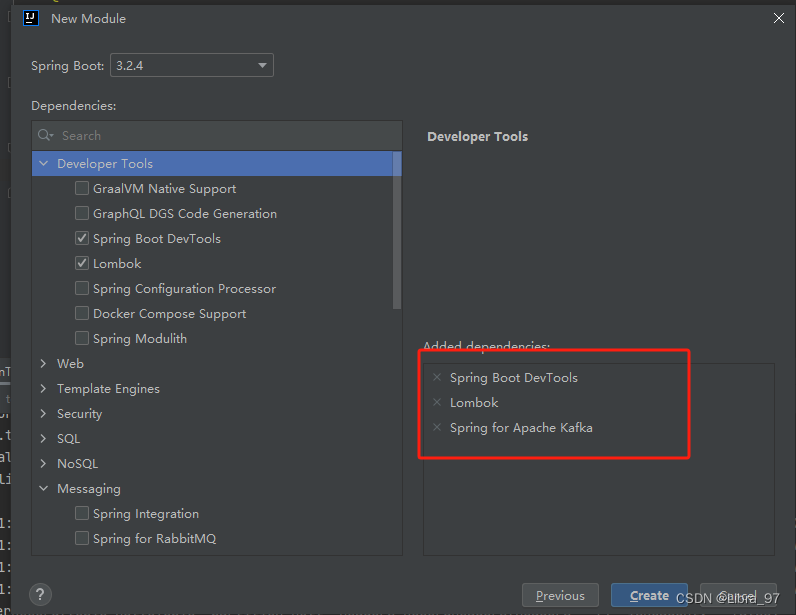
消费者类
@Component
public class EventConsumer {// 采用监听的方式接收事件(消息、数据)@KafkaListener(topics = {"helloTopic"}, groupId = "helloGroup")public void onEvent(String event){System.out.println("读取到的事件:" + event);}
}
生产者类
@Component
public class EventProducer {@Resourceprivate KafkaTemplate<String, String> kafkaTemplate;public void sendEvent() {kafkaTemplate.send("helloTopic", "hello kafka");}
}
配置文件
spring:application:name: spring-boot-02-kafka-basekafka:bootstrap-servers: 192.168.2.118:9092测试代码
@SpringBootTest
class KafkaBaseApplicationTests {@Resourceprivate EventProducer eventProducer;@Testvoid test01(){System.out.println(111);eventProducer.sendEvent();}}
启动服务,执行测试代码,成功读取到最新发送的消息
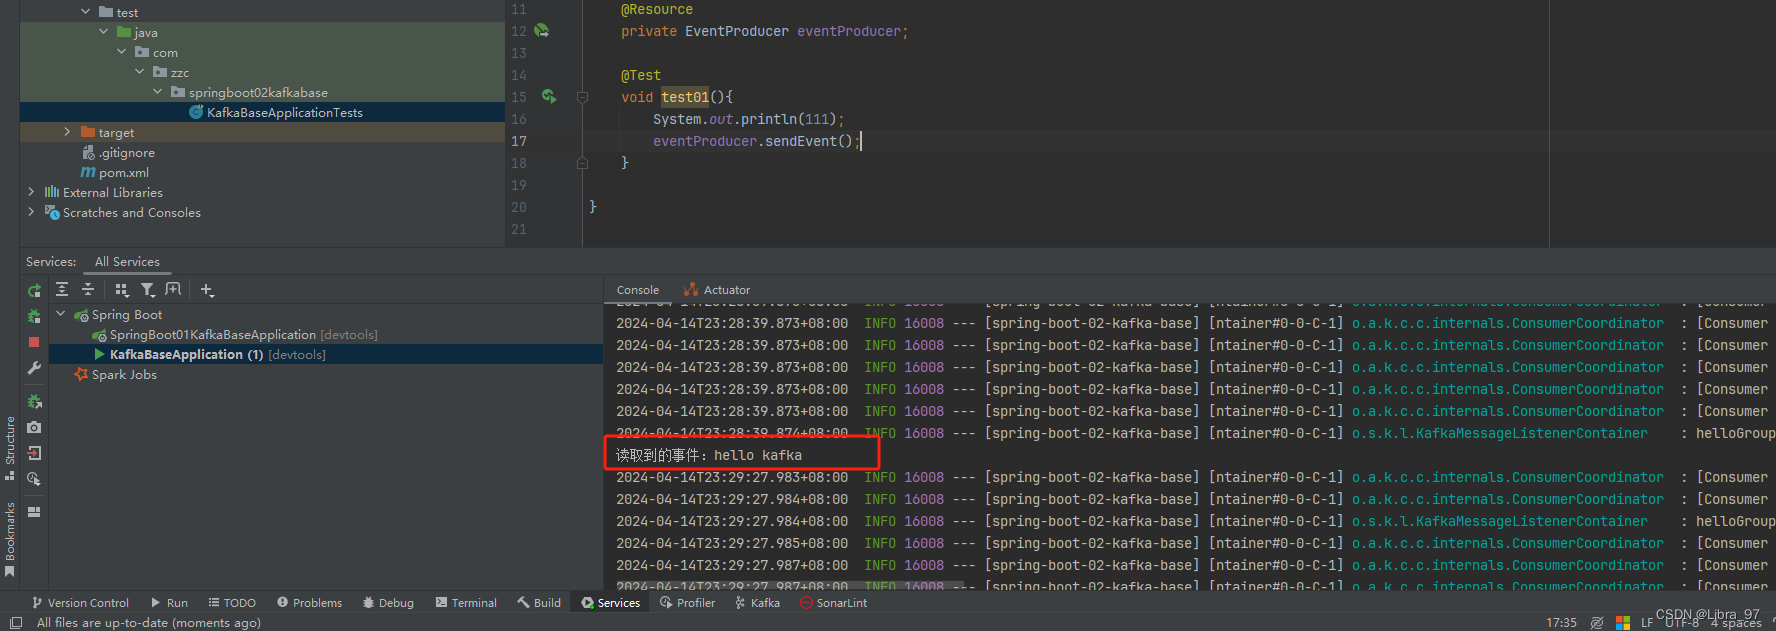
4.14.1 @Payload : 标记该参数是消息体内容
消费者类参数添加@Payload注解

重启服务,执行测试代码 成功读取到最新消息
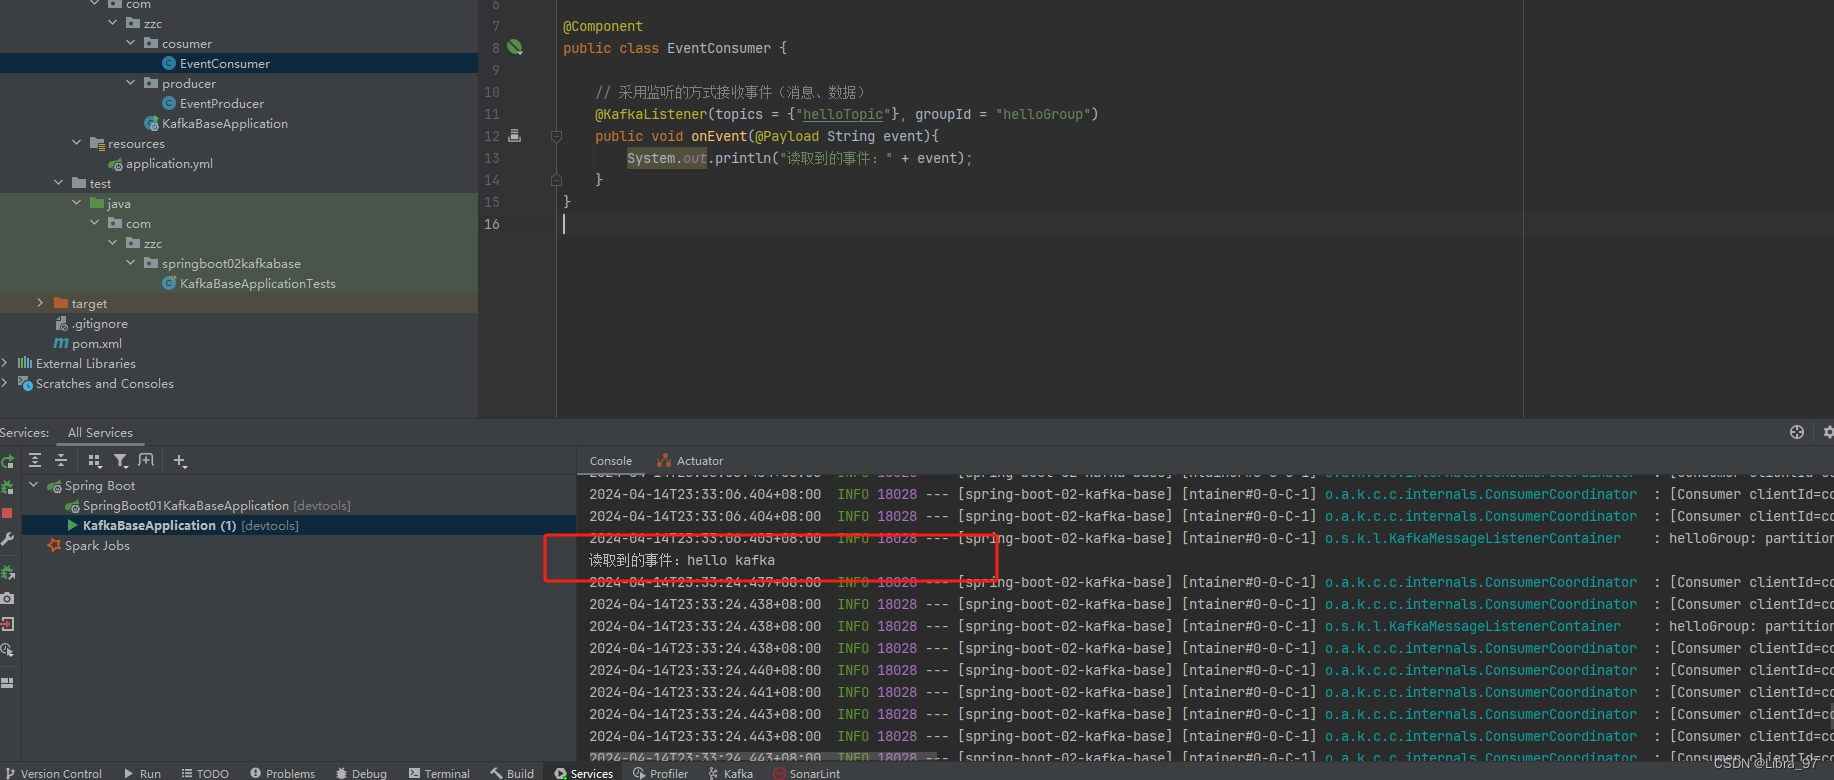
4.14.2 @Header注解:标记该参数是消息头内容
消费者类参数添加@Header注解 获取header中的topic和partition
@Component
public class EventConsumer {// 采用监听的方式接收事件(消息、数据)@KafkaListener(topics = {"helloTopic"}, groupId = "helloGroup")public void onEvent(@Payload String event,@Header(value = KafkaHeaders.RECEIVED_TOPIC) String topic,@Header(value = KafkaHeaders.RECEIVED_PARTITION) String partition){System.out.println("读取到的事件:" + event +  ", topic:" + topic + ", partition:" + partition);}
}
重启服务类,测试代码不变,进行测试
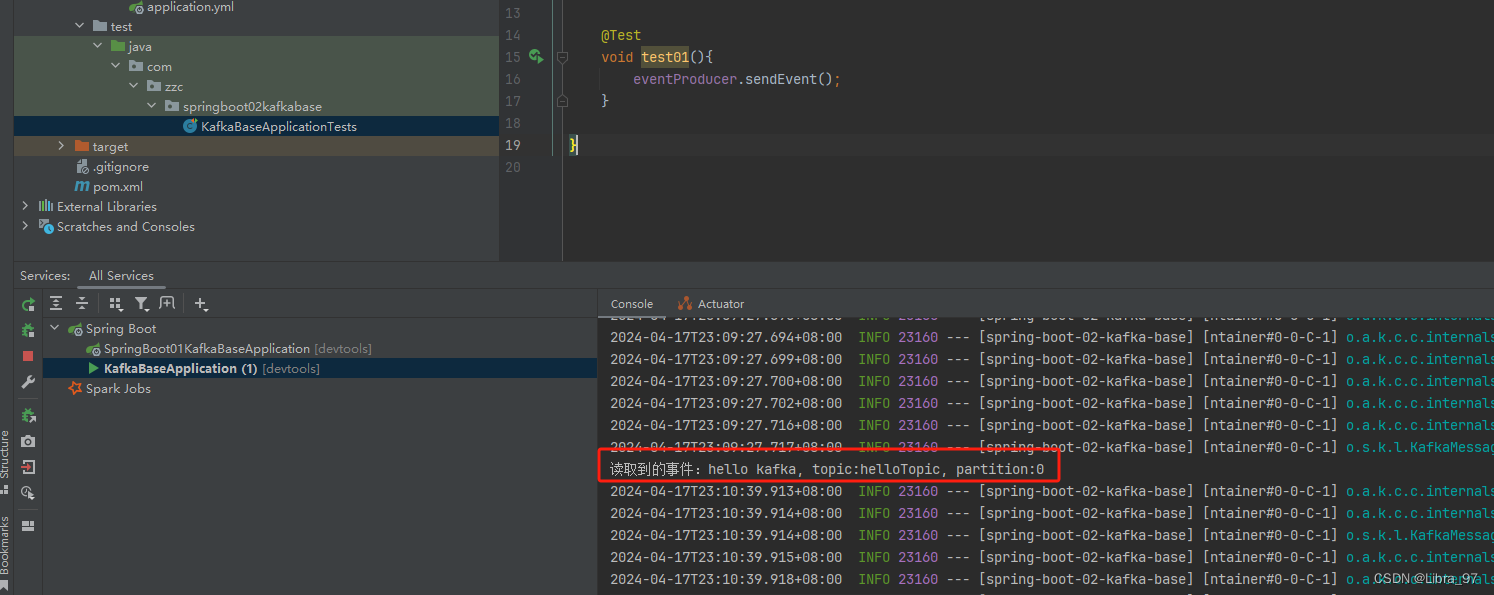
4.14.3 ConsumerRecord对象
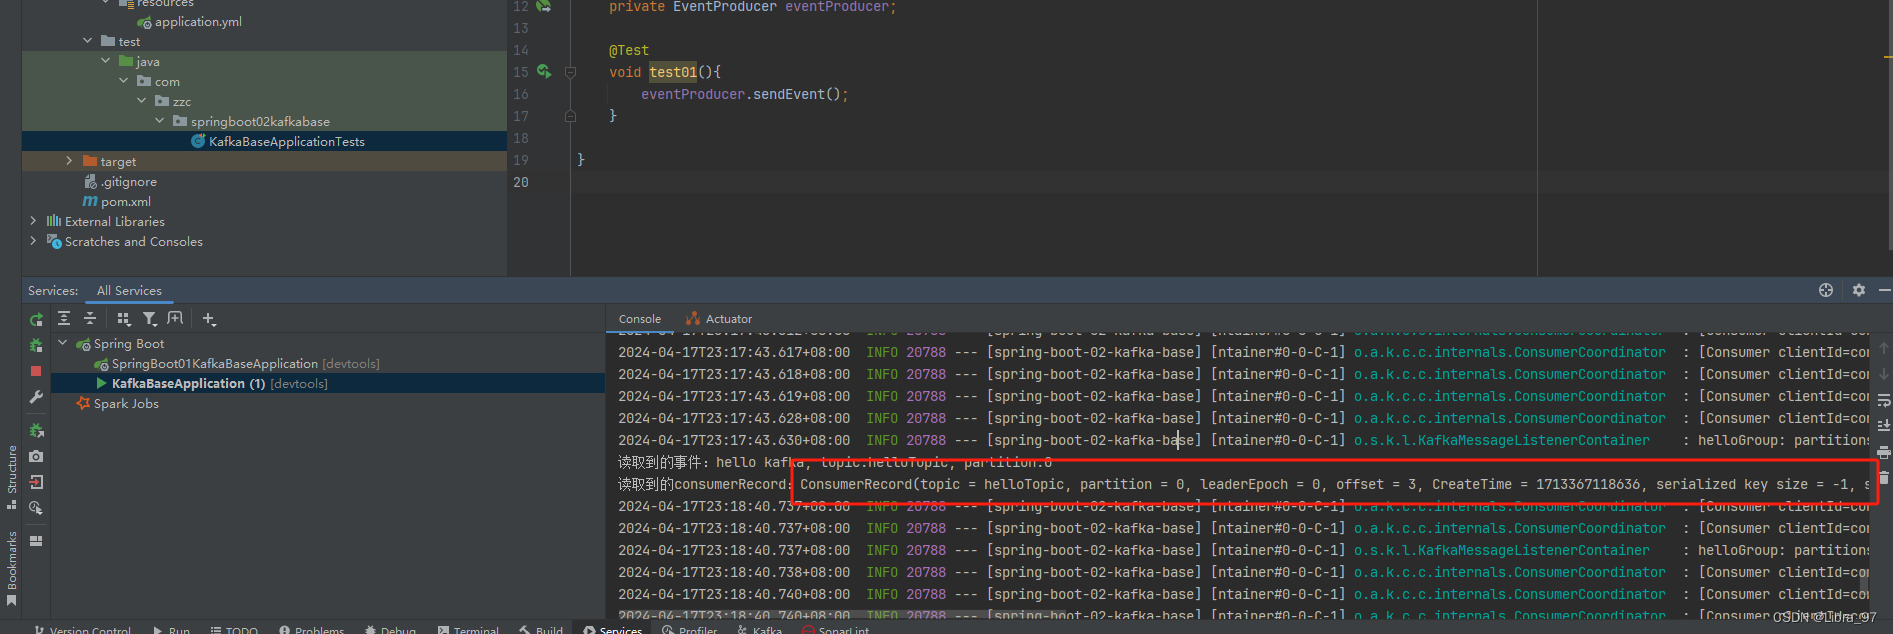
可以从ConsumerRecord对象中获取想要的内容
@Component
public class EventConsumer {// 采用监听的方式接收事件(消息、数据)@KafkaListener(topics = {"helloTopic"}, groupId = "helloGroup")public void onEvent(@Payload String event,@Header(value = KafkaHeaders.RECEIVED_TOPIC) String topic,@Header(value = KafkaHeaders.RECEIVED_PARTITION) String partition,ConsumerRecord<String, String> consumerRecord){System.out.println("读取到的事件:" + event +  ", topic:" + topic + ", partition:" + partition);System.out.println("读取到的consumerRecord:" + consumerRecord.toString());}
}
重启服务类,测试代码不变,进行测试
想要的内容都可以从ConsumerRecord对象中获取
4.14.4 获取对象类型数据
User类代码
package com.zzc.model;import lombok.AllArgsConstructor;
import lombok.Builder;
import lombok.Data;
import lombok.NoArgsConstructor;import java.util.Date;@Builder
@AllArgsConstructor
@NoArgsConstructor
@Data
public class User {private int id;private String phone;private Date birthDay;
}
EventConsumer类新增onEvent2方法
@KafkaListener(topics = {"helloTopic"}, groupId = "helloGroup")public void onEvent2(User user,@Header(value = KafkaHeaders.RECEIVED_TOPIC) String topic,@Header(value = KafkaHeaders.RECEIVED_PARTITION) String partition,ConsumerRecord<String, String> consumerRecord){System.out.println("读取到的事件:" + user + ", topic:" + topic + ", partition:" + partition);System.out.println("读取到的consumerRecord:" + consumerRecord.toString());}
EventProducer类新增sendEvent2方法
@Resourceprivate KafkaTemplate<String, Object> kafkaTemplate2;public void sendEvent2(){User user = User.builder().id(213234).phone("13239407234").birthDay(new Date()).build();kafkaTemplate2.send("helloTopic", user);}
测试类新增test02方法
@Testpublic void test02(){eventProducer.sendEvent2();}
执行测试,报错生产者不能将User转换成String类型
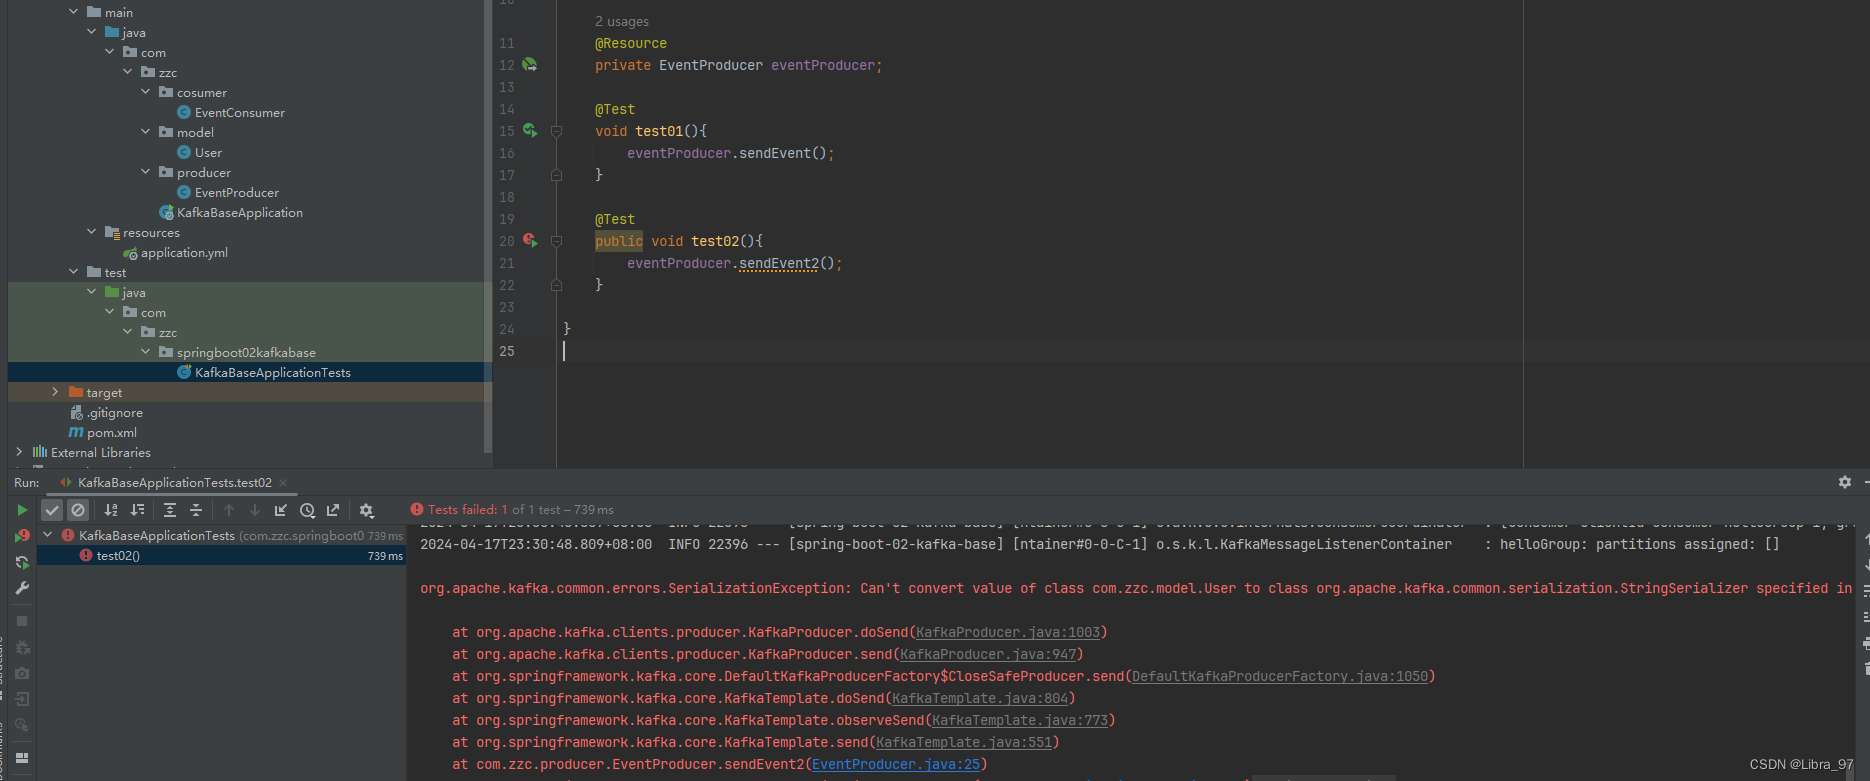
去配置文件中修改生产者和消费者的value序列化器
spring:application:name: spring-boot-02-kafka-basekafka:bootstrap-servers: 192.168.2.118:9092producer:value-serializer: org.springframework.kafka.support.serializer.JsonSerializerconsumer:value-deserializer: org.springframework.kafka.support.seri
重新启动服务,依然报错,说没有找到jackson的jar包
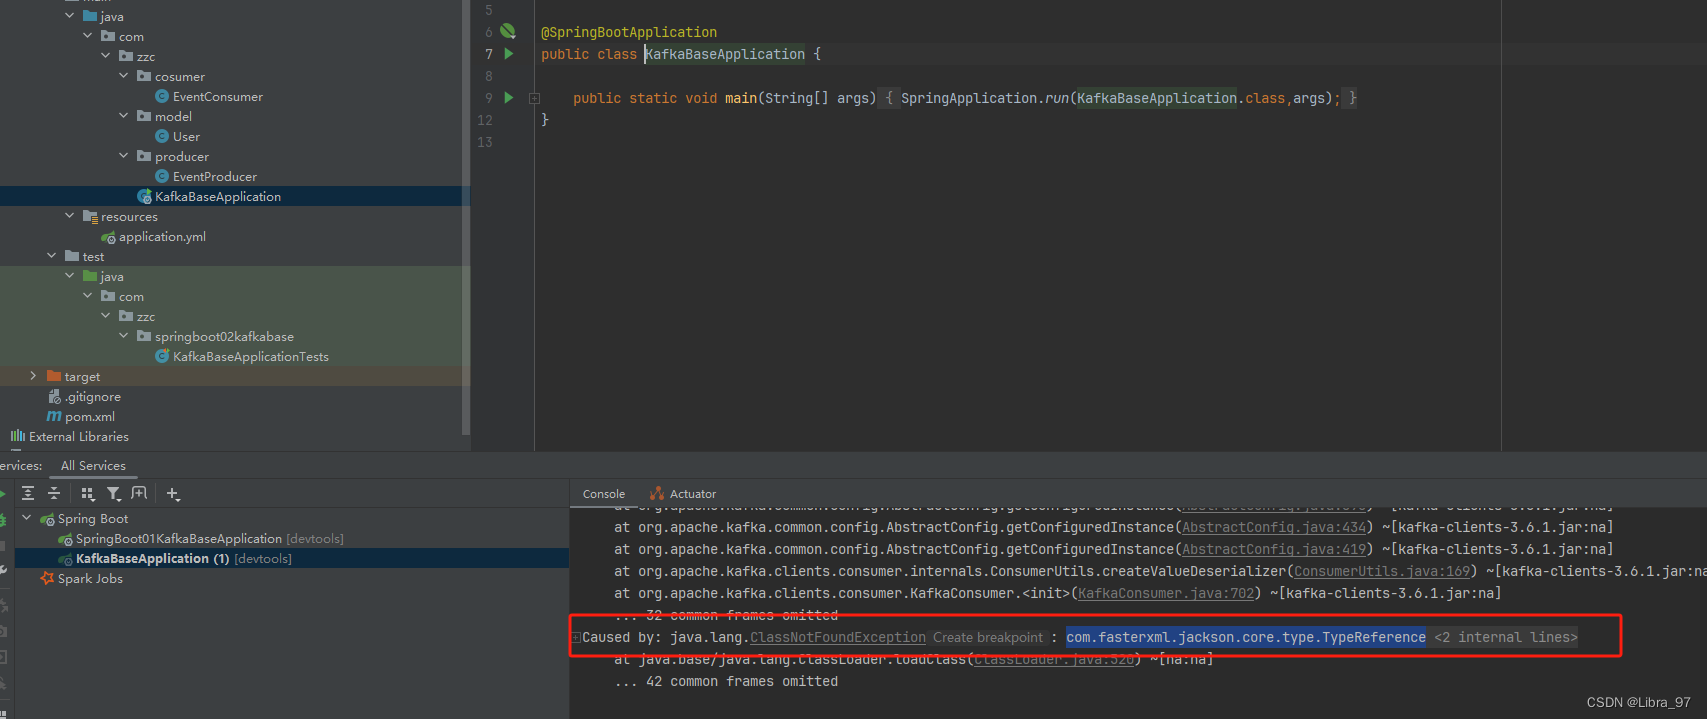
那我们去pom文件中添加jackson依赖
<dependency><groupId>org.springframework.boot</groupId><artifactId>spring-boot-starter-json</artifactId>
</dependency>
添加依赖后可以正常启动了
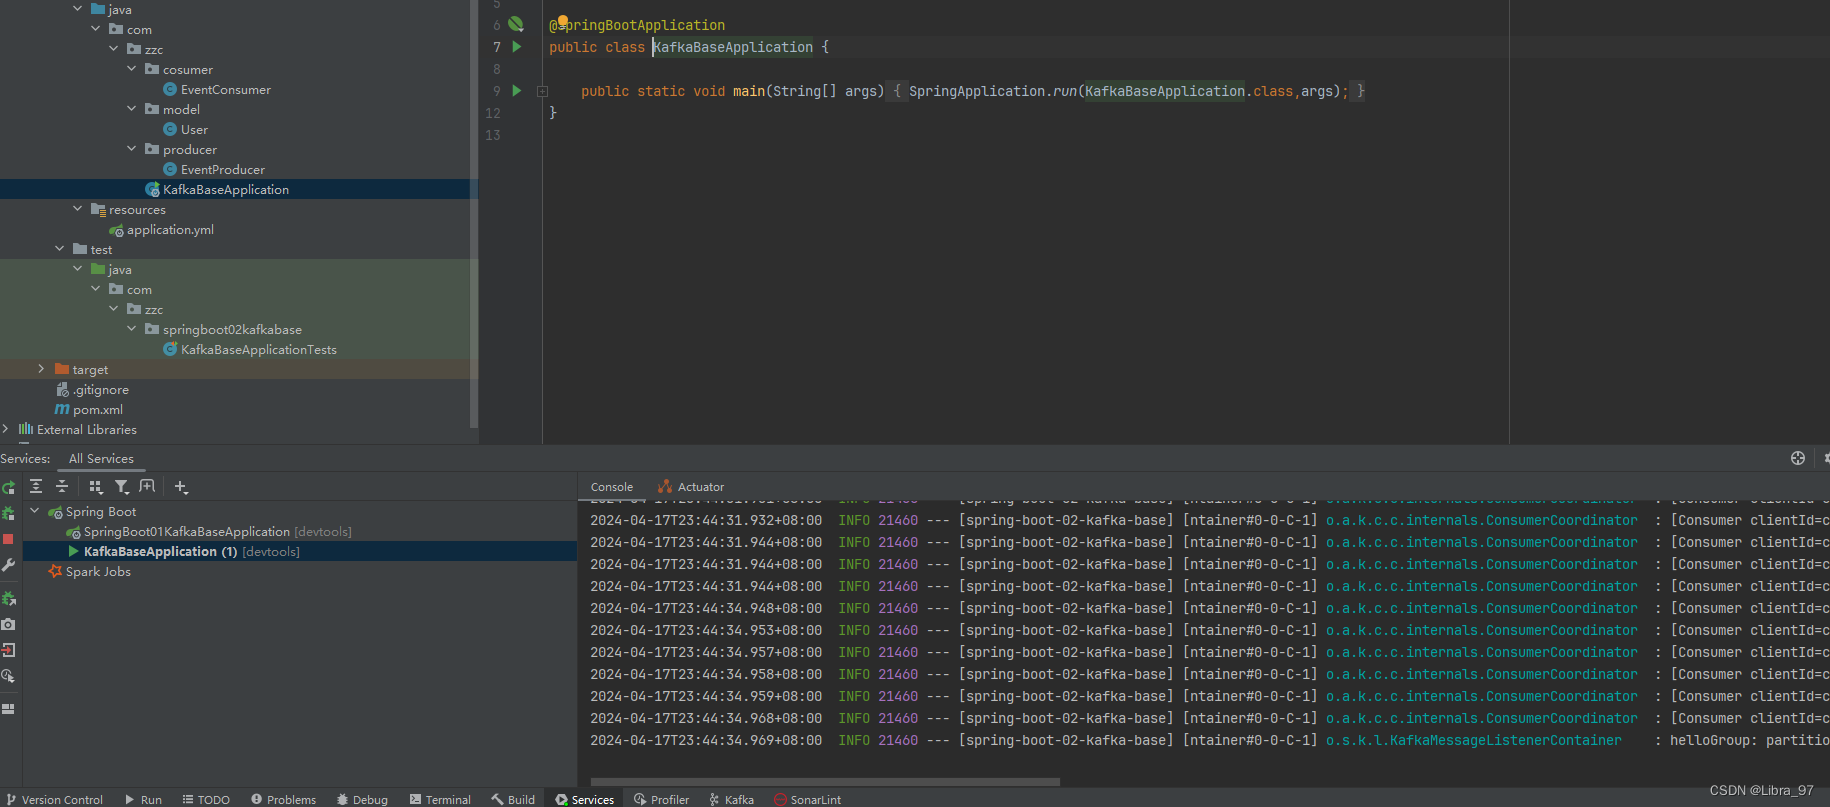
执行测试代码,服务一直报错,说User类不受安全的,只有java.util, java.lang下的类才是安全的

解决方案:将对象类型转为String类型进行发送,读取的时候再将String类型转为对象类型
创建JSONUtils类
package com.zzc.util;import com.fasterxml.jackson.core.JsonProcessingException;
import com.fasterxml.jackson.databind.ObjectMapper;public class JSONUtils {private static final ObjectMapper OBJECTMAPPER = new ObjectMapper();public static String toJSON(Object object){try {return OBJECTMAPPER.writeValueAsString(object);}catch (JsonProcessingException e){throw new RuntimeException(e);}}public static <T> T toBean(String jsonStr, Class<T> clazz){try {return OBJECTMAPPER.readValue(jsonStr, clazz);} catch (JsonProcessingException e) {throw new RuntimeException(e);}}
}
修改EventProducer代码,将原本的User类型改为String类型发送到topic中
public void sendEvent2(){User user = User.builder().id(213234).phone("13239407234").birthDay(new Date()).build();String userJson = JSONUtils.toJSON(user);kafkaTemplate.send("helloTopic", userJson);}
修改EventConsumer代码,将原本中参数的User类型改为String类型,再转换成User类型进行消费
@KafkaListener(topics = {"helloTopic"}, groupId = "helloGroup")public void onEvent2(String userStr,@Header(value = KafkaHeaders.RECEIVED_TOPIC) String topic,@Header(value = KafkaHeaders.RECEIVED_PARTITION) String partition,ConsumerRecord<String, String> consumerRecord){User user = (User) JSONUtils.toBean(userStr, User.class);System.out.println("读取到的事件:" + user + ", topic:" + topic + ", partition:" + partition);System.out.println("读取到的consumerRecord:" + consumerRecord.toString());}
将配置文件中的消费者和生产者配置都注释掉
spring:application:name: spring-boot-02-kafka-basekafka:bootstrap-servers: 192.168.2.118:9092#    producer:
#      value-serializer: org.springframework.kafka.support.serializer.JsonSerializer#    consumer:
#      value-deserializer: org.springframework.kafka.support.serializer.JsonDeserializer
重启服务,再次执行测试代码

4.14.5 获取自定义配置参数的数据
自定义配置topic的name和consumer的group值,消费者进行读取
spring:application:name: spring-boot-02-kafka-basekafka:bootstrap-servers: 192.168.2.118:9092#    producer:
#      value-serializer: org.springframework.kafka.support.serializer.JsonSerializer#    consumer:
#      value-deserializer: org.springframework.kafka.support.serializer.JsonDeserializerkafka:topic:name: helloTopicconsumer:group: helloGroup
使用${}的方式进行读取配置文件中的值
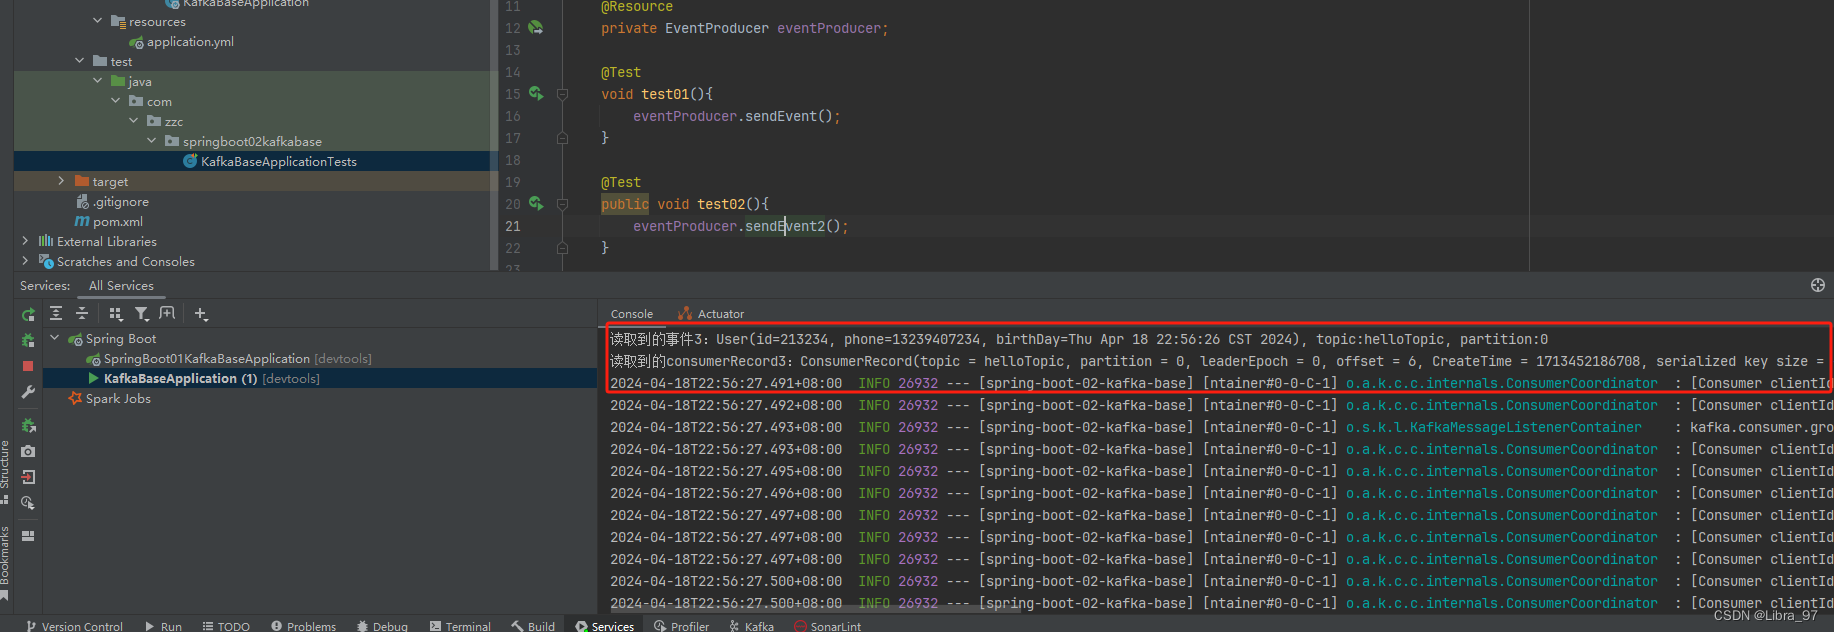
@KafkaListener(topics = {"${kafka.topic.name}"}, groupId = "kafka.consumer.group")public void onEvent3(String userStr,@Header(value = KafkaHeaders.RECEIVED_TOPIC) String topic,@Header(value = KafkaHeaders.RECEIVED_PARTITION) String partition,ConsumerRecord<String, String> consumerRecord){User user = (User) JSONUtils.toBean(userStr, User.class);System.out.println("读取到的事件3:" + user + ", topic:" + topic + ", partition:" + partition);System.out.println("读取到的consumerRecord3:" + consumerRecord.toString());}
重启服务,执行测试代码,能够读取到消息
4.14.6 ACK手动确认消息
默认情况下, Kafka 消费者消费消息后会自动发送确认信息给 Kafka 服务器,表示消息已经被成功消费。但在
某些场景下,我们希望在消息处理成功后再发送确认,或者在消息处理失败时选择不发送确认,以便 Kafka 能
够重新发送该消息;
EventConsumer类代码
@KafkaListener(topics = {"${kafka.topic.name}"}, groupId = "kafka.consumer.group")public void onEvent4(String userStr,@Header(value = KafkaHeaders.RECEIVED_TOPIC) String topic,@Header(value = KafkaHeaders.RECEIVED_PARTITION) String partition,ConsumerRecord<String, String> consumerRecord,Acknowledgment acknowledgment){User user = (User) JSONUtils.toBean(userStr, User.class);System.out.println("读取到的事件4:" + user + ", topic:" + topic + ", partition:" + partition);System.out.println("读取到的consumerRecord4:" + consumerRecord.toString());}
配置文件中添加手动ack模式
kafka:bootstrap-servers: 192.168.2.118:9092listener:ack-mode: manual
重启服务,执行测试代码。无论重启多少此服务,都能读取到这条消息,因为还没有确认消费这条消息,所以offset一直没有变

如果在代码中加入确认消费的话,那么就只会读取一次,offset也会发生变化

重启服务后,不再读取到这条消息了
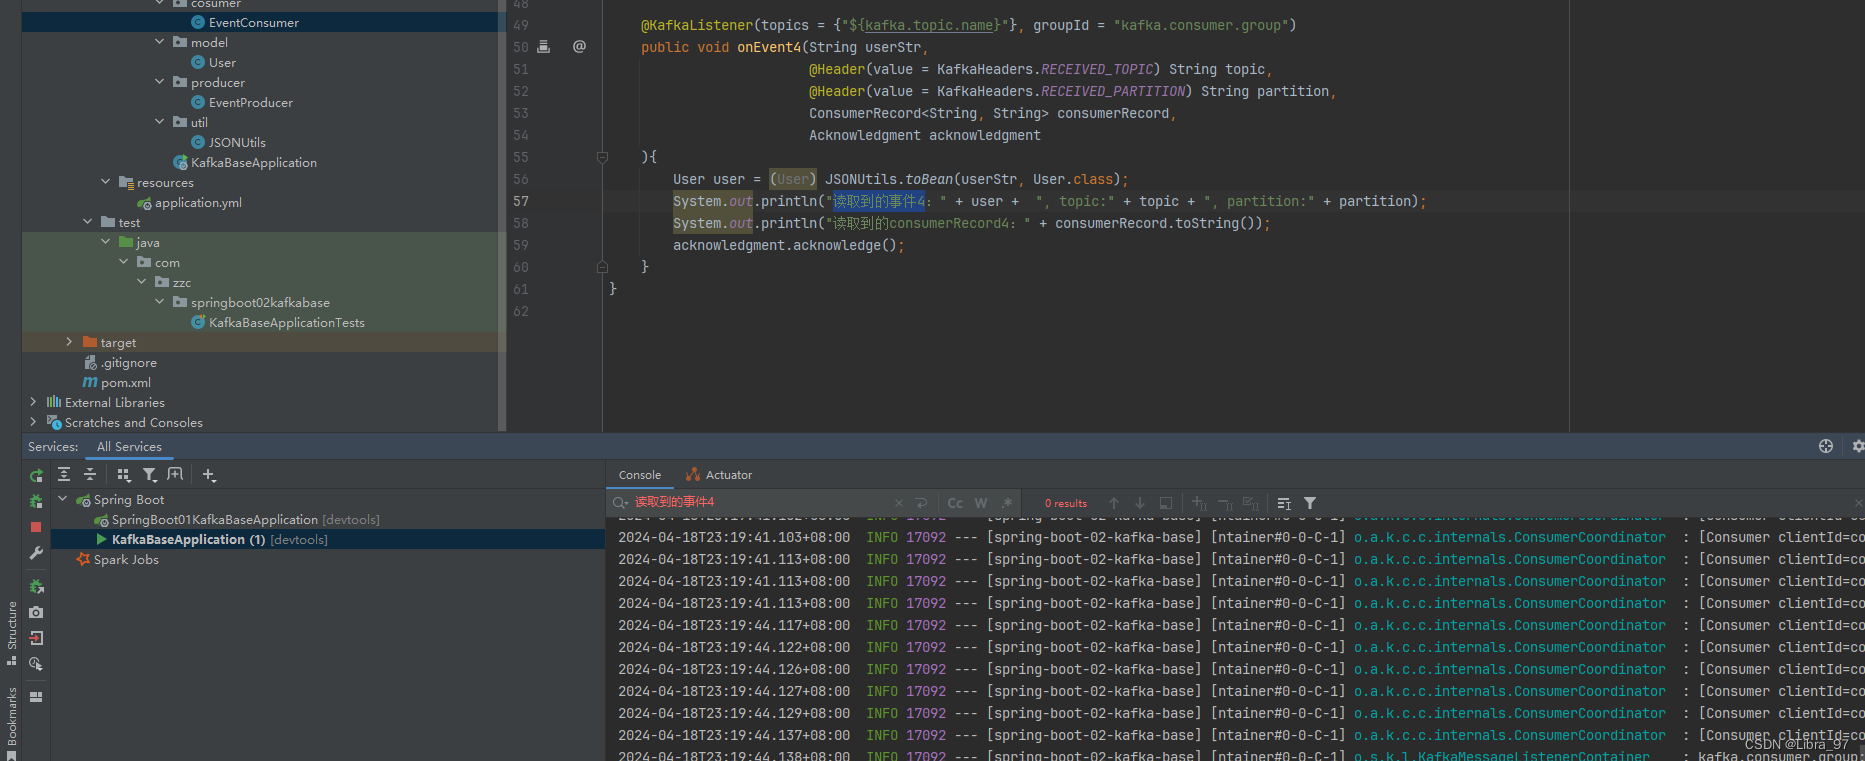
平常业务中可以这么写
@KafkaListener(topics = {"${kafka.topic.name}"}, groupId = "kafka.consumer.group")public void onEvent4(String userStr,@Header(value = KafkaHeaders.RECEIVED_TOPIC) String topic,@Header(value = KafkaHeaders.RECEIVED_PARTITION) String partition,ConsumerRecord<String, String> consumerRecord,Acknowledgment acknowledgment){try {User user = (User) JSONUtils.toBean(userStr, User.class);System.out.println("读取到的事件4:" + user + ", topic:" + topic + ", partition:" + partition);System.out.println("读取到的consumerRecord4:" + consumerRecord.toString());int i = 1 / 0;// 可以执行完所有业务,再进行确认消息。如果执行过程中发生异常,那么可以再次消费此消息acknowledgment.acknowledge();}catch (Exception e){e.printStackTrace();}}
4.14.7 指定 topic 、 partition 、 offset 消费
创建配置类,指定生成5个分区
@Configuration
public class KafkaConfig {// 创建一个名为helloTopic的Topic并设置分区数为5,分区副本数为1@Beanpublic NewTopic newTopic(){return new NewTopic("helloTopic", 5, (short) 1);}}
EventConsumer类中新增onEvent5方法
@KafkaListener(groupId = "${kafka.consumer.group}",// 配置更加详细的监听信息 topics和topicPartitions不能同时使用topicPartitions = {@TopicPartition(topic = "${kafka.topic.name}",// 监听topic的0、1、2号分区的所有消息partitions = {"0", "1", "2"},// 监听3、4号分区中offset从3开始的消息partitionOffsets = {@PartitionOffset(partition = "3", initialOffset = "3"),@PartitionOffset(partition = "4", initialOffset = "3")})})public void onEvent5(String userStr,@Header(value = KafkaHeaders.RECEIVED_TOPIC) String topic,@Header(value = KafkaHeaders.RECEIVED_PARTITION) String partition,ConsumerRecord<String, String> consumerRecord,Acknowledgment acknowledgment){try {User user = (User) JSONUtils.toBean(userStr, User.class);System.out.println("读取到的事件5:" + user + ", topic:" + topic + ", partition:" + partition);System.out.println("读取到的consumerRecord5:" + consumerRecord.toString());acknowledgment.acknowledge();}catch (Exception e){e.printStackTrace();}}
EventProducer新增sendEvent3方法
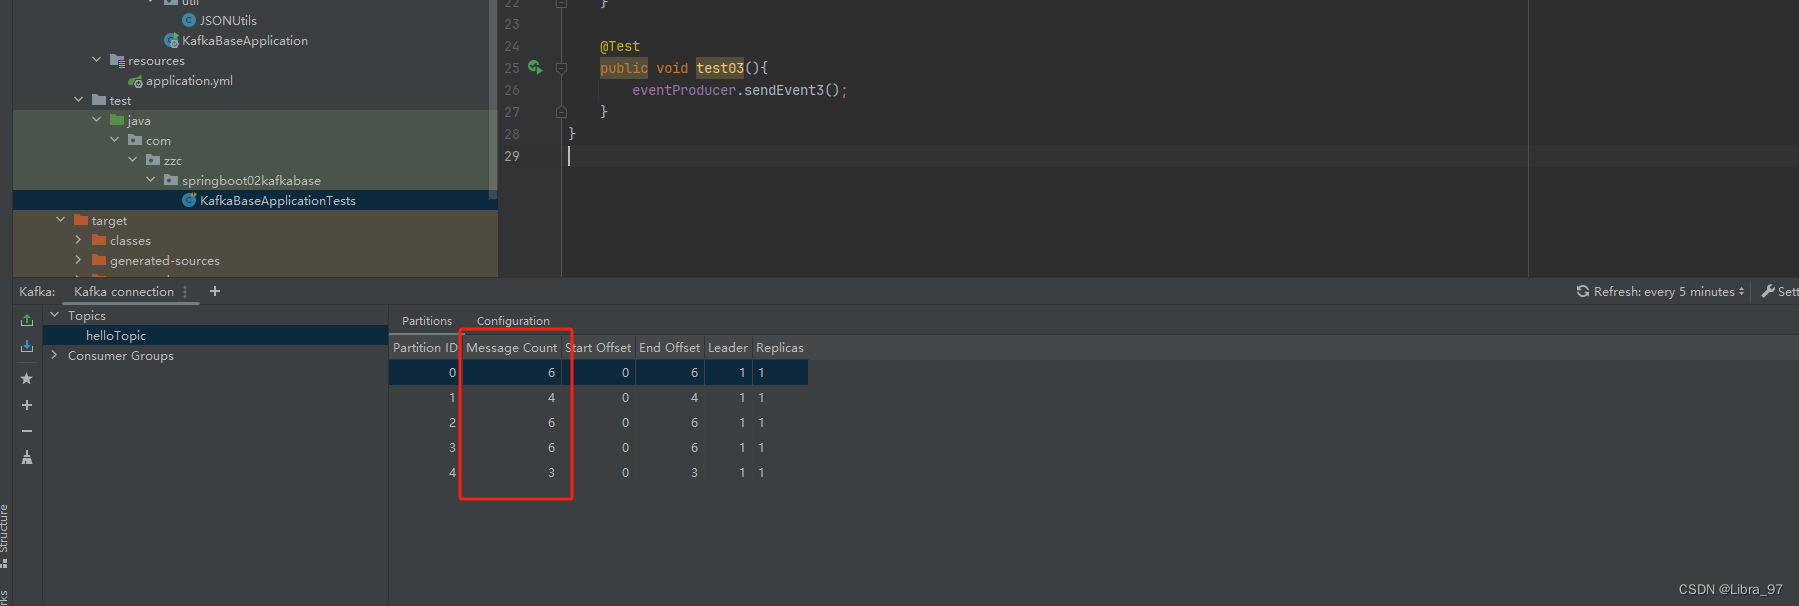
public void sendEvent3(){for (int i = 0; i < 25; i++) {User user = User.builder().id(i).phone("13239407234" + i).birthDay(new Date()).build();String userJson = JSONUtils.toJSON(user);kafkaTemplate2.send("helloTopic", "k" + i, userJson);}}
重启服务,执行测试代码
@Testpublic void test03(){eventProducer.sendEvent3();}
生成的25个消息已经发送到0~4号分区里了
消费消息,注意:需要停止服务,先运行测试代码,再启动服务
发现只消费了3条消息


现在去配置文件中修改成从最早的消息开始消费
consumer:# 从最早的消息开始消费auto-offset-reset: earliest
再次重启服务进行消费,发现还是只消费到3条消息

这是怎么回事呢?我们之前有遇到过这种情况,有两个解决方案
- 手动修改分区的偏移量
- 换一个消费组id
我们去配置文件中换一个groupId,由原来的helloGroup改为helloGroup1

再次重启服务,发现已经读取到19个消息了


再次重启服务的话,发现又只能消费3个消息了

4.14.8 批量消费消息
重新创建一个模块 spring-boot-03-kafka-base
配置文件进行批量消费配置
spring:application:name: spring-boot-03-kafka-basekafka:bootstrap-servers: 192.168.2.118:9092consumer:# 设置批量最多消费多少条消息max-poll-records: 20listener:# 设置批量消费type: batch
创建EventConsumer类
package com.zzc.springboot03kafkabase.cosumer;import org.apache.kafka.clients.consumer.ConsumerRecord;
import org.springframework.kafka.annotation.KafkaListener;
import org.springframework.stereotype.Component;import java.util.List;@Component
public class EventConsumer {@KafkaListener(topics = "batchTopic", groupId = "bactchGroup")public void onEvent(List<ConsumerRecord<String, String>> records) {System.out.println(" 批量消费, records.size() = " + records.size() + " , records = " + records);}
}
User类
package com.zzc.springboot03kafkabase.model;import lombok.AllArgsConstructor;
import lombok.Builder;
import lombok.Data;
import lombok.NoArgsConstructor;import java.util.Date;@Builder
@AllArgsConstructor
@NoArgsConstructor
@Data
public class User {private int id;private String phone;private Date birthDay;
}
创建EventProducer类
package com.zzc.springboot03kafkabase.producer;import com.zzc.springboot03kafkabase.model.User;
import com.zzc.springboot03kafkabase.util.JSONUtils;
import jakarta.annotation.Resource;
import org.springframework.kafka.core.KafkaTemplate;
import org.springframework.stereotype.Component;import java.util.Date;@Component
public class EventProducer {@Resourceprivate KafkaTemplate<String, String> kafkaTemplate;public void sendEvent(){for (int i = 0; i < 125; i++) {User user = User.builder().id(i).phone("13239407234" + i).birthDay(new Date()).build();String userJson = JSONUtils.toJSON(user);kafkaTemplate.send("batchTopic", "k" + i, userJson);}}}
创建Json字符串转换对象工具类
package com.zzc.springboot03kafkabase.util;import com.fasterxml.jackson.core.JsonProcessingException;
import com.fasterxml.jackson.databind.ObjectMapper;public class JSONUtils {private static final ObjectMapper OBJECTMAPPER = new ObjectMapper();public static String toJSON(Object object){try {return OBJECTMAPPER.writeValueAsString(object);}catch (JsonProcessingException e){throw new RuntimeException(e);}}public static <T> T toBean(String jsonStr, Class<T> clazz){try {return OBJECTMAPPER.readValue(jsonStr, clazz);} catch (JsonProcessingException e) {throw new RuntimeException(e);}}
}
pom文件
<?xml version="1.0" encoding="UTF-8"?>
<project xmlns="http://maven.apache.org/POM/4.0.0" xmlns:xsi="http://www.w3.org/2001/XMLSchema-instance"xsi:schemaLocation="http://maven.apache.org/POM/4.0.0 https://maven.apache.org/xsd/maven-4.0.0.xsd"><modelVersion>4.0.0</modelVersion><parent><groupId>org.springframework.boot</groupId><artifactId>spring-boot-starter-parent</artifactId><version>3.2.5</version><relativePath/> <!-- lookup parent from repository --></parent><groupId>com.zzc</groupId><artifactId>spring-boot-03-kafka-base</artifactId><version>0.0.1-SNAPSHOT</version><name>spring-boot-03-kafka-base</name><description>spring-boot-03-kafka-base</description><properties><java.version>17</java.version></properties><dependencies><dependency><groupId>org.springframework.boot</groupId><artifactId>spring-boot-starter-json</artifactId></dependency><dependency><groupId>org.springframework.boot</groupId><artifactId>spring-boot-starter</artifactId></dependency><dependency><groupId>org.springframework.kafka</groupId><artifactId>spring-kafka</artifactId></dependency><dependency><groupId>org.springframework.boot</groupId><artifactId>spring-boot-devtools</artifactId><scope>runtime</scope><optional>true</optional></dependency><dependency><groupId>org.projectlombok</groupId><artifactId>lombok</artifactId><optional>true</optional></dependency><dependency><groupId>org.springframework.boot</groupId><artifactId>spring-boot-starter-test</artifactId><scope>test</scope></dependency><dependency><groupId>org.springframework.kafka</groupId><artifactId>spring-kafka-test</artifactId><scope>test</scope></dependency></dependencies><build><plugins><plugin><groupId>org.springframework.boot</groupId><artifactId>spring-boot-maven-plugin</artifactId><configuration><excludes><exclude><groupId>org.projectlombok</groupId><artifactId>lombok</artifactId></exclude></excludes></configuration></plugin></plugins></build></project>
先执行测试文件,生成125个消息到batchTopic的主题中
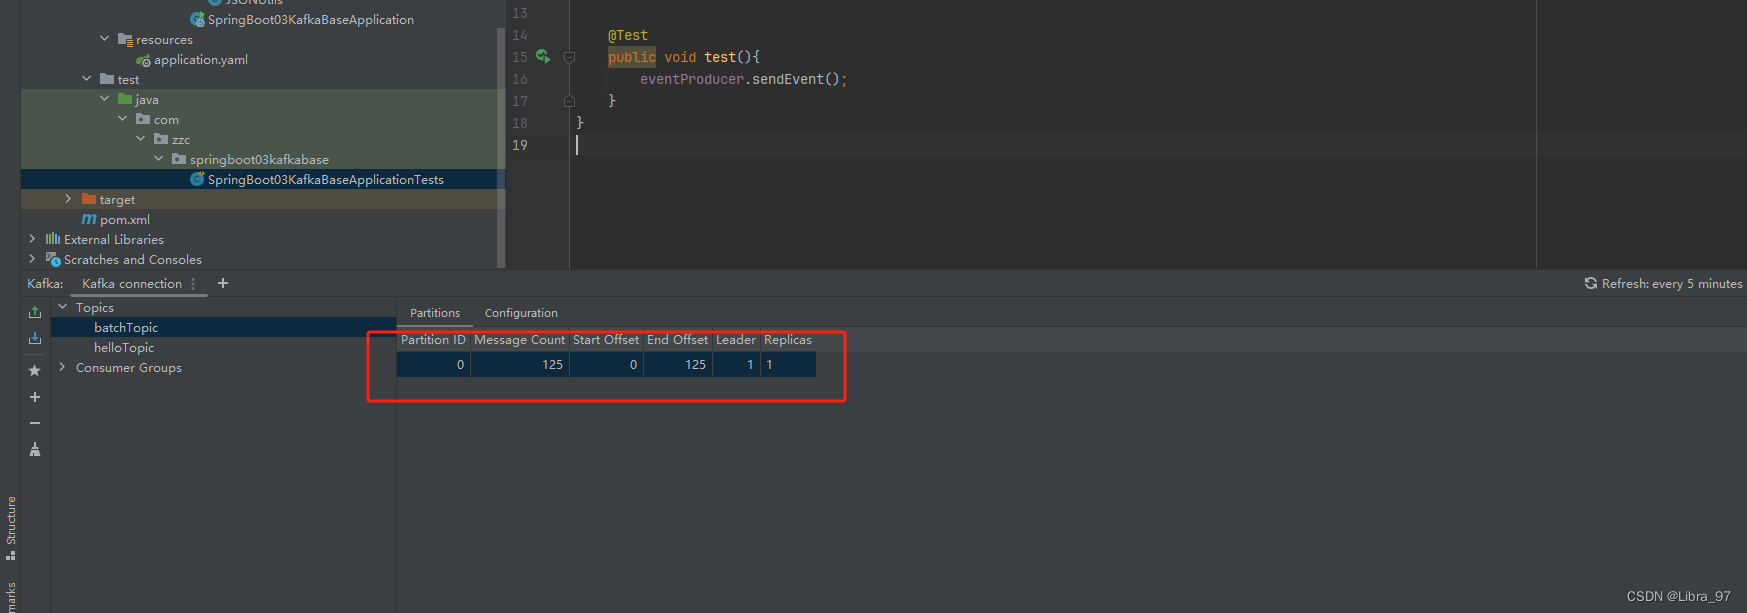
启动服务,发现一条消息也没有消费到
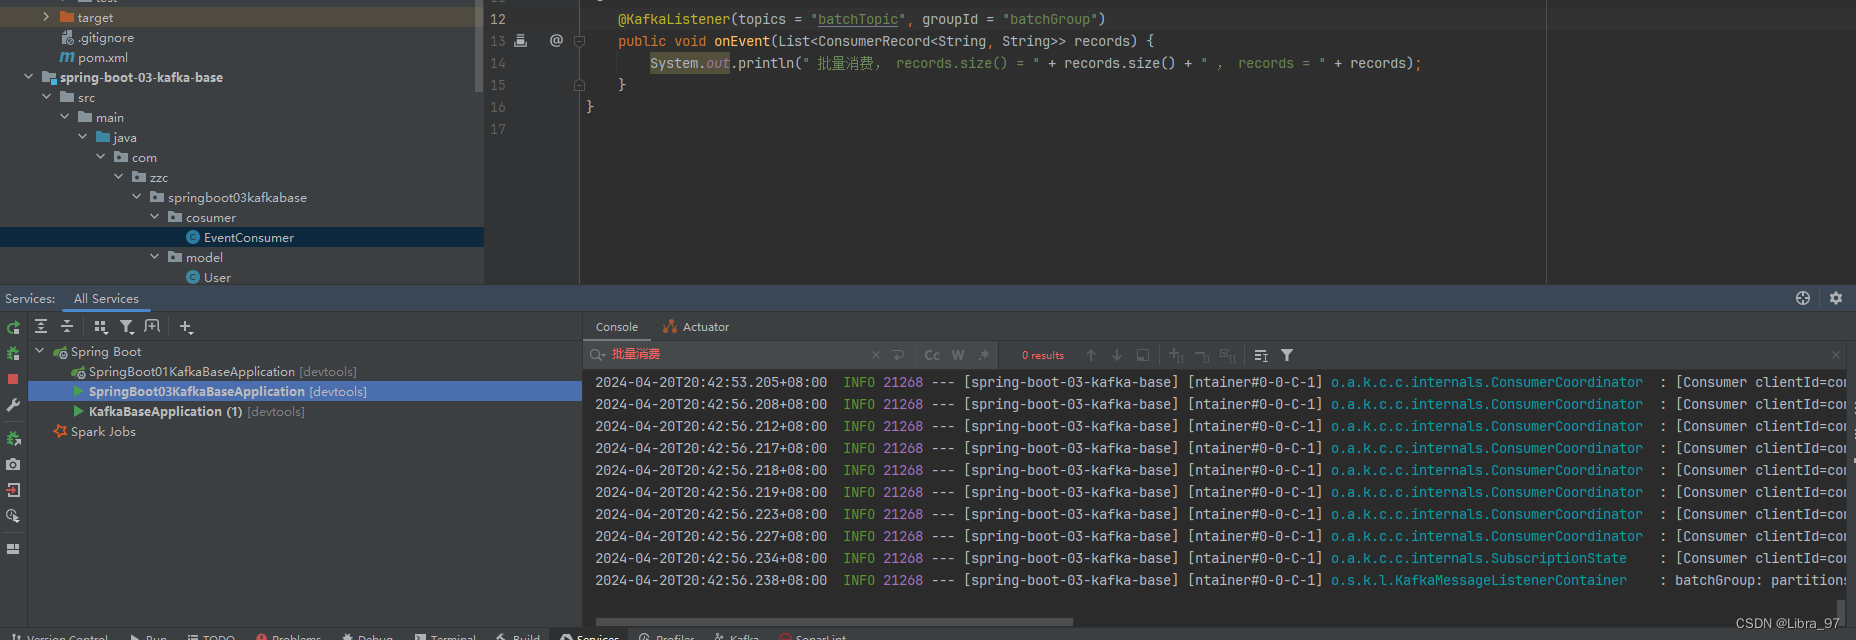
这个问题之前也遇到过,因为默认是最后一个偏移量+1开始消费的。
此时我们需要先在配置文件中将消费消息配置成从最早消息开始消费
consumer:# 设置批量最多消费多少条消息max-poll-records: 20auto-offset-reset: earliest
修改groupId,因为之前已经使用这个groupId消费过次一次了 所以要换一个groupId

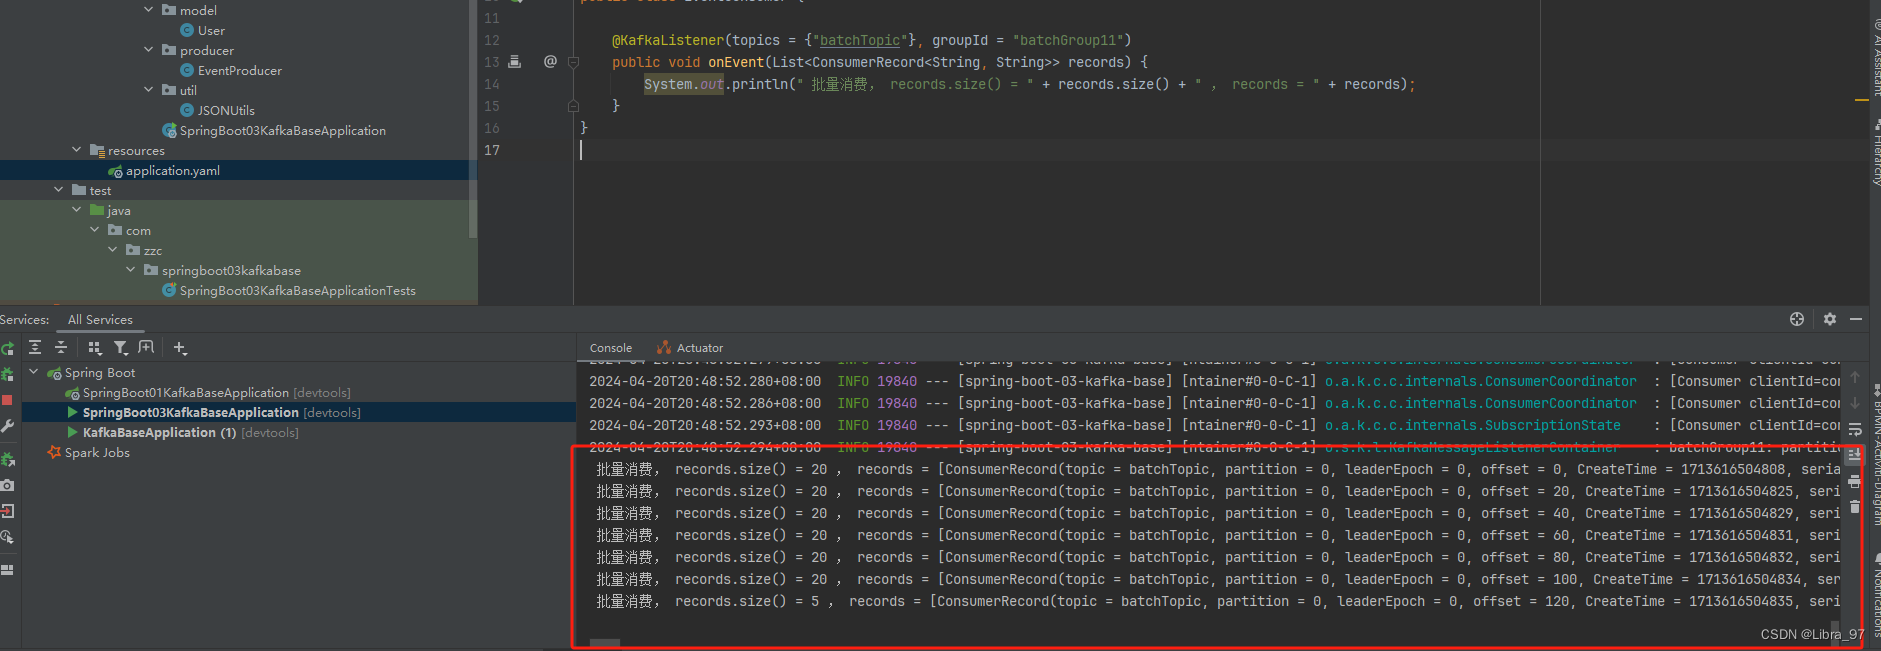
重启服务,成功消费到消息。每次最多消费20条,总共125条消息都消费到了。
4.15 消费消息拦截器
在消息消费之前,我们可以通过配置拦截器对消息进行拦截,在消息被实际处理之前对其进行一些操作,例如记录日志、修改消息内容或执行一些安全检查等;
4.15.1 创建新模块spring-boot-04-kafka-base,依赖还是springboot、Lombok、kafka这三个
4.15.2 主文件中添加代码
package com.zzc;import org.springframework.boot.SpringApplication;
import org.springframework.boot.autoconfigure.SpringBootApplication;
import org.springframework.context.ApplicationContext;
import org.springframework.context.ConfigurableApplicationContext;
import org.springframework.kafka.config.KafkaListenerContainerFactory;
import org.springframework.kafka.core.ConsumerFactory;import java.util.Map;@SpringBootApplication
public class SpringBoot04KafkaBaseApplication {public static void main(String[] args) {ApplicationContext context = SpringApplication.run(SpringBoot04KafkaBaseApplication.class, args);Map<String, ConsumerFactory> beansOfType = context.getBeansOfType(ConsumerFactory.class);beansOfType.forEach((k, v) -> {System.out.println(k + " -- " + v);});Map<String, KafkaListenerContainerFactory> beansOfType2 = context.getBeansOfType(KafkaListenerContainerFactory.class);beansOfType2.forEach((k, v) -> {System.out.println(k + " -- " + v);});}}
启动服务类,发现容器中默认有kafkaConsumerFactory和kafkaListenerContainerFactory类

我们需要使用自己的kafkaConsumerFactory和kafkaListenerContainerFactory,因为我们需要加上拦截器
4.15.2 创建拦截器CustomConsumerInterceptor
package com.zzc.interceptor;import org.apache.kafka.clients.consumer.ConsumerInterceptor;
import org.apache.kafka.clients.consumer.ConsumerRecords;
import org.apache.kafka.clients.consumer.OffsetAndMetadata;
import org.apache.kafka.common.TopicPartition;import java.util.Map;public class CustomConsumerInterceptor implements ConsumerInterceptor<String, String > {/*** 在消费消息之前执行* @param consumerRecords* @return*/@Overridepublic ConsumerRecords<String, String> onConsume(ConsumerRecords<String, String> consumerRecords) {System.out.println("onConsumer方法执行:" + consumerRecords);return consumerRecords;}/*** 消息拿到之后,提交offset之前执行该方法* @param offsets*/@Overridepublic void onCommit(Map<TopicPartition, OffsetAndMetadata> offsets) {System.out.println("onCommit方法执行:" + offsets);}@Overridepublic void close() {}@Overridepublic void configure(Map<String, ?> map) {}
}
4.15.3 创建配置类
package com.zzc.config;import com.zzc.interceptor.CustomConsumerInterceptor;
import org.apache.kafka.clients.consumer.ConsumerConfig;
import org.springframework.beans.factory.annotation.Value;
import org.springframework.context.annotation.Bean;
import org.springframework.context.annotation.Configuration;
import org.springframework.kafka.config.ConcurrentKafkaListenerContainerFactory;
import org.springframework.kafka.config.KafkaListenerContainerFactory;
import org.springframework.kafka.core.ConsumerFactory;
import org.springframework.kafka.core.DefaultKafkaConsumerFactory;import java.util.HashMap;
import java.util.Map;@Configuration
public class KafkaConfig {@Value("${spring.kafka.bootstrap-servers}")private String bootstrapServers;@Value("${spring.kafka.consumer.value-deserializer}")private String valueDeSerializer;@Value("${spring.kafka.consumer.key-deserializer}")private String keyDeSerializer;public Map<String, Object> consumerConfigs(){HashMap<String, Object> consumer = new HashMap<>();consumer.put(ConsumerConfig.BOOTSTRAP_SERVERS_CONFIG,bootstrapServers);consumer.put(ConsumerConfig.KEY_DESERIALIZER_CLASS_CONFIG,keyDeSerializer);consumer.put(ConsumerConfig.VALUE_DESERIALIZER_CLASS_CONFIG, valueDeSerializer);// 添加一个消费拦截器consumer.put(ConsumerConfig.INTERCEPTOR_CLASSES_CONFIG, CustomConsumerInterceptor.class.getName());return consumer;}/*** 消费者创建工厂* @return*/@Beanpublic ConsumerFactory<String, String> ourConsumerFactory(){return new DefaultKafkaConsumerFactory<>(consumerConfigs());}/*** 监听器容器工厂* @param ourConsumerFactory* @return*/@Beanpublic KafkaListenerContainerFactory ourKafkaListenerContainerFactory(ConsumerFactory ourConsumerFactory){ConcurrentKafkaListenerContainerFactory<String, String> listenerContainerFactory = new ConcurrentKafkaListenerContainerFactory<>();listenerContainerFactory.setConsumerFactory(ourConsumerFactory);return listenerContainerFactory;}
}
4.15.4 测试spring容器默认的和自定义的消费者创建工厂和监听器容器工厂
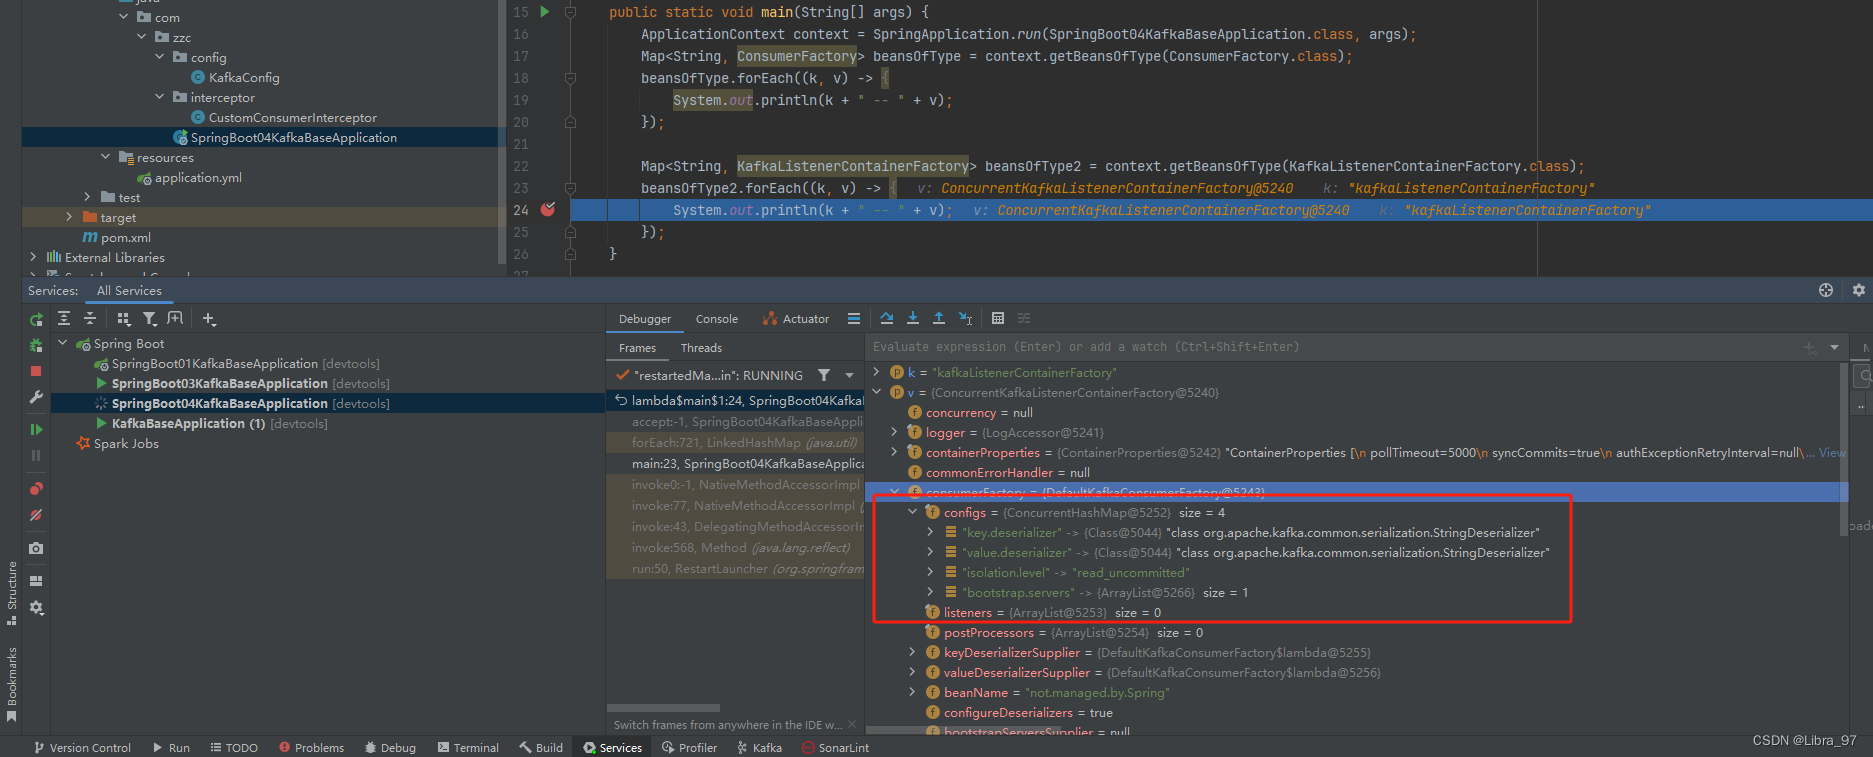
重启服务,测试容器中用的已经是我们自己创建的消费者创建工厂和监听器容器工厂了
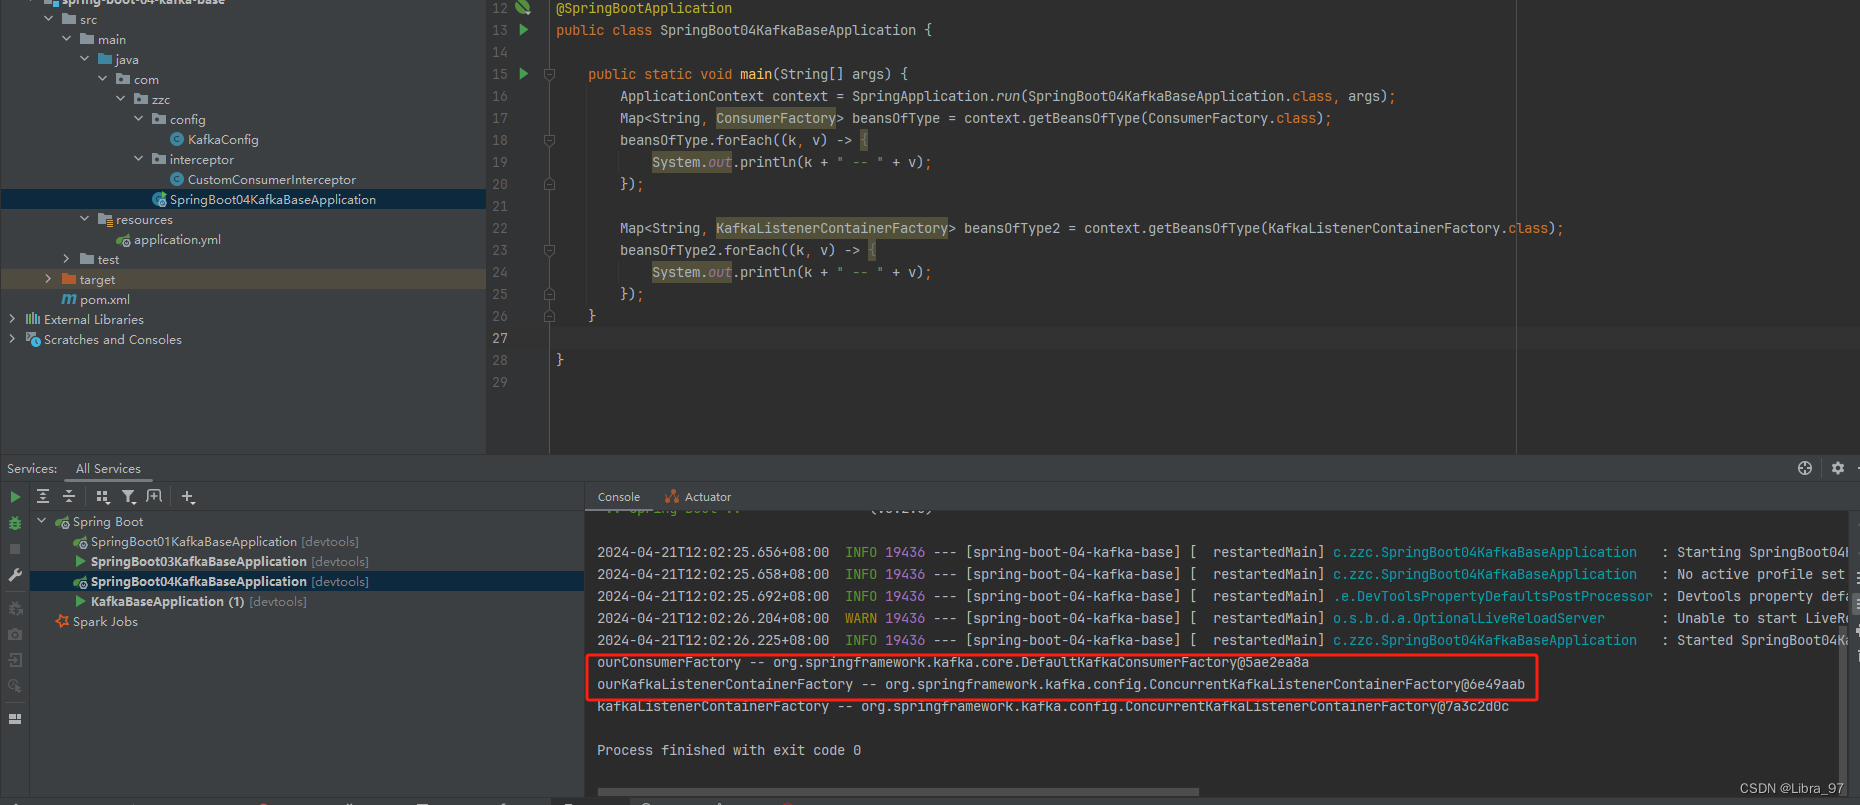
我们自定义的监听器容器工厂的配置中可以看到有我们创建的拦截器对象

spring的默认监听器工厂对象的配置中就没有我们创建的拦截器对象
4.15.5 消费消息
创建消费者对象,KafkaListener注解加上containerFactory参数
package com.zzc.cosumer;import org.apache.kafka.clients.consumer.ConsumerRecord;
import org.springframework.kafka.annotation.KafkaListener;
import org.springframework.stereotype.Component;import java.util.List;@Component
public class EventConsumer {@KafkaListener(topics = {"interTopic"}, groupId = "interGroup", containerFactory = "ourKafkaListenerContainerFactory")public void onEvent(ConsumerRecord<String, String> records) {System.out.println(" 消费消息, records = " + records);}
}
创建生产者对象
package com.zzc.producer;import com.zzc.model.User;
import com.zzc.util.JSONUtils;
import jakarta.annotation.Resource;
import org.springframework.kafka.core.KafkaTemplate;
import org.springframework.stereotype.Component;import java.util.Date;@Component
public class EventProducer {@Resourceprivate KafkaTemplate<String, String> kafkaTemplate;public void sendEvent() {User user = User.builder().id(1023).phone("13239407234").birthDay(new Date()).build();String userJson = JSONUtils.toJSON(user);kafkaTemplate.send("interTopic", "k", userJson);}}
测试代码
@Resourceprivate EventProducer eventProducer;@Testpublic void test(){eventProducer.sendEvent();}
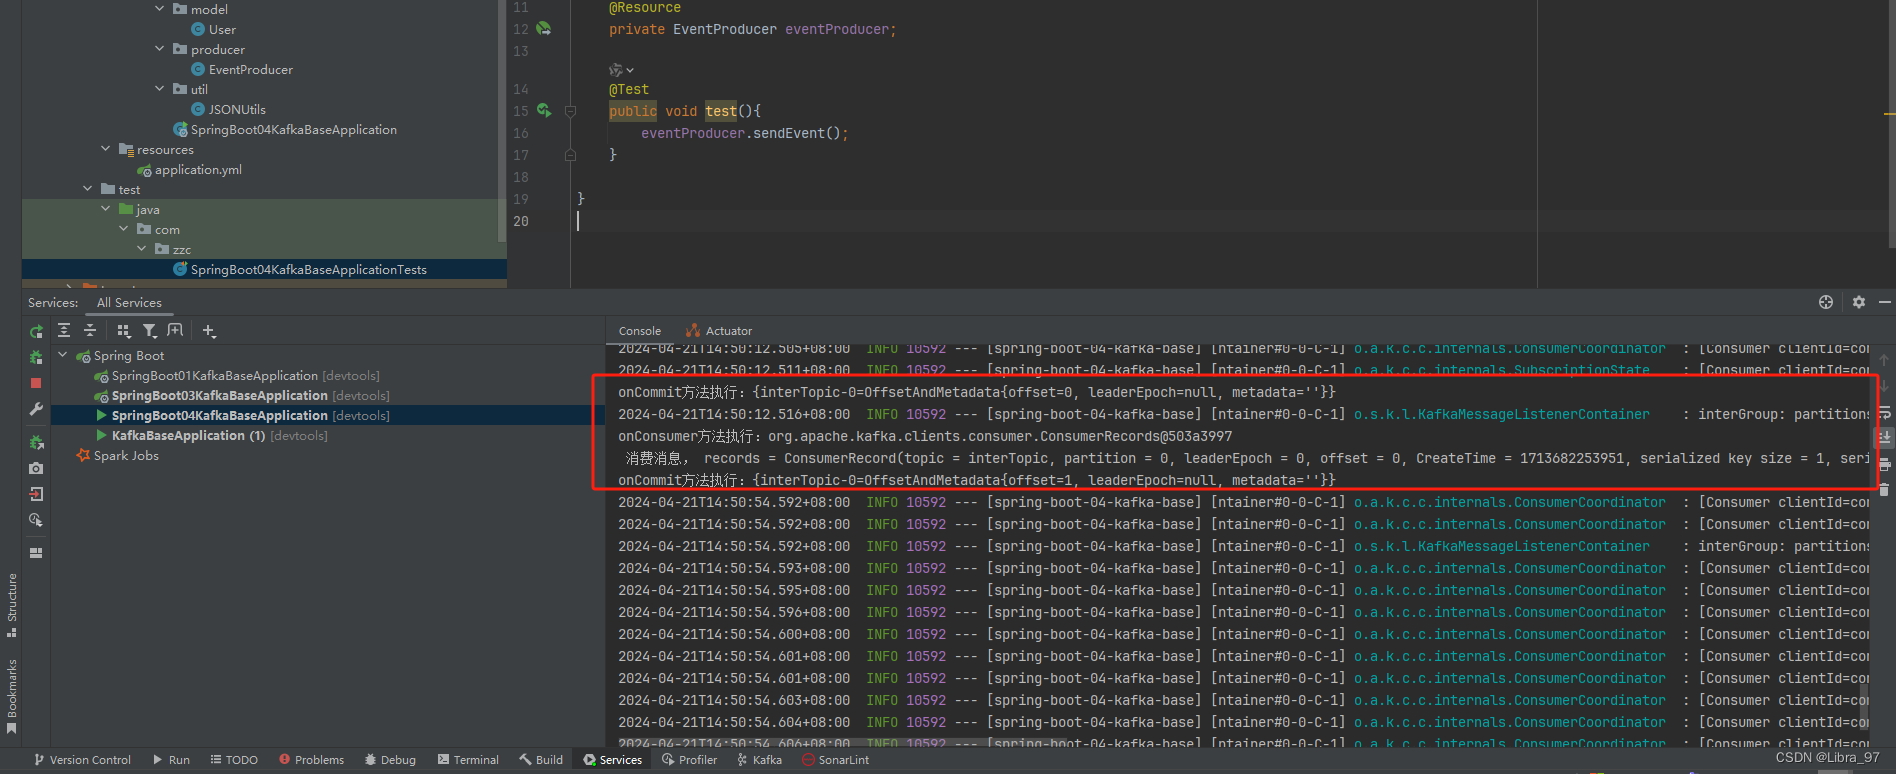
启动服务,再执行测试代码,成功打印出拦截器中的消息
测试KafkaListener注解中不加containerFactory参数是否会打印拦截器的消息
@Component
public class EventConsumer {//    @KafkaListener(topics = {"interTopic"}, groupId = "interGroup", containerFactory = "ourKafkaListenerContainerFactory")@KafkaListener(topics = {"interTopic"}, groupId = "interGroup", )public void onEvent(ConsumerRecord<String, String> records) {System.out.println(" 消费消息, records = " + records);}
}
重启服务,再次执行测试代码,发现并没有打印出拦截器的消息

4.16 消息转发
消息转发就是应用 A 从 TopicA 接收到消息,经过处理后转发到 TopicB ,再由应用 B 监听接收该消息,即一个应用处理完成后将该消息转发至其他应用处理,这在实际开发中,是可能存在这样的需求的;
创建一个新模块spring-boot-05-kafka-base,结构如下

consumer代码
package com.zzc.cosumer;import org.apache.kafka.clients.consumer.ConsumerRecord;
import org.springframework.kafka.annotation.KafkaListener;
import org.springframework.messaging.handler.annotation.SendTo;
import org.springframework.stereotype.Component;import java.util.List;@Component
public class EventConsumer {@KafkaListener(topics = {"topicA"}, groupId = "group1")@SendTo("topicB")  // 转发消息给topicBpublic String onEvent(ConsumerRecord<String, String> record) {System.out.println(" 消费消息, record = " + record);return record.value() + "forward message";}@KafkaListener(topics = {"topicB"}, groupId = "group2")public void onEvent2(List<ConsumerRecord<String, String>> records) {System.out.println(" 消费消息, record = " + records);}
}
producer代码
package com.zzc.producer;import com.zzc.model.User;
import com.zzc.util.JSONUtils;
import jakarta.annotation.Resource;
import org.springframework.kafka.core.KafkaTemplate;
import org.springframework.stereotype.Component;import java.util.Date;@Component
public class EventProducer {@Resourceprivate KafkaTemplate<String, String> kafkaTemplate;public void sendEvent() {User user = User.builder().id(1023).phone("13239407234").birthDay(new Date()).build();String userJson = JSONUtils.toJSON(user);kafkaTemplate.send("topicA", "k", userJson);}
}
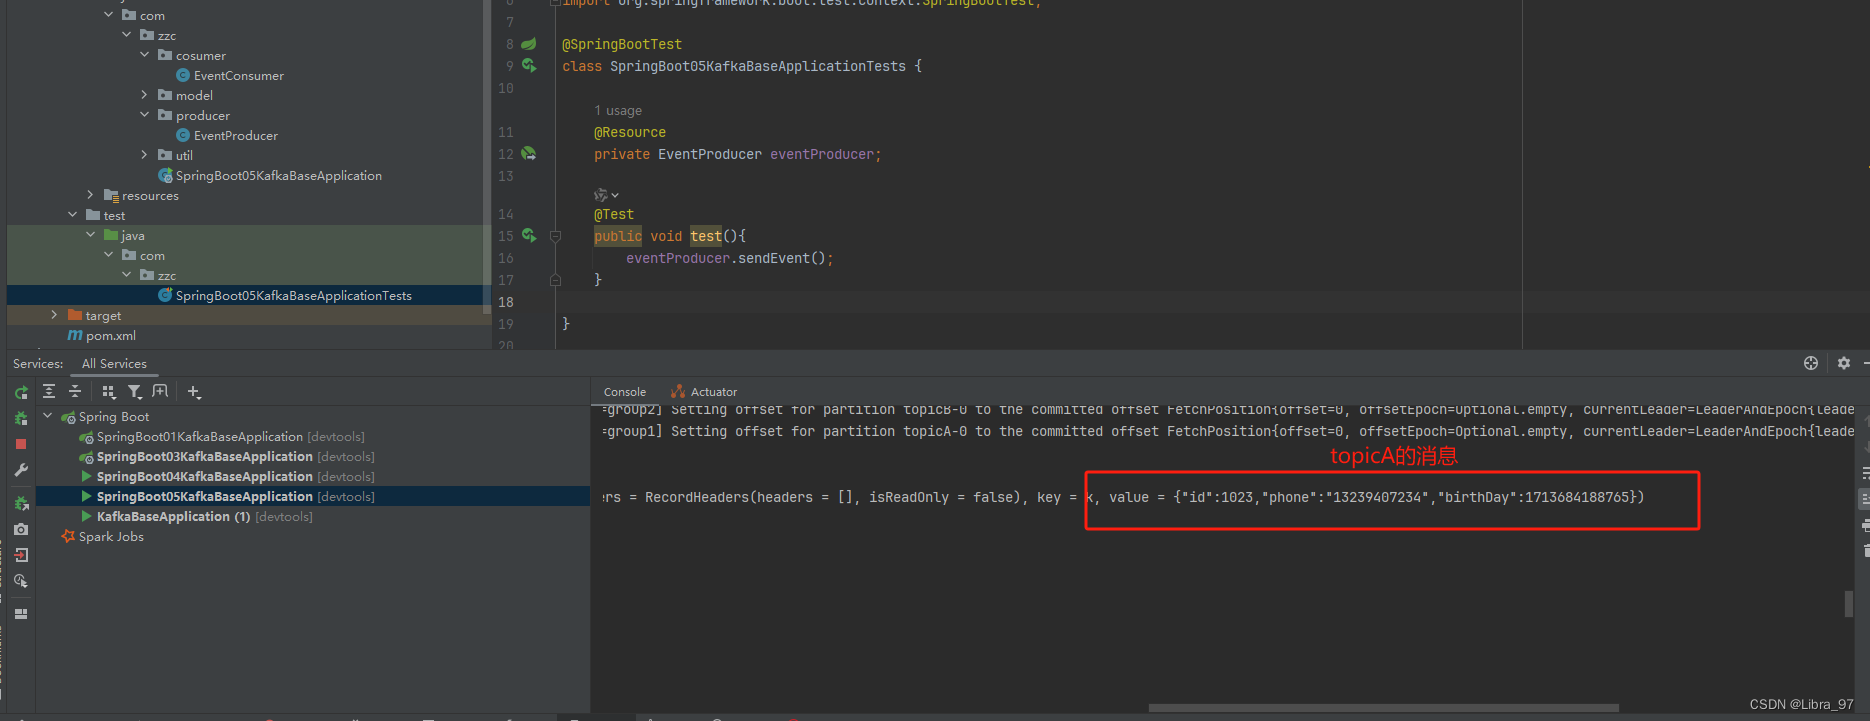
启动服务,执行测试代码

4.17 消息消费的分区策略
- Kafka 消费消息时的分区策略:是指 Kafka 主题 topic 中哪些分区应该由哪些消费者来消费;

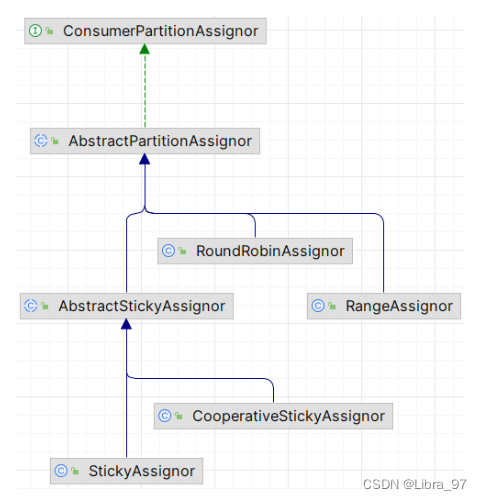
- Kafka 有多种分区分配策略,默认的分区分配策略是RangeAssignor ,除了 RangeAssignor 策略外, Kafka 还有其他分区分配策略:
- RoundRobinAssignor
- StickyAssignor
- CooperativeStickyAssignor ,
- 这些策略各有特点,可以根据实际的应用场景和需求来选择适合的分区分配策略;
4.17.1 RangeAssignor 策略
创建新模块spring-boot-06-kafka-base
配置类KafkaConfig
package com.zzc.config;import org.apache.kafka.clients.admin.NewTopic;
import org.springframework.context.annotation.Bean;
import org.springframework.context.annotation.Configuration;@Configuration
public class KafkaConfig {// 创建一个名为helloTopic的Topic并设置分区数为5,分区副本数为1@Beanpublic NewTopic newTopic(){return new NewTopic("myTopic", 10, (short) 1);}
}
消费者类EventConsumer
package com.zzc.cosumer;import org.apache.kafka.clients.consumer.ConsumerRecord;
import org.springframework.kafka.annotation.KafkaListener;
import org.springframework.stereotype.Component;import java.util.List;@Component
public class EventConsumer {// concurrency 消费者数量@KafkaListener(topics = {"myTopic"}, groupId = "myGroup", concurrency = "3")public void onEvent(ConsumerRecord<String, String> records) {System.out.println(" 消费消息, records = " + records);}
}
生产者类
package com.zzc.producer;import com.zzc.model.User;
import com.zzc.util.JSONUtils;
import jakarta.annotation.Resource;
import org.springframework.kafka.core.KafkaTemplate;
import org.springframework.stereotype.Component;import java.util.Date;@Component
public class EventProducer {@Resourceprivate KafkaTemplate<String, String> kafkaTemplate;public void sendEvent() {for (int i = 0; i < 100; i++) {User user = User.builder().id(i).phone("13239407234" + i).birthDay(new Date()).build();String userJson = JSONUtils.toJSON(user);kafkaTemplate.send("myTopic", "k" + i, userJson);}}}
测试代码
package com.zzc;import com.zzc.producer.EventProducer;
import jakarta.annotation.Resource;
import org.junit.jupiter.api.Test;
import org.springframework.boot.test.context.SpringBootTest;@SpringBootTest
class SpringBoot06KafkaBaseApplicationTests {@Resourceprivate EventProducer eventProducer;@Testpublic void test(){eventProducer.sendEvent();}}
配置文件
spring:application:name: spring-boot-06-kafka-basekafka:bootstrap-servers: 192.168.2.118:9092consumer:key-deserializer: org.apache.kafka.common.serialization.StringDeserializervalue-deserializer: org.apache.kafka.common.serialization.StringDeserializerauto-offset-reset: earliest
先执行测试代码,生产100个消息发送到10个分区中
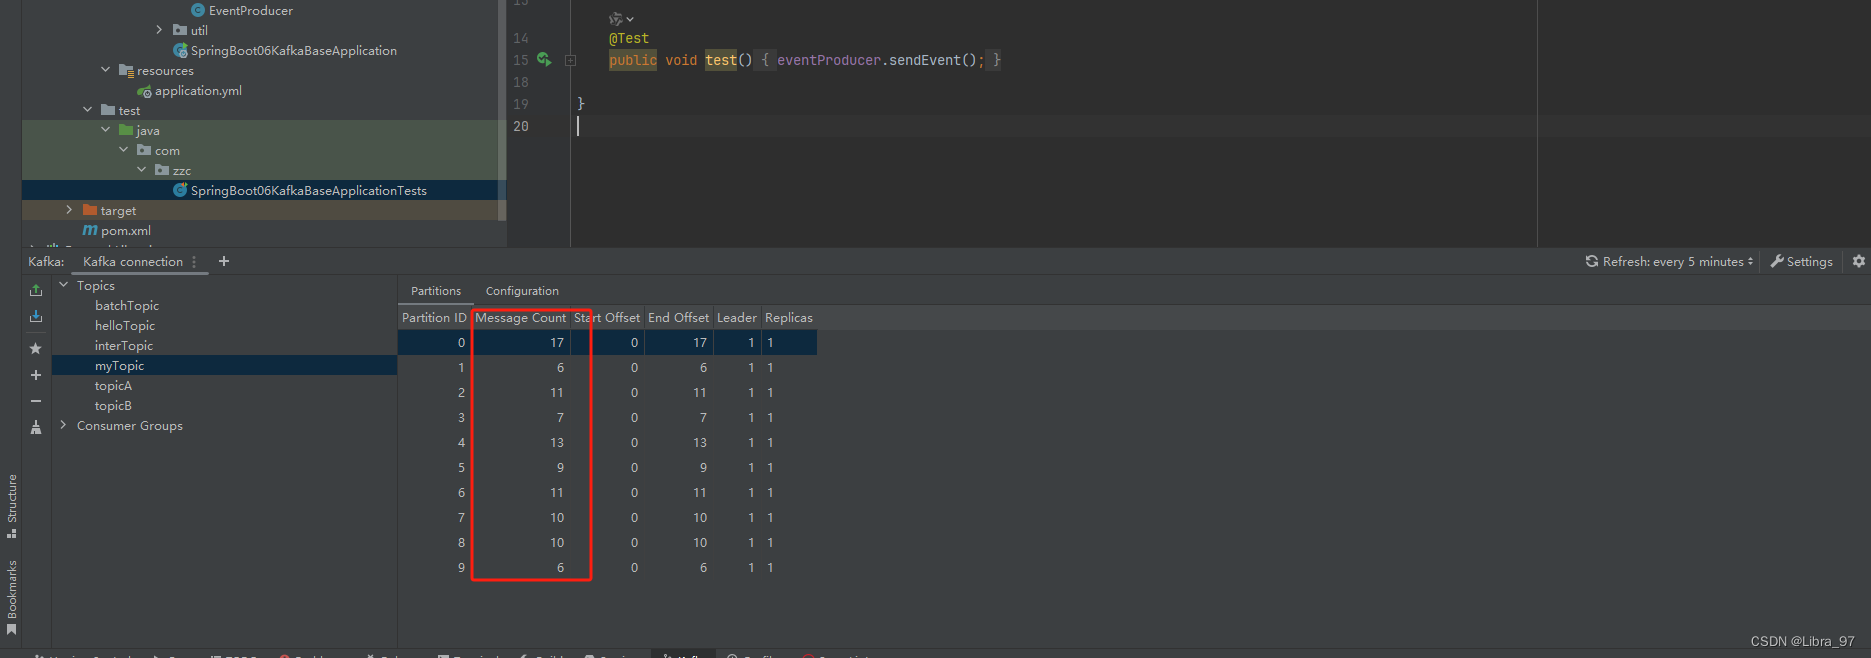
启动服务,进行消费,打印出100个消息

我们来看一下最小的线程id38是否消费4个分区
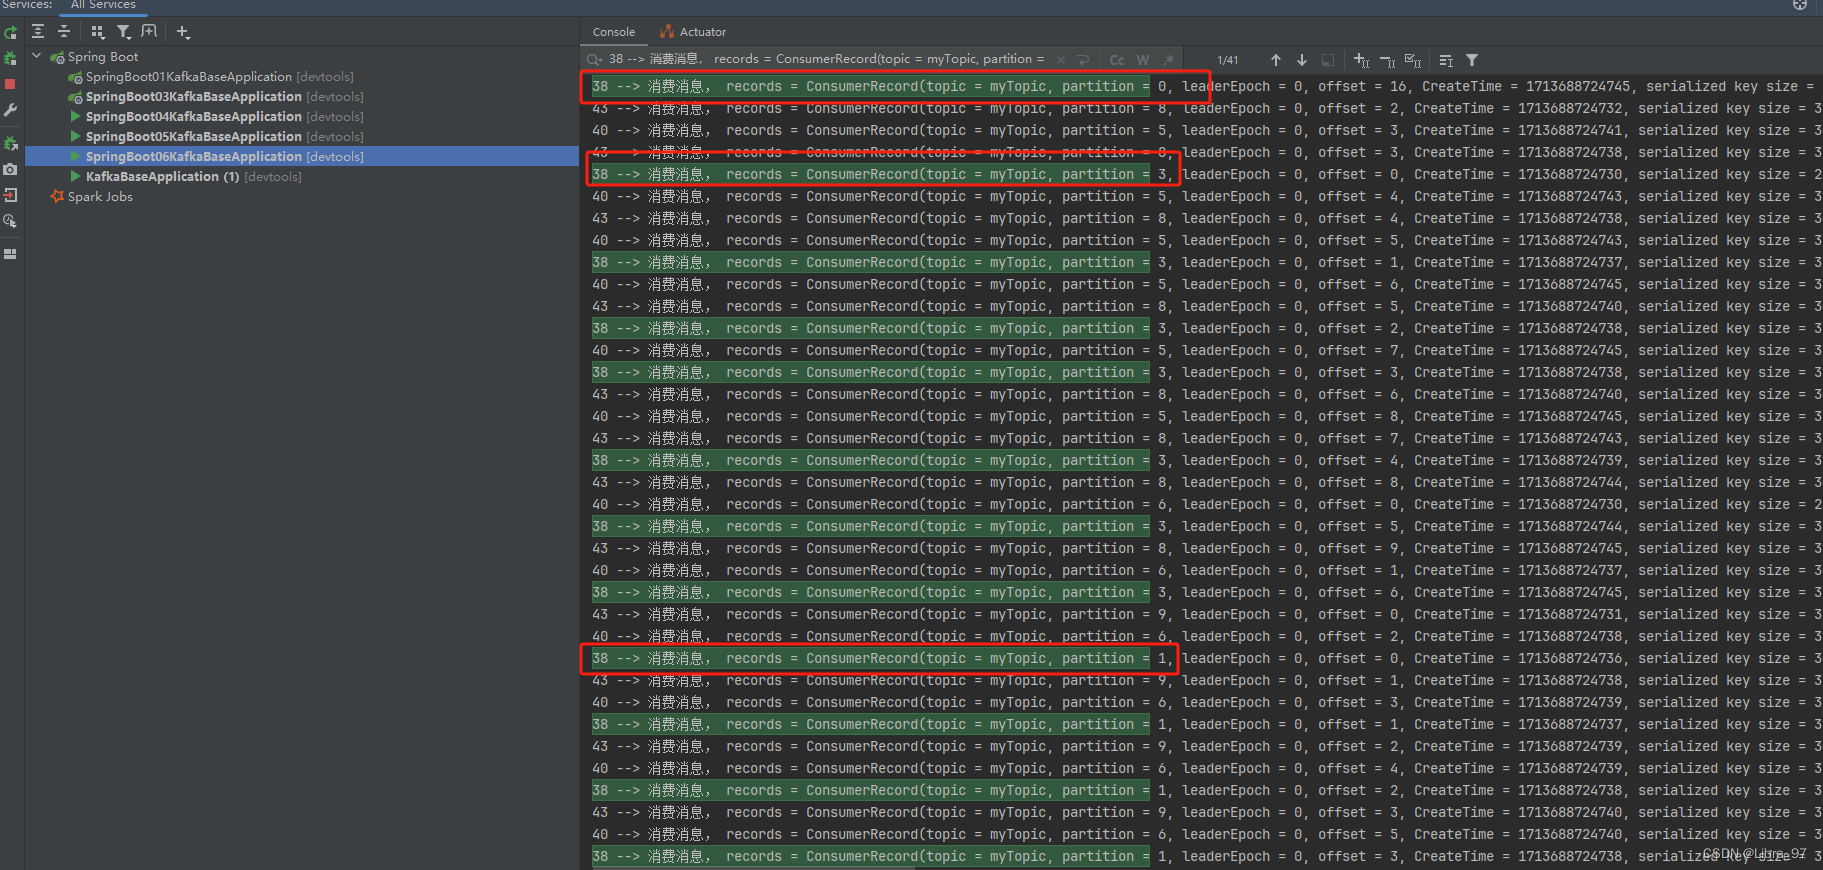
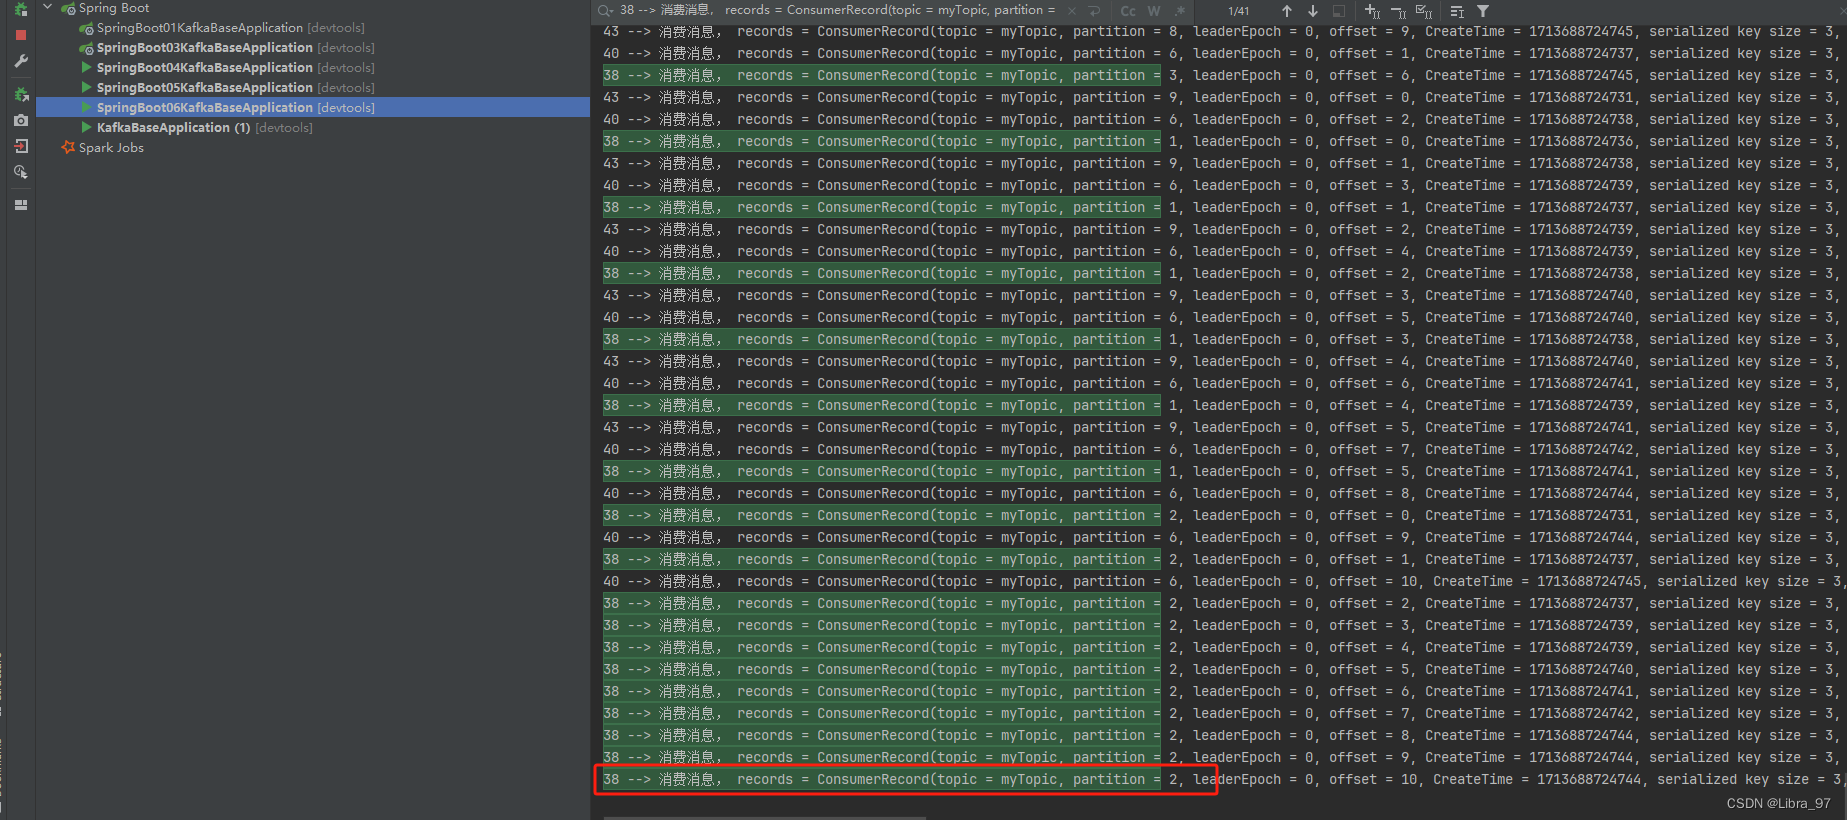
线程id38确实是消费了0、1、2、3号共4个分区。其他两个线程各消费3个分区
4.17.2 RoundRobinAssignor策略
配置文件中无法修改策略,所以需要在配置类中设置
配置类代码
package com.zzc.config;import org.apache.kafka.clients.admin.NewTopic;
import org.apache.kafka.clients.consumer.ConsumerConfig;
import org.apache.kafka.clients.consumer.RoundRobinAssignor;
import org.apache.kafka.clients.producer.RoundRobinPartitioner;
import org.springframework.beans.factory.annotation.Value;
import org.springframework.context.annotation.Bean;
import org.springframework.context.annotation.Configuration;
import org.springframework.kafka.config.ConcurrentKafkaListenerContainerFactory;
import org.springframework.kafka.config.KafkaListenerContainerFactory;
import org.springframework.kafka.core.ConsumerFactory;
import org.springframework.kafka.core.DefaultKafkaConsumerFactory;import java.util.HashMap;
import java.util.Map;@Configuration
public class KafkaConfig {@Value("${spring.kafka.bootstrap-servers}")private String bootstrapServers;@Value("${spring.kafka.consumer.value-deserializer}")private String valueDeSerializer;@Value("${spring.kafka.consumer.key-deserializer}")private String keyDeSerializer;@Value("${spring.kafka.consumer.auto-offset-reset}")private String autoOffsetReset;public Map<String, Object> consumerConfigs(){HashMap<String, Object> consumer = new HashMap<>();consumer.put(ConsumerConfig.BOOTSTRAP_SERVERS_CONFIG,bootstrapServers);consumer.put(ConsumerConfig.KEY_DESERIALIZER_CLASS_CONFIG,keyDeSerializer);consumer.put(ConsumerConfig.VALUE_DESERIALIZER_CLASS_CONFIG, valueDeSerializer);consumer.put(ConsumerConfig.AUTO_OFFSET_RESET_CONFIG, autoOffsetReset);// 设置消费者策略为轮询模式consumer.put(ConsumerConfig.PARTITION_ASSIGNMENT_STRATEGY_CONFIG, RoundRobinAssignor.class.getName());return consumer;}// 创建一个名为helloTopic的Topic并设置分区数为5,分区副本数为1@Beanpublic NewTopic newTopic(){return new NewTopic("myTopic", 10, (short) 1);}/*** 消费者创建工厂* @return*/@Beanpublic ConsumerFactory<String, String> ourConsumerFactory(){return new DefaultKafkaConsumerFactory<>(consumerConfigs());}/*** 监听器容器工厂* @param ourConsumerFactory* @return*/@Beanpublic KafkaListenerContainerFactory ourKafkaListenerContainerFactory(ConsumerFactory ourConsumerFactory){ConcurrentKafkaListenerContainerFactory<String, String> listenerContainerFactory = new ConcurrentKafkaListenerContainerFactory<>();listenerContainerFactory.setConsumerFactory(ourConsumerFactory);return listenerContainerFactory;}
}
消费者代码中设置为自定义监听器容器创建工厂
package com.zzc.cosumer;import org.apache.kafka.clients.consumer.ConsumerRecord;
import org.springframework.kafka.annotation.KafkaListener;
import org.springframework.stereotype.Component;import java.util.List;@Component
public class EventConsumer {// concurrency 设置消费者数量    containerFactory 设置监听器容器工厂@KafkaListener(topics = {"myTopic"}, groupId = "myGroup4", concurrency = "3", containerFactory = "ourKafkaListenerContainerFactory")public void onEvent(ConsumerRecord<String, String> records) {System.out.println(Thread.currentThread().getId() + " --> 消费消息, records = " + records);}
}
执行测试代码,发现线程id39消费的分区变成0、3、6、9号分区了
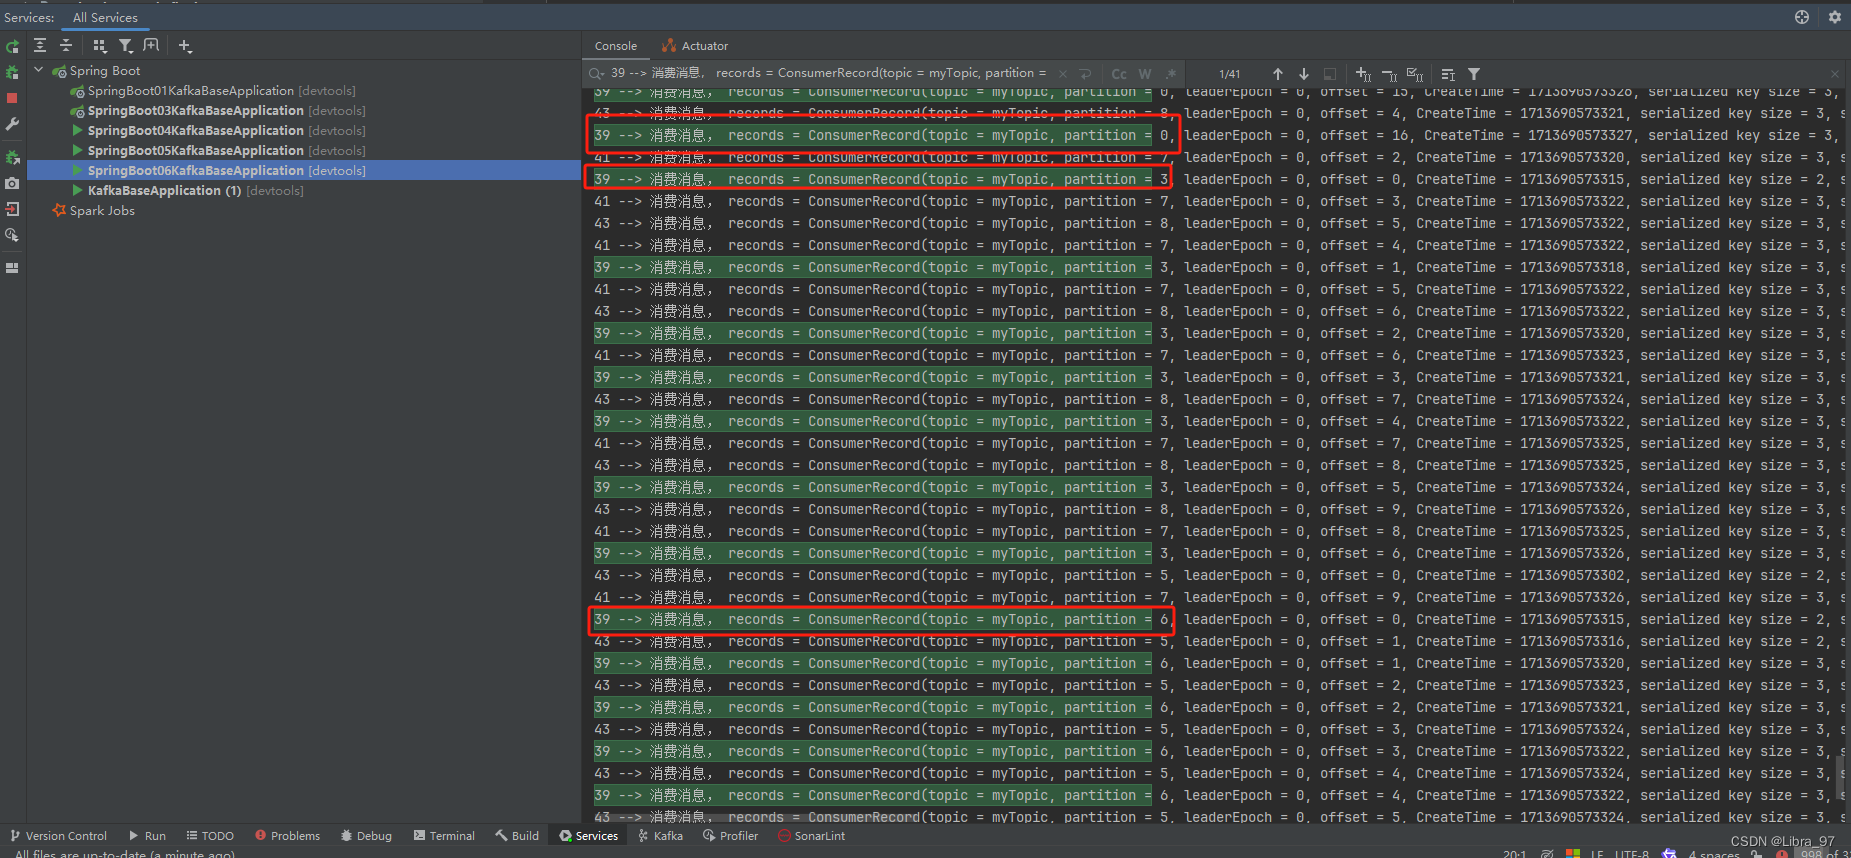
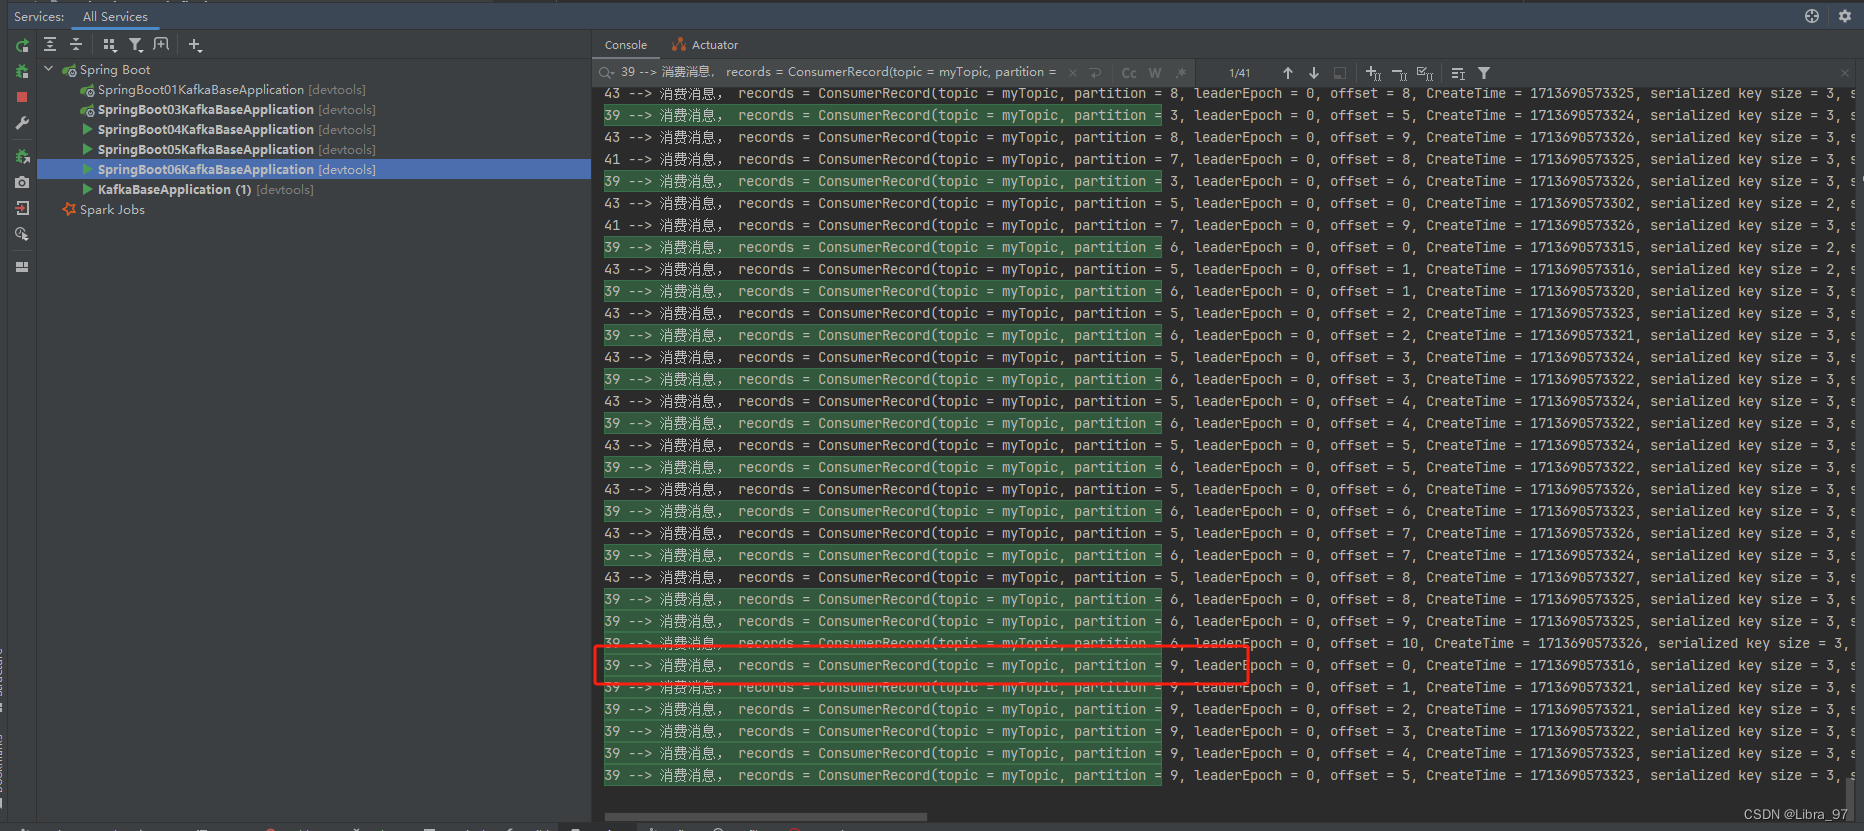
采用 RoundRobinAssignor 策略进行测试,得到的结果如下:
39 : 0 , 3 , 6 , 9
41 : 1 , 4 , 7
43 : 2 , 5 , 8
4.17.3 StickyAssignor 消费分区策略
- 尽可能保持消费者与分区之间的分配关系不变,即使消费组的消费者成员发生变化,减少不必要的分区重分配;
- 尽量保持现有的分区分配不变,仅对新加入的消费者或离开的消费者进行分区调整。这样,大多数消费者可以
继续消费它们之前消费的分区,只有少数消费者需要处理额外的分区;所以叫“粘性”分配;
4.17.4 CooperativeStickyAssignor 消费分区策略
- 与 StickyAssignor 类似,但增加了对协作式重新平衡的支持,即消费者可以在它离开消费者组之前通知协调
器,以便协调器可以预先计划分区迁移,而不是在消费者突然离开时立即进行分区重分配;
4.18 Kafka 事件 ( 消息、数据 ) 的存储
-
kafka的所有事件(消息、数据)都存储在/tmp/kafka-logs目录中,可通过log.dirs=/tmp/kafka-logs配置
-
Kafka的所有事件(消息、数据)都是以日志文件的方式来保存
-
Kafka一般都是海量的消息数据,为了避免日志文件过大,日志文件被存放在多个日志目录下,日志目录的命名规则为:<topic_name>-<partiton_id>
-
比如创建一个名为 firstTopic 的 topic ,其中有 3 个 partition ,那么在 kafka 的数据目录( /tmp/kafka-
log )中就有 3 个目录, firstTopic-0 、 firstTopic-1 、 firstTopic-2 ;
进入myTopic-0中

查看日志信息

- 00000000000000000000.index 消息索引文件
- 00000000000000000000.log 消息数据文件
- 00000000000000000000.timeindex 消息的时间戳索引文件
- 00000000000000000006.snapshot 快照文件,生产者发生故障或重启时能够恢复并继续之前的操作
- leader-epoch-checkpoint 记录每个分区当前领导者的 epoch 以及领导者开始写入消息时的起始偏移量
- partition.metadata 存储关于特定分区的元数据( metadata )信息
每次消费一个消息并且提交以后,会保存当前消费到的最近的一个 offset ;
在 kafka 中,有一个 __consumer_offsets 的 topic , 消费者消费提交的 offset 信息会写入到
该 topic 中, __consumer_offsets 保存了每个 consumer group 某一时刻提交的 offset 信息
, __consumer_offsets 默认有 50 个分区;
consumer_group 保存在哪个分区中的计算公式:
Math.abs(“groupid”.hashCode())%groupMetadataTopicPartitionCount ;
4.19 Offset详解
4.19.1 生产者Offset
-
生产者发送一条消息到 Kafka 的 broker 的某个 topic 下某个 partition 中;
-
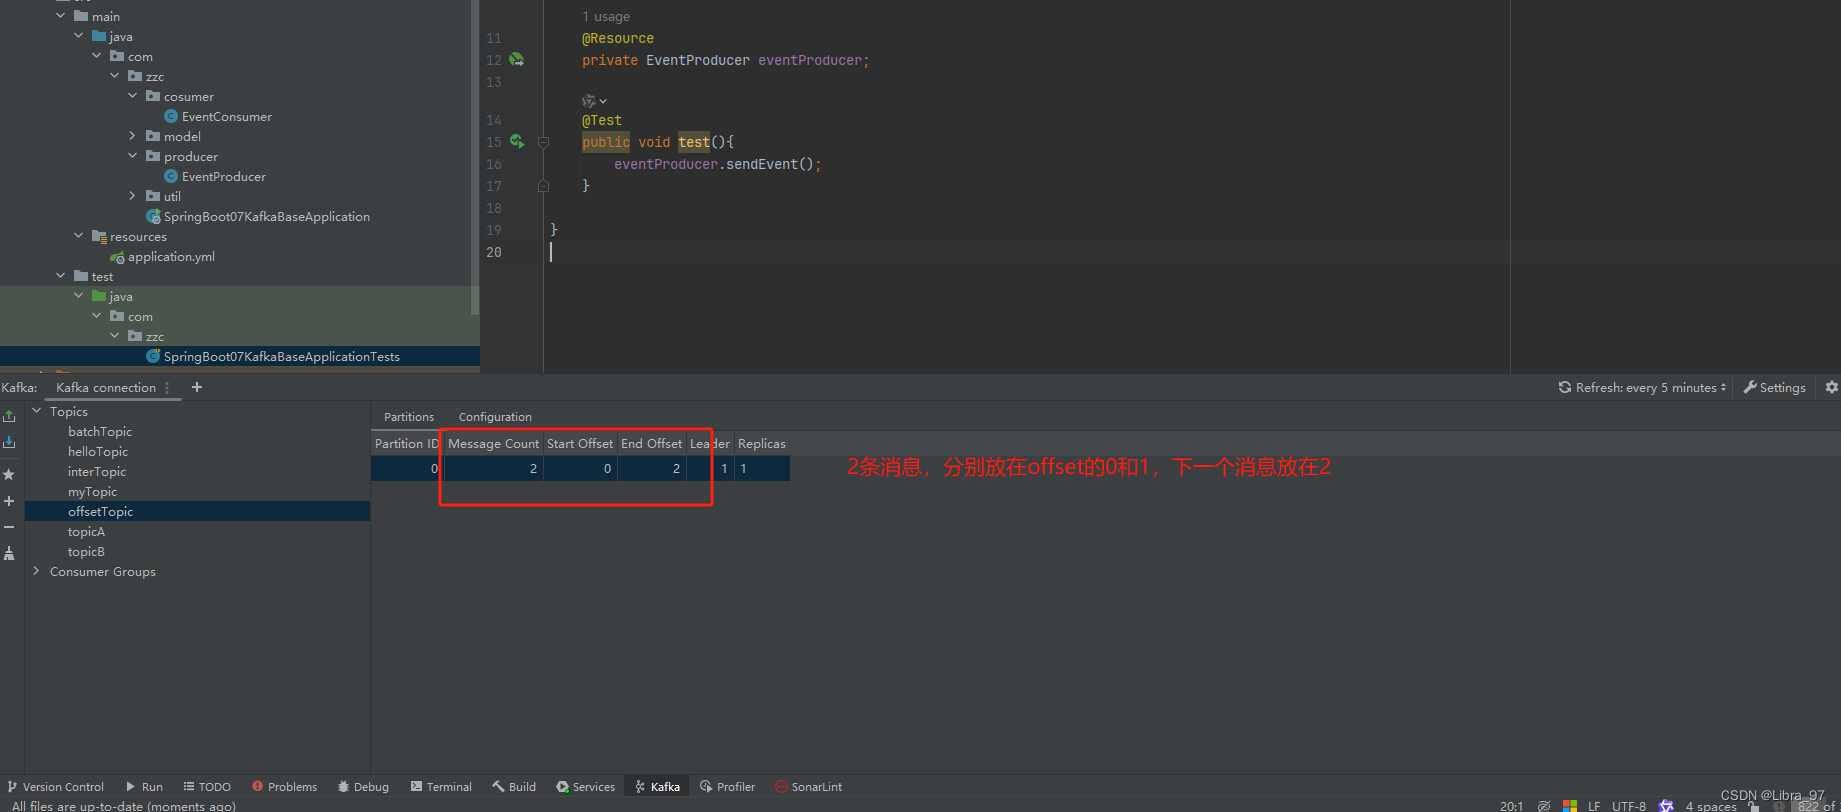
Kafka 内部会为每条消息分配一个唯一的 offset ,该 offset 就是该消息在 partition 中的位置


创建spring-boot-07-kafka-base模块
消费者代码
package com.zzc.cosumer;import org.apache.kafka.clients.consumer.ConsumerRecord;
import org.springframework.kafka.annotation.KafkaListener;
import org.springframework.stereotype.Component;@Component
public class EventConsumer {@KafkaListener(topics = {"offsetTopic"}, groupId = "offsetGroup")public void onEvent(ConsumerRecord<String, String> records) {System.out.println(Thread.currentThread().getId() + " --> 消费消息, records = " + records);}
}
生产者代码
package com.zzc.producer;import com.zzc.model.User;
import com.zzc.util.JSONUtils;
import jakarta.annotation.Resource;
import org.springframework.kafka.core.KafkaTemplate;
import org.springframework.stereotype.Component;import java.util.Date;@Component
public class EventProducer {@Resourceprivate KafkaTemplate<String, String> kafkaTemplate;public void sendEvent() {for (int i = 0; i < 2; i++) {User user = User.builder().id(i).phone("13239407234" + i).birthDay(new Date()).build();String userJson = JSONUtils.toJSON(user);kafkaTemplate.send("offsetTopic", "k" + i, userJson);}}}
配置文件
spring:application:name: spring-boot-07-kafka-basekafka:bootstrap-servers: 192.168.2.118:9092consumer:key-deserializer: org.apache.kafka.common.serialization.StringDeserializervalue-deserializer: org.apache.kafka.common.serialization.StringDeserializer
测试代码
package com.zzc;import com.zzc.producer.EventProducer;
import jakarta.annotation.Resource;
import org.junit.jupiter.api.Test;
import org.springframework.boot.test.context.SpringBootTest;@SpringBootTest
class SpringBoot07KafkaBaseApplicationTests {@Resourceprivate EventProducer eventProducer;@Testpublic void test(){eventProducer.sendEvent();}}
执行测试代码
4.19.2 消费者Offset
- 每个消费者组启动开始监听消息,默认从消息的最新的位置开始监听消息,即把最新的位置作为消费者
offset ;- 分区中还没有发送消息,则最新的位置就是0
- 分区中已经发送过消息,则最新的位置就是生产者offset的下一个位置
- 消费者消费消息后,如果不提交确认( ack ),则 offset 不更新,提交了才更新;
- 命令行命令: ./kafka-consumer-groups.sh --bootstrap-server 127.0.0.1:9092 --group 消费者组名 --describe
4.19.2.1 验证分区中已经发送过消息的情况
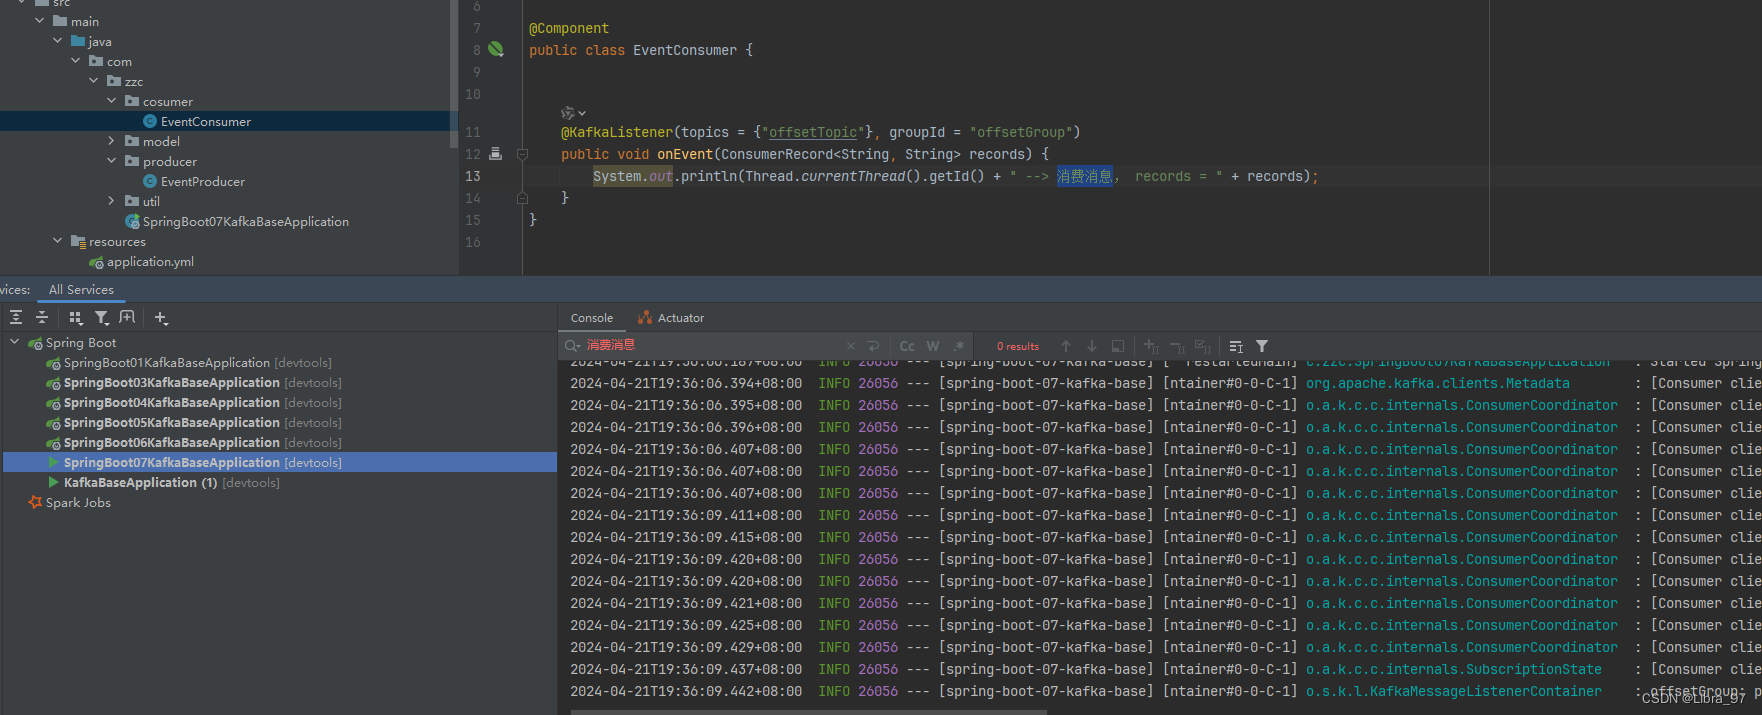
启动服务,监听器并没有消费到消息
使用命令看一下offsetGroup的offset是在哪

我们再发两条消息试试,先把服务停了,执行测试代码发送消息
再次执行命令 查看offsetGroup的offset是在哪

我们现在启动服务,能够消费到消息了
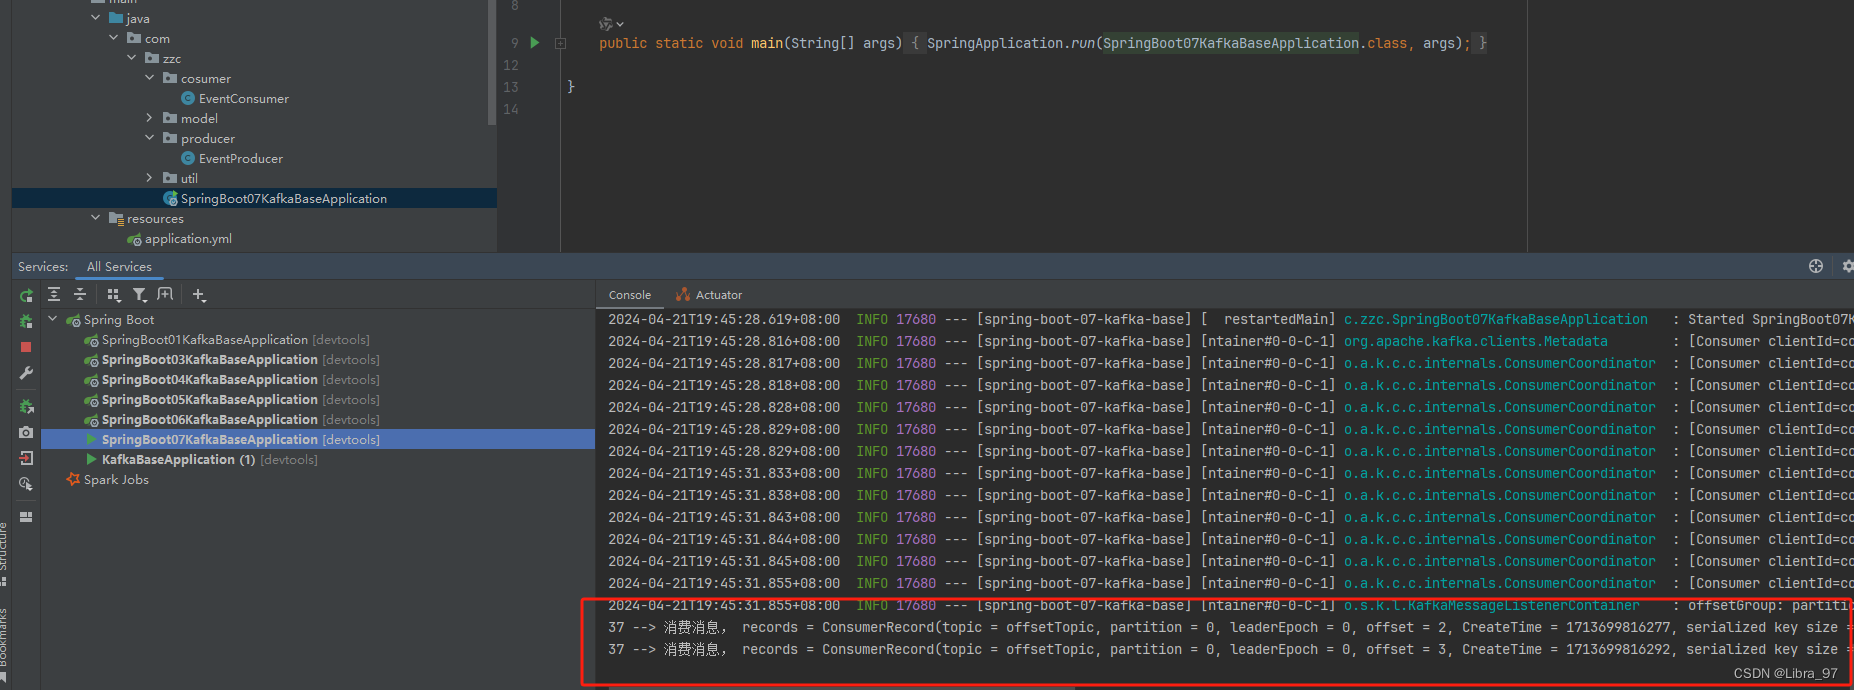
消费完消息,再次执行命令,发现current-offset已经变成4了,也没有消息可读了

4.19.2.2 验证分区中还没有发过消息的情况
我们把offsetTopic删除,然后重启服务,再执行命令
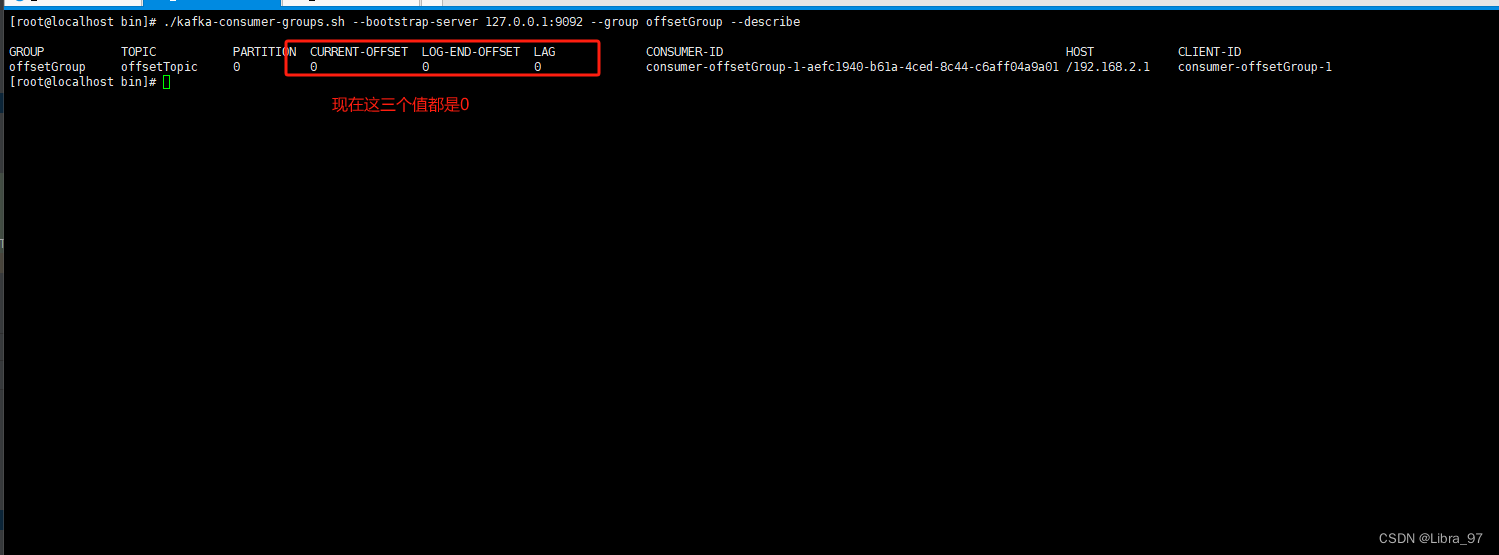
然后停止服务,执行测试代码 发送消息,在执行命令
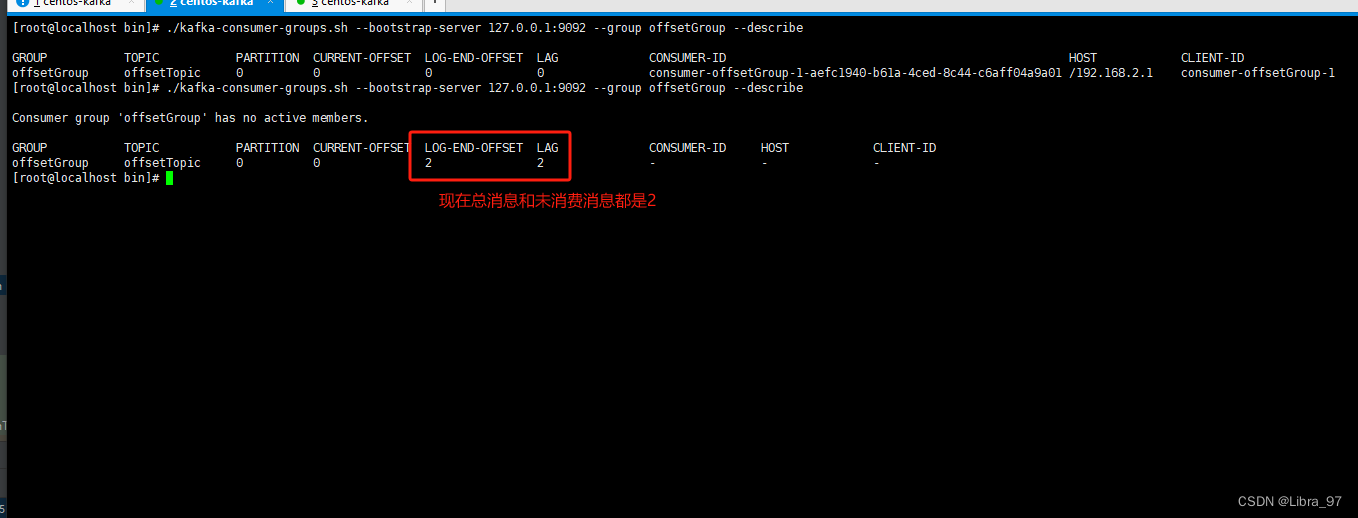
我们再启动服务,就能够消费这2个消息

4.19.3 offset总结
消费者从什么位置开始消费,就看消费者的 offset 是多少,消费者 offset 是多少,它启动后,可以通过上面
的命令查看;
