1.环境准备
总体架构介绍
| 序号 | 类型 | 名称 | 外网地址 | 内网地址 | 软件 |
| 02 | 负载均衡服务器 | lb01 | 10.0.0.5 | 192.168.88.5 | nginx keepalived |
| 03 | 负载均衡服务器 | lb02 | 10.0.0.6 | 192.168.88.6 | nginx keepalived |
| 04 | web服务器 | web01 | 10.0.0.7 | 192.168.88.7 | nginx |
| 05 | web服务器 | web02 | 10.0.0.8 | 192.168.88.8 | nginx |
| 06 | web服务器 | web03 | 10.0.0.9 | 192.168.88.9 | nginx |
| 07 | 数据库服务器 | db01 | 10.0.0.51 | 192.168.88.51 | mariadb mysql |
| 08 | 存储服务器 | nfs01 | 10.0.0.31 | 192.168.88.31 | nfs-utils rpcbind |
| 09 | 备份服务器 | backup | 10.0.0.41 | 192.168.88.41 | rsync |
| 10 | 批量管理服务器 | m01 | 10.0.0.61 | 192.168.88.61 | ansible |
| 11 | 跳板机服务器 | jumpserver | 10.0.0.71 | 192.168.88.71 | jumpserver |
| 12 | 监控服务器 | zabbix | 10.0.0.72 | 192.168.88.72 | zabbix |
| 13 | 缓存服务器 | redis |
2.ansible搭建
cat >01_ins_ansible.sh<<EOF
#!/bin/bash
cat >/etc/yum.repos.d/ansible.repo<<EOM
[ansible]
name=ansible
baseurl=https://mirror.tuna.tsinghua.edu.cn/epel/7/x86_64/
gpgcheck=0
enabled=1
EOM
yum clean all
yum repoinfo
yum -y install ansible
EOF
vim 02_config_ansible.sh
#!/bin/bash
ls /ansible
[ $? -eq 0 ] ||  mkdir /ansible
cat >/ansible/ansible.cfg<<EOF
[defaults]
host_key_checking = false
inventory = inventory
EOF
cat >/ansible/inventory<<EOF
[web]
192.168.88.7
192.168.88.8
192.168.88.9[lb01]
192.168.88.5[lb02]
192.168.88.6[db]
192.168.88.51[backup]
192.168.88.41[data]
192.168.88.31
[all:vars]
ansible_ssh_user=root     #所有机器用户名都是root,密码是123
ansible_ssh_pass=123
EOF
1.测试ansible可以正常访问
ansible all -m ping
3.web服务(LNMP架构wordpress)
(一)安装linux操作系统(略)
(二)整体文件系统说明
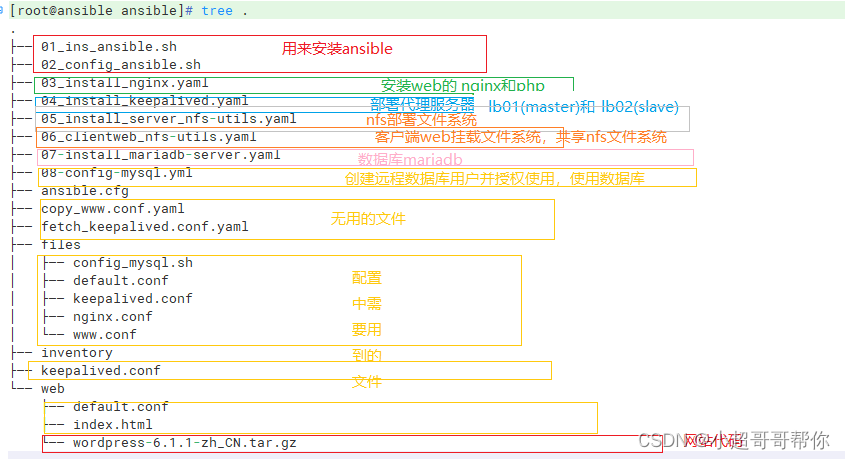
1设置tab键
每次缩进2个空格,方便编写yaml文件,直接拷贝执行即可
cat >.vimrc<<EOF
autocmd FileType yaml setlocal ai ts=2 sw=2 et
EOF
2.一键安装web服务器nginx,php,部署3台web
cd /ansible
cat >03_install_nginx.yaml<<EOF
---
- name: install nginxhosts: webtasks:- name: touchcopy:content: |[nginx]name=nginx repobaseurl=http://nginx.org/packages/centos/7/$basearch/gpgcheck=0enabled=1dest: /etc/yum.repos.d/nginx.repo- name: shellshell:cmd:yum makecache- name: install nginxshell:cmd: |yum -y install nginxyum remove -y epel-release.noarchyum install -y epel-releaseyum install -y https://mirrors.tuna.tsinghua.edu.cn/remi/enterprise/remi-release-7.rpmyum --enablerepo=remi-php74 install -y php php-cli php-common php-devel php-embedded php-gd php-mbstring php-pdo php-xml php-fpm php-mysqlnd php-opcache php-mcrypt php-pecl-memcached php-pecl-mongodb php-pecl-redis- name: copy web/default.confcopy:src: web/default.confdest: /etc/nginx/conf.d/- name: copy www.confcopy:src: files/www.confdest: /etc/php-fpm.d/www.conf- name: start  nginx serviceservice:name: "{{item}}"state: restartedenabled: yesloop: [nginx,php-fpm]
EOF
ansible-playbook 03_install_nginx.yaml 执行
3.一键安装代理服务器nginx,keepalived,部署2台lb01和lb02
cat >04_install_keepalived.yaml<<EOF
---
- name: install nginxhosts: lb01,lb02tasks:- name: touchcopy:content: |[nginx]name=nginx repobaseurl=http://nginx.org/packages/centos/7/$basearch/gpgcheck=0enabled=1dest: /etc/yum.repos.d/nginx.repo- name: shellshell: yum makecache- name: install nginxyum:name: nginx,keepalivedstate: present- name: copy nginx.confcopy:src: files/nginx.confdest: /etc/nginx/- name: copy default.confcopy:src: files/default.confdest: /etc/nginx/conf.d/
- name: config keepalived.confhosts: lb01tasks:- name:  copy lb01  keepalived.confcopy:src: files/keepalived.conf  #master配置文件dest: /etc/keepalived/
- name: lb02hosts: lb02tasks:- name:  copy lb02 keepalived.confcopy:src: ./keepalived.conf #slave配置文件dest: /etc/keepalived/
- name: start servicehosts: lb01,lb02tasks:- name: start  nginx keepalived serviceservice:name: "{{item}}"state: restartedenabled: yesloop: [nginx,keepalived]
EOF
4.nfs服务端文件系统部署
cat >05_install_server_nfs-utils.yaml<<EOF
---
- name: install nfs01hosts: datatasks:- name: install nfs-utilsyum:name: nfs-utils,rpcbindstate: present- name: copy /etc/exportscopy:content: |/data 192.168.88.0/24(rw,sync)dest: /etc/exports- name: mkdir /datafile:path: /datastate: directoryowner: nfsnobodygroup: nfsnobody- name: htmlcopy:src: web/wordpress-6.1.1-zh_CN.tar.gzdest: /data- name: tar -xf wordpress-6.1.1-zh_CN.tar.gzshell: cmd: |tar -xf   /data/wordpress-6.1.1-zh_CN.tar.gz -C /datachmod -R 777 /data- name: start rpcbind,nfsservice:name: "{{item}}"state: restartedenabled: yesloop: [rpcbind,nfs]EOF
5.nfs客户端web文件系统部署
cat >06_clientweb_nfs-utils.yaml<<EOF
---
- name: install nfs-utilshosts: webtasks:- name: install nfs-utilsyum:name: nfs-utilsstate: present- name: copy /etc/copy:content: |mount -t nfs 192.168.88.31:/data /mntdest: /etc/rc.d/nfs.local- name:  chmod a+x  /etc/rc.d/nfs.localshell:cmd: |chmod a+x  /etc/rc.d/nfs.localmount -t nfs 192.168.88.31:/data /mnt
EOF
6.mariadb数据库部署
cat >07-install_mariadb-server.yaml<<EOF
---
- name: install nfs-utilshosts: dbtasks:- name: install nfs-utilsyum:name: mariadb-server,mariadbstate: present- name: start mariadbservice:name: mariadbstate: restartedenabled: yes- name: 修改passwdshell:cmd: |mysqladmin -u root password '123456'
EOF
7.创建收钱数据库和用户
cat >08-config-mysql.yml<<EOF
---
- name: config mysqlhosts: dbtasks:- name: create databasescript: files/config_mysql.sh
EOF
7.files目录下文件
1.files/config_mysql.sh
cat files/config_mysql.sh<<EOF
mysql -u root -p123456 -e "create database wordpress character set utf8mb4"
mysql -u root -p123456 -e "create user wordpress@'%' identified by 'wordpress'"
mysql -u root -p123456 -e "grant all privileges on wordpress.* to wordpress@'%'"
EOF
2.files/default.conf
cat >default.conf<<EOF
server {listen       80;server_name  localhost;#access_log  /var/log/nginx/host.access.log  main;location / {proxy_pass http://webserver; #路由转发root   /usr/share/nginx/html;index  index.html index.htm;}#error_page  404              /404.html;# redirect server error pages to the static page /50x.html#error_page   500 502 503 504  /50x.html;location = /50x.html {root   /usr/share/nginx/html;}# proxy the PHP scripts to Apache listening on 127.0.0.1:80##location ~ \.php$ {#    proxy_pass   http://127.0.0.1;#}# pass the PHP scripts to FastCGI server listening on 127.0.0.1:9000##location ~ \.php$ {#    root           html;#    fastcgi_pass   127.0.0.1:9000;#    fastcgi_index  index.php;#    fastcgi_param  SCRIPT_FILENAME  /scripts$fastcgi_script_name;#    include        fastcgi_params;#}# deny access to .htaccess files, if Apache's document root# concurs with nginx's one##location ~ /\.ht {#    deny  all;#}
}
EOF
3.files/keepalived.conf
cat >keepalived.conf<<EOF
! Configuration File for keepalivedglobal_defs {notification_email {acassen@firewall.locfailover@firewall.locsysadmin@firewall.loc}notification_email_from Alexandre.Cassen@firewall.locsmtp_server 192.168.200.1smtp_connect_timeout 30router_id lb01vrrp_iptablesvrrp_skip_check_adv_addrvrrp_strictvrrp_garp_interval 0vrrp_gna_interval 0
}
vrrp_script chk_http_port {  # 定义监视脚本script "/etc/keepalived/check_lvs.sh"  interval 2   # 脚本每隔2秒运行一次}
vrrp_instance VI_1 {state MASTERinterface ens33virtual_router_id 51priority 100advert_int 1authentication {auth_type PASSauth_pass 1111}virtual_ipaddress {192.168.88.80/24}
track_script {    # 引用脚本chk_http_port}
}
EOF
4.files/check_lvs.sh
cat >files/check_lvs.sh<<EOF  #检测keepalived主备切换
#!/bin/bash
ss -ntulp | grep :80 &> /dev/null && exit 0 || exit 1
EOF
chmod +x files/check_lvs.sh #记得加执行权限
5.files/www.conf
cat >files/www.conf<<EOF #源文件修改以下2行
...
user = nginxgroup = nginx
...
EOF
8.web目录下文件
1.web/default.conf
cat >web/default.conf<<EOF
server {listen       80;server_name  localhost;#access_log  /var/log/nginx/host.access.log  main;location / {root   /mnt/wordpress;index index.php index.html index.htm;}#error_page  404              /404.html;# redirect server error pages to the static page /50x.html#error_page   500 502 503 504  /50x.html;location = /50x.html {root   /mnt/wordpress;}# proxy the PHP scripts to Apache listening on 127.0.0.1:80##location ~ \.php$ {#    proxy_pass   http://127.0.0.1;#}# pass the PHP scripts to FastCGI server listening on 127.0.0.1:9000#location ~ \.php$ {root           /mnt/wordpress;fastcgi_pass   127.0.0.1:9000;fastcgi_index  index.php;#    fastcgi_param  SCRIPT_FILENAME  /scripts$fastcgi_script_name;fastcgi_param  SCRIPT_FILENAME  $document_root$fastcgi_script_name;include        fastcgi_params;}# deny access to .htaccess files, if Apache's document root# concurs with nginx's one##location ~ /\.ht {#    deny  all;#}
}
EOF
2.web/wordpress-6.1.1-zh_CN.tar.gz
下载网址
wordpress-6.1-zh_CN.zip - 坚果云 - 云盘|网盘|企业网盘|同步|备份|无限空间|免费网络硬盘|企业云盘 (jianguoyun.com)
9.注意事项
如果客户端是windows主机,则使用记事本程序打开C:\windows\System32\drivers\etc\hosts添加名称解析
当点击http://192.168.88.80页面中任意链接时,地址栏上的地址,都会变成192.168.88.7。通过以下方式修复它:
# 在nfs服务器上修改配置文件
[root@nfs01 ~]# vim /mnt/wordpress/wp-config.php
# define('DB_NAME', 'wordpress')它的上方添加以下两行:
define('WP_SITEURL', 'http://192.168.88.80');
define('WP_HOME', 'http://192.168.88.80');
3.backup备份
服务端:backup
客户端:web01 web02 web03
要求:
每天晚上 00 点整在 Web 服务器上打包备份系统配置文件、网站程序目录及访问日志并通过 rsync 命令推送备份服务器 backup 上备份保留(备份思路可以是先在本地按日期打包,然后再推到备份服务器 backup 上) ,NFS 存储服务器同 Web 服务器,实际工作 中就是全部的服务器。
具体要求如下:
1)所有服务器的备份目录必须都为/backup。
2)要备份的系统配置文件包括但不限于:
a.定时任务服务的配置文件(/var/spool/cron/root)
b.开机自启动的配置文件(/etc/rc.local)
c.日常脚本的目录 (/server/scripts)。
d.防火墙 iptables 的配置文件(/etc/sysconfig/iptables)。
e.自己思考下还有什么需要备份呢?
3)Web 服务器站点目录(/var/html/www)。
4)Web 服务器 A 访问日志路径(/app/logs)
5)Web 服务器保留打包后的 7 天的备份数据即可(本地留存不能多于 7 天,因为太多硬盘会 满)
6)备份服务器上,保留每周一的所有数据副本,其它要保留 6 个月的数据副本。
7)备份服务器上要按照备份数据服务器的内网 IP 为目录保存备份,备份的文件按照时间名 字保存。
8)*需要确保备份的数据尽量完整正确,在备份服务器上对备份的数据进行检查,把备份的成功及失败结 果信息发给系统管理员邮箱中。
cat >09_backup_all_config.yaml<<EOF
---
- name: 客户端和服务端安装rsynchosts: web,backuptasks:- name: 安装rsync同步软件yum:name: rsyncstate: latest- name: 创建备份目录file:path: /server/scriptsstate: directory
- name: 配置backup服务端hosts: backupvars:rsync_password: "rsync_backup:123456"backup_dir: "/backup"tasks:- name: 配置/etc/rsyncd.confcopy:dest: /etc/rsyncd.confcontent: |uid = rsyncgid = rsyncport = 873fake super = yesuse chroot = nomax connections =200timeout = 300pid file = /var/run/rsyncd.pidlock file = /var/run/rsync.locklog file = /var/log/rsyncd.logignore errorsread only = falselist = falsehosts allow = 192.168.88.0/24hosts deny = 0.0.0.0/32auth users = rsync_backupsecrets file = /etc/rsync.password[backup]comment = "backup dir by abin"path = /backup- name: Add rsync useruser:name: rsynccreate_home: noshell: /sbin/nologinsystem: yes- name: Create rsync password fileshell: echo "{{ rsync_password }}" > /etc/rsync.password && chmod 600 /etc/rsync.password- name: Create backup directoryfile:path: "{{ backup_dir }}"state: directoryowner: rsyncgroup: rsync- name: Start and enable rsync serviceservice:name: rsyncdstate: restartedenabled: yes- name: 清理过期文件脚本copy:dest: /server/scripts/backup_server.shcontent: |#!/bin/bash# del 180 day ago datafind /backup/ -type f -mtime +180 ! -name "*week1.tar.gz"|xargs rm 2>/dev/null# check backup datafind /backup/ -type f -name "finger.txt"|xargs md5sum -c >/tmp/check.txt#send check mailmail -s "check backup info for $(date +%F)" 1781668237@qq.com </tmp/check.txt- name: Add cron job for backup_server scriptcron:user: "root"minute: "0"hour: "0"job: "/bin/sh /server/scripts/backup_server.sh"state: present
- name: 配置web客户端hosts: webvars:password: "123456"tasks:- name: Create rsync password fileshell: echo "{{ password }}" > /etc/rsync.password && chmod 600 /etc/rsync.password- name: 备份脚本copy:dest: /server/scripts/backup.shcontent: |#!/bin/bashBackup_dir="/backup"IP_info=`ifconfig | head -2 | tail -1 | awk '{print $2}'`# create backup dirmkdir -p $Backup_dir/$IP_info# tar backup datacd /tar zchf /$Backup_dir/$IP_info/system_backup_$(date +%F_week%w -d -0day).tar.gz  /etc/rc.local /etc/nginx/nginx.conf /etc/nginx/conf.d/default.conf  /server/scripts /var/spool/cron/root tar zchf /$Backup_dir/$IP_info/www_backup_$(date +%F_week%w).tar.gz  ./var/html/wwwtar zchf /$Backup_dir/$IP_info/www_log_backup_$(date +%F_week%w).tar.gz  ./app/logs# del 7 day ago datafind $Backup_dir -type f -mtime +7|xargs rm 2>/dev/null# create finger filefind $Backup_dir/ -type f -mtime -1 ! -name "finger*"|xargs md5sum >/$Backup_dir/$IP_info/finger.txt# backup push data inforsync -az $Backup_dir/ rsync_backup@192.168.88.41::backup --password-file=/etc/rsync.password- name: Add cron job for backup scriptcron:user: "root"minute: "0"hour: "0"job: "/bin/sh /server/scripts/backup.sh"state: present
EOF