1、条件装配
在上一篇中,我们介绍了Spring,Spring MVC常见类的自动装配,在源码中可见许多以@Conditional...开头的注解:

@Conditional 注解是Spring 框架提供的一种条件化装配的机制,它可以根据特定的条件来控制 Bean 的创建是否生效。
下面是一些常见的使用场景:
-
根据环境变量选择性地加载 Bean:你可以根据应用程序运行的环境,比如开发环境、测试环境或者生产环境,来决定是否加载某个 Bean。例如,你可以通过@Conditional注解根据不同的环境变量来选择性地加载数据库配置。
-
根据系统属性选择性地加载 Bean:类似于环境变量,你也可以根据系统的某些属性来选择性地加载 Bean。这种情况下,你可以编写自定义的条件判断逻辑来决定是否满足条件。
-
根据类路径下是否存在特定的类来加载 Bean:有时你可能希望在类路径下存在某些特定的类时才加载某个 Bean。通过@Conditional注解,你可以指定类路径下是否存在某个特定的类来决定 Bean 的加载。
-
自定义条件判断逻辑:除了上述常见的条件判断方式外,你还可以编写自定义的条件判断逻辑来决定是否加载 Bean。这样你可以根据应用程序的具体需求来定制条件。
下面我们通过一个案例演示下上面的第三条使用场景:
我们初始有五个类,分别是Bean1和Bean2,以及注册Bean1的配置类MyConfig1,注册Bean2的配置类MyConfig2,以及本项目的配置类Config。其中在本项目的配置类中,通过@Import(MyImportSelector.class) 去在MyImportSelector类中自动装配MyConfig1,MyConfig2。该过程此前已经多次演示,这里就不重复贴代码了。
我们想要的效果是,在MyConfig1中注册Bean1时,需要类路径下包含"com.alibaba.druid.pool.DruidAbstractDataSource",注册Bean2时则不需要包含DruidAbstractDataSource:
自定义一个组合注解@ConditionalOnClass ,在组合注解中,又包含了@Conditional(MyConditional1.class) 注解。
@Target({ElementType.METHOD,ElementType.TYPE})
@Retention(RetentionPolicy.RUNTIME)
@Conditional(MyConditional1.class)
public @interface ConditionalOnClass {/*** 判断是否存在* @return*/boolean exist();/*** 要判断的类名* @return*/String value();
}
MyConditional1是真正的条件装配类,用于编写选择的逻辑,需要实现Condition接口:
/*** 自定义条件装配类,实现Condition接口,配合@Conditional()注解使用,编写条件装配逻辑*/
public class MyConditional1 implements Condition {@Overridepublic boolean matches(ConditionContext context, AnnotatedTypeMetadata metadata) {//得到@ConditionalOnClass 注解上的信息Map<String, Object> attributes = metadata.getAnnotationAttributes(ConditionalOnClass.class.getName());boolean exist = (boolean) attributes.get("exist");String value = attributes.get("value").toString();boolean present = ClassUtils.isPresent(value, null);return exist == present;
//        return ClassUtils.isPresent("com.alibaba.druid.pool.DruidAbstractDataSource",null);}
}
然后我们在MyConfig1和MyConfig2上加入组合注解:
@Configuration
@ConditionalOnClass(exist = true,value = "com.alibaba.druid.pool.DruidAbstractDataSource")
public class MyConfig1 {@Beanpublic Bean1 bean1(){return new Bean1();}
}
@Configuration
@ConditionalOnClass(exist = false,value = "com.alibaba.druid.pool.DruidAbstractDataSource")
public class MyConfig2 {@Beanpublic Bean2 bean2(){return new Bean2();}
}
在主类中获取BeanDefinitionNames,最终能获取到Bean1,因为当前类路径下存在DruidAbstractDataSource,MyConfig1的@ConditionalOnClass 注解条件成立。

2、FactoryBean
FactoryBean 是 Spring 框架中的一个接口,用于创建复杂对象或者需要特殊处理的对象实例。它允许开发人员自定义对象的创建过程,灵活地控制对象的创建逻辑、生命周期和其他行为。
其中有三个重要方法:
- getObject():用于自定义创建对象实例的逻辑,并且返回由工厂创建的对象实例。
- getObjectType():这个方法用于返回由工厂创建的对象的类型。Spring 需要根据类型来判断如何注入或者使用这个对象(非根据名称)
- isSingleton(): 用于控制返回的对象是否为单例。
其中getObjectType() 方法,如果返回为null,那么从容器中根据类型获取Bean对象就会报错。
使用示例:
@Component("bean1")
public class Bean1FactoryBean implements FactoryBean<Bean1> {private static final Logger log = LoggerFactory.getLogger(Bean1FactoryBean.class);// 决定了根据【类型】获取或依赖注入能否成功//context.getBean(Bean1.class) 根据类型获取 如果此方法返回null则会报错@Overridepublic Class<?> getObjectType() {return Bean1.class;}// 决定了 getObject() 方法被调用一次还是多次(单例还是多例)@Overridepublic boolean isSingleton() {return true;}/*** 得到bean1对象* @return* @throws Exception*/@Overridepublic Bean1 getObject() throws Exception {Bean1 bean1 = new Bean1();log.debug("create bean: {}", bean1);return bean1;}
}
FactoryBean和此前多次提到的BeanFactory有什么区别?
- FactoryBean 是用于创建特定类型对象的工厂接口,负责对象的实例化和定制化,通常被用来创建一些比较复杂或者需要特殊处理的对象
- BeanFactory 是Spring IoC 容器的基础接口,负责管理和控制所有 Bean 对象的创建、装配和管理。
被 FactoryBean 创建的对象会有以下的特点:
- Bean的创建、依赖注入、Aware 接口回调、前初始化流程都不会走
- 后初始化的流程会走,创建的Bean可以被代理增强
- 单例的产品不会存储于 BeanFactory 的 singletonObjects 成员中, 而是另一个 factoryBeanObjectCache 成员中
我们有一个Bean1,在上方的FactoryBean 使用案例中被创建:
public class Bean1 implements BeanFactoryAware {private static final Logger log = LoggerFactory.getLogger(Bean1.class);private Bean2 bean2;/*** 依赖注入bean2* @param bean2*/@Autowiredpublic void setBean2(Bean2 bean2) {log.debug("setBean2({})", bean2);this.bean2 = bean2;}public Bean2 getBean2() {return bean2;}/*** 初始化bean1*/@PostConstructpublic void init() {log.debug("init");}/*** 设置bean工厂* @param beanFactory* @throws BeansException*/@Overridepublic void setBeanFactory(BeanFactory beanFactory) throws BeansException {log.debug("setBeanFactory({})", beanFactory);}
}
并且加入一个处理器:
@Component
public class Bean1PostProcessor implements BeanPostProcessor {private static final Logger log = LoggerFactory.getLogger(Bean1PostProcessor.class);@Overridepublic Object postProcessBeforeInitialization(Object bean, String beanName) throws BeansException {if (beanName.equals("bean1") && bean instanceof Bean1) {log.info("before [{}] init", beanName);}return bean;}@Overridepublic Object postProcessAfterInitialization(Object bean, String beanName) throws BeansException {if (beanName.equals("bean1") && bean instanceof Bean1) {log.info("after [{}] init", beanName);}return bean;}
}
我们从容器中获取Bean1,发现Bean的创建、依赖注入、Aware 接口回调、前初始化流程对应的信息都没有被打印,但是后处理流程被执行:
2024-05-08 19:53:17.326 [main] INFO  com.itbaima.a43.Bean1PostProcessor.postProcessAfterInitialization:25 - after [bean1] init
com.itbaima.a43.Bean1@59d4cd39
如果我们要获取FactoryBean 的Bean实例,虽然在FactoryBean 上通过@Component("bean1") 注解将FactoryBean 的ID设置成了bean1,但是如果通过
context.getBean("bean1")获取到的并非是FactoryBean 的Bean实例,而是Bean1实例。原因在于当 Spring 容器需要获取 Bean1类型的 Bean 时,它会调用 Bean1FactoryBean的 getObject()方法,从而得到 Bean1实例。
如果需要通过名称获取FactoryBean 的实例,需要:
context.getBean("&bean1")3、@Indexed
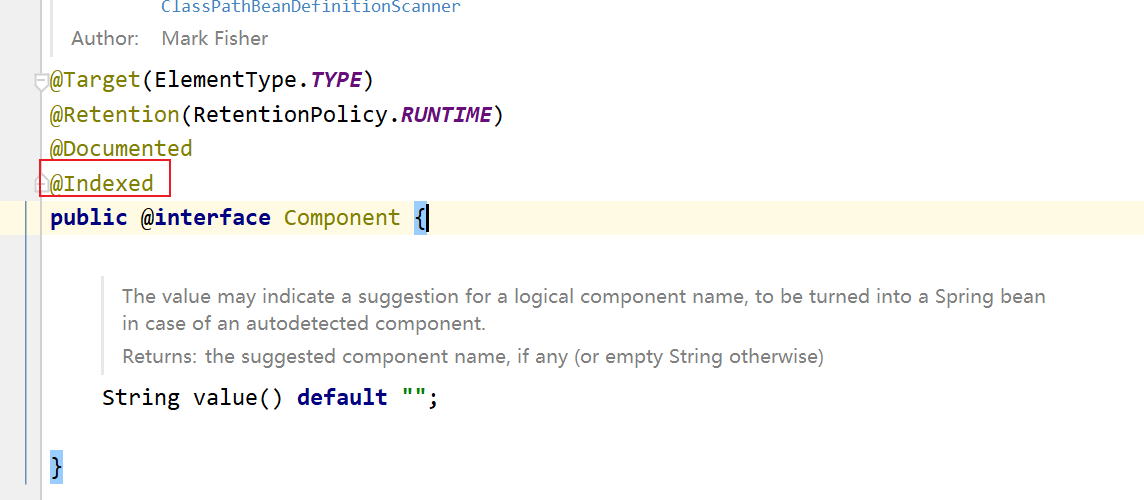
假设我们现在有一个包a44,包下有三个加上了@Component注解的类,通常会这样进行组件扫描:
DefaultListableBeanFactory beanFactory = new DefaultListableBeanFactory();
// 组件扫描的核心类
ClassPathBeanDefinitionScanner scanner = new ClassPathBeanDefinitionScanner(beanFactory);
scanner.scan(A44.class.getPackage().getName());
Spring会将指定路径下所有加上了相关注解的类加入DefaultListableBeanFactory中统一管理。但是在Spring 5及以后的版本,对上面的操作进行了优化:
首先会去编译后项目的target-classes-META-INF文件夹下找到一个spring.components的文件,并以其中的内容为准加载 bean definition,否则再去遍历包下所有 class 资源。
其底层就在于,在编译时根据 @Indexed 生成spring.components文件,而我们常见的Spring相关注解@Component 其中就包含了@Indexed :
要实现@Indexed 优化,还需要在项目中导入jar包:
<dependency><groupId>org.springframework</groupId><artifactId>spring-context-indexer</artifactId><optional>true</optional></dependency>4、Spring代理的特点
我们写了一个Aop类,需要对Bean1中的所有方法进行增强:
@Aspect
@Component
public class MyAspect {// 对所有方法增强@Before("execution(* com.itbaima.a45.Bean1.*(..))")public void before() {System.out.println("before");}
}
Bean1:
@Component
public class Bean1 {private static final Logger log = LoggerFactory.getLogger(Bean1.class);protected Bean2 bean2;protected boolean initialized;@Autowiredpublic void setBean2(Bean2 bean2) {log.info("setBean2(Bean2 bean2)");this.bean2 = bean2;}@PostConstructpublic void info() {log.info("init");initialized = true;}public Bean2 getBean2() {log.info("getBean2()");return bean2;}public boolean isInitialized() {log.info("isInitialized()");return initialized;}}
在日志中,依赖注入和初始化的阶段都已执行,但是没有被增强,调用的是原始方法。
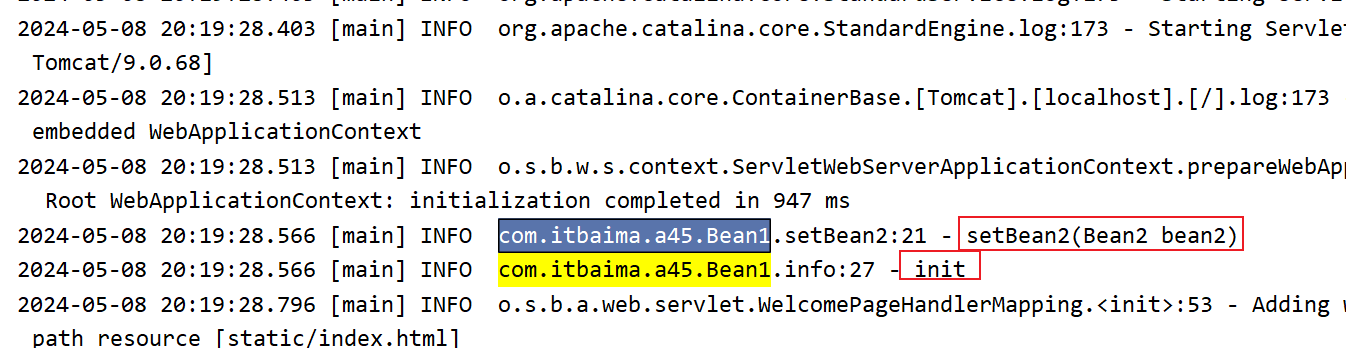
依赖注入和初始化阶段都完成,拿到Bean后,再次去调用setBean2()和init() 方法,会被增强,调用的是代理的方法。
即:依赖注入和初始化影响的是原有的方法
我们再写一个方法查看下代理中的成员变量和目标的成员变量的区别:
public static void showProxyAndTarget(Bean1 proxy) throws Exception {System.out.println(">>>>> 代理中的成员变量");System.out.println("\tinitialized=" + proxy.initialized);System.out.println("\tbean2=" + proxy.bean2);if (proxy instanceof Advised ) {Advised proxy1 = (Advised) proxy;System.out.println(">>>>> 目标中的成员变量");Bean1 target = (Bean1) proxy1.getTargetSource().getTarget();System.out.println("\tinitialized=" + target.initialized);System.out.println("\tbean2=" + target.bean2);}}
>>>>> 代理中的成员变量
initialized=false
bean2=null
>>>>> 目标中的成员变量
initialized=true
bean2=com.itbaima.a45.Bean2@7915bca3
这个方法的调用时机是从容器中获取Bean(Bean已初始化完成)发现代理中的成员变量没有赋值,都是默认值。而目标中的成员变量已经赋值。( 在spring高级篇(三)代理的创建时机中提到过,如果没有循环依赖,代理是在初始化之后创建。)
说明了代理与目标是两个对象,二者成员变量并不共用数据,以及依赖注入和初始化的阶段调用的是原始方法。
被static、final、private关键字修饰的方法均无法增强,因为CGLIB动态代理是生成目标的子类。(上一篇分析过,当properties配置文件中有spring.aop前缀的键,并且值为false时,才会走JDK动态代理)
5、@Value注入
@Value用于将属性值注入到 Spring 管理的 Bean 中。
可以直接将基本类型值或字符串值注入到 Bean 的属性中,或者从外部配置文件/环境变量中读取值:
public class Bean1 {@Value("${JAVA_HOME}")private String home;@Value("18")private int age;}也可以使用 SpEL(Spring Expression Language)表达式来动态地计算属性值:
public class Bean2 {@Value("#{@bean3}") // SpringEL       #{SpEL}private Bean3 bean3;
}@Component("bean3")
public class Bean3 {}
或者结合使用:
static class Bean4 {@Value("#{'hello, ' + '${JAVA_HOME}'}")private String value;}下面来演示一下如何解析@Value 并获取值:
ContextAnnotationAutowireCandidateResolver用于解析@Value ,还可以解析@Lazy注解
解析${}:
public static void main(String[] args) throws Exception {AnnotationConfigApplicationContext context = new AnnotationConfigApplicationContext(A46.class);DefaultListableBeanFactory beanFactory = context.getDefaultListableBeanFactory();ContextAnnotationAutowireCandidateResolver resolver = new ContextAnnotationAutowireCandidateResolver();resolver.setBeanFactory(beanFactory);test1(context, resolver, Bean1.class.getDeclaredField("home"));}private static void test1(AnnotationConfigApplicationContext context, ContextAnnotationAutowireCandidateResolver resolver, Field field) {DependencyDescriptor dd1 = new DependencyDescriptor(field, false);// 获取 @Value 的内容String value = resolver.getSuggestedValue(dd1).toString();System.out.println(value);// 解析 ${}value = context.getEnvironment().resolvePlaceholders(value);System.out.println(value);
}解析字符串/基本数据类型:(解析出的类型默认都是字符串,需要使用转换器转换成真实的类型,这一点和MVC中的参数类型转换类似。)
public static void main(String[] args) throws Exception {AnnotationConfigApplicationContext context = new AnnotationConfigApplicationContext(A46.class);DefaultListableBeanFactory beanFactory = context.getDefaultListableBeanFactory();ContextAnnotationAutowireCandidateResolver resolver = new ContextAnnotationAutowireCandidateResolver();resolver.setBeanFactory(beanFactory);test2(context, resolver, Bean1.class.getDeclaredField("age"));}private static void test2(AnnotationConfigApplicationContext context, ContextAnnotationAutowireCandidateResolver resolver, Field field) {DependencyDescriptor dd1 = new DependencyDescriptor(field, false);// 获取 @Value 的内容String value = resolver.getSuggestedValue(dd1).toString();System.out.println(value);value = context.getEnvironment().resolvePlaceholders(value);System.out.println(value);System.out.println(value.getClass());Object age = context.getBeanFactory().getTypeConverter().convertIfNecessary(value, dd1.getDependencyType());System.out.println(age.getClass());}解析SpEL表达式: 顺序为:先解析@Value的内容,然后解析${},最后解析#{}
public static void main(String[] args) throws Exception {AnnotationConfigApplicationContext context = new AnnotationConfigApplicationContext(A46.class);DefaultListableBeanFactory beanFactory = context.getDefaultListableBeanFactory();ContextAnnotationAutowireCandidateResolver resolver = new ContextAnnotationAutowireCandidateResolver();resolver.setBeanFactory(beanFactory);test3(context, resolver, Bean2.class.getDeclaredField("bean3"));}private static void test3(AnnotationConfigApplicationContext context, ContextAnnotationAutowireCandidateResolver resolver, Field field) {DependencyDescriptor dd1 = new DependencyDescriptor(field, false);// 获取 @Value 的内容String value = resolver.getSuggestedValue(dd1).toString();System.out.println(value);// 解析 ${}value = context.getEnvironment().resolvePlaceholders(value);System.out.println(value);System.out.println(value.getClass());// 解析 #{} @bean3Object bean3 = context.getBeanFactory().getBeanExpressionResolver().evaluate(value, new BeanExpressionContext(context.getBeanFactory(), null));// 类型转换Object result = context.getBeanFactory().getTypeConverter().convertIfNecessary(bean3, dd1.getDependencyType());System.out.println(result);}6、@Autowired注入底层
首先回顾一下本系列中关于@Autowired的知识:
@Autowired 默认是按照类型进行装配,也可以配合@Qualifier 进行名称装配。当@Autowired和@Resource 同时加在字段或者方法上时,会以@Autowired 为准。因为它在后处理器排序中相较于@Resource 靠前(在Spring底层入门第一篇中有过验证)。
这里我们演示下各种情况的@Autowired 注入:
其核心在于利用beanFactory的doResolveDependency()方法
分别对Bean2进行方法注入,字段注入,以及包装成Optional和ObjectFactory类型的注入:
static class Bean1 {@Autowiredprivate Bean2 bean2;@Autowired public void setBean2(Bean2 bean2) {this.bean2 = bean2;}@Autowiredprivate Optional<Bean2> bean3;@Autowired private ObjectFactory<Bean2> bean4;}@Component("bean2")static class Bean2 {@Overridepublic String toString() {return super.toString();}}准备一个Spring容器和Bean工厂:
AnnotationConfigApplicationContext context = new AnnotationConfigApplicationContext(A47_1.class);
DefaultListableBeanFactory beanFactory = context.getDefaultListableBeanFactory();
根据成员变量和参数的值注入(首先要得到Bean2在Bean1中待注入的方法或字段):
// 1. 根据成员变量的类型注入DependencyDescriptor dd1 = new DependencyDescriptor(Bean1.class.getDeclaredField("bean2"), false);System.out.println(beanFactory.doResolveDependency(dd1, "bean1", null, null));System.out.println(">>>>>>>>>>>>>>>>>>>>>>>>>>>>>>>>>>>>>>>>");// 2. 根据参数的类型注入Method setBean2 = Bean1.class.getDeclaredMethod("setBean2", Bean2.class);DependencyDescriptor dd2 = new DependencyDescriptor(new MethodParameter(setBean2, 0), false);System.out.println(beanFactory.doResolveDependency(dd2, "bean1", null, null));System.out.println(">>>>>>>>>>>>>>>>>>>>>>>>>>>>>>>>>>>>>>>>");如果结果包装成其他引用数据类型,需要通过DependencyDescriptor的increaseNestingLevel()找到内层真正需要注入的Bean,而非外层的包装类。在注入完成后,再将结果进行包装。
// 3. 结果包装为 Optional<Bean2>DependencyDescriptor dd3 = new DependencyDescriptor(Bean1.class.getDeclaredField("bean3"), false);if (dd3.getDependencyType() == Optional.class) {dd3.increaseNestingLevel();Object result = beanFactory.doResolveDependency(dd3, "bean1", null, null);System.out.println(Optional.ofNullable(result));}System.out.println(">>>>>>>>>>>>>>>>>>>>>>>>>>>>>>>>>>>>>>>>");// 4. 结果包装为 ObjectProvider,ObjectFactoryDependencyDescriptor dd4 = new DependencyDescriptor(Bean1.class.getDeclaredField("bean4"), false);if (dd4.getDependencyType() == ObjectFactory.class) {dd4.increaseNestingLevel();ObjectFactory objectFactory = new ObjectFactory() {@Overridepublic Object getObject() throws BeansException {return beanFactory.doResolveDependency(dd4, "bean1", null, null);}};System.out.println(objectFactory.getObject());}System.out.println(">>>>>>>>>>>>>>>>>>>>>>>>>>>>>>>>>>>>>>>>");如果字段或者方法参数上加入了@Lazy注解,需要通过ContextAnnotationAutowireCandidateResolver解析@Lazy注解并且生成代理:
getLazyResolutionProxyIfNecessary() 方法:判断需要解析的方法/字段上是否有@Lazy 注解,如果有就会生成代理:
// 5. 对 @Lazy 的处理DependencyDescriptor dd5 = new DependencyDescriptor(Bean1.class.getDeclaredField("bean2"), false);ContextAnnotationAutowireCandidateResolver resolver = new ContextAnnotationAutowireCandidateResolver();resolver.setBeanFactory(beanFactory);Object proxy = resolver.getLazyResolutionProxyIfNecessary(dd5, "bean1");System.out.println(proxy);System.out.println(proxy.getClass());以上就是@Autowired 四种注入情况的实现分析,其中ObjectFactory,@Lazy 注解也体现了延迟加载的思想,目的之一是为了解决单例容器注入多例Bean失效的情况。
下面我们再演示几种注入:
假设现在有一个接口以及三个实现类:
interface Service {}@Component("service1")static class Service1 implements Service {}@Component("service2")static class Service2 implements Service {}@Component("service3")static class Service3 implements Service {}在目标类中需要分别注入数组类型的serviceArray和Service集合类型的serviceList
static class Target {@Autowired private Service[] serviceArray;@Autowired private List<Service> serviceList;}注入数组类型的serviceArray:
- 首先需要得到目标类中待解析的字段
- 该字段的类型是数组,进入if条件块
- 得到组件的类型
- 获取所有与组件类型匹配的 Bean 的名称。
- 解析候选 Bean,并将解析得到的 Bean 添加到一个集合中
- 调用转换器将集合转换成为数组
private static void testArray(DefaultListableBeanFactory beanFactory) throws NoSuchFieldException {DependencyDescriptor dd1 = new DependencyDescriptor(Target.class.getDeclaredField("serviceArray"), true);if (dd1.getDependencyType().isArray()) {Class<?> componentType = dd1.getDependencyType().getComponentType();System.out.println(componentType);String[] names = BeanFactoryUtils.beanNamesForTypeIncludingAncestors(beanFactory, componentType);List<Object> beans = new ArrayList<>();for (String name : names) {System.out.println(name);Object bean = dd1.resolveCandidate(name, componentType, beanFactory);beans.add(bean);}Object array = beanFactory.getTypeConverter().convertIfNecessary(beans, dd1.getDependencyType());System.out.println(array);}}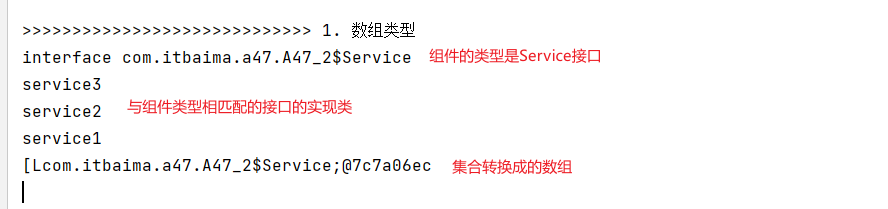
注入Service集合类型的serviceList
- 首先需要得到目标类中待解析的字段
- 该字段的类型是集合,进入if条件块
- 获取依赖类型的泛型参数类型(Service接口)。
- 获取所有与泛型参数类型匹配的 Bean 的名称。
- 解析候选 Bean,并将解析得到的 Bean 添加到一个集合中
private static void testList(DefaultListableBeanFactory beanFactory) throws NoSuchFieldException {DependencyDescriptor dd2 = new DependencyDescriptor(Target.class.getDeclaredField("serviceList"), true);if (dd2.getDependencyType() == List.class) {Class<?> resolve = dd2.getResolvableType().getGeneric().resolve();System.out.println(resolve);List<Object> list = new ArrayList<>();String[] names = BeanFactoryUtils.beanNamesForTypeIncludingAncestors(beanFactory, resolve);for (String name : names) {Object bean = dd2.resolveCandidate(name, resolve, beanFactory);list.add(bean);}System.out.println(list);}}
由此可知,注入接口类型的数组或集合,实际注入的是接口所有的实现类
如果待注入的字段不是自定义的类或接口,而是Spring中自有的Bean,那么@Autowired 会如何进行注入?
@Autowired
private ConfigurableApplicationContext applicationContext;
Spring会将所有成品的bean放在DefaultListableBeanFactory的上级接口DefaultSingletonBeanRegistry中:

Spring在执行refresh()方法中的prepareBeanFactory()方法时
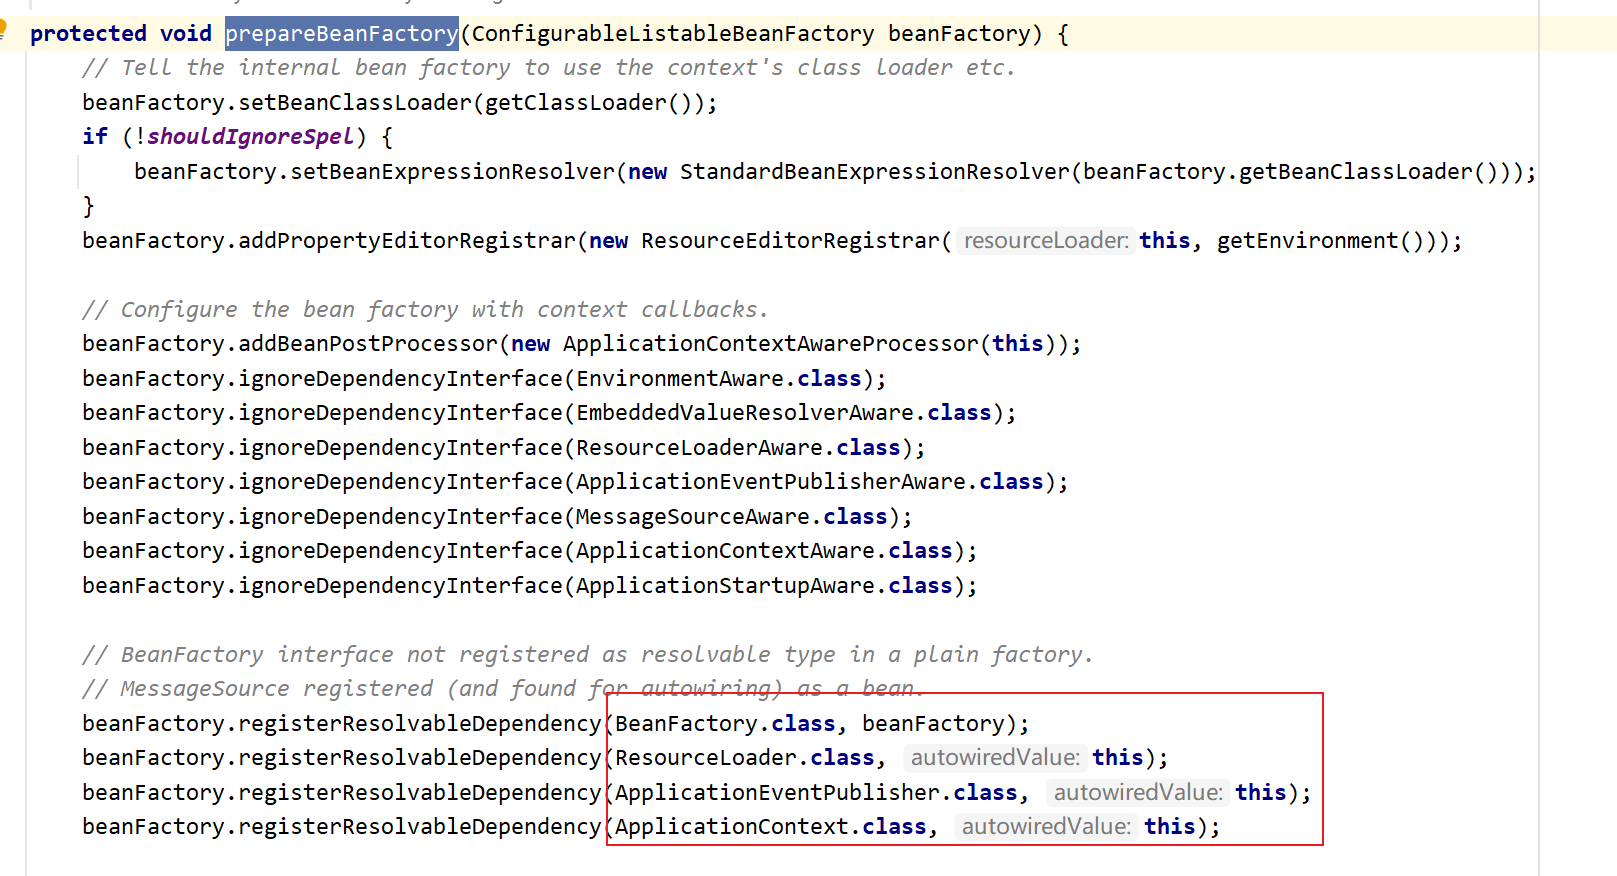
也会将BeanFactory,ApplicationContext等放在DefaultListableBeanFactory的resolvableDependencies成员变量里:
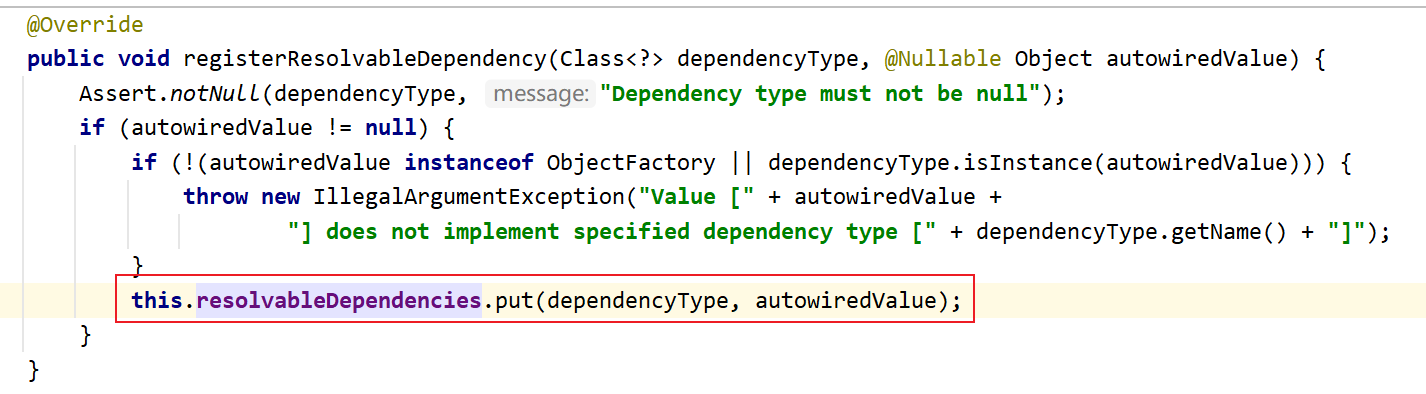
resolvableDependencies是一个Map集合,Key存放的是类的字节码文件,Value存放的是对应的类

有了上述的知识储备,我们以解析ApplicationContext的子类ConfigurableApplicationContext为例:
首先要得到目标对象上待解析的字段,并封装成DependencyDescriptor类型:
DependencyDescriptor dd3 = new DependencyDescriptor(Target.class.getDeclaredField("applicationContext"), true);然后通过反射得到key为BeanFactory时resolvableDependencies中的值
Field resolvableDependencies = DefaultListableBeanFactory.class.getDeclaredField("resolvableDependencies");
resolvableDependencies.setAccessible(true);
Map<Class<?>, Object> dependencies = (Map<Class<?>, Object>) resolvableDependencies.get(beanFactory);
最后我们遍历这个集合,因为需要解析的ConfigurableApplicationContext是Map中ApplicationContext的子类,我们需要利用.isAssignableFrom() 方法进行判断,如果待注入的类型是Map中任何Key的子类,就获取到该Key对应的值进行注入。
for (Map.Entry<Class<?>, Object> entry : dependencies.entrySet()) {// 左边类型 右边类型if (entry.getKey().isAssignableFrom(dd3.getDependencyType())) {System.out.println(entry.getValue());break;}}所以注入ConfigurableApplicationContext,最终实际注入的是AnnotationConfigApplicationContext。
下面再演示一种情况,我现在有两个类实现了一个泛型接口:
interface Dao<T> {}@Component("dao1") static class Dao1 implements Dao<Student> {}@Component("dao2") static class Dao2 implements Dao<Teacher> {}static class Student {}static class Teacher {}需要对实现了Teacher泛型接口的类进行注入
@Autowired
private Dao<Teacher> dao;此时获取到的是接口的类型DAO,也就是没有区分泛型,无论是Dao1和Dao2都能找到:
DependencyDescriptor dd4 = new DependencyDescriptor(Target.class.getDeclaredField("dao"), true);Class<?> type = dd4.getDependencyType();ContextAnnotationAutowireCandidateResolver resolver = new ContextAnnotationAutowireCandidateResolver();resolver.setBeanFactory(beanFactory);for (String name : BeanFactoryUtils.beanNamesForTypeIncludingAncestors(beanFactory, type)) {BeanDefinition bd = beanFactory.getMergedBeanDefinition(name);System.out.println(bd);};
我们需要在for循环中加入.isAutowireCandidate() 条件判断,对泛型进行检查。
if (resolver.isAutowireCandidate(new BeanDefinitionHolder(bd,name), dd4)) {System.out.println(name);System.out.println(dd4.resolveCandidate(name, type, beanFactory));
}最后再演示一种对@Qualifier 注解的解析。注意与案例一的区别在于,注入字段的类型非Service接口数组,所以如果没有加入@Qualifier ,Spring将无法识别注入哪一个实现类,从而报错。
@Autowired
@Qualifier("service2")
private Service service;解析过程和上一个案例类似,依旧要使用.isAutowireCandidate() 方法进行筛选,找出与@Qualifier("service2") 中的value同名的Service实现类。(否则会找到所有Service接口的实现类)
DependencyDescriptor dd5 = new DependencyDescriptor(Target.class.getDeclaredField("service"), true);Class<?> type = dd5.getDependencyType();ContextAnnotationAutowireCandidateResolver resolver = new ContextAnnotationAutowireCandidateResolver();resolver.setBeanFactory(beanFactory);for (String name : BeanFactoryUtils.beanNamesForTypeIncludingAncestors(beanFactory, type)) {BeanDefinition bd = beanFactory.getMergedBeanDefinition(name);System.out.println(bd);// @Qualifier("service2")if (resolver.isAutowireCandidate(new BeanDefinitionHolder(bd,name), dd5)) {System.out.println(name);System.out.println(dd5.resolveCandidate(name, type, beanFactory));}}在最后一个案例中,如果不使用@Qualifier 注解,又有同名的Bean,还有两种方式去进行区分注入:
- @Primary 注解:通过beanFactory的getMergedBeanDefinition(name).isPrimary()方法去匹配加上了该注解的Bean。注意:如果有两个同名的Bean都加上了该注解,Spring依旧无法进行区分。
private static void testPrimary(DefaultListableBeanFactory beanFactory) throws NoSuchFieldException {DependencyDescriptor dd = new DependencyDescriptor(Target1.class.getDeclaredField("service"), false);Class<?> type = dd.getDependencyType();for (String name : BeanFactoryUtils.beanNamesForTypeIncludingAncestors(beanFactory, type)) {if (beanFactory.getMergedBeanDefinition(name).isPrimary()) {System.out.println(name);}}}- 以待注入的字段名进行区分,用DependencyDescriptor的getDependencyName() 方法获取的字段名,和根据类型找到的字段名比较,如果一致就进行注入。
private static void testDefault(DefaultListableBeanFactory beanFactory) throws NoSuchFieldException {DependencyDescriptor dd = new DependencyDescriptor(Target2.class.getDeclaredField("service3"), false);Class<?> type = dd.getDependencyType();for (String name : BeanFactoryUtils.beanNamesForTypeIncludingAncestors(beanFactory, type)) {if(name.equals(dd.getDependencyName())) {System.out.println(name);}}}7、事件监听器
在Spring底层入门(一)中对于Spring自带的事件发布器和监听器有过介绍,它是ApplicationContext相较于BeanFactory而言做的扩展功能,但是本身也具有很大的局限性,不能适配分布式架构。
在本篇中,我们在Spring底层入门(一)的基础上做一些扩展讲解:
首先复习一下,事件发布器和监听器的存在是为了解耦:
例如我现在有一段业务代码,需求是执行完业务代码后,发送短信和邮件:
@Component
public class MyService {public void doBusiness(){System.out.println("业务代码");System.out.println("发送邮件");System.out.println("发送短信");      }}
如果像上面的代码,那么每次如果需要修改发送邮件/发送短信的代码,都需要对doBusiness() 方法进行修改,引入监听器和发布器乃至消息中间件就是为了解决这样的问题。
我们需要先自定义一个事件类:
/*** 事件发布器*/
public class MyEvent extends ApplicationEvent{public MyEvent(Object source) {super(source);}
}
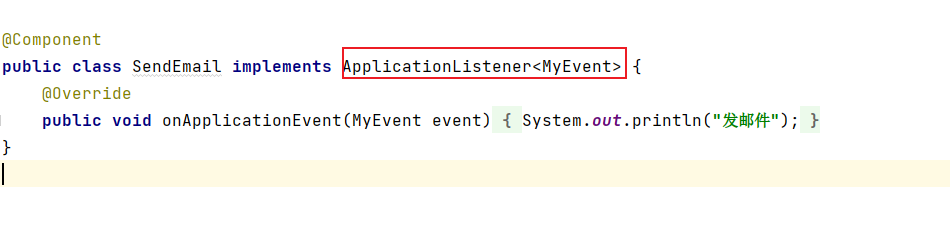
实现事件监听器有两种方式:
- 实现ApplicationListener<>接口:
@Component
public class SendEmail implements ApplicationListener<MyEvent> {@Overridepublic void onApplicationEvent(MyEvent event) {System.out.println("发邮件");}
}
- 使用 @EventListener注解(底层依旧是解析ApplicationListener接口)
@Component
public class SendEmail{/*** 使用注解监听事件* @param event*/@EventListenerpublic void sendEmail(MyEvent event) {System.out.println("发邮件"+Thread.currentThread().getName());}
}
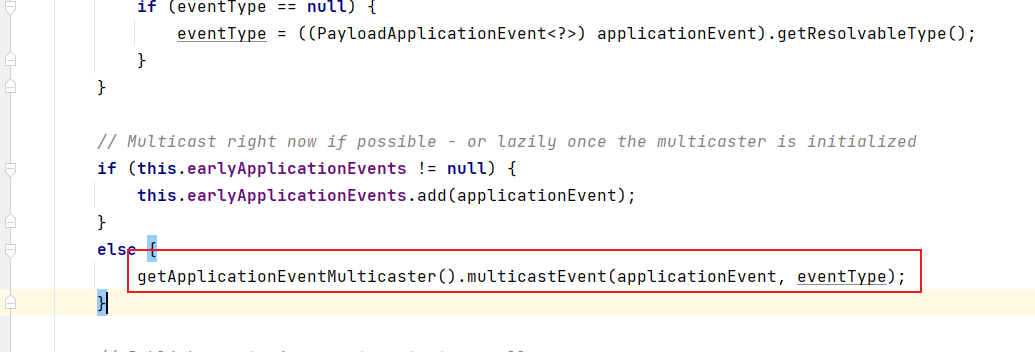
在业务类中,需要注入ApplicationEventPublisher,调用.publishEvent() 方法注册自定义事件。
@Component
public class MyService {@Autowiredprivate ApplicationEventPublisher publisher;public void doBusiness(){System.out.println("业务代码");publisher.publishEvent(new MyEvent("MyService.doBusiness()"));}}
在.publishEvent() 方法的底层,实际上最后是调用了ApplicationEventMulticaster的子类SimpleApplicationEventMulticaster的multicastEvent()方法
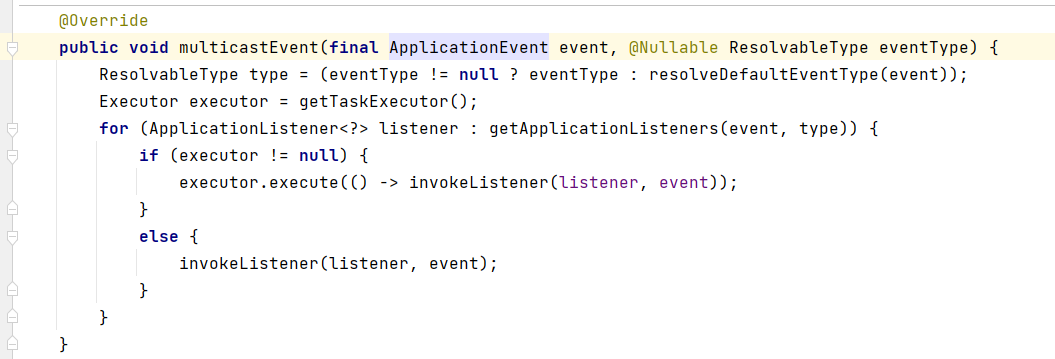
而SimpleApplicationEventMulticaster类中有一个成员变量taskExecutor,用于控制是否异步监听。
可以通过自定义SimpleApplicationEventMulticaster Bean的方式实现异步监听:
/*** 异步发送通知优化 创建线程池* @return*/@Beanpublic ThreadPoolTaskExecutor threadPoolTaskExecutor(){ThreadPoolTaskExecutor executor = new ThreadPoolTaskExecutor();executor.setCorePoolSize(3);executor.setMaxPoolSize(10);executor.setQueueCapacity(100);return executor;}@Beanpublic SimpleApplicationEventMulticaster applicationEventMulticaster(ThreadPoolTaskExecutor threadPoolTaskExecutor){SimpleApplicationEventMulticaster multicaster = new SimpleApplicationEventMulticaster();multicaster.setTaskExecutor(threadPoolTaskExecutor);return multicaster;}
我们再通过自定义注解的方式简单演示一下 @EventListener注解的原理:
@Retention(RetentionPolicy.RUNTIME)
@Target(ElementType.METHOD)
public @interface MyEventListener {
}在Config类中,将SmartInitializingSingleton注册成Bean,然后编写解析@MyEventListener 注解的逻辑:
- 得到BeanDefinition中所有的bean名称,然后根据bean名称获取到bean实例。
- 找到Bean实例中所有的方法,判断方法上是否加了@MyEventListener
- 符合条件则创建ApplicationListener接口的匿名内部类,通过反射调用bean实例的方法。(注意:在调用前还需要判断方法参数上的事件类型和Event是否匹配)
- 最后通过 applicationContext的addApplicationListener() 方法进行注册监听器。
复习一下,JAVA面向对象中,多态的弊端:无法调用子类特有的方法
@Beanpublic SmartInitializingSingleton smartInitializingSingleton(ConfigurableApplicationContext applicationContext) {return () -> {//得到BeanDefinition中所有的bean名称for (String name : applicationContext.getBeanDefinitionNames()) {//根据bean名称获取到bean实例Object bean = applicationContext.getBean(name);//读取自定义@MyEventListener注解//找到类中所有的方法for (Method method : bean.getClass().getMethods()) {//判断方法上是否存在MyEventListener注解if (method.isAnnotationPresent(MyEventListener.class)) {//解析MyEventListener注解实际上还是调用ApplicationListener类//同时也体现了适配器模式,将MyEvent类型转换为addApplicationListener需要的ApplicationListenerApplicationListener listener = new ApplicationListener() {@Overridepublic void onApplicationEvent(ApplicationEvent event) {System.out.println(event.getClass());//得到方法上所有的参数Class<?> parameterType = method.getParameterTypes()[0];//方法参数的事件类型和event的事件类型匹配才执行if (parameterType.isAssignableFrom(event.getClass())) {try {method.invoke(bean, event);} catch (IllegalAccessException | InvocationTargetException e) {e.printStackTrace();}}}};//多态的弊端:无法调用子类特有的方法
//                applicationContext.addapplicationContext.addApplicationListener(listener);}}}};
8、事件发布器
上面提到过,发布事件实际上底层最终调用的是ApplicationEventMulticaster的multicastEvent()方法
我们简单的模拟一下这个操作:
ApplicationEventMulticaster是一个接口,如果直接用子类实现,需要重写其中所有的方法。但是ApplicationEventMulticaster中关键的方法是addApplicationListenerBean()和multicastEvent(),在模拟的过程中只想重写这两个方法,我们可以创建一个抽象类先去实现ApplicationEventMulticaster接口中的所有方法,这也是适配器模式的一种体现:
/*** 不想实现ApplicationEventMulticaster中的所有方法时,可以先定义一个抽象类实现所有方法,然后创建抽象类的匿名内部类*/
public abstract class AbstractApplicationMulticaster implements ApplicationEventMulticaster {.../重写了ApplicationEventMulticaster的所有方法
}
然后再自定义类去继承抽象类AbstractApplicationMulticaster或创建AbstractApplicationMulticaster的匿名内部类,去选择性的重写必要的方法:
- addApplicationListenerBean() 方法:用于收集所有的监听器,存放在集合中。
- multicastEvent() 方法:用于遍历集合中所有的监听器,并且发布事件。
@Bean@SuppressWarnings("all")public ApplicationEventMulticaster applicationEventMulticaster(ConfigurableApplicationContext context){return new AbstractApplicationMulticaster() {private ArrayList<ApplicationListener> applicationListeners = new ArrayList<>();/*** 收集所有的监听器* @param listenerBeanName*/@Overridepublic void addApplicationListenerBean(String listenerBeanName) {ApplicationListener bean = context.getBean(listenerBeanName, ApplicationListener.class);System.out.println(bean);applicationListeners.add(bean);}/*** 发布事件* @param event* @param eventType*/@Overridepublic void multicastEvent(ApplicationEvent event, ResolvableType eventType) {for (ApplicationListener applicationListener : applicationListeners) {applicationListener.onApplicationEvent(event);}}};}但是上面的代码存在一个弊端:在案例中所有的监听器实现的ApplicationListener的泛型,都是自定义的监听器MyEven,而Spring监听器的类型是多种多样的,上面的写法没有考虑到类型匹配:
 需要解决类型匹配的问题,需要改造以上的代码
- 收集监听器时,需要获得目前实现了ApplicationListener的泛型
- 然后将原始的 listener 封装为支持事件类型检查的 listener。(如果要支持多线程,只需要在GenericApplicationListener的onApplicationEvent() 方法中使用线程池提交任务即可)
// 收集监听器@Overridepublic void addApplicationListenerBean(String name) {ApplicationListener listener = context.getBean(name, ApplicationListener.class);System.out.println(listener);// 获取该监听器支持的事件类型ResolvableType type = ResolvableType.forClass(listener.getClass()).getInterfaces()[0].getGeneric();System.out.println(type);// 将原始的 listener 封装为支持事件类型检查的 listenerGenericApplicationListener genericApplicationListener = new GenericApplicationListener() {// 是否支持某事件类型 真实的事件类型@Overridepublic boolean supportsEventType(ResolvableType eventType) {return type.isAssignableFrom(eventType);}@Overridepublic void onApplicationEvent(ApplicationEvent event) {executor.submit(() -> listener.onApplicationEvent(event));}};listeners.add(genericApplicationListener);}- 发布事件时,需要从GenericApplicationListener类型的List集合中进行遍历,只有类型匹配时才发布事件:
// 发布事件@Overridepublic void multicastEvent(ApplicationEvent event, ResolvableType eventType) {for (GenericApplicationListener listener : listeners) {if (listener.supportsEventType(ResolvableType.forClass(event.getClass()))) {listener.onApplicationEvent(event);}}}至此,Spring底层入门系列全部结束,后续进入JVM篇学习。

![[windows系统安装/重装系统][step-2]BIOS设置UEFI引导、磁盘分区GPT分区、安装系统[含完整操作拍照图片]](https://img-blog.csdnimg.cn/img_convert/003e678357e3aaf599d591c2d94b9b4f.png)
![使用Android数据恢复恢复已删除的文件[Windows]](https://img-blog.csdnimg.cn/direct/d0a3b1712a2e416d9aaa605b0a472e54.png)