源码解析Activity的结构分析
目录
- 1、Activity、View、Window有什么关联?
- 2、Activity的结构构建流程
- 3 源码解析Activity的构成
- 3.1 Activity的Attach方法
- 3.2 Activity的OnCreate
- 4、WindowManager与View的关系
- 总结
- 1、一个Activity对应几个WindowManage,对应几个Window?
- 2、DecorView在哪被创建?
- 3、PhoneWindow和Window有什么关系?
- 4、在Activity的onResume方法调用Handler的post可以获取View的宽高吗?View的post方法能拿到View的宽高?
参考文献:
1、Android进阶之光第二版
2、Android 源码分析 - Activity的结构分析
3、反思|Android LayoutInflater机制的设计与实现
1、Activity、View、Window有什么关联?
用一个简单的例子理解它们,假设现在正在装修一个新房子:
📌
Activity相当于一个房子。
Window相当于房子的窗户,可以通过窗户观察到房子。
WindowManage相当于管家,控制窗户的开关。
View相当于各种各样的家具。
layoutInflater相当于室内装修师 将家具(View)正确的摆放在房子(Activity)中。
XML文件就像是装修图纸,将不同的家具(View)排列组合
通过一个图理解它们之间的层级关系:
关于Activity和Window,DecorView怎么关联起来参考:View事件的分发机制
2、Activity的结构构建流程

首先简单介绍一下各个部分的作用:
ActivityThread:每个流程调用起始地点
Activity:相当于是一个管理者,负责创建WindowManager和Window。
Window:承载着View,同时代Activity处理一切View的事务。
WindowManager:从字面意思来理解是Window的管理,其实是管理Window上的View,包括addView和remove。
3 源码解析Activity的构成
3.1 Activity的Attach方法
在Activity的Attach方法中主要做了两件事:
- 初始化mWindow,通过new PhoneWindow调用它的构造方法。
- 初始化WindowManage,并且将它set到Window中
接下来具体看看源码在干啥:
@UnsupportedAppUsage
private WindowManager mWindowManager;final void attach(Context context, ActivityThread aThread,Instrumentation instr, IBinder token, int ident,Application application, Intent intent, ActivityInfo info,CharSequence title, Activity parent, String id,NonConfigurationInstances lastNonConfigurationInstances,Configuration config, String referrer, IVoiceInteractor voiceInteractor,Window window, ActivityConfigCallback activityConfigCallback) {// ······mWindow = new PhoneWindow(this, window, activityConfigCallback);  //1// ······//  2mWindow.setWindowManager((WindowManager)context.getSystemService(Context.WINDOW_SERVICE),mToken, mComponent.flattenToString(),(info.flags & ActivityInfo.FLAG_HARDWARE_ACCELERATED) != 0);// ······mWindowManager = mWindow.getWindowManager();  //3
}
这里的context.getSystemService方法就是用来返回一个WindowManage对象
@Override
public Object getSystemService(@ServiceName @NonNull String name) {if (getBaseContext() == null) {throw new IllegalStateException("System services not available to Activities before onCreate()");}if (WINDOW_SERVICE.equals(name)) {return mWindowManager;} else if (SEARCH_SERVICE.equals(name)) {ensureSearchManager();return mSearchManager;}return super.getSystemService(name);
}
一个小疑问,为什么先setWindowManager接下来又通过getWindowManager获取mWindowManager,但是getSystemService返回的也是这个mWindowManager,这是在做什么?
实际上Android在这里做了一个缓存,在第一次创建时super.getSystemService(name);调用系统级别的管理器WindowManager,再之后的创建每一次都是同一个WindowManager。
当我们调用 context.getSystemService(Context.WINDOW_SERVICE) 时,实际上返回的是 WindowManagerGlobal 中唯一的那个 WindowManagerImpl 实例的一个代理对象。这种设计使得整个系统只存在一个真正的 WindowManagerImpl 实例,所有视图都是由它来管理和调度的。
3.2 Activity的OnCreate
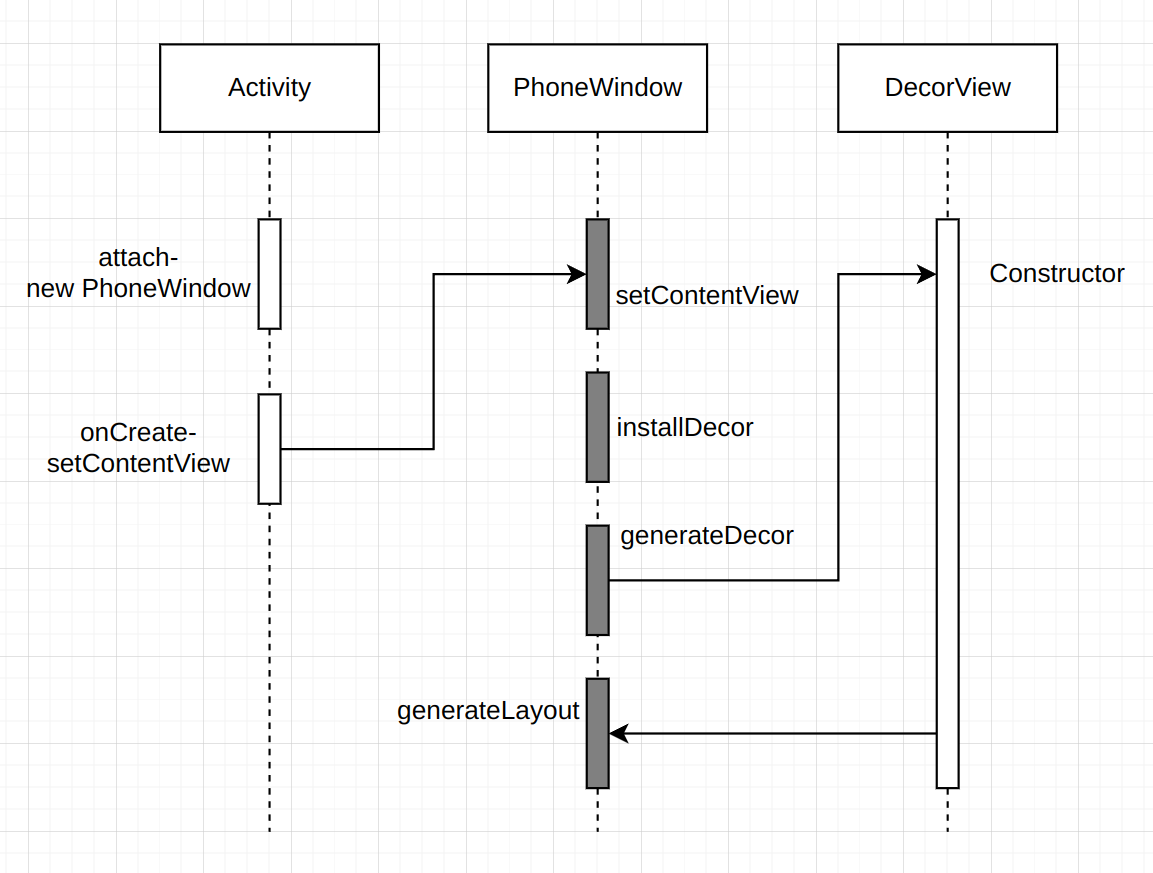
OnCreate主要通过setContentView方法给当前页面设置一个布局,实际上 Activity的setContentView并没有做什么工作,主要是Window的setContentView方法实现了这个功能。
当一个事件点击后首先传递给Activity,在我们写Activity时会调用setContentView方法来加载布局,我们看一下setContenView方法在做什么:
//frameworks/base/core/java/android/app/Activity.javapublic void setContentView(@LayoutRes int layoutResID) {getWindow().setContentView(layoutResID);initWindowDecorActionBar();
}
发现它首先调用了getWindow的setContentview方法,那么getWindow是什么呢?它返回了一个mWindow对象,查看代码后再Activity的attach方法中发现了它。
mWindow = new PhoneWindow(this, window, activityConfigCallback);
它原来是一个PhoneWindow,接下来我们看看它的setContentView方法在做什么。
@Override
public void setContentView(int layoutResID) {// Note: FEATURE_CONTENT_TRANSITIONS may be set in the process of installing the window// decor, when theme attributes and the like are crystalized. Do not check the feature// before this happens.if (mContentParent == null) {installDecor();   //1} else if (!hasFeature(FEATURE_CONTENT_TRANSITIONS)) {mContentParent.removeAllViews();}if (hasFeature(FEATURE_CONTENT_TRANSITIONS)) {final Scene newScene = Scene.getSceneForLayout(mContentParent, layoutResID,getContext());transitionTo(newScene);} else {mLayoutInflater.inflate(layoutResID, mContentParent);}mContentParent.requestApplyInsets();final Callback cb = getCallback();if (cb != null && !isDestroyed()) {cb.onContentChanged();}mContentParentExplicitlySet = true;
}
FEATURE_CONTENT_TRANSITIONS是一个用于启用内容转换特性的标志,作用时提供一种动画效果过渡的切换视图。
我们重点看一下mContentParent为null时installDecor()方法做了什么。这个方法比较长,看一下重点地方:
private void installDecor() {mForceDecorInstall = false;if (mDecor == null) {mDecor = generateDecor(-1); //1mDecor.setDescendantFocusability(ViewGroup.FOCUS_AFTER_DESCENDANTS);mDecor.setIsRootNamespace(true);if (!mInvalidatePanelMenuPosted && mInvalidatePanelMenuFeatures != 0) {mDecor.postOnAnimation(mInvalidatePanelMenuRunnable);}} else {mDecor.setWindow(this);}if (mContentParent == null) {mContentParent = generateLayout(mDecor); //2
看一下注释1的代码做了什么事情,发现这个generateDecor创建了一个DecorView。
protected DecorView generateDecor(int featureId) {// System process doesn't have application context and in that case we need to directly use// the context we have. Otherwise we want the application context, so we don't cling to the// activity.Context context;if (mUseDecorContext) {Context applicationContext = getContext().getApplicationContext();if (applicationContext == null) {context = getContext();} else {context = new DecorContext(applicationContext, this);if (mTheme != -1) {context.setTheme(mTheme);}}} else {context = getContext();}return new DecorView(context, featureId, this, getAttributes());
}
查看DecorView源码发现,它继承了Fragment。
public class DecorView extends FrameLayout implements RootViewSurfaceTaker, WindowCallbacks
接下来我们再回到installDecor() 方法,看一下注释2 中的generateLayout(mDecor)做了什么事。
这段代码很长,具体就不展示了。其中最重要的一点就是根据不同的情况给LayoutResource加载不同的布局。我们查看其中的一个布局文件R.layout.screen_title。这个文件在:frameworks/base/core/res/res/layout/screen_title.xml中,代码如下所示:
<LinearLayout xmlns:android="http://schemas.android.com/apk/res/android"android:orientation="vertical"android:fitsSystemWindows="true"><!-- Popout bar for action modes --><ViewStub android:id="@+id/action_mode_bar_stub"android:inflatedId="@+id/action_mode_bar"android:layout="@layout/action_mode_bar"android:layout_width="match_parent"android:layout_height="wrap_content"android:theme="?attr/actionBarTheme" /><FrameLayoutandroid:layout_width="match_parent" android:layout_height="?android:attr/windowTitleSize"style="?android:attr/windowTitleBackgroundStyle"><TextView android:id="@android:id/title" style="?android:attr/windowTitleStyle"android:background="@null"android:fadingEdge="horizontal"android:gravity="center_vertical"android:layout_width="match_parent"android:layout_height="match_parent" /></FrameLayout><FrameLayout android:id="@android:id/content"android:layout_width="match_parent" android:layout_height="0dip"android:layout_weight="1"android:foregroundGravity="fill_horizontal|top"android:foreground="?android:attr/windowContentOverlay" />
</LinearLayout>
上面的ViewStub是用来显示Actionbar的,下面的两个Fragment一个是Title用于显示标题,另一个是Conten,用来显示内容。
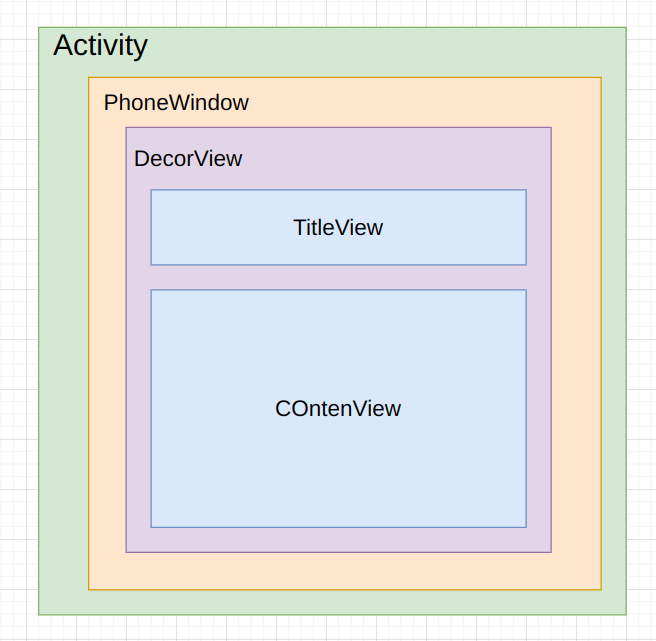
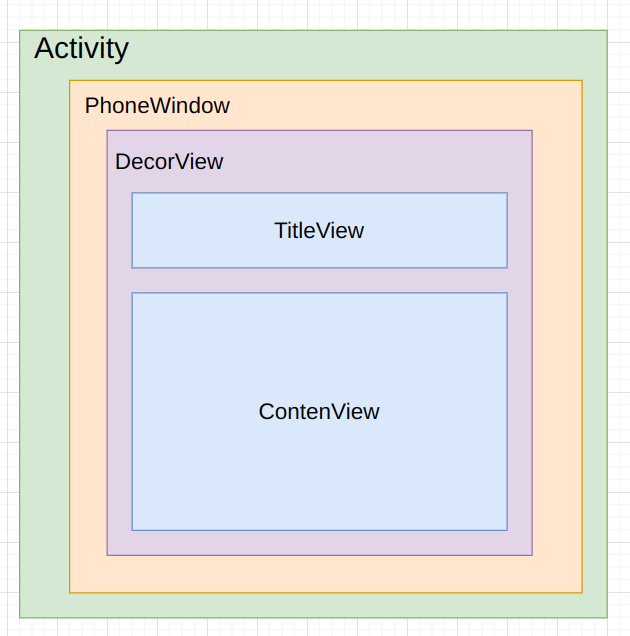
刚刚通过这段源码分析可以知道一个Activity包含了一个Window对象,这个对象是PhoneWindow来实现的。PhoneWindow将DecorView作为整个应用窗口的根View,这个DecorView将屏幕分成两个区域,一个区域是TitleView,另一个区域是ContenView。而我们平常写的布局都是展示在ContenView中。如图:
4、WindowManager与View的关系
众所周知,DecrorView的ViewParent是ViewRootImpl,而View最重要的三大流程就是由ViewRootImpl触发的。
结合上面的流程我们知道了DecroView的创建过程,那么它是如何被绑定到Window上的呢?ViewRootImpl又是怎么和Window、DecroView建立联系的?
我们先看一下ActivityThread的handleResumeActivity方法在干什么:
代码较长这里截取关键地方
@Override
public void handleResumeActivity(ActivityClientRecord r, boolean finalStateRequest,boolean isForward, boolean shouldSendCompatFakeFocus, String reason) {//........// TODO 将resumeArgs推送到活动中以供考虑// 对于双恢复和 r.mFinish = true 的情况,跳过以下步骤。// 1if (!performResumeActivity(r, finalStateRequest, reason)) {return;}//........if (r.window == null && !a.mFinished && willBeVisible) {r.window = r.activity.getWindow();View decor = r.window.getDecorView();  //2decor.setVisibility(View.INVISIBLE);ViewManager wm = a.getWindowManager(); //3WindowManager.LayoutParams l = r.window.getAttributes();a.mDecor = decor;l.type = WindowManager.LayoutParams.TYPE_BASE_APPLICATION;l.softInputMode |= forwardBit;if (r.mPreserveWindow) {a.mWindowAdded = true;r.mPreserveWindow = false;// Normally the ViewRoot sets up callbacks with the Activity// in addView->ViewRootImpl#setView. If we are instead reusing// the decor view we have to notify the view root that the// callbacks may have changed.ViewRootImpl impl = decor.getViewRootImpl();if (impl != null) {impl.notifyChildRebuilt();}}if (a.mVisibleFromClient) {if (!a.mWindowAdded) {a.mWindowAdded = true;wm.addView(decor, l); //4} else {// The activity will get a callback for this {@link LayoutParams} change// earlier. However, at that time the decor will not be set (this is set// in this method), so no action will be taken. This call ensures the// callback occurs with the decor set.a.onWindowAttributesChanged(l);}}//..........}
handleResumeActivity主要做了两件事件,第一件事情在注释1处,通过performResumeActivity进而回调Activity的onResume方法。
第二件事是注释2,3,4共同完成,它将一个DecorView添加到了WindowManage中。
我们详细看一下这个addView的过程,通过查找发现这个addView实际上是WindowManageImpl的addView。
//WindowManageImpl@Override
public void addView(@NonNull View view, @NonNull ViewGroup.LayoutParams params) {applyTokens(params);mGlobal.addView(view, params, mContext.getDisplayNoVerify(), mParentWindow,mContext.getUserId());
}
在这个方法中调用了mGlobal的addView方法,继续查找源码发现mGlobal居然是一个WindowManagerGlobal。看一下它的addView在干什么,同样的代码过长,我们在这选出重点代码。
//WindowManagerGlobalprivate final ArrayList<View> mViews = new ArrayList<View>();
private final ArrayList<ViewRootImpl> mRoots = new ArrayList<ViewRootImpl>();
private final ArrayList<WindowManager.LayoutParams> mParams =new ArrayList<WindowManager.LayoutParams>();public void addView(View view, ViewGroup.LayoutParams params,Display display, Window parentWindow, int userId) {//.....// 1if (windowlessSession == null) {root = new ViewRootImpl(view.getContext(), display);} else {root = new ViewRootImpl(view.getContext(), display,windowlessSession, new WindowlessWindowLayout());}view.setLayoutParams(wparams);mViews.add(view);mRoots.add(root);mParams.add(wparams);// do this last because it fires off messages to start doing thingstry {root.setView(view, wparams, panelParentView, userId); //2} catch (RuntimeException e) {final int viewIndex = (index >= 0) ? index : (mViews.size() - 1);// BadTokenException or InvalidDisplayException, clean up.if (viewIndex >= 0) {removeViewLocked(viewIndex, true);}throw e;}//.....}这个方法也主要干了两件事,在注释1处初始化了ViewRootImpl,在注释2处通过这个set方法将DecorView绑定到了ViewRootImpl中,并且触发了View的三大流程1。
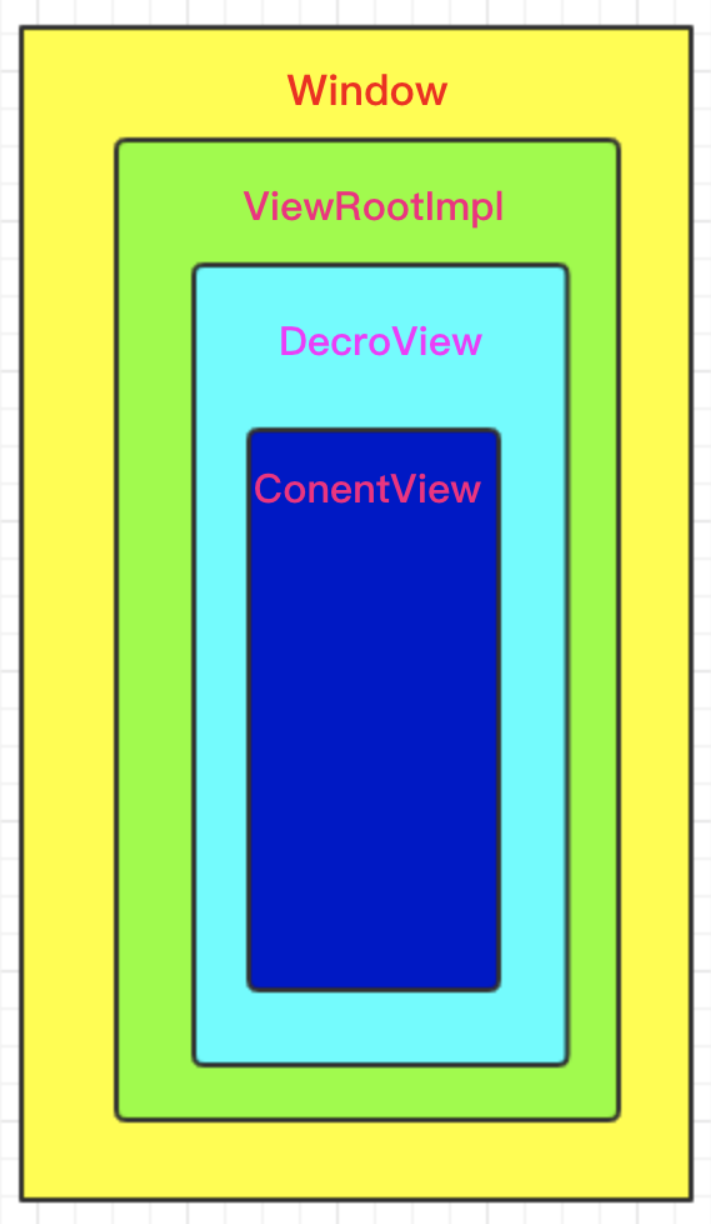
通过上面的分析我们知道,每个Window都对应着一个DecorView,而从这里我们可以发现,每个DecorView都对应着一个ViewRootImpl。
📌从而得知,如果是一个Dialog或者其他新
Window的界面,必定有一个新的ViewRootImpl来触发View的三大流程,而不是由宿主Window的ViwRootImpl触发的。
总结
1、一个Activity对应几个WindowManage,对应几个Window?
通过3.1源码分析可知,一个Activity对应一个WindowManage,而一个WindowManage对应一个Window。并且一个Window对应一个DecorView,而每个DecorView着对应一个ViewRootImpl。
有一些特殊情况下可能会存在多个
DecorView,比如系统弹出对话框或者悬浮窗口等。但是这些额外的DecorView通常不是直接与Activity关联的,而是由系统创建和管理的。在这些情况下,虽然存在多个DecorView,但它们不是在同一个Window中,并且与主Activity的DecorView是独立的。
2、DecorView在哪被创建?
DecorView是在Window被创建的时候同步创建的,具体来说,DecorView 在 PhoneWindow 的 setContentView() 方法中被创建。Window会通过LayoutInflater将选定的DecorView布局加载并实例化成View对象。这个View对象就是DecorView。
最后,DecorView会被设置为Window的顶级View,所有的UI界面都是附加到这个DecorView的子View上ContentView。
3、PhoneWindow和Window有什么关系?
它们是继承关系,PhoneWindow继承了Window,并针对手机平台的特性进行了具体实现和扩展。
4、在Activity的onResume方法调用Handler的post可以获取View的宽高吗?View的post方法能拿到View的宽高?
通过4部分的代码分析,我们知道Activity的onResume方法的执行是在ViewRootImpl触发测量过程之前,同时ViewRootImpl是通过如下的方式来触发测量过程的:
void scheduleTraversals() {if (!mTraversalScheduled) {mTraversalScheduled = true;mTraversalBarrier = mHandler.getLooper().getQueue().postSyncBarrier();mChoreographer.postCallback(Choreographer.CALLBACK_TRAVERSAL, mTraversalRunnable, null);notifyRendererOfFramePending();pokeDrawLockIfNeeded();}
}
这里使用了一个Handler.post了一个异步消息来进行测量。尽管post的是异步消息,但在onResume方法中无法保证中立即获取到正确的视图宽高,在Activity的onResume方法调用Handler.post不能获取View的宽高。

View.post方法可以获取View的宽高,View.post 方法添加的消息会在主线程空闲时被处理,这时候通常是在视图的测量和布局过程完成之后。
View 的三大流程通常指的是 View 的绘制流程、布局流程和事件分发流程。 ↩︎


![NSSCTF | [第五空间 2021]WebFTP](https://img-blog.csdnimg.cn/direct/5a2f9086ba2746748269cf5d2d68cacb.png)