上一篇【学习笔记】Windows GDI绘图(五)图形路径GraphicsPath详解(上)介绍了GraphicsPath类的构造函数、属性和方法AddArc添加椭圆弧、AddBezier添加贝赛尔曲线、AddClosedCurve添加封闭基数样条曲线、AddCurve添加开放基数样条曲线、基数样条如何转Bezier、AddEllipse添加椭圆、AddLine添加线段。
革命尚未成功,同志仍需努力!
文章目录
- GraphicsPath方法
- AddLines添加线段
- AddPath附加路径
- AddPie添加饼形
- AddPolygon添加多边形
- AddRectangle和AddRectangles 添加矩形
- AddString添加字符串
- SetMarkers设置标记
- ClearMarkers清空标记
- StartFigure开始新的图形
- CloseAllFigures闭合所有图形、CloseFigure闭合当前图形
GraphicsPath方法
AddLines添加线段
原型:
public void AddLines (params System.Drawing.Point[] points);
public void AddLines (params System.Drawing.PointF[] points);
添加一系列的线段到GraphicsPath中。
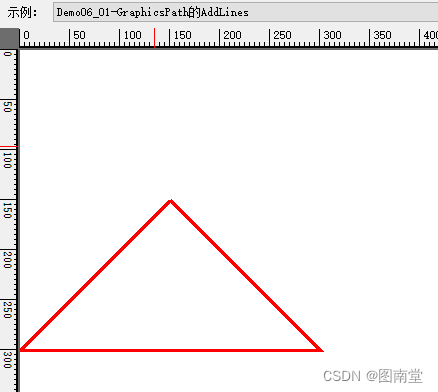
// 定义三角形的顶点
Point[] points ={new Point(150,150),new Point(300,300),new Point(0,300),new Point(150,150)};using (var myPath = new GraphicsPath())
{myPath.AddLines(points);e.Graphics.DrawPath(penRed, myPath);
}
通过点集绘制线段
AddPath附加路径
原型:
public void AddPath (System.Drawing.Drawing2D.GraphicsPath addingPath, bool connect);
connect,当前路径与附加的路径是否相连
将指定的GraphicsPath附加到当前Path中
Point[] myArray ={new Point(120,120),new Point(240,240),new Point(0,240),new Point(120,120)};
GraphicsPath myPath = new GraphicsPath();
myPath.AddLines(myArray);Point[] myArray2 ={new Point(120,100),new Point(20,20),new Point(220,20),new Point(120,100)};
GraphicsPath myPath2 = new GraphicsPath();
myPath2.AddLines(myArray2);// Add the second path to the first path.
myPath.AddPath(myPath2, false);//各自独立// Draw the combined path to the screen.
e.Graphics.DrawPath(penRed, myPath);myPath.Reset();
myPath.AddLines(myArray);
myPath.AddPath(myPath2, true);//相连myPath.Transform(new Matrix(1, 0, 0, 1, 400, 0));
e.Graphics.DrawPath(penLightGreen, myPath);

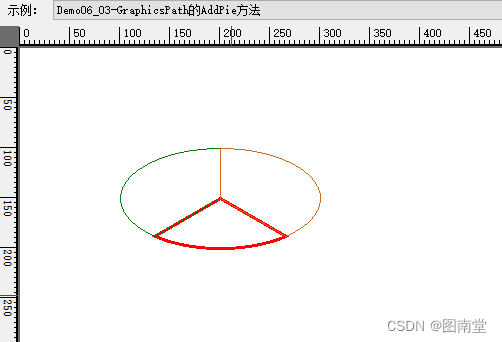
AddPie添加饼形
原型:
public void AddPie (System.Drawing.Rectangle rect, float startAngle, float sweepAngle);
public void AddPie (int x, int y, int width, int height, float startAngle, float sweepAngle);
public void AddPie (float x, float y, float width, float height, float startAngle, float sweepAngle);
通过一个矩形、起始角度和扫描角度来角度一个饼形,与椭圆参数类似。
var rect = new Rectangle(100, 100, 200, 100);
using (var path = new GraphicsPath())
{//添加饼形 30°至150°path.AddPie(rect, 30, 120);e.Graphics.DrawPath(penRed, path);path.Reset();//150°至270°path.AddPie(rect, 30 + 120, 120);e.Graphics.DrawPath(penLightGreen, path);path.Reset();//30°到 270°(逆时针)path.AddPie(rect, 30, -120);e.Graphics.DrawPath(Pens.Chocolate, path);
}
sweepAngle,正数,顺时针;负数,逆时针
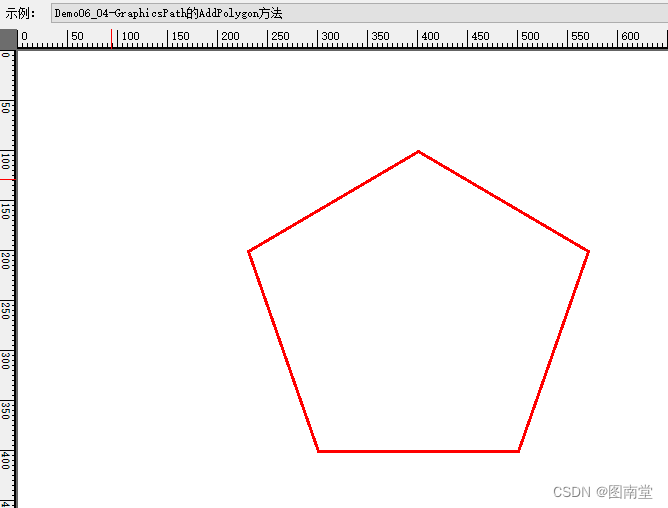
AddPolygon添加多边形
原型:
public void AddPolygon (System.Drawing.Point[] points);
public void AddPolygon (System.Drawing.PointF[] points);
定义点集,形成多边形
// 多边形顶点
Point[] myArray ={new Point(230, 200),new Point(400, 100),new Point(570, 200),new Point(500, 400),new Point(300, 400)};using (var myPath = new GraphicsPath())
{//添加多边形myPath.AddPolygon(myArray);e.Graphics.DrawPath(penRed, myPath);
}
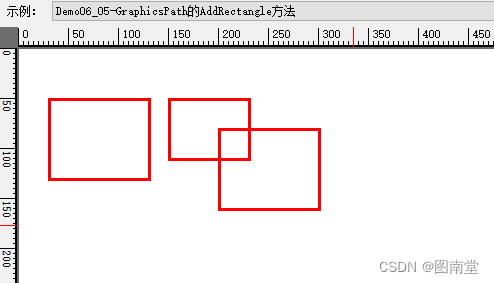
AddRectangle和AddRectangles 添加矩形
原型:
public void AddRectangle (System.Drawing.RectangleF rect);
public void AddRectangle (System.Drawing.Rectangle rect);
public void AddRectangles (System.Drawing.Rectangle[] rects);
public void AddRectangles (params System.Drawing.RectangleF[] rects);
定义矩形和矩形集,添加到路径中。
var rect = new Rectangle(30, 50, 100, 80);var rects = new RectangleF[]
{new RectangleF(150,50,80,60),new RectangleF(200,80,100,80)
};using (var myPath = new GraphicsPath())
{                myPath.AddRectangle(rect);myPath.AddRectangles(rects);e.Graphics.DrawPath(penRed, myPath);
}
AddString添加字符串
原型:
public void AddString (string s, System.Drawing.FontFamily family, int style, float emSize, System.Drawing.Point origin, System.Drawing.StringFormat? format);
public void AddString (string s, System.Drawing.FontFamily family, int style, float emSize, System.Drawing.PointF origin, System.Drawing.StringFormat? format);
public void AddString (string s, System.Drawing.FontFamily family, int style, float emSize, System.Drawing.Rectangle layoutRect, System.Drawing.StringFormat? format);
public void AddString (string s, System.Drawing.FontFamily family, int style, float emSize, System.Drawing.RectangleF layoutRect, System.Drawing.StringFormat? format);
| 参数 | 说明 |
|---|---|
| s | 待添加的文本 |
| family | FontFamily字体名称 |
| style | 文本样式,Bold-1,Italic-2,Regular-0,Strikeout-8,Underline-4 |
| emSize | 文本高度,单位:像素 |
| origin | 文本起始点,默认是左对齐时,是左上角 |
| format | 指定文本格式信息,例如行距和对齐方式 |
这里先随便给个示例吧,估计关于绘制文本,可以另起一篇。
// Create a GraphicsPath object.
GraphicsPath myPath = new GraphicsPath();// Set up all the string parameters.
string stringText = "我在学习GDI+";
FontFamily family = new FontFamily("Arial");
int fontStyle = (int)FontStyle.Italic;
int emSize = 38;//文本高度,像素
Point origin = new Point(200, 100);//文本开始绘制的左上角点StringFormat format = new StringFormat(StringFormatFlags.NoWrap);
format.Alignment = StringAlignment.Center;//水平居中
format.LineAlignment = StringAlignment.Center; // 垂直居中// Add the string to the path.
myPath.AddString(stringText,family,fontStyle,emSize,origin,format);e.Graphics.FillPath(Brushes.Green, myPath);//文本定位点
e.Graphics.FillEllipse(Brushes.Red, origin.X - 3, origin.Y - 3, 6, 6);

SetMarkers设置标记
原型:
public void SetMarkers ();
使用 SetMarkers 方法在 GraphicsPath 中的当前位置创建标记。使用 NextMarker 方法迭代路径中的现有标记。
标记用于分隔子路径组。两个标记之间可以包含一个或多个子路径。
[System.ComponentModel.Description("GraphicsPath的SetMarkers/ClearMarkers方法")]
public void Demo06_07(PaintEventArgs e)
{// Create a path and set two markers.GraphicsPath myPath = new GraphicsPath();myPath.AddLine(new Point(0, 0), new Point(50, 50));myPath.SetMarkers();Rectangle rect = new Rectangle(50, 50, 50, 50);myPath.AddRectangle(rect);myPath.SetMarkers();myPath.AddEllipse(100, 100, 100, 50);// Draw the path to screen.e.Graphics.DrawPath(new Pen(Color.Black, 2), myPath);var pathIterator =new GraphicsPathIterator(myPath);pathIterator.Rewind();var potins = myPath.PathPoints;var types = myPath.PathTypes;var height = 20;var markerIndex = 0;int startIndex;int endIndex;while(true){var resultCount = pathIterator.NextMarker(out startIndex, out endIndex);if (resultCount == 0) break;//Marker信息e.Graphics.DrawString($"Marker {markerIndex}:  Start: {startIndex} End: {endIndex}",Font,Brushes.Red,200,height);height += 20;//每段Marker的点与类型信息for (int i = startIndex; i <= endIndex; i++){e.Graphics.DrawString($"point {i}: ({potins[i].X},{potins[i].Y}) Type:{(int)types[i]}:{GetPathTypes((int)types[i])}",Font,Brushes.Black,250,height);height += 20;}markerIndex++;}myPath.ClearMarkers();pathIterator = new GraphicsPathIterator(myPath);pathIterator.Rewind();var count= pathIterator.NextMarker(out startIndex, out endIndex);//这里合成一个,0至19
}
/// <summary>
/// PathType转字符串
/// </summary>
/// <param name="pathType"></param>
/// <returns></returns>
private string GetPathTypes(int pathType)
{if (pathType == 0) return "0(起点)";List<string> typeStrs = new List<string>();while(true){if(pathType >= 0x80){typeStrs.Add("128(终点)");pathType -= 0x80;}else if (pathType >= 0x20){typeStrs.Add("32(标记)");pathType -= 0x20;}else if (pathType >=0x7){typeStrs.Add("7(屏蔽)");pathType -= 0x7;}else if(pathType >= 0x3){typeStrs.Add("3(Bezier)");pathType -= 0x3;}else if (pathType >= 1){typeStrs.Add("1(Line)");pathType -= 0x1;}if (pathType <= 0) break;}return string.Join("+",typeStrs.ToArray());
}

ClearMarkers清空标记
原型:
public void ClearMarkers ();
清除所有标记(Marker),合并为一个。
StartFigure开始新的图形
原型:
public void StartFigure ();
在不封闭当前图形(路径)下,新开一个图形,后续增加的路径将在此图形中。
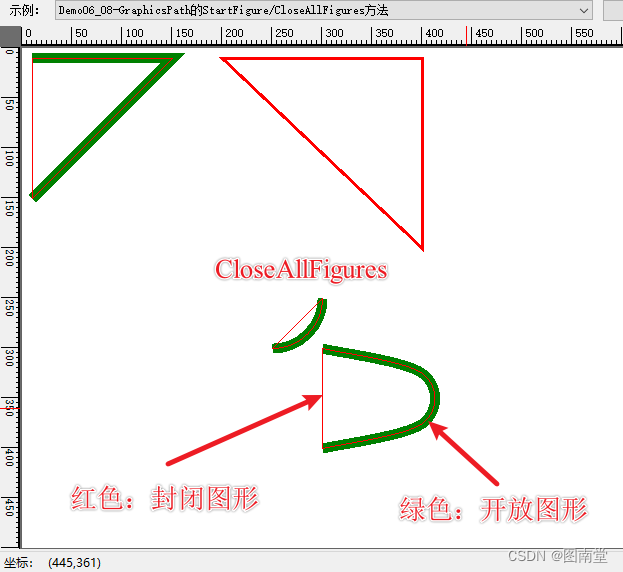
CloseAllFigures闭合所有图形、CloseFigure闭合当前图形
原型:
public void CloseAllFigures ();
public void CloseFigure ();
CloseAllFigures :闭合该路径中所有开放的图形并开始一个新图形。它通过从端点到起点连接一条线来闭合每个开放图形。
CloseFigure:闭合当前图形并开始新图形。
// 创建含多个开放路径的图形
GraphicsPath myPath = new GraphicsPath();
myPath.StartFigure();
myPath.AddLine(new Point(10, 10), new Point(150, 10));
myPath.AddLine(new Point(150, 10), new Point(10, 150));
myPath.StartFigure();
myPath.AddArc(200, 200, 100, 100, 0, 90);
myPath.StartFigure();
Point point1 = new Point(300, 300);
Point point2 = new Point(400, 325);
Point point3 = new Point(400, 375);
Point point4 = new Point(300, 400);
Point[] points = { point1, point2, point3, point4 };
myPath.AddCurve(points);// 绘制非封闭路径
e.Graphics.DrawPath(new Pen(Color.Green, 10), myPath);// 封闭所有路径.
myPath.CloseAllFigures();// 绘制封闭后路径
e.Graphics.DrawPath(new Pen(Color.Red, 1), myPath);myPath = new GraphicsPath();
myPath.StartFigure();
myPath.AddLine(new Point(200, 10), new Point(400, 10));
myPath.AddLine(new Point(400, 10), new Point(400, 200));
myPath.CloseFigure();e.Graphics.DrawPath(penRed, myPath);
【学习笔记】Windows GDI绘图目录