负载均衡案例
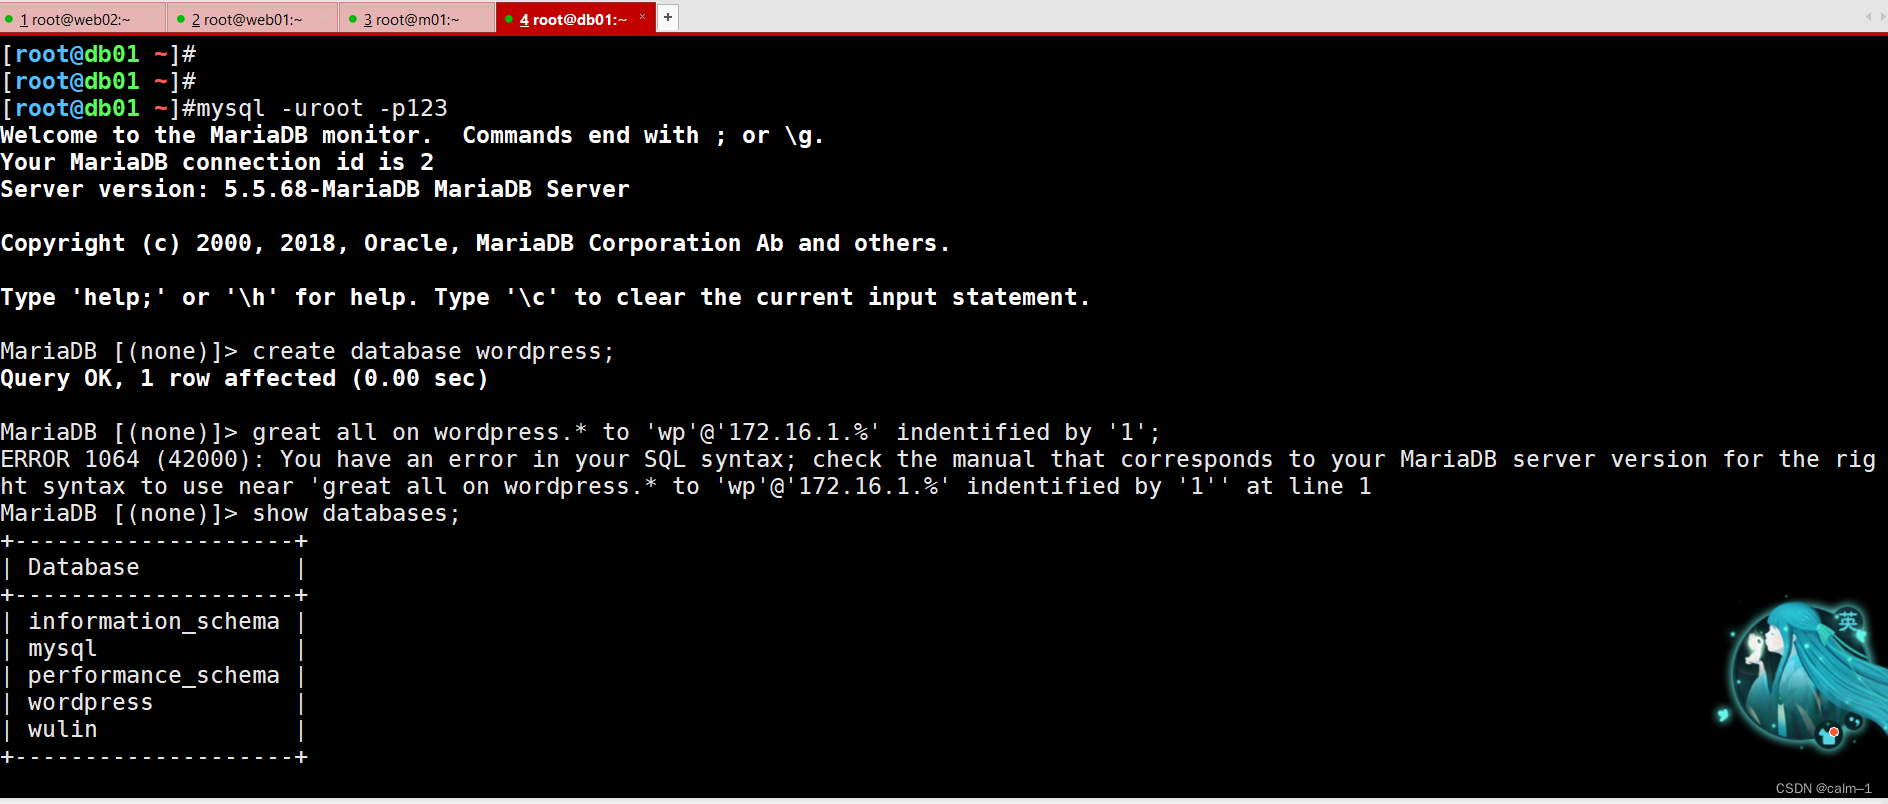
ERROR 1064 (42000): You have an error in your SQL syntax; check the manual that corresponds to your MariaDB server version for the right syntax to use near 'great all on wordpress.* to 'wp'@'172.16.1.%' indentified by '1'' at line 1
MariaDB [(none)]> show databases;
+--------------------+
| Database           |
+--------------------+
| information_schema |
| mysql              |
| performance_schema |
| wordpress          |
| wulin              |
+--------------------+
5 rows in set (0.00 sec)MariaDB [(none)]> select user,host from mysql.user;
+-------+------------+
| user  | host       |
+-------+------------+
| root  | 127.0.0.1  |
| wulin | 172.16.1.% |
| root  | ::1        |
| root  | localhost  |
| wulin | localhost  |
+-------+------------+
5 rows in set (0.00 sec)

[root@web02 ~]#useradd -u 1999 -s /sbin/nologin -M www
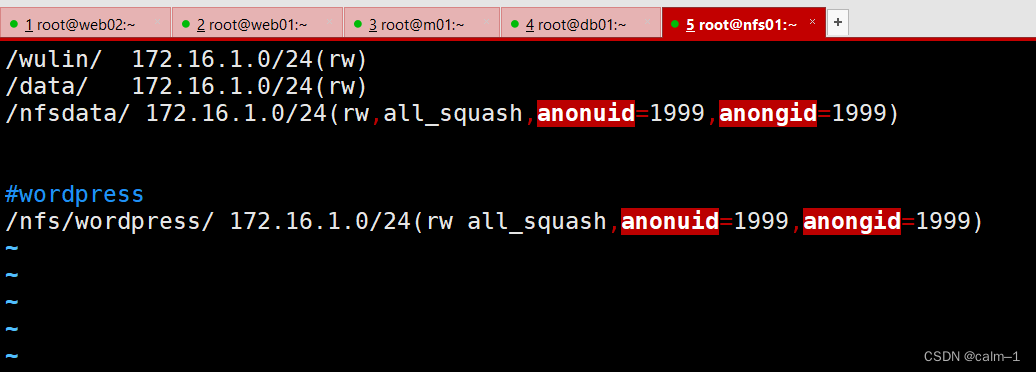
[root@nfs01 ~]#yum install rpcbind nfs -y
[root@nfs01 ~]#systemctl enable rpcbind nfs
[root@nfs01 ~]#systemctl start rpcbind nfs
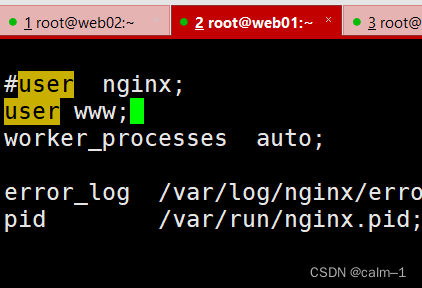
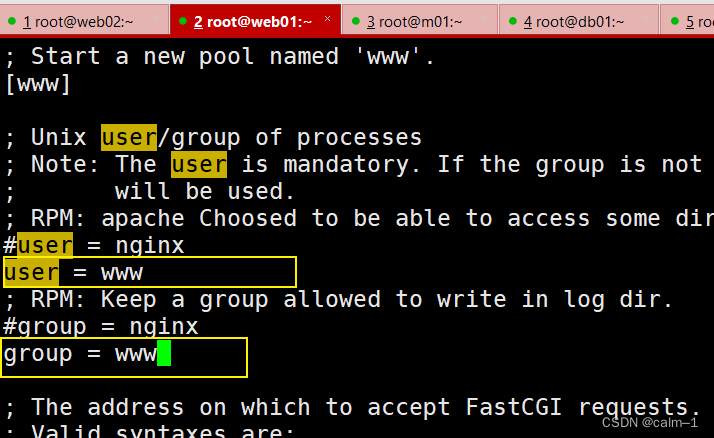
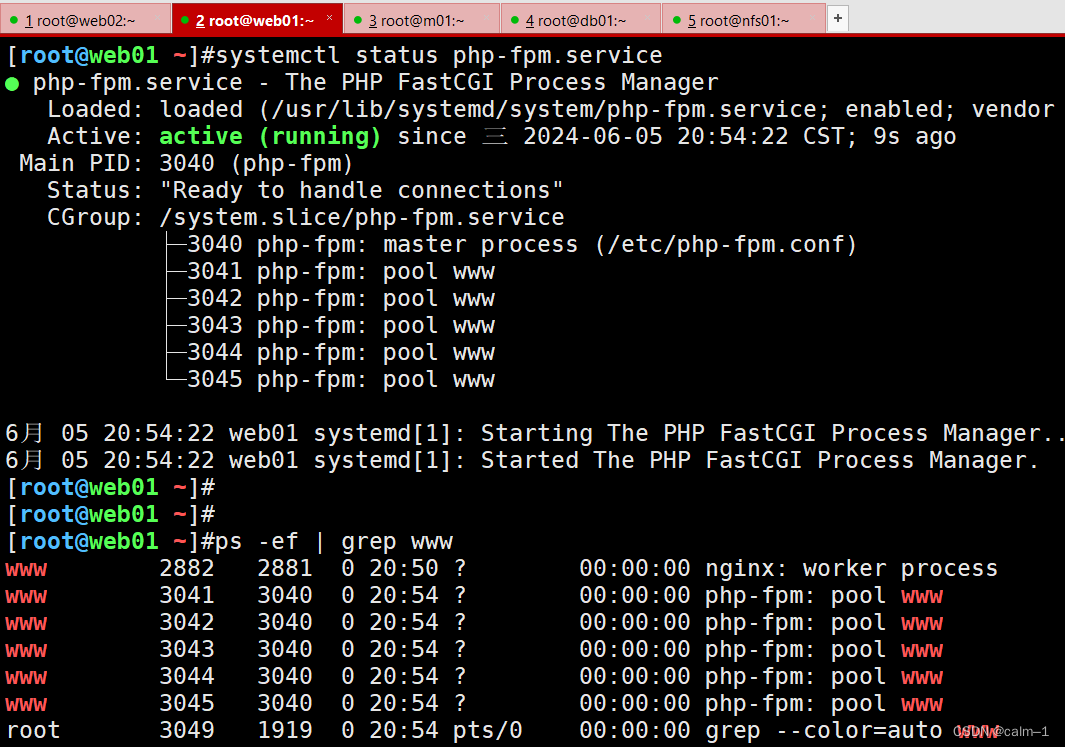
[root@web01 ~]#vim /etc/php-fpm.d/www.conf

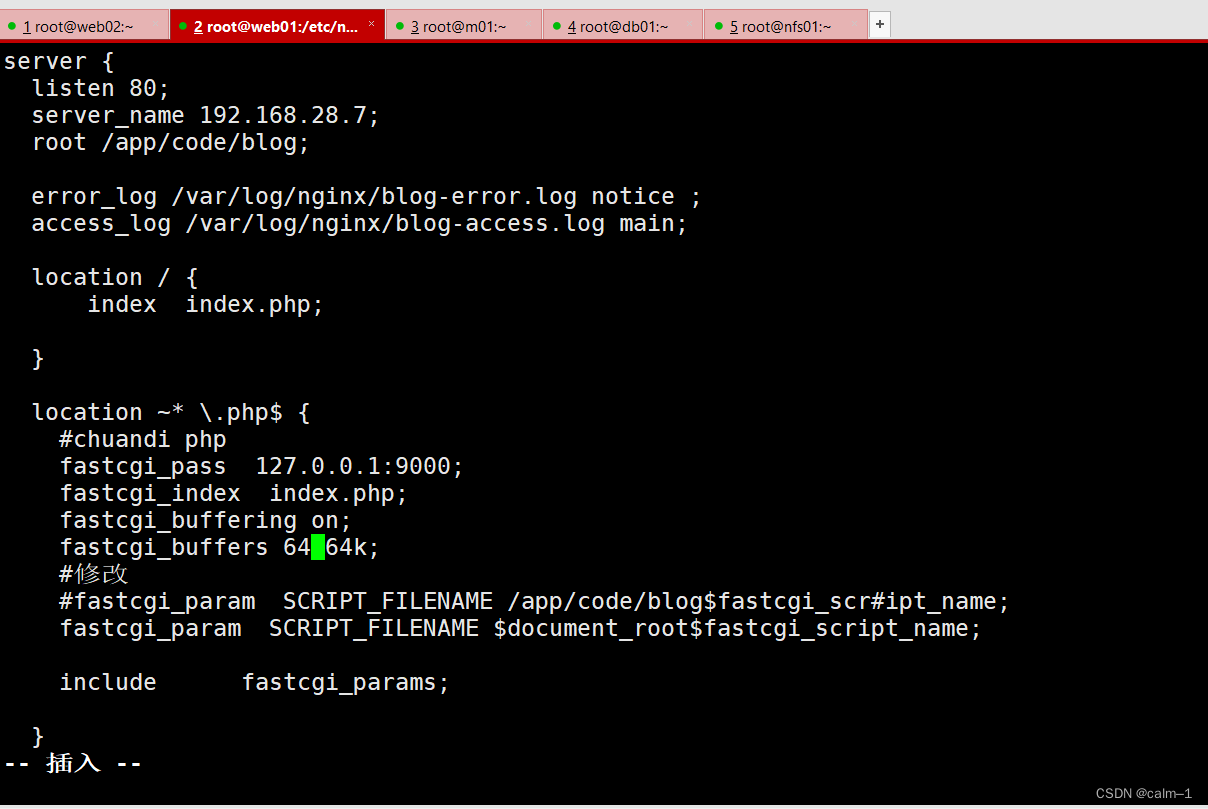
[root@web01 /etc/nginx/conf.d]#cat blog.wulinlinux.cn.conf
server {listen 80;server_name 192.168.28.7;root /app/code/blog;error_log /var/log/nginx/blog-error.log notice ;access_log /var/log/nginx/blog-access.log main;location / {index  index.php;}location ~* \.php$ {#chuandi phpfastcgi_pass  127.0.0.1:9000;fastcgi_index  index.php;fastcgi_buffering on;fastcgi_buffers 64 64k;#修改#fastcgi_param  SCRIPT_FILENAME /app/code/blog$fastcgi_scr#ipt_name;fastcgi_param  SCRIPT_FILENAME $document_root$fastcgi_script_name;include      fastcgi_params;}}
[root@web01 ~]#ll -d /app/code/blog/
drwxr-xr-x 5 nginx nginx 4096 5月  28 15:16 /app/code/blog/
[root@web01 ~]#
[root@web01 ~]#chown -R www.www /app/code/blog/
 进入浏览器进行查看

挂载nfs
mkdir -p /app/code/blog/wp-content/uploads
如果报错是因为没有安装nfs-utils
yum install -y nfs-utils
记得永久挂载(开机时候先去开存储服务器)
nginx代理缓存机制
nginx的http_proxy模块,可以实现类似于Squid的缓存功能。
Nginx对客户已经访问过的内容在Nginx服务器本地建立副本,这样在一段时间内再次访问该数据,就不需要通过N ginx服务器再次向后端服务器发出请求,所以能够减少Nginx服务器与后端服务器之间的网络流量,减轻网络拥塞,同时还能减小数据传输延迟,提高用户访问速度。
同时,当后端服务器宕机时,Nginx服务器上的副本资源还能够回应相关的用户请求,这样能够提高后端服务器的鲁棒性(健壮性)。
对于缓存,会有下面的几个疑问:
-缓存文件放在哪儿?
如何指定那些请求被缓存?
缓存的有效期是多久?
对于某些请求,是否可以不走缓存?
解决以上问题,nginx的缓存也就基本配置完成了。
缓存文件放在哪?
proxy_cache_path:Nginx使用该参数指定缓存位置。
proxy_cache:该参数为之前指定的缓存名称。
proxy_cache_path:有两个必填参数,
第一个参数为缓存目录。
第二个参数keys_zone指定缓存名称和占用内存空间的大小。
// An highlighted block
user www-data;
worker_processes auto; #表示服务器有几个内核就起几个work
pid /run/nginx.pid;  #进程编号http {proxy_cache_path /data/nginx/cache keys_zone=one:10m max_size=10g;upstream wulin.cn {server 127.0.0.1:8881; # 第一台服务器server 127.0.0.1:8882; # 第二台服务器server 127.0.0.1:8883; # 第三台服务器}server {listen 80; # 监听80端口proxy_cache one; # 指定缓存配置server_name test.wulin.cn; # 自己的域名或者IPlocation / {proxy_pass    http://test.wulin.cn;proxy_set_header Host  $host;proxy_set_header X-Real-IP $remote_addr;}}
}
注: 示例中的10m是对内存中缓存内容元数据信息大小的限制,如果想限制缓存总量大小,需要用max_size参数。
如何指定哪些请求被缓存?
Nginx 默认会缓存所有get 和 head方法的请求结果,缓存的key默认使用请求字符串。
自定义key
例如 proxy_cache_key
“ h o s t host hostrequest_uri$cookie_user”;
指定请求至少被发送了多少次以上时才缓存,可以防止低频请求被缓存。
例如 proxy_cache_min_uses 5;
指定哪些方法的请求被缓存
例如 proxy_cache_methods GET HEAD POST;
// An highlighted block
user www-data;
worker_processes auto; #表示服务器有几个内核就起几个work
pid /run/nginx.pid;  #进程编号http {proxy_cache_path /data/nginx/cache keys_zone=one:10m;upstream test.lazyfennec.cn {server 127.0.0.1:8881; # 第一台服务器server 127.0.0.1:8882; # 第二台服务器server 127.0.0.1:8883; # 第三台服务器}server {listen 80; # 监听80端口proxy_cache one; # 指定缓存配置server_name test.wukin.cn; # 自己的域名或者IPlocation / {proxy_pass    http://test.wulin.cn;proxy_set_header Host  $host;proxy_set_header X-Real-IP $remote_addr;proxy_cache_key $host$request_uri$cookie_user; # 指定缓存key}}
}
缓存有效期
默认情况下,缓存内容是长期存留的,除非缓存的总量超出限制。可以指定缓存有效时间,例如:
响应状态码为 200 302 时, 10分钟有效
proxy_cache_valid 200 302 10m;
对应任何状态码,5分钟有效
proxy_cache_valid any 5m;
// An highlighted block
user www-data;
worker_processes auto; #表示服务器有几个内核就起几个work
pid /run/nginx.pid;  #进程编号http {proxy_cache_path /data/nginx/cache keys_zone=one:10m;upstream test.wulin.cn {server 127.0.0.1:8881; # 第一台服务器server 127.0.0.1:8882; # 第二台服务器server 127.0.0.1:8883; # 第三台服务器}server {listen 80; # 监听80端口proxy_cache one; # 指定缓存配置server_name test.wulin.cn; # 自己的域名或者IPlocation / {proxy_pass    http://test.wulin.cn;proxy_set_header Host  $host;proxy_set_header X-Real-IP $remote_addr;proxy_cache_valid 200 302 10m;}}
}## 对于某些请求,是否可以不走缓存?
proxy_cache_bypass:该指令响应来自原始服务器而不是缓存。例如proxy_cache_bypass $cookie_nocache $arg_nocache$arg_comment;如果任何一个参数值不为空,或者不等于0,nginx就不会查找缓存,直接进行代理转发。```javascript
// An highlighted block
user www-data;
worker_processes auto; #表示服务器有几个内核就起几个work
pid /run/nginx.pid;  #进程编号http {proxy_cache_path /data/nginx/cache keys_zone=one:10m;upstream test.wulin.cn {server 127.0.0.1:8881; # 第一台服务器server 127.0.0.1:8882; # 第二台服务器server 127.0.0.1:8883; # 第三台服务器}server {listen 80; # 监听80端口proxy_cache one; # 指定缓存配置server_name test.wulin.cn; # 自己的域名或者IPlocation / {proxy_pass    http://test.wulin.cn;proxy_set_header Host  $host;proxy_set_header X-Real-IP $remote_addr;proxy_cache_bypass $cookie_nocache $arg_nocache$arg_comment; # 任意参数不为空则不走缓存}}
}
网页的缓存是由HTTP消息头中的“Cache-control”来控制的,常见的取值有private、no-cache、max-age、must-revalidate等,默认为private。
// An highlighted block
user www-data;
worker_processes auto; #表示服务器有几个内核就起几个work
pid /run/nginx.pid;  #进程编号events {use epoll;worker_connections 65535;
}http {proxy_cache_path /data/workspace/cache keys_zone=one:10m max_size=10g inactive=60m;proxy_cache_key "$scheme$request_method$request_uri";upstream origin.wulin.cn {server 127.0.0.1:9000;}server {listen 80; # 监听80端口proxy_cache one; # 指定缓存配置server_name test.wulin.cn; # 自己的域名或者IPlocation / {add_header X-proxy-Cache $upsteam_cache_status;include proxy_params;proxy_pass    http://origin.wulin.cn;}}server {listen 9000;root /data/workspace/nodejs/;index index.html index.htm;charset utf-8;include h5dp/basic.conf; # 引入外部的配置文件,即上边的图basic.conflocation / {try_files $uri $uri/ = 404;}}
}


