一、前言
本章主要讲解yolov10的C#接口,主要是使用微软开发的openvinocsharp工具加载yolov10模型,并做推理。
二、yolov10模型转换
这里为了演示,使用官方yolov10m模型(其他大小的模型同理)做演示,可从下方下载,当然也可以是自己训练好的模型
https://github.com/THU-MIG/yolov10/releases/download/v1.1/yolov10m.pt
该原始模型,需要被转换为openvinocsharp所支持的模型格式,为此需要建立一个yolov10的python环境,使用conda创建,requirements.txt 为 yolov10官方代码下的所需包
conda create -n yolov10 python=3.9
conda activate yolov10
pip install -r requirements.txt
pip install -e .
然后安装OpenVINO™环境,输入以下指令
pip install openvino==2024.1.0
在该创建好的虚拟环境,cd 至下载好的yolov10m.pt 所在目录,执行
yolo export model=yolov10m.pt format=onnx opset=11 simplify
ovc yolov10m.onnx
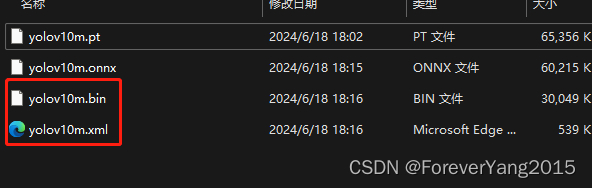
这样,pt文件的模型将转换为onnx文件,再换换为 openvino 所需的 bin 和 xml 文件格式
三、C#端openvinosharp相关包安装
首先需使用VS2022构建项目,其次将openvinosharp相关包安装上
<Project Sdk="Microsoft.NET.Sdk"><PropertyGroup><OutputType>Exe</OutputType><TargetFramework>net6.0</TargetFramework><ImplicitUsings>enable</ImplicitUsings><Nullable>enable</Nullable></PropertyGroup><ItemGroup><PackageReference Include="OpenCvSharp4" Version="4.9.0.20240103" /><PackageReference Include="OpenCvSharp4.Extensions" Version="4.9.0.20240103" /><PackageReference Include="OpenCvSharp4.runtime.win" Version="4.9.0.20240103" /><PackageReference Include="OpenVINO.CSharp.API" Version="2024.1.0.1" /><PackageReference Include="OpenVINO.CSharp.API.Extensions.OpenCvSharp" Version="1.0.4" /><PackageReference Include="OpenVINO.runtime.win" Version="2024.1.0.1" /></ItemGroup></Project>也就是 OpenCvSharp4、OpenCvSharp4.Extensions、OpenCvSharp4.runtime.win、OpenVINO.CSharp.API、OpenVINO.CSharp.API.Extensions.OpenCvSharp、OpenVINO.runtime.win,这6个包给装上
这部分参考自下面博客
【OpenVINO™】在C#中使用 OpenVINO™ 部署 YOLOv10 模型实现目标_yolov10 openvino-CSDN博客
四、C#加载yolo10推理代码
这样就可以创建C# winform项目,愉快地加载前面转换好的模型文件做前向推理了
// See https://aka.ms/new-console-template for more information
//Console.WriteLine("Hello, World!");using System.Reflection;
using System.Runtime.InteropServices;
using System;
using OpenVinoSharp;
using OpenVinoSharp.Extensions.utility;
using OpenVinoSharp.Extensions;
using OpenCvSharp;
using OpenCvSharp.Dnn;
using OpenVinoSharp.preprocess;namespace yolov10_det_opencvsharp
{internal class Program{static void Main(string[] args){string model_path = "./model_demo/yolov10m.xml";string image_path = "./model_demo/cat.png";string device = "AUTO";  //CPU GPU AUTO,可选AUTO模式// -------- Get OpenVINO runtime version --------OpenVinoSharp.Version version = Ov.get_openvino_version();Slog.INFO("---- OpenVINO INFO----");Slog.INFO("Description : " + version.description);Slog.INFO("Build number: " + version.buildNumber);Slog.INFO("Predict model files: " + model_path);Slog.INFO("Predict image  files: " + image_path);Slog.INFO("Inference device: " + device);Slog.INFO("Start yolov10 model inference.");//yolov10_det(model_path, image_path, device);yolov10_det_process(model_path, image_path , device);}static void yolov10_det(string model_path, string image_path, string device){DateTime start = DateTime.Now;// -------- Step 1. Initialize OpenVINO Runtime Core --------Core core = new Core();DateTime end = DateTime.Now;Slog.INFO("1. Initialize OpenVINO Runtime Core success, time spend: " + (end - start).TotalMilliseconds + "ms.");// -------- Step 2. Read inference model --------start = DateTime.Now;Model model = core.read_model(model_path);end = DateTime.Now;Slog.INFO("2. Read inference model success, time spend: " + (end - start).TotalMilliseconds + "ms.");OvExtensions.printf_model_info(model);// -------- Step 3. Loading a model to the device --------start = DateTime.Now;CompiledModel compiled_model = core.compile_model(model, device);end = DateTime.Now;Slog.INFO("3. Loading a model to the device success, time spend:" + (end - start).TotalMilliseconds + "ms.");// -------- Step 4. Create an infer request --------start = DateTime.Now;InferRequest infer_request = compiled_model.create_infer_request();end = DateTime.Now;Slog.INFO("4. Create an infer request success, time spend:" + (end - start).TotalMilliseconds + "ms.");// -------- Step 5. Process input images --------start = DateTime.Now;Mat image = new Mat(image_path); // Read image by opencvsharpint max_image_length = image.Cols > image.Rows ? image.Cols : image.Rows;Mat max_image = Mat.Zeros(new OpenCvSharp.Size(max_image_length, max_image_length), MatType.CV_8UC3);Rect roi = new Rect(0, 0, image.Cols, image.Rows);image.CopyTo(new Mat(max_image, roi));float factor = (float)(max_image_length / 640.0);end = DateTime.Now;Slog.INFO("5. Process input images success, time spend:" + (end - start).TotalMilliseconds + "ms.");// -------- Step 6. Set up input data --------start = DateTime.Now;Tensor input_tensor = infer_request.get_input_tensor();Shape input_shape = input_tensor.get_shape();Mat input_mat = CvDnn.BlobFromImage(max_image, 1.0 / 255.0, new OpenCvSharp.Size(input_shape[2], input_shape[3]), 0, true, false);float[] input_data = new float[input_shape[1] * input_shape[2] * input_shape[3]];Marshal.Copy(input_mat.Ptr(0), input_data, 0, input_data.Length);input_tensor.set_data<float>(input_data);end = DateTime.Now;Slog.INFO("6. Set up input data success, time spend:" + (end - start).TotalMilliseconds + "ms.");// -------- Step 7. Do inference synchronously --------infer_request.infer();start = DateTime.Now;infer_request.infer();end = DateTime.Now;Slog.INFO("7. Do inference synchronously success, time spend:" + (end - start).TotalMilliseconds + "ms.");// -------- Step 8. Get infer result data --------start = DateTime.Now;Tensor output_tensor = infer_request.get_output_tensor();int output_length = (int)output_tensor.get_size();float[] output_data = output_tensor.get_data<float>(output_length);end = DateTime.Now;Slog.INFO("8. Get infer result data success, time spend:" + (end - start).TotalMilliseconds + "ms.");-------- Step 9. Process reault  --------start = DateTime.Now;List<Rect> position_boxes = new List<Rect>();List<int> class_ids = new List<int>();List<float> confidences = new List<float>();// Preprocessing output resultsfor (int i = 0; i < output_data.Length / 6; i++){int s = 6 * i;if ((float)output_data[s + 4] > 0.5){float cx = output_data[s + 0];float cy = output_data[s + 1];float dx = output_data[s + 2];float dy = output_data[s + 3];int x = (int)((cx) * factor);int y = (int)((cy) * factor);int width = (int)((dx - cx) * factor);int height = (int)((dy - cy) * factor);Rect box = new Rect();box.X = x;box.Y = y;box.Width = width;box.Height = height;position_boxes.Add(box);class_ids.Add((int)output_data[s + 5]);confidences.Add((float)output_data[s + 4]);}}end = DateTime.Now;Slog.INFO("9. Process reault  success, time spend:" + (end - start).TotalMilliseconds + "ms.");for (int i = 0; i < class_ids.Count; i++){int index = i;Cv2.Rectangle(image, position_boxes[index], new Scalar(0, 0, 255), 2, LineTypes.Link8);Cv2.Rectangle(image, new OpenCvSharp.Point(position_boxes[index].TopLeft.X, position_boxes[index].TopLeft.Y + 30),new OpenCvSharp.Point(position_boxes[index].BottomRight.X, position_boxes[index].TopLeft.Y), new Scalar(0, 255, 255), -1);Cv2.PutText(image, class_ids[index] + "-" + confidences[index].ToString("0.00"),new OpenCvSharp.Point(position_boxes[index].X, position_boxes[index].Y + 25),HersheyFonts.HersheySimplex, 0.8, new Scalar(0, 0, 0), 2);}string output_path = Path.Combine(Path.GetDirectoryName(Path.GetFullPath(image_path)),Path.GetFileNameWithoutExtension(image_path) + "_result.jpg");Cv2.ImWrite(output_path, image);Slog.INFO("The result save to " + output_path);Cv2.ImShow("Result", image);Cv2.WaitKey(0);}static void yolov10_det_process(string model_path, string image_path, string device){DateTime start = DateTime.Now;// -------- Step 1. Initialize OpenVINO Runtime Core --------Core core = new Core();DateTime end = DateTime.Now;Slog.INFO("1. Initialize OpenVINO Runtime Core success, time spend: " + (end - start).TotalMilliseconds + "ms.");// -------- Step 2. Read inference model --------start = DateTime.Now;Model model = core.read_model(model_path);end = DateTime.Now;Slog.INFO("2. Read inference model success, time spend: " + (end - start).TotalMilliseconds + "ms.");OvExtensions.printf_model_info(model);PrePostProcessor processor = new PrePostProcessor(model);Tensor input_tensor_pro = new Tensor(new OvType(ElementType.U8), new Shape(1, 640, 640, 3));   //注意这个地方要改和模型窗口一致,模型是640,这里也要640InputInfo input_info = processor.input(0);InputTensorInfo input_tensor_info = input_info.tensor();input_tensor_info.set_from(input_tensor_pro).set_layout(new Layout("NHWC")).set_color_format(ColorFormat.BGR);PreProcessSteps process_steps = input_info.preprocess();process_steps.convert_color(ColorFormat.RGB).resize(ResizeAlgorithm.RESIZE_LINEAR).convert_element_type(new OvType(ElementType.F32)).scale(255.0f).convert_layout(new Layout("NCHW"));Model new_model = processor.build();// -------- Step 3. Loading a model to the device --------start = DateTime.Now;CompiledModel compiled_model = core.compile_model(new_model, device);end = DateTime.Now;Slog.INFO("3. Loading a model to the device success, time spend:" + (end - start).TotalMilliseconds + "ms.");// -------- Step 4. Create an infer request --------start = DateTime.Now;InferRequest infer_request = compiled_model.create_infer_request();end = DateTime.Now;Slog.INFO("4. Create an infer request success, time spend:" + (end - start).TotalMilliseconds + "ms.");// -------- Step 5. Process input images --------start = DateTime.Now;Mat image = new Mat(image_path); // Read image by opencvsharpint max_image_length = image.Cols > image.Rows ? image.Cols : image.Rows;Mat max_image = Mat.Zeros(new OpenCvSharp.Size(max_image_length, max_image_length), MatType.CV_8UC3);Rect roi = new Rect(0, 0, image.Cols, image.Rows);image.CopyTo(new Mat(max_image, roi));Cv2.Resize(max_image, max_image, new OpenCvSharp.Size(640, 640));   //注意这个地方要改和模型窗口一致,模型是640,这里也要640float factor = (float)(max_image_length / 640.0);end = DateTime.Now;Slog.INFO("5. Process input images success, time spend:" + (end - start).TotalMilliseconds + "ms.");// -------- Step 6. Set up input data --------start = DateTime.Now;Tensor input_tensor = infer_request.get_input_tensor();Shape input_shape = input_tensor.get_shape();byte[] input_data = new byte[input_shape[1] * input_shape[2] * input_shape[3]];//max_image.GetArray<int>(out input_data);Marshal.Copy(max_image.Ptr(0), input_data, 0, input_data.Length);IntPtr destination = input_tensor.data();Marshal.Copy(input_data, 0, destination, input_data.Length);end = DateTime.Now;Slog.INFO("6. Set up input data success, time spend:" + (end - start).TotalMilliseconds + "ms.");// -------- Step 7. Do inference synchronously --------infer_request.infer();start = DateTime.Now;infer_request.infer();end = DateTime.Now;Slog.INFO("7. Do inference synchronously success, time spend:" + (end - start).TotalMilliseconds + "ms.");// -------- Step 8. Get infer result data --------start = DateTime.Now;Tensor output_tensor = infer_request.get_output_tensor();int output_length = (int)output_tensor.get_size();float[] output_data = output_tensor.get_data<float>(output_length);end = DateTime.Now;Slog.INFO("8. Get infer result data success, time spend:" + (end - start).TotalMilliseconds + "ms.");-------- Step 9. Process reault  --------start = DateTime.Now;List<Rect> position_boxes = new List<Rect>();List<int> class_ids = new List<int>();List<float> confidences = new List<float>();// Preprocessing output resultsfor (int i = 0; i < output_data.Length / 6; i++){int s = 6 * i;if ((float)output_data[s + 4] > 0.2){float cx = output_data[s + 0];float cy = output_data[s + 1];float dx = output_data[s + 2];float dy = output_data[s + 3];int x = (int)((cx) * factor);int y = (int)((cy) * factor);int width = (int)((dx - cx) * factor);int height = (int)((dy - cy) * factor);Rect box = new Rect();box.X = x;box.Y = y;box.Width = width;box.Height = height;position_boxes.Add(box);class_ids.Add((int)output_data[s + 5]);confidences.Add((float)output_data[s + 4]);}}end = DateTime.Now;Slog.INFO("9. Process reault  success, time spend:" + (end - start).TotalMilliseconds + "ms.");for (int i = 0; i < class_ids.Count; i++){int index = i;Cv2.Rectangle(image, position_boxes[index], new Scalar(0, 0, 255), 2, LineTypes.Link8);Cv2.Rectangle(image, new OpenCvSharp.Point(position_boxes[index].TopLeft.X, position_boxes[index].TopLeft.Y + 30),new OpenCvSharp.Point(position_boxes[index].BottomRight.X, position_boxes[index].TopLeft.Y), new Scalar(0, 255, 255), -1);Cv2.PutText(image, class_ids[index] + "-" + confidences[index].ToString("0.00"),new OpenCvSharp.Point(position_boxes[index].X, position_boxes[index].Y + 25),HersheyFonts.HersheySimplex, 0.8, new Scalar(0, 0, 0), 2);}string output_path = Path.Combine(Path.GetDirectoryName(Path.GetFullPath(image_path)),Path.GetFileNameWithoutExtension(image_path) + "_result.jpg");Cv2.ImWrite(output_path, image);Slog.INFO("The result save to " + output_path);Cv2.ImShow("Result", image);Cv2.WaitKey(0);}}
}
五、输出结果
运行代码,可以得到统计的代码加载、预处理、推理的运行时间,并且得到识别结果,类别号、置信度、以及位置
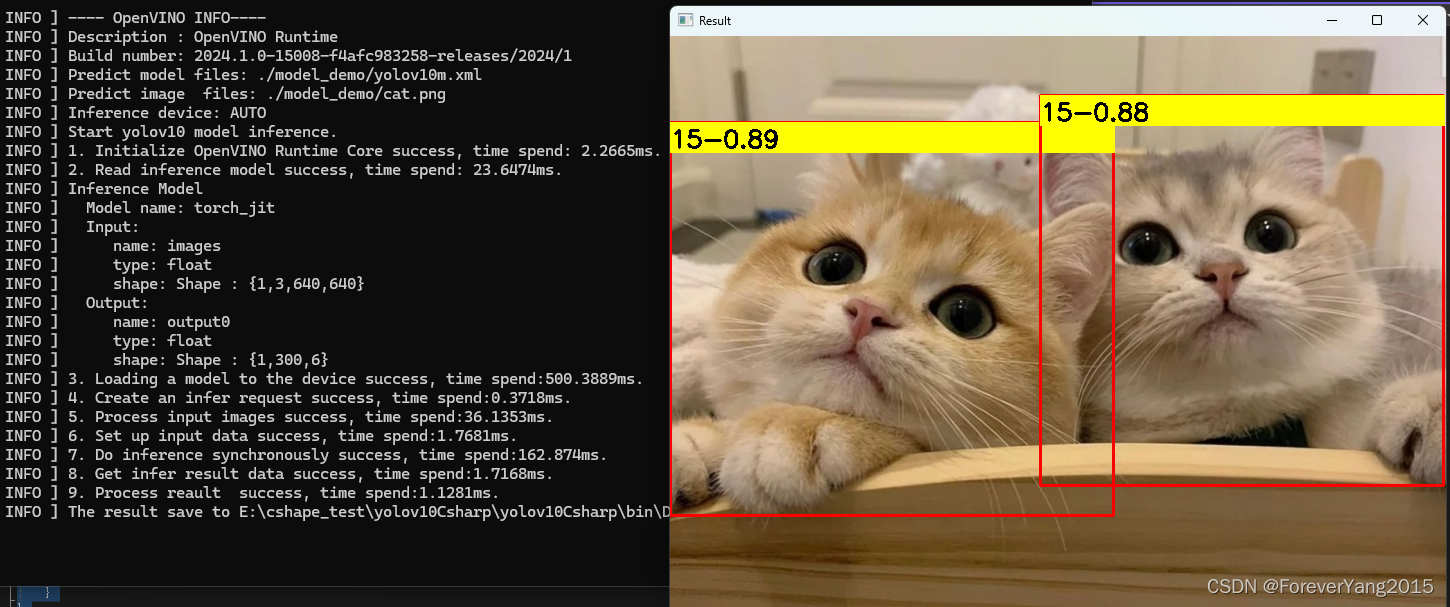
有显卡的话,可将模型AUTO改为GPU,运行时间会更快些。。。