1、签名自定义组件代码示例:
qianMing.vue
<template><!-- 容器,包含画布和清除按钮 --><div class="signature-pad-container"><!-- 画布元素,用于用户签名 --><canvasref="canvas" <!-- 用于获取canvas DOM元素的引用 -->class="signature-pad" <!-- 自定义类名,便于样式控制 -->@mousedown="startDrawing" <!-- 鼠标按下时开始绘图 -->@mousemove="draw" <!-- 鼠标移动时持续绘图 -->@mouseup="stopDrawing" <!-- 鼠标抬起时停止绘图 -->@mouseleave="stopDrawing" <!-- 鼠标离开画布时停止绘图 -->@touchstart.prevent="startDrawing" <!-- 触摸屏幕开始绘图,阻止默认行为 -->@touchmove.prevent="draw" <!-- 触摸滑动时绘图,阻止默认行为 -->@touchend="stopDrawing" <!-- 触摸结束时停止绘图 -->></canvas><!-- 清除画布按钮 --><button @click="clearCanvas">Clear</button></div>
</template><script>
export default {// 数据属性定义data() {return {isDrawing: false, // 绘制状态标志,true为正在绘制context: null, // 2D渲染上下文,用于操作画布lastX: 0, // 上一次鼠标或触摸点的X坐标lastY: 0 // 上一次鼠标或触摸点的Y坐标};},// 挂载后执行,用于初始化画布mounted() {const canvas = this.$refs.canvas; // 获取canvas元素canvas.width = canvas.offsetWidth; // 设置画布宽度为元素显示宽度canvas.height = canvas.offsetHeight; // 设置画布高度为元素显示高度this.context = canvas.getContext('2d'); // 获取2D渲染上下文this.context.strokeStyle = '#000'; // 设置线颜色为黑色this.context.lineWidth = 2; // 设置线条宽度为2},// 方法集合methods: {// 开始绘图的处理函数startDrawing(event) {this.isDrawing = true; // 设置绘制状态为true// 获取事件坐标const { offsetX, offsetY } = this.getEventCoords(event);this.lastX = offsetX; // 记录起始点X坐标this.lastY = offsetY; // 记录起始点Y坐标this.context.beginPath(); // 开始一条新的路径this.context.moveTo(this.lastX, this.lastY); // 移动到起始点},// 绘图过程中的处理函数draw(event) {// 如果不是绘制状态则返回if (!this.isDrawing) return;// 获取当前坐标const { offsetX, offsetY } = this.getEventCoords(event);// 从上一点画直线到当前位置this.context.lineTo(offsetX, offsetY);this.context.stroke(); // 绘制路径// 更新最后的位置坐标this.lastX = offsetX;this.lastY = offsetY;},// 停止绘图的处理函数stopDrawing() {this.isDrawing = false; // 设置绘制状态为falsethis.context.closePath(); // 结束当前路径},// 清除画布的方法clearCanvas() {const canvas = this.$refs.canvas; // 获取canvas元素// 清除整个画布this.context.clearRect(0, 0, canvas.width, canvas.height);},// 获取事件坐标的方法,兼容触控和鼠标事件getEventCoords(event) {// 如果是触控事件,则计算相对于canvas的位置if (event.touches && event.touches.length > 0) {const rect = this.$refs.canvas.getBoundingClientRect(); // 获取canvas元素的边界信息return {offsetX: event.touches[0].clientX - rect.left, // 触摸点相对画布左边界的X坐标offsetY: event.touches[0].clientY - rect.top // 触摸点相对画布上边界的Y坐标};} else { // 否则是鼠标事件return {offsetX: event.offsetX, // 鼠标事件直接提供相对于元素内部的坐标offsetY: event.offsetY};}}}
};
</script><style scoped>
/* 容器样式 */
.signature-pad-container {position: relative; /* 使子元素可以绝对定位 */width: 100%; /* 宽度充满父容器 */height: 100px; /* 高度固定 */border: 1px solid #ccc; /* 边框样式 */border-radius: 15px; /* 边框圆角 */
}/* 画布样式 */
.signature-pad {width: 100%; /* 宽度充满容器 */height: 100%; /* 高度充满容器 */cursor: crosshair; /* 鼠标指针为十字准星 */touch-action: none; /* 禁止浏览器对触摸事件的默认处理 */
}/* 清除按钮样式 */
button {position: absolute; /* 绝对定位 */top: 10px; /* 距离顶部距离 */right: 10px; /* 距离右侧距离 */z-index: 10; /* 确保按钮在最上层 */
}
</style>
2、在script中引入自定义组件
<script>
import qianMing from "@/components/qianMing.vue";
export default {name: 'App',data() { return {}},methods: {},components: {qianMing}
}
</script>
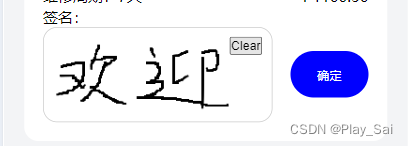
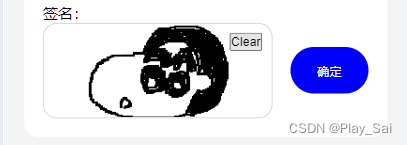
完成上述步骤即可实现网页签名效果。
效果图:
