文章目录
- 一、Qt界面布局
- 二、Qt水平布局--QHBoxLayout
- 三、Qt竖直布局
- 四、Qt栅格布局
- 五、分裂器布局代码实现
- 六、setLayout使用说明
- 七、布局切换与布局删除重构
- 1.如何添加右键菜单
- 2.布局切换与布局删除重构
一、Qt界面布局
Qt的界面布局类型可分为如下几种
-
水平布局(Horizontal Layout):
水平布局将控件水平排列。控件按照从左到右的顺序排列,可以设置控件之间的间距。
-
竖直布局(Vertical Layout):
竖直布局将控件垂直排列。控件按照从上到下的顺序排列,也可以设置控件之间的间距。
-
栅格布局(Grid Layout):
栅格布局将控件排列在网格中。你可以指定控件的行和列,以及行和列的间距。栅格布局非常适合需要将控件整齐排列在表格中的场景。
-
分裂器布局(Splitter Layout):
分裂器布局允许用户通过拖动分隔条来调整相邻控件的大小。这种布局通常用于需要动态调整空间分配的界面,例如在文本编辑器中调整工具栏和文本区域的大小。
除了这些基本布局,Qt 还提供了其他一些布局管理器,例如:
- 表单布局(Form Layout):用于创建表单界面,控件和标签按照两列排列。
- 堆栈布局(Stack Layout):允许在同一个空间内堆叠多个控件,并且一次只能显示一个。
- 工具箱布局(Tool Box Layout):类似于网页上的选项卡,允许用户在多个页面之间切换。
ui设计器设计界面很方便,为什么还要手写代码?
- 更好的控制布局
- 更好的设置qss
- 代码复用
二、Qt水平布局–QHBoxLayout
介绍手写水平布局,不使用ui设计器来设置布局,因此,可将ui文件等删掉
-
创建水平布局
#include <QHBoxLayout> QHBoxLayout *pHLay = new QHBoxLayout(父窗口指针); //一般填this -
相关方法
- addWidget:在布局中添加一个控件
- addLayout:在布局里添加布局
- setMargin:设置水平布局最外边界与相邻空间左上右下的间隙,这时左上右下的间隙相同;如果想设置成不同,可以使用setContentMargins方法
- setSpacing:设置相邻控件之间的间隙,默认值大概是7
- addSpacing:在setSpacing的基础上进行相加,例如:addSpacing(-7),相当于两个控件之间没有距离;addSpacing(13)相当于setSpacing(20);
- addStretch:在水平布局时添加一个水平的伸缩空间(QSpacerItem),在竖直布局时,添加一个竖直的伸缩空间
示例:
xx.h:
#pragma once#include <QtWidgets/QWidget>class ch2_3_hLayout : public QWidget
{Q_OBJECTpublic:ch2_3_hLayout(QWidget *parent = Q_NULLPTR);};
xx.cpp
#include "ch2_3_hLayout.h"
#include <QHBoxLayout>
#include <QLabel>
#include <QLineEdit>
#include <QPushButton>
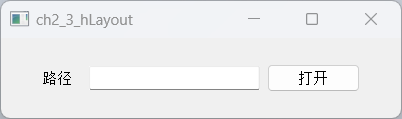
#include <QDebug>ch2_3_hLayout::ch2_3_hLayout(QWidget *parent): QWidget(parent)
{this->resize(400, 80);//新建三个控件QLabel* pPath = new QLabel(this);pPath->setObjectName("pPath");//pPath->setFixedSize(40, 32);pPath->setText(u8"路径");QLineEdit* pEdit = new QLineEdit(this);pEdit->setObjectName("pEdit");//pEdit->setFixedSize(100, 32);pEdit->setMinimumWidth(50);QPushButton* pBtn = new QPushButton(this);pBtn->setObjectName("pBtn");//pBtn->setFixedSize(50, 32);pBtn->setText(u8"打开");//创建水平布局QHBoxLayout* pHLay = new QHBoxLayout(this);//pHLay->setMargin(0); //设置水平布局最外边界与相邻空间左上右下的间隙//pHLay->setContentsMargins(0, 100, 10, 0); //设置左上右下的间隙//将三个控件添加到水平布局中pHLay->addStretch(); //添加水平弹簧pHLay->addWidget(pPath);pHLay->addSpacing(10); //添加相邻两个控件间的间隙pHLay->addWidget(pEdit);pHLay->addWidget(pBtn);pHLay->addStretch();
}
main.cpp:
#include "ch2_3_hLayout.h"
#include <QtWidgets/QApplication>int main(int argc, char *argv[])
{QApplication a(argc, argv);ch2_3_hLayout w;w.show();return a.exec();
}
运行结果:
三、Qt竖直布局
-
创建水平布局
#include <QVBoxLayout> QVBoxLayout *pMainVLay = new QVBoxLayout(父窗口指针); //一般填this -
相关方法:与水平布局类似
- addWidget:在布局中添加一个控件
- addLayout:在布局里添加布局
- setMargin:设置水平布局最外边界与相邻空间左上右下的间隙,这时左上右下的间隙相同;如果想设置成不同,可以使用setContentMargins方法
- setSpacing:设置相邻控件之间的间隙,默认值大概是7
- addSpacing:在setSpacing的基础上进行相加,例如:addSpacing(-7),相当于两个控件之间没有距离;addSpacing(13)相当于setSpacing(20);
- addStretch:在水平布局时添加一个水平的伸缩空间(QSpacerItem),在竖直布局时,添加一个竖直的伸缩空间
示例:
xx.h:
#ifndef WIDGET_H
#define WIDGET_H#include <QWidget>class Widget : public QWidget
{Q_OBJECTpublic:Widget(QWidget *parent = nullptr);~Widget();
};
#endif // WIDGET_H
xx.cpp:
#include "widget.h"
#include <QPushButton>
#include <QVBoxLayout>Widget::Widget(QWidget *parent): QWidget(parent)
{//新建三个按钮QPushButton *pBtn1 = new QPushButton(this);pBtn1->setObjectName("pBtn1");pBtn1->setText("pBtn1");// pBtn1->setFixedSize(40, 32);QPushButton *pBtn2 = new QPushButton(this);pBtn2->setObjectName("pBtn2");pBtn2->setText("pBtn2");// pBtn1->setFixedSize(40, 32);QPushButton *pBtn3 = new QPushButton(this);pBtn3->setObjectName("pBtn3");pBtn3->setText("pBtn3");// pBtn1->setFixedSize(40, 32);//新建竖直布局QVBoxLayout *pVLay = new QVBoxLayout(this);// pVLay->setMargin(100);// pVLay->setContentsMargins(80, 70, 60, 50);pVLay->addWidget(pBtn1);pVLay->addSpacing(10);pVLay->addWidget(pBtn2);pVLay->addSpacing(50);pVLay->addWidget(pBtn3);
}Widget::~Widget()
{}
main.cpp:
#include "widget.h"#include <QApplication>int main(int argc, char *argv[])
{QApplication a(argc, argv);Widget w;w.show();return a.exec();
}
运行结果:

四、Qt栅格布局
-
创建栅格布局
#include <QGridLayout> QGridLayout *pGridLayout = new QGridLayout(this); -
相关方法:与水平布局类似
-
栅格布局添加控件
class Q_WIDGETS_EXPORT QGridLayout : public QLayout {//...inline void addWidget(QWidget *w) { QLayout::addWidget(w); }//基于行、列、对齐方式来添加控件void addWidget(QWidget *, int row, int column, Qt::Alignment = Qt::Alignment());//基于行、列、跨多少行、跨多少列、对齐方式来添加控件void addWidget(QWidget *, int row, int column, int rowSpan, int columnSpan, Qt::Alignment = Qt::Alignment());//基于行、列、对齐方式来添加子布局void addLayout(QLayout *, int row, int column, Qt::Alignment = Qt::Alignment());void addLayout(QLayout *, int row, int column, int rowSpan, int columnSpan, Qt::Alignment = Qt::Alignment());//... } -
栅格布局设置间隙
-
设置水平间距
pGridLayout->setHorizontalSpacing(10); -
设置垂直间距
pGridLayout->setVerticalSpacing(10);
-
-
示例:
xx.h:
#ifndef WIDGET_H
#define WIDGET_H#include <QWidget>class Widget : public QWidget
{Q_OBJECTpublic:Widget(QWidget *parent = nullptr);~Widget();
};
#endif // WIDGET_H
xx.cpp:
#include "widget.h"
#include <QGridLayout>
#include <QPushButton>
#include <QLabel>
#include <QLineEdit>
#include <QCheckBox>
#include <QDebug>Widget::Widget(QWidget *parent): QWidget(parent)
{//无边框窗口且可以最大化与最小化this->setWindowFlags(Qt::FramelessWindowHint | Qt::WindowMinMaxButtonsHint);/**新建控件**///头像QLabel* pImageLabel = new QLabel(this);QPixmap pixMap(":/resources/user_image.png");pImageLabel->setFixedSize(150, 150);pixMap.scaled(pImageLabel->size(), Qt::KeepAspectRatio);pImageLabel->setPixmap(pixMap);pImageLabel->setScaledContents(true);//用户名QLineEdit* pUserNameLineEdit = new QLineEdit(this);pUserNameLineEdit->setFixedSize(300, 50);pUserNameLineEdit->setPlaceholderText("QQ号码/手机/邮箱"); //设置提示信息//密码QLineEdit* pPwdLineEdit = new QLineEdit(this);pPwdLineEdit->setFixedSize(300, 50);pPwdLineEdit->setPlaceholderText("密码");pPwdLineEdit->setEchoMode(QLineEdit::Password); //密码模式//找回密码QPushButton* pForgetButton = new QPushButton(this);pForgetButton->setText("找回密码");pForgetButton->setFixedWidth(80);//记住密码QCheckBox* pRemCheckBox = new QCheckBox(this);pRemCheckBox->setText("记住密码");//自动登陆QCheckBox* pAutoLoginCheckBox = new QCheckBox(this);pAutoLoginCheckBox->setText("自动登陆");//登陆QPushButton* pLoginBtn = new QPushButton(this);pLoginBtn->setFixedHeight(48);pLoginBtn->setText("登陆");//注册账号QPushButton* pRegisterBtn = new QPushButton(this);pRegisterBtn->setFixedHeight(48);pRegisterBtn->setText("注册账号");//新建栅格布局QGridLayout* pGridLayout = new QGridLayout(this);pGridLayout->addWidget(pImageLabel, 0, 0, 3, 1);pGridLayout->addWidget(pUserNameLineEdit, 0, 1, 1, 2);pGridLayout->addWidget(pPwdLineEdit, 1, 1, 1, 2);pGridLayout->addWidget(pForgetButton, 2, 1, 1, 1);pGridLayout->addWidget(pRemCheckBox, 2, 2, 1, 1, Qt::AlignLeft | Qt::AlignVCenter);pGridLayout->addWidget(pAutoLoginCheckBox, 2, 2, 1, 1, Qt::AlignRight | Qt::AlignVCenter);pGridLayout->addWidget(pLoginBtn, 3, 1, 1, 2);pGridLayout->addWidget(pRegisterBtn, 4, 1, 1, 2);//设置水平布局与垂直布局pGridLayout->setHorizontalSpacing(20);//pGridLayout->setVerticalSpacing(20);pGridLayout->setContentsMargins(30, 30, 30, 30);
}Widget::~Widget() {}
main.cpp
#include "widget.h"#include <QApplication>int main(int argc, char *argv[])
{QApplication a(argc, argv);Widget w;w.show();return a.exec();
}
运行结果:

五、分裂器布局代码实现
在Qt设计器中使用两个按钮实现分裂器

-
水平分裂器
QSplitter* pHSplitter = new QSplitter(Qt::Horizontal, this); -
竖直分裂器
QSplitter* pVSplitter = new QSplitter(Qt::Vertical, pHSplitter); -
分裂器也是
QWidget的子类,因此,分裂器也有addWidget方法,而布局也可以使用addWidget往布局里添加分裂器。
示例:
xx.h:
#ifndef WIDGET_H
#define WIDGET_H#include <QWidget>class Widget : public QWidget
{Q_OBJECTpublic:Widget(QWidget *parent = nullptr);~Widget();
};
#endif // WIDGET_H
xx.cpp:
#include "widget.h"
#include <QHBoxLayout>
#include <QSplitter>
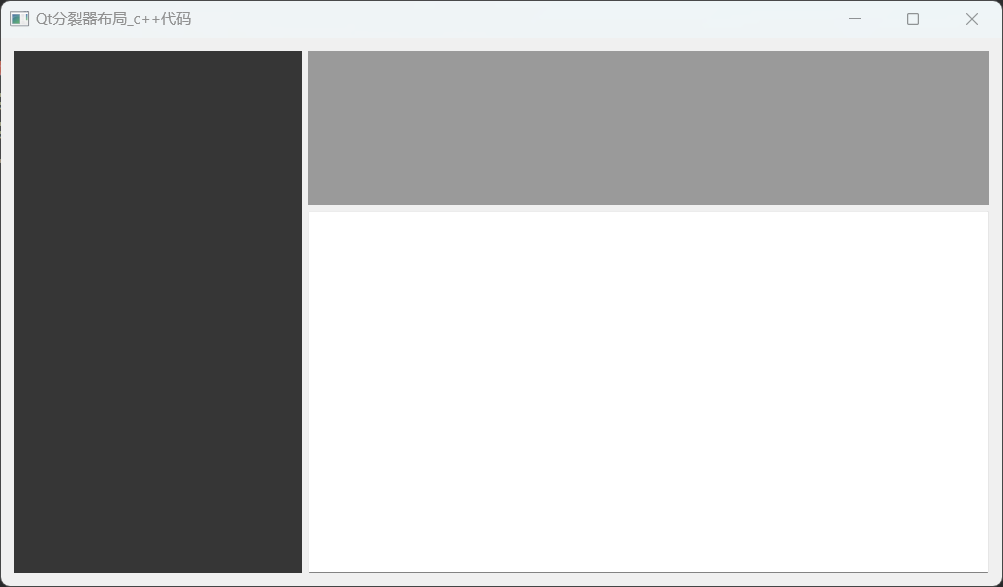
#include <QTextBrowser>Widget::Widget(QWidget *parent): QWidget(parent)
{this->setWindowTitle("Qt分裂器布局_c++代码");QHBoxLayout* pHboxLayout = new QHBoxLayout(this);//整体的水平分裂器QSplitter* pHSplitter = new QSplitter(Qt::Horizontal, this);//左侧widgetQWidget* pLeftWidget = new QWidget(this);pLeftWidget->setStyleSheet("background-color:rgb(54, 54, 54)");pLeftWidget->setMinimumWidth(200);//分裂器添加widgetpHSplitter->addWidget(pLeftWidget);//右侧的竖直分裂器QSplitter* pVSplitter = new QSplitter(Qt::Vertical, pHSplitter);//在拖动到位并弹起鼠标后再显式分隔条pVSplitter->setOpaqueResize(false);//右侧顶部widgetQWidget* pRightTopWidget = new QWidget(this);pRightTopWidget->setStyleSheet("background-color:rgb(154, 154, 154)");//右侧底部窗体QTextBrowser* pRightBottom = new QTextBrowser(this);pVSplitter->addWidget(pRightTopWidget);pVSplitter->addWidget(pRightBottom);pHSplitter->addWidget(pVSplitter);//布局添加分裂器pHboxLayout->addWidget(pHSplitter);//设置整体布局//this->setLayout(pHboxLayout);
}Widget::~Widget() {}
main.cpp:
#include "widget.h"#include <QApplication>int main(int argc, char *argv[])
{QApplication a(argc, argv);Widget w;w.show();return a.exec();
}
运行结果:
六、setLayout使用说明
QWidget::setLayout(QLayout *layout) 是 Qt 框架中的一个成员函数,用于为窗口小部件(widget)设置布局管理器(layout manager)。
- 设置此窗口小部件的布局管理器为
layout。 - 如果此窗口小部件上已经安装了布局管理器,
QWidget不会允许你安装另一个。你必须首先删除现有的布局管理器(由layout()返回),然后才能使用新的布局调用setLayout()。 - 如果
layout是另一个窗口小部件上的布局管理器,setLayout()将重新为其设置父级,并使其成为此窗口小部件的布局管理器。
示例:
QVBoxLayout *layout = new QVBoxLayout;
layout->addWidget(formWidget);
setLayout(layout);
还可以通过将窗口小部件作为参数传递给布局的构造函数来设置布局,这样窗口小部件就会自动接管布局的所有权。
七、布局切换与布局删除重构
1.如何添加右键菜单
-
菜单事件
void contextMenuEvent(QContextMenuEvent* event) override; -
设置菜单策略
this->setContextMenuPolicy(Qt::DefaultContextMenu); -
创建菜单
void Widget::initMenu() {m_pMenu = new QMenu(this);QAction *pAction1 = new QAction("查看");QAction *pAction2 = new QAction("排序方式");QAction *pAction3 = new QAction("刷新");m_pMenu->addAction(pAction1);m_pMenu->addAction(pAction2);m_pMenu->addAction(pAction3); } -
弹出菜单
void Widget::contextMenuEvent(QContextMenuEvent* event)
{m_pMenu->exec(QCursor::pos());
}
示例:
xx.h:
#ifndef WIDGET_H
#define WIDGET_H#include <QWidget>
#include <QMenu>class Widget : public QWidget
{Q_OBJECTpublic:Widget(QWidget *parent = nullptr);~Widget();//菜单事件void contextMenuEvent(QContextMenuEvent* event) override;void initMenu();    //创建菜单private:QMenu* m_pMenu = nullptr;
};
#endif // WIDGET_H
xx.cpp:
#include "widget.h"
#include <QAction>
#include <QMessageBox>Widget::Widget(QWidget *parent): QWidget(parent)
{this->setWindowFlags(Qt::FramelessWindowHint | Qt::WindowMinMaxButtonsHint);//设置菜单策略this->setContextMenuPolicy(Qt::DefaultContextMenu);initMenu(); //初始化菜单
}Widget::~Widget() {}void Widget::contextMenuEvent(QContextMenuEvent* event)
{m_pMenu->exec(QCursor::pos());
}void Widget::initMenu()
{m_pMenu = new QMenu(this);QAction *pAction1 = new QAction("查看");QAction *pAction2 = new QAction("排序方式");QAction *pAction3 = new QAction("刷新");m_pMenu->addAction(pAction1);m_pMenu->addAction(pAction2);m_pMenu->addAction(pAction3);connect(pAction1, &QAction::triggered, [=]{QMessageBox::information(this, "title", "查看");});
}
main.cpp:
#include "widget.h"#include <QApplication>int main(int argc, char *argv[])
{QApplication a(argc, argv);Widget w;w.show();return a.exec();
}
运行结果:

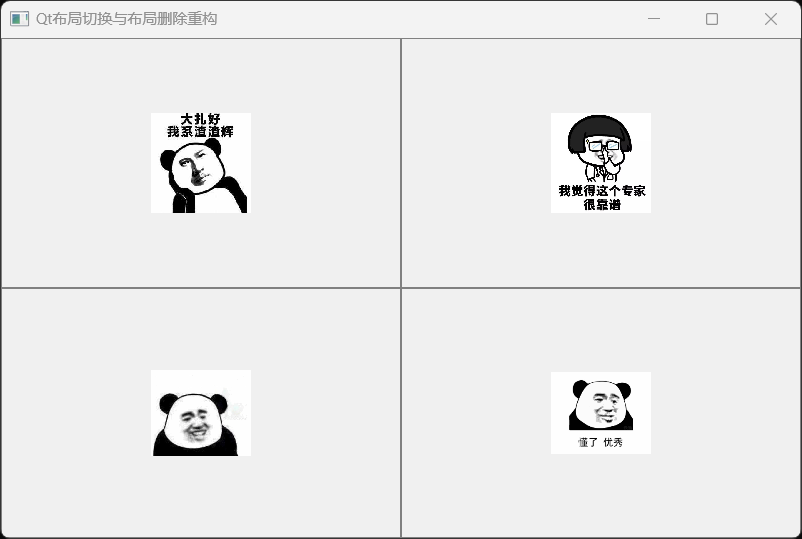
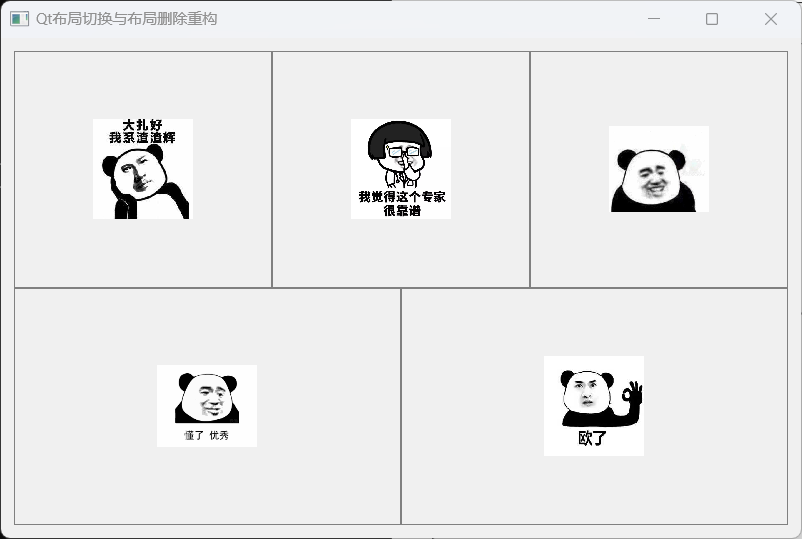
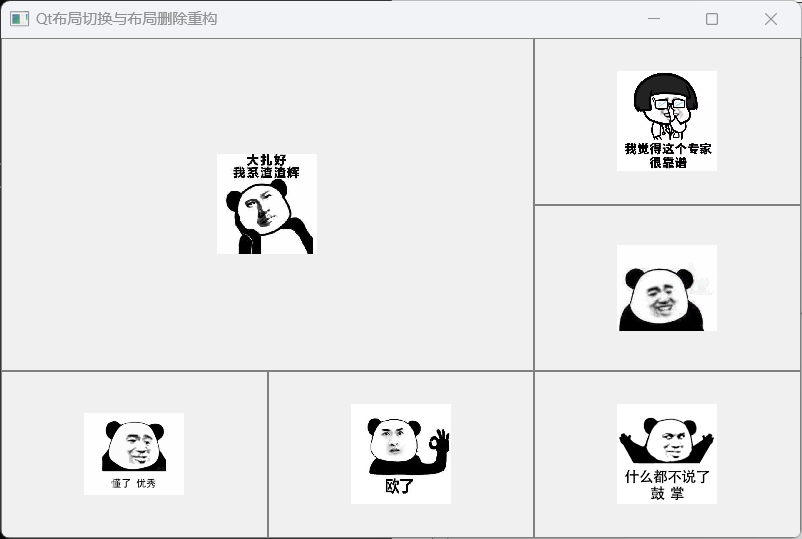
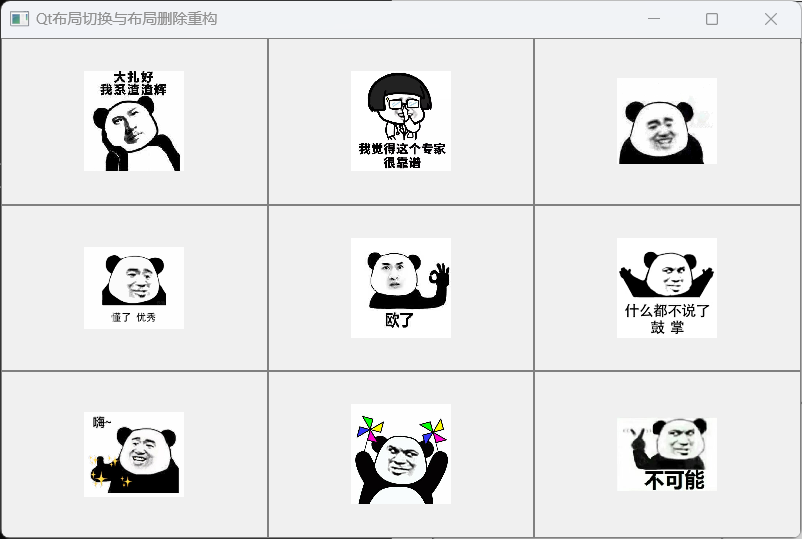
2.布局切换与布局删除重构
通过右键菜单项,实现布局的切换与布局删除重构。
示例:
SwitchWidget.h:
#pragma once#include <QtWidgets/QWidget>
#include <QLabel>
#include <QList>
#include <QMenu>// 视频分屏类型
enum VideoLayoutType
{OneVideo = 0,TwoVideo,ThreeVideo,FourVideo,FiveVideo,SixVideo,SeventVideo,EightVideo,NineVideo,
};class SwitchWidget : public QWidget
{Q_OBJECTpublic:SwitchWidget(QWidget* parent = nullptr);~SwitchWidget();private:void initWidget();void initMenu();void contextMenuEvent(QContextMenuEvent* event) override;  //菜单事件void switchLayout(VideoLayoutType type);    //切换不同布局private:QList<QLabel*> m_videoLabelList;    //用于保存视频区域QMenu* m_switchMenu;
};
SwitchWidget.cpp:
#pragma execution_character_set("utf-8")
#include "SwitchWidget.h"
#include <QGridLayout>
#include <QContextMenuEvent>
#include <QDebug>SwitchWidget::SwitchWidget(QWidget* parent): QWidget(parent)
{this->setWindowTitle(u8"Qt布局切换与布局删除重构");initWidget();this->resize(QSize(800, 500));this->setContextMenuPolicy(Qt::DefaultContextMenu); //设置菜单策略
}SwitchWidget::~SwitchWidget() {}void SwitchWidget::initWidget() //初始化界面
{initMenu(); //初始化菜单for (int i = 0; i < 9; i++){QLabel* label = new QLabel();label->setStyleSheet(QString("QLabel{background-image:url(:/SwitchWidget/resources/%1.png); \border:1px solid gray; \background-position:center; \background-repeat:no-repeat; \}").arg(QString::number(i + 1)));m_videoLabelList.append(label);}switchLayout(VideoLayoutType::OneVideo);
}void SwitchWidget::initMenu() //初始化菜单
{m_switchMenu = new QMenu(this);m_switchMenu->addAction(u8"一分屏");m_switchMenu->addAction(u8"四分屏");m_switchMenu->addAction(u8"五分屏");m_switchMenu->addAction(u8"六分屏");m_switchMenu->addAction(u8"九分屏");QMap<QString, int> strTypeMap;strTypeMap["一分屏"] = VideoLayoutType::OneVideo;strTypeMap["四分屏"] = VideoLayoutType::FourVideo;strTypeMap["五分屏"] = VideoLayoutType::FiveVideo;strTypeMap["六分屏"] = VideoLayoutType::SixVideo;strTypeMap["九分屏"] = VideoLayoutType::NineVideo;//信号槽connect(m_switchMenu, &QMenu::triggered, this, [=](QAction* action) {QString strText = action->text();qDebug() << "strText = " << strText;qDebug() << strTypeMap[strText];VideoLayoutType type = static_cast<VideoLayoutType>(strTypeMap[strText]);qDebug() << "type = " << type;switchLayout(type);});
}void SwitchWidget::contextMenuEvent(QContextMenuEvent* event) //菜单事件
{m_switchMenu->exec(QCursor::pos()); //弹出菜单--使用当前鼠标位置来执行菜单
}void SwitchWidget::switchLayout(VideoLayoutType type) //切换不同布局
{QLayout* layout = this->layout();   //获取当前窗口的布局//当切换布局时,若布局不为空,则清空布局内的所有元素if (layout){QLayoutItem* child; //布局中的子项//删除布局中的所有子项while ((child = layout->takeAt(0)) != 0){//调用 setParent(NULL) 方法将控件的父对象设置为 NULL。这样做可以防止控件在从布局中删除后界面上仍然显示。if (child->widget()){child->widget()->setParent(NULL);}delete child;}delete layout;}//设置新的布局switch (type){case OneVideo:{qDebug() << "OneVideo\n";QGridLayout* gLayout = new QGridLayout(this);gLayout->addWidget(m_videoLabelList[0]);gLayout->setMargin(0);}break;case FourVideo:{qDebug() << "FourVideo\n";QGridLayout* gLayout = new QGridLayout(this);gLayout->setSpacing(0);gLayout->setMargin(0);for (int i = 0; i < 4; i++){gLayout->addWidget(m_videoLabelList[i], i / 2, i % 2);}}break;case FiveVideo:{qDebug() << "FiveVideo\n";QVBoxLayout* pVLay = new QVBoxLayout(this);pVLay->setSpacing(0);QHBoxLayout* pHTopLay = new QHBoxLayout(this);pHTopLay->setSpacing(0);for (int i = 0; i < 3; i++){pHTopLay->addWidget(m_videoLabelList[i]);}QHBoxLayout* pHBottomLay = new QHBoxLayout(this);pHBottomLay->setSpacing(0);for (int i = 3; i < 5; i++){pHBottomLay->addWidget(m_videoLabelList[i]);}pVLay->addLayout(pHTopLay);pVLay->addLayout(pHBottomLay);}break;case SixVideo:{QGridLayout* gLayout = new QGridLayout(this);gLayout->addWidget(m_videoLabelList[0], 0, 0, 2, 2);gLayout->addWidget(m_videoLabelList[1], 0, 2);gLayout->addWidget(m_videoLabelList[2], 1, 2);gLayout->addWidget(m_videoLabelList[3], 2, 0);gLayout->addWidget(m_videoLabelList[4], 2, 1);gLayout->addWidget(m_videoLabelList[5], 2, 2);gLayout->setSpacing(0);gLayout->setMargin(0);}break;case NineVideo:{QGridLayout* gLayout = new QGridLayout(this);gLayout->setSpacing(0);gLayout->setMargin(0);for (int i = 0; i < 9; i++){gLayout->addWidget(m_videoLabelList[i], i / 3, i % 3);}}break;default:break;}}
main.cpp:
#include "SwitchWidget.h"
#include <QtWidgets/QApplication>int main(int argc, char *argv[])
{QApplication a(argc, argv);SwitchWidget w;w.show();return a.exec();
}
运行结果: