文章目录
- nginx
- 源码编译安装
- 平滑升级及版本回滚
- 平滑升级
- 版本回滚
- 服务启动脚本
- 核心配置
- 全局配置参数优化调整
- root与alias
- 自定义错误日志
- 自定义错误页面
- 检测文件是否存在
- 长链接配置
- 下载服务器的配置
- nginx高级配置
- nginx状态页面
- 压缩功能
- 变量
- 内置变量
- 自定义变量
- nginx rewrite
- 指令
- if指令
- set指令
- break指令
- return指令
- rewrite指令
- rewrite flag
- 域名永久重定向、临时重定向
- break与last
- nginx防盗链
- 实现盗链
- 实现防盗链
- nginx反向代理
- 实现http反向代理
- 反向代理实现负载均衡
- FastCGI
- php配置优化
- php缓存模块
- php高速缓存
- php高速缓存
nginx
源码编译安装
1、解压
2、配置软件编译环境./configurednf install gcc pcre-devel zlib-devel openssl-devel -y[root@nginx nginx-1.24.0]# ./configure --prefix=/usr/local/nginx --user=nginx --group=nginx --add-module=/root/echo-nginx-module-0.63 --with-http_ssl_module --with-http_v2_module --with-http_realip_module --with-http_stub_status_module --with-http_gzip_static_module --with-pcre --with-stream --with-stream_ssl_module --with-stream_realip_module3、生成makefile文件(重新makefile需要make clean)
4、编译(make)
5、makeinstall
#创建用户
[root@nginx ~]# useradd -s /sbin/nologin -M nginx#启动nginx
[root@nginx nginx]# cd sbin/
[root@nginx sbin]# ./nginx
[root@nginx sbin]# ps -aux | grep nginx
root 39753 0.0 0.0 9864 932 ? Ss 17:43 0:00 nginx: master process ./nginx
nginx 39754 0.0 0.1 13760 4820 ? S 17:43 0:00 nginx: worker process
root 39756 0.0 0.0 221680 2484 pts/0 S+ 17:43 0:00 grep --color=auto nginx
删除编译后的nginx
[root@nginx local]# rm -rf /usr/local/nginx/删除Makefile  objs 文件
[root@nginx nginx-1.24.0]# make clean
rm -rf Makefile objs
[root@nginx nginx-1.24.0]# ls
auto  CHANGES  CHANGES.ru  conf  configure  contrib  html  LICENSE  man  README  src
关闭debug
[root@nginx nginx-1.24.0]# vim auto/cc/gcc
# debug
#CFLAGS="$CFLAGS -g"编译环境
[root@nginx nginx-1.24.0]# ./configure --prefix=/usr/local/nginx --user=nginx --group=nginx --with-http_ssl_module --with-http_v2_module --with-http_realip_module --with-http_stub_status_module --with-http_gzip_static_module --with-pcre --with-stream --with-stream_ssl_module --with-stream_realip_modulemake && make install添加nginx命令执行路径到环境变量中
[root@nginx ~]# vim ~/.bash_profile
export PATH=$PATH:/usr/local/nginx/sbin[root@nginx ~]# source ~/.bash_profile启动nginx
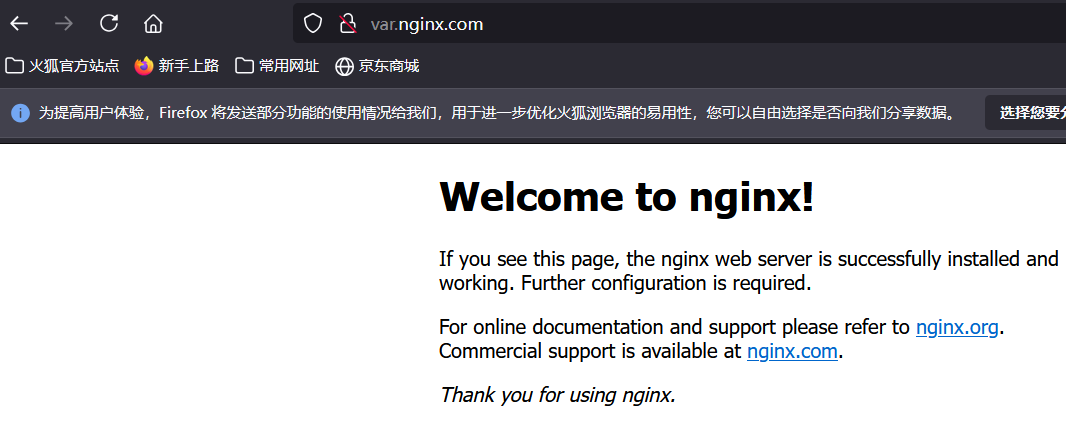
[root@nginx ~]# nginx平滑升级及版本回滚
平滑升级
将nginx由1.24升级为1.26版本
1、解压1.26版本
[root@nginx ~]# tar -zxf nginx-1.26.1.tar.gz2、编译新版本
[root@nginx nginx-1.26.1]# ./configure --prefix=/usr/local/nginx  --with-http_ssl_module --with-http_v2_module --with-http_realip_module --with-http_stub_status_module --with-http_gzip_static_module --with-pcre --with-stream --with-stream_ssl_module --with-stream_realip_module3、make(无需make install)
[root@nginx nginx-1.26.1]# make4、备份旧版本nginx
[root@nginx objs]# cd /usr/local/nginx/sbin/
[root@nginx sbin]# cp nginx nginx.245、拷贝新版本nginx
[root@nginx sbin]# \cp -f /root/nginx-1.26.1/objs/nginx /usr/local/nginx/sbin6、平滑升级
kill -USR2 42814(nginx work ID)7、回收旧版本
kill -WINCH 42814(nginx work ID)

版本回滚
将nginx由1.26回滚到1.24
1、备份1.26版本,将1.24版本覆盖1.26版本
[root@nginx sbin]# cp nginx nginx.26
[root@nginx sbin]# ls
nginx  nginx.24  nginx.26[root@nginx sbin]# \cp -f nginx.24 nginx2、重新加载1.24的进程,回收1.26的
[root@nginx sbin]# kill -HUP 42813
[root@nginx sbin]# kill -WINCH 45972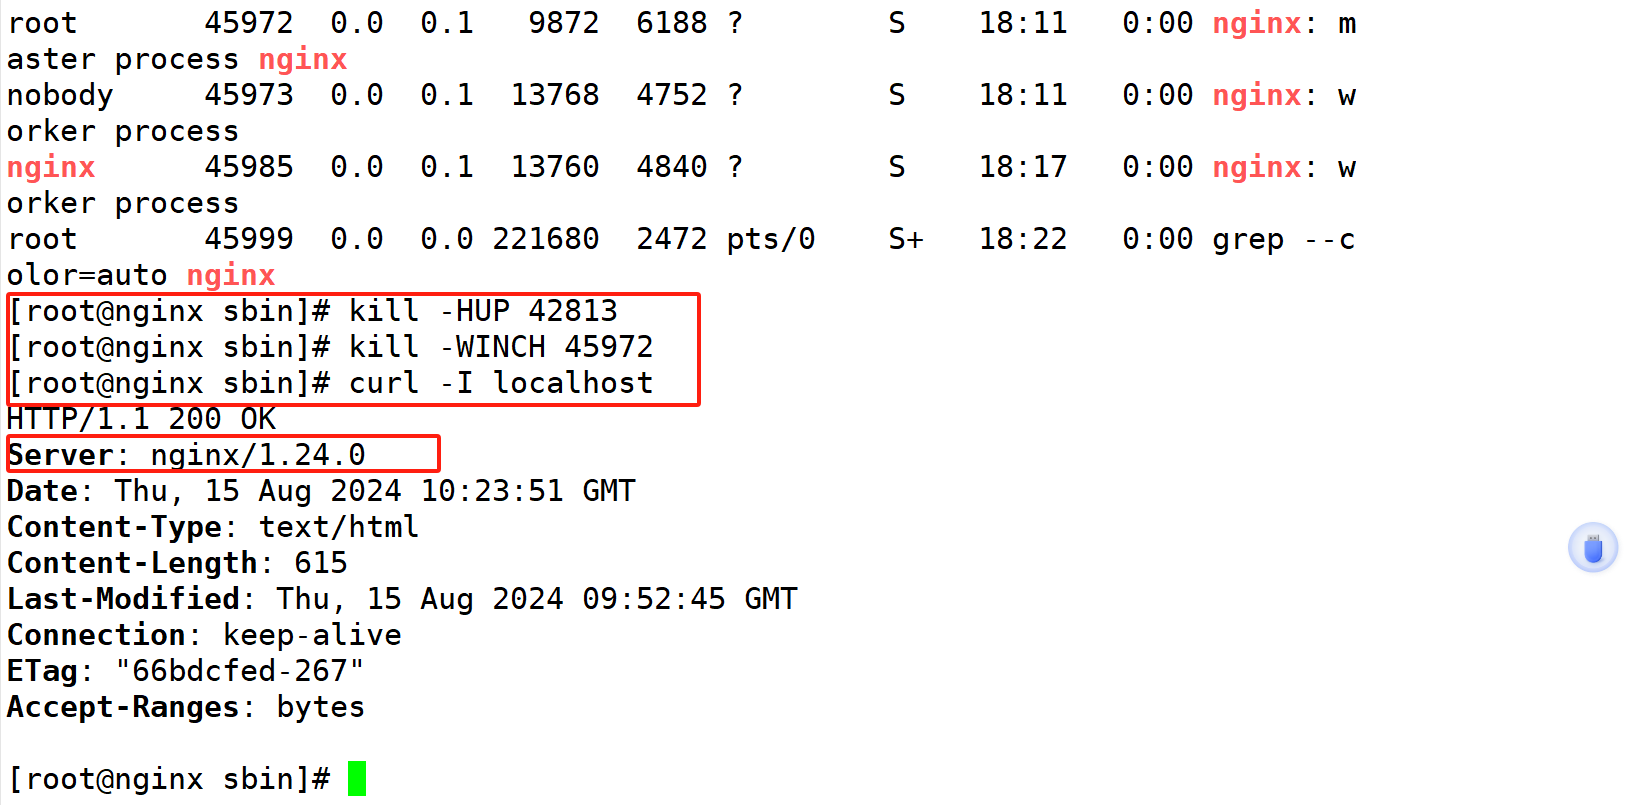
服务启动脚本
[root@nginx ~]#  vim /lib/systemd/system/nginx.service[Unit]
Description=The NGINX HTTP and reverse proxy server
After=syslog.target network-online.target remote-fs.target nss-lookup.target
Wants=network-online.target
[Service]
Type=forking
PIDFile=/usr/local/nginx/logs/nginx.pid
ExecStartPre=/usr/local/nginx/sbin/nginx -t
ExecStart=/usr/local/nginx/sbin/nginx
ExecReload=/usr/local/nginx/sbin/nginx -s reload
ExecStop=/bin/kill -s QUIT $MAINPID
PrivateTmp=true
[Install]
WantedBy=multi-user.target[root@nginx ~]# systemctl daemon-reload
[root@nginx ~]# systemctl start nginx

核心配置
全局配置参数优化调整
[root@nginx ~]# vim /usr/local/nginx/conf/nginx.conf
user nginx;			#用户指定
#user  nobody;
worker_processes  auto;		#进程绑定
work_cpu_affinity 01 10;events {worker_connections  100000;	#并发连接
}[root@nginx ~]# vim /etc/security/limits.conf
*		-	nofile		100000测试
[root@nginx ~]# sudo -u nginx ulimit -a
real-time non-blocking time  (microseconds, -R) unlimited
core file size              (blocks, -c) 0
data seg size               (kbytes, -d) unlimited
open files                          (-n) 100000
root与alias
#1、添加子配置模块
[root@nginx ~]# vim /usr/local/nginx/conf/nginx.conf
include "/usr/local/nginx/conf.d/*.conf";
server {listen       80;server_name  localhost;
#2、创建文件目录
[root@nginx ~]#mkdir -p /www/web/test1
[root@nginx ~]#echo hahahah > /www/web/test1/index.html#3、配置子文件
[root@nginx sbin]# cat /usr/local/nginx/conf.d/http1.conf
server {listen 80;server_name www.abc.com;root /www/web;location /test1/ {root /www/web;}location /test2 {alias /www/web/test1;}
}
[root@nginx ~]#nginx -s reload


自定义错误日志
access_log   文件地址
error_log   文件地址
注:文件地址需提前创建好
自定义错误页面
error_page code 文件地址
1、编辑配置文件
[root@nginx nginx-1.26.1]# cat /usr/local/nginx/conf.d/error.conf
server {listen 80;root /www/web;server_name var.nginx.com;error_page 500 502 503 /error.html;location = /error.html {root /www/web;}
}2、编辑错误访问内容
[root@nginx nginx-1.26.1]# cat /www/web/error.html
faile file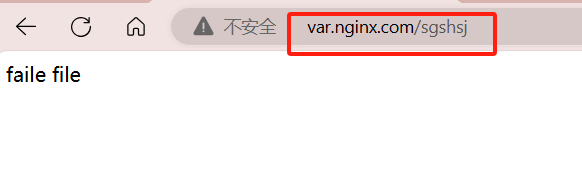
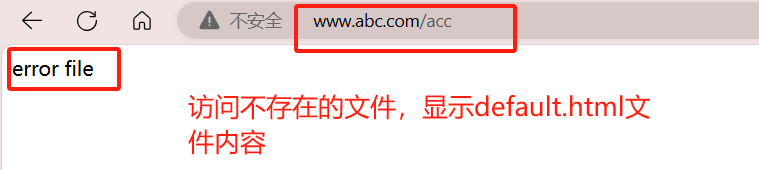
检测文件是否存在
1、编辑子配置文件
try_files  $uri $uri.html $uri/index.html   /文件地址
2、创建文件地址并写入文件
注:写入的文件地址应从server下的root里的文件地址开始
[root@nginx conf.d]# cat user.conf
server {listen 192.168.84.100:80;root /www/web;server_name www.abc.com;try_files $uri $uri.html $uri/index.html /error/default.html;location = /error.html {root /www/web/error;}
}
#创建文件地址并写入文件
[root@nginx conf.d]# echo error file > /www/web/error/default.html  #从root里的地址开始
长链接配置
主配置文件(/usr/local/nginx/conf/nginx.conf)添加如下参数:
keepalive_timeout	  :长连接超时时长,0表示禁止连接
keepalive_requests    :长连接数请求发起数量
下载服务器的配置
1、制作下载文件
[root@nginx ~]# mkdir /www/web/download -p
[root@nginx ~]# dd if=/dev/zero of=/www/web/download/afile bs=1M count=100
记录了100+0 的读入
记录了100+0 的写出
104857600字节(105 MB,100 MiB)已复制,0.0514982 s,2.0 GB/s2、配置文件参数
[root@nginx ~]# vim /usr/local/nginx/conf.d/user.conf
location /download {root /www/web;autoindex on;		#开启自动文件索引autoindex_localtime on;		#显示本机上传时间autoindex_exact_size off;	#计算文件大小limit_rate 2048k;		#限速2MB/s}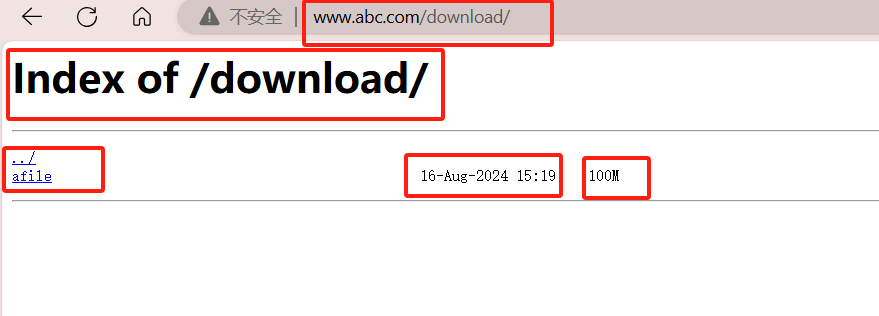
nginx高级配置
nginx状态页面
基于nginx 模块 ngx_http_stub_status_module 实现,
在编译安装nginx的时候需要添加编译参数 --with-http_stub_status_module
否则配置完成之后监测会是提示法错误
配置实例:
[root@nginx conf.d]# cat status.conf
server {listen 80;root /www/web;server_name var.nginx.com;location = /nginx.html {root /www/web;stub_status;allow 192.168.84.0/24;deny all;}
}
压缩功能
nginx对指定类型的文件进行压缩之后再传输给客户端,降低出口带宽的利用率,不会占用过多的CPU资源
配置指令:
1、准备压缩文件
[root@nginx ~]# cp /usr/local/nginx/logs/access.log /www/web/test.html
[root@nginx data]# du -sh /www/web/test.html
4.0K	/www/web/test.html2、编辑配置文件
[root@nginx ~]# cat /usr/local/nginx/conf.d/tar.conf
server {listen 80;root /www/web;server_name var.nginx.com;location /test.html {gzip on;gzip_comp_level 5;		#压缩比例gzip_types text/plain application/javascript application/x-javascript text/css application/xml text/javascript application/x-httpd-php image/gif image/png;		#压缩文件类型gzip_vary on;	#启动压缩首部报恩插入Accept-Ending}
}3、测试结果

变量
内置变量
$remote_addr; #存放了客户端的地址,注意是客户端的公网IP$args; #变量中存放了URL中的所有参数
#例如:https://search.jd.com/Search?keyword=手机&enc=utf-8
#返回结果为: keyword=手机&enc=utf-8$is_args#如果有参数为? 否则为空$document_root; #保存了针对当前资源的请求的系统根目录,例如:/webdata/nginx/timinglee.org/lee。$document_uri;#保存了当前请求中不包含参数的URI,注意是不包含请求的指令
#比如:http://lee.timinglee.org/var?\id=11111会被定义为/var
#返回结果为:/var$host; #存放了请求的host名称limit_rate 10240;
echo $limit_rate;#如果nginx服务器使用limit_rate配置了显示网络速率,则会显示,如果没有设置, 则显示0$remote_port;#客户端请求Nginx服务器时随机打开的端口,这是每个客户端自己的端口$remote_user;#已经经过Auth Basic Module验证的用户名$request_body_file;#做反向代理时发给后端服务器的本地资源的名称$request_method;示例:#请求资源的方式,GET/PUT/DELETE等$request_filename;#当前请求的资源文件的磁盘路径,由root或alias指令与URI请求生成的文件绝对路径,
#如:webdata/nginx/timinglee.org/lee/var/index.html$request_uri;
#包含请求参数的原始URI,不包含主机名,相当于:$document_uri?$args,
#例如:/main/index.do?id=20190221&partner=search $scheme;
#请求的协议,例如:http,https,ftp等$server_protocol;
#保存了客户端请求资源使用的协议的版本,例如:HTTP/1.0,HTTP/1.1,HTTP/2.0等
自定义变量
设置变量:set  $变量名   值;
引用变量:echo  $变量名;
配置指令:
[root@nginx ~]# vim /usr/local/nginx/conf.d/vhosts.conf
server {listen 80;server_name lee.timinglee.org;root /webdata/nginx/timinglee.org/lee;location /var {default_type text/html;set $name timinglee;echo $name;set $web_port $server_port;echo $web_port;}
}
测试结果:
[root@client ~]# curl lee.timinglee.org/var
timinglee
80
nginx rewrite
指令
if指令
if (条件匹配) { action
}
set指令
设置变量:set  $变量名   值;
引用变量:echo  $变量名;
break指令
break 中断当前作用域
return指令
return code; #返回给客户端指定的HTTP状态码
return code [text]; #返回给客户端的状态码及响应报文的实体内容#可以调用变量,其中text如果有空格,需要用单或双引号
return code URL; #返回给客户端的URL地址
配置指令:
[root@nginx conf.d]# cat return.conf
server {listen 80;root /www/web;server_name var.nginx.com;location /return {if ( !-e $request_filename ){return 301 http://www.baidu.com;#return 666 "$request_filename is not exist";}echo "$request_filename is exist";}
}
测试结果:
[root@client ~]# curl var.nginx.com/return
/www/web/return is exist
[root@client ~]# curl var.nginx.com/return1
/www/web/return1 is not exist
rewrite指令
rewrite flag
利用nginx的rewrite的指令,可以实现url的重新跳转,rewrite有四种不同的flag,分别是redirect(临时
重定向302)、permanent(永久重定向301)、break和last。其中前两种是跳转型的flag,后两种是代理型
跳转型指由客户端浏览器重新对新地址进行请求
代理型是在WEB服务器内部实现跳转
redirect;
#临时重定向,重写完成后以临时重定向方式直接返回重写后生成的新URL给客户端
#由客户端重新发起请求;使用相对路径,或者http://或https://开头,状态码:302
permanent;
#重写完成后以永久重定向方式直接返回重写后生成的新URL给客户端
#由客户端重新发起请求,状态码:301
break;
#重写完成后,停止对当前URL在当前location中后续的其它重写操作
#而后直接跳转至重写规则配置块之后的其它配置,结束循环,建议在location中使用
#适用于一个URL一次重写
last;
#重写完成后,停止对当前URI在当前location中后续的其它重写操作,
#而后对新的URL启动新一轮重写检查,不建议在location中使用
#适用于一个URL多次重写,要注意避免出现超过十次以及URL重写后返回错误的给用户
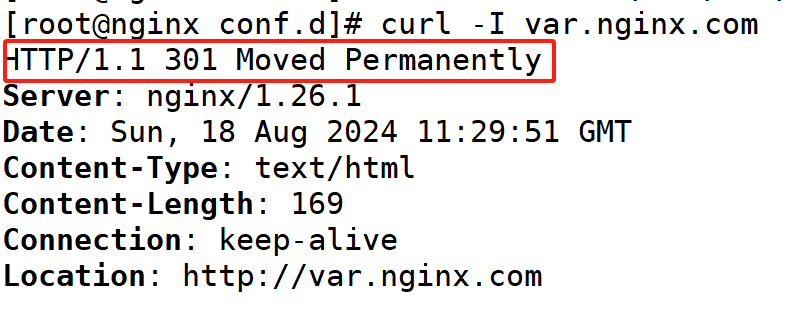
域名永久重定向、临时重定向
永久重定向301:
[root@nginx conf.d]# cat rewrite.conf
server {listen 80;root /www/web;server_name var.nginx.com;index index.html;location / {#rewrite / http://var.nginx.com redirect;rewrite / http://var.nginx.com permanent;}
}
临时重定向302:
[root@nginx conf.d]# cat rewrite.conf
server {listen 80;root /www/web;server_name var.nginx.com;index index.html;location / {rewrite / http://var.nginx.com redirect;#rewrite / http://var.nginx.com permanent;}
}

break与last
break:中断后续所有的loaction,只在当前的location内执行
last:执行完本location后寻找后续符合的location执行后输出
[root@centos8 ~]#cat /apps/nginx/conf.d/pc.conf
server {listen 80;server_name lee.timinglee.org;root /webdata/nginx/timinglee.org/lee;location /break {root /webdata/nginx/timinglee.org/lee;rewrite ^/break/(.*) /test1/$1 last;rewrite ^/test1/(.*) /test2/$1 break;}location /last {root /webdata/nginx/timinglee.org/lee;rewrite ^/last/(.*) /test1/$1 last;rewrite ^/test1/(.*) /test2/$1 last;}location /test1 {default_type text/html;return 666 "new test1";}location /test2 {root /webdata/nginx/timinglee.org/lee;}
}
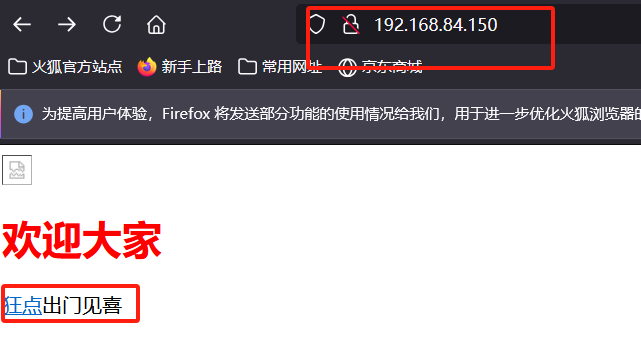
nginx防盗链
防盗链基于客户端携带的referer实现,referer是记录打开一个页面之前记录是从哪个页面跳转过来的标 记信息,如果别人只链接了自己网站图片或某个单独的资源,而不是打开了网站的整个页面,这就是盗 链,referer就是之前的那个网站域名
实现盗链
| 角色 | ip | |
|---|---|---|
| nginx | 192.168.84.100 | 被盗者 |
| web | 192.168.84.150 | 施盗者 |
#web相关配置
1、安装httpd软件
2、准备盗链web,盗取nginx的image/hah.jpg
[root@web1 ~]# cat /var/www/html/index.html
<html><head><meta http-equiv=Content-Type content="text/html;charset=utf-8"><title>盗链</title>
</head><body><img src="http://var.nginx.com/hah.jpg" ><h1 style="color:red">欢迎大家</h1><p><a href=http://var.nginx.comm>狂点</a>出门见喜</p></body>
</html>
实现防盗链
在nginx上配置
[root@nginx ~]# cat /usr/local/nginx/conf.d/valid.conf
server {listen 80;server_name var.nginx.com;root /www/web;location /image {valid_referers none blocked server_names *.nginx.com ~\.baidu\.;if ($invalid_referer){#return 403;rewrite ^/ http://var.nginx.com/hah.jpg permanent;}}
}
nginx反向代理
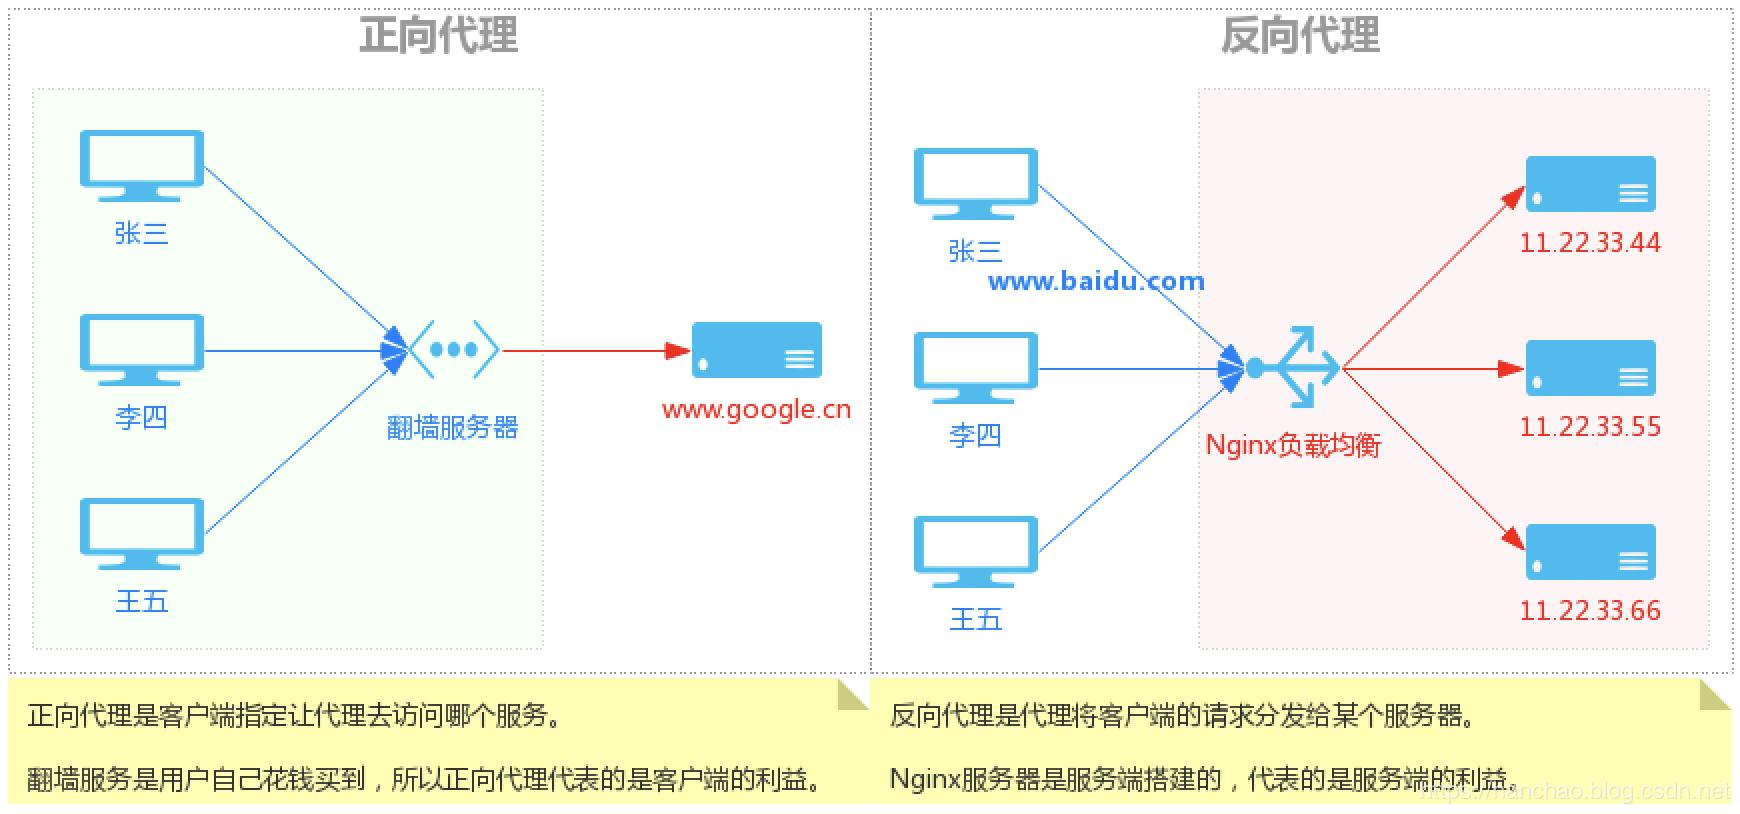
实现http反向代理
反向代理至web服务器
[root@nginx ~]# cat /usr/local/nginx/conf.d/valid.conf
server {listen 80;server_name var.nginx.com;location / {proxy_pass http://192.168.84.150:80;	#指定web服务器的ip}
}
指定location实现反向代理
[root@Nginx ~]# vim /usr/local/nginx/conf.d/vhost.conf
server {listen 80;server_name var.nginx.com;location / {proxy_pass http://192.168.84.150:80;}location ~ \.(png|jpg|gif) {proxy_pass http://192.168.84.160:8080;}
}
反向代理实现负载均衡
upstream name { server ...........
}
FastCGI
为什么会有FastCGI?
CGI协议虽然解决了语言解析器和 Web Server 之间通讯的问题,但是它的效率很低,因为 Web Server 每收到一个请求都会创建一个CGI进程,PHP解析器都会解析php.ini文件,初始化环境,请求结束的时候 再关闭进程,对于每一个创建的CGI进程都会执行这些操作,所以效率很低,而FastCGI是用来提高CGI性 能的,FastCGI每次处理完请求之后不会关闭掉进程,而是保留这个进程,使这个进程可以处理多个请 求。这样的话每个请求都不用再重新创建一个进程了,大大提升了处理效率。
什么是PHP-FPM?
PHP-FPM(FastCGI Process Manager: FastCGI进程管理器)是一个实现了Fastcgi的程序,并且提供进程管理的功能。 进程包括master进程和worker进程。master进程只有一个,负责监听端口,接受来自web server 的请求 worker进程一般会有多个,每个进程中会嵌入一个PHP解析器,进行PHP代码的处理。
源码编译nginx
1、上传模块压缩包后解压
2、删除原nginx,重新编译软件
./configure --prefix=/usr/local/nginx  --with-http_ssl_module --with-http_v2_module --with-http_realip_module --with-http_stub_status_module --with-http_gzip_static_module --with-pcre --with-stream --with-stream_ssl_module --with-stream_realip_module --add-module=/root/
3、make &&  make install
源码编译安装php
1、下载依赖
yum install -y bzip2 systemd-devel libxml2-devel sqlite-devel libpng-devel libcurl-devel oniguruma-develwget https://mirrors.aliyun.com/rockylinux/9.4/devel/x86_64/kickstart/Packages/o/oniguruma-devel-6.9.6-1.el9.5.x86_64.rpmdnf install -y oniguruma-devel-6.9.6-1.el9.5.x86_64.rpm2、源码编译php
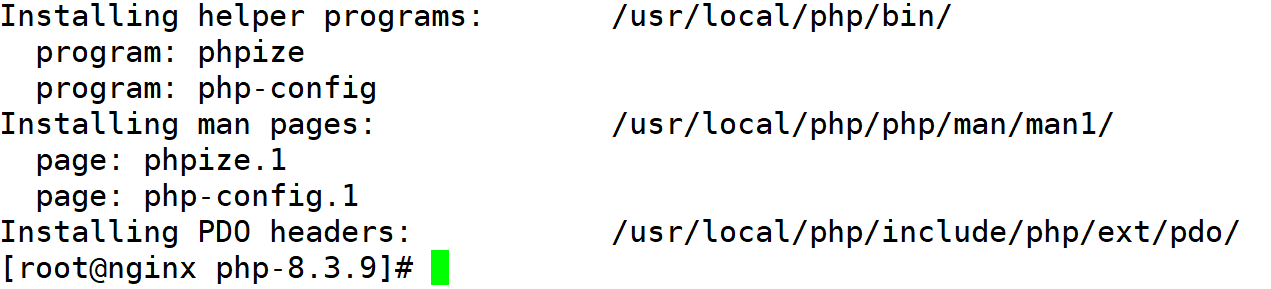
./configure --prefix=/usr/local/php --with-config-file-path=/usr/local/php/etc --enable-fpm --with-fpm-user=nginx --with-fpm-group=nginx --with-curl --with-iconv --with-mhash --with-zlib --with-openssl --enable-mysqlnd --with-mysqli --with-pdo-mysql --disable-debug --enable-sockets --enable-soap --enable-xml --enable-ftp --enable-gd --enable-exif --enable-mbstring --enable-bcmath --with-fpm-systemd
注:缺少依赖的软件包yum仓库里没有的话
php配置优化
[root@Nginx etc]# cp /usr/local/php/etc/php-fpm.conf.default /usr/local/php/etc/php-fpm.conf
[root@Nginx etc]# vim php-fpm.conf
去掉注释pid = run/php-fpm.pid #指定pid文件存放位置[root@Nginx ~]# cd /usr/local/php/etc/php-fpm.d/
[root@Nginx php-fpm.d]# cp www.conf.default www.conf#生成主配置文件
[root@Nginx ~]# cp /root/php-8.3.9/php.ini-production /usr/local/php/etc/php.ini
[root@Nginx ~]# vim /usr/local/php/etc/php.ini
[Date]
; Defines the default timezone used by the date functions
; https://php.net/date.timezone
date.timezone = Asia/Shanghai #修改时区#生成启动文件
[root@Nginx ~]# cd /root/php-8.3.9/
[root@Nginx php-8.3.9]# cp sapi/fpm/php-fpm.service /lib/systemd/system/
# Mounts the /usr, /boot, and /etc directories read-only for processes invoked by
this unit.
#ProtectSystem=full   #注释掉
添加环境变量
[root@nginx php-8.3.9]# cat ~/.bash_profile
# .bash_profile# Get the aliases and functions
if [ -f ~/.bashrc ]; then. ~/.bashrc
fi# User specific environment and startup programs
export PATH=$PATH:/usr/local/nginx/sbin:/usr/local/php/bin:/usr/local/php/sbin
[root@nginx php-8.3.9]# systemctl daemon-reload
[root@nginx php-8.3.9]# systemctl start php-fpm.service
编辑测试页
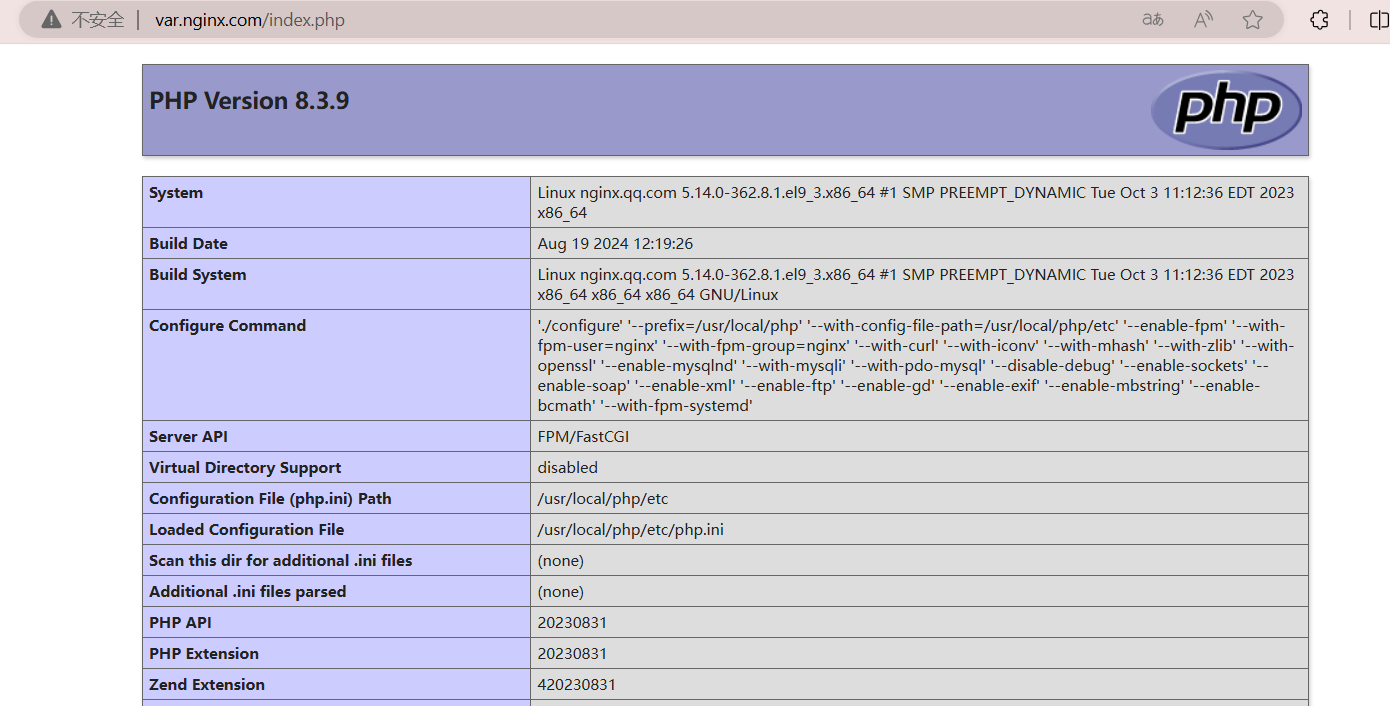
[root@nginx ~]# cat /usr/local/nginx/conf.d/vhost.conf
server {listen 80;server_name var.nginx.com;root /data/php;index index.php;location ~ \.php$ {fastcgi_pass 127.0.0.1:9000;fastcgi_index index.php;include fastcgi.conf;}
}[root@nginx ~]# cat /data/php/index.php
<?php
phpinfo();
?>[root@nginx ~]#nginx -s reload
php缓存模块

安装mamcache:
[root@Nginx ~]# tar zxf memcache-8.2.tgz
[root@Nginx ~]# cd memcache-8.2/
[root@Nginx memcache-8.2]# yum install autoconf
[root@Nginx memcache-8.2]# phpize
[root@Nginx memcache-8.2]# ./configure && make && make install
复制测试文件至nginx访问目录:
[root@Nginx ~]# cd memcache-8.2/
[root@Nginx memcache-8.2]# ls
autom4te.cache config.log configure.ac example.php Makefile.fragments
README
build config.m4 config.w32 include Makefile.objects runtests.php
config9.m4config.nice CREDITS libtool memcache.la src
config.h config.status docker LICENSE memcache.php
tests
config.h.in configure Dockerfile Makefile modules
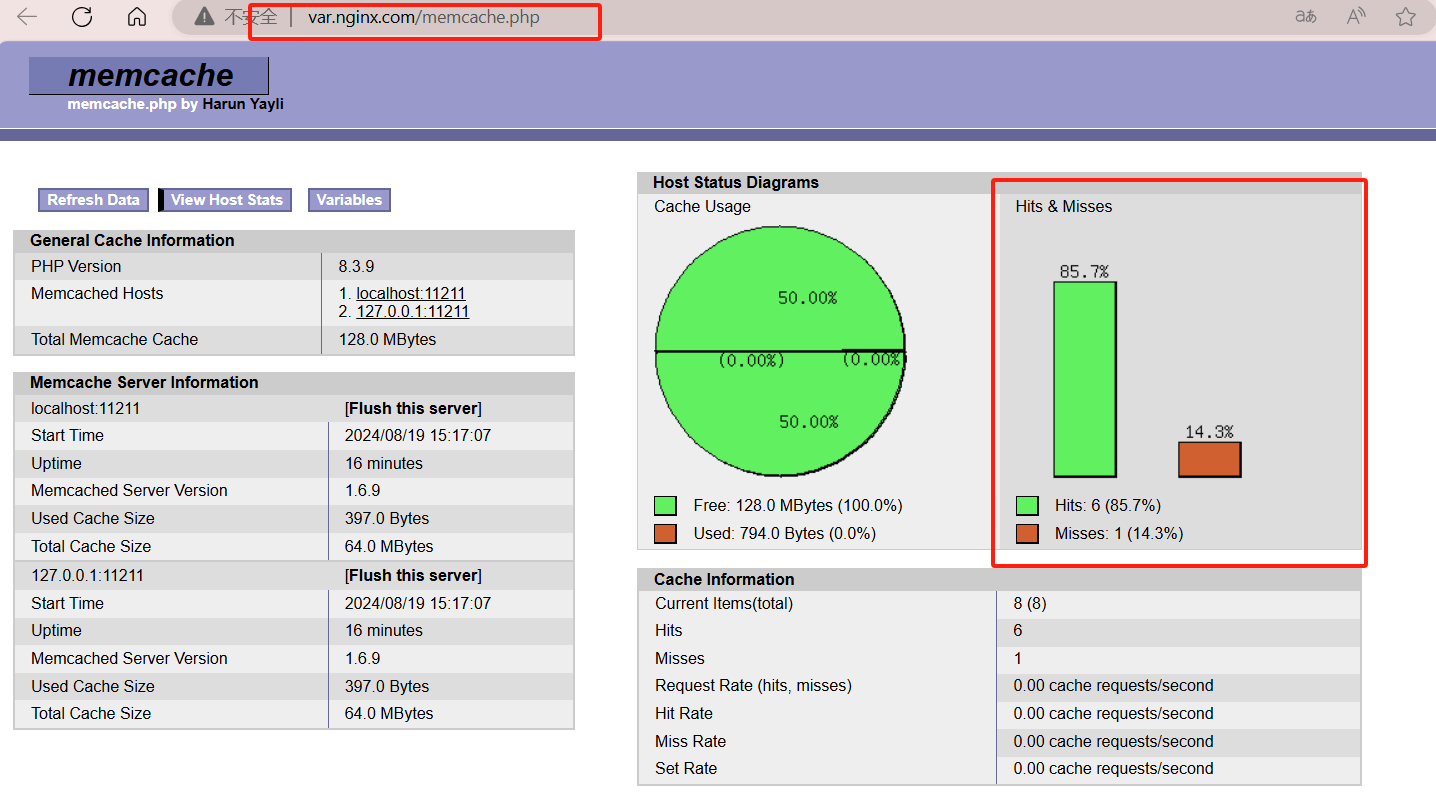
[root@Nginx memcache-8.2]# cp example.php memcache.php /data/php/
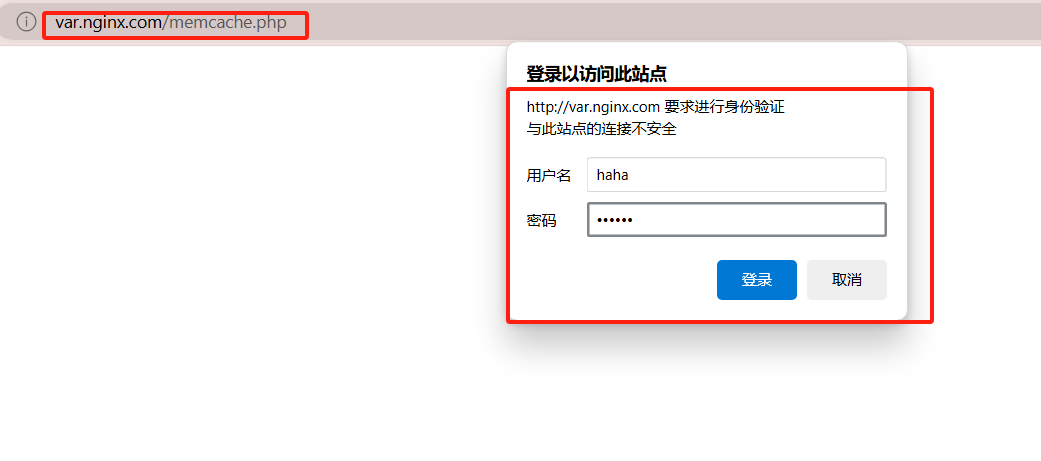
[root@Nginx ~]# vim /data/php/memcache.php
define('ADMIN_USERNAME','haha'); //账号
define('ADMIN_PASSWORD','123456'); // 密码
define('DATE_FORMAT','Y/m/d H:i:s');
define('GRAPH_SIZE',200);
define('MAX_ITEM_DUMP',50);
$MEMCACHE_SERVERS[] = 'localhost:11211'; // add more as an array
#$MEMCACHE_SERVERS[] = 'mymemcache-server2:11211'; // add more as an array
配置php加载memcached模块:
[root@Nginx ~]# vim /usr/local/php/etc/php.ini
;extension=zip
extension=memcache
;zend_extension=opcache[root@Nginx ~]# systemctl reload php-fpm[root@Nginx no-debug-non-zts-20230831]# php -m | grep mem
memcache
部署memcached:
[root@Nginx ~]# yum install memcached -y
[root@Nginx ~]# systemctl enable --now memcached.service[root@Nginx ~]# netstat -antlupe | grep memcache
tcp       0     0 127.0.0.1:11211         0.0.0.0:*               LISTEN
976       1037243   186762/memcached[root@Nginx ~]# cat /etc/sysconfig/memcached
PORT="11211"
USER="memcached"
MAXCONN="1024"
CACHESIZE="64"
OPTIONS="-l 127.0.0.1,::1"
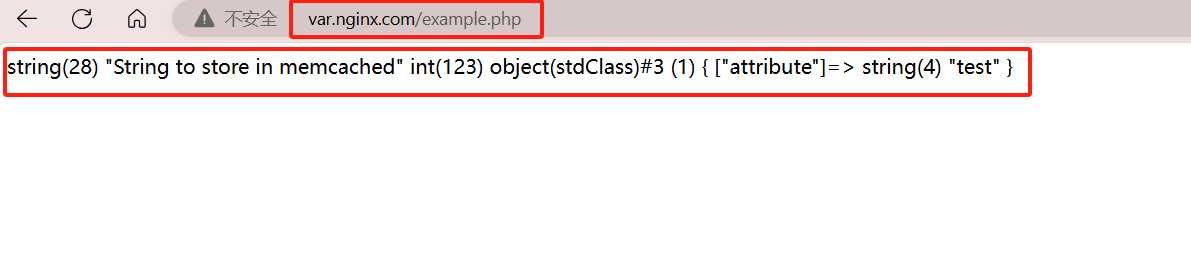
php高速缓存
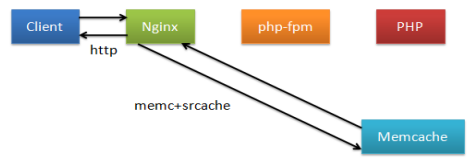
借助srcache-nginx-module-0.33、memc-nginx-module-0.20两个模块来实现
[root@Nginx ~]#cat /usr/local/nginx/conf.d/php.conf
upstream memcache {server 127.0.0.1:11211;keepalive 512;
}
server {listen 80;server_name php.timinglee.org;root /data/php;location /memc {internal;memc_connect_timeout 100ms;memc_send_timeout 100ms;memc_read_timeout 100ms;set $memc_key $query_string; #使用内置变量$query_string来作为keyset $memc_exptime 300; #缓存失效时间300秒memc_pass memcache;}location ~ \.php$ {set $key $uri$args; #设定key的值srcache_fetch GET /memc $key; #检测mem中是否有要访问的phpsrcache_store PUT /memc $key; #缓存为加载的php数据fastcgi_pass 127.0.0.1:9000;fastcgi_index index.php;include fastcgi.conf;}
}
[root@Nginx ~]# systemctl start nginx.service
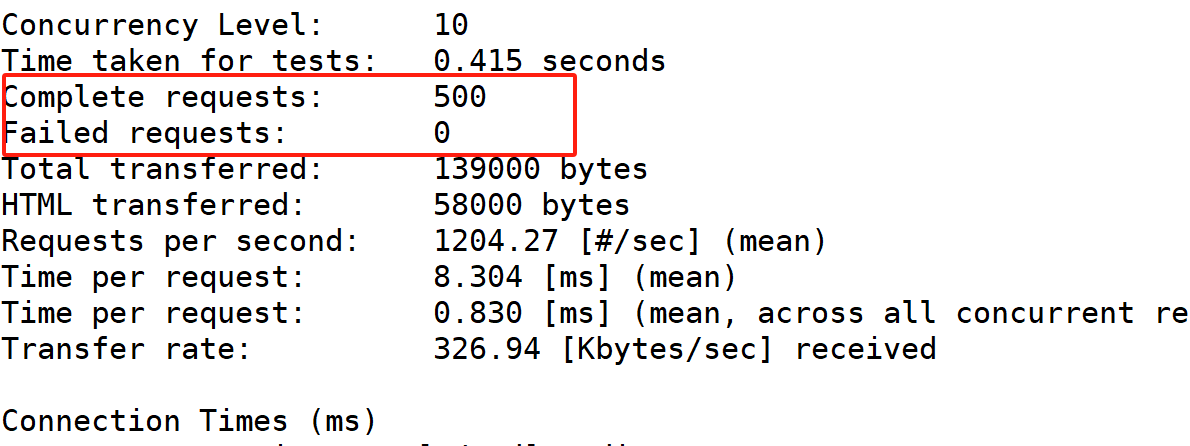
php高速缓存
[外链图片转存中…(img-aDDbZjCn-1724166746916)]
借助srcache-nginx-module-0.33、memc-nginx-module-0.20两个模块来实现
[root@Nginx ~]#cat /usr/local/nginx/conf.d/php.conf
upstream memcache {server 127.0.0.1:11211;keepalive 512;
}
server {listen 80;server_name php.timinglee.org;root /data/php;location /memc {internal;memc_connect_timeout 100ms;memc_send_timeout 100ms;memc_read_timeout 100ms;set $memc_key $query_string; #使用内置变量$query_string来作为keyset $memc_exptime 300; #缓存失效时间300秒memc_pass memcache;}location ~ \.php$ {set $key $uri$args; #设定key的值srcache_fetch GET /memc $key; #检测mem中是否有要访问的phpsrcache_store PUT /memc $key; #缓存为加载的php数据fastcgi_pass 127.0.0.1:9000;fastcgi_index index.php;include fastcgi.conf;}
}
[root@Nginx ~]# systemctl start nginx.service
[外链图片转存中…(img-jFRkbeIb-1724166746916)]