为什么需要SPI机制
SPI和API的区别是什么
SPI是一种跟API相对应的反向设计思想:API由实现方确定标准规范和功能,调用方无权做任何干预; 而SPI是由调用方确定标准规范,也就是接口,然后调用方依赖此接口,第三方实现此接口,这样做就可以方便的进行扩展,类似于插件机制,这是SPI出现的需求背景。
SPI : “接口”位于“调用方”所在的“包”中
-
概念上更依赖调用方。
-
组织上位于调用方所在的包中。
-
实现位于独立的包中。
-
常见的例子是:插件模式的插件。
API : “接口”位于“实现方”所在的“包”中
-
概念上更接近实现方。
-
组织上位于实现方所在的包中。
-
实现和接口在一个包中。
什么是SPI机制
SPI(Service Provider Interface),是JDK内置的一种 服务提供发现机制,可以用来启用框架扩展和替换组件,主要是被框架的开发人员使用,例如数据库中的java.sql.Driver接口,不同的厂商可以针对同一接口做出不同的实现,如下图所示,MySQL和PostgreSQL都有不同的实现提供给用户。
而Java的SPI机制可以为某个接口寻找服务实现,Java中SPI机制主要思想是将装配的控制权移到程序之外,在模块化设计中这个机制尤其重要,其核心思想就是 解耦。
SPI整体机制图如下:
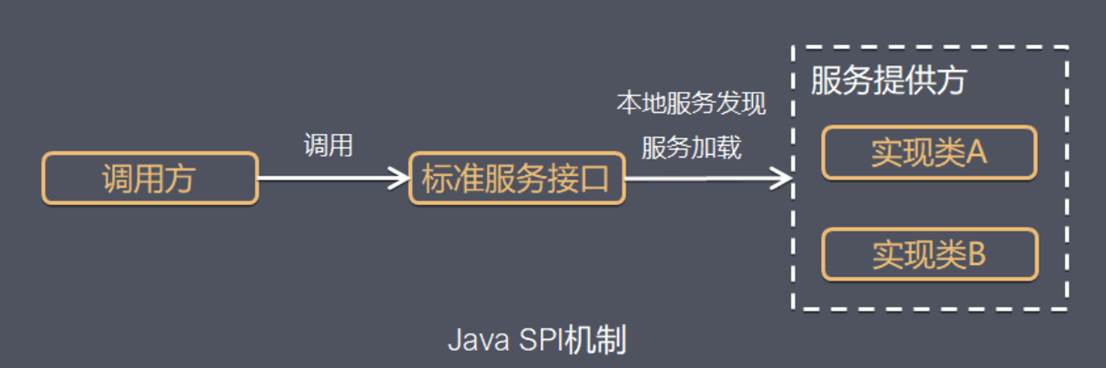
- 当服务的提供者提供了一种接口的实现之后,需要在classpath下的 META-INF/services/ 目录里创建一个文件,文件名是以服务接口命名的,而文件里的内容是这个接口的具体的实现类。
- 当其他的程序需要这个服务的时候,就可以通过查找这个jar包(一般都是以jar包做依赖)的META-INF/services/中的配置文件,配置文件中有接口的具体实现类名,再根据这个类名进行加载实例化,就可以使用该服务了。JDK中查找服务的实现的工具类是:java.util.ServiceLoader。
SPI机制的简单示例
假设现在需要一个发送消息的服务MessageService,发送消息的实现可能是基于短信、也可能是基于电子邮件、或推送通知发送消息。
- 接口定义:首先定义一个接口
MessageService
public interface MessageService {void sendMessage(String message);
}
- 提供两个实现类:一个通过短信发送消息,一个通过电子邮件发送消息。
// 短信发送实现
public class SmsMessageService implements MessageService {@Overridepublic void sendMessage(String message) {System.out.println("Sending SMS: " + message);}
}// 电子邮件发送实现
public class EmailMessageService implements MessageService {@Overridepublic void sendMessage(String message) {System.out.println("Sending Email: " + message);}
}
- 配置文件:在
META-INF/services/目录下创建一个配置文件,文件名为MessageService,全限定名com.example.MessageService,文件内容为接口的实现类的全限定名。
# 文件: META-INF/services/com.seven.MessageService
com.seven.SmsMessageService
com.seven.EmailMessageService
- 加载服务实现:在应用程序中,通过
ServiceLoader动态加载并使用这些实现类。
public class Application {public static void main(String[] args) {ServiceLoader<MessageService> loader = ServiceLoader.load(MessageService.class);for (MessageService service : loader) {service.sendMessage("Hello, SPI!");}}
}
运行时,ServiceLoader 会发现并加载配置文件中列出的所有实现类,并依次调用它们的 sendMessage 方法。
由于在 配置文件 写了两个实现类,因此两个实现类都会执行 sendMessage 方法。
这就是因为ServiceLoader.load(Search.class)在加载某接口时,会去 META-INF/services 下找接口的全限定名文件,再根据里面的内容加载相应的实现类。
这就是spi的思想,接口的实现由provider实现,provider只用在提交的jar包里的META-INF/services下根据平台定义的接口新建文件,并添加进相应的实现类内容就好。
SPI机制的应用
JDBC DriverManager
在JDBC4.0之前,开发连接数据库的时候,通常会用Class.forName("com.mysql.jdbc.Driver")这句先加载数据库相关的驱动,然后再进行获取连接等的操作。而JDBC4.0之后不需要用Class.forName("com.mysql.jdbc.Driver")来加载驱动,直接获取连接就可以了,原因就是现在使用了Java的SPI扩展机制来实现。
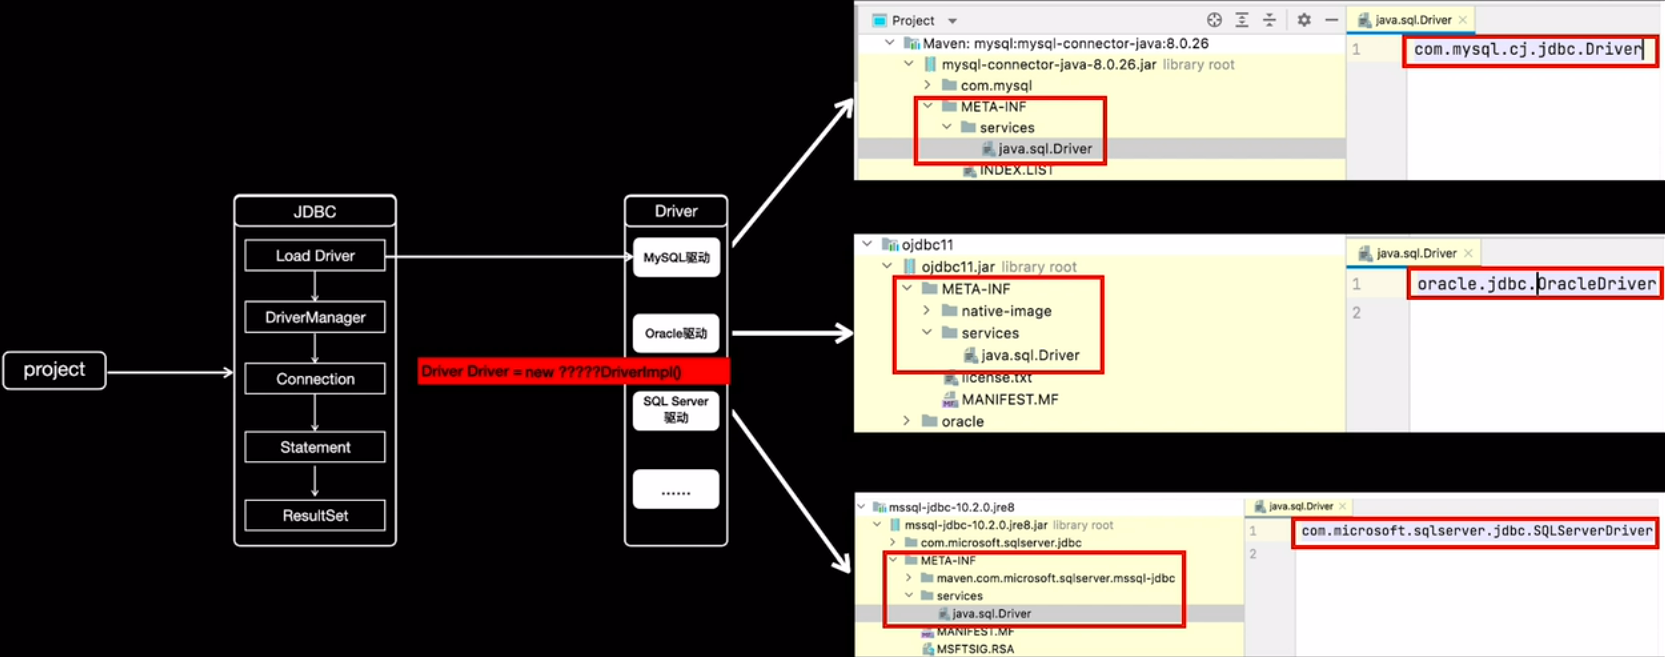
如上图所示:
- 首先在java中定义了接口 java.sql.Driver,并没有具体的实现,具体的实现都是由不同厂商来提供的。
- 在mysql的jar包mysql-connector-java-8.0.26.jar中,可以找到 META-INF/services 目录,该目录下会有一个名字为 java.sql.Driver 的文件,文件内容是com.mysql.cj.jdbc.Driver,这里面的内容就是mysql针对Java中定义的接口的实现。
- 同样在ojdbc的jar包ojdbc11.jar中,也可以找到同样的配置文件,文件内容是 oracle.jdbc.OracleDriver,这是oracle数据库对Java的java.sql.Driver的实现。
使用方法
而现在Java中写连接数据库的代码的时候,不需要再使用Class.forName("com.mysql.jdbc.Driver")来加载驱动了,直接获取连接就可以了:
String url = "jdbc:xxxx://xxxx:xxxx/xxxx";
Connection conn = DriverManager.getConnection(url, username, password);
.....
这里并没有涉及到spi的使用,看下面源码。
源码实现
上面的使用方法,就是普通的连接数据库的代码,实际上并没有涉及到 SPI 的东西,但是有一点可以确定的是,我们没有写有关具体驱动的硬编码Class.forName("com.mysql.jdbc.Driver")!
而上面的代码就可以直接获取数据库连接进行操作,但是跟SPI有啥关系呢?
既然上面代码没有加载驱动的代码,那实际上是怎么去确定使用哪个数据库连接的驱动呢?
这里就涉及到使用Java的SPI 扩展机制来查找相关驱动的东西了,关于驱动的查找其实都在DriverManager中,DriverManager是Java中的实现,用来获取数据库连接,源码如下:
public class DriverManager {// 存放注册的jdbc驱动private final static CopyOnWriteArrayList<DriverInfo> registeredDrivers = new CopyOnWriteArrayList<>();/*** Load the initial JDBC drivers by checking the System property* jdbc.properties and then use the {@code ServiceLoader} mechanism*/static {loadInitialDrivers();println("JDBC DriverManager initialized");}private static void loadInitialDrivers() {String drivers;try {// 从JVM -D参数读取jdbc驱动drivers = AccessController.doPrivileged(new PrivilegedAction<String>() {public String run() {return System.getProperty("jdbc.drivers");}});} catch (Exception ex) {drivers = null;}// If the driver is packaged as a Service Provider, load it.// Get all the drivers through the classloader// exposed as a java.sql.Driver.class service.// ServiceLoader.load() replaces the sun.misc.Providers()AccessController.doPrivileged(new PrivilegedAction<Void>() {public Void run() {ServiceLoader<Driver> loadedDrivers = ServiceLoader.load(Driver.class);Iterator<Driver> driversIterator = loadedDrivers.iterator();/* Load these drivers, so that they can be instantiated.* It may be the case that the driver class may not be there* i.e. there may be a packaged driver with the service class* as implementation of java.sql.Driver but the actual class* may be missing. In that case a java.util.ServiceConfigurationError* will be thrown at runtime by the VM trying to locate* and load the service.** Adding a try catch block to catch those runtime errors* if driver not available in classpath but it's* packaged as service and that service is there in classpath.*/try{// 加载创建所有Driverwhile(driversIterator.hasNext()) {// 触发Driver的类加载->在静态代码块中创建Driver对象并放到DriverManagerdriversIterator.next();}} catch(Throwable t) {// Do nothing}return null;}});println("DriverManager.initialize: jdbc.drivers = " + drivers);if (drivers == null || drivers.equals("")) {return;}// 解析JVM参数的jdbc驱动String[] driversList = drivers.split(":");println("number of Drivers:" + driversList.length);for (String aDriver : driversList) {try {println("DriverManager.Initialize: loading " + aDriver);// initial为ture // 触发Driver的类加载->在静态代码块中创建Driver对象并放到DriverManagerClass.forName(aDriver, true,ClassLoader.getSystemClassLoader());} catch (Exception ex) {println("DriverManager.Initialize: load failed: " + ex);}}}}
上面的代码主要步骤是:
- 从系统变量中获取有关驱动的定义。
- 使用SPI来获取驱动的实现。
- 遍历使用SPI获取到的具体实现,实例化各个实现类。
- 根据第一步获取到的驱动列表来实例化具体实现类。
- 第二步:使用SPI来获取驱动的实现,对应的代码是:
ServiceLoader<Driver> loadedDrivers = ServiceLoader.load(Driver.class);
这里封装了接口类型和类加载器,并初始化了一个迭代器。
- 第三步:遍历获取到的具体实现,实例化各个实现类,对应的代码如下:
//获取迭代器
Iterator<Driver> driversIterator = loadedDrivers.iterator();
//遍历所有的驱动实现
while(driversIterator.hasNext()) {driversIterator.next();
}
在遍历的时候,首先调用driversIterator.hasNext()方法,这里会搜索classpath下以及jar包中所有的META-INF/services目录下的java.sql.Driver文件,并找到文件中的实现类的名字,此时并没有实例化具体的实现类(ServiceLoader具体的源码实现在下面)。
然后是调用driversIterator.next();方法,此时就会根据驱动名字具体实例化各个实现类了。现在驱动就被找到并实例化了。
Common-Logging
common-logging(也称Jakarta Commons Logging,缩写 JCL)是常用的日志库门面, 使用了SPI的方式来动态加载和配置日志实现。这种机制允许库在运行时找到合适的日志实现,而无需硬编码具体的日志库。
我们看下它是怎么通过SPI解耦的。
首先,日志实例是通过LogFactory的getLog(String)方法创建的:
public static getLog(Class clazz) throws LogConfigurationException {return getFactory().getInstance(clazz);
}
LogFatory是一个抽象类,它负责加载具体的日志实现,getFactory()方法源码如下:
public static org.apache.commons.logging.LogFactory getFactory() throws LogConfigurationException {// Identify the class loader we will be usingClassLoader contextClassLoader = getContextClassLoaderInternal();if (contextClassLoader == null) {// This is an odd enough situation to report about. This// output will be a nuisance on JDK1.1, as the system// classloader is null in that environment.if (isDiagnosticsEnabled()) {logDiagnostic("Context classloader is null.");}}// Return any previously registered factory for this class loaderorg.apache.commons.logging.LogFactory factory = getCachedFactory(contextClassLoader);if (factory != null) {return factory;}if (isDiagnosticsEnabled()) {logDiagnostic("[LOOKUP] LogFactory implementation requested for the first time for context classloader " +objectId(contextClassLoader));logHierarchy("[LOOKUP] ", contextClassLoader);}// classpath根目录下寻找commons-logging.propertiesProperties props = getConfigurationFile(contextClassLoader, FACTORY_PROPERTIES);// Determine whether we will be using the thread context class loader to// load logging classes or not by checking the loaded properties file (if any).// classpath根目录下commons-logging.properties是否配置use_tcclClassLoader baseClassLoader = contextClassLoader;if (props != null) {String useTCCLStr = props.getProperty(TCCL_KEY);if (useTCCLStr != null) {if (Boolean.valueOf(useTCCLStr).booleanValue() == false) {baseClassLoader = thisClassLoader;}}}// 这里真正开始决定使用哪个factory// 首先,尝试查找vm系统属性org.apache.commons.logging.LogFactory,其是否指定factoryif (isDiagnosticsEnabled()) {logDiagnostic("[LOOKUP] Looking for system property [" + FACTORY_PROPERTY +"] to define the LogFactory subclass to use...");}try {String factoryClass = getSystemProperty(FACTORY_PROPERTY, null);if (factoryClass != null) {if (isDiagnosticsEnabled()) {logDiagnostic("[LOOKUP] Creating an instance of LogFactory class '" + factoryClass +"' as specified by system property " + FACTORY_PROPERTY);}factory = newFactory(factoryClass, baseClassLoader, contextClassLoader);} else {if (isDiagnosticsEnabled()) {logDiagnostic("[LOOKUP] No system property [" + FACTORY_PROPERTY + "] defined.");}}} catch (SecurityException e) {if (isDiagnosticsEnabled()) {logDiagnostic("[LOOKUP] A security exception occurred while trying to create an" +" instance of the custom factory class" + ": [" + trim(e.getMessage()) +"]. Trying alternative implementations...");}// ignore} catch (RuntimeException e) {if (isDiagnosticsEnabled()) {logDiagnostic("[LOOKUP] An exception occurred while trying to create an" +" instance of the custom factory class" + ": [" +trim(e.getMessage()) +"] as specified by a system property.");}throw e;}// 第二,尝试使用java spi服务发现机制,在META-INF/services下寻找org.apache.commons.logging.LogFactory实现if (factory == null) {if (isDiagnosticsEnabled()) {logDiagnostic("[LOOKUP] Looking for a resource file of name [" + SERVICE_ID +"] to define the LogFactory subclass to use...");}try {// META-INF/services/org.apache.commons.logging.LogFactory, SERVICE_IDfinal InputStream is = getResourceAsStream(contextClassLoader, SERVICE_ID);if (is != null) {// This code is needed by EBCDIC and other strange systems.// It's a fix for bugs reported in xercesBufferedReader rd;try {rd = new BufferedReader(new InputStreamReader(is, "UTF-8"));} catch (java.io.UnsupportedEncodingException e) {rd = new BufferedReader(new InputStreamReader(is));}String factoryClassName = rd.readLine();rd.close();if (factoryClassName != null && !"".equals(factoryClassName)) {if (isDiagnosticsEnabled()) {logDiagnostic("[LOOKUP]  Creating an instance of LogFactory class " +factoryClassName +" as specified by file '" + SERVICE_ID +"' which was present in the path of the context classloader.");}factory = newFactory(factoryClassName, baseClassLoader, contextClassLoader);}} else {// is == nullif (isDiagnosticsEnabled()) {logDiagnostic("[LOOKUP] No resource file with name '" + SERVICE_ID + "' found.");}}} catch (Exception ex) {// note: if the specified LogFactory class wasn't compatible with LogFactory// for some reason, a ClassCastException will be caught here, and attempts will// continue to find a compatible class.if (isDiagnosticsEnabled()) {logDiagnostic("[LOOKUP] A security exception occurred while trying to create an" +" instance of the custom factory class" +": [" + trim(ex.getMessage()) +"]. Trying alternative implementations...");}// ignore}}// 第三,尝试从classpath根目录下的commons-logging.properties中查找org.apache.commons.logging.LogFactory属性指定的factoryif (factory == null) {if (props != null) {if (isDiagnosticsEnabled()) {logDiagnostic("[LOOKUP] Looking in properties file for entry with key '" + FACTORY_PROPERTY +"' to define the LogFactory subclass to use...");}String factoryClass = props.getProperty(FACTORY_PROPERTY);if (factoryClass != null) {if (isDiagnosticsEnabled()) {logDiagnostic("[LOOKUP] Properties file specifies LogFactory subclass '" + factoryClass + "'");}factory = newFactory(factoryClass, baseClassLoader, contextClassLoader);// TODO: think about whether we need to handle exceptions from newFactory} else {if (isDiagnosticsEnabled()) {logDiagnostic("[LOOKUP] Properties file has no entry specifying LogFactory subclass.");}}} else {if (isDiagnosticsEnabled()) {logDiagnostic("[LOOKUP] No properties file available to determine" + " LogFactory subclass from..");}}}// 最后,使用后备factory实现,org.apache.commons.logging.impl.LogFactoryImplif (factory == null) {if (isDiagnosticsEnabled()) {logDiagnostic("[LOOKUP] Loading the default LogFactory implementation '" + FACTORY_DEFAULT +"' via the same classloader that loaded this LogFactory" +" class (ie not looking in the context classloader).");}factory = newFactory(FACTORY_DEFAULT, thisClassLoader, contextClassLoader);}if (factory != null) {cacheFactory(contextClassLoader, factory);if (props != null) {Enumeration names = props.propertyNames();while (names.hasMoreElements()) {String name = (String) names.nextElement();String value = props.getProperty(name);factory.setAttribute(name, value);}}}return factory;
}
可以看出,抽象类LogFactory加载具体实现的步骤如下:
- 从vm系统属性org.apache.commons.logging.LogFactory
- 使用SPI服务发现机制,发现org.apache.commons.logging.LogFactory的实现
- 查找classpath根目录commons-logging.properties的org.apache.commons.logging.LogFactory属性是否指定factory实现
- 使用默认factory实现,org.apache.commons.logging.impl.LogFactoryImpl
LogFactory的getLog()方法返回类型是org.apache.commons.logging.Log接口,提供了从trace到fatal方法。可以确定,如果日志实现提供者只要实现该接口,并且使用继承自org.apache.commons.logging.LogFactory的子类创建Log,必然可以构建一个松耦合的日志系统。
Spring中SPI机制
在springboot的自动装配过程中,最终会加载META-INF/spring.factories文件,主要通过以下几个步骤实现:
- 服务接口定义: Spring 定义了许多服务接口,如
org.springframework.boot.autoconfigure.EnableAutoConfiguration。 - 服务提供者实现: 各种具体的模块和库会提供这些服务接口的实现,如各种自动配置类。
- 服务描述文件: 在实现模块的 JAR 包中,会有一个
META-INF/spring.factories文件,这个文件中列出了该 JAR 包中实现的自动配置类。 - 服务加载: Spring Boot 在启动时加载
spring.factories文件,并实例化这些文件中列出的实现类。
Spring Boot 使用 SpringFactoriesLoader 来加载 spring.factories 文件中列出的所有类,并将它们注册到应用上下文中。需要注意的是,其实这里不仅仅是会去ClassPath路径下查找,会扫描所有路径下的Jar包,只不过这个文件只会在Classpath下的jar包中。
public static final String FACTORIES_RESOURCE_LOCATION = "META-INF/spring.factories";
// spring.factories文件的格式为:key=value1,value2,value3
// 从所有的jar包中找到META-INF/spring.factories文件
// 然后从文件中解析出key=factoryClass类名称的所有value值
public static List<String> loadFactoryNames(Class<?> factoryClass, ClassLoader classLoader) {String factoryClassName = factoryClass.getName();// 取得资源文件的URLEnumeration<URL> urls = (classLoader != null ? classLoader.getResources(FACTORIES_RESOURCE_LOCATION) : ClassLoader.getSystemResources(FACTORIES_RESOURCE_LOCATION));List<String> result = new ArrayList<String>();// 遍历所有的URLwhile (urls.hasMoreElements()) {URL url = urls.nextElement();// 根据资源文件URL解析properties文件,得到对应的一组@Configuration类Properties properties = PropertiesLoaderUtils.loadProperties(new UrlResource(url));String factoryClassNames = properties.getProperty(factoryClassName);// 组装数据,并返回result.addAll(Arrays.asList(StringUtils.commaDelimitedListToStringArray(factoryClassNames)));}return result;
}
通过 SPI 机制和 spring.factories 文件的配合,Spring Boot 实现了模块化和自动配置的能力。开发者可以通过定义自动配置类并在 spring.factories 文件中声明它们,从而实现模块的独立和松耦合。这种机制不仅简化了配置和启动过程,还提升了应用的可扩展性和维护性。
SPI 机制通常怎么使用
看完上面的几个例子解析,应该都能知道大概的流程了:
- 定义标准:定义标准,就是定义接口。比如接口java.sql.Driver
- 具体厂商或者框架开发者实现:厂商或者框架开发者开发具体的实现:
在META-INF/services目录下定义一个名字为接口全限定名的文件,比如java.sql.Driver文件,文件内容是具体的实现名字,比如me.cxis.sql.MyDriver。写具体的实现me.cxis.sql.MyDriver,都是对接口Driver的实现。 - 具体使用:引用具体厂商的jar包来实现我们的功能:
ServiceLoader<Driver> loadedDrivers = ServiceLoader.load(Driver.class);
//获取迭代器
Iterator<Driver> driversIterator = loadedDrivers.iterator();
//遍历
while(driversIterator.hasNext()) {driversIterator.next();//可以做具体的业务逻辑
}- 使用规范:

SPI机制实现原理
那么问题来了: 怎么样才能加载这些SPI接口的实现类呢,真正的原因是Java的类加载机制! SPI接口属于java rt核心包,只能由启动类加载器BootStrap classLoader加载,而第三方jar包是用户classPath路径下,根据类加载器的可见性原则:启动类加载器无法加载这些jar包,也就是没法向下委托,所以spi必须打破这种传统的双亲委派机制,通过自定义的类加载器来加载第三方jar包下的spi接口实现类!
JDK中ServiceLoader方法的具体实现:
//ServiceLoader实现了Iterable接口,可以遍历所有的服务实现者
public final class ServiceLoader<S> implements Iterable<S>{//查找配置文件的目录private static final String PREFIX = "META-INF/services/";//表示要被加载的服务的类或接口private final Class<S> service;//这个ClassLoader用来定位,加载,实例化服务提供者private final ClassLoader loader;// 访问控制上下文private final AccessControlContext acc;// 缓存已经被实例化的服务提供者,按照实例化的顺序存储private LinkedHashMap<String,S> providers = new LinkedHashMap<>();// 迭代器private LazyIterator lookupIterator;//重新加载,就相当于重新创建ServiceLoader了,用于新的服务提供者安装到正在运行的Java虚拟机中的情况。public void reload() {//清空缓存中所有已实例化的服务提供者providers.clear();//新建一个迭代器,该迭代器会从头查找和实例化服务提供者lookupIterator = new LazyIterator(service, loader);}//私有构造器//使用指定的类加载器和服务创建服务加载器//如果没有指定类加载器,使用系统类加载器,就是应用类加载器。private ServiceLoader(Class<S> svc, ClassLoader cl) {service = Objects.requireNonNull(svc, "Service interface cannot be null");loader = (cl == null) ? ClassLoader.getSystemClassLoader() : cl;acc = (System.getSecurityManager() != null) ? AccessController.getContext() : null;reload();}//解析失败处理的方法private static void fail(Class<?> service, String msg, Throwable cause)throws ServiceConfigurationError{throw new ServiceConfigurationError(service.getName() + ": " + msg,cause);}private static void fail(Class<?> service, String msg)throws ServiceConfigurationError{throw new ServiceConfigurationError(service.getName() + ": " + msg);}private static void fail(Class<?> service, URL u, int line, String msg)throws ServiceConfigurationError{fail(service, u + ":" + line + ": " + msg);}//解析服务提供者配置文件中的一行//首先去掉注释校验,然后保存//返回下一行行号//重复的配置项和已经被实例化的配置项不会被保存private int parseLine(Class<?> service, URL u, BufferedReader r, int lc, List<String> names)throws IOException, ServiceConfigurationError{//读取一行String ln = r.readLine();if (ln == null) {return -1;}//#号代表注释行int ci = ln.indexOf('#');if (ci >= 0) ln = ln.substring(0, ci);ln = ln.trim();int n = ln.length();if (n != 0) {if ((ln.indexOf(' ') >= 0) || (ln.indexOf('\t') >= 0))fail(service, u, lc, "Illegal configuration-file syntax");int cp = ln.codePointAt(0);if (!Character.isJavaIdentifierStart(cp))fail(service, u, lc, "Illegal provider-class name: " + ln);for (int i = Character.charCount(cp); i < n; i += Character.charCount(cp)) {cp = ln.codePointAt(i);if (!Character.isJavaIdentifierPart(cp) && (cp != '.'))fail(service, u, lc, "Illegal provider-class name: " + ln);}if (!providers.containsKey(ln) && !names.contains(ln))names.add(ln);}return lc + 1;}//解析配置文件,解析指定的url配置文件//使用parseLine方法进行解析,未被实例化的服务提供者会被保存到缓存中去private Iterator<String> parse(Class<?> service, URL u) throws ServiceConfigurationError{InputStream in = null;BufferedReader r = null;ArrayList<String> names = new ArrayList<>();try {in = u.openStream();r = new BufferedReader(new InputStreamReader(in, "utf-8"));int lc = 1;while ((lc = parseLine(service, u, r, lc, names)) >= 0);}return names.iterator();}//服务提供者查找的迭代器private class LazyIterator implements Iterator<S>{Class<S> service;//服务提供者接口ClassLoader loader;//类加载器Enumeration<URL> configs = null;//保存实现类的urlIterator<String> pending = null;//保存实现类的全名String nextName = null;//迭代器中下一个实现类的全名private LazyIterator(Class<S> service, ClassLoader loader) {this.service = service;this.loader = loader;}private boolean hasNextService() {if (nextName != null) {return true;}if (configs == null) {try {String fullName = PREFIX + service.getName();if (loader == null)configs = ClassLoader.getSystemResources(fullName);elseconfigs = loader.getResources(fullName);}}while ((pending == null) || !pending.hasNext()) {if (!configs.hasMoreElements()) {return false;}pending = parse(service, configs.nextElement());}nextName = pending.next();return true;}private S nextService() {if (!hasNextService())throw new NoSuchElementException();String cn = nextName;nextName = null;Class<?> c = null;try {c = Class.forName(cn, false, loader);}if (!service.isAssignableFrom(c)) {fail(service, "Provider " + cn  + " not a subtype");}try {S p = service.cast(c.newInstance());providers.put(cn, p);return p;}}public boolean hasNext() {if (acc == null) {return hasNextService();} else {PrivilegedAction<Boolean> action = new PrivilegedAction<Boolean>() {public Boolean run() { return hasNextService(); }};return AccessController.doPrivileged(action, acc);}}public S next() {if (acc == null) {return nextService();} else {PrivilegedAction<S> action = new PrivilegedAction<S>() {public S run() { return nextService(); }};return AccessController.doPrivileged(action, acc);}}public void remove() {throw new UnsupportedOperationException();}}//获取迭代器//返回遍历服务提供者的迭代器//以懒加载的方式加载可用的服务提供者//懒加载的实现是:解析配置文件和实例化服务提供者的工作由迭代器本身完成public Iterator<S> iterator() {return new Iterator<S>() {//按照实例化顺序返回已经缓存的服务提供者实例Iterator<Map.Entry<String,S>> knownProviders= providers.entrySet().iterator();public boolean hasNext() {if (knownProviders.hasNext())return true;return lookupIterator.hasNext();}public S next() {if (knownProviders.hasNext())return knownProviders.next().getValue();return lookupIterator.next();}public void remove() {throw new UnsupportedOperationException();}};}//为指定的服务使用指定的类加载器来创建一个ServiceLoaderpublic static <S> ServiceLoader<S> load(Class<S> service, ClassLoader loader){return new ServiceLoader<>(service, loader);}//使用线程上下文的类加载器来创建ServiceLoaderpublic static <S> ServiceLoader<S> load(Class<S> service) {ClassLoader cl = Thread.currentThread().getContextClassLoader();return ServiceLoader.load(service, cl);}//使用扩展类加载器为指定的服务创建ServiceLoader//只能找到并加载已经安装到当前Java虚拟机中的服务提供者,应用程序类路径中的服务提供者将被忽略public static <S> ServiceLoader<S> loadInstalled(Class<S> service) {ClassLoader cl = ClassLoader.getSystemClassLoader();ClassLoader prev = null;while (cl != null) {prev = cl;cl = cl.getParent();}return ServiceLoader.load(service, prev);}public String toString() {return "java.util.ServiceLoader[" + service.getName() + "]";}}
- 首先,ServiceLoader实现了Iterable接口,所以它有迭代器的属性,这里主要都是实现了迭代器的 hasNext 和 next 方法。这里主要都是调用的lookupIterator的相应hasNext和next方法,lookupIterator是懒加载迭代器。
- 其次,LazyIterator 中的 hasNext 方法,静态变量PREFIX就是”META-INF/services/”目录,这也就是为什么需要在classpath下的META-INF/services/目录里创建一个以服务接口命名的文件。
- 最后,通过反射方法Class.forName()加载类对象,并用newInstance方法将类实例化,并把实例化后的类缓存到providers对象中,(LinkedHashMap<String,S>类型)然后返回实例对象。
所以可以看到ServiceLoader不是实例化以后,就去读取配置文件中的具体实现,并进行实例化。而是等到使用迭代器去遍历的时候,才会加载对应的配置文件去解析,调用hasNext方法的时候会去加载配置文件进行解析,调用next方法的时候进行实例化并缓存。
所有的配置文件只会加载一次,服务提供者也只会被实例化一次,重新加载配置文件可使用reload方法。
JDK SPI机制的缺陷
通过上面的解析,可以发现,我们使用SPI机制的缺陷:
-
获取某个实现类的方式不够灵活,只能通过 Iterator 形式获取,不能根据某个参数来获取对应的实现类。如果不想用某些实现类,或者某些类实例化很耗时,它也被载入并实例化了,这就造成了浪费。
-
多个并发多线程使用 ServiceLoader 类的实例是不安全的
关于作者
来自一线程序员Seven的探索与实践,持续学习迭代中~
本文已收录于我的个人博客:https://www.seven97.top
公众号:seven97,欢迎关注~