更多SpringBoot3内容请关注我的专栏:《SpringBoot3》
期待您的点赞👍收藏⭐评论✍
重学SpringBoot3-集成Redis(六)之消息队列
- 1. 什么是发布/订阅(Pub/Sub)?
- 2. 场景应用
- 3. Spring Boot 3 整合 Redis 实现发布/订阅
- 3.1. 添加依赖
- 3.2. 配置 Redis 连接
- 3.3. 实现消息发布功能
- 3.4. 实现消息订阅功能
- 3.5. 测试发布/订阅功能
- 3.6. 使用Redisson
- 4. 总结
Redis 不仅是一个高效的缓存解决方案,也具备强大的消息队列功能。通过 Redis 的 发布/订阅(Pub/Sub) 机制,开发者可以轻松实现服务之间的通信和消息传递功能,而无需引入专门的消息队列工具。这篇文章将介绍如何通过 Spring Boot 3 和 Redis 实现消息队列的发布与订阅功能。
1. 什么是发布/订阅(Pub/Sub)?
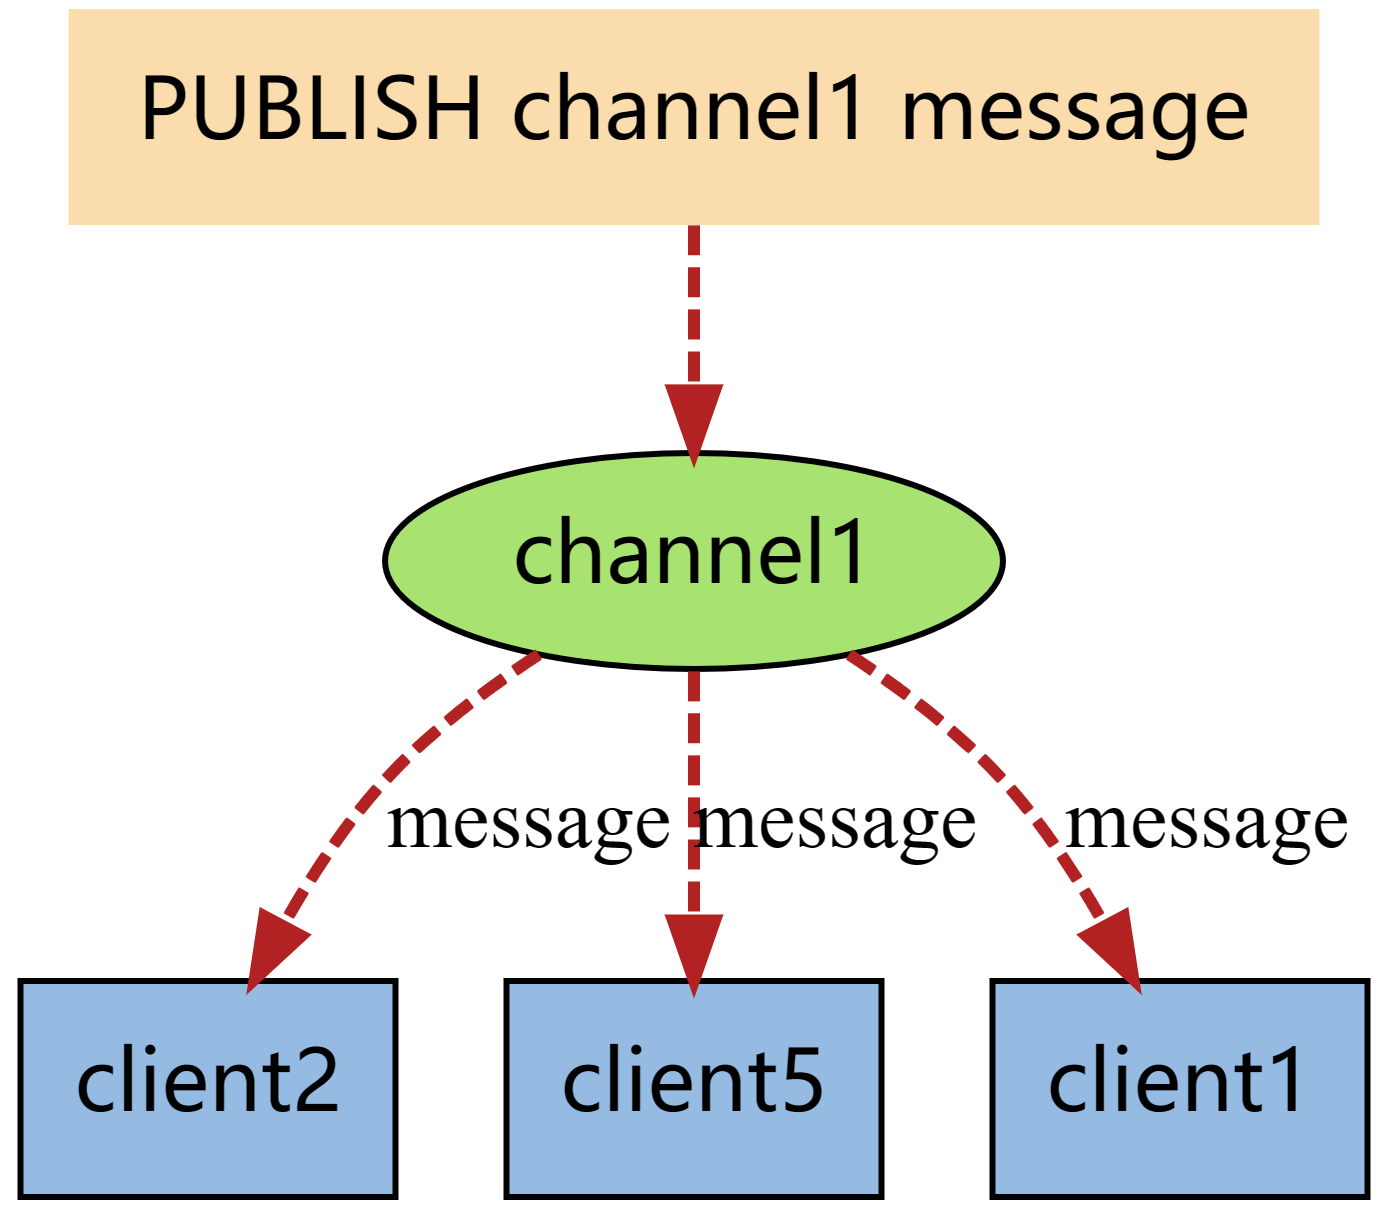
发布/订阅是一种消息传递模式,发布者发送消息到某个频道(channel),而订阅了该频道的所有订阅者都会收到该消息。这种模式与传统的消息队列不同,不会将消息存储下来,而是将其立即广播给所有的订阅者。因此,发布/订阅模式非常适合用于通知、事件广播等实时性较强的场景。
- 发布者:向一个或多个频道发布消息。
- 订阅者:订阅一个或多个频道,实时接收消息。
2. 场景应用
- 事件驱动系统:如任务通知、状态更新、日志广播。
- 消息通知服务:如实时的新闻推送、股票行情推送。
- 微服务通信:不同服务之间的消息传递。
3. Spring Boot 3 整合 Redis 实现发布/订阅
在 Spring Boot 3 中,我们可以通过 Spring Data Redis 轻松集成 Redis 的发布/订阅功能。
3.1. 添加依赖
首先,我们需要在项目的 pom.xml 文件中添加必要的依赖,详细参考重学SpringBoot3-集成Redis(一)基本使用。
<dependency><groupId>org.springframework.boot</groupId><artifactId>spring-boot-starter-data-redis</artifactId></dependency>
3.2. 配置 Redis 连接
在 application.yml 中配置 Redis 连接信息:
spring:data:redis:host: localhostport: 6379 # Redis 端口password: # 如果有密码可以在这里配置lettuce:pool:max-active: 100 # 最大并发连接数max-idle: 50 # 最大空闲连接数min-idle: 10 # 最小空闲连接数
3.3. 实现消息发布功能
首先,我们需要创建一个 消息发布者,用于发送消息到特定的频道:
package com.coderjia.boot310redis.config;import org.springframework.beans.factory.annotation.Autowired;
import org.springframework.data.redis.core.RedisTemplate;
import org.springframework.stereotype.Component;/*** @author CoderJia* @create 2024/10/6 下午 10:44* @Description**/
@Component
public class MessagePublisher {@Autowiredprivate RedisTemplate redisTemplate;public void publish(String channel, String message) {redisTemplate.convertAndSend(channel, message);System.out.println("Message published to channel " + channel + ": " + message);}
}
在这个类中,RedisTemplate 被用来将消息发送到指定的频道。
3.4. 实现消息订阅功能
接下来,我们实现一个 消息订阅者,用于监听特定频道的消息:
package com.coderjia.boot310redis.config;import org.springframework.stereotype.Component;/*** @author CoderJia* @create 2024/10/6 下午 10:45* @Description**/
@Component
public class MessageSubscriber {public void onMessage(String message, String channel) {System.out.println("Received message from channel " + channel + ": " + message);}
}
为了让这个订阅者生效,我们需要注册一个消息监听器:
package com.coderjia.boot310redis.config;import com.fasterxml.jackson.databind.ObjectMapper;
import org.springframework.context.annotation.Bean;
import org.springframework.context.annotation.Configuration;
import org.springframework.data.redis.connection.RedisConnectionFactory;
import org.springframework.data.redis.core.RedisTemplate;
import org.springframework.data.redis.listener.ChannelTopic;
import org.springframework.data.redis.listener.RedisMessageListenerContainer;
import org.springframework.data.redis.listener.adapter.MessageListenerAdapter;
import org.springframework.data.redis.serializer.Jackson2JsonRedisSerializer;
import org.springframework.data.redis.serializer.StringRedisSerializer;/*** @author CoderJia* @create 2024/10/4 下午 12:43* @Description**/
@Configuration
public class RedisConfig {@Beanpublic RedisTemplate<String, Object> redisTemplate(RedisConnectionFactory redisConnectionFactory) {RedisTemplate<String, Object> template = new RedisTemplate<>();template.setConnectionFactory(redisConnectionFactory);// 使用String序列化器序列化Keytemplate.setKeySerializer(new StringRedisSerializer());// 使用Jackson2JsonRedisSerializer序列化ValueObjectMapper objectMapper = new ObjectMapper();Jackson2JsonRedisSerializer<Object> serializer = new Jackson2JsonRedisSerializer<>(objectMapper,Object.class);template.setValueSerializer(serializer);return template;}@Beanpublic RedisMessageListenerContainer container(RedisConnectionFactory connectionFactory,MessageListenerAdapter listenerAdapter) {RedisMessageListenerContainer container = new RedisMessageListenerContainer();container.setConnectionFactory(connectionFactory);container.addMessageListener(listenerAdapter, new ChannelTopic("myChannel"));return container;}@Beanpublic MessageListenerAdapter listenerAdapter(MessageSubscriber subscriber) {return new MessageListenerAdapter(subscriber, "onMessage");}
}
在这个配置类中,我们使用 RedisMessageListenerContainer 来监听频道消息,并使用 MessageListenerAdapter 将消息处理委托给 MessageSubscriber。
3.5. 测试发布/订阅功能
在我们的控制器或服务中,我们可以调用 MessagePublisher 来发布消息,并观察 MessageSubscriber 是否正确接收消息。
package com.coderjia.boot310redis.demos.web;import com.coderjia.boot310redis.config.MessagePublisher;
import org.springframework.beans.factory.annotation.Autowired;
import org.springframework.web.bind.annotation.GetMapping;
import org.springframework.web.bind.annotation.RequestParam;
import org.springframework.web.bind.annotation.RestController;/*** @author CoderJia* @create 2024/10/6 下午 10:47* @Description**/
@RestController
public class PubSubController {@Autowiredprivate MessagePublisher messagePublisher;@GetMapping("/publish")public String publishMessage(@RequestParam String message) {messagePublisher.publish("myChannel", message);return "Message published!";}
}
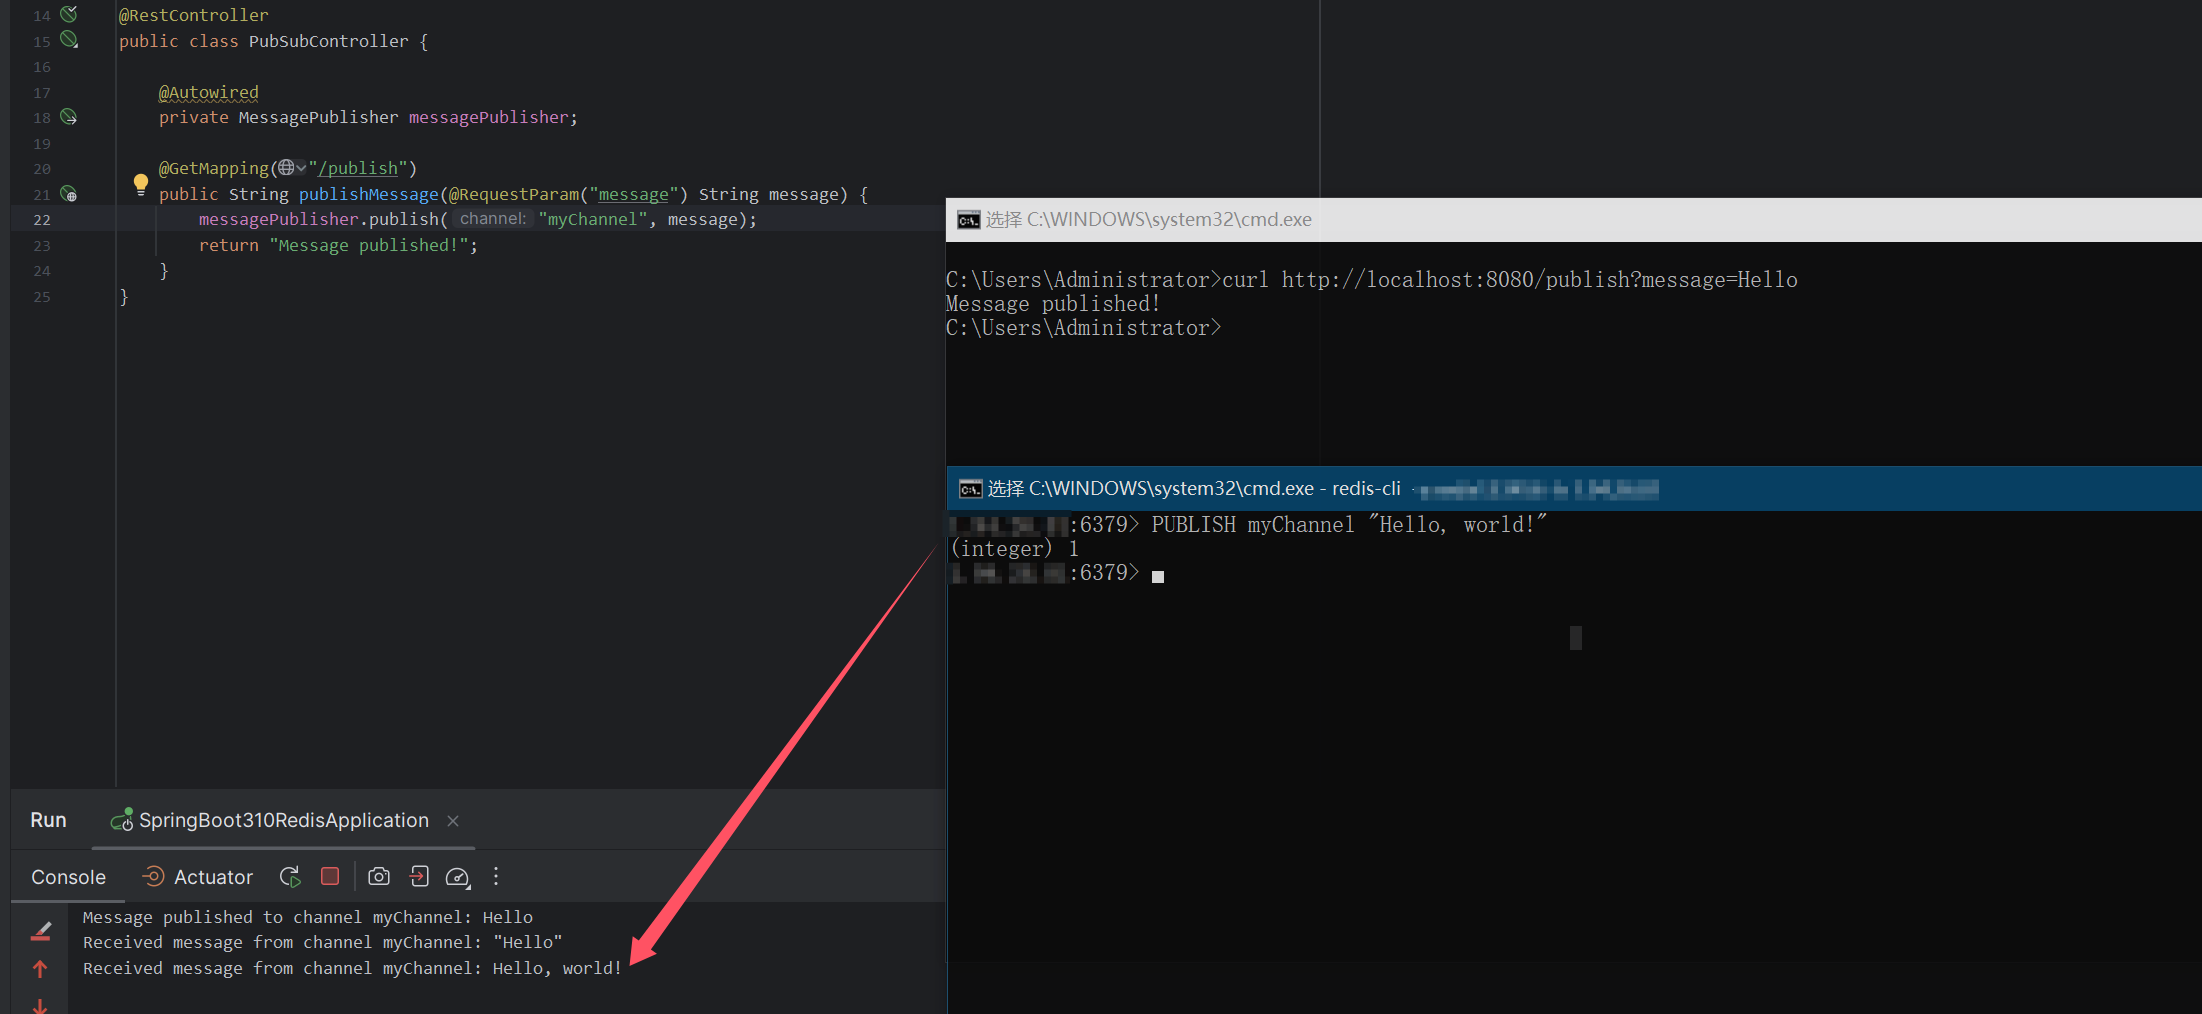
现在,我们可以启动应用程序,并通过访问 curl http://localhost:8080/publish?message=Hello 来测试消息发布,订阅者会自动接收到该消息。
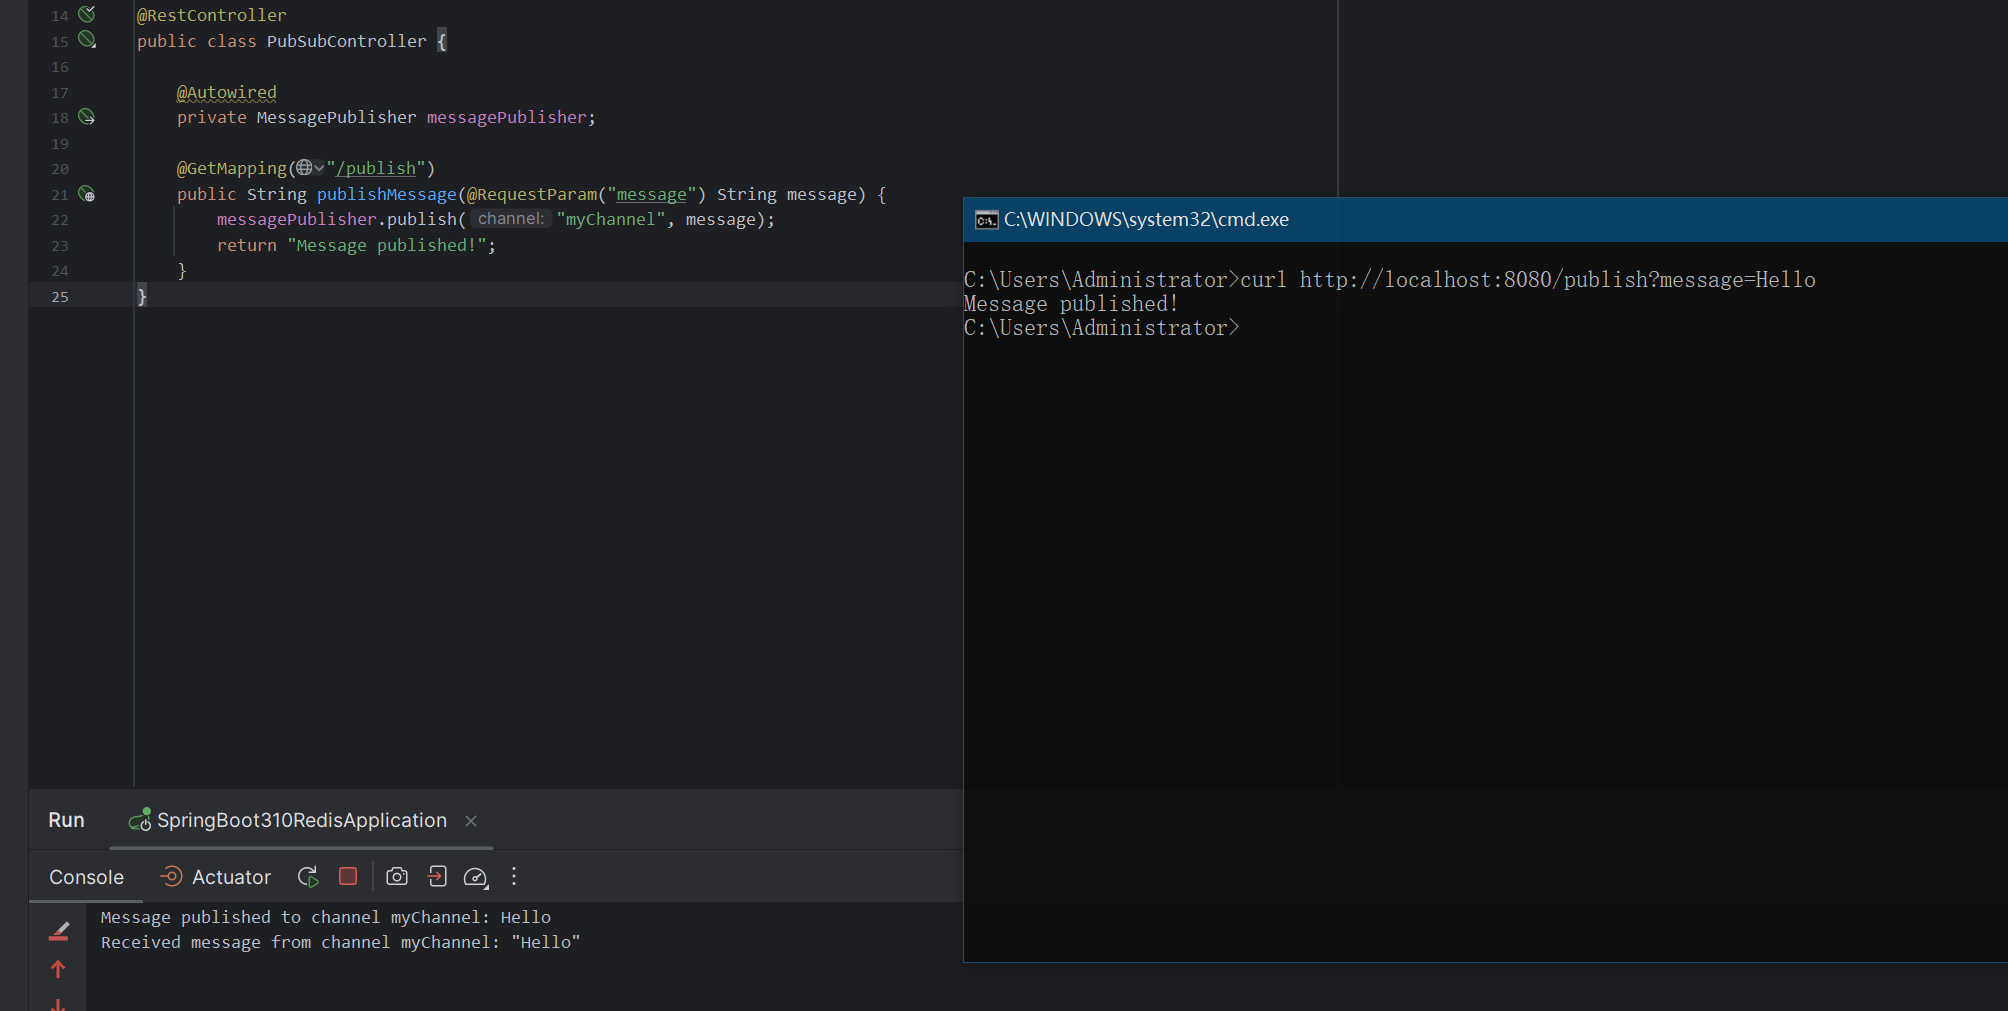
也可以使用 redis 命令 PUBLISH myChannel "Hello, world!" 向渠道发布消息,订阅者同样可以接收到消息。
3.6. 使用Redisson
使用 Redisson 同样能能实现发布订阅功能,而且是更接近 MQ 使用方式,下列代码仅供参考。
public void publish(String channel, String message) {// redisTemplate.convertAndSend(channel, message);// System.out.println("Message published to channel " + channel + ": " + message);// 获取TopicRTopic topic = redissonClient.getTopic("myChannel");// 向渠道发送消息topic.publish("Hello, world!");topic.addListener(String.class, (channel1, message1) -> {System.out.println("Received message from channel " + channel1 + ": " + message1);});}
4. 总结
通过 Spring Boot 3 与 Redis 的整合,消息发布与订阅功能的实现非常简洁且高效。Redis 的发布/订阅功能不仅可以用于简单的消息通知,还可以结合其他业务场景,如微服务通信、日志广播等。虽然 Redis 的 Pub/Sub 并不具备消息持久化的能力,但它在需要即时消息传递的场景下,具有很高的性能和灵活性。
这篇文章为 Redis 消息队列功能奠定了基础,后续将深入 Redis 的其他功能,如缓存管理、分布式锁等。如果你对 Redis 有其他问题或建议,欢迎留言讨论!


