参考
https://tensorflow.google.cn/?hl=zh-cn
https://tensorflow.google.cn/tutorials/keras/classification?hl=zh-cn
项目资源
https://download.csdn.net/download/AnalogElectronic/89872174
文章目录
- 一、案例学习
- 1、导入测试和训练数据集,定义模型,编译模型,模型训练,模型评估
- 2、模型经过训练后,您可以使用它对一些图像进行预测。附加一个 Softmax 层,将模型的线性输出 logits 转换成更容易理解的概率。
- 3、绘图显示某一张测试图片
- 4、Windows上画图工具手写数字图片保存到本地文件夹,像素也是28*28
- 5、使用模型预测手写图片
- 二、项目落地
- 1、在IDEA工具Pycharm中运行如下代码
- 2、运行日志如下
- 3、使用postman调用接口
一、案例学习
1、导入测试和训练数据集,定义模型,编译模型,模型训练,模型评估
数据集市28*28单通道灰度图像
import tensorflow as tf
import numpy as np
import matplotlib.pyplot as plt
mnist = tf.keras.datasets.mnist(x_train, y_train),(x_test, y_test) = mnist.load_data()
x_train, x_test = x_train / 255.0, x_test / 255.0model = tf.keras.models.Sequential([tf.keras.layers.Flatten(input_shape=(28, 28)),tf.keras.layers.Dense(128, activation='relu'),tf.keras.layers.Dropout(0.2),tf.keras.layers.Dense(10, activation='softmax')
])model.compile(optimizer='adam',loss='sparse_categorical_crossentropy',metrics=['accuracy'])model.fit(x_train, y_train, epochs=5)
model.evaluate(x_test, y_test)

2、模型经过训练后,您可以使用它对一些图像进行预测。附加一个 Softmax 层,将模型的线性输出 logits 转换成更容易理解的概率。
probability_model = tf.keras.Sequential([model,tf.keras.layers.Softmax()
])#保存模型
probability_model.save('./mnist.model.keras')#测试前五张图片的测试概率
probability_model(x_test[:5])
预测结果是一个包含 10 个数字的数组。它们代表模型对 10 种不同服装中每种服装的“置信度”。您可以看到哪个标签的置信度值最大:

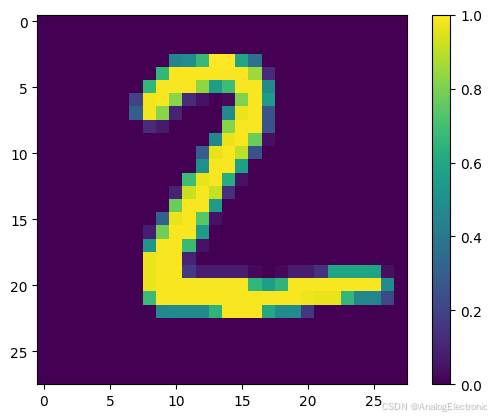
3、绘图显示某一张测试图片
import numpy as np
import matplotlib.pyplot as plt
plt.figure()
plt.imshow(x_test[1])
plt.colorbar()
plt.grid(False)
plt.show()
4、Windows上画图工具手写数字图片保存到本地文件夹,像素也是28*28

5、使用模型预测手写图片
from tensorflow.keras.preprocessing.image import img_to_array, load_img
img_path = './img/7.png'
img = load_img(img_path, target_size=(28, 28), color_mode='grayscale')
img = img_to_array(img) # 灰度化
img = img.reshape(1,28,28)
img = 255-img
predictions  = probability_model(img)
np.argmax(predictions[0])
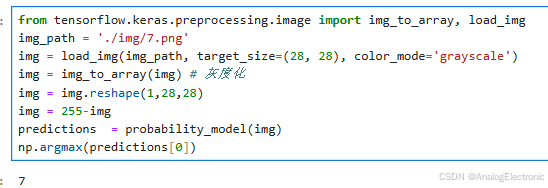
测试多次屡试不爽都是对应数字
二、项目落地
使用python搭建一个web项目,项目中加载保存的模型,预测用户上传的图片,通过接口上传图片返回图片对应的数字
1、在IDEA工具Pycharm中运行如下代码
from flask import Flask, request
from PIL import Image
import numpy as np
from werkzeug.utils import secure_filename
from tensorflow import kerasmodel = keras.models.load_model('./mnist.model.keras')app = Flask(__name__)
app.config['UPLOAD_FOLDER'] = './path/to/the/uploads'  # 替换为你的上传文件夹路径@app.route('/')
def hello_world():return '欢迎来到我的Python Web程序!'@app.route('/upload', methods=['POST'])
def upload_image():if 'file' not in request.files:return 'No file part'file = request.files['file']if file.filename == '':return 'No selected file'if file:  # 这里可以加文件类型判断逻辑filename = secure_filename(file.filename)# file.save(os.path.join(app.config['UPLOAD_FOLDER'], filename))img = Image.open(file.stream)channels = len(img.getbands())print('图像通道数为', channels)img = img.convert("L")  # 转换为灰度# img = img.convert("RGB")  # 转换为3通道img_matrix = np.asarray(img)img_matrix = 255 - img_matriximg_matrix = img_matrix.reshape(1, 28, 28)predictions = model.predict(img_matrix)result = np.argmax(predictions[0])return 'File uploaded successfully filename='+filename + 'predict result='+str(result)if __name__ == '__main__':app.run(debug=True)
2、运行日志如下
2024-10-10 18:45:12.611150: I tensorflow/core/util/port.cc:153] oneDNN custom operations are on. You may see slightly different numerical results due to floating-point round-off errors from different computation orders. To turn them off, set the environment variable `TF_ENABLE_ONEDNN_OPTS=0`.
2024-10-10 18:45:13.735215: I tensorflow/core/util/port.cc:153] oneDNN custom operations are on. You may see slightly different numerical results due to floating-point round-off errors from different computation orders. To turn them off, set the environment variable `TF_ENABLE_ONEDNN_OPTS=0`.
2024-10-10 18:45:16.360099: I tensorflow/core/platform/cpu_feature_guard.cc:210] This TensorFlow binary is optimized to use available CPU instructions in performance-critical operations.
To enable the following instructions: AVX2 FMA, in other operations, rebuild TensorFlow with the appropriate compiler flags.* Serving Flask app 'webtest01'* Debug mode: on
WARNING: This is a development server. Do not use it in a production deployment. Use a production WSGI server instead.* Running on http://127.0.0.1:5000
Press CTRL+C to quit* Restarting with stat
2024-10-10 18:45:17.159241: I tensorflow/core/util/port.cc:153] oneDNN custom operations are on. You may see slightly different numerical results due to floating-point round-off errors from different computation orders. To turn them off, set the environment variable `TF_ENABLE_ONEDNN_OPTS=0`.
2024-10-10 18:45:18.305527: I tensorflow/core/util/port.cc:153] oneDNN custom operations are on. You may see slightly different numerical results due to floating-point round-off errors from different computation orders. To turn them off, set the environment variable `TF_ENABLE_ONEDNN_OPTS=0`.
2024-10-10 18:45:21.072051: I tensorflow/core/platform/cpu_feature_guard.cc:210] This TensorFlow binary is optimized to use available CPU instructions in performance-critical operations.
To enable the following instructions: AVX2 FMA, in other operations, rebuild TensorFlow with the appropriate compiler flags.* Debugger is active!* Debugger PIN: 459-068-596
图像通道数为 4
127.0.0.1 - - [10/Oct/2024 18:45:21] "POST /upload HTTP/1.1" 200 -
1/1 ━━━━━━━━━━━━━━━━━━━━ 0s 57ms/step
3、使用postman调用接口


后话,发现一个现象,如果绘图手写数字不在正中间占满图片,而是偏离正中间,或者写的特别小就识别不出来了


