二十一、Spring事务详解
(一)、Spring基于XML的事务配置
1.环境搭建
1.1 构建maven工程,添加相关技术依赖
<dependencies><dependency><groupId>org.springframework</groupId><artifactId>spring-context</artifactId><version>5.3.18</version></dependency><!--导入Jdbc模块依赖--><dependency><groupId>org.springframework</groupId><artifactId>spring-jdbc</artifactId><version>5.3.18</version></dependency><!--mysql--><dependency><groupId>mysql</groupId><artifactId>mysql-connector-java</artifactId><version>8.0.29</version></dependency><!--c3p0的连接依赖--><dependency><groupId>com.mchange</groupId><artifactId>c3p0</artifactId><version>0.9.5.4</version></dependency><dependency><groupId>junit</groupId><artifactId>junit</artifactId><version>4.13.2</version></dependency><dependency><groupId>commons-dbutils</groupId><artifactId>commons-dbutils</artifactId><version>1.7</version></dependency><dependency><groupId>org.springframework</groupId><artifactId>spring-test</artifactId><version>5.3.18</version></dependency><!--添加AOP的依赖--><dependency><groupId>org.aspectj</groupId><artifactId>aspectjweaver</artifactId><version>1.9.7</version></dependency></dependencies>1.2 创建 spring 的配置文件并导入约束
<?xml version="1.0" encoding="UTF-8"?>
<beans xmlns="http://www.springframework.org/schema/beans"xmlns:xsi="http://www.w3.org/2001/XMLSchema-instance"xmlns:context="http://www.springframework.org/schema/context"xsi:schemaLocation="http://www.springframework.org/schema/beanshttp://www.springframework.org/schema/beans/spring-beans.xsdhttp://www.springframework.org/schema/contexthttps://www.springframework.org/schema/context/spring-context.xsd"><!--创建容器时扫描的包--><context:component-scan base-package="com.jn"></context:component-scan><!--加载properties配置文件--><context:property-placeholder location="classpath:dbconfig.properties"></context:property-placeholder><!-- 连接数据库的核心配置文件   以及数据源--><bean id="dataSource" class="com.mchange.v2.c3p0.ComboPooledDataSource"><property name="driverClass" value="${jdbc.driver}" /><property name="jdbcUrl" value="${jdbc.url}" /><property name="user" value="${jdbc.username}" /><property name="password" value="${jdbc.password}" /></bean><!--jdbcTemlpate--><bean id="jdbcTemplate" class="org.springframework.jdbc.core.JdbcTemplate"><property name="dataSource" ref="dataSource"></property></bean></beans>
1.3 沿用转账业务的代码
copy Account AccountDao AccountDaoImpl AccontService AccountServiceImpl 代码:
注意: AccountDaoImpl 具体使用使用Spring提供的JdbcTemplate模板对象实现

2.事务管理配置步骤
2.1 配置事务管理器
<!--事务管理器的配置--><bean id="transactionManager" class="org.springframework.jdbc.datasource.DataSourceTransactionManager"><property name="dataSource" ref="dataSource"></property></bean>
2.2 配置事务的通知引用事务管理器
<!--配置事务的通知引用事务管理器--><tx:advice id="txAdvice" transaction-manager="transactionManager"></tx:advice>2.3 配置事务的属性
<!--配置事务的通知引用事务管理器--><tx:advice id="txAdvice" transaction-manager="transactionManager"><!--配置事务的属性isolation:设置事务的隔离级别。timeout:设置事务的超时时间。 -1 永不超时propagation:设置事务的传播行为read-only:设置事务是否为只读。 查询操作: 设置为只读。 写操作: 非只读。rollback-for="" 指定一个异常类型。 如果遇到了该异常,就进行事务的回滚操作。 否则事务不回滚no-rollback-for="" 指定一个异常类型。 如果遇到了该异常,不进行事务的回滚。 否则回滚--><tx:attributes><tx:method name="*" isolation="DEFAULT" timeout="-1" propagation="REQUIRED" read-only="false" /></tx:attributes></tx:advice>2.4 配置 AOP 切入点表达式
<!--配置AOP--><aop:config><aop:pointcut id="myPointcut" expression="execution(* com.jn.service.impl.*.*(..))"/></aop:config>2.5 配置切入点表达式和事务通知的对应关系
<!--配置AOP--><aop:config><aop:pointcut id="myPointcut" expression="execution(* com.jn.service.impl.*.*(..))"/><!--在aop内部使用事务通知--><aop:advisor advice-ref="txAdvice" pointcut-ref="myPointcut"/></aop:config>3.测试
package com.jn;import com.jn.service.AccountService;
import org.junit.Test;
import org.springframework.context.support.ClassPathXmlApplicationContext;public class XmlTransactionTest {@Testpublic void test(){ClassPathXmlApplicationContext context = new ClassPathXmlApplicationContext("applicationContext.xml");AccountService accountService = (AccountService) context.getBean("accountService");accountService.transfer("王思梦","铁头",100.0);}
}
3.1成功转账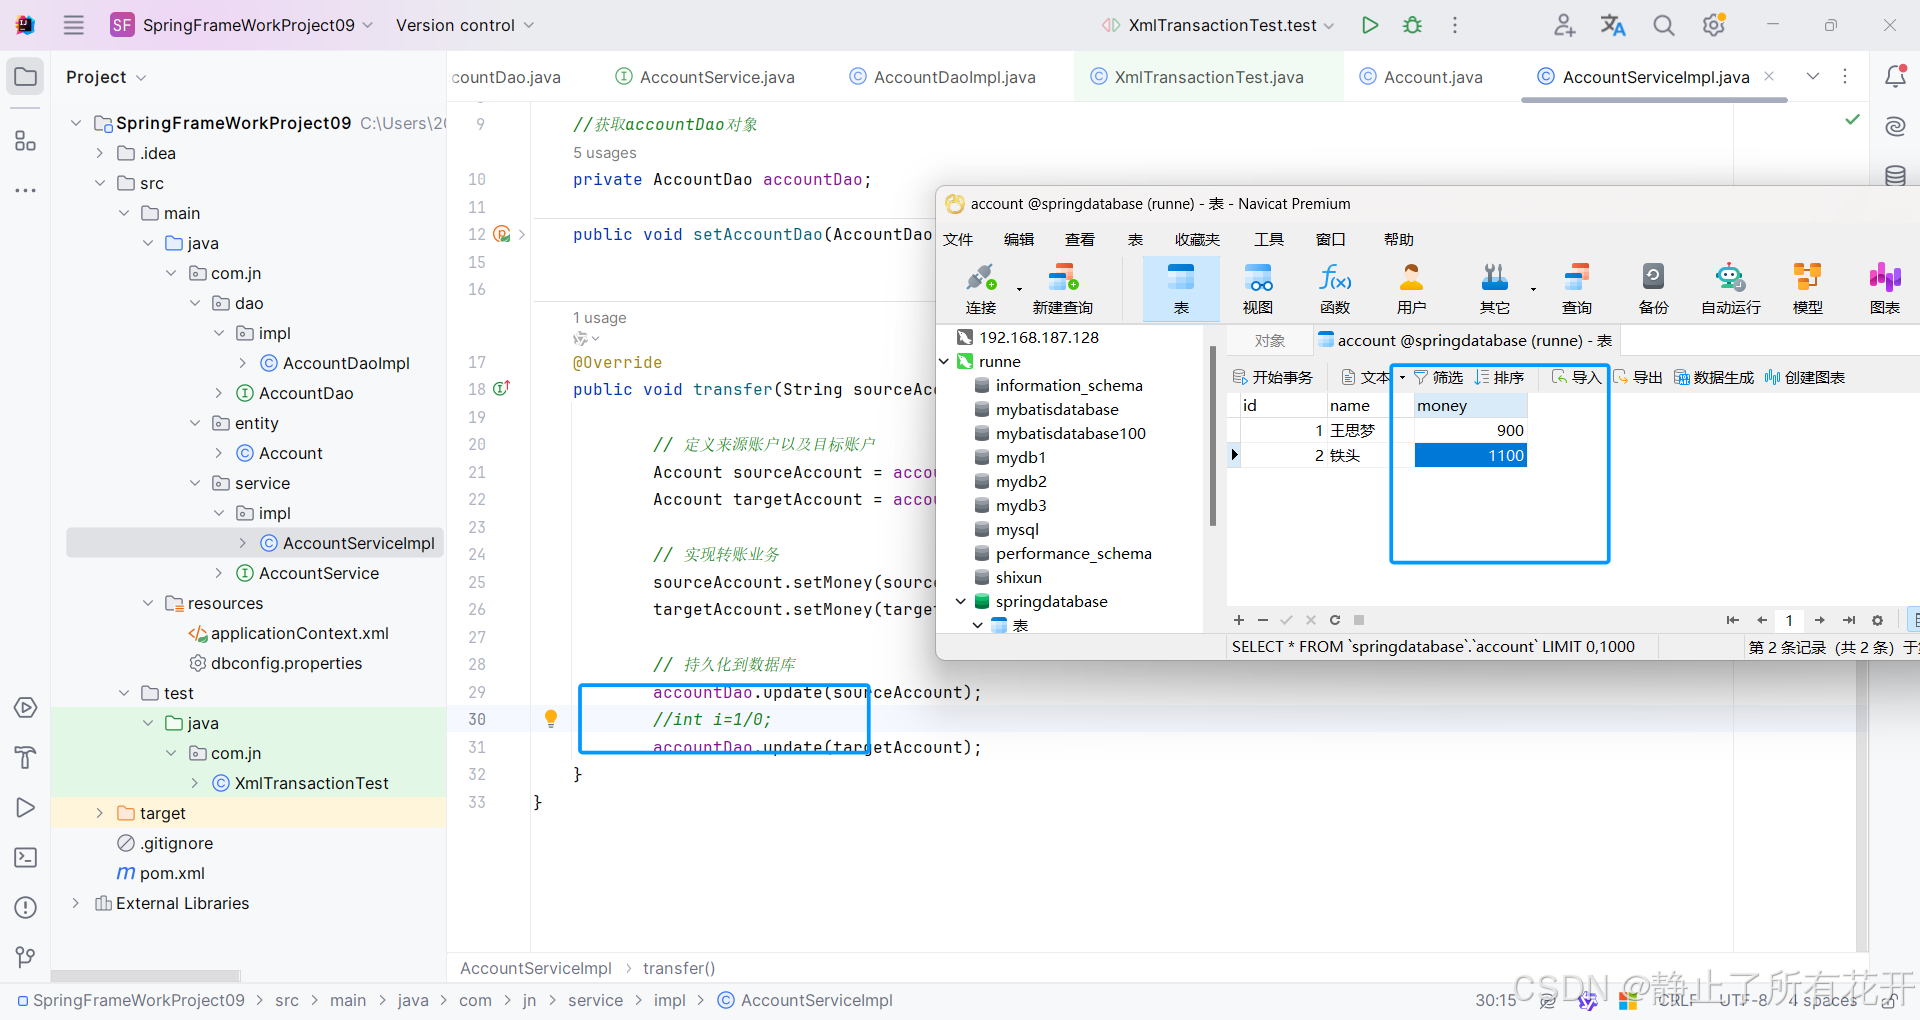
3.2转账失败回滚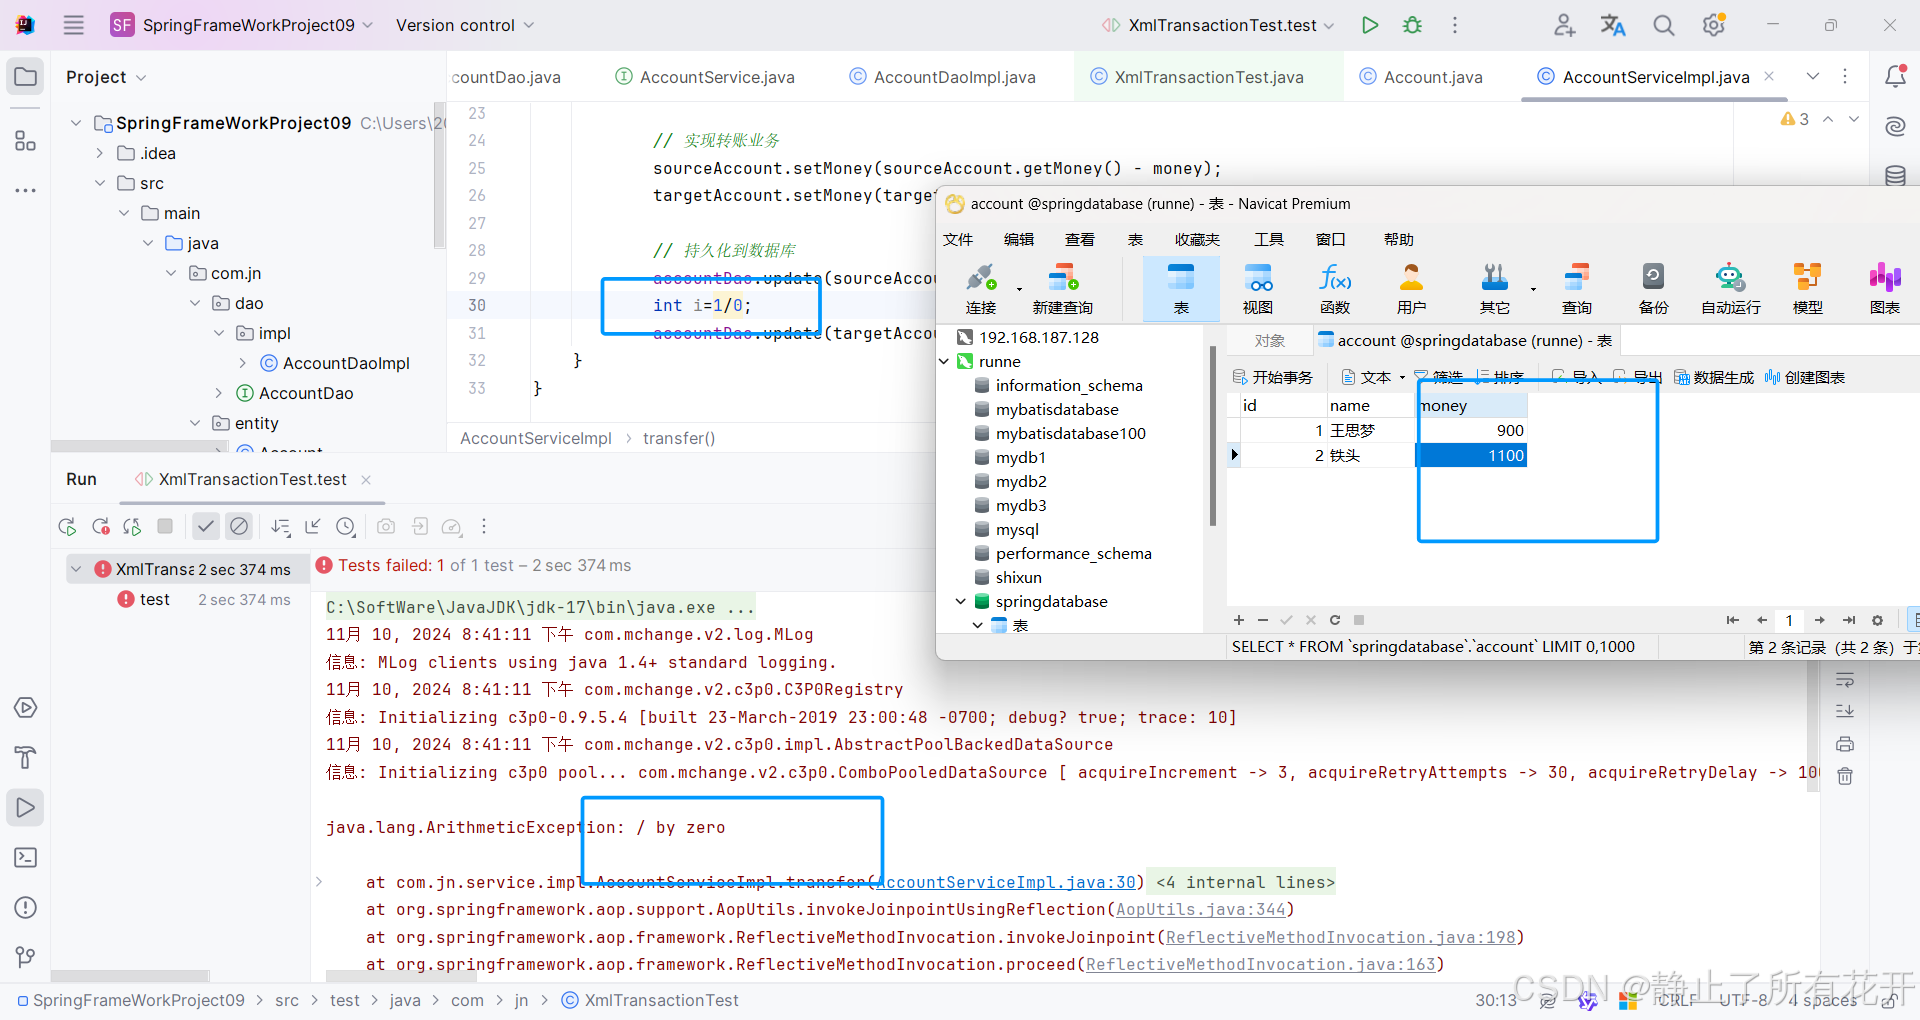
(二) 、Spring基于注解的事务配置
1.环境搭建
1.1 构建maven工程,添加相关技术依赖
<?xml version="1.0" encoding="UTF-8"?>
<project xmlns="http://maven.apache.org/POM/4.0.0"xmlns:xsi="http://www.w3.org/2001/XMLSchema-instance"xsi:schemaLocation="http://maven.apache.org/POM/4.0.0 http://maven.apache.org/xsd/maven-4.0.0.xsd"><modelVersion>4.0.0</modelVersion><groupId>com.jn</groupId><artifactId>SpringFrameWorkProject10</artifactId><version>1.0-SNAPSHOT</version><properties><maven.compiler.source>17</maven.compiler.source><maven.compiler.target>17</maven.compiler.target><project.build.sourceEncoding>UTF-8</project.build.sourceEncoding></properties><dependencies><dependency><groupId>org.springframework</groupId><artifactId>spring-context</artifactId><version>5.3.18</version></dependency><!--导入Jdbc模块依赖--><dependency><groupId>org.springframework</groupId><artifactId>spring-jdbc</artifactId><version>5.3.18</version></dependency><!--mysql--><dependency><groupId>mysql</groupId><artifactId>mysql-connector-java</artifactId><version>8.0.29</version></dependency><!--c3p0的连接依赖--><dependency><groupId>com.mchange</groupId><artifactId>c3p0</artifactId><version>0.9.5.4</version></dependency><dependency><groupId>junit</groupId><artifactId>junit</artifactId><version>4.13.2</version></dependency><dependency><groupId>org.springframework</groupId><artifactId>spring-test</artifactId><version>5.3.18</version></dependency><!--添加AOP的依赖--><dependency><groupId>org.aspectj</groupId><artifactId>aspectjweaver</artifactId><version>1.9.7</version></dependency><!--添加注解相关的依赖--><dependency><groupId>org.springframework</groupId><artifactId>spring-aop</artifactId><version>5.3.18</version></dependency></dependencies>
</project>
1.2 创建 Spring 的配置文件并导入约束
<?xml version="1.0" encoding="UTF-8"?>
<beans xmlns="http://www.springframework.org/schema/beans"xmlns:xsi="http://www.w3.org/2001/XMLSchema-instance"xmlns:context="http://www.springframework.org/schema/context"xmlns:tx="http://www.springframework.org/schema/tx" xmlns:aop="http://www.springframework.org/schema/aop"xsi:schemaLocation="http://www.springframework.org/schema/beanshttp://www.springframework.org/schema/beans/spring-beans.xsdhttp://www.springframework.org/schema/contexthttps://www.springframework.org/schema/context/spring-context.xsdhttp://www.springframework.org/schema/txhttp://www.springframework.org/schema/tx/spring-tx.xsd http://www.springframework.org/schema/aop https://www.springframework.org/schema/aop/spring-aop.xsd"><!--创建容器时扫描的包--><context:component-scan base-package="com.jn"></context:component-scan><!--加载properties配置文件--><context:property-placeholder location="classpath:dbconfig.properties"></context:property-placeholder><!-- 连接数据库的核心配置文件   以及数据源--><bean id="dataSource" class="com.mchange.v2.c3p0.ComboPooledDataSource"><property name="driverClass" value="${jdbc.driver}" /><property name="jdbcUrl" value="${jdbc.url}" /><property name="user" value="${jdbc.username}" /><property name="password" value="${jdbc.password}" /></bean><!--jdbcTemlpate--><bean id="jdbcTemplate" class="org.springframework.jdbc.core.JdbcTemplate"><property name="dataSource" ref="dataSource"></property></bean></beans>
1.3 沿用转账业务的代码:dao实现类和service实现类采用注解的形式,添加到容器中管理
copy Account AccountDao AccountImpl AccountService AccountServiceImpl 到工程当中复用
2 .事务管理配置步骤
2.1 配置事务管理器并注入数据源
<!--事务管理器的配置--><bean id="transactionManager" class="org.springframework.jdbc.datasource.DataSourceTransactionManager"><property name="dataSource" ref="dataSource"></property></bean>2.2 在业务层使用@Transactional 注解
package com.jn.service.impl;
import com.jn.dao.AccountDao;
import com.jn.entity.Account;
import com.jn.service.AccountService;
import org.springframework.beans.factory.annotation.Autowired;
import org.springframework.stereotype.Service;
import org.springframework.transaction.annotation.Propagation;
import org.springframework.transaction.annotation.Transactional;@Service("accountService")
@Transactional(readOnly = true, propagation = Propagation.SUPPORTS)
public class AccountServiceImpl implements AccountService {//获取accountDao对象@Autowiredprivate AccountDao accountDao;@Transactional(readOnly = false, propagation = Propagation.REQUIRED)@Overridepublic void transfer(String sourceAccountName, String targetAccountName, Double money) {// 定义来源账户以及目标账户Account sourceAccount = accountDao.findByName(sourceAccountName);Account targetAccount = accountDao.findByName(targetAccountName);// 实现转账业务sourceAccount.setMoney(sourceAccount.getMoney() - money);targetAccount.setMoney(targetAccount.getMoney() + money);// 持久化到数据库accountDao.update(sourceAccount);int i=1/0;accountDao.update(targetAccount);}
}
2.3 在配置文件中开启 Spring 对注解事务的支持
<!--开启对事务的支持--><tx:annotation-driven transaction-manager="transactionManager"/>3.测试
package com.jn;import com.jn.service.AccountService;
import org.junit.Test;
import org.junit.runner.RunWith;
import org.springframework.beans.factory.annotation.Autowired;
import org.springframework.context.annotation.PropertySource;
import org.springframework.test.context.ContextConfiguration;
import org.springframework.test.context.junit4.SpringJUnit4ClassRunner;@RunWith(SpringJUnit4ClassRunner.class)
@ContextConfiguration("classpath:applicationContext.xml")
public class AnnotationTransactionTest {@Autowiredprivate AccountService accountService;@Testpublic void testTransacyion(){accountService.transfer("王思梦","铁头",100d);}}
3.1转账成功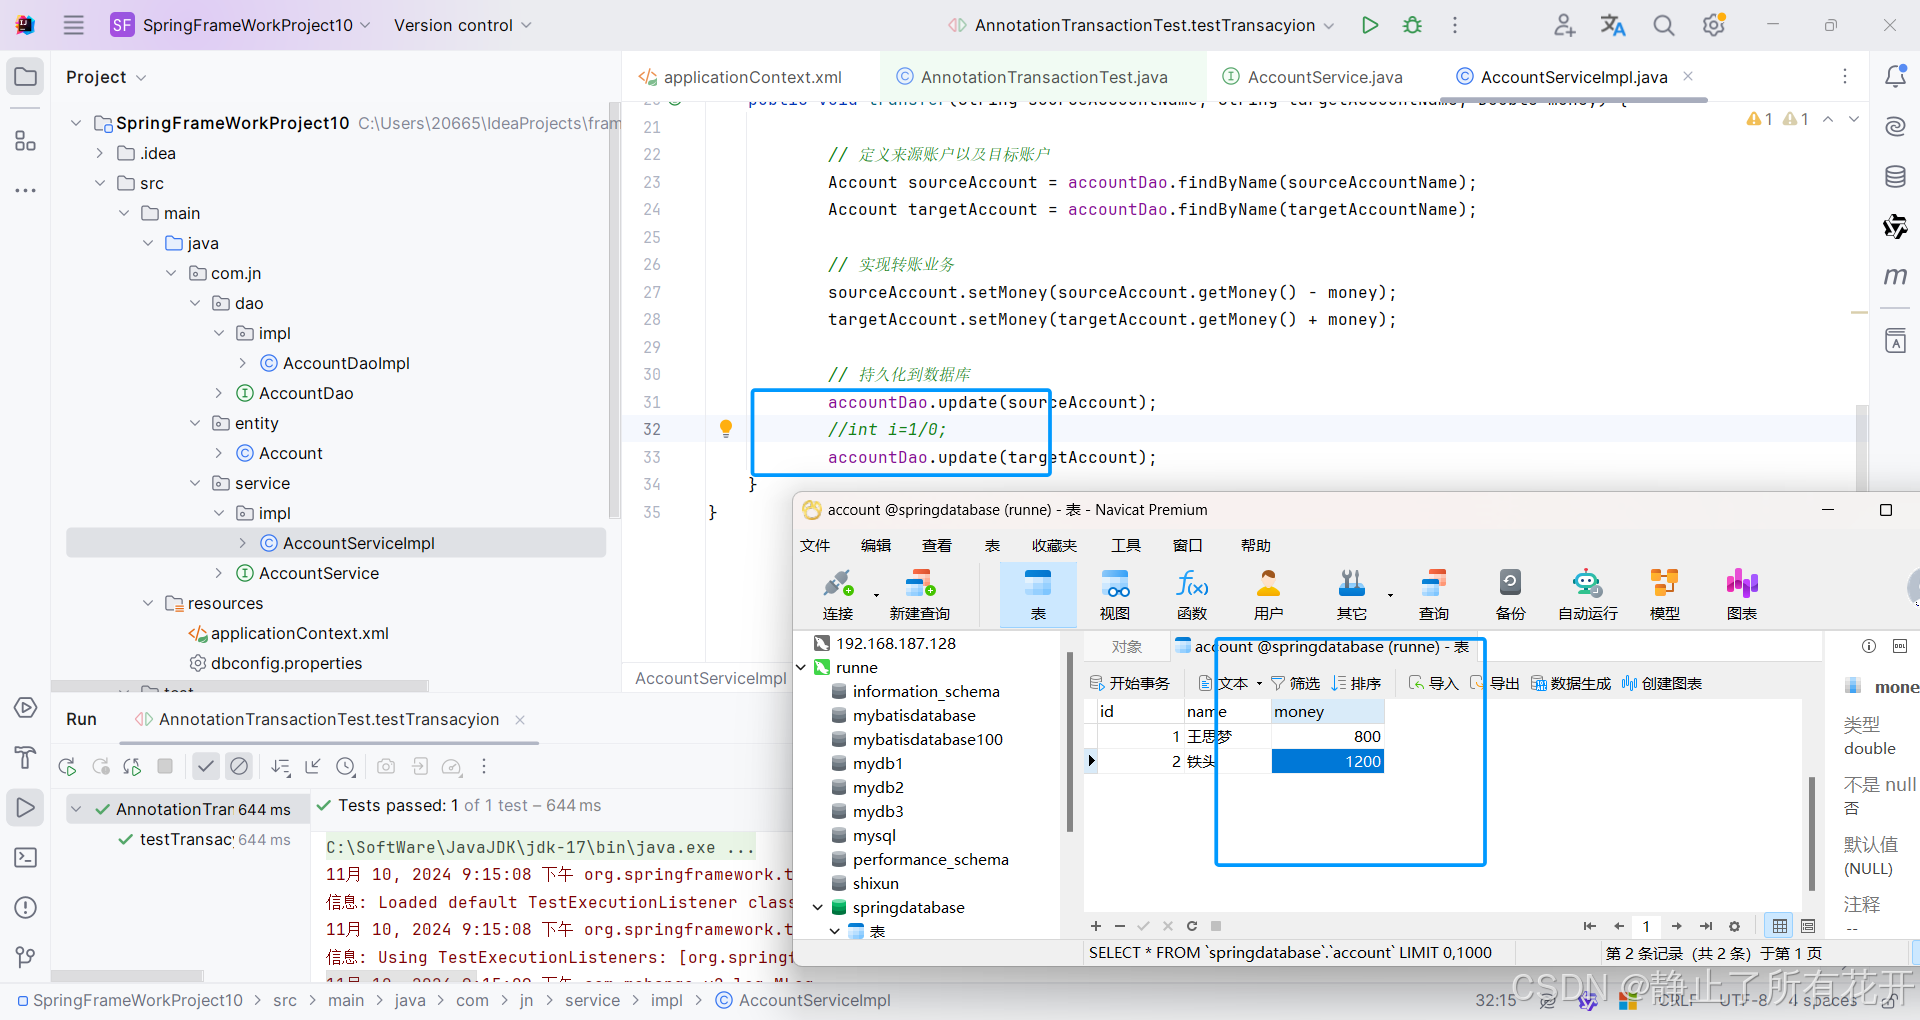
3.2转账失败回滚 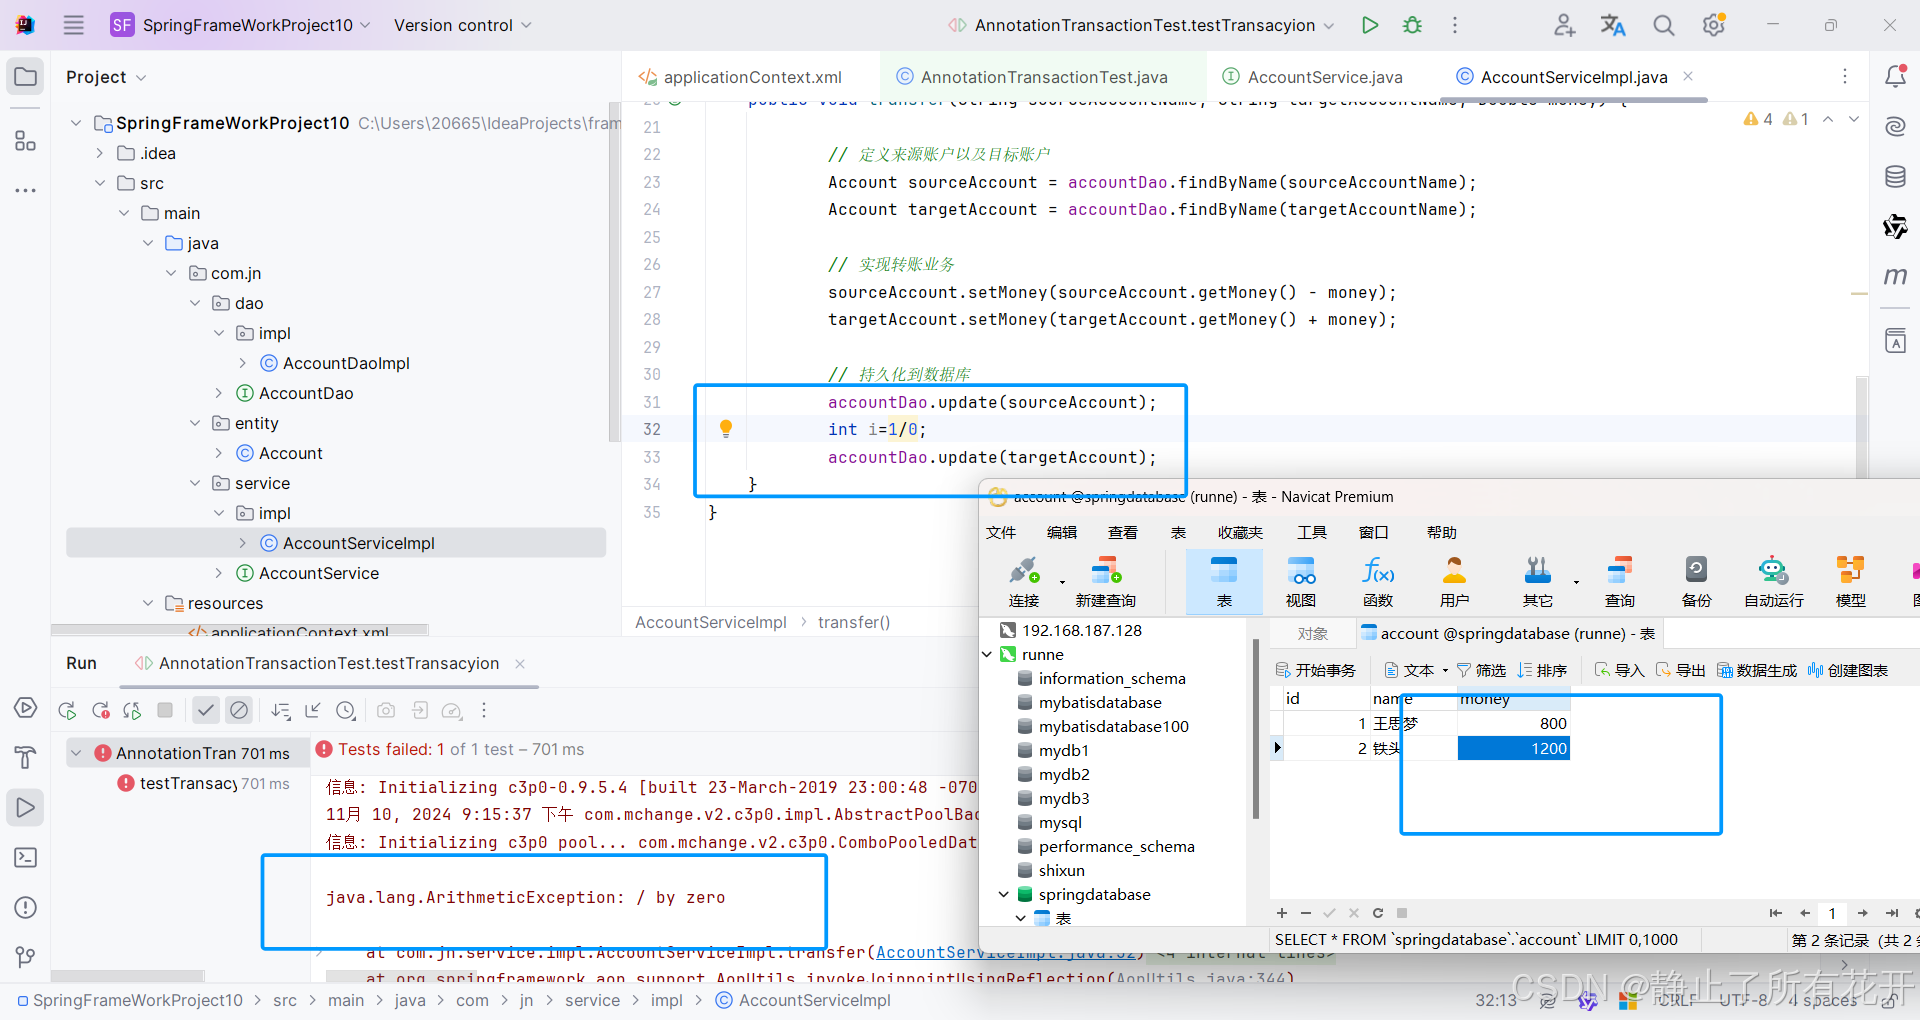
二十二、Spring整合Mybatis实现用户的CRUD
(一)整合思路分析
Mybatis框架是一个持久层ORM框架,而Spring则是一个综合性一站式框架。所以整合是Mybatis往Spring上整合。就是让Spring框架接管Mybatis的组件。
Mybatis单独运行时,数据源的管理,事务的管理, SqlSessionFactory 以及接口的实现类都是Mybatis管理的,整合后以上组件交给Spring管理。
(二)构建maven工程,添加技术依赖
<?xml version="1.0" encoding="UTF-8"?>
<project xmlns="http://maven.apache.org/POM/4.0.0"xmlns:xsi="http://www.w3.org/2001/XMLSchema-instance"xsi:schemaLocation="http://maven.apache.org/POM/4.0.0 http://maven.apache.org/xsd/maven-4.0.0.xsd"><modelVersion>4.0.0</modelVersion><groupId>com.jn</groupId><artifactId>SpringFrameWorkProject11</artifactId><version>1.0-SNAPSHOT</version><properties><maven.compiler.source>17</maven.compiler.source><maven.compiler.target>17</maven.compiler.target><project.build.sourceEncoding>UTF-8</project.build.sourceEncoding></properties><dependencies><dependency><groupId>org.springframework</groupId><artifactId>spring-context</artifactId><version>5.3.18</version></dependency><!--导入Jdbc模块依赖--><dependency><groupId>org.springframework</groupId><artifactId>spring-jdbc</artifactId><version>5.3.18</version></dependency><!--mysql--><dependency><groupId>mysql</groupId><artifactId>mysql-connector-java</artifactId><version>8.0.29</version></dependency><!--c3p0的连接依赖--><dependency><groupId>com.mchange</groupId><artifactId>c3p0</artifactId><version>0.9.5.4</version></dependency><dependency><groupId>junit</groupId><artifactId>junit</artifactId><version>4.13.2</version></dependency><dependency><groupId>org.springframework</groupId><artifactId>spring-test</artifactId><version>5.3.18</version></dependency><!--添加AOP的依赖--><dependency><groupId>org.aspectj</groupId><artifactId>aspectjweaver</artifactId><version>1.9.7</version></dependency><!--Mybatis-Spring的适配包--><dependency><groupId>org.mybatis</groupId><artifactId>mybatis-spring</artifactId><version>2.0.6</version></dependency><!--Mybatis orm框架--><dependency><groupId>org.mybatis</groupId><artifactId>mybatis</artifactId><version>3.5.9</version></dependency></dependencies></project>(三)构建数据库表并创建实体User
package com.jn.entity;import java.io.Serializable;
import java.util.Date;public class User implements Serializable {private   Integer id;private   String name;private   Integer age;private   String gender;private Date birthday;public User() {}public Integer getId() {return id;}public void setId(Integer id) {this.id = id;}public String getName() {return name;}public void setName(String name) {this.name = name;}public int getAge() {return age;}public void setAge(Integer age) {this.age = age;}public String getGender() {return gender;}public void setGender(String gender) {this.gender = gender;}public Date getBirthday() {return birthday;}public void setBirthday(Date birthday) {this.birthday = birthday;}public User(String name, Integer age, String gender, Date birthday) {this.name = name;this.age = age;this.gender = gender;this.birthday = birthday;}public User(Integer id, String name, Integer age, String gender, Date birthday) {this.id = id;this.name = name;this.age = age;this.gender = gender;this.birthday = birthday;}@Overridepublic String toString() {return "User{" +"id='" + id + '\'' +", name='" + name + '\'' +", age=" + age +", gender='" + gender + '\'' +", birthday=" + birthday +'}';}
}
(四)编写dao层的接口UserMapper
package com.jn.dao;import com.jn.entity.User;import java.util.List;public interface UserMapper {int insert(User record);int update(User record);int delete(Integer id);User findById(Integer id);List<User> findAll();
}
(五)构建mapper接口对应的sql配置文件
<?xml version="1.0" encoding="UTF-8" ?>
<!DOCTYPE mapperPUBLIC "-//mybatis.org//DTD Mapper 3.0//EN""https://mybatis.org/dtd/mybatis-3-mapper.dtd">
<mapper namespace="com.jn.dao.UserMapper"><!--insert--><insert id="insert" parameterType="com.jn.entity.User">insert into users(name,age,gender,birthday) values(#{name},#{age},#{gender},#{birthday})</insert><!--update--><update id="update" parameterType="com.jn.entity.User">update users set name=#{name},age=#{age},gender=#{gender},birthday=#{birthday} where id=#{id}</update><!--delete--><delete id="delete" parameterType="java.lang.Integer">delete from users where id=#{id}</delete><!--selectById--><select id="findById" parameterType="java.lang.Integer" resultType="com.jn.entity.User">select * from users where id=#{id}</select><!--findAll--><select id="findAll" resultType="com.jn.entity.User">select * from users</select></mapper>(六)构建服务层接口UserService
package com.jn.service;import com.jn.entity.User;import java.util.List;public interface UserService {int insert(User record);int update(User record);int delete(Integer id);User findById(Integer id);List<User> findAll();
}
(七)构建服务层实现类UserServiceImpl
package com.jn.service.impl;import com.jn.dao.UserMapper;
import com.jn.entity.User;
import com.jn.service.UserService;
import org.springframework.beans.factory.annotation.Autowired;
import org.springframework.stereotype.Service;import java.util.List;@Service
public class UserServiceImpl implements UserService {@Autowiredprivate UserMapper userMapper;@Overridepublic int insert(User record) {return userMapper.insert(record);}@Overridepublic int update(User record) {return userMapper.update(record);}@Overridepublic int delete(Integer id) {return userMapper.delete(id);}@Overridepublic User findById(Integer id) {return userMapper.findById(id);}@Overridepublic List<User> findAll() {List<User> users = userMapper.findAll();return users;}
}
(八)构建Spring框架的配置文件applicationContext.xml,配置IOC管理的对象
<?xml version="1.0" encoding="UTF-8"?>
<beans xmlns="http://www.springframework.org/schema/beans"xmlns:xsi="http://www.w3.org/2001/XMLSchema-instance"xmlns:context="http://www.springframework.org/schema/context"xmlns:tx="http://www.springframework.org/schema/tx"xmlns:aop="http://www.springframework.org/schema/aop"xsi:schemaLocation="http://www.springframework.org/schema/beanshttp://www.springframework.org/schema/beans/spring-beans.xsdhttp://www.springframework.org/schema/contexthttps://www.springframework.org/schema/context/spring-context.xsdhttp://www.springframework.org/schema/txhttp://www.springframework.org/schema/tx/spring-tx.xsdhttp://www.springframework.org/schema/aophttps://www.springframework.org/schema/aop/spring-aop.xsd"><!--创建容器时扫描的包--><context:component-scan base-package="com.jn"></context:component-scan><!--加载properties配置文件--><context:property-placeholder location="classpath:dbconfig.properties"></context:property-placeholder><!-- 连接数据库的核心配置文件   以及数据源--><bean id="dataSource" class="com.mchange.v2.c3p0.ComboPooledDataSource"><property name="driverClass" value="${jdbc.driver}" /><property name="jdbcUrl" value="${jdbc.url}" /><property name="user" value="${jdbc.username}" /><property name="password" value="${jdbc.password}" /></bean><!--Mybatis核心对象:工厂对象--><bean id="sqlSessionFactory" class="org.mybatis.spring.SqlSessionFactoryBean"><!--注入数据源--><property name="dataSource" ref="dataSource"></property><!--指定mapper文件位置--><property name="mapperLocations" value="classpath:/UserMpaaer.xml"></property><!--Mybatis的核心配置文件--><property name="configLocation" value="classpath:SqlMapperConfig.xml"></property><!--别名配置--><property name="typeAliasesPackage" value="com.jn.entity"></property><!--进行分页插件的配置<property name="plugins"><array></array></property>  --></bean><!--配置接口扫描的包--><bean id="mapper" class="org.mybatis.spring.mapper.MapperScannerConfigurer"><property name="basePackage" value="com.jn.dao"></property></bean><!--配置平台管理器--><bean id="transactionManager" class="org.springframework.jdbc.datasource.DataSourceTransactionManager"><!--注入数据源--><property name="dataSource" ref="dataSource"></property></bean><tx:annotation-driven transaction-manager="transactionManager"></tx:annotation-driven>
</beans>
(九)SqlMapperConfig.xml文件编写
<?xml version="1.0" encoding="UTF-8" ?>
<!DOCTYPE configurationPUBLIC "-//mybatis.org//DTD Config 3.0//EN""https://mybatis.org/dtd/mybatis-3-config.dtd">
<configuration></configuration>
(十)测试代码
package com.jn;import com.jn.entity.User;
import com.jn.service.UserService;
import org.junit.Test;
import org.junit.runner.RunWith;
import org.springframework.beans.factory.annotation.Autowired;
import org.springframework.test.context.ContextConfiguration;
import org.springframework.test.context.junit4.SpringJUnit4ClassRunner;import java.util.Date;@RunWith(SpringJUnit4ClassRunner.class)
@ContextConfiguration(locations = "classpath:applicationContext.xml")
public class SpringMybatisTest {@Autowiredprivate UserService userService;//save@Testpublic void testSave(){User user = new User("小明", 18, "男", new Date());userService.insert(user);}//delete@Testpublic void testDelete(){userService.delete(1);}//update@Testpublic void testUpdate(){User user = new User(2, "小明", 18, "男", new Date());userService.update(user);}//findById@Testpublic void testFindById(){User user = userService.findById(2);System.out.println(user);}//findAll@Testpublic void testFindAll(){for (User user : userService.findAll()) {System.out.println(user);}}}
项目整体目录结构:







![[安洵杯 2019]easy_web 详细题解](https://i-blog.csdnimg.cn/direct/bcb82a1f4b8243dbbbc0e02966dbc031.png)
