SuperMap iObjects Docker打包全攻略
文章目录
- SuperMap iObjects Docker打包全攻略
- 说明
- 开始打包iObjects容器
- 启动容器
- 参考
说明
- 此教程编写时使用的iObjects版本为 10.2.1 ,理论高版本同样支持,具体自测。
- 基础镜像为 Docker 官方 ubuntu:16.04完整版。(想换alpine自己折腾)
- 不同CPU架构都需要重新打包Dockerfile以安装相关LIB库(本教程以x64为例)
- 容器内部默认使用超图iObjects完整包内自带的JRE(10.2.1是1.8),因此如果由高版本JRE需求的请自己研究。
- 切记构建容器时,使用的是超图官方下载的iObjects完整包!
- 构建后的容器默认以 Spring Boot 分离式打包启动,有需要的话参考这里。
- 容器构建中使用了多段构建模式,为了减少ADD层3个G的超图包大小,因此部分指令略显冗余。
- 在打包时排除了
$SUPERMAP/Bin,以减少镜像体积,后续通过目录映射提供。 - 此教程最终打包后的容器大小在 600M,算是可接受范围。
PS:超图的iObjects依赖坑挺多的!
开始打包iObjects容器
1)准备Docker环境,版本务必 > 17.05;超图 iObjects 版本 > 10.2.1。
Docker下载:https://www.docker.com/products/docker-desktop
iObjects下载:http://support.supermap.com.cn/DownloadCenter/ProductPlatform.aspx
切记不要只下载Bin包!要下的完整包也就是绿色版!根据实际的CPU架构下载!
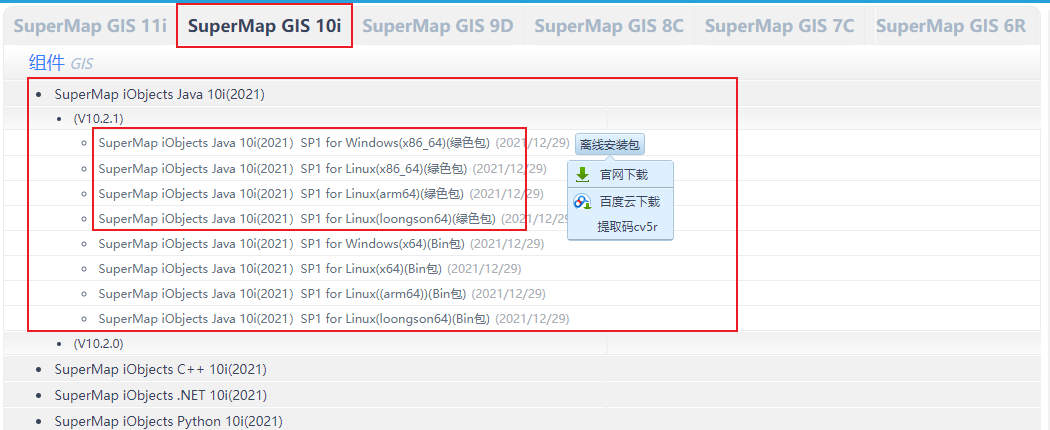
2)随便创个文件夹,在里面丢入:1、iObjects完整包 2、Dockerfile。
目录内容如下:

Dockerfile配置如下:
# 超图容器依赖打包 Dockerfile(支持x64、arm)
# 临时镜像,用于去掉ADD的大文件层(超图包3个G),最后只保留最终镜像
FROM ubuntu:16.04 AS TMP_IMAGE
MAINTAINER Yoko# 超图目录&JRE
ENV SUPERMAP /supermap
ENV SUPERMAP_TMP $SUPERMAP/tmp
ENV SUPERMAP_SUPPORT $SUPERMAP/Support
ENV SUPERMAP_BIN $SUPERMAP/Bin
ENV SUPERMAP_JRE $SUPERMAP/jre
# 超图依赖(完整包),需要不同架构的去下载不同的包即可:http://support.supermap.com.cn/DownloadCenter/ProductPlatform.aspx
ADD supermap-iobjectsjava-10.2.1-20428-92245-linux64-all.tar.gz $SUPERMAP_TMP
RUN mv $SUPERMAP_TMP/jre* $SUPERMAP_JRE && mv $SUPERMAP_TMP/Support $SUPERMAP_SUPPORT
# RUN mv $SUPERMAP_TMP/Bin $SUPERMAP_BIN # 是否需要Bin内嵌看自己
RUN tar -xvf $SUPERMAP_SUPPORT/aksusbd* -C $SUPERMAP_SUPPORT --strip-components=1
RUN rm -rf $SUPERMAP_TMP && rm -rf $SUPERMAP_SUPPORT/*.tar# 多端构建模式,去除大文件依赖,也可以使用 docker build -t municipal-app-supermap . --squash 但需要开启docker的experimental功能
FROM ubuntu:16.04
WORKDIR /
ENV SUPERMAP /supermap
ENV SUPERMAP_TMP $SUPERMAP/tmp
ENV SUPERMAP_SUPPORT $SUPERMAP/Support
ENV SUPERMAP_BIN $SUPERMAP/Bin
ENV SUPERMAP_JRE $SUPERMAP/jre
ENV JAVA_HOME $SUPERMAP_JRE# 直接复制临时镜像内部文件
COPY --from=TMP_IMAGE $SUPERMAP $SUPERMAP# 更换阿里源,依次安装相关依赖库(超图包缺失的)
RUN sed -i s@/archive.ubuntu.com/@/mirrors.aliyun.com/@g /etc/apt/sources.list \&& sed -i s@/security.ubuntu.com/@/mirrors.aliyun.com/@g /etc/apt/sources.list \&& apt-get clean && apt-get update \&& apt-get install -y libgomp1 \&& apt-get install -y libx11-dev \&& apt-get install -y libxext-dev \&& apt-get install -y libxrender-dev \&& apt-get install -y libxtst-dev \&& apt-get install -y libxinerama-dev \&& apt-get install -y libxrandr-dev \&& apt-get install -y tzdata \&& apt-get autoclean \&& apt-get autoremove -y \&& rm -rf /var/cache/apt/* \&& rm -rf /var/lib/apt/lists/*# 时区
RUN ln -sf /usr/share/zoneinfo/Asia/Shanghai /etc/localtime && dpkg-reconfigure -f noninteractive tzdata
# 文件目录
RUN mkdir -p /opt/upFiles && mkdir -p /opt/webapp# 设置字符集(防止应用日志乱码)
ENV LANG=C.UTF-8 LC_ALL=C.UTF-8
# 动态链接库
ENV LD_LIBRARY_PATH $SUPERMAP_BIN:$LD_LIBRARY_PATH
# 环境变量,超图的必须在最前面
ENV PATH $SUPERMAP_BIN:$JAVA_HOME/bin:$PATH
# 应用目录
ENV APP /app
# 应用入口
ENV APP_NAME=main.jar
# 依赖文件夹,设置为空时,不以配置分离式启动
ENV APP_LIB_PATH=lib APP_CONFIG_PATH=config
# 配置启用配置文件
ENV APP_PROFILE_ACTIVE=prod APP_PORT=8888
# 特殊JVM参数
ENV APP_JVM_OPTION="-Djava.security.egd=file:/dev/./urandom -Xms2048m -Xmx2048m"# 暴露端口
EXPOSE $APP_PORT/tcp
# 应用-入口文件夹(必须)
VOLUME $APP
# 超图-依赖目录(必须)
VOLUME $SUPERMAP_BIN
# 超图-证书目录(必须)
VOLUME /opt/SuperMap/License
# 应用-本地文件上传目录(建议)
VOLUME /opt/upFiles
# 应用-本地webapp目录(可选)
VOLUME /opt/webappCMD echo "环境变量: ${PATH}" \&& echo "加载驱动: $SUPERMAP_SUPPORT" && cd $SUPERMAP_SUPPORT && ./dinst \&& echo "启动app: $APP" && cd $APP && ls . -al \&& if [ -n "$APP_LIB_PATH" ] && [ -n "$APP_CONFIG_PATH" ]; then \java $APP_JVM_OPTION \-Dloader.path=$APP_LIB_PATH,$APP_CONFIG_PATH \-Dspring.profiles.active=$APP_PROFILE_ACTIVE \-Dserver.port=$APP_PORT \-jar $APP_NAME; \else \java $APP_JVM_OPTION \-Dspring.profiles.active=$APP_PROFILE_ACTIVE \-Dserver.port=$APP_PORT \-jar $APP_NAME; \fi
3)打开powershell/shell执行构建,不出意外的话应该不会出意外,等待结束就行了。
# 构建镜像
docker build -t app-supermap .
# 导出镜像
docker save -o ./app-supermap app-supermap
# 载入镜像
docker load -i app-supermap
启动容器
0)启动参数说明
| Docker启动参数(必需) | 说明 |
|---|---|
| -v APP应用目录:/app | 映射APP目录 |
| -v 超图/Bin:/supermap/Bin | 超图iObjects的Bin依赖 |
| -v 超图证书目录:/opt/SuperMap/License | 超图的证书 |
| -p 8888:8888 | 映射的端口 |
| -v 文件上传目录:/opt/upFiles | APP本地文件的保存路径 |
| Docker启动参数(可选) | |
| -e APP_NAME=main.jar | APP的入口jar,默认为main.jar |
| -e APP_LIB_PATH=lib | APP所需的依赖目录,默认为jar包同级目录下的 lib 目录,留空则以不分离模式启动 |
| -e APP_CONFIG_PATH=config | APP所需的配置目录,默认为jar包同级目录下的 config 目录 |
| -e APP_PROFILE_ACTIVE=prod | APP启动时加载的配置文件,默认prod |
| -e APP_PORT=8888 | APP启动端口,默认8888 |
| -e APP_JVM_OPTION=“” | APP启动时附带的额外JVM参数 |
1)必须要申请超图的证书:https://www.supermapol.com/web/pricing/triallicense
申请完如下:

注:Windows系统上的许可证得放在这个目录下 C:\Program Files\Common Files\SuperMap\License ,可以参考超图博客
2)启动示例
APP目录结构长这样:
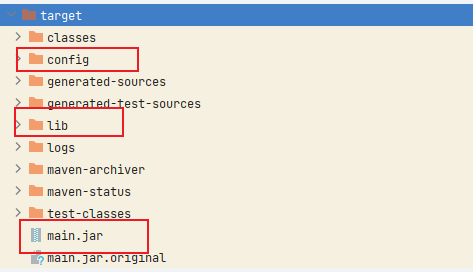
对应的启动参数长这样:
docker run -di \-p 8888:8888 \-v /home/app:/app \-v /home/upFiles:/opt/upFiles \-v /home/supermap/Bin:/supermap/Bin \-v /opt/SuperMap/License:/opt/SuperMap/License --restart=unless-stopped \--name app app-supermap
如果是未分离打包的JAR,把APP_LIB_PATH或者APP_CONFIG_PATH置空:
docker run -di \-p 8888:8888 \-v /home/app:/app \-v /home/upFiles:/opt/upFiles \-v /home/supermap/Bin:/supermap/Bin \-v /opt/SuperMap/License:/opt/SuperMap/License \-e APP_LIB_PATH="" \--restart=unless-stopped \--name app app-supermap
参考
1)ChatGPT
2)https://www.zhihu.com/question/325416061

