缓存是一种用于将经常访问的数据临时存储在更快的存储层(通常在内存中)中的技术,以便可以更快地满足未来对该数据的请求,从而提高应用程序的性能和效率。在 Spring Boot 中,缓存是一种简单而强大的方法,可以通过减少数据库命中、API 调用或昂贵的计算来增强应用程序性能。

为什么要使用缓存?
- 改进的性能:缓存通过从更快的缓存中提供频繁请求的数据而不是重新计算或重新获取数据来减少响应时间。
- 减少资源负载:减少数据库或外部服务等底层资源的负载。
- 成本效率:当您的应用程序在云中运行或使用第三方服务时,减少 API 调用或数据库访问次数可以节省成本。
- 更好的可扩展性:通过缓存,您可以通过降低后端服务的压力来允许应用程序处理更多并发请求。

Spring Boot中的缓存
Spring Boot 使用@Cacheable 、 @CachePut和@CacheEvict注释等提供了一个用于缓存的抽象层。这种抽象允许您轻松集成不同的缓存实现(例如 EhCache、Hazelcast、Redis 等)。
Spring Boot 缓存中的关键概念
- 缓存存储:这是数据缓存的实际位置(内存中、Redis、EhCache 等)。
- 缓存键:用于存储和检索缓存数据的标识符。
- 缓存值:与缓存键关联的实际数据。
- 缓存管理器:用于管理不同缓存实现的 Spring 抽象。
缓存操作:
@Cacheable:缓存方法的结果。@CachePut:更新缓存而不影响方法的执行。@CacheEvict:从缓存中删除条目。
2.2. Spring Boot 缓存注解
@EnableCaching :此注释启用 Spring Boot 中的缓存支持。
- 要启用缓存,您只需使用
@EnableCaching注释您的主配置类。
@SpringBootApplication
@EnableCaching
public class Application {public static void main(String[] args) {SpringApplication.run(Application.class, args);}
}
@Cacheable :该注解用于缓存方法调用的结果。当调用@Cacheable注解的方法时,Spring会检查结果是否已经在缓存中。如果是,则返回缓存的值;否则,执行该方法,并将结果存储在缓存中。
@Cacheable("employees")
public Employee getEmployeeById(Long id) {// Simulate expensive operationreturn employeeRepository.findById(id).orElse(null);
}
@CacheEvict :这用于从缓存中删除条目。您可以指定要逐出哪个键或缓存。
@CacheEvict(value = "employees", allEntries = true)
public void clearCache() {// Clears all cache entries for 'employees'
}
@CachePut :与@Cacheable不同,此注释确保方法始终执行,但用结果更新缓存。
@CachePut(value = "employees", key = "#employee.id")
public Employee updateEmployee(Employee employee) {return employeeRepository.save(employee);
}
缓存机制工作流程
步骤1 :向带有@Cacheable注释的方法发出请求。
步骤 2 :Spring 检查缓存中的数据是否可用:
- 如果是,则返回缓存的值而不执行该方法。
- 如果没有,则执行该方法,缓存结果,然后返回结果。
步骤3 :对于@CachePut ,执行该方法,并且无论key是否已经存在于缓存中,结果都会被缓存。
步骤4 :对于@CacheEvict ,Spring根据提供的缓存键删除缓存条目(或清除整个缓存)。
在 Spring Boot 中配置缓存存储
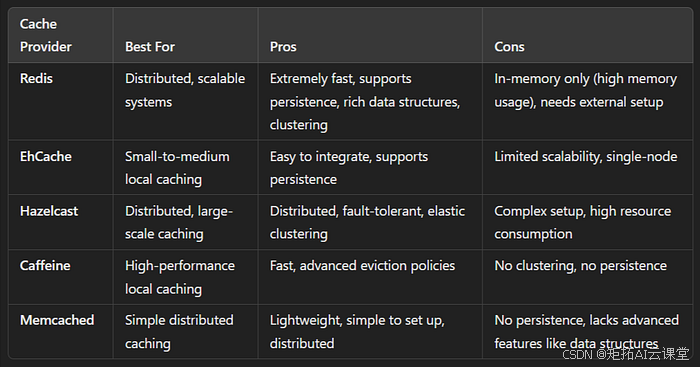
Spring Boot 支持多个缓存提供程序,例如:
- ConcurrentMapCache (默认,内存缓存)
- EhCache 高速缓存
- Hazelcast 榛卡斯特
- Redis 雷迪斯
- Caffeine 咖啡因
生产场景用到的缓存中间件

如何在生产中应用
- 由于其性能、集群功能、灵活性和广泛的功能, Redis通常是大多数生产环境的最佳缓存提供程序。
- 如果您正在使用分布式系统或微服务,Redis 或Hazelcast因其可扩展性而更适合。
- 对于易于集成和本地缓存就足够的小型单节点应用程序, EhCache或Caffeine会更易于使用。
为了演示在带有 MySQL 的 Spring Boot 应用程序中使用EhCache 的完整示例,我们将构建一个基本应用程序,该应用程序对
Employee实体执行 CRUD 操作,并利用缓存来获取、更新和删除操作。
设置项目
We’ll use the following: 我们将使用以下内容:
- 用于数据库交互的Spring Boot Starter Data JPA 。
- EhCache作为缓存提供者。
- MySQL作为数据库。
依赖关系
在您的pom.xml中,包含必要的依赖项:
<dependencies><!-- Spring Boot Starter Data JPA --><dependency><groupId>org.springframework.boot</groupId><artifactId>spring-boot-starter-data-jpa</artifactId></dependency><!-- Spring Boot Starter Cache --><dependency><groupId>org.springframework.boot</groupId><artifactId>spring-boot-starter-cache</artifactId></dependency><!-- EhCache --><dependency><groupId>org.ehcache</groupId><artifactId>ehcache</artifactId></dependency><!-- MySQL Driver --><dependency><groupId>mysql</groupId><artifactId>mysql-connector-java</artifactId><scope>runtime</scope></dependency><!-- Spring Boot Starter Web --><dependency><groupId>org.springframework.boot</groupId><artifactId>spring-boot-starter-web</artifactId></dependency><!-- Lombok (for boilerplate code) --><dependency><groupId>org.projectlombok</groupId><artifactId>lombok</artifactId><scope>provided</scope></dependency>
</dependencies>
EhCache配置
在src/main/resources目录下创建**ehcache.xml**文件:
<ehcache xmlns:xsi="http://www.w3.org/2001/XMLSchema-instance"xsi:noNamespaceSchemaLocation="http://ehcache.org/ehcache.xsd"><cache name="employees"maxEntriesLocalHeap="1000"timeToLiveSeconds="3600"memoryStoreEvictionPolicy="LRU"></cache>
</ehcache>
应用程序属性
在application.properties中,配置 MySQL 并启用 EhCache:
# MySQL Configuration
spring.datasource.url=jdbc:mysql://localhost:3306/employee_db
spring.datasource.username=root
spring.datasource.password=yourpassword
spring.jpa.hibernate.ddl-auto=update
spring.jpa.show-sql=true# EhCache Configuration
spring.cache.type=ehcache
spring.cache.ehcache.config=classpath:ehcache.xml
实体类
定义Employee实体类:
package com.example.caching.entity;import lombok.AllArgsConstructor;
import lombok.Data;
import lombok.NoArgsConstructor;import javax.persistence.*;@Entity
@Data
@NoArgsConstructor
@AllArgsConstructor
public class Employee {@Id@GeneratedValue(strategy = GenerationType.IDENTITY)private Long id;private String name;private String department;private double salary;
}
存储库接口
创建一个扩展JpaRepository EmployeeRepository接口:
package com.example.caching.repository;import com.example.caching.entity.Employee;
import org.springframework.data.jpa.repository.JpaRepository;public interface EmployeeRepository extends JpaRepository<Employee, Long> {
}
服务层
在EmployeeService中实现缓存逻辑:
package com.example.caching.service;import com.example.caching.entity.Employee;
import com.example.caching.repository.EmployeeRepository;
import org.springframework.beans.factory.annotation.Autowired;
import org.springframework.cache.annotation.CacheEvict;
import org.springframework.cache.annotation.CachePut;
import org.springframework.cache.annotation.Cacheable;
import org.springframework.stereotype.Service;import java.util.Optional;@Service
public class EmployeeService {@Autowiredprivate EmployeeRepository employeeRepository;// Fetch employee and cache the result@Cacheable(value = "employees", key = "#id")public Employee getEmployeeById(Long id) {System.out.println("Fetching from database...");Optional<Employee> employee = employeeRepository.findById(id);return employee.orElse(null);}// Update employee and update cache@CachePut(value = "employees", key = "#employee.id")public Employee updateEmployee(Employee employee) {System.out.println("Updating employee in database and cache...");return employeeRepository.save(employee);}// Delete employee and evict cache@CacheEvict(value = "employees", key = "#id")public void deleteEmployee(Long id) {System.out.println("Deleting employee from database and evicting cache...");employeeRepository.deleteById(id);}// Clear entire cache for 'employees'@CacheEvict(value = "employees", allEntries = true)public void clearCache() {System.out.println("Cache cleared!");}
}
控制器层
创建一个 REST 控制器来公开 CRUD 端点:
package com.example.caching.controller;import com.example.caching.entity.Employee;
import com.example.caching.service.EmployeeService;
import org.springframework.beans.factory.annotation.Autowired;
import org.springframework.web.bind.annotation.*;@RestController
@RequestMapping("/api/employees")
public class EmployeeController {@Autowiredprivate EmployeeService employeeService;// Fetch employee by ID@GetMapping("/{id}")public Employee getEmployee(@PathVariable Long id) {return employeeService.getEmployeeById(id);}// Update employee@PutMapping("/{id}")public Employee updateEmployee(@PathVariable Long id, @RequestBody Employee employee) {employee.setId(id);return employeeService.updateEmployee(employee);}// Delete employee@DeleteMapping("/{id}")public void deleteEmployee(@PathVariable Long id) {employeeService.deleteEmployee(id);}// Clear cache@DeleteMapping("/cache/clear")public void clearCache() {employeeService.clearCache();}
}
主要应用类
通过添加@EnableCaching在 Spring Boot 应用程序中启用缓存:
package com.example.caching;import org.springframework.boot.SpringApplication;
import org.springframework.boot.autoconfigure.SpringBootApplication;
import org.springframework.cache.annotation.EnableCaching;@SpringBootApplication
@EnableCaching
public class CachingApplication {public static void main(String[] args) {SpringApplication.run(CachingApplication.class, args);}
}
测试应用程序
启动应用程序并使用 Postman(或类似工具)来访问以下端点:
获取员工(缓存结果):
GET http://localhost:8080/api/employees/{id}
第一个请求将从数据库中获取员工并缓存结果。后续对同一员工 ID 的请求将从缓存中返回结果。
更新员工(更新缓存):
PUT http://localhost:8080/api/employees/{id}
更新数据库和缓存中的员工。
删除员工(删除缓存):
DELETE http://localhost:8080/api/employees/{id}
从数据库中删除员工并删除缓存条目。
Clear Cache: 清空缓存:
DELETE http://localhost:8080/api/employees/cache/clear
清除employees的所有缓存条目。
这个完整的 Spring Boot 示例演示了如何将EhCache与 MySQL 数据库集成以缓存 CRUD 操作。 @Cacheable 、 @CachePut和@CacheEvict注释无缝处理缓存,通过减少数据库负载来提高性能。


