看此篇前请先阅读https://blog.csdn.net/qq_20330595/article/details/144139026?spm=1001.2014.3001.5502
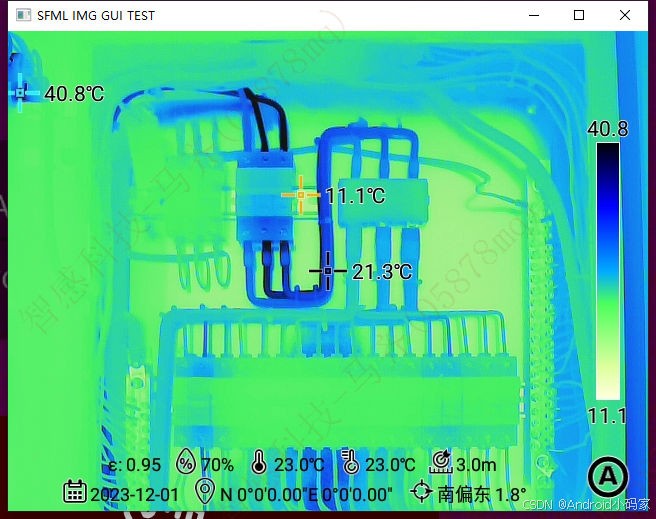
先上效果图

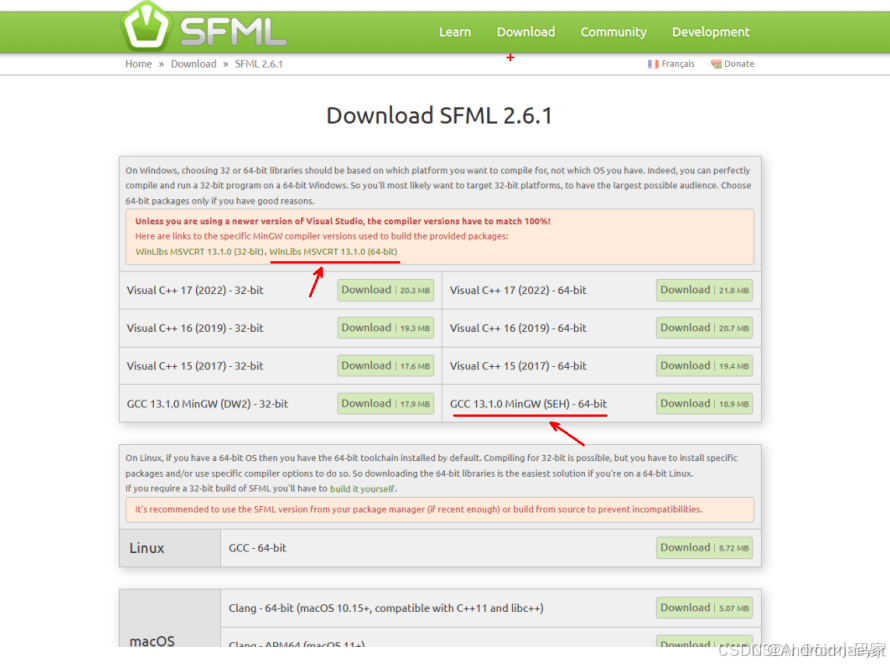
找到对应的环境版本

配置环境

目录结构

Ctrl+Shift+P
c_cpp_properties.json
{"configurations": [{"name": "Win32","includePath": ["${workspaceFolder}/src/**","${workspaceFolder}/stb/**","G:\\SFML-2.6.2\\include"],"defines": ["_DEBUG","UNICODE","_UNICODE"],"compilerPath": "G:\\mingw64\\bin\\gcc.exe","cStandard": "c17","cppStandard": "gnu++17","intelliSenseMode": "windows-gcc-x64"}],"version": 4
}
launch.json
{"version": "0.2.0","configurations": [// {// "name": "(gdb) Launch", // "type": "cppdbg", // "request": "launch", // "program": "${fileDirname}\\${fileBasenameNoExtension}.exe", // 修改为相应的可执行文件// "args": [], // "stopAtEntry": false,// "cwd": "${workspaceRoot}",// "environment": [],// "externalConsole": true, // "MIMode": "gdb",// "miDebuggerPath": "G:\\mingw64\\bin\\gcc.exe",// "preLaunchTask": "g++",// "setupCommands": [// {// "description": "Enable pretty-printing for gdb",// "text": "-enable-pretty-printing",// "ignoreFailures": true// }// ]// }]}
settings.json自定生成
{"files.associations": {"iostream": "cpp","string": "cpp","array": "cpp","atomic": "cpp","bit": "cpp","*.tcc": "cpp","cctype": "cpp","clocale": "cpp","cmath": "cpp","compare": "cpp","concepts": "cpp","cstdarg": "cpp","cstddef": "cpp","cstdint": "cpp","cstdio": "cpp","cstdlib": "cpp","ctime": "cpp","cwchar": "cpp","cwctype": "cpp","deque": "cpp","map": "cpp","set": "cpp","unordered_map": "cpp","vector": "cpp","exception": "cpp","algorithm": "cpp","functional": "cpp","iterator": "cpp","memory": "cpp","memory_resource": "cpp","numeric": "cpp","random": "cpp","string_view": "cpp","system_error": "cpp","tuple": "cpp","type_traits": "cpp","utility": "cpp","initializer_list": "cpp","iosfwd": "cpp","istream": "cpp","limits": "cpp","new": "cpp","numbers": "cpp","ostream": "cpp","stdexcept": "cpp","streambuf": "cpp","cinttypes": "cpp","typeinfo": "cpp","optional": "cpp"}
}
Ctrl+Shift+P
tasks.json
{"version": "2.0.0","tasks": [{"type": "cppbuild","label": "C/C++: g++.exe build active file","command": "g++","args": ["${workspaceFolder}/src/*.cpp","-I${workspaceFolder}/stb","-IG:\\SFML-2.6.2\\include","-LG:\\SFML-2.6.2\\lib",        "-o","${fileDirname}/${fileBasenameNoExtension}.exe","-lsfml-graphics","-lsfml-system","-lsfml-window",],"options": {"kind": "build","isDefault": true},"problemMatcher": ["$gcc"],"group": {"kind": "build","isDefault": true},"detail": "Task generated by Debugger."},{"label": "Run Output","type": "shell","command": "main", // 运行生成的可执行文件  "group": "test","dependsOn": "Compile All C and CPP Files","problemMatcher": ["$gcc"], // GCC 问题匹配器  }]
}
image_loader.cpp
#define STB_IMAGE_IMPLEMENTATION
#include "stb_image.h"
#include "image_loader.h"
#include <iostream>  unsigned char* ImageLoader::loadImage(const std::string& filepath, int& width, int& height, int& channels) {  unsigned char* img_data = stbi_load(filepath.c_str(), &width, &height, &channels, 0);  if (img_data == nullptr) {  std::cerr << "Error loading image: " << stbi_failure_reason() << std::endl;  return nullptr;  }  return img_data;
}  void ImageLoader::freeImage(unsigned char* img_data) {  stbi_image_free(img_data);
}
image_loader.h
#ifndef IMAGE_LOADER_H
#define IMAGE_LOADER_H  #include <string>  class ImageLoader {
public:  static unsigned char* loadImage(const std::string& filepath, int& width, int& height, int& channels);  static void freeImage(unsigned char* img_data);
};  #endif // IMAGE_LOADER_H
image_processor.cpp
#include "image_processor.h"  void ImageProcessor::invertColors(unsigned char* img_data, int width, int height, int channels) {  for (int i = 0; i < width * height * channels; i++) {  img_data[i] = 255 - img_data[i]; // 反转颜色  }
}
image_processor.h
#ifndef IMAGE_PROCESSOR_H
#define IMAGE_PROCESSOR_H  class ImageProcessor {
public:  static void invertColors(unsigned char* img_data, int width, int height, int channels);
};  #endif // IMAGE_PROCESSOR_H
test_sfml.cpp
// MessageBox.cpp
#include "test_sfml.hpp" // 引入头文件void showMessageBox(sf::RenderWindow &window, const std::string &message)
{// 创建一个用于弹窗的窗口sf::RenderWindow popup(sf::VideoMode(300, 150), "Message", sf::Style::Close);popup.setPosition(sf::Vector2i(100, 100)); // 设置弹窗位置// 设置字体(需要一个字体文件,确保路径正确)sf::Font font;if (!font.loadFromFile("arial.ttf")){           // 检查字体是否加载成功return; // 若失败则退出}// 创建文本sf::Text text(message, font, 20);text.setFillColor(sf::Color::Black);text.setPosition(10, 40);// 创建关闭按钮文本sf::Text closeButton("Close", font, 20);closeButton.setFillColor(sf::Color::Black);closeButton.setPosition(100, 100);// 事件循环while (popup.isOpen()){sf::Event event;while (popup.pollEvent(event)){if (event.type == sf::Event::Closed){popup.close(); // 关闭弹窗}if (event.type == sf::Event::MouseButtonPressed){// 检查关闭按钮是否被点击if (event.mouseButton.button == sf::Mouse::Left &&closeButton.getGlobalBounds().contains(event.mouseButton.x, event.mouseButton.y)){popup.close(); // 关闭弹窗}}}popup.clear(sf::Color::White); // 清屏,设置弹窗背景颜色popup.draw(text);              // 绘制文本popup.draw(closeButton);       // 绘制关闭按钮文本popup.display();               // 显示内容}
}
test_sfml.hpp
// MessageBox.hpp
#ifndef MESSAGEBOX_HPP
#define MESSAGEBOX_HPP  #include <SFML/Graphics.hpp>
#include <string>  void showMessageBox(sf::RenderWindow& window, const std::string& message);  #endif // MESSAGEBOX_HPP
stb_image.c stb_image_write.h stb_image.h
见上文讲解,未图片解析库源码,引入即可
main.cpp
#define STB_IMAGE_WRITE_IMPLEMENTATION
#include "stb_image_write.h"
#include "image_loader.h"
#include "image_processor.h"
#include "test_sfml.hpp"
#include <iostream>int main()
{// 输入图像路径const char *inputFilepath = "G:\\WorkSpacePy\\images_cmake\\IRI_20220322_145855.jpg"; const char *outputFilepath = "output_image.png";                                      int width, height, channels;// 加载图像unsigned char *img_data = ImageLoader::loadImage(inputFilepath, width, height, channels);if (img_data == nullptr){return -1; // 加载失败}// 打印图像信息std::cout << "Image loaded successfully!" << std::endl;std::cout << "Width: " << width << ", Height: " << height << ", Channels: " << channels << std::endl;// 反转颜色ImageProcessor::invertColors(img_data, width, height, channels);std::cout << "Colors inverted!" << std::endl;// 保存新的图像if (stbi_write_png(outputFilepath, width, height, channels, img_data, width * channels)){std::cout << "Image saved successfully as " << outputFilepath << std::endl;}else{std::cerr << "Error saving image!" << std::endl;}/* ================================================  GUI代码 ================================================*/// 释放图像数据ImageLoader::freeImage(img_data);std::cout << "Starting the main window..." << std::endl;// 创建主窗口sf::RenderWindow window(sf::VideoMode(width, height), "SFML Simple Window");// 加载图片sf::Texture texture;texture.loadFromFile(inputFilepath); // Replace with your image file// 创建精灵sf::Sprite sprite;sprite.setTexture(texture);sprite.setPosition(0, 0); // Set the position of the sprite// 主程序循环while (window.isOpen()){sf::Event event;while (window.pollEvent(event)){if (event.type == sf::Event::Closed){window.close(); // 关闭主窗口}if (event.type == sf::Event::KeyPressed && event.key.code == sf::Keyboard::Space){// 摁下空格键时显示弹窗showMessageBox(window, "Hello from SFML!"); // 点击提示框时显示一条消息}}window.clear(sf::Color::White); // 清屏设置背景颜色为白色window.draw(sprite);            // 绘制精灵window.display();               // 显示内容}return 0;
}
// https://www.sfml-dev.org/download/sfml/2.6.2/
// https://blog.csdn.net/F1ssk/article/details/139710907
// https://openatomworkshop.csdn.net/67404a4e3a01316874d72fa5.html
下一步使用Libusb


