环境
服务器及产品支持情况见:Oracle Fusion Middleware Supported System Configurations
ogg进程内存容量配置:CACHEMGR (oracle.com)
- 此处将ogg12c的内存配置情况,及修改方法贴出:
CACHEMGR
Extract and Replicat, all databases except DB2 on z/OS
Use the
CACHEMGRparameter to control the amount of virtual memory and temporary disk space that is available for caching uncommitted transaction data.Caution:
Before changing this parameter from its default cache settings, contact Oracle Support for guidance. The cache manager of Oracle GoldenGate is internally self-configuring and self-adjusting, and most production environments will not require changes to this parameter. You can, however, specify the directory for the page files without assistance.
Note:
While described as accurately as possible here, the underlying design of the memory management component is always subject to changes that may be required by ongoing product improvements.
Because Oracle GoldenGate replicates only committed transactions, it stores the operations of each transaction in a managed virtual-memory pool known as a cache until it receives either a commit or a rollback for that transaction. One global cache operates as a shared resource of an Extract or Replicat process. The following sub-pools of virtual memory are allocated from the global cache:
One sub-pool per Extract log reader thread or Replicat trail reader thread for most transaction row data.
One sub-pool for BLOB data and possibly other large items.
Within each sub-pool, individual buffers are allocated from the global cache. Each buffer contains information that is relative to a transaction that is being processed by Oracle GoldenGate.
The Oracle GoldenGate cache manager takes advantage of the memory management functions of the operating system to ensure that Oracle GoldenGate processes work in a sustained and efficient manner. Within its cache, it makes use of modern virtual memory techniques by:
Allocating and managing active buffers efficiently.
Recycling old buffers instead of paging to disk, when possible.
Paging less-used information to disk, when necessary.
The actual amount of physical memory that is used by any Oracle GoldenGate process is controlled by the operating system, not the Oracle GoldenGate program.
The cache manager keeps an Oracle GoldenGate process working within the soft limit of its global cache size, only allocating virtual memory on demand. (The cache manager does not allocate physical memory, over which it has no control.) System calls to increase the cache size are made only as a last resort and, when used, are always followed by the release of virtual memory back to the system.
The system must have sufficient swap space for each Oracle GoldenGate Extract and Replicat process that will be running. To determine the required swap space:
Start one Extract process and one Replicat process.
Run GGSCI.
View the report file of each running process and find the line
PROCESS VM AVAIL FROM OS (min).Round up each value to the next full gigabyte if needed. For example, round up 1.76GB to 2 GB.
Multiply the rounded-up Extract value by the number of Extract processes.
Multiply the rounded-up Replicat value by the number of Replicat processes.
Add the two results, plus any additional swap space required by other Oracle GoldenGate processes and other processes on the system.
(PROCESS_VM x number_Extracts) + (PROCESS_VM x number_Replicats) +
(swap_for_other_processes) = max_swap_space_on_system
This sum is the maximum amount of swap space that could be needed for those processes. The actual amount of physical memory that is used by any Oracle GoldenGate process is controlled by the operating system, not the Oracle GoldenGate process. The global cache size is controlled by the
CACHESIZEoption ofCACHEMGR.Note:
The cache manager is also used internally by Oracle GoldenGate for other purposes besides the BLOB sub-pool and the sub-pool for other transaction data. You may see these additional memory pools when you view the statistics.
The memory manager generates statistics that can be viewed with the
SEND EXTRACTorSEND REPLICATcommand when used with theCACHEMANAGERoption. The statistics show the size of the memory pool, the paging frequency, the size of the transactions, and other information that creates a system profile.Based on this profile, you might need to make adjustments to the memory cache if you see performance problems that appear to be related to file caching. The first step is to modify the
CACHESIZEparameter. You might need to use a higher or lower cache size based on the size and type of transactions that are being generated.It is possible, however, that operating system constraints could limit the effect of modifying any components of the
CACHEMGRparameter. In particular, if the operating system has a small per-process virtual memory limit, it will force more file caching, regardless of theCACHEMGRconfiguration.See "SEND EXTRACT" and "SEND REPLICAT" for more information.
Viewing Basic Statistics in the Report File
Upon completing its initialization, the cache manager writes the following statistics to the process report file:
CACHEMGR virtual memory values (may have been adjusted)
CACHESIZE: 32G
CACHEPAGEOUTSIZE (normal): 8M
PROCESS VM AVAIL FROM OS (min): 63.97G
CACHESIZEMAX (strict force to disk): 48G
Where:
CACHESIZEshows the soft limit of virtual memory that is available to the process for caching transaction data. It is determined dynamically, based on the value ofPROCESS VM AVAIL FROM OS (min). It can be controlled with theCACHESIZEoption ofCACHEMGR.
PROCESS VM AVAIL FROM OS (min)shows the approximate amount of virtual memory that the process has determined it can use. For internal reasons, this amount may be less than what the operating system shows as being available.
CACHESIZEMAX (strict force to disk)is derived fromPROCESS VM AVAIL FROM OSandCACHESIZE. It can be understood in terms of how the cache manager determines which transactions are eligible to be paged out to disk. Normally, only those whose current virtual memory buffers exceed a specific internal value are eligible to be paged. When the total memory requested exceedsCACHESIZE, the cache manager looks for transactions to write to disk and chooses them from the list of eligible ones. If the eligible ones have been paged to disk already, and the virtual memory in use now exceedsCACHESIZEMAX (strict force to disk), then any transaction that requires additional buffers can be eligible for paging. This guarantees that virtual memory will always be available.Identifying the Paging Directory
By default, Oracle GoldenGate maintains data that it swaps to disk in the
dirtmpsub-directory of the Oracle GoldenGate installation directory. The cache manager assumes that all of the free space on the file system is available. This directory can fill up quickly if there is a large transaction volume with large transaction sizes. To prevent I/O contention and possible disk-related Extract failures, dedicate a disk to this directory. You can assign a name and size to this directory with theCACHEDIRECTORYoption of theCACHEMGRparameter. TheCACHESIZEoption ofCACHEMGRsets a soft limit for the amount of virtual memory (cache size) that is available for caching transaction data.
This parameter is valid for all databases supported by Oracle GoldenGate.
At least one argument must be supplied.
CACHEMGRby itself is invalid.Parameter options can be listed in any order.
Only one
CACHEMGRparameter is permitted in a parameter file.To use this parameter correctly (other than specifying the directory for the page files), you must know the profile of the system and the kinds of transactions that are being propagated from your applications. In normal environments, you should not need to change this parameter, because the cache manager is self-adjusting. If you feel that an adjustment is warranted, please open an Oracle service request at http://support.oracle.com.
None
CACHEMGR {[, CACHESIZE size][, CACHEDIRECTORY path [size] [, ...]]
CACHEMGR CACHEFSOPTION { MS_SYNC | MS_ASYNC } |
}
CACHESIZEsizeSets a soft limit for the amount of virtual memory (cache size) that is available for caching transaction data. On 64-bit systems, the default is 64 GB. On 32-bit systems, the cache size is determined dynamically by the cache manager.
The memory is allocated on demand. By default, the cache manager dynamically determines the amount of virtual memory that is available to it from the operating system and determines the appropriate cache size. The available virtual memory is reported with the
PROCESS VM AVAIL FROM OSvalue in the report file. TheCACHESIZEvalue will be sized down if it is larger than, or sufficiently close to, the amount of virtual memory that is available to the process. However, for systems with large address spaces, the cache manager does no further determination once an internal limit is reached.The
CACHESIZEvalue will always be a power of two, rounded down from the value ofPROCESS VM AVAIL FROM OS, unless the latter is itself a power of two, in which case it is halved. After the specified size is consumed by data, the memory manager will try to free up memory by paging data to disk or by reusing aged buffers, before requesting more memory from the system.If a transaction's cache virtual memory requirements grow beyond the initial buffer allocation, the additional amount of cache memory that is allocated by the cache manager is determined dynamically based on factors such as the current size of the cached data of this transaction, the size needed for the new data, and the amount of virtual memory that is being used conjointly by all the transactions.
CACHEDIRECTORYpath [size]Specifies the name of the directory to which Oracle GoldenGate writes transaction data to disk temporarily when necessary. The default without this parameter is the
dirtmpsub-directory of the Oracle GoldenGate installation directory. Any directory for temporary files can be on an Oracle Database File System, but cannot be on a direct I/O or concurrent I/O mounted file system that does not support themmap()system call, such as AIX.
pathis a fully qualified directory name.
sizesets a maximum amount of disk space that can be allocated to the specified directory. The upper limit is that which is imposed by the file system, such as maximum file size or number of files. The minimum size is 2 GB, which is enforced. There is no default. Do not use this option unless you must constrain the swap space that is used by Oracle GoldenGate because of resource limitations.You can specify more than one directory by using a
CACHEDIRECTORYclause for each one. The maximum number of directories is 100.The value can be specified in bytes or in terms of gigabytes, megabytes, or kilobytes in any of the following forms:
GB | MB | KB | G | M | K | gb | mb | kb | g | m | k
CACHEMGR CACHEFSOPTION {MS_SYNC | MS_ASYNC}Performs synchronous or asynchronous writes of the mapped data in the Oracle GoldenGate memory cache manager.
CACHEMGR CACHESIZE 500MB, CACHEDIRECTORY /ggs/temp 2GB, CACHEDIRECTORY /ggs2/temp 2GB
关于操作系统磁盘空间说明:
来源:1 System Requirements and Preinstallation Instructions (oracle.com)
It is typically more efficient for the operating system to swap to disk than it is for Extract to write temporary files. The default
CACHESIZEsetting assumes this. Thus, there should be sufficient disk space to account for this, because only after the value forCACHESIZEis exceeded will Extract write transaction cached data to temporary files in the file system name space. If multiple Extract processes are running on a system, the disk requirements can multiply.Allow at least 256 GB of disk space per Extract process for these activities. An allocation of at least 512 GB is preferable.操作系统交换到磁盘通常比 Extract 写入临时文件更有效。默认的 CACHESIZE 设置假定了这一点。因此,应该有足够的磁盘空间来解决这个问题,因为只有在超过 CACHESIZE 的值之后,Extract 才会将事务缓存数据写入文件系统名称空间中的临时文件。如果系统上正在运行多个 Extract 进程,则磁盘需求可能会成倍增加。每个 Extract 进程至少需要 256 GB 的磁盘空间用于这些活动。最好分配至少 512 GB。
本文使用环境:
- ogg服务器:Linux7×64,IP:192.168.10.90,主机名:OggServer
- ogg版本: Oracle GoldenGate Manager for Oracle Version 19.1.0.0.4 OGGCORE_19.1.0.0.0_PLATFORMS_191017.1054 Linux, x64, 64bit (optimized), Oracle 19c on Oct 17 2019 15:21:16
- Oracle db1(源端):Linux7×64,IP:192.168.10.99,主机名:db1
- Oracle db2(目标端):Linux7×64,IP:192.168.10.98,主机名:db2
- Oracle版本:源端:19.3,目标端:19.3
场景
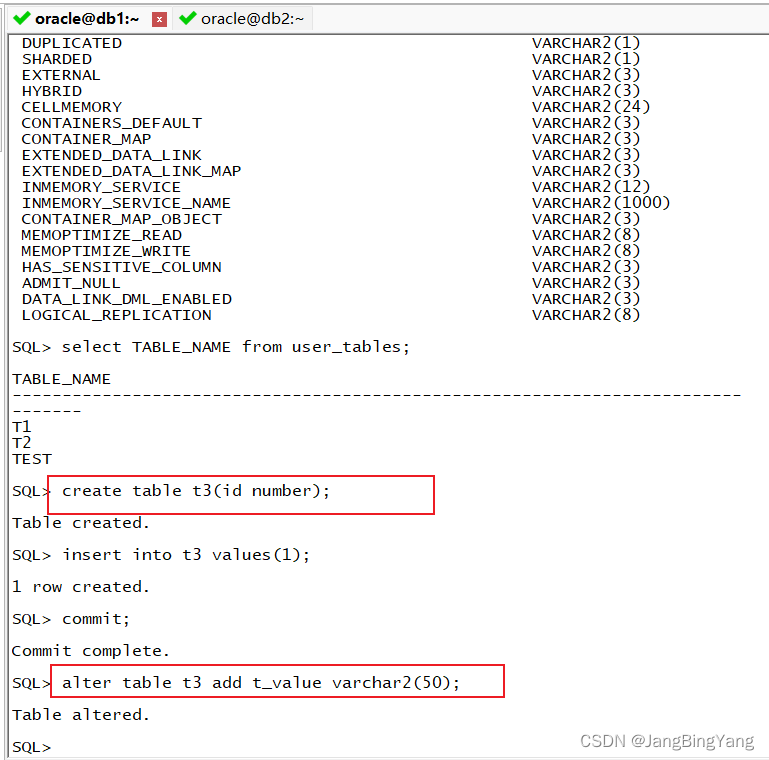
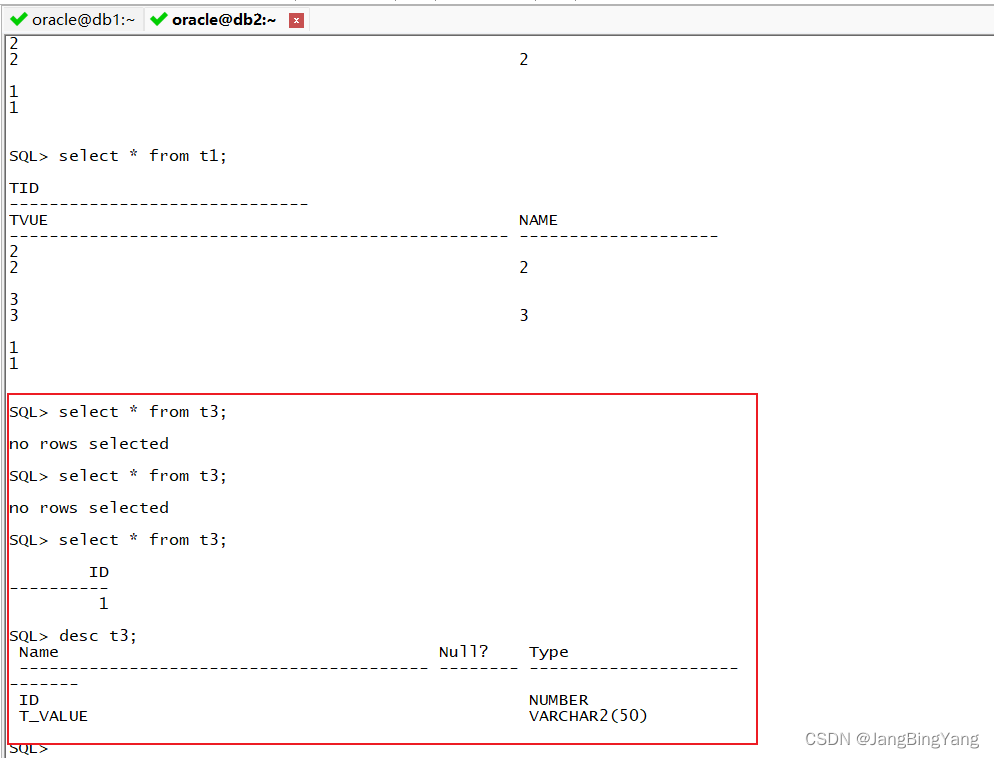
在单独服务器上安装部署ogg服务,将db1端的Oracle数据实时同步至db2端,包括DML,DDL。
OGG环境部署
1 服务安装
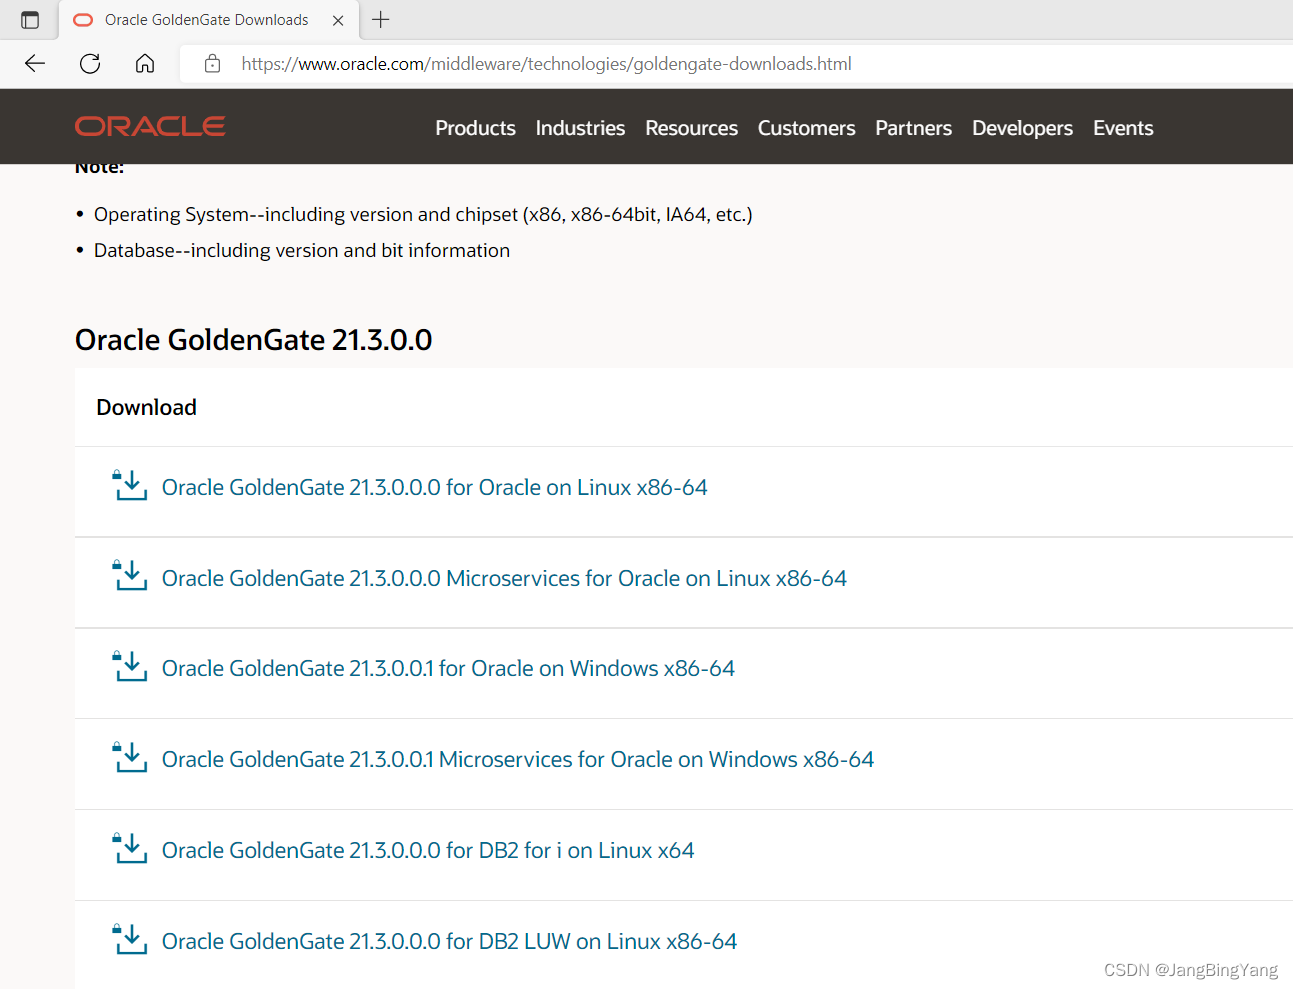
安装包下载位置:https://www.oracle.com/middleware/technologies/goldengate-downloads.html
1.1 创建用户和目录
组
> groupadd oinstall
用户
> useradd -g oinstall oracle
> passwd oracle
目录
> mkdir /ogg/oraclient -p
> mkdir /ogg/ogg191
> mkdir /ogg/oraInventory
> chown oracle:oinstall -R /ogg
> chmod 775 -R /ogg
2.2 配置环境变量
#Oracle客户端安装目录,环境变量名必须为ORACLE_HOME,ogg默认读取此环境变量
export ORACLE_HOME=/ogg/oraclient/instantclient_11_2
#ogg服务
export GG_HOME=/ogg/ogg191
#ogg服务ggsci运行需要的lib包位置,环境变量名需为LD_LIBRARY_PATH
export LD_LIBRARY_PATH=$ORACLE_HOME:$GG_HOME
export PATH=$ORACLE_HOME:$GG_HOME:$PATH
#ogg连接登录数据库别名配置,此文不采用此方法,直接明文配置,故此处环境变量可无
#alias ggsci='cd GG_HOME; ggsci'
2.3 Oracle客户端静默安装
ps:最基础客户端包即可,其实最好能与Oracle数据库版本对应(以下两种方式选取任意一种)
#免安装,解压版直接使用方式
> unzip -d /ogg/oraclient instantclient-basic-linux.x64-11.2.0.4.0
#rpm包安装方式
1、下载rpm安装包
Instant Client for Linux x86-64 (64-bit)
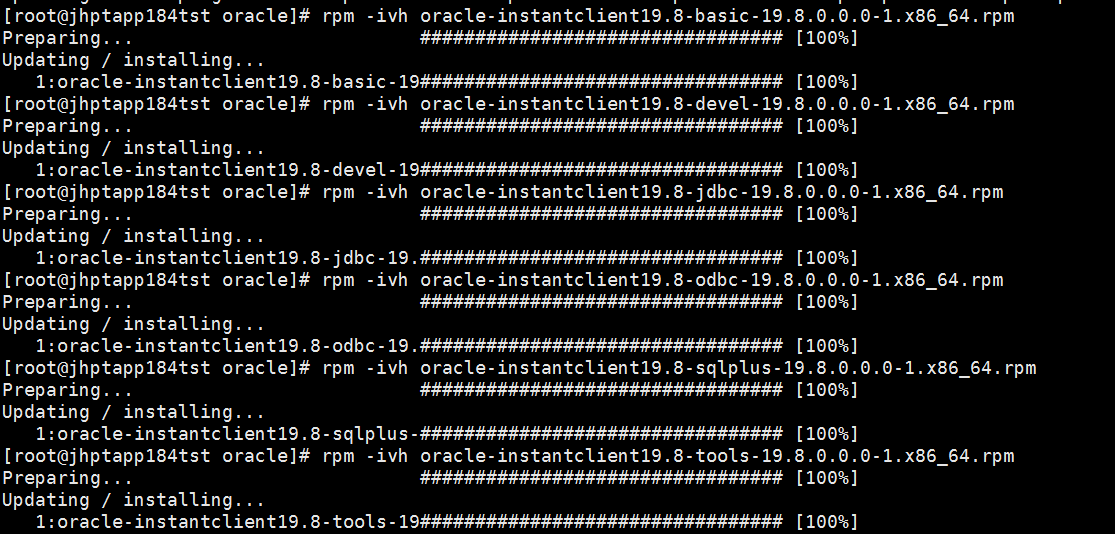
由于产品需要对数据库进行写数据操作,所以安装了sqlldr(tools包),sqlldr安装包也可从别的地方直接复制
共下载了6个安装包,可根据需要安装。
oracle-instantclient19.8-basic-19.8.0.0.0-1.x86_64.rpm、 oracle-instantclient19.8-odbc-19.8.0.0.0-1.x86_64.rpm
oracle-instantclient19.8-devel-19.8.0.0.0-1.x86_64.rpm、 oracle-instantclient19.8-sqlplus-19.8.0.0.0-1.x86_64.rpm
oracle-instantclient19.8-jdbc-19.8.0.0.0-1.x86_64.rpm 、oracle-instantclient19.8-tools-19.8.0.0.0-1.x86_64.rpm2、开始安装
①:切换至root用户,将安装包放在根目录的 opt/oracle下(地址随意定)。
②:执行安装命令 ,rpm -ivh rpm包名,安装顺序注意一下,basic、devel,其他的随意。安装完成后会在根目录下的usr/lib下生产oracle目录。
2.4 OGG静默安装
解压对应安装包
> unzip 19.1.0.0.4-for-Oracle-on-Linux x86-64
编辑响应文件
> vi /home/oracle/fbo_ggs_Linux_x64_shiphome/Disk1/response/oggcore.rsp#数据库版本
INSTALL_OPTION=ORA19c
#ogg安装位置
SOFTWARE_LOCATION=/ogg/ogg191
START_MANAGER=
MANAGER_PORT=
DATABASE_LOCATION=
#ogg安装日志目录
INVENTORY_LOCATION=/ogg/oraInventory
#ogg安装用户组
UNIX_GROUP_NAME=oinstall
#oggcore.rsp示例内容
####################################################################
 ## Copyright(c) Oracle Corporation 2019. All rights reserved.     ##
 ##                                                                ##
 ## Specify values for the variables listed below to customize     ##
 ## your installation.                                             ##
 ##                                                                ##
 ## Each variable is associated with a comment. The comment        ##
 ## can help to populate the variables with the appropriate        ##
 ## values.                                                        ##
 ##                                                                ##
 ## IMPORTANT NOTE: This file should be secured to have read       ##
 ## permission only by the oracle user or an administrator who     ##
 ## own this installation to protect any sensitive input values.   ##
 ##                                                                ##
 ####################################################################
#-------------------------------------------------------------------------------
 # Do not change the following system generated value.
 #-------------------------------------------------------------------------------
 oracle.install.responseFileVersion=/oracle/install/rspfmt_ogginstall_response_schema_v19_1_0
################################################################################
 ##                                                                            ##
 ## Oracle GoldenGate installation option and details                          ##
 ##                                                                            ##
 ################################################################################
#-------------------------------------------------------------------------------
 # Specify the installation option.
 # Specify ORA19c for installing Oracle GoldenGate for Oracle Database 19c or
 #         ORA18c for installing Oracle GoldenGate for Oracle Database 18c or
 #         ORA12c for installing Oracle GoldenGate for Oracle Database 12c or
 #         ORA11g for installing Oracle GoldenGate for Oracle Database 11g
 #-------------------------------------------------------------------------------
 INSTALL_OPTION=ORA19c
#-------------------------------------------------------------------------------
 # Specify a location to install Oracle GoldenGate
 #-------------------------------------------------------------------------------
 SOFTWARE_LOCATION=/opt/ogg/oggHome
#-------------------------------------------------------------------------------
 # Specify true to start the manager after installation.
 #-------------------------------------------------------------------------------
 START_MANAGER=
#-------------------------------------------------------------------------------
 # Specify a free port within the valid range for the manager process.
 # Required only if START_MANAGER is true.
 #-------------------------------------------------------------------------------
 MANAGER_PORT=
#-------------------------------------------------------------------------------
 # Specify the location of the Oracle Database.
 # Required only if START_MANAGER is true.
 #-------------------------------------------------------------------------------
 DATABASE_LOCATION=
################################################################################
 ##                                                                            ##
 ## Specify details to Create inventory for Oracle installs                    ##
 ## Required only for the first Oracle product install on a system.            ##
 ##                                                                            ##
 ################################################################################
#-------------------------------------------------------------------------------
 # Specify the location which holds the install inventory files.
 # This is an optional parameter if installing on
 # Windows based Operating System.
 #-------------------------------------------------------------------------------
 INVENTORY_LOCATION=/opt/ogg/oraInventory
#-------------------------------------------------------------------------------
 # Unix group to be set for the inventory directory.
 # This parameter is not applicable if installing on
 # Windows based Operating System.
 #-------------------------------------------------------------------------------
 UNIX_GROUP_NAME=ogg
静默安装
#进入ogg安装目录
> ./runInstaller -silent -showProgress -responseFile /home/oracle/fbo_ggs_Linux_x64_shiphome/Disk1/response/oggcore.rsp
2 Oracle数据库环境准备
若为容器数据库,以下命令需在容器库下执行,创建表空间及用户(源端需在容器下执行,目标端可在对应pdb下执行)。
2.1 开启归档
startup mount
alter database archivelog;
ps:作为目标端,不需要向ogg提供日志数据,不需要配置
2.2 开启强制日志
alter database force logging;
ps:作为目标端,不需要向ogg提供日志数据,不需要配置
2.3 开启数据库最小附加日志
alter database add supplemental log data;
ps:作为目标端,不需要向ogg提供日志数据,不需要配置
1.4 配置参数
alter system set enable_goldengate_replication=true;
ps:11.2.0.4以上需要配置
1.5 创建OGG用户和表空间
表空间
create tablespace ggtbs datafile '+DATA' size 1g autoextend on;
用户
create user ggadmin identified by ggadmin default tablespace ggtbs quota unlimited on ggtbs;
授权
grant connect,resource to ggadmin;
grant alter session to ggadmin;
grant select any dictionary to ggadmin;
grant select any transaction to ggadmin;
grant select any table to ggadmin;
grant flashback any table to ggadmin;
grant alter any table to ggadmin;
exec dbms_goldengate_auth.grant_admin_privilege('GGADMIN','*',TRUE)
扩充:
以下是适用于复制到多租户容器数据库和从多租户容器数据库复制的特殊要求:
多租户容器数据库中的所有可插拔数据库都必须具有相同的属性,例如字符集、区域设置和区分大小写。可插入数据库的字符集可以是根容器字符集的子集。
Extract 必须在集成捕获模式下运行。有关提取捕获模式的更多信息,请参阅Choosing Capture and Apply Modes。
Replicat 可以在其任何模式下运行。Extract 必须以普通用户身份连接到根容器 (cdb$root) 才能与日志挖掘服务器交互。要指定根容器,请为您使用 USERID 或 USERIDALIAS 参数指定的数据库用户使用适当的 SQL*Net 连接字符串。例如:C##GGADMIN@FINANCE。有关如何为 Oracle GoldenGate 进程创建用户并授予正确权限的信息,请参见Establishing Oracle GoldenGate Credentials。
dbms_goldengate_auth.grant_admin_privilege 包授予在多租户容器数据库中捕获和应用的适当权限。这包括容器参数,该参数必须设置为 ALL,如下例所示:
dbms_goldengate_auth.grant_admin_privilege('C##GGADMIN',container=>'all')
ps:其他权限可以根据实际情况而定。
本文上述代码案例中创建的数据库用户均为GGADMIN,但实际在数据库中创建的用户有所区别(源端:用户名:C##OGG,密码:oralce;目标端:用户名:OGG,密码:oracle)
1.6 源端需执行相应ogg脚本
所有脚本在OGG 安装目录下(源端安装即可,若为容器,需要在容器下执行,若为12c以上版本,只需执行marker_setup.sql)
SQL> conn / as sysdba
SQL> @/ogg/marker_setup.sql
SQL> @/ogg/ddl_setup.sql
SQL> @/ogg/role_setup.sql
SQL> @/ogg/ddl_enable.sql
3 ogg管理程序配置
首次配置,需创建ogg基本管理目录
执行命令:
#进入ogg安装目录
> ./ggsci
GGSCI> create subdirs
编辑参数
> edit param mgrPORT 7809DYNAMICPORTLIST 7809-8000AUTORESTART EXTRACT *,RETRIES 5,WAITMINUTES 3PURGEOLDEXTRACTS ./dirdat/,usecheckpoints, minkeepdays 3--ACCESSRULE, PROG *, IPADDR 192.168.10.*, ALLOWLAGREPORTHOURS 1 LAGINFOMINUTES 30 LAGCRITICALMINUTES 45
启动
> start mgr
查看
> info all
4 抽取/投递进程配置(源端)
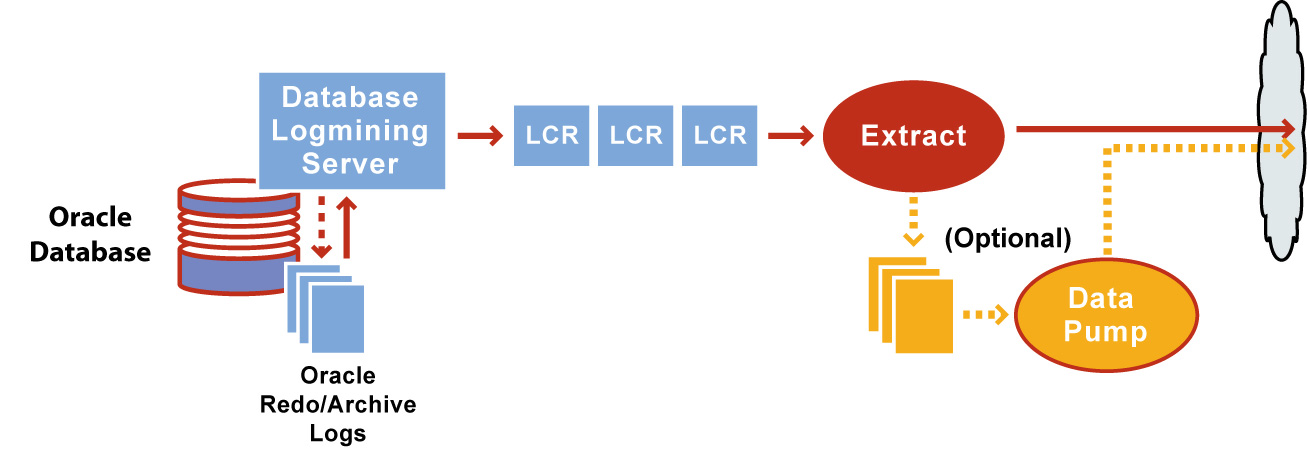
在集成捕获模式下,Oracle GoldenGate Extract 进程直接与数据库日志服务器交互,以逻辑更改记录 (LCR) 的形式接收数据更改。下图说明了 Extract 在集成捕获模式下的配置。
#抽取进程
GGSCI (OggServer) 49> edit param DB1EXT01
--集成模式下远程捕捉
extract db1ext01userid c##ogg@192.168.10.99/orclsoa,password oracle
--EXTRACT ie_e
--USERIDALIAS wldb--别名模式
LOGALLSUPCOLS
NOCOMPRESSUPDATES
UPDATERECORDFORMAT FULL
DBOPTIONS ALLOWUNUSEDCOLUMN
FETCHOPTIONS NOUSESNAPSHOT
GETTRUNCATES
--EXTTRAIL ./dirdat/ie
--DISCARDFILE ./dirrpt/ie_e.dsc, PURGE, MEGABYTES 1024
WARNLONGTRANS 1H, CHECKINTERVAL 5M
CACHEMGR CACHESIZE 1024MB, CACHEDIRECTORY ./dirtmp--GETUPDATEBEFORES
--GETTRUNCATES
--BR BRINTERVAL 2H
--CACHEMGR CACHESIZE 500MB,CACHEDIRECTORY ./dirtmp
--WARNLONGTRANS 2H,CHECKINTERVAL 5M
--NUMFILES 4000
--EOFDELAYCSECS 10
--LOGALLSUPCOLS
---TRANLOGOPTIONS INTEGRATEDPARAMS (max_sga_size 200, parallelism,DBLOGREADER)
---远程日志模式
--TRANLOGOPTIONS DBLOGREADER
---tranlogoptions asmuser sys@192.168.10.99/orcl, asmpassword oraclediscardfile ./dirrpt/db1extract.dsc,append, megabytes 200
REPORTCOUNT EVERY 60 SECONDS, RATE
exttrail ./dirdat/e1
DDL INCLUDE ALLDDLOPTIONS ADDTRANDATA, REPORT
TABLE orcl.hr.*;
--因为通过logminer挖掘日志,日志参数无需指定,可以利用参数配置logminer的并发数和内存大小
#投递进程
GGSCI (OggServer) 51> edit param DB1PUMP1
extract db1pump1
dynamicresolution
setenv (NLS_LANG=AMERICAN_AMERICA.AL32UTF8)
userid c##ogg@192.168.10.99/orclsoa,password oracle
rmthost 192.168.10.90,mgrport 7809,compress
rmttrail ./dirdat/p1
TABLE orcl.hr.*;
#启动
GGSCI (OggServer) 53> start *
#查看
GGSCI (OggServer) 54> info all
Program Status Group Lag at Chkpt Time Since Chkpt
MANAGER RUNNING
EXTRACT RUNNING DB1EXT01 00:00:00 00:00:06
EXTRACT RUNNING DB1PUMP1 00:00:00 00:00:00
REPLICAT RUNNING DB2REP01 00:00:00 00:00:01
5 复制进程配置(目标端)
#复制进程
GGSCI (OggServer) 53> view param DB2REP01replicat db2rep01
setenv (NLS_LANG=AMERICAN_AMERICA.AL32UTF8)
userid ogg@192.168.10.98/orcl,password oracle
assumetargetdefs
reperror default,discard
discardfile ./dirrpt/db2rep.dsc,append,megabytes 50
DDL INCLUDE MAPPEDDDLOPTIONS REPORT
GETTRUNCATES
ALLOWNOOPUPDATES
REPORTCOUNT EVERY 60 SECONDS, RATE
MAP orcl.hr.*, TARGET orcl.hr.*;
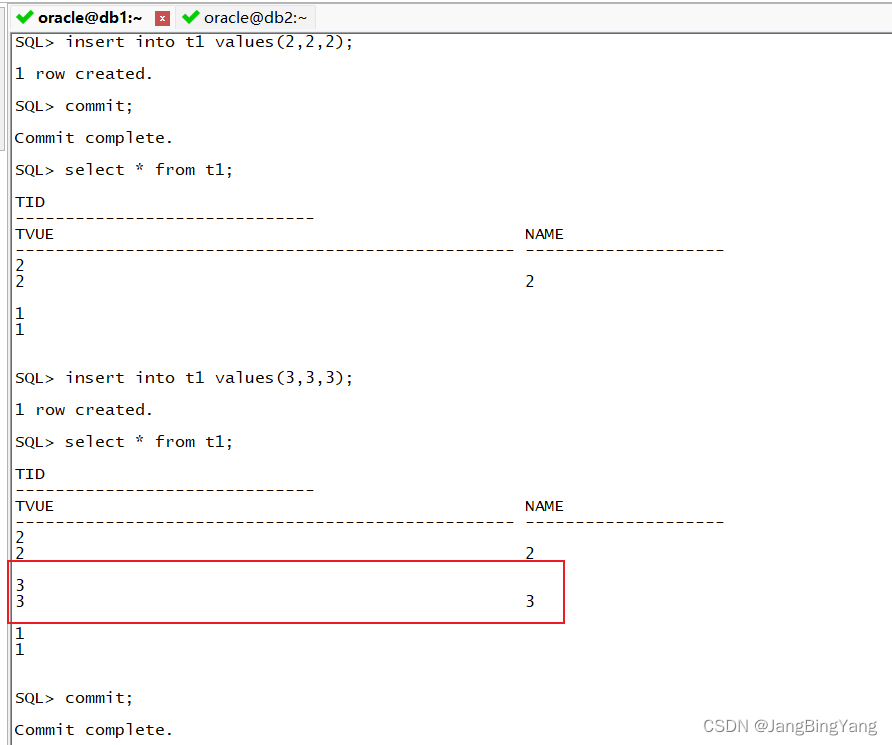
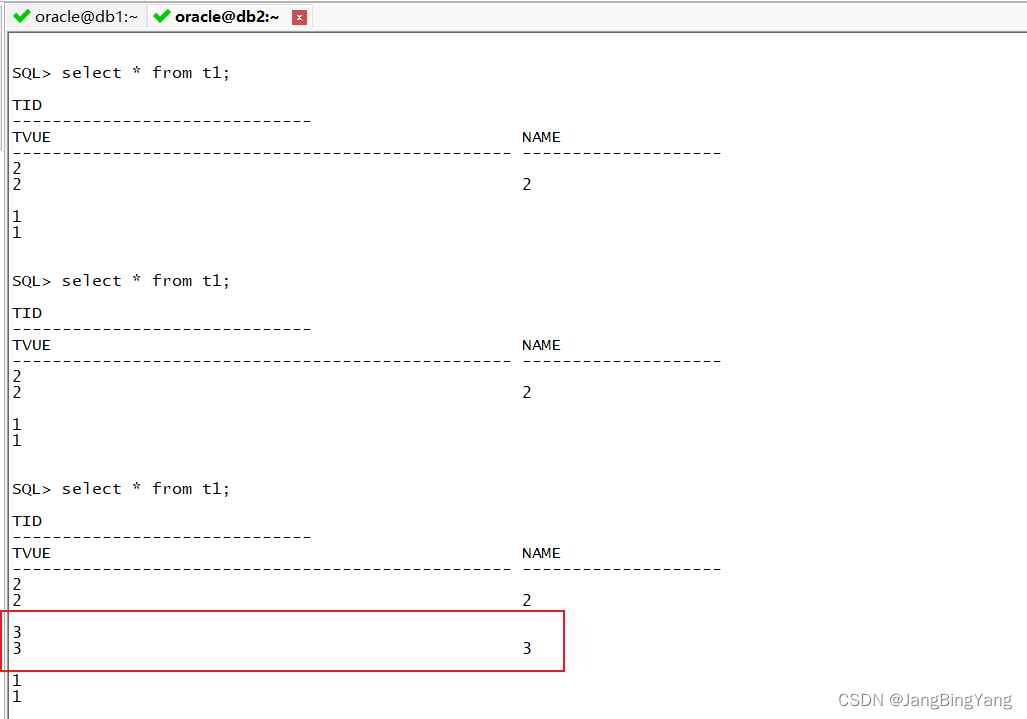
6 DML同步测试
7 DDL同步测试
