1.掷一个D6和一个D10 50000次的结果
die.py
from random import randintclass Die:def __init__(self, num_sides=6):self.num_sides = num_sidesdef roll(self):return randint(1, self.num_sides)die_visual.py
from die import Die
from plotly.graph_objs import Bar, Layout
from plotly import offline# 创建1个D6和1个D10
die_1 = Die()
die_2 = Die(10)# 掷色子并将结果存储在一个列表中
results = []
for roll_num in range(50000):result = die_1.roll() + die_2.roll()results.append(result)# 分析结果
frequencies = []
max_result = die_1.num_sides + die_2.num_sides
for value in range(2, max_result+1):frequency = results.count(value)frequencies.append(frequency)
# print(frequencies)#对结果可视化
x_values = list(range(2, max_result+1))
data = [Bar(x=x_values, y=frequencies)]x_axis_config = {'title': '结果', 'dtick': 1}
y_axis_config = {'title': '结果的频率'}
my_layout = Layout(title='掷一个D6和一个D10 50000次的结果', xaxis=x_axis_config, yaxis=y_axis_config)
offline.plot({'data': data, 'layout': my_layout}, filename='d6_d10.html')
可视化结果:

2.读取scv文件,绘制数据图,处理数据缺失错误
death_valley_highs_lows.py
import csv
import matplotlib.pyplot as plt
from datetime import datetimefilename = 'D:\python_project\Data_Visualization\source_code\chapter_16\\the_csv_file_format\data\death_valley_2018_simple.csv'
with open(filename) as f:reader = csv.reader(f)header_row = next(reader)# for index, column_header in enumerate(header_row):#     print(index, column_header)# 从文件中获取最高温度dates, highs, lows= [], [], []for row in reader:current_date = datetime.strptime(row[2], '%Y-%m-%d')# 处理缺失数据错误try:high = int(row[4])low = int(row[5])except ValueError:print(f"Missing data for {current_date}")else:dates.append(current_date)highs.append(high)lows.append(low)# 根据最高温度绘制图形
plt.style.use('seaborn')
fig, ax = plt.subplots()
ax.plot(dates, highs, c='red', alpha=0.5)
ax.plot(dates, lows, c='blue', alpha=0.5)
ax.fill_between(dates, highs, lows, facecolor='blue', alpha=0.1)# 设置图形的格式
title = "2018年每日最高和最低温度\n 美国加利福尼亚州死亡谷"
ax.set_title(title, fontsize=20)
ax.set_xlabel('', fontsize=16)
fig.autofmt_xdate()
ax.set_ylabel("温度(F)", fontsize=16)
ax.tick_params(axis='both', which='major', labelsize=16)
plt.rcParams['font.sans-serif']=['SimHei'] # 用来正常显示中文标签(中文乱码问题)plt.show()
数据结果图:

3.绘制全球地震散点图:数据json格式
eq_world_map.py
import plotly.express as px
import json
import pandas as pdfilename = "D:\python_project\Data_Visualization\source_code\chapter_16\mapping_global_data_sets\data\eq_data_30_day_m1.json"
with open(filename) as f:all_eq_data = json.load(f)all_eq_dicts = all_eq_data['features']
# print(len(all_eq_dicts))
mags, titles, lons, lats = [], [], [], []
for eq_dict in all_eq_dicts:mag = eq_dict['properties']['mag']title = eq_dict['properties']['title']lon = eq_dict['geometry']['coordinates'][0]lat = eq_dict['geometry']['coordinates'][1]mags.append(mag)titles.append(title)lons.append(lon)lats.append(lat)data = pd.DataFrame(data=zip(lons, lats, titles, mags),columns=['经度', '纬度', '位置', '震级']
)
data.head()fig = px.scatter(data,x='经度',y='纬度',range_x=[-200, 200],range_y=[-90, 90],width=800,height=800,title='全球地震散点图',size='震级',size_max=10,color='震级',hover_name='位置',
)
fig.write_html('global_earthquakes.html')
fig.show()
可视化结果:

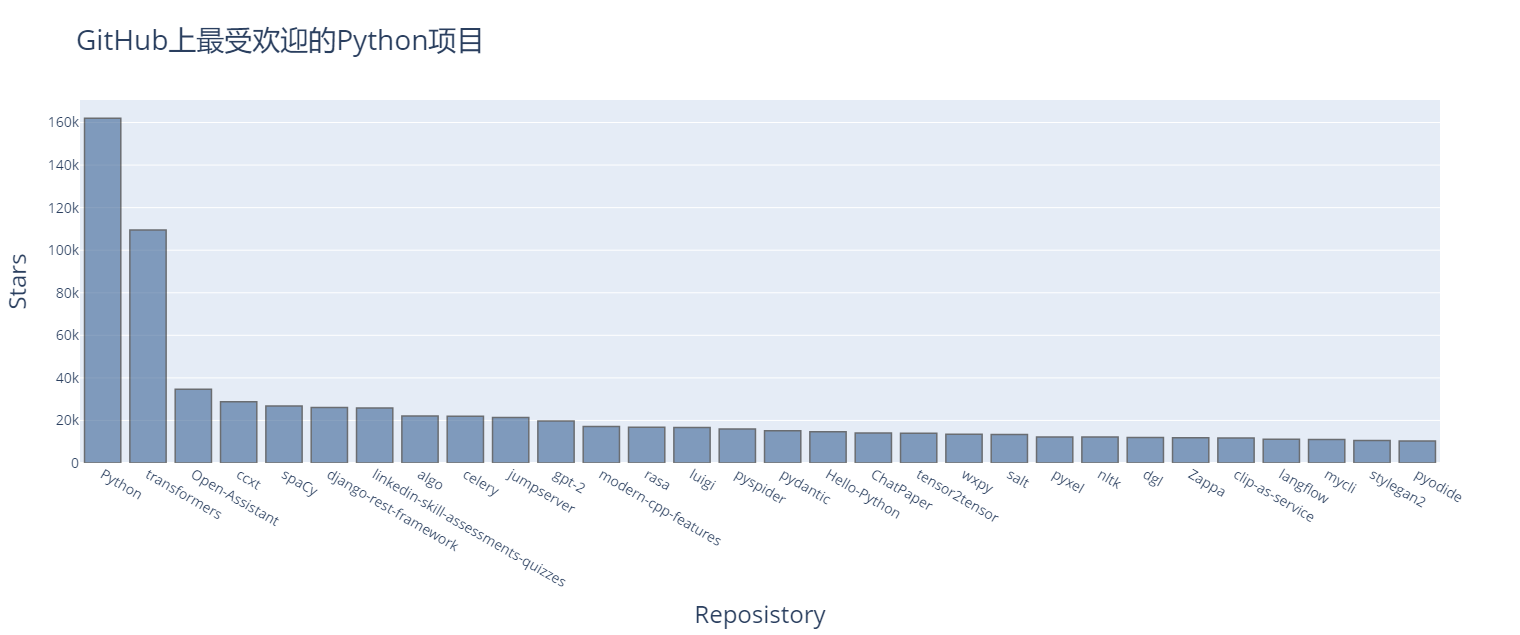
4.使用Plotly可视化GitHub的API仓库
python_repos_visual.py
import requests
from plotly.graph_objs import Bar
from plotly import offline# 执行API调用并存储响应
url = "https://api.github.com/search/repositories?q=language:python&sort=stars"
headers = {'Accept': 'application/vnd.github.v3+json'}
r = requests.get(url, headers=headers)
print(f"Status code: {r.status_code}")# 处理响应
response_dict = r.json()
repo_dicts = response_dict['items']
repo_links, stars, labels = [], [], []
for repo_dict in repo_dicts:repo_name = repo_dict['name']repo_url = repo_dict['html_url']repo_link = f"<a href='{repo_url}'>{repo_name}"repo_links.append(repo_link)stars.append(repo_dict['stargazers_count'])owner = repo_dict['owner']['login']description = repo_dict['description']label = f"{owner}<br />{description}"labels.append(label)# 可视化
data = [{'type': 'bar','x': repo_links,'y': stars,'hovertext': labels,# 条形设计'marker': {'color': 'rgb(60, 100, 150)','line': {'width': 1.5, 'color': 'rgb(25, 25, 25)'}},'opacity': 0.6,  # 不透明度
}]
my_layout = {'title': 'GitHub上最受欢迎的Python项目','titlefont': {'size': 28},'xaxis': {'title': 'Reposistory','titlefont': {'size': 24},      # 图标名称字号'tickfont': {'size': 14},       # 刻度标签字号},'yaxis': {'title': 'Stars','titlefont': {'size': 24},'tickfont': {'size': 14},},
}fig = {'data': data, 'layout': my_layout}
offline.plot(fig, filename='python.repos.html')
可交互式图表:
