宿主机环境:RockyLinux 9
前言,定制docker镜像的方式有两种:
- 手动修改容器内容,然后docker commit提交容器为新的镜像
- 通过在dockerfile中定义一系列的命令和参数构成的脚本,然后这些命令应用于基础镜像,依次添加层, 最终生成一个新的镜像。极大的简化了部署工作。
Dockfile简介

镜像是多层存储,每一层在前一层的基础上进行修改;
容器也是多层存储,以镜像为基础层,在其基础上加一层作为容器运行时的存储层。
官方提供的dockerfile实例
https://github.com/CentOS/CentOS-Dockerfiles
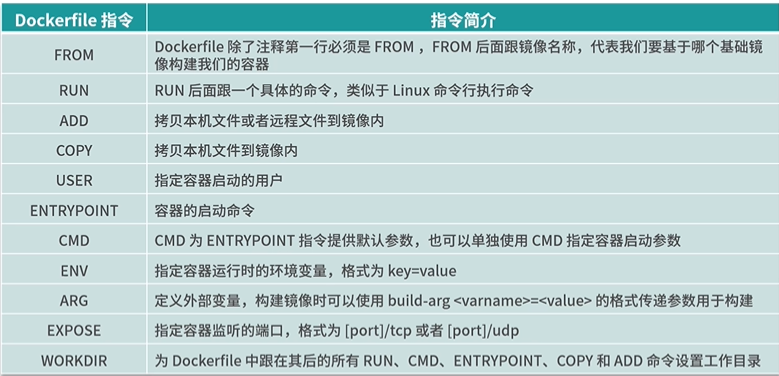
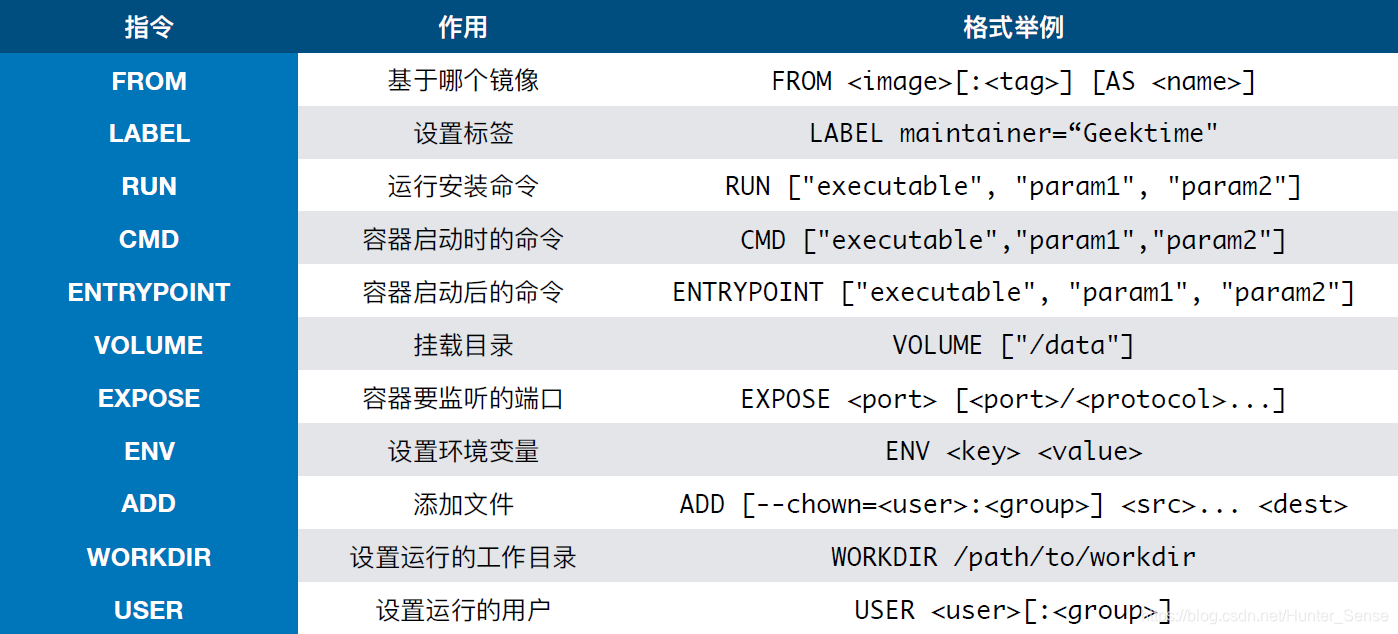
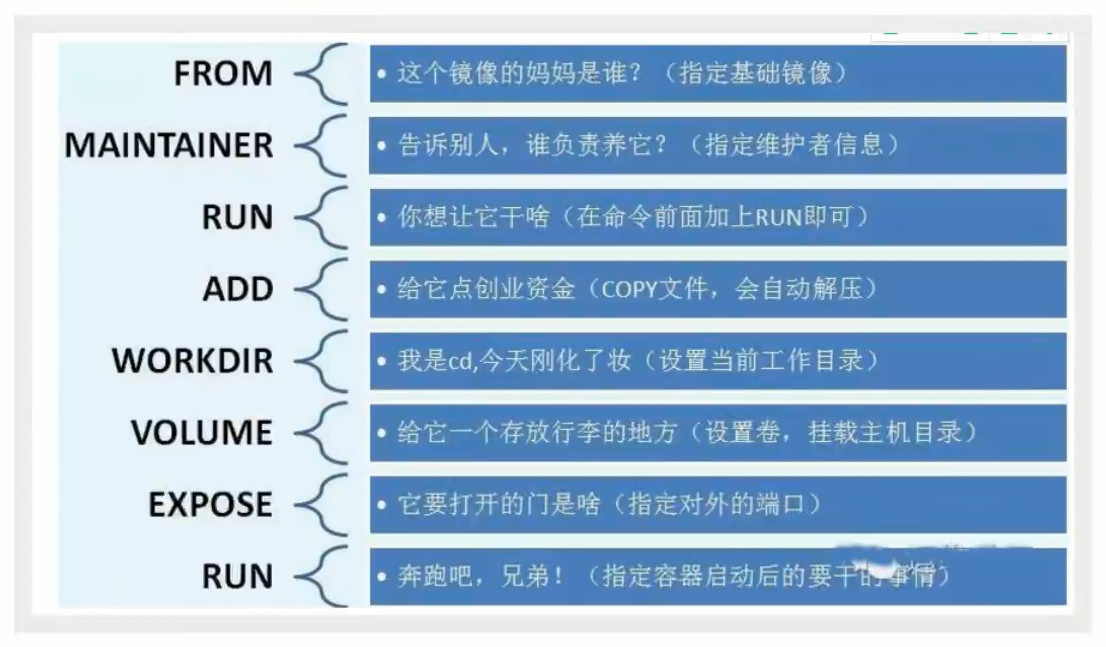
Dockerfile命令

Dockfile实践
需求,通过dockfile,构建nginx镜像,且运行容器后,生成页面显示“云原生基础,从零开始学Docker!”
- 编辑dockfile文件
[root@192 ~]# mkdir learn_docker [root@192 learn_docker]# ls [root@192 learn_docker]# cat dockerfile FROM nginx RUN echo '<meta charset=utf8>云原生基础,从零开始学Docker!' > /usr/share/nginx/html/index.html - 根据dockfile构建镜像
[root@192 learn_docker]# docker build .[root@192 learn_docker]# docker images REPOSITORY TAG IMAGE ID CREATED SIZE <none> <none> b268ad835d4c 12 minutes ago 187MB nginx_hunter latest 53807fe50cad 6 hours ago 187MB nginx latest 89da1fb6dcb9 31 hours ago 187MB# 对其生成的镜像重命名 repository和tag [root@192 learn_docker]# docker tag b268ad8 my_nginx [root@192 learn_docker]# docker images REPOSITORY TAG IMAGE ID CREATED SIZE my_nginx latest b268ad835d4c 13 minutes ago 187MB nginx_hunter latest 53807fe50cad 6 hours ago 187MB nginx latest 89da1fb6dcb9 31 hours ago 187MB - 根据构建镜像创建容器并运行
# 创建并启动nginx容器 [root@192 learn_docker]# docker run -d -p 86:80 --name my_nginx001 my_nginx 2c4ee3f20fff7f15af0b9ace26dc2c246810ef8240751849a9c4fc4bea8bf39a [root@192 learn_docker]# docker ps CONTAINER ID IMAGE COMMAND CREATED STATUS PORTS NAMES 2c4ee3f20fff my_nginx "/docker-entrypoint.…" 5 seconds ago Up 4 seconds 0.0.0.0:86->80/tcp, :::86->80/tcp my_nginx001 6627aa9383d9 nginx "/docker-entrypoint.…" 6 hours ago Up About an hour 0.0.0.0:85->80/tcp, :::85->80/tcp nginx001 - 验证结果

Dockfile构建一个网站镜像
这里以我之前关注过的一个前端框架Demo为例
文档地址:Vben Admin
- 打包前端框架,并上传至宿主机指定目录
[root@192 html]# pwd /root/learn_docker/html [root@192 html]# ls # 这里就是我们打包好的前段静态文件 _app.config.js assets favicon.ico index.html logo.png resource - 编写dockfile
[root@192 learn_docker]# cat /root/learn_docker/dockerfile FROM nginxMAINTAINER Hunter4JCOPY html/ /usr/share/nginx/html/EXPOSE 5173构建的nginx实例中,我使用的是默认的nginx.conf配置,文件位置在 /etc/nginx/conf.d/default.conf
server {listen 80;listen [::]:80;server_name localhost;#access_log /var/log/nginx/host.access.log main;location / {root /usr/share/nginx/html;index index.html index.htm;}#error_page 404 /404.html;# redirect server error pages to the static page /50x.html#error_page 500 502 503 504 /50x.html;location = /50x.html {root /usr/share/nginx/html;}# proxy the PHP scripts to Apache listening on 127.0.0.1:80##location ~ \.php$ {# proxy_pass http://127.0.0.1;#}# pass the PHP scripts to FastCGI server listening on 127.0.0.1:9000##location ~ \.php$ {# root html;# fastcgi_pass 127.0.0.1:9000;# fastcgi_index index.php;# fastcgi_param SCRIPT_FILENAME /scripts$fastcgi_script_name;# include fastcgi_params;#}# deny access to .htaccess files, if Apache's document root# concurs with nginx's one##location ~ /\.ht {# deny all;#} } - 生成镜像
[root@192 learn_docker]# docker build -t myvben .[root@192 learn_docker]# docker images REPOSITORY TAG IMAGE ID CREATED SIZE myvben latest fae1690423df 20 minutes ago 194MB -
创建并运行容器
[root@192 learn_docker]# docker run -d -p 8080:80 --name myvben001 myvben 153421a01df490b70a238ed7706ded3d4e9efd2bf477e0c5497c4608a125dec2[root@192 learn_docker]# docker ps CONTAINER ID IMAGE COMMAND CREATED STATUS PORTS NAMES 153421a01df4 myvben "/docker-entrypoint.…" 3 seconds ago Up 3 seconds 0.0.0.0:8080->80/tcp, :::8080->80/tcp myvben001 -
浏览器验证容器中程序运行情况
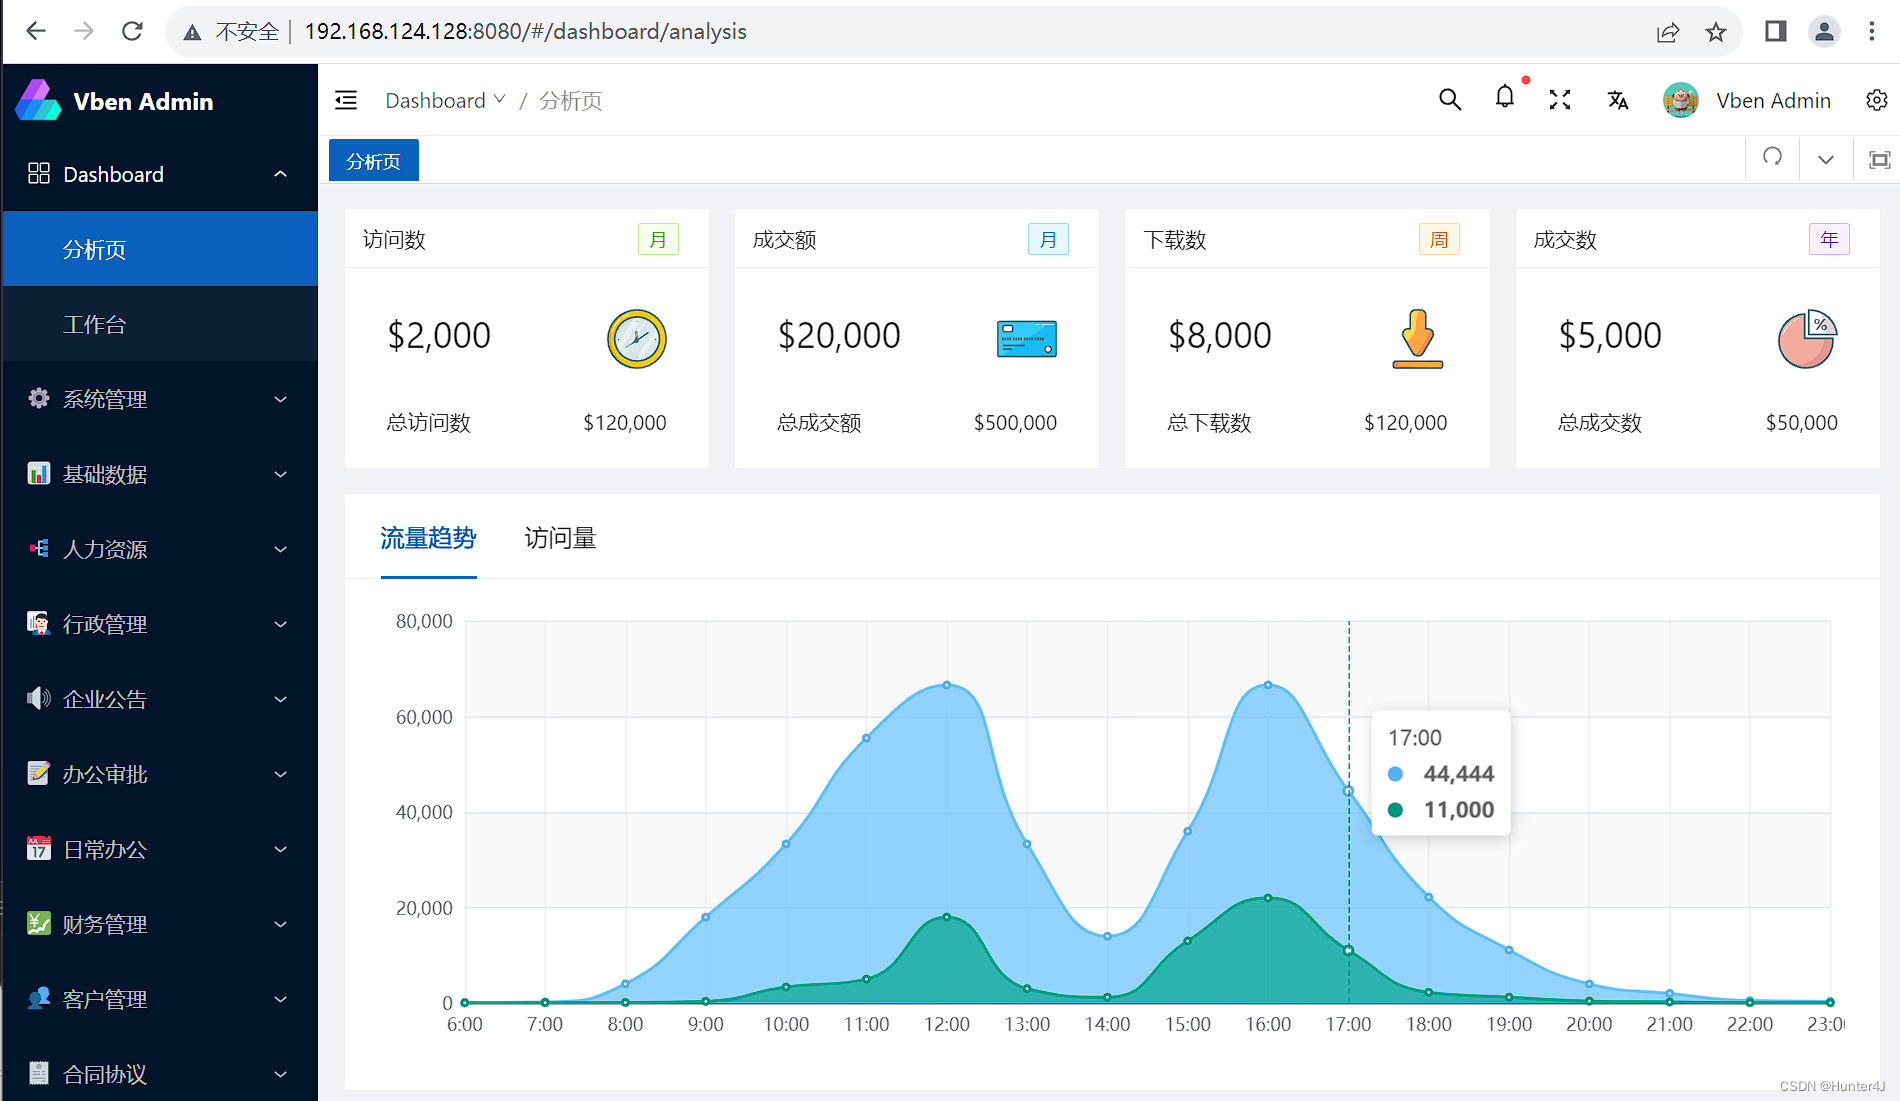
至此,我们在容器中第一个运行的项目已经部署成功了
