前言:最近在捣鼓一个开源的管理kafka的web版,名字叫kafka-ui。准备部署到本地,方便平时遇到问题时,查看kafka的情况。开源项目github地址:点这里 。拿到这个项目,折腾了几天,今天终于编译成功了,虽然编译成功了,但遇到了代理的问题,始终无法连接mave的中央仓库。折腾了一天,还是无法解决,实在不想折腾了,还是投降了,选择使用私有仓库解决问题,特此记录一下,等待有缘人来答疑解惑。
由于最新版的kafka-ui使用的是spring3.x和java17,我们本地项目还在使用java8,所以我之前想着移植到java8中,方便集成到生产环境中使用。经过2天的折腾,这个移植的想法也放弃了,因为代码里面使用了太多的新语法,比如var变量,stream流式的新方法,switch的新语法等等,如果进行移植,那改动太多了,我改了两天都没改完,所以果然放弃了。期间还想过使用旧的支持java8的分支,但想着可能有的功能不全,我是个喜新厌旧的人,所以这个想法也抛弃了。
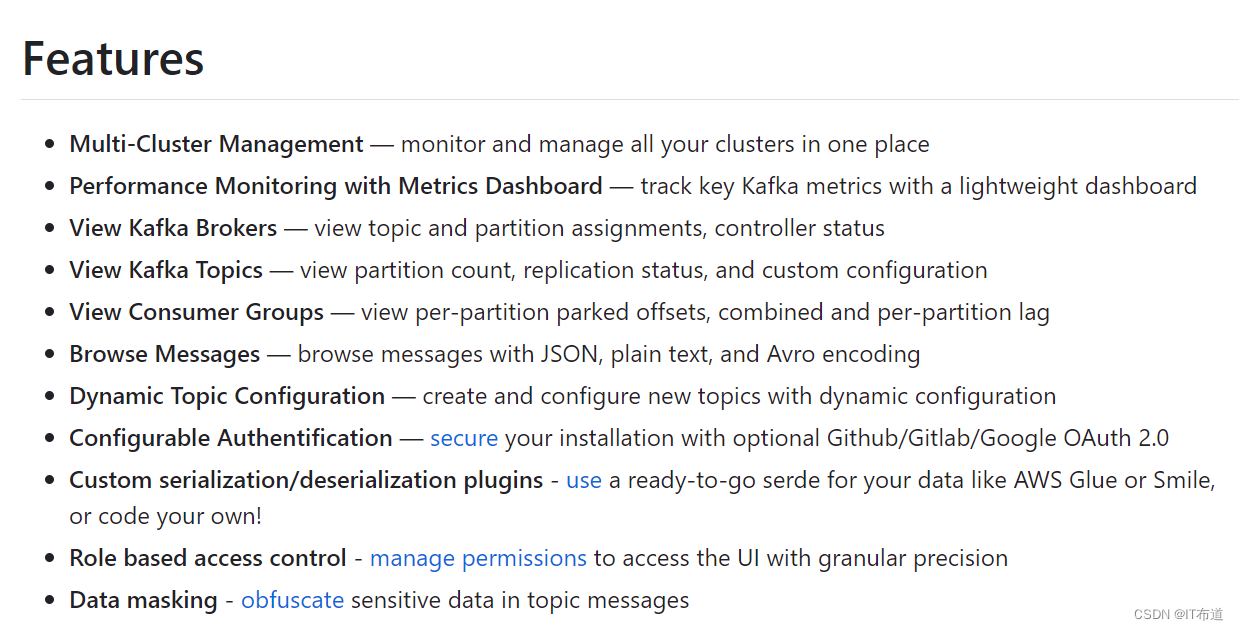
在捣鼓过程中,我发现这个项目做的确实挺完整的,不是一个简单的小项目,以下是其官网展示的目前支持的功能:
这个项目使用了多个插件,是我平时没用过的,尤其是前端,本身就不熟悉,一大堆插件和框架糅合在一起,简直要命。好了,铺垫了这么多,该聊正事了。下面介绍第一个插件:
frontend-maven-plugin以下是其在pom.xml的配置内容:
<plugin><groupId>com.github.eirslett</groupId><artifactId>frontend-maven-plugin</artifactId><version>${frontend-maven-plugin.version}</version><configuration><workingDirectory>../kafka-ui-react-app</workingDirectory><environmentVariables><VITE_TAG>${project.version}</VITE_TAG></environmentVariables></configuration><executions><execution><id>install node and pnpm</id><goals><goal>install-node-and-pnpm</goal></goals><configuration><nodeVersion>${node.version}</nodeVersion><pnpmVersion>${pnpm.version}</pnpmVersion></configuration></execution><execution><id>pnpm install</id><goals><goal>pnpm</goal></goals><configuration><arguments>install</arguments></configuration></execution><execution><id>pnpm gen:sources</id><goals><goal>pnpm</goal></goals><configuration><arguments>gen:sources</arguments></configuration></execution></executions>
</plugin>
简单总结这个插件的作用,就是将可将前后端打包成一个包,然后直接运行。不用单独启动前端和后端。
在上面的pom.xml中,插件执行第二个动作就是执行:
pnpm gen:sources这个命令的作用生成源码。
gen:sources是自定义的命令,所以在web项目中,package.json有该命令对应的执行内容,如下:
"scripts": {"start": "vite","dev": "vite","gen:sources": "rimraf src/generated-sources && openapi-generator-cli generate","build": "vite build","preview": "vite preview","lint": "eslint --ext .tsx,.ts src/","lint:fix": "eslint --ext .tsx,.ts src/ --fix","lint:CI": "eslint --ext .tsx,.ts src/ --max-warnings=0","test": "jest --watch","test:coverage": "jest --watchAll --coverage","test:CI": "CI=true pnpm test:coverage --ci --testResultsProcessor=\"jest-sonar-reporter\" --watchAll=false","tsc": "tsc --pretty --noEmit","deadcode": "ts-prune -i src/generated-sources"},"gen:sources": "rimraf src/generated-sources && openapi-generator-cli generate"
gen:sources后面跟的是两个node module,第一个是rimraf,这个模块类似rm -rf命令,删除文件的作用。第二个是openapi-generator-cli,这个模块就是用来生成源码的,它也是今天的重头戏。
openapi-generator-cli是一个node module,执行这个module,它会生成一个openapitools.json的文件,和web项目的package.json同级。openapitools.json的内容如下:
{"$schema": "node_modules/@openapitools/openapi-generator-cli/config.schema.json","spaces": 2,"generator-cli": {"version": "6.6.0","generators": {"fetch": {"generatorName": "typescript-fetch","output": "src/generated-sources","glob": "../kafka-ui-contract/src/main/resources/swagger/kafka-ui-api.yaml","additionalProperties": {"enumPropertyNaming": "UPPERCASE","typescriptThreePlus": true,"supportsES6": true,"nullSafeAdditionalProps": true,"withInterfaces": true},"typeMappings": {"object": "any"}}}}
}
配置文件中的kafka-ui-api.yaml就是定义的接口,通过这个配置文件里面的定义即可生成相应的源码。在生成源码之前,它需要先去maven中央仓库去下载对应版本的openapi-generator-cli.jar。就是这个地方,折腾了我两天。
我们可以看下面的日志,就是上面的openapi-generator-cli模块执行的大致流程:
[INFO] --- frontend-maven-plugin:1.13.4:pnpm (pnpm gen:sources) @ kafka-ui-contract ---
[INFO] Running 'pnpm gen:sources' in C:\workspace\kafka-ui\kafka-ui-react-app
[INFO]
[INFO] > kafka-ui@0.4.0 gen:sources C:\workspace\kafka-ui\kafka-ui-react-app
[INFO] > rimraf src/generated-sources && openapi-generator-cli generate
[INFO]
[INFO] Download 6.5.0 ...
[INFO] Download failed, because of: "connect ETIMEDOUT 146.75.40.209:443"
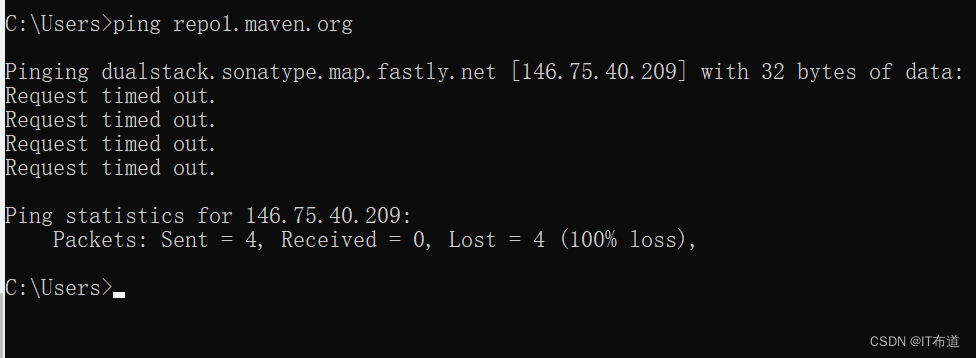
上面的日志写的很清楚,连接146.75.40.209:443超时了,我查了下,146.75.40.209就是repo1.maven.org的地址,如下图:
通过openapi-generator-cli的源码,也可以确认这一点,以下是配置文件apps/generator-cli/src/config.schema.json中的部分内容:
{"$id": "https://openapitools.org/openapi-generator-cli/config.schema.json","$schema": "http://json-schema.org/draft-07/schema#","title": "OpenAPI Generator CLI - Config","type": "object","required": ["generator-cli"],"additionalProperties": false,"properties": {"$schema": {"type": "string"},"spaces": {"type": "number","default": 2},"generator-cli": {"type": "object","required": ["version"],"properties": {"version": {"type": "string"},"storageDir": {"type": "string"},"repository": {"queryUrl": {"type": "string","default": "https://search.maven.org/solrsearch/select?q=g:${group.id}+AND+a:${artifact.id}&core=gav&start=0&rows=200"},"downloadUrl": {"type": "string","default": "https://repo1.maven.org/maven2/${groupId}/${artifactId}/${versionName}/${artifactId}-${versionName}.jar"}},"useDocker": {"type": "boolean","default": false},"dockerImageName": {"type": "string","default": "openapitools/openapi-generator-cli"},"generators": {"type": "object","additionalProperties": {"$ref": "#/definitions/generator"}}}..........}再精简以下,只需关注如下内容即可:
"repository": {"queryUrl": {"type": "string","default": "https://search.maven.org/solrsearch/select?q=g:${group.id}+AND+a:${artifact.id}&core=gav&start=0&rows=200"},"downloadUrl": {"type": "string","default": "https://repo1.maven.org/maven2/${groupId}/${artifactId}/${versionName}/${artifactId}-${versionName}.jar"}}上面定义了下载的路径,就是maven的默认中央仓库。
事到如今,问题已经很清晰了,就是这个中央仓库连接不上。可为什么会连接不上呢,这个有点蹊跷,因为我平时下java的依赖包都没问题。所以可以确定网络是通的。但这里需要重点说明一下,我的环境在公司网络里面,访问外网时会通过代理出去。因为有代理,所以在maven的配置文件中也是配置了代理的。我查看frontend-maven-plugin官网关于代理的问题,它也明确说明了,如果maven配置文件设置了代理,npm也会使用该代理。

由于前面那个build日志是不含代理信息的接下来,所以我们再看一遍maven中增加了代理的build的日志流程:
[INFO] > kafka-ui@0.4.0 gen:sources C:\workspace\kafka-ui\kafka-ui-react-app
[INFO] > rimraf src/generated-sources && openapi-generator-cli generate "--https-proxy=http://10.10.10.10:8000" "--proxy=http://10.10.10.10:8000" "--noproxy=localhost,127.0.0.1"
[INFO]
[INFO] Download 6.5.0 ...
[INFO] Download failed, because of: "connect ETIMEDOUT 146.75.40.209:443"
由此可以看到,日志中也包含了代理的参数--https-proxy和--proxy。但是build的结果还是不行,提示连不上maven的中央仓库。顺着这个线索,我搜索了下frontend-maven-plugin插件的issue列表,发现有用户报类似的问题,只要是在公司网络有代理的情况下,就会有该问题。详细问题点这儿 ,以下是部分截图:
 可惜这个问题直到今天也没看到答案,也不知道他们是否解决了。
好了,感觉走到现在,有点走不下去了,正准备放弃的时候。又去openapi-generator-cli的官网翻了翻,突然瞥到了自定义私有仓库的配置,看来这个问题还有转机的希望。以下是官网的配置说明:
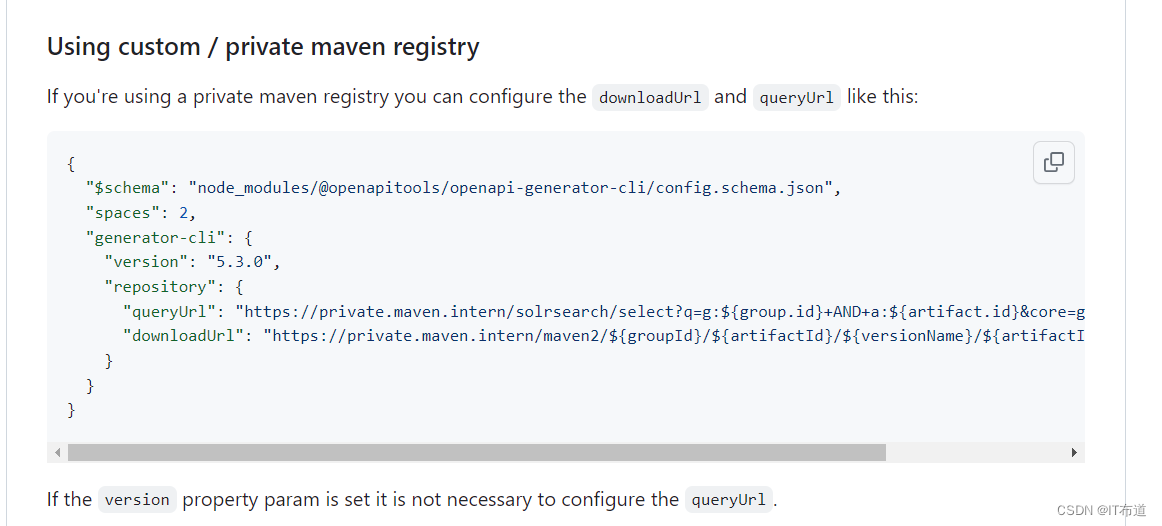
正好我们自己有私有仓库,按照上述的方式,配置一个试试,文档特别说明了,如果指定了版本,就不用queryUrl了,所以只需要配置downloadUrl即可。好了,我们再build一次看看,是否能通过了:
[INFO] Reactor Summary:
[INFO]
[INFO] kafka-ui 0.0.1-SNAPSHOT ............................ SUCCESS [  0.004 s]
[INFO] kafka-ui-contract 0.0.1-SNAPSHOT ................... SUCCESS [ 36.901 s]
[INFO] kafka-ui-serde-api 1.0.0 ........................... SUCCESS [  0.926 s]
[INFO] kafka-ui-api 0.0.1-SNAPSHOT ........................ SUCCESS [ 26.429 s]
[INFO] kafka-ui-e2e-checks 0.0.1-SNAPSHOT ................. SUCCESS [  6.281 s]
[INFO] ------------------------------------------------------------------------
[INFO] BUILD SUCCESS
[INFO] ------------------------------------------------------------------------
[INFO] Total time:  01:10 min
编译终于通过了,至于如何设置代理的问题,有知道的大神还请不吝赐教,感激不尽!

![[K8S:命令执行:权限异常:解决篇]:通过更新kubeconfig配置相关信息](https://img-blog.csdnimg.cn/4a89fdf9224c49c78a1ab3c2562bbb03.png)
