源码分析
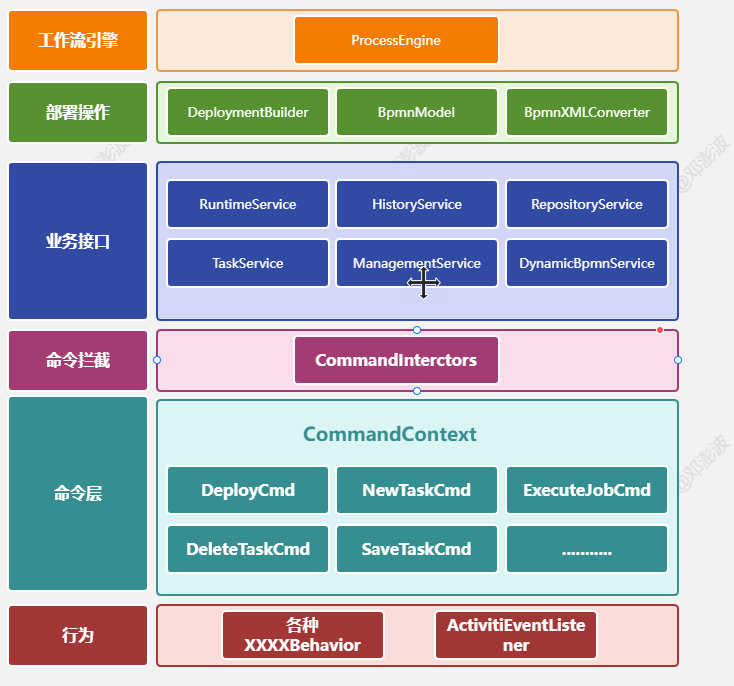
1.设计模式
1.1 命令模式
https://dpb-bobokaoya-sm.blog.csdn.net/article/details/89115420
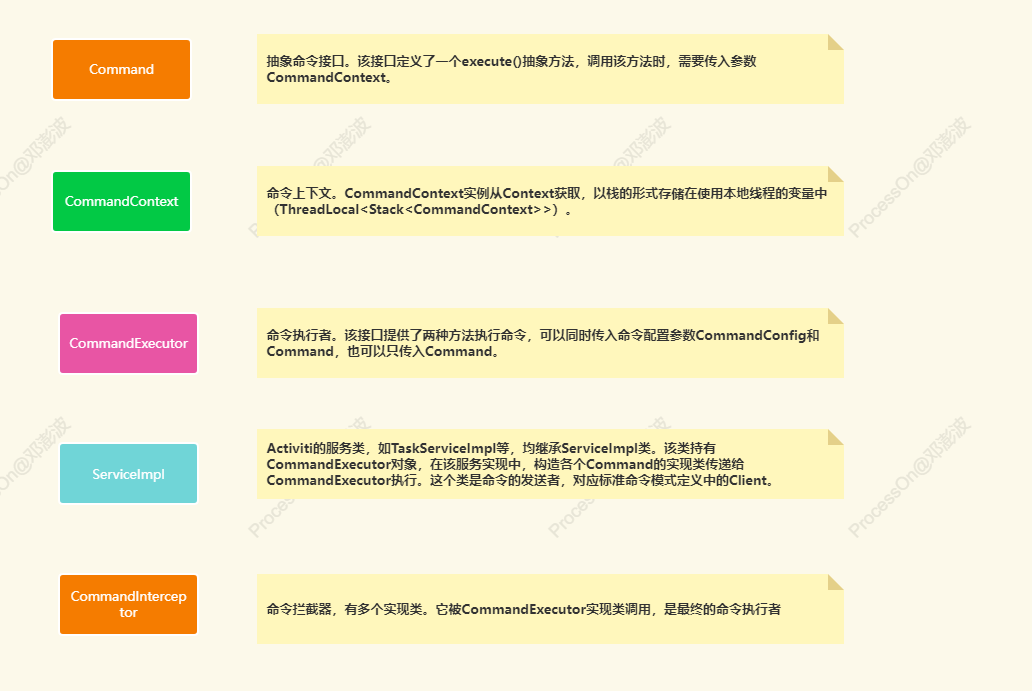
1.2 责任链模式
https://dpb-bobokaoya-sm.blog.csdn.net/article/details/89077040
2.初始化过程
2.1 入口代码
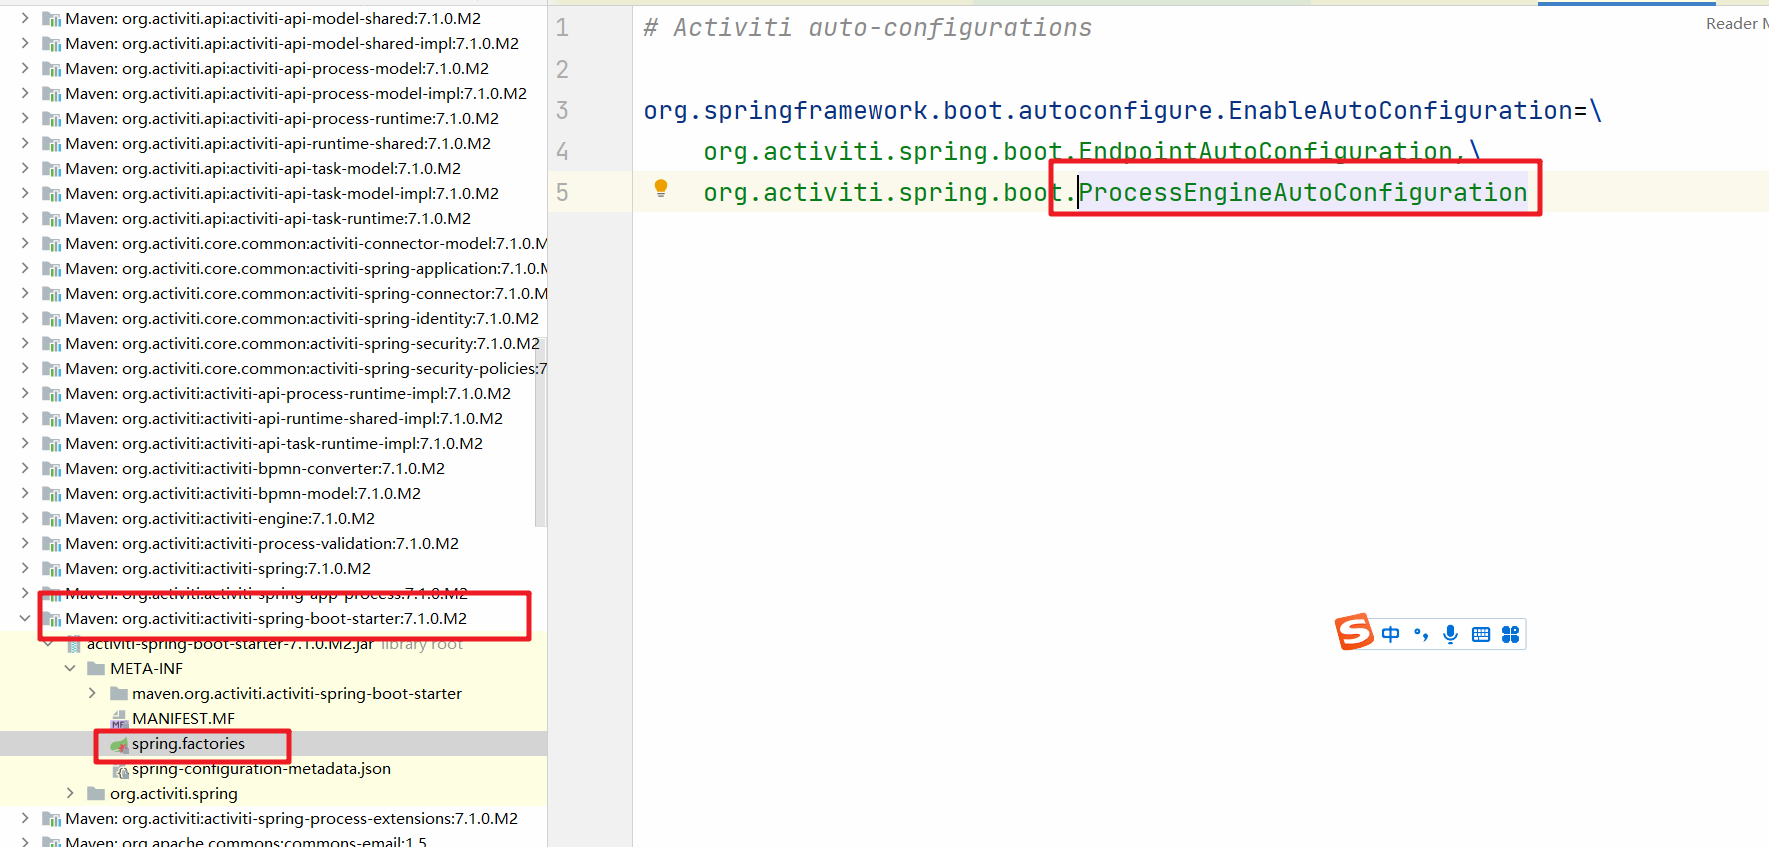
我们在SpringBoot项目中来看Activiti7的源码。首先要找到的是自动装配的入口。在activiti-spring-boot-starter的spring.factories中找到自动配置类ProcessEngineAutoConfiguration这个配置类
进入到ProcessEngineAutoConfiguration中可以看到完成了SpringProcessEngineConfiguration的注入。我们再进入父类AbstractProcessEngineAutoConfiguration中。
@Beanpublic ProcessEngineFactoryBean processEngine(SpringProcessEngineConfiguration configuration) {return super.springProcessEngineBean(configuration);}
看到了ProcessEngineFactoryBean这让我们联想到了是getObject()方法。然后进入到springProcessEngineBean方法中。
public ProcessEngineFactoryBean springProcessEngineBean(SpringProcessEngineConfiguration configuration) {ProcessEngineFactoryBean processEngineFactoryBean = new ProcessEngineFactoryBean();processEngineFactoryBean.setProcessEngineConfiguration(configuration);return processEngineFactoryBean;}
再进入到ProcessEngineFactoryBean的getObject方法
public ProcessEngine getObject() throws Exception {this.configureExpressionManager();this.configureExternallyManagedTransactions();if (this.processEngineConfiguration.getBeans() == null) {this.processEngineConfiguration.setBeans(new SpringBeanFactoryProxyMap(this.applicationContext));}this.processEngine = this.processEngineConfiguration.buildProcessEngine();return this.processEngine;}
关键是processEngineConfiguration.buildProcessEngine();这行代码。进入buildProcessEngine方法中查看。即进入到了ProcessEngineConfigurationImpl类中,并且调用了下面的方法。
@Overridepublic ProcessEngine buildProcessEngine() {init();ProcessEngineImpl processEngine = new ProcessEngineImpl(this);postProcessEngineInitialisation();return processEngine;}
ProcessEngineConfigurationImpl的作用:配置和初始化Activiti的流程引擎。通过该类,可以对流程引擎的各种参数进行配置,包括数据库连接信息、事务管理器、缓存管理器、作业执行器等。同时,该类还提供了创建和获取ProcessEngine实例的方法,用于启动和管理流程引擎的运行。
2.2 init方法
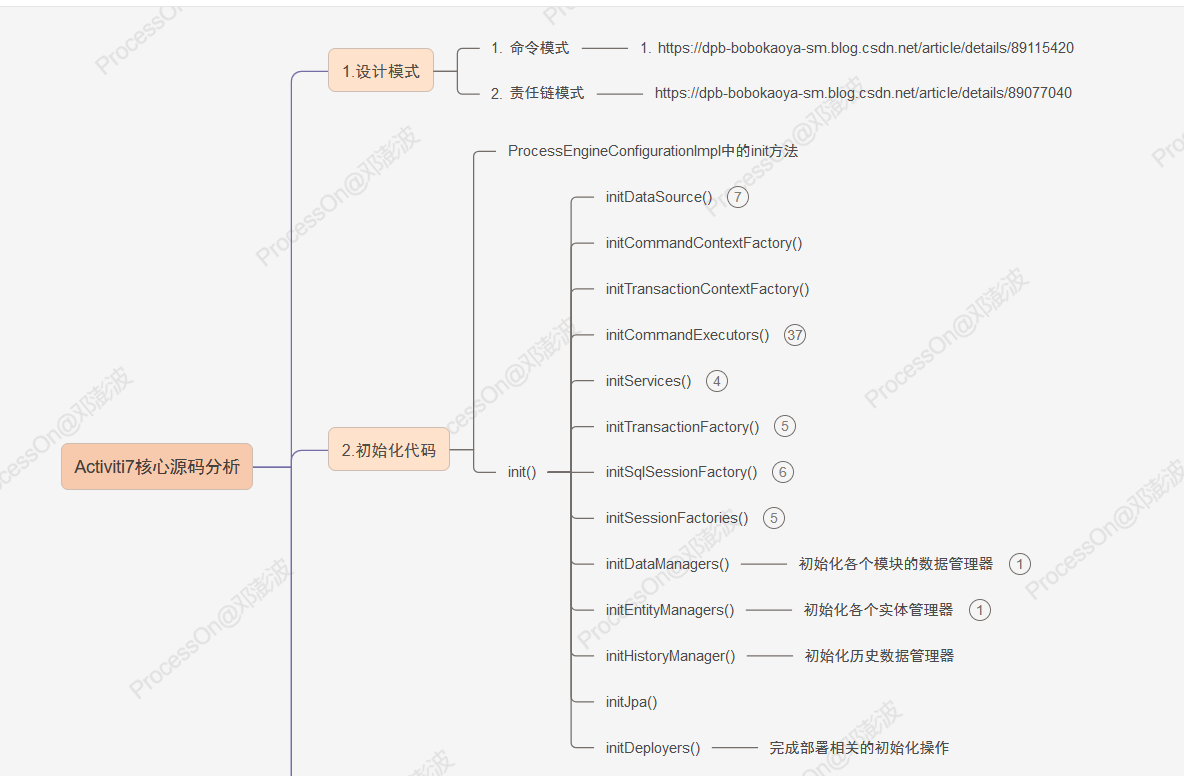
init()方法的作用是初始化Activiti引擎的配置,为引擎的正常运行做准备。
public void init() {initConfigurators();configuratorsBeforeInit();initHistoryLevel();initExpressionManager();if (usingRelationalDatabase) {initDataSource();}initAgendaFactory();initHelpers();initVariableTypes();initBeans();initScriptingEngines();initClock();initBusinessCalendarManager();initCommandContextFactory();initTransactionContextFactory();initCommandExecutors();initServices();initIdGenerator();initBehaviorFactory();initListenerFactory();initBpmnParser();initProcessDefinitionCache();initProcessDefinitionInfoCache();initKnowledgeBaseCache();initJobHandlers();initJobManager();initAsyncExecutor();initTransactionFactory();if (usingRelationalDatabase) {initSqlSessionFactory();}initSessionFactories();initDataManagers();initEntityManagers();initHistoryManager();initJpa();initDeployers();initDelegateInterceptor();initEventHandlers();initFailedJobCommandFactory();initEventDispatcher();initProcessValidator();initDatabaseEventLogging();configuratorsAfterInit();
}
上面初始化的内容有很多。我们先来看几个关键的:
- initCommandContextFactory();
- initTransactionContextFactory();
- initCommandExecutors();
- initServices();
2.2.1 initCommandContextFactory
initCommandContextFactory方法的作用很简单,完成ProcessEngineConfigurationImpl中的commandContextFactory属性的初始化操作。
public void initCommandContextFactory() {if (commandContextFactory == null) {commandContextFactory = new CommandContextFactory();}commandContextFactory.setProcessEngineConfiguration(this);
}
2.2.2 initTransactionContextFactory
initTransactionContextFactory方法的作用也很简单,完成ProcessEngineConfigurationImpl中的transactionContextFactory属性的初始化操作。
public void initTransactionContextFactory() {if (transactionContextFactory == null) {transactionContextFactory = new StandaloneMybatisTransactionContextFactory();}
}
2.2.3 initCommandExecutors
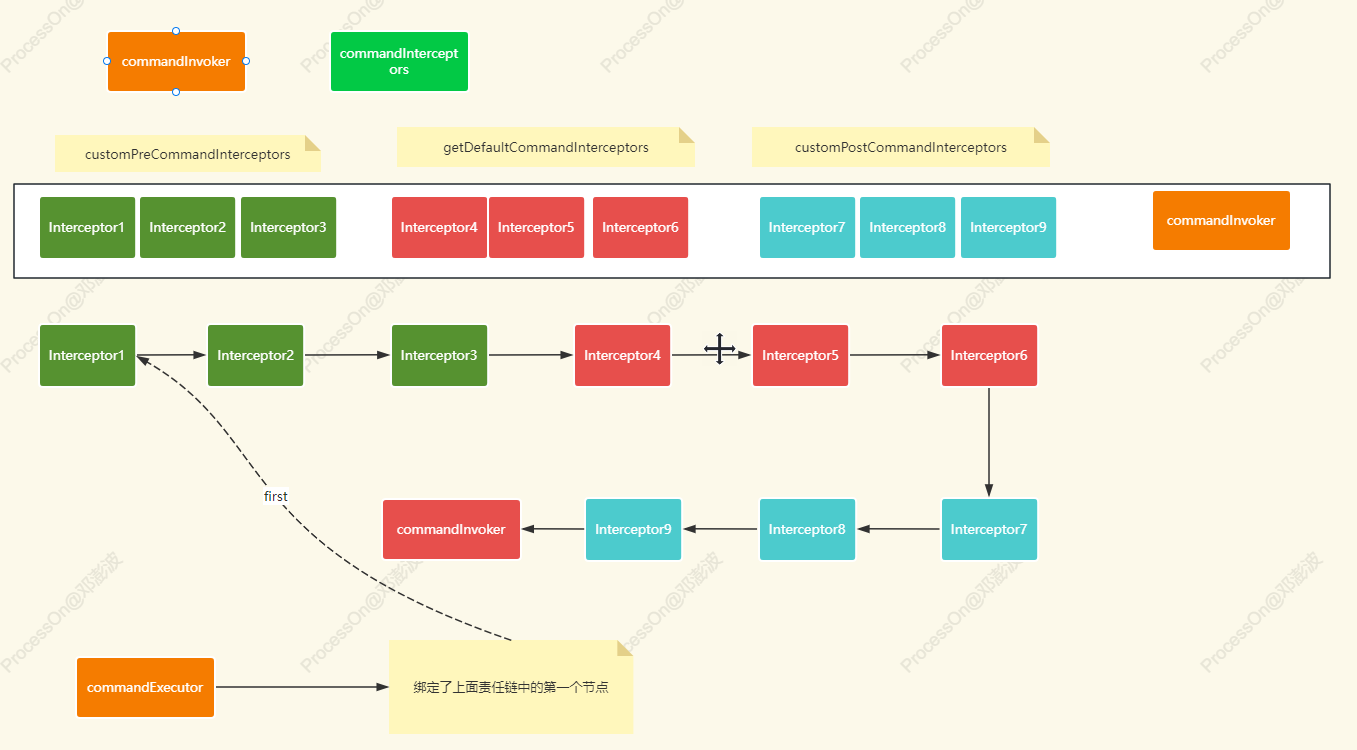
initCommandExecutors这是一个非常重要的方法。会完成责任链中相关拦截器的组织和加载。里面的方法有
- initDefaultCommandConfig() :初始化defaultCommandConfig属性【可重用Context上下文,支持事务传播属性】
- initSchemaCommandConfig() :初始化schemaCommandConfig属性【不可重用Context上下文,不支持事务传播属性】
- initCommandInvoker() :初始化commandInvoker属性。这个是责任链路中的最后一个节点
- initCommandInterceptors() :初始化commandInterceptors属性,组装所有的拦截器到集合中
- initCommandExecutor():初始化commandExecutor属性,完成责任链的关联并绑定链路的第一个节点【first】
核心代码:
public void initCommandExecutor() {if (commandExecutor == null) {// 获取责任链中的第一个拦截器    初始化责任链CommandInterceptor first = initInterceptorChain(commandInterceptors);commandExecutor = new CommandExecutorImpl(getDefaultCommandConfig(), first);}
}public CommandInterceptor initInterceptorChain(List<CommandInterceptor> chain) {if (chain == null || chain.isEmpty()) {throw new ActivitiException("invalid command interceptor chain configuration: " + chain);}// 设置责任链for (int i = 0; i < chain.size() - 1; i++) {chain.get(i).setNext(chain.get(i + 1));}return chain.get(0); // 返回第一个节点
}
对应的图解:
2.2.4 initServices
在Activiti7中我们完成各种流程的操作,比如部署,查询流程定义、流程审批等各种操作都是通过xxxService来完成的。这些service在ProcessEngineConfigurationImpl中的成员变量中就会完成对象的实例化。
protected RepositoryService repositoryService = new RepositoryServiceImpl();protected RuntimeService runtimeService = new RuntimeServiceImpl();protected HistoryService historyService = new HistoryServiceImpl(this);protected TaskService taskService = new TaskServiceImpl(this);protected ManagementService managementService = new ManagementServiceImpl();protected DynamicBpmnService dynamicBpmnService = new DynamicBpmnServiceImpl(this);
在init方法的initServices完成的操作是和上面实例化的commandExecutor完成绑定。也就是xxxService中的各种执行操作最终都是由commandExecutor来完成的。
public void initServices() {initService(repositoryService);initService(runtimeService);initService(historyService);initService(taskService);initService(managementService);initService(dynamicBpmnService);}
绑定commandExecutor
public void initService(Object service) {if (service instanceof ServiceImpl) {((ServiceImpl) service).setCommandExecutor(commandExecutor);}}
