一、说在前面
小伙伴们好,博主很久没有写博客了,略感生疏,不到之处敬请谅解,欢迎指出文中错误,大家一起探讨。欲看视频讲解,可转至博主DouYin、B站,欢迎关注,链接如下:
Github: GitHub - samylee/YOLOV1_PyTorch
DY: samylee_csdn
B站:samylee
二、博客系列链接
YOLO系列解读DAY1—YOLOV1预训练模型
YOLO系列解读DAY2—YOLOV1预测代码转换
三、预测代码转换效果演示

四、YOLOV1网络架构
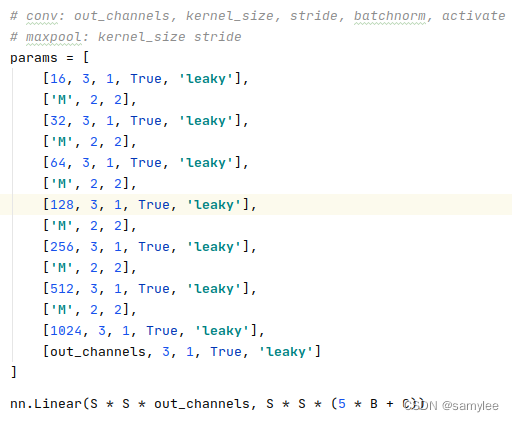
从上图可以看出yolov1-tiny的网络架构较为简单,只是采用卷积层和全连接层累加的形式,但并不能否认该网络在当时是开山之作,后面的架构都是基于该架构的思想进行创作的!其中要注意的是yolov1并不是通过anchor回归边界框,而是暴力地直接回归边框信息,所以导致边界框并不是很准。这个在后面的yolov1训练部分会进一步讲解,敬请期待。
网络输出的全连接层默认S=7,表示输出特征图的尺寸为7x7,B=2,表示输出两个矩形框(boundingbox),C=20,表示voc2007+2012的20类目标。之所以作者尝试用全连接层作为网络输出,是因为当时没想到可以用全卷积网络呗,当时的主流网络框架就是卷积+全连接,后面作者开源的YOLOV2则是用了全卷积作为网络的主干架构。输出特征如下图(非原创图,若有侵权,联系删除)所示:
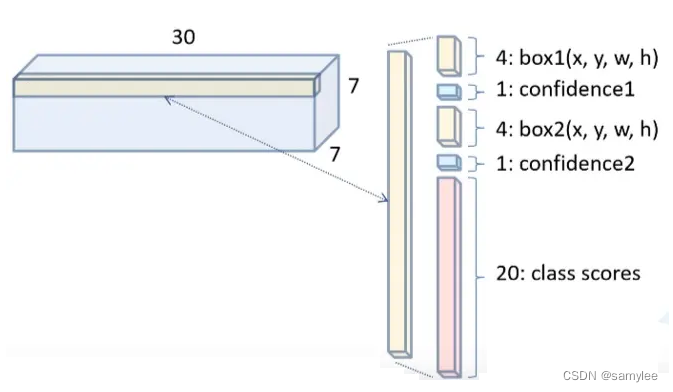
上图可以一目了然反应输出特征图表达的含义,即2个boundingbox,2个对应的有无目标概率,20个类别概率,然而confidence与class-score两者的乘积才作为类别的输出概率。需要注意yolov1全连接层的数据排序,其输出的channels=(S*S*(5*B+C))=1470,前7x7x20存储的是voc20类的概率,中间7x7x2存储的是2个矩形框的目标概率,最后7x7x2x4存储的是2个矩形框的边框信息。
五、YOLOV1网络预测转PyTorch
网络转换预测需要注意三个地方:
1、要求将yolov1-tiny网络按照其特定的网络序列复写出PyTorch的网络架构,切不可心浮气躁;
2、Darknet存储参数的序列和PyTorch稍有不同,若遇到BatchNorm架构的卷积层,Darknet会先存储BatchNorm层的参数,进而存储卷积层的参数;
3、图像数据预处理部分,yolov1-tiny网络的顺序是:BGR2RGB->Norm(1/255)->Resize,所以我们在复现的时候一定要按照该顺序进行数据预处理操作。
代码复现如下,版本PyTorch1.4,Python3.6。
detect.py
import torch
import torch.nn as nn
import cv2
import numpy as npfrom YOLOV1 import YOLOV1
from utils import load_darknet_weights, nmsdef postprocess(output, thresh, S, B, C, img_w, img_h):# to cpu numpypredictions = output.squeeze(0).data.cpu().numpy()# detection results# [xmin, ymin, xmax, ymax, score, class_id]results = np.empty((0, 4 + 1 + 1), dtype=np.float32)probs_tmp = np.empty((C), dtype=np.float32)boxes_tmp = np.empty((4), dtype=np.float32)for i in range(S * S):row = i // Scol = i % S# get objprob_index = S * S * C + i * Bobj1_prob = predictions[prob_index]obj2_prob = predictions[prob_index + 1]obj_prob_max = obj1_prob if obj1_prob > obj2_prob else obj2_probobj_prob_max_index = 0 if obj1_prob > obj2_prob else 1# get classclass_index = i * Cfor j in range(C):class_prob = obj_prob_max * predictions[class_index + j]probs_tmp[j] = class_prob if class_prob > thresh else 0if probs_tmp.max() > thresh:# get network boxesbox_index = S * S * (C + B) + (i * B + obj_prob_max_index) * 4boxes_tmp[0] = (predictions[box_index + 0] + col) / Sboxes_tmp[1] = (predictions[box_index + 1] + row) / Sboxes_tmp[2] = pow(predictions[box_index + 2], 2)boxes_tmp[3] = pow(predictions[box_index + 3], 2)# get real boxesxmin = (boxes_tmp[0] - boxes_tmp[2] / 2.) * img_wymin = (boxes_tmp[1] - boxes_tmp[3] / 2.) * img_hxmax = (boxes_tmp[0] + boxes_tmp[2] / 2.) * img_wymax = (boxes_tmp[1] + boxes_tmp[3] / 2.) * img_h# limit rectxmin = xmin if xmin > 0 else 0ymin = ymin if ymin > 0 else 0xmax = xmax if xmax < img_w else img_w - 1ymax = ymax if ymax < img_h else img_h - 1values = [xmin, ymin, xmax, ymax, probs_tmp.max(), probs_tmp.argmax()]row_values = np.expand_dims(np.array(values), axis=0)results = np.append(results, row_values, axis=0)return resultsdef preprocess(img, net_w, net_h):# img bgr2rgbimg_rgb = cv2.cvtColor(img, cv2.COLOR_BGR2RGB)# resize imgimg_resize = cv2.resize(img_rgb, (net_w, net_h))# norm imgimg_resize = torch.from_numpy(img_resize.transpose((2, 0, 1)))img_norm = img_resize.float().div(255).unsqueeze(0)return img_normif __name__ == '__main__':# load moelcheckpoint_path = 'weights/yolov1-tiny.weights'S, B, C = 7, 2, 20model = YOLOV1(S=S, B=B, C=C)load_darknet_weights(model, checkpoint_path)model.eval()# params initnet_w, net_h = 448, 448thresh = 0.2iou_thresh = 0.4classes = ['aeroplane', 'bicycle', 'bird', 'boat', 'bottle','bus', 'car', 'cat', 'chair', 'cow','diningtable', 'dog', 'horse', 'motorbike', 'person','pottedplant', 'sheep', 'sofa', 'train', 'tvmonitor']# load imgimg = cv2.imread('data/person.jpg')img_h, img_w, _ = img.shape# preprocessimg_norm = preprocess(img, net_w, net_h)# forwardoutput = model(img_norm)# postprocessresults = postprocess(output, thresh, S, B, C, img_w, img_h)# nmsresults = nms(results, iou_thresh)# showfor i in range(results.shape[0]):if results[i][4] > thresh:cv2.rectangle(img, (int(results[i][0]), int(results[i][1])), (int(results[i][2]), int(results[i][3])), (0,255,0), 2)cv2.putText(img, classes[int(results[i][5])] + '-' + str(round(results[i][4], 4)), (int(results[i][0]), int(results[i][1])), 0, 0.6, (0,255,255), 2)cv2.imwrite('demo.jpg', img)cv2.imshow('demo', img)cv2.waitKey(0)
YOLOV1.py
import torch
import torch.nn as nnclass YOLOV1(nn.Module):def __init__(self, S=7, B=2, C=20):super(YOLOV1, self).__init__()in_channels = 3out_channels = 256self.features = self.make_layers(in_channels=in_channels, out_channels=out_channels)self.fc = nn.Linear(S * S * out_channels, S * S * (5 * B + C))def forward(self, x):for feature in self.features:x = feature(x)# flattenx = x.view(x.size(0), -1)x = self.fc(x)return xdef make_layers(self, in_channels=3, out_channels=256):# conv: out_channels, kernel_size, stride, batchnorm, activate# maxpool: kernel_size strideparams = [[16, 3, 1, True, 'leaky'],['M', 2, 2],[32, 3, 1, True, 'leaky'],['M', 2, 2],[64, 3, 1, True, 'leaky'],['M', 2, 2],[128, 3, 1, True, 'leaky'],['M', 2, 2],[256, 3, 1, True, 'leaky'],['M', 2, 2],[512, 3, 1, True, 'leaky'],['M', 2, 2],[1024, 3, 1, True, 'leaky'],[out_channels, 3, 1, True, 'leaky']]module_list = nn.ModuleList()for i, v in enumerate(params):modules = nn.Sequential()if v[0] == 'M':modules.add_module(f'maxpool_{i}', nn.MaxPool2d(kernel_size=v[1], stride=v[2], padding=int((v[1] - 1) // 2)))else:modules.add_module(f'conv_{i}',nn.Conv2d(in_channels,v[0],kernel_size=v[1],stride=v[2],padding=(v[1] - 1) // 2,bias=not v[3]))if v[3]:modules.add_module(f'bn_{i}', nn.BatchNorm2d(v[0]))modules.add_module(f'act_{i}', nn.LeakyReLU(0.1) if v[4] == 'leaky' else nn.ReLU())in_channels = v[0]module_list.append(modules)return module_list
utils.py
import numpy as np
import torch
import torch.nn as nndef nms(boxes, iou_thres):x1 = boxes[:, 0]y1 = boxes[:, 1]x2 = boxes[:, 2]y2 = boxes[:, 3]scores = boxes[:, 4]areas = (x2 - x1 + 1) * (y2 - y1 + 1)keep = []index = np.argsort(scores)[::-1]while(index.size):i = index[0]keep.append(index[0])inter_x1 = np.maximum(x1[i], x1[index[1:]])inter_y1 = np.maximum(y1[i], y1[index[1:]])inter_x2 = np.minimum(x2[i], x2[index[1:]])inter_y2 = np.minimum(y2[i], y2[index[1:]])inter_area = np.maximum(inter_x2 - inter_x1 + 1, 0) * np.maximum(inter_y2 - inter_y1 + 1, 0)iou = inter_area / (areas[index[1:]] + areas[i] - inter_area)ids = np.where(iou <= iou_thres)[0]index = index[ids + 1]return boxes[keep]def load_darknet_weights(model, weights_path):# Open the weights filewith open(weights_path, 'rb') as f:# First five are header valuesheader = np.fromfile(f, dtype=np.int32, count=4)header_info = header  # Needed to write header when saving weightsseen = header[3]  # number of images seen during trainingweights = np.fromfile(f, dtype=np.float32)  # The rest are weightsweights_len = len(weights)ptr = 0# convfor module in model.features:if isinstance(module[0], nn.Conv2d):conv_layer = module[0]if isinstance(module[1], nn.BatchNorm2d):# Load BN bias, weights, running mean and running variancebn_layer = module[1]num_b = bn_layer.bias.numel()  # Number of biases# Biasbn_b = torch.from_numpy(weights[ptr: ptr + num_b]).view_as(bn_layer.bias)bn_layer.bias.data.copy_(bn_b)ptr += num_b# Weightbn_w = torch.from_numpy(weights[ptr: ptr + num_b]).view_as(bn_layer.weight)bn_layer.weight.data.copy_(bn_w)ptr += num_b# Running Meanbn_rm = torch.from_numpy(weights[ptr: ptr + num_b]).view_as(bn_layer.running_mean)bn_layer.running_mean.data.copy_(bn_rm)ptr += num_b# Running Varbn_rv = torch.from_numpy(weights[ptr: ptr + num_b]).view_as(bn_layer.running_var)bn_layer.running_var.data.copy_(bn_rv)ptr += num_belse:# Load conv. biasnum_b = conv_layer.bias.numel()conv_b = torch.from_numpy(weights[ptr: ptr + num_b]).view_as(conv_layer.bias)conv_layer.bias.data.copy_(conv_b)ptr += num_b# Load conv. weightsnum_w = conv_layer.weight.numel()conv_w = torch.from_numpy(weights[ptr: ptr + num_w]).view_as(conv_layer.weight)conv_layer.weight.data.copy_(conv_w)ptr += num_w# fcfc_layer = model.fc# biasnum_b = fc_layer.bias.numel()fc_b = torch.from_numpy(weights[ptr: ptr + num_b]).view_as(fc_layer.bias)fc_layer.bias.data.copy_(fc_b)ptr += num_b# weightsnum_w = fc_layer.weight.numel()fc_w = torch.from_numpy(weights[ptr: ptr + num_w]).view_as(fc_layer.weight)fc_layer.weight.data.copy_(fc_w)ptr += num_wassert weights_len == ptr, 'darknet_weights\'s length dont match pytorch_weights\'s length'
六、写在后面
小伙伴们若能坚持完成YOLO系列的代码和原理学习,相信能对图像检测任务有个全新的认识,跟随博主的脚步,培养自己的动手能力吧!希望博主也能坚持将该系列做下去,一起加油!!!
七、参考
YOLO: Real-Time Object Detection
GitHub - samylee/YOLOV1_PyTorch