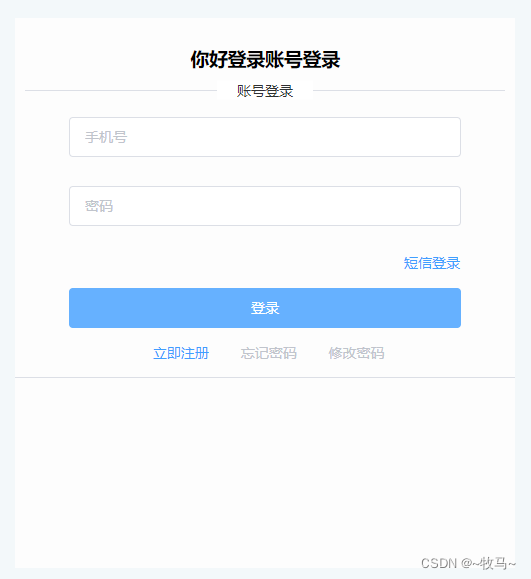
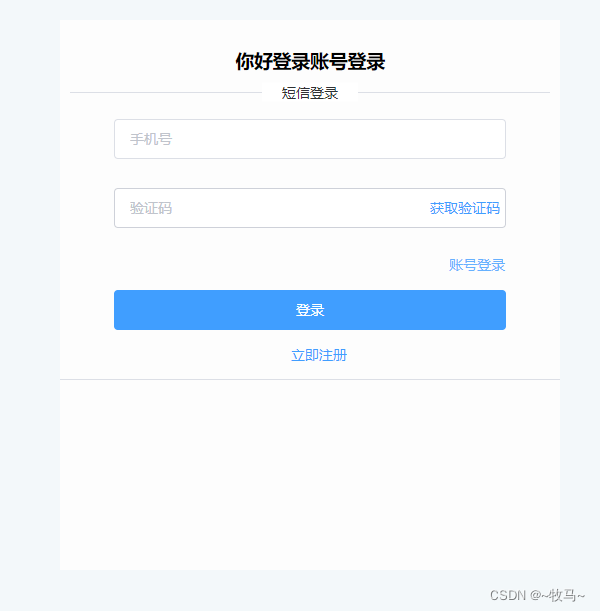
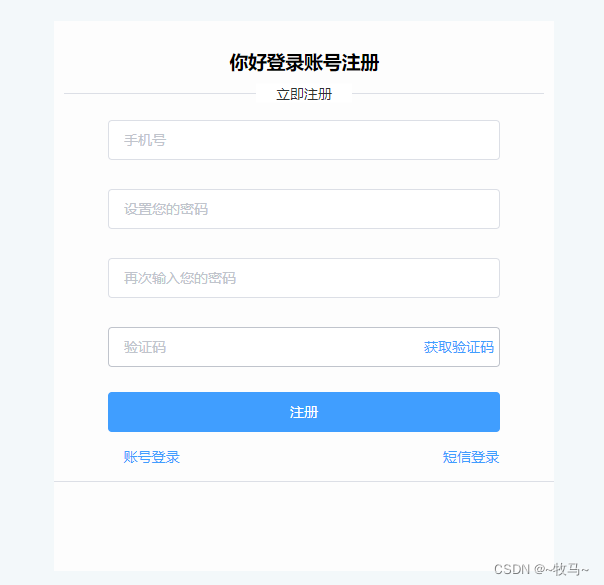
<template><div class="loginhome"><Header :butShow="butShow"></Header><div class="formdiv"><div style="text-align:center;padding:10px;"><h3>你好登录账号{{ stauts == 3? '注册':'登录' }}</h3><el-divider>{{ stauts == 1 ?'账号登录':stauts == 2 ?'短信登录':stauts == 3 ?'立即注册':'--' }}</el-divider></div><el-form :model="Form"><!-- 账号密码登录 --><template v-if="stauts == 1"><table class="table" cellspacing="3"><tr><td colspan="5"><el-form-item prop="phone" :rules="[{ required: true, message: '输入手机号', trigger: 'blur' },{type:'phone', max: 12, message: '输入正确的11位手机号', trigger: 'blur'}]"><el-input type="phone" placeholder="手机号" maxlength="11" v-model="Form.phone"></el-input></el-form-item></td></tr><tr><td colspan="5"><el-form-item prop="password" :rules="[{ required: true, message: '输入密码', trigger: 'blur' },{min:8, max: 20, message: '输入8~20位', trigger: 'blur'}]"><el-input :type="eyeshow ? 'text':'password'" maxlength="20" placeholder="密码" v-model="Form.password" show-password><!-- <el-button slot="suffix" type="text"><i  :class="eyeshow ? 'el-icon-key':'el-icon-unlock'" @click="iClick"></i></el-button> --></el-input></el-form-item></td></tr><tr><td></td><td colspan="3"></td><td><el-button type="text" @click="stauts = 2">短信登录</el-button></td></tr><tr><td colspan="5"><el-button style="width:100%;" type="primary" @click="CodeLoginClick()">登录</el-button></td></tr><tr><td class="table_td"></td><td class="table_td"><el-button type="text" @click="stauts = 3; eyeshow = false;">立即注册</el-button></td><td class="table_td"><el-button type="text" :disabled="true">忘记密码</el-button></td><td class="table_td"><el-button type="text" :disabled="true">修改密码</el-button></td><td class="table_td"></td></tr></table></template><!-- 短信验证码登录 --><template v-else-if="stauts == 2"><table class="table" cellspacing="3"><tr><td colspan="5"><el-form-item prop="telephone" :rules="[{ required: true, message: '输入手机号', trigger: 'blur' },{type:'number', max: 11, message: '输入正确的11位手机号', trigger: 'blur'}]"><el-input type="text" placeholder="手机号" v-model="Form.telephone"></el-input></el-form-item></td></tr><tr><td colspan="5"><el-form-item prop="code" :rules="[{ required: true, message: '输入验证码', trigger: 'blur' },{type:'number',  message: '请输入正确的', trigger: 'blur'}]"><el-input :type="eyeshow ? 'text':'password'" placeholder="验证码" v-model="Form.code"><el-button slot="suffix" type="text" @click="iClick">获取验证码</el-button></el-input></el-form-item></td></tr><tr><td></td><td colspan="3"></td><td><el-button type="text" @click="stauts = 1">账号登录</el-button></td></tr><tr><td colspan="5"><el-button style="width:100%;" type="primary">登录</el-button></td></tr><tr><td class="table_td"></td><td class="table_td"></td><td class="table_td"><el-button type="text" @click="stauts = 3; eyeshow = false;">立即注册</el-button></td><td class="table_td"></td><td class="table_td"></td></tr></table></template><!-- 立即注册 --><template v-else-if="stauts == 3"><table class="table" cellspacing="3"><tr><td colspan="5"><el-form-item prop="register_telephone" :rules="[{ required: true, message: '输入手机号', trigger: 'blur' },{type:'number', max: 11, message: '输入正确的11位手机号', trigger: 'blur'}]"><el-input type="text" placeholder="手机号" v-model="Form.register_telephone"></el-input></el-form-item></td></tr><tr><td colspan="5"><el-form-item prop="register_password" :rules="[{ required: true, message: '设置密码', trigger: 'blur' },{min:8, max: 11, message: '输入8~11位', trigger: 'blur'}]"><el-input :type="eyeshow ? 'text':'password'" placeholder="设置您的密码" v-model="Form.register_password" show-password><!-- <el-button slot="suffix" type="text"><i  :class="eyeshow ? 'el-icon-key':'el-icon-unlock'" @click="iClick"></i></el-button> --></el-input></el-form-item></td></tr><tr><td colspan="5"><el-form-item prop="register_again_password" :rules="[{ required: true, message: '输入密码', trigger: 'blur' },{min:8, max: 11, message: '请输入8~11位', trigger: 'blur'}]"><el-input :type="eyeshow ? 'text':'password'" placeholder="再次输入您的密码" v-model="Form.register_again_password" show-password><!-- <el-button slot="suffix" type="text"><i  :class="eyeshow ? 'el-icon-key':'el-icon-unlock'" @click="iClick"></i></el-button> --></el-input></el-form-item></td></tr><tr><td colspan="5"><el-form-item prop="register_code" :rules="[{ required: true, message: '输入验证码', trigger: 'blur' },{ type:'number',min:6, max: 6, message: '输入完整的验证码', trigger: 'change'}]"><el-input type="text" placeholder="验证码" v-model="Form.register_code"><el-button slot="suffix" type="text" @click="SendCodeClick">获取验证码</el-button></el-input></el-form-item></td></tr><tr><td></td><td colspan="3"></td><td></td></tr><tr><td colspan="5"><el-button style="width:100%;margin-top:3px;" type="primary">注册</el-button></td></tr><tr><td class="table_td"><el-button type="text" @click="stauts = 1; eyeshow = false;">账号登录</el-button></td><td class="table_td"></td><td class="table_td"></td><td class="table_td"></td><td class="table_td"><el-button type="text" @click="stauts = 2">短信登录</el-button></td></tr></table></template></el-form><el-divider></el-divider></div></div>
</template>
<script>
import Header from '@/components/header.vue'
export default {components: {Header},data() {return {stauts: 1,  // 模式butShow: 1,eyeshow: false,againPassword_message: '',Form: {phone: '', password: '',  // 账号登录telephone: '',  code: '',  // 短信登录register_password: '', register_again_password: '', register_telephone:'', register_code:'',  // 立即注册},}},methods: {iClick() {console.log(this.eyeshow);this.eyeshow = !this.eyeshow},// 获取验证码SendCodeClick() {console.log('获取验证码');},//  账号登录CodeLoginClick() {if (this.Form.phone =='17602931841' &&  this.Form.password == '17602931841') {this.$notify.success('登录成功')setTimeout(() => {this.$router.push('/fristhome')},1000)} else {this.$notify.warning('账号或密码错误!!')}}}
}
</script>
<style scoped>
.loginhome { width: 100%;height: calc(100vh); background-color: rgb(243, 248, 250); }
.formdiv { width: 500px; height: 550px; background-color: rgb(253, 253, 253); position: relative; top: 5%; left: calc((100vw - 500px) / 2); }
#i { position: relative; top: 0; right: 0; }
.table { width:80%;margin:0 10%;text-align:center; }
.table_td { width: 25%; }
.input_btu { position: relative; top: 0; right: 0; }
#suffix { position: absolute; top: 0; right: 0; color: red; }
.show-pwd {position: absolute;right: 10px;top: 7px;font-size: 16px;color: red;cursor: pointer;user-select: none;}
</style>
<style>
.table .el-form-item__error {color: #F56C6C;font-size: 12px;line-height: -1;padding-top: 4px;position: absolute;top: 100%;left: 0;
}
.table .el-form-item {margin-bottom: 0px;
}
</style>


![Java IO流(五)Netty实战[TCP|Http|心跳检测|Websocket]](https://img-blog.csdnimg.cn/3785951d86a845319206115b3fecc033.png)