目录
1 docker镜像下载
2 SDK下载
3 下载sophon-demo
4 修改docker镜像的脚本
5 创建个文件夹
6.source
7.转模型
1 docker镜像下载
可以在dockerhub看到镜像的相关信息
https://hub.docker.com/r/sophgo/tpuc_dev/tags
 用下面的命令下载
docker pull sophgo/tpuc_dev:latest如果上面的命令太慢,那去算能官网下载另一个版本的docker镜像,
technical center
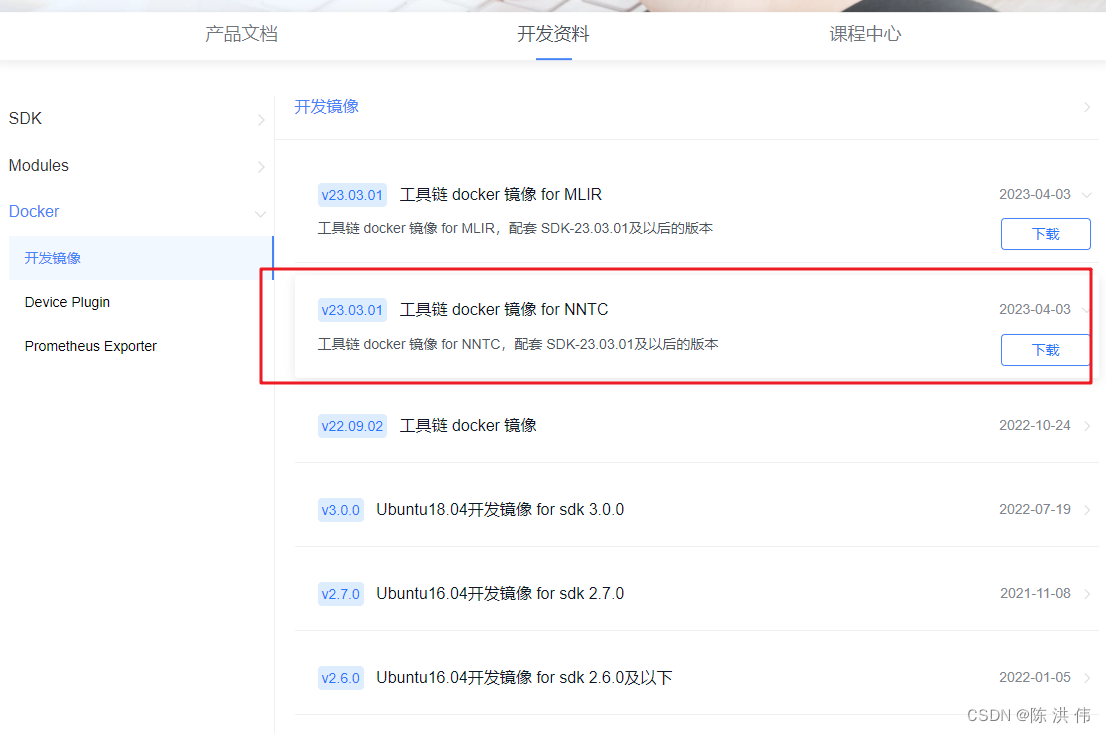
下载完之后是:

然后执行下下面的命令load镜像
docker load -i sophgo-tpuc_dev-v2.1-82d75f5c633d.tar
475a54c2a93d: Loading layer [==================================================>]  65.52MB/65.52MB
c5cf9c6d3cf4: Loading layer [==================================================>]  5.647GB/5.647GB
0cdbfbd3d3f4: Loading layer [==================================================>]  739.4MB/739.4MB
7d7b0448f25b: Loading layer [==================================================>]  1.536kB/1.536kB
Loaded image: sophgo/tpuc_dev:v2.1
注意这里的sophgo/tpuc_dev:v2.1,后面脚本中会用到。
2 SDK下载
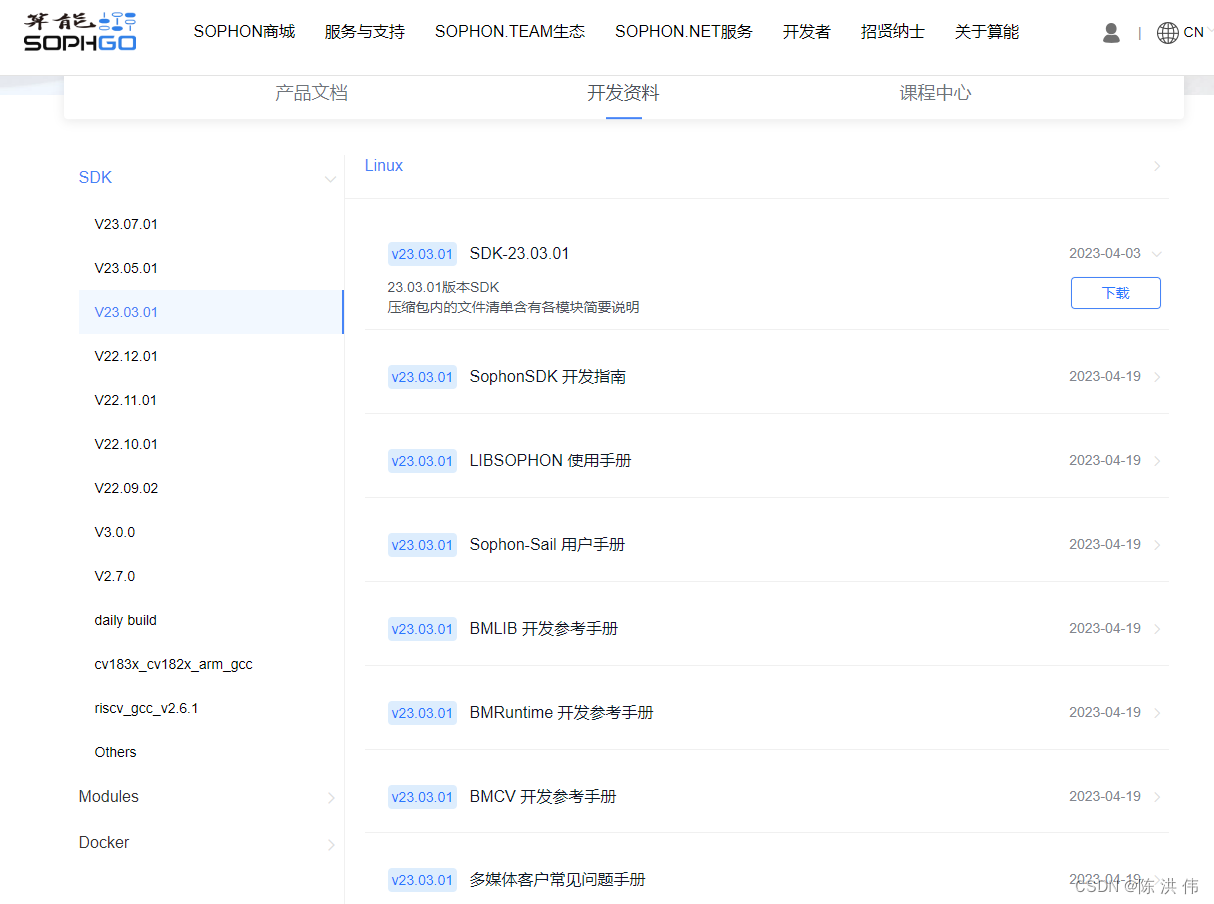
technical center
去下载23.03.01,模型转换不需要SDK,但是需要里面的nntc。
3 下载sophon-demo
https://github.com/sophgo/sophon-demo
去上面的网址下载sophon-demo,这里面有转换脚本。
4 修改docker镜像的脚本
docker_run_sophonsdk.sh,
#!/bin/basharch=$(uname -m)
x86="x86"
arm="aarch64"REPO="sophgo"
IMAGE="sophonsdk3"
TAG=${1:-ubuntu18.04-py37-dev-22.06}if [ x$(echo ${arch} | grep ${x86}) != x"" ]; thenecho "running on: ${arch}"
elif [[ $(echo ${arch} | grep ${arm}) != "" ]]; thenecho "${arch} not support yet"
elseecho "${arch} not support yet"exit 1
fiDIR="$( cd "$( dirname "${BASH_SOURCE[0]}" )" && pwd )"
WORKSPACE=$PWD
echo "Current   Directory: $DIR"
echo "Workspace Directory: $WORKSPACE"
echo "Docker             : $REPO/$IMAGE:$TAG"if [ -c "/dev/bm-sophon0" ]; thenfor dev in $(ls /dev/bm-sophon*);domount_options+="--device="$dev:$dev" "doneCMD="docker run \--network=host \--workdir=/workspace \--privileged=true \${mount_options} \--device=/dev/bmdev-ctl:/dev/bmdev-ctl \-v /dev/shm --tmpfs /dev/shm:exec \-v $WORKSPACE:/workspace \-v /dev:/dev \-v /etc/localtime:/etc/localtime \-e LOCAL_USER_ID=`id -u` \-itd $REPO/$IMAGE:$TAG \bash"
elseCMD="docker run \--network=host \--workdir=/workspace \--privileged=true \-v $WORKSPACE:/workspace \-v /dev/shm --tmpfs /dev/shm:exec \-v /etc/localtime:/etc/localtime \-e LOCAL_USER_ID=`id -u` \-itd $REPO/$IMAGE:$TAG \bash"
fiecho "creating docker container from image: $REPO/$IMAGE:$TAG"
echo $CMD
container_sha=`eval $CMD`
container_id=${container_sha:0:12}
CMD="docker exec -it ${container_id} bash"echo "container_id: $container_id"
[[ ! -z "$container_id" ]] && eval $CMD || echo "failed to create container!"
由于我们换了新的镜像,所以修改里面docker镜像的REPO,IMAGE,TAG为下面的形式,其他内容暂时不修改。
REPO="sophgo"
IMAGE="tpuc_dev"
TAG="v2.1"
5 创建个文件夹
这里我创建了一个convert_model文件夹,然后把demo,nntc都放到里面,如下图所示

docker_run_sophonsdk.sh在前面已经修改过了,然后我直接运行脚本把镜像起来。
./docker_run_sophonsdk.sh6.source
source下环境变量
在/workspace/tpu-nntc/tpu-nntc_v3.1.7-b267d3cd-230327/scripts有个envsetup.sh脚本
source envsetup.sh7.转模型
然后具体的转换模型脚本在sophon-demo-release/sample/YOLOv5/scripts这里面有,
模型要用jit之后的模型,具体方法在老方法里面有:https://github.com/sophon-ai-algo/examples/tree/3.0.0/simple/yolov5
我们修改一下gen_int8bmodel_nntc.sh脚本,修改其中的校准图片的路径还有模型文件的路径和名字。修改后如下
#!/bin/bash
model_dir=$(dirname $(readlink -f "$0"))if [ ! $1 ]; thenecho "Please set the target chip. Option: BM1684 and BM1684X"exit
elsetarget=$1
fioutdir=../models/$targetfunction auto_cali()
{python3 -m ufw.cali.cali_model  \--net_name=yolov5s  \--model=../build/640_edge_compute_best_20230821.torch.pt  \--cali_image_path=../calib  \--cali_iterations=128   \--cali_image_preprocess='resize_h=640,resize_w=640;scale=0.003921569,bgr2rgb=True'   \--input_shapes="[1,3,640,640]"  \--target=$target   \--convert_bmodel_cmd_opt="-opt=1"   \--try_cali_accuracy_opt="-fpfwd_outputs=< 24 >86,< 24 >55,< 24 >18;-th_method=MAX"mv ../models/torch/yolov5s_batch1/compilation.bmodel $outdir/yolov5s_v6.1_3output_int8_1b.bmodel
}function gen_int8bmodel()
{bmnetu --model=../models/torch/yolov5s_bmnetp_deploy_int8_unique_top.prototxt  \--weight=../models/torch/yolov5s_bmnetp.int8umodel \-net_name=yolov5s \--shapes=[$1,3,640,640] \-target=$target \-opt=1mv compilation/compilation.bmodel $outdir/yolov5s_v6.1_3output_int8_$1b.bmodel
}pushd $model_dir
if [ ! -d $outdir ]; thenmkdir -p $outdir
fi
# batch_size=1
auto_cali
# batch_size=4
gen_int8bmodel 4popd
然后执行
./gen_int8bmodel_nntc.sh BM1684报错:
bad layer name: < 24 >55 !!!
*** Check failure stack trace: ***
./gen_int8bmodel_nntc.sh: line 14:  2971 Aborted                 (core dumped) python3 -m ufw.cali.cali_model --net_name=yolov5s --model=../build/640_edge_compute_best_20230821.torch.pt --cali_image_path=../calib --cali_iterations=128 --cali_image_preprocess='resize_h=640,resize_w=640;scale=0.003921569,bgr2rgb=True' --input_shapes="[1,3,640,640]" --target=$target --convert_bmodel_cmd_opt="-opt=1" --try_cali_accuracy_opt="-fpfwd_outputs=< 24 >86,< 24 >55,< 24 >18;-th_method=MAX"
mv: cannot stat '../models/torch/yolov5s_batch1/compilation.bmodel': No such file or directory
然后可以看到脚本里面24行那里的outputs的名字,
这是因为层的名字不对,我看我自己的onnx模型,

然后把脚本里面的层名字改一下,修改后的脚本如下,gen_int8bmodel那个函数没有调用,不需要
#!/bin/bash
model_dir=$(dirname $(readlink -f "$0"))if [ ! $1 ]; thenecho "Please set the target chip. Option: BM1684 and BM1684X"exit
elsetarget=$1
fioutdir=../models/$targetfunction auto_cali()
{python3 -m ufw.cali.cali_model  \--net_name=yolov5s  \--model=../build/edge_compute_best_20230821.onnx  \--cali_image_path=../calib  \--cali_iterations=150   \--cali_image_preprocess='resize_h=640,resize_w=640;scale=0.003921569,bgr2rgb=True'   \--input_shapes="[1,3,640,640]"  \--target=$target   \--convert_bmodel_cmd_opt="-opt=1"   \--try_cali_accuracy_opt="-fpfwd_outputs=326,378,430;-th_method=MAX"#mv ../models/torch/yolov5s_batch1/compilation.bmodel $outdir/yolov5s_v6.1_3output_int8_1b.bmodel
}function gen_int8bmodel()
{bmnetu --model=../models/torch/yolov5s_bmnetp_deploy_int8_unique_top.prototxt  \--weight=../models/torch/yolov5s_bmnetp.int8umodel \-net_name=yolov5s \--shapes=[$1,3,640,640] \-target=$target \-opt=1mv compilation/compilation.bmodel $outdir/yolov5s_v6.1_3output_int8_$1b.bmodel
}pushd $model_dir
if [ ! -d $outdir ]; thenmkdir -p $outdir
fi
# batch_size=1
auto_cali
# batch_size=4
#gen_int8bmodel 4popd
然后会生成模型

======================================================================
以后转模型用上面介绍的新方法,下面的方法是之前的老的方法,现在新方法教程在:https://github.com/sophgo/sophon-demo
https://github.com/sophgo/sophon-demo/blob/release/docs/Environment_Install_Guide.md#1-tpu-mlir%E7%8E%AF%E5%A2%83%E6%90%AD%E5%BB%BA
并且docker镜像下载新的,然后SDK可以先用之前用的3.0然后只把SDK里面的nntc替换成新的,然后转换demo用新的网址。
以下网址弃用。
https://github.com/sophon-ai-algo/examples/tree/cc94f7c06da1c645ec193e40537915d40f94e005/simple/yolov5
按照以上网址的说明进行算法模型转换,
1.首先要下载SDK包和镜像包
SDK软件包下载:
-
开发docker基础镜像:点击前往官网下载Ubuntu开发镜像,请选择与SDK版本适配的docker镜像 -
SDK软件包:点击前往官网下载SDK软件包,请选择与仓库代码分支对应的SDK版本
2 创建docker开发环境
-
安装工具sudo apt update sudo apt install unzip -
加载docker镜像:unzip <docker_image_file>.zip cd <docker_image_file> docker load -i <docker_image> -
解压缩SDK:unzip <sdk_zip_file>.zip cd <sdk_zip_file>/ tar zxvf <sdk_file>.tar.gz -
创建docker容器,SDK将被挂载映射到容器内部供使用:cd <sdk_path>/ # 若您没有执行前述关于docker命令免root执行的配置操作,需在命令前添加sudo ./docker_run_<***>sdk.sh -
进入docker容器中安装库:# 进入容器中执行 cd /workspace/scripts/ ./install_lib.sh nntc -
设置环境变量-[无PCIe加速卡]:# 配置环境变量,这一步会安装一些依赖库,并导出环境变量到当前终端 # 导出的环境变量只对当前终端有效,每次进入容器都需要重新执行一遍,或者可以将这些环境变量写入~/.bashrc,这样每次登录将会自动设置环境变量 source envsetup_cmodel.sh -
设置环境变量-[有PCIe加速卡]:# 配置环境变量,这一步会安装一些依赖库,并导出环境变量到当前终端 # 导出的环境变量只对当前终端有效,每次进入容器都需要重新执行一遍,或者可以将这些环境变量写入~/.bashrc,这样每次登录将会自动设置环境变量 source envsetup_pcie.sh -
安装python对应版本的sail包# the wheel package is in the SophonSDK: pip3 uninstall -y sophon # get your python version python3 -V # choose the same verion of sophon wheel to install # the following py3x maybe py35, py36, py37 or py38 # for x86 pip3 install ../lib/sail/python3/pcie/py3x/sophon-?.?.?-py3-none-any.whl --user
3 模型准备
这个需要注意的是,在我们导出算法模型时,需要增加相关的trace代码
SophonSDK中的PyTorch模型编译工具BMNETP只接受PyTorch的JIT模型(TorchScript模型)。
JIT(Just-In-Time)是一组编译工具,用于弥合PyTorch研究与生产之间的差距。它允许创建可以在不依赖Python解释器的情况下运行的模型,并且可以更积极地进行优化。在已有PyTorch的Python模型(基类为torch.nn.Module)的情况下,通过torch.jit.trace就可以得到JIT模型,如torch.jit.trace(python_model, torch.rand(input_shape)).save('jit_model')。BMNETP暂时不支持带有控制流操作(如if语句或循环)的JIT模型,因此不能使用torch.jit.script,而要使用torch.jit.trace,它仅跟踪和记录张量上的操作,不会记录任何控制流操作。这部分操作yolov5已经为我们写好,只需运行如下命令即可导出符合要求的JIT模型:
4 模型转换
这个直接运行脚本进行转换即可,32位的模型和int8的模型分别都有不同的脚本。
8. 各框架模型转ONNX参考 — TPU-MLIR 1.1 文档
https://github.com/sophgo/sophon-demo






![[QT]设置程序仅打开一个,再打开就唤醒已打开程序的窗口](https://img-blog.csdnimg.cn/8e3c0d6e8cdb4c55a80a3fe2ef116a80.gif)
