文章目录
- 1. 概念
- 1.1 SpringBoot快速入门
- 1.2 SpringBoot和Spring对比
- 1.3 pom文件坐标介绍
- 1.4 引导类
- 1.5 修改配置
- 1.6 读取配置
- 1.6.1 读取配置信息
- 1.6.2 读取配置信息并创建类进行封装
- 1.7 整合第三方技术
- 1.7.1 整合JUnit
- 1.7.1 整合Mybatis
- 1.7.1 整合Mybatis-Plus
- 1.7.1 整合Druid
- 2.数据层
- 2.1 SSMP整合-基础数据库CRUD
- 2.2 调试日志
- 2.3 分页
- 2.4 条件查询
- 3.业务层
- 3.1 业务层定义
- 3.2 业务层快速开发
- 4. 表现层
- 4.1 表现层定义
- 4.2 消息一致性处理
- 4.3 前后端联调
- 4.4 页面列表数据展示
- 4.5 列表操作
1. 概念
SpringBoot是一个
用于快速构建基于Spring框架的Java应用程序的开源框架。
简化了Spring应用程序的配置和部署过程;- 提供了
约定大于配置的原则,使得开发者能够更加专注于业务逻辑的实现。
/Spring Boot 并不是对 Spring 功能上的增强,而是提供了一种快速使用 Spring 的方式。
Spring存在的问题:
- 配置繁琐:然Spring的组件代码是轻量级的,但它的配置却是重量级。
- 依赖繁琐:项目的依赖管理也是一件耗时耗力的事情;
SpringBoot功能
- 自动配置
Spring Boot根据应用程序的依赖关系和类路径上的库,自动配置应用程序的各个组件,包括数据库连接、Web开发、安全性等。这样可以减少手动配置的工作量,提高开发效率。- 起步依赖
Spring Boot提供了一系列的Starter依赖,通过引入这些依赖,可以快速集成常用的技术栈和框架,如Spring MVC、Spring Data、JPA、Thymeleaf等。Starter依赖简化了依赖管理和版本控制的工作。- 嵌入式容器
Spring Boot集成了一些常用的嵌入式Servlet容器(如Tomcat、Jetty),可以将应用程序打包成可执行的JAR文件或WAR文件,方便部署和运行,不需要额外安装独立的Web服务器。
4.配置管理
Spring Boot支持多种配置文件格式,如properties、YAML等,可以方便地管理应用程序的配置信息。它还提供了属性绑定和配置注解等特性,简化了配置的读取和使用。
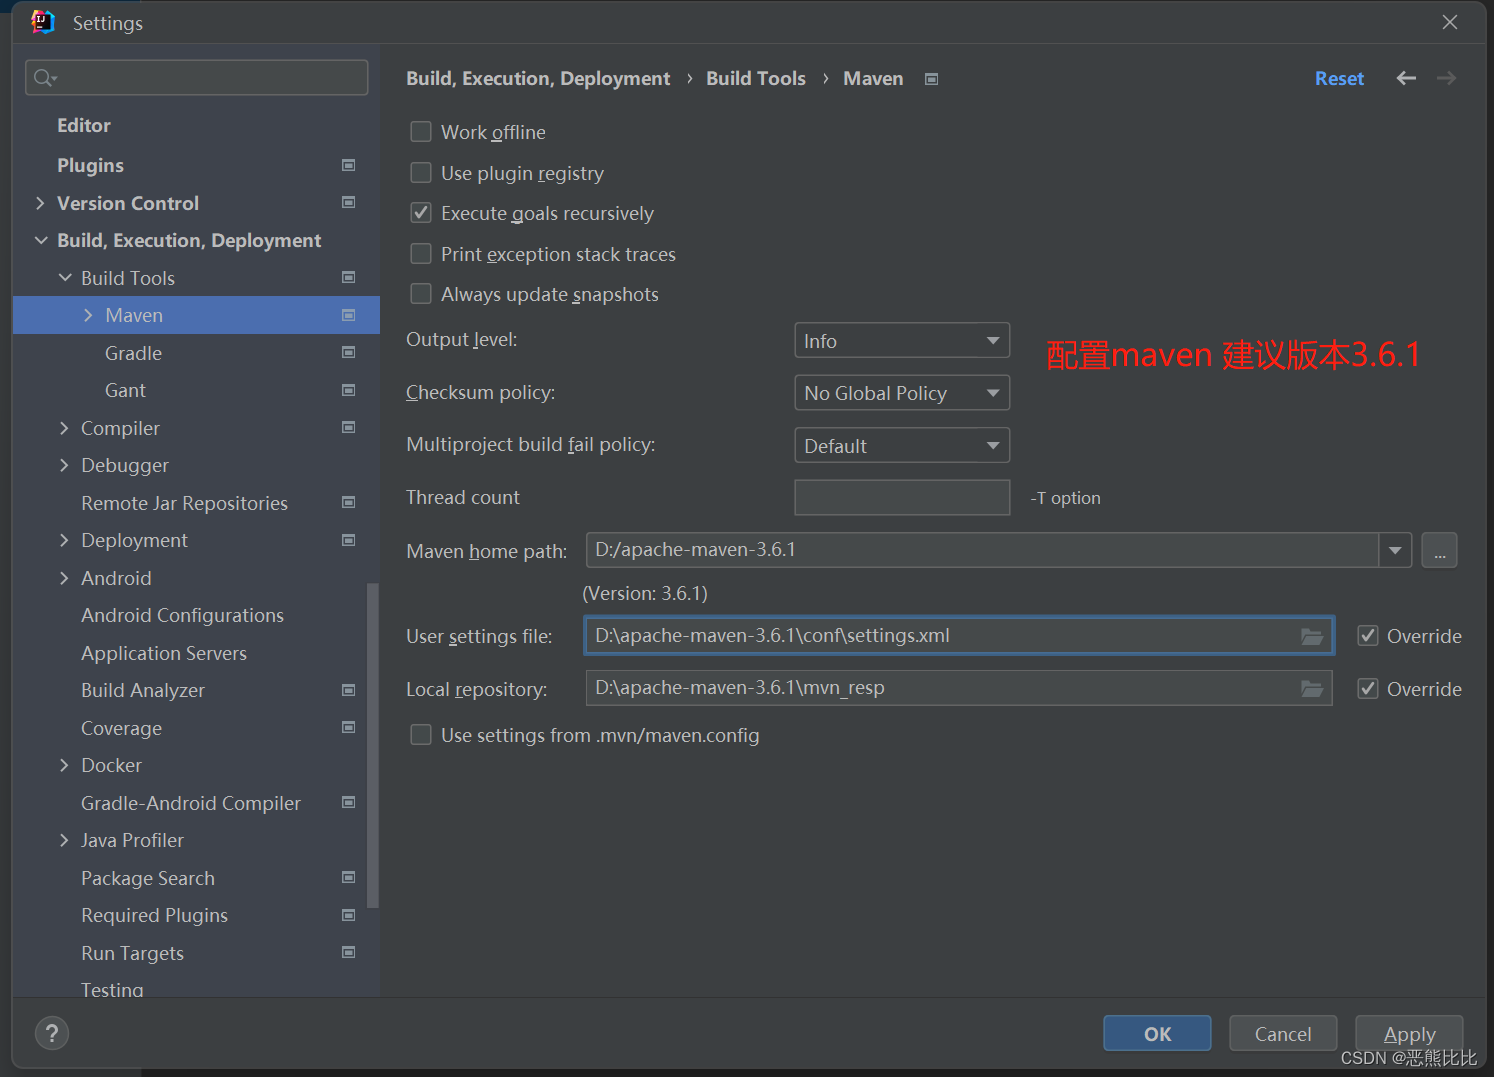
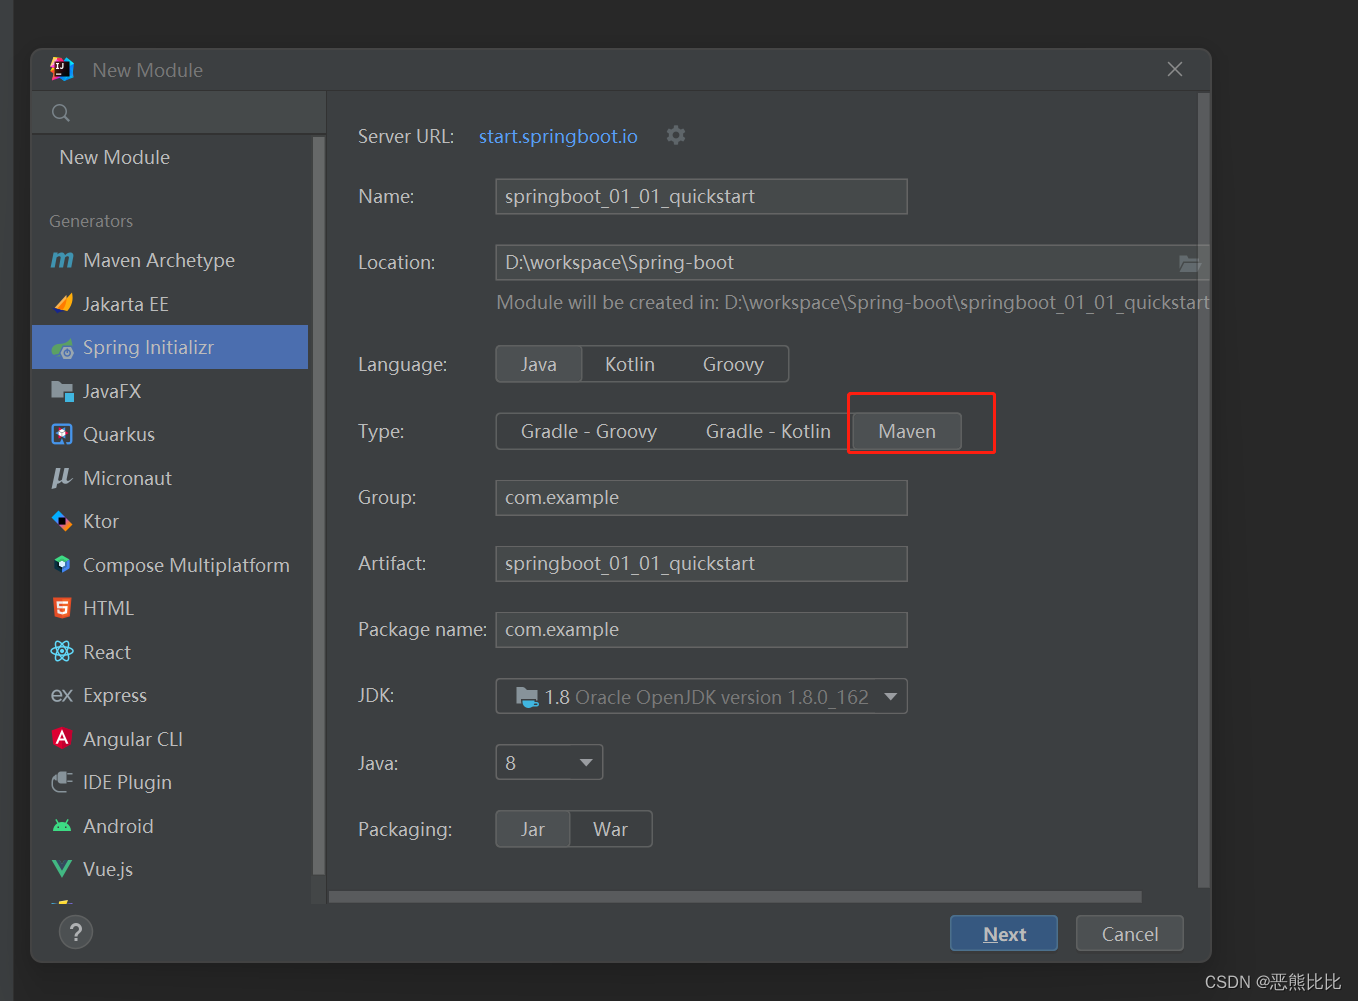
1.1 SpringBoot快速入门
视频:https://www.bilibili.com/video/BV15b4y1a7yG
实现步骤
① 创建Maven项目
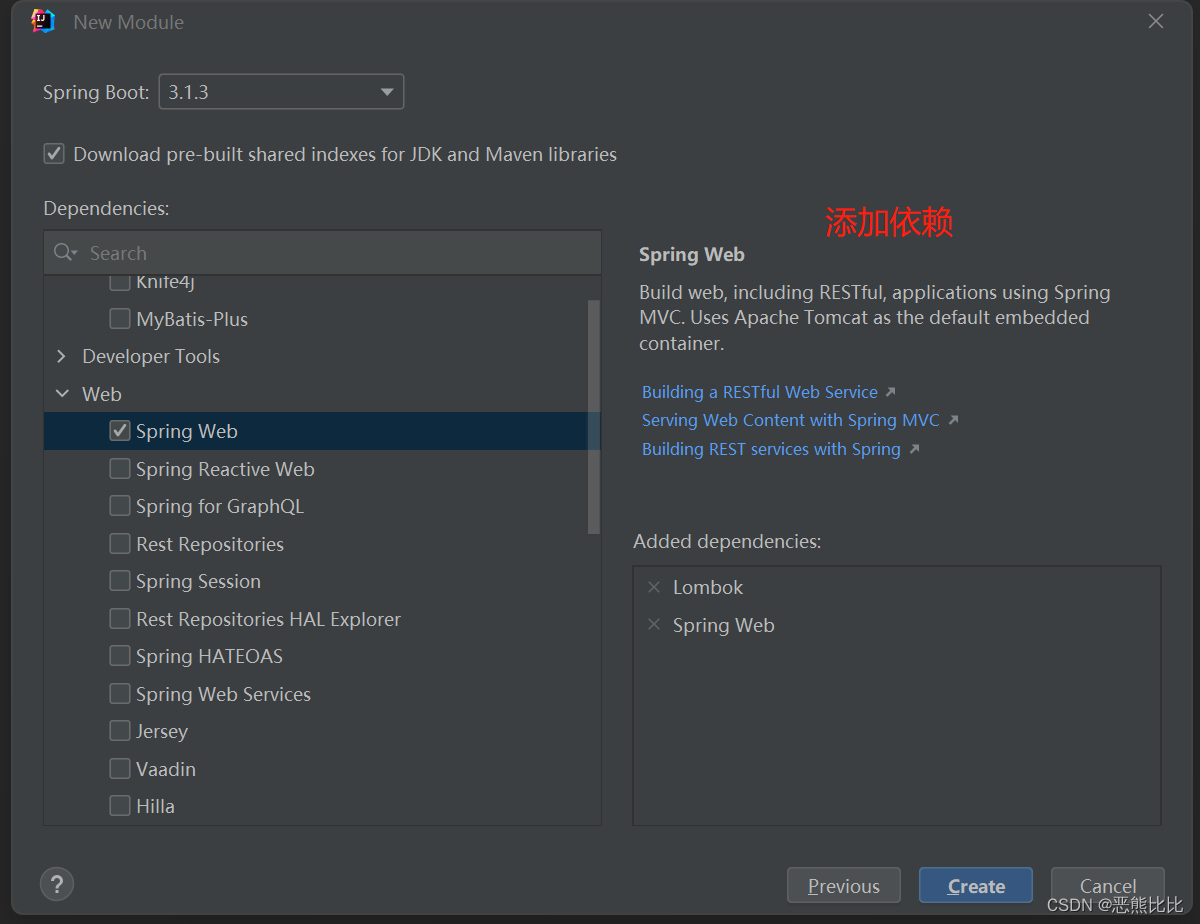
② 导入SpringBoot起步依赖
③ 定义Controller
④ 编写引导类
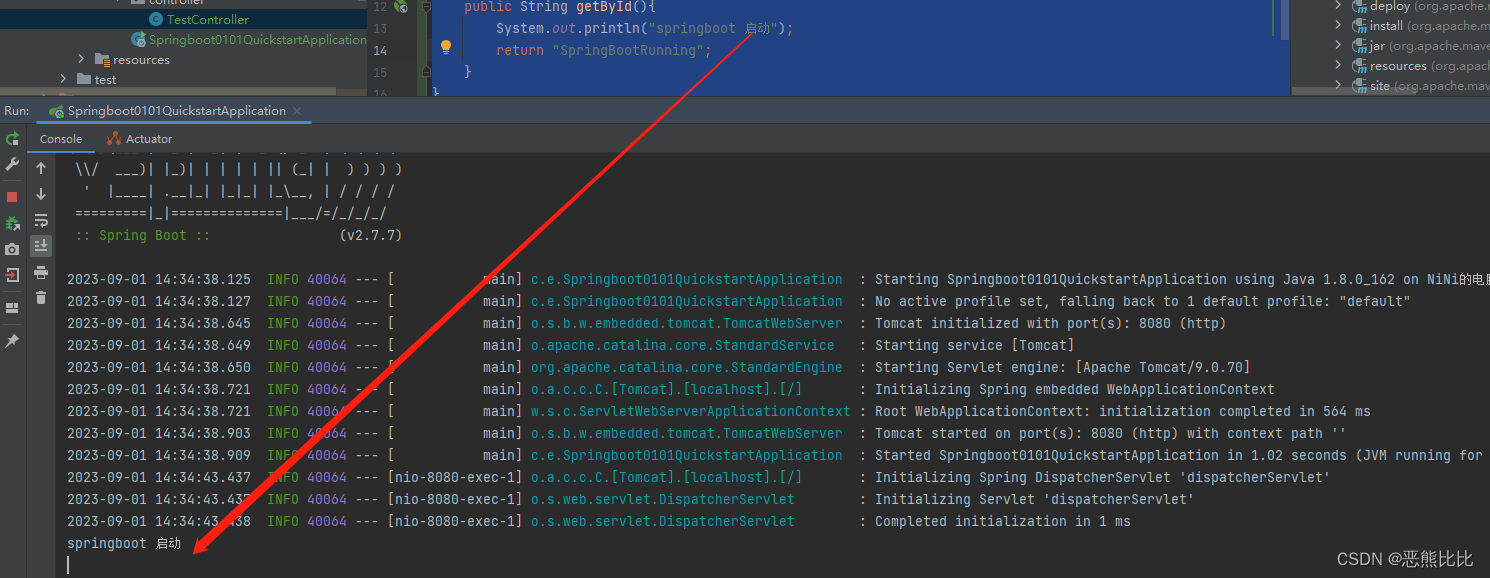
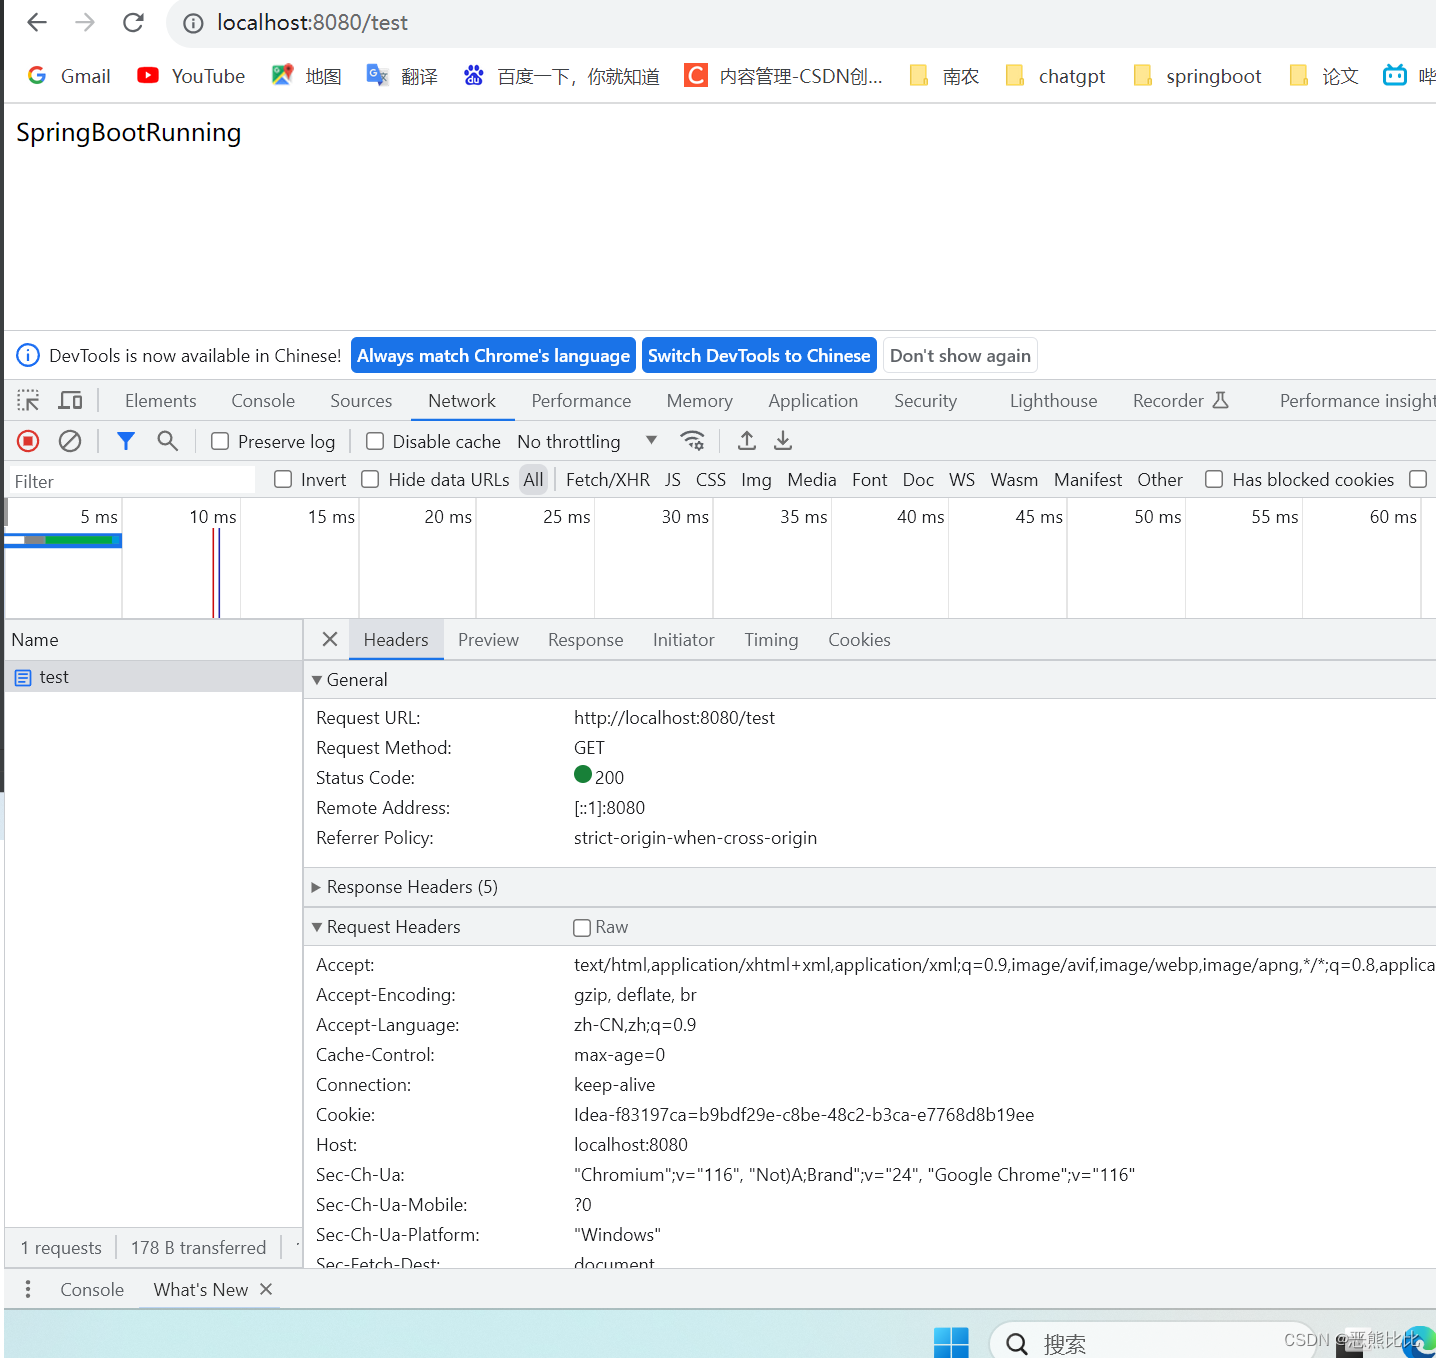
⑤ 启动测试
<?xml version="1.0" encoding="UTF-8"?>
<project xmlns="http://maven.apache.org/POM/4.0.0" xmlns:xsi="http://www.w3.org/2001/XMLSchema-instance"xsi:schemaLocation="http://maven.apache.org/POM/4.0.0 https://maven.apache.org/xsd/maven-4.0.0.xsd"><modelVersion>4.0.0</modelVersion><parent><groupId>org.springframework.boot</groupId><artifactId>spring-boot-starter-parent</artifactId>
<!--		<version>3.1.3</version>--><version>2.7.7</version><relativePath/> <!-- lookup parent from repository --></parent><!-- Generated by https://start.springboot.io --><!-- 优质的 spring/boot/data/security/cloud 框架中文文档尽在 => https://springdoc.cn --><groupId>com.example</groupId><artifactId>springboot_01_01_quickstart</artifactId><version>0.0.1-SNAPSHOT</version><name>springboot_01_01_quickstart</name><description>springboot_01_01_quickstart</description><properties><java.version>1.8</java.version></properties><dependencies><dependency><groupId>org.springframework.boot</groupId><artifactId>spring-boot-starter-web</artifactId><version>2.7.3</version></dependency><dependency><groupId>org.projectlombok</groupId><artifactId>lombok</artifactId><optional>true</optional></dependency><dependency><groupId>org.springframework.boot</groupId><artifactId>spring-boot-starter-test</artifactId><scope>test</scope></dependency></dependencies><build><plugins><plugin><groupId>org.springframework.boot</groupId><artifactId>spring-boot-maven-plugin</artifactId><configuration><excludes><exclude><groupId>org.projectlombok</groupId><artifactId>lombok</artifactId></exclude></excludes></configuration></plugin></plugins></build></project>
创建controller类
package com.example.controller;import org.springframework.web.bind.annotation.GetMapping;
import org.springframework.web.bind.annotation.RequestMapping;
import org.springframework.web.bind.annotation.RestController;@RestController
@RequestMapping("/test")
public class TestController {@GetMappingpublic String getById(){System.out.println("springboot 启动");return "SpringBootRunning";}
}
启用quickstart测试
1.2 SpringBoot和Spring对比
| 类/配置文件 | Spring | SpringBoot |
|---|---|---|
| pom文件坐标 | 手工 | 勾选添加 |
| web3.0配置类 | 手工 | 无 |
| 配置类 | 手工 | 无 |
| 控制器 | 手工 | 手工 |
1.3 pom文件坐标介绍
spring-boot-starter-parent坐标
<parent><groupId>org.springframework.boot</groupId><artifactId>spring-boot-starter-parent</artifactId><version>2.7.7</version><relativePath/></parent>
介绍
- spring-boot-starter-parent是一个Spring Boot的父POM(开发SpringBoot程序需要继承这个坐标)
- 定义了依赖管理、构建配置、插件配置
优势
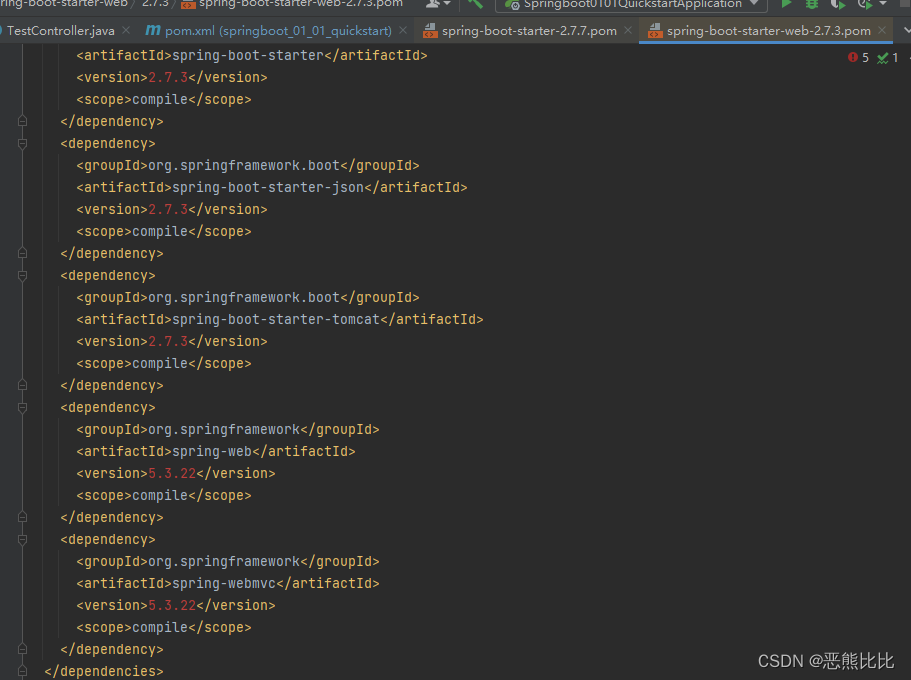
- 简化配置:pring-boot-starter-parent包含了很多相关的子坐标或者叫依赖项。这些依赖项是Spring Boot项目常用的库和框架,例如Spring核心库、Spring Data、Spring MVC、Jackson等。
- 统一管理:通过使用父POM,可以统一管理项目中使用的依赖库的版本,从而避免了不同项目之间因为依赖版本不一致而产生的兼容性问题。
- 提高效率:通过使用父POM,可以方便地添加和管理常用的依赖库,从而提高了开发效率。
SpringBoot Start系列
Spring Boot Start系列是Spring Boot提供的一系列starter依赖项,用于简化Spring应用程序的构建和依赖管理
优势
- 定义了当前项目使用的所有依赖,以达到减少配置的目的;
- 每个Start根据功能不同,包含了多个相关依赖坐标;
- 可以达到快速配置,简化配置的目的
类型:
| 坐标 | 说明 |
|---|---|
| spring-boot-starter: | 这是Spring Boot应用程序的基本构建器,包含了Spring Boot的核心功能和基本依赖项。 |
| spring-boot-starter-web: | 用于构建Web应用程序的starter,包含了Spring MVC、Spring Web、Spring Data、Jackson等依赖项。 |
| spring-boot-starter-data-jpa: | 提供了基于Spring Data的JPA数据访问抽象,简化了数据库操作。 |
| spring-boot-starter-data-rest: | 提供了基于Spring Data Rest的数据暴露抽象,可以快速搭建RESTful API。 |
| spring-boot-starter-jdbc: | 提供了基于Spring JDBC的数据库访问抽象,简化了数据库操作。 |
| spring-boot-starter-amqp: | 用于构建基于RabbitMQ的消息传递应用程序的starter。 |
| spring-boot-starter-integration: | 提供了基于Spring Integration模块的集成抽象,简化了业务集成开发。 |
| spring-boot-starter-test: | 提供了用于单元测试、集成测试和端到端测试的依赖项。 |
| spring-boot-starter-thymeleaf | thymeleaf是模板引擎,将模板和数据合并并生成最终文档的web开发工具thymeleaf使用 |
spring-boot-starter-web
<dependency><groupId>org.springframework.boot</groupId><artifactId>spring-boot-starter-web</artifactId><version>2.7.3</version></dependency>
介绍
- spring-boot-starter-web是一个Spring Boot的starter坐标,用于快速搭建一个基于Spring的Web项目。
- 它包含了构建Web应用程序所需的依赖库和配置,包括Spring MVC、Spring Web、Spring Data、Jackson等
优势
- 简化配置:通过内嵌Servlet容器,Spring Boot得以简化配置,不再需要打成war包部署到容器中。开发者只需打成一个可执行的jar包
- 自动配置:Spring Boot能根据当前类路径下的类、jar包来自动配置bean,如添加一个spring-boot-starter-web启动器就能拥有web的功能,无需其他配置。
1.4 引导类
启动类:
- 是整个程序的执行入口
- 功能:初始化一个Spring容器,扫描引导类所在的包加载bean
package com.example;import com.example.controller.TestController;
import org.springframework.boot.SpringApplication;
import org.springframework.boot.autoconfigure.SpringBootApplication;
import org.springframework.context.ConfigurableApplicationContext;//SpringBootApplication:
//Spring Boot提供的核心注解,它包含了@Configuration、@EnableAutoConfiguration、@ComponentScan等注解的功能。
@SpringBootApplication
public class Springboot0101QuickstartApplication {public static void main(String[] args) {//SpringApplication.run方法来启动Spring Boot应用程序ConfigurableApplicationContext context = SpringApplication.run(Springboot0101QuickstartApplication.class, args);TestController bean = context.getBean(TestController.class);System.out.println(bean);}}
1.5 修改配置
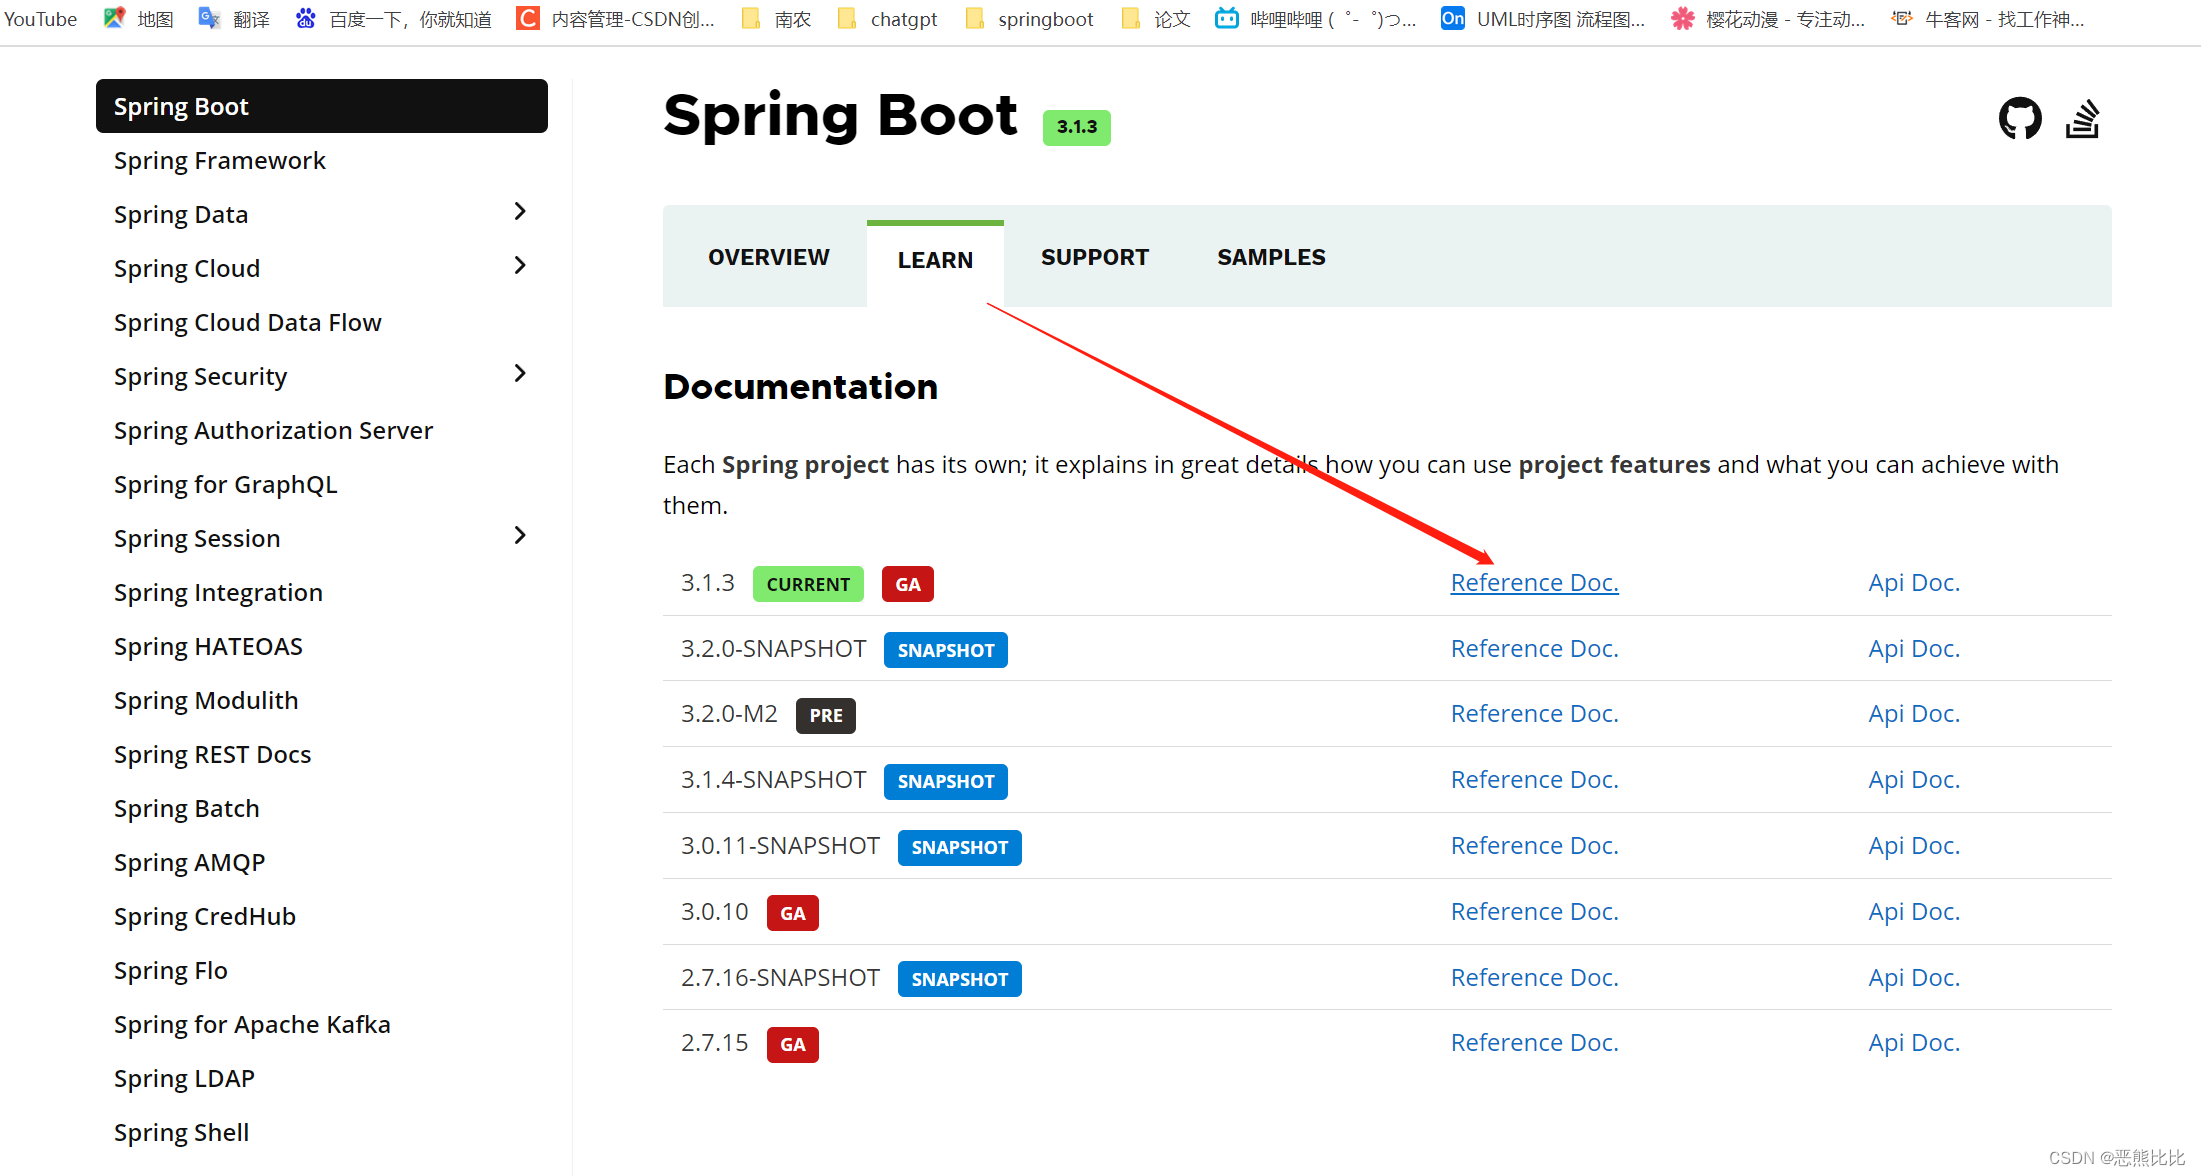
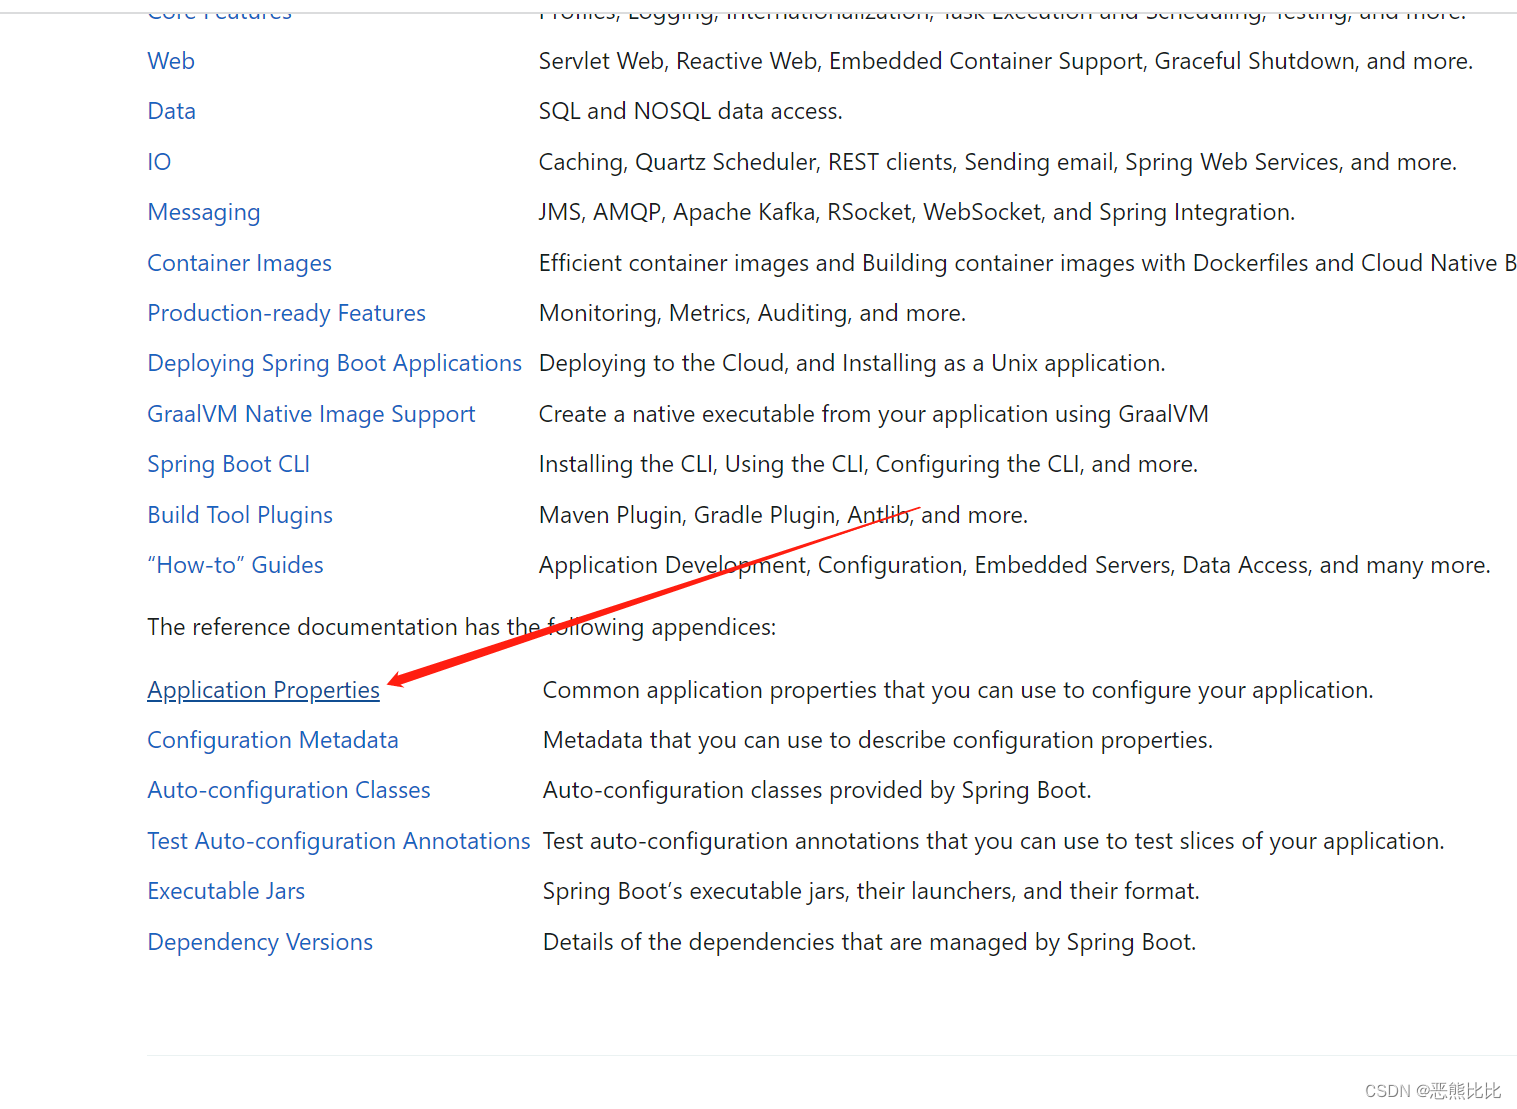
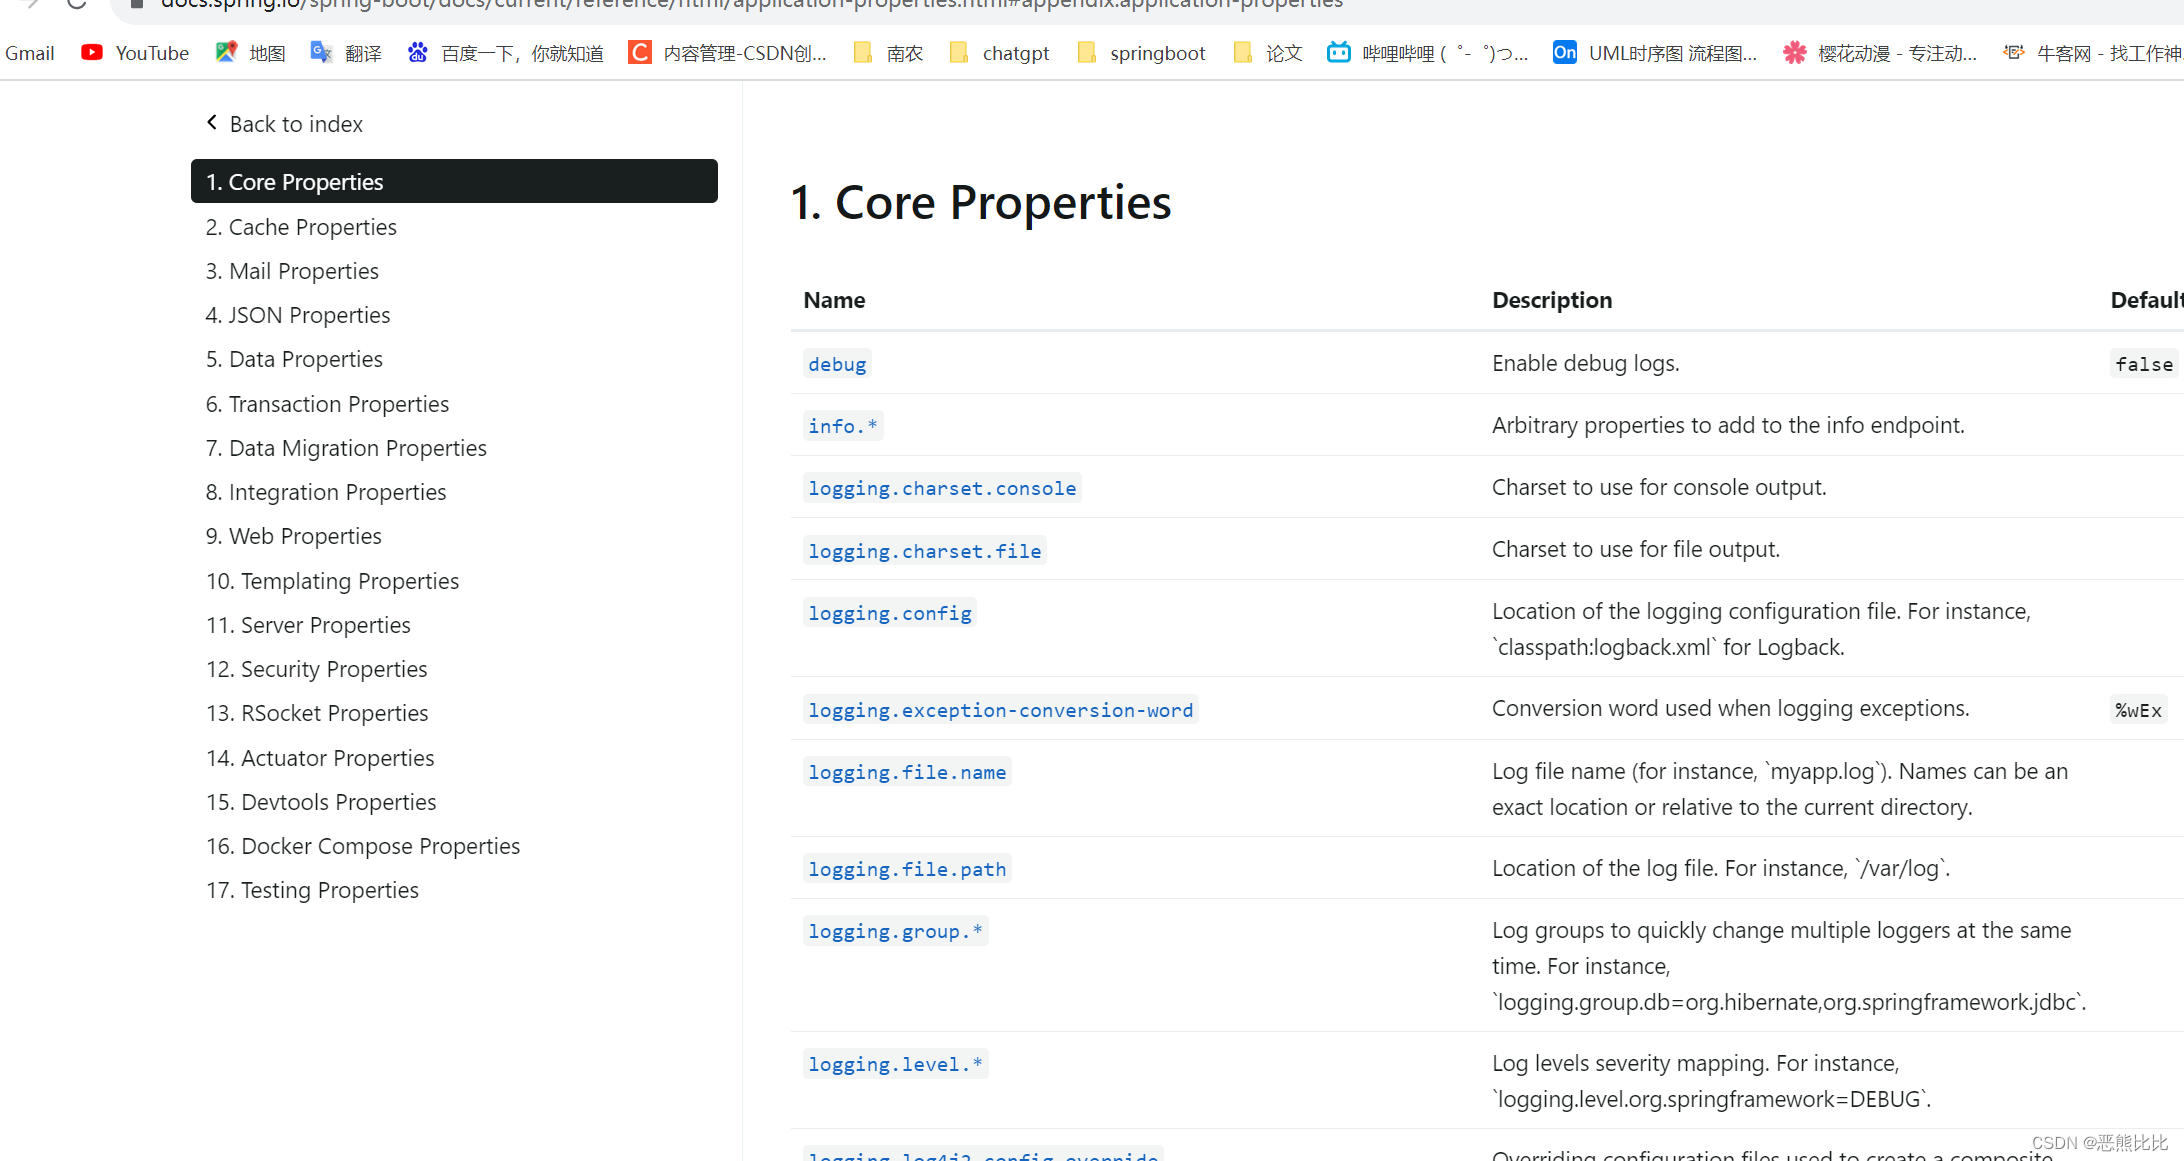
配置文档:
https://docs.spring.io/spring-boot/docs/current/reference/html/application-properties.html#appendix.application-properties
查询方法
寻找配置
SpringBoot配置方式
- application.properties
- application.yml
- application.yaml
--------------------application.properties------------------------
server.port=8080
spring.datasource.url=jdbc:mysql://localhost:3306/mydb
spring.datasource.username=root
spring.datasource.password=password---------------------application.yml(主流)/application.yaml-------------------------------
server:  port: 8080
spring:  datasource:  url: jdbc:mysql://localhost:3306/mydb  username: root  password: password
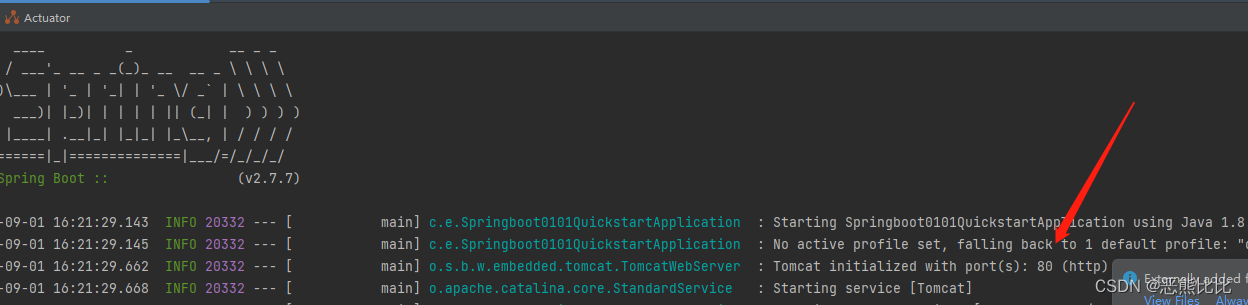
1.修改端口配置
在resources下的application.properties文件中添加端口
#修改服务器端口
server.port=80
重启服务器
2 修改banner
banner就是启动springboot那个图片
#修改banner
#关闭
spring.main.banner-mode=off
3.修改日志
#日志
#只调错误的
logging.level.root=error
1.6 读取配置
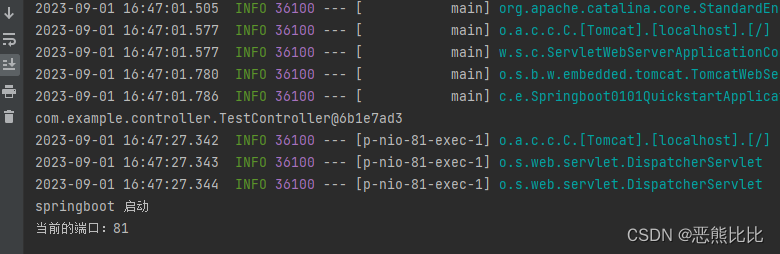
1.6.1 读取配置信息
server:port: 81
@Value(value = “${server.port}”):
这个注解用于注入环境变量server.port的值到类的成员变量port中。这里使用了Spring的注解@Value,它可以将外部的配置属性注入到Spring Bean中。
package com.example.controller;import org.springframework.beans.factory.annotation.Value;
import org.springframework.web.bind.annotation.GetMapping;
import org.springframework.web.bind.annotation.RequestMapping;
import org.springframework.web.bind.annotation.RestController;@RestController
@RequestMapping("/test")
public class TestController {@Value(value = "${server.port}")private Integer port;@GetMappingpublic String getById(){System.out.println("springboot 启动");System.out.println("当前的端口:"+port);return "SpringBootRunning";}
}
方法2:先加载所有配置,在读取需要的
//加载所有配置@Autowiredprivate Environment env;@GetMappingpublic String getById(){System.out.println("springboot 启动");System.out.println("当前的端口:"+env.getProperty("server.port"));return "SpringBootRunning";}
1.6.2 读取配置信息并创建类进行封装
步骤:
- 创建类用于封装yaml文件中对应的数据
- 定义Springboot管控的bean
- 指定特定的属性
package com.example;import lombok.Data;
import org.springframework.boot.context.properties.ConfigurationProperties;
import org.springframework.stereotype.Component;//1.创建类用于封装yaml文件中对应的数据
//2. 定义Springboot管控的bean
@Component//3.指定特定的属性
@ConfigurationProperties(prefix = "datasource")
@Data
public class MyDataSource {private String driver;private String url;private String username;private String password;}
测试:
@Autowiredprivate MyDataSource myDataSource;@GetMappingpublic String getById(){System.out.println("springboot 启动");System.out.println(myDataSource);return "SpringBootRunning";}

1.7 整合第三方技术
1.7.1 整合JUnit
介绍
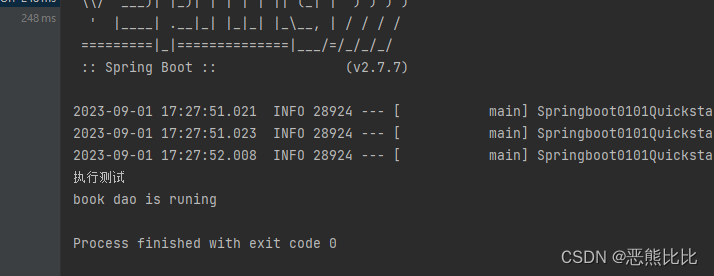
JUnit是一个Java语言的单元测试框架,用于编写和运行可重复的测试。它是用于单元测试框架体系xUnit的一个实例,可以用于进行单元测试(即白盒测试)。步骤:
- 导入测试对应的starter
- 测试类使用@SpringBootTest修饰
- 使用自动装配的形式添加要测试的对象
package com.example.dao;public interface BooDao {public void save();
}
-----------------------------------------------------
package com.example.dao.impl;import com.example.dao.BooDao;
import org.springframework.stereotype.Repository;//@Repository是一个注解,用于标识数据访问对象(DAO)组件
@Repository
public class BookDaoImpl implements BooDao {@Overridepublic void save() {System.out.println("book dao is runing");}
}
--------------------------------------------------
package com.example;import com.example.dao.BooDao;
import org.junit.jupiter.api.Test;
import org.springframework.beans.factory.annotation.Autowired;
import org.springframework.boot.test.context.SpringBootTest;@SpringBootTest
class Springboot0101QuickstartApplicationTests {//1.注入要测试的对象@Autowiredprivate BooDao booDao;//02.执行要测试的对应的方法@Testvoid contextLoads() {System.out.println("执行测试");booDao.save();}
}
1.7.1 整合Mybatis
步骤:
- 导入对应的starter;
- 配置相关信息;
- 定义数据层接口与映射配置;
- 测试类中注入dao接口,测试功能;
1.导入对应的starter
<dependency><groupId>org.mybatis.spring.boot</groupId><artifactId>mybatis-spring-boot-starter</artifactId><version>2.2.0</version></dependency><dependency><groupId>mysql</groupId><artifactId>mysql-connector-java</artifactId><scope>runtime</scope></dependency>
2.配置相关信息
spring:datasource:driver-class-name: com.mysql.jdbc.Driverurl: dbc:mysql://localhost:3306/db1username: rootpassword: 123456
3.定义数据接口层和映射层
package com.example.domain;import lombok.Data;@Data
public class User {private int id;private String username;private String password;
}-----------------------------------------------------------
package com.example.dao;import com.example.domain.User;
import org.apache.ibatis.annotations.*;import java.util.List;//用户增删改查接口
@Mapper
public interface UserDao {@Insert("INSERT INTO tb_user values (null,#{username},#{password})")public void save(User user);@Update("UPDATE tb_user set username=#{username},password=#{password} where id=#{id}")public void update(User user);@Delete("DELETE from tb_user where id = #{id}")public void delete(Integer id);@Select("SELECT * FROM tb_user")public List<User> selectAll();@Select("SELECT * FROM tb_user WHERE id=#{id}")public User selectById(Integer id);}
4.编写测试类
package com.example;import com.example.dao.BooDao;
import com.example.dao.UserDao;
import com.example.domain.User;
import org.junit.jupiter.api.Test;
import org.springframework.beans.factory.annotation.Autowired;
import org.springframework.boot.test.context.SpringBootTest;import java.util.List;@SpringBootTest
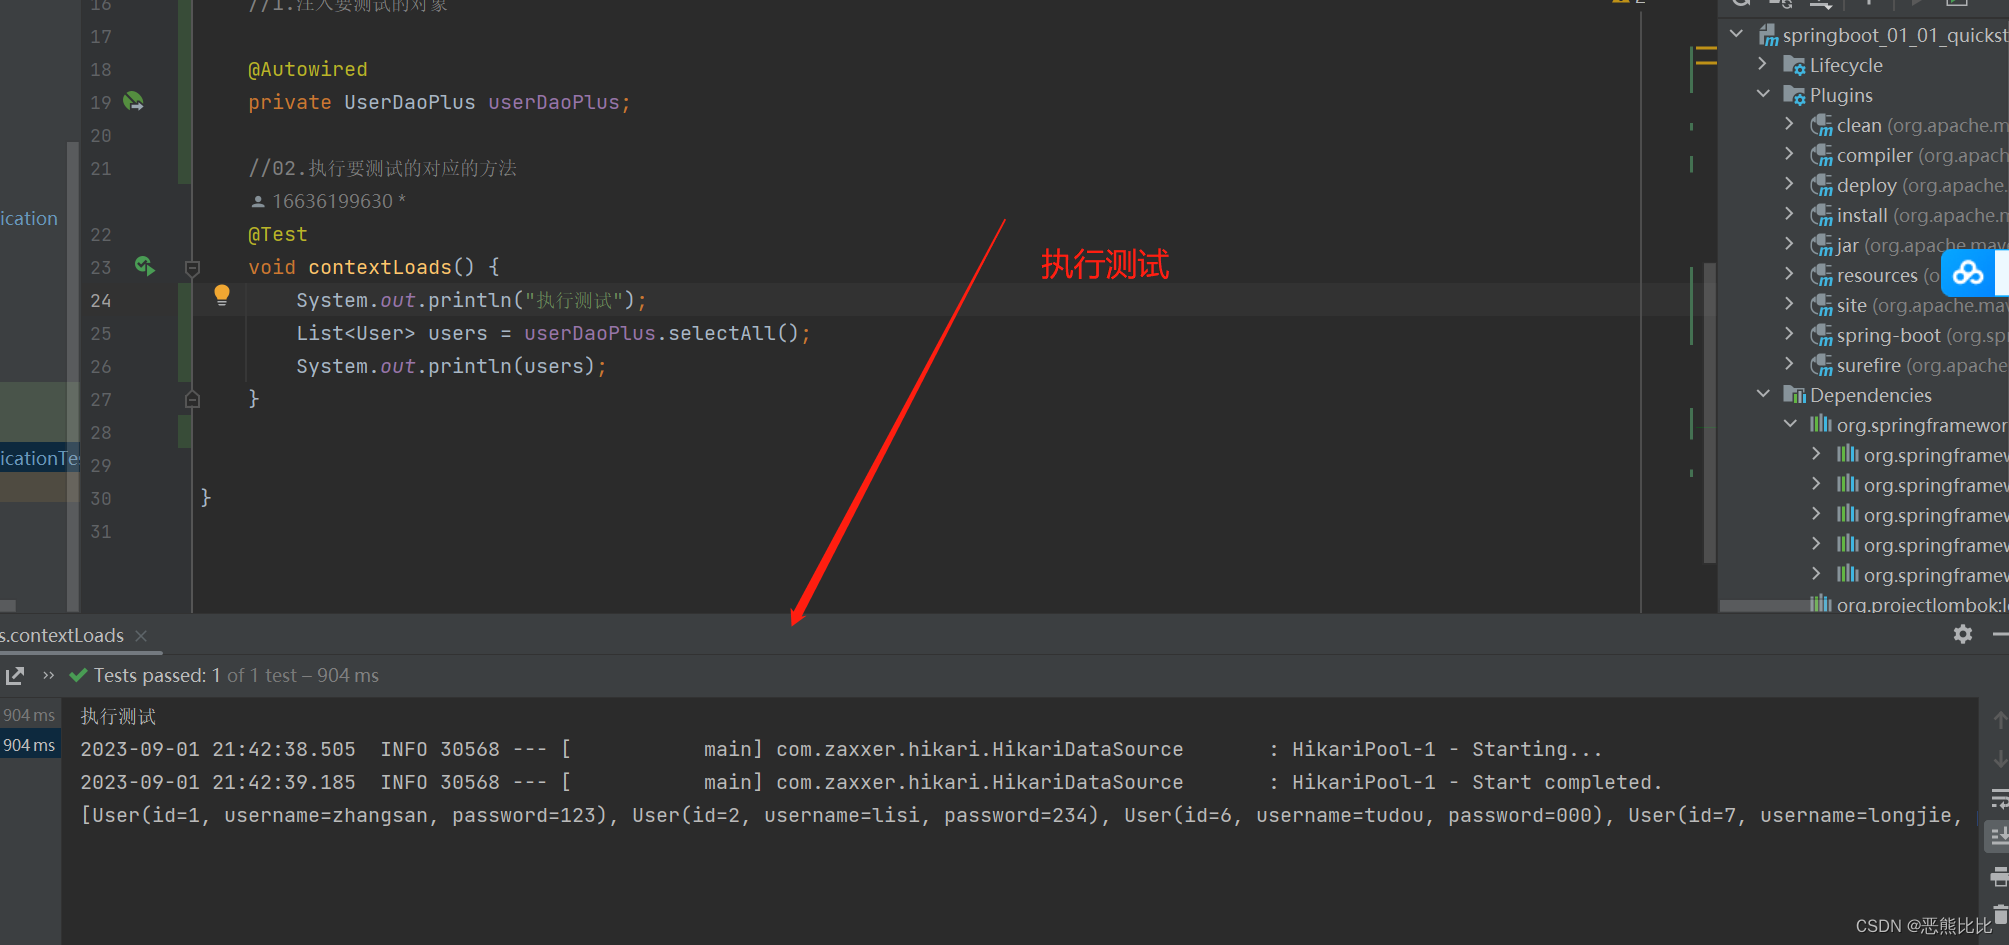
class Springboot0101QuickstartApplicationTests {//1.注入要测试的对象@Autowiredprivate UserDao userDao;//02.执行要测试的对应的方法@Testvoid contextLoads() {System.out.println("执行测试");List<User> users = userDao.selectAll();System.out.println(users);}}
1.7.1 整合Mybatis-Plus
Mybatis和Mybatis-plus有什么区别?
- 导入坐标不同
- 数据层实现简化
步骤:
- 导入对应的starter;
- 定义数据层接口与映射配置,继承BaseMapper
- 定义数据层接口与映射配置;
- 测试类中注入dao接口,测试功能;
<dependency><groupId>com.baomidou</groupId><artifactId>mybatis-plus-boot-starter</artifactId><version>3.4.3</version></dependency>
@Mapper
public interface UserDaoPlus extends BaseMapper<User> {
其他和mybatis类似
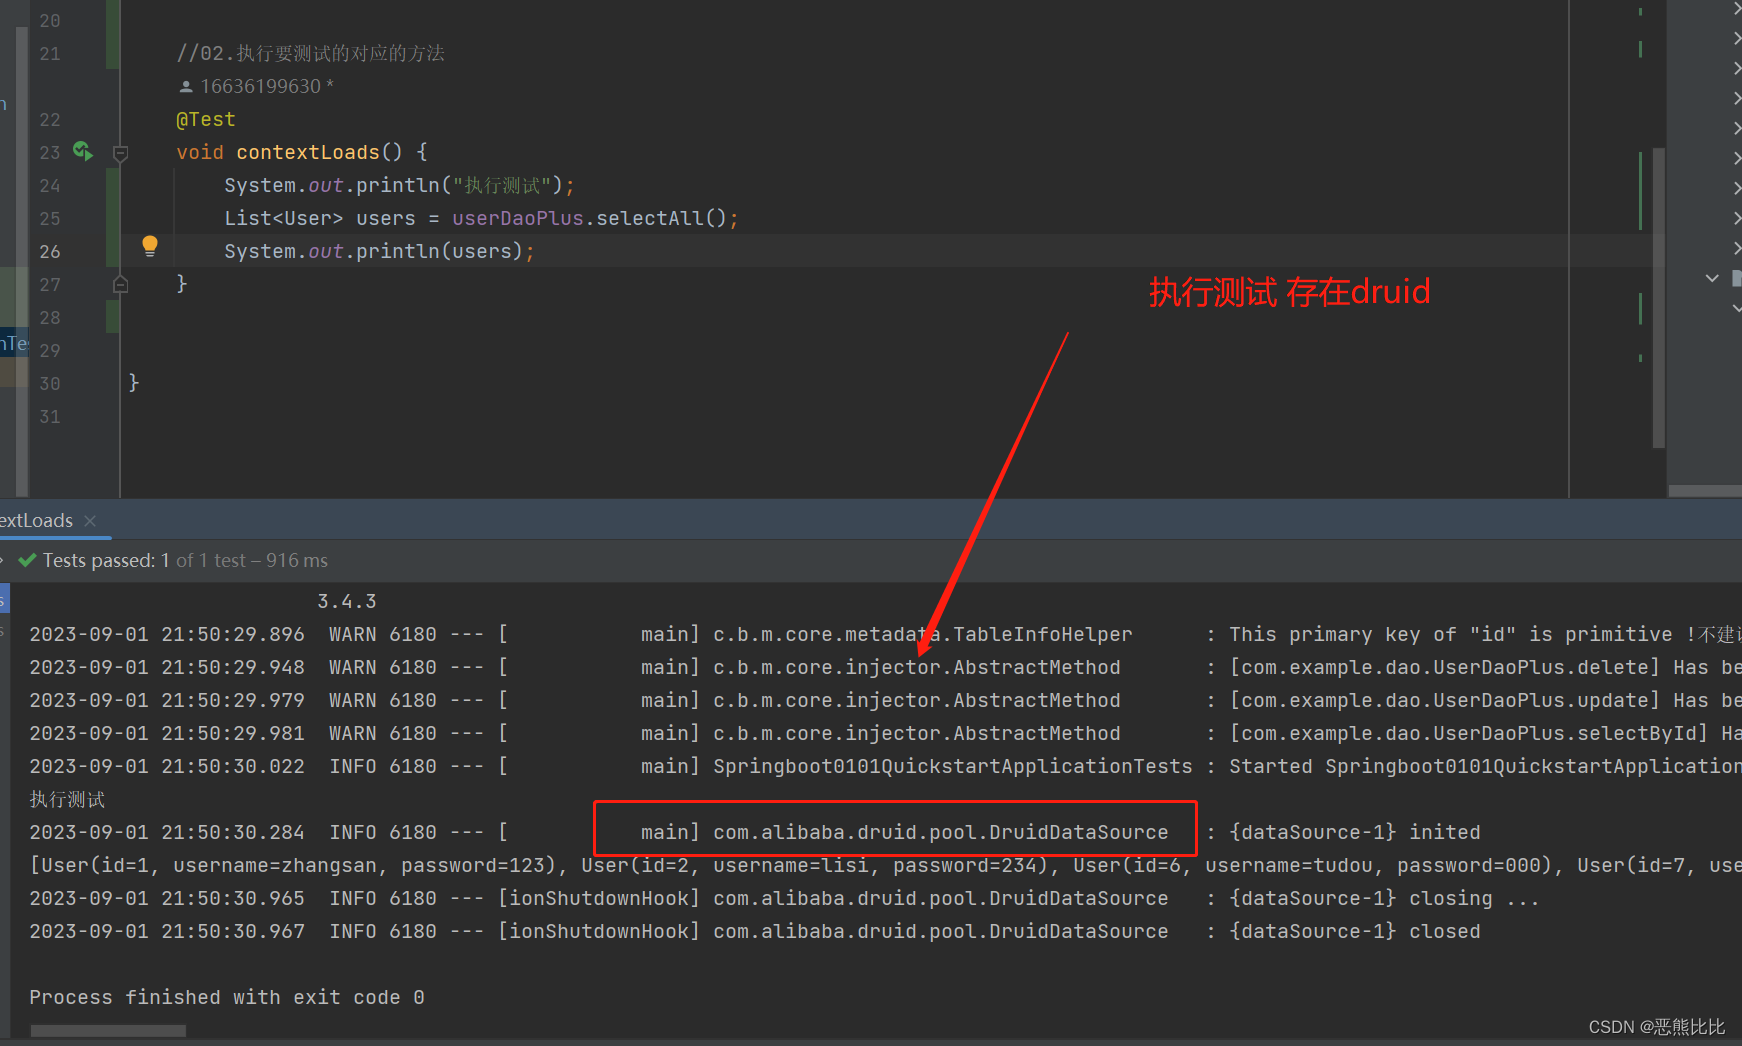
1.7.1 整合Druid
地址:https://blog.csdn.net/qq_47436772/article/details/115185046
Druid是一种分布式的数据存储和查询系统,旨在支持实时数据分析。
- Druid 是阿里巴巴开源平台上一个
数据库连接池实现,结合了 C3P0、DBCP 等 DB 池的优点,同时加入了日志监控- 它采用分布式架构,可以处理大规模的数据流,并提供实时聚合和查询功能。
<!-- https://mvnrepository.com/artifact/com.alibaba/druid -->
<dependency><groupId>com.alibaba</groupId><artifactId>druid</artifactId><version>1.2.5</version>
</dependency>spring:datasource:driver-class-name: com.mysql.cj.jdbc.Driverurl: jdbc:mysql://localhost:3306/db1username: rootpassword: 123456type: com.alibaba.druid.pool.DruidDataSourceC3P0Adapter
2.数据层
2.1 SSMP整合-基础数据库CRUD
步骤:
- 导入坐标
- 配置相关信息
- 编写domain/dao文件
- 实现测试
<?xml version="1.0" encoding="UTF-8"?>
<project xmlns="http://maven.apache.org/POM/4.0.0" xmlns:xsi="http://www.w3.org/2001/XMLSchema-instance"xsi:schemaLocation="http://maven.apache.org/POM/4.0.0 https://maven.apache.org/xsd/maven-4.0.0.xsd"><modelVersion>4.0.0</modelVersion><parent><groupId>org.springframework.boot</groupId><artifactId>spring-boot-starter-parent</artifactId><version>2.7.7</version><relativePath/></parent><groupId>com.example</groupId><artifactId>springboot_01_01_quickstart</artifactId><version>0.0.1-SNAPSHOT</version><name>springboot_01_01_quickstart</name><description>springboot_01_01_quickstart</description><properties><java.version>1.8</java.version></properties><dependencies><dependency><groupId>org.springframework.boot</groupId><artifactId>spring-boot-starter-web</artifactId><version>2.7.3</version></dependency><dependency><groupId>org.projectlombok</groupId><artifactId>lombok</artifactId><optional>true</optional></dependency><dependency><groupId>org.springframework.boot</groupId><artifactId>spring-boot-starter-test</artifactId><scope>test</scope></dependency><dependency><groupId>org.mybatis.spring.boot</groupId><artifactId>mybatis-spring-boot-starter</artifactId><version>2.2.0</version></dependency><dependency><groupId>mysql</groupId><artifactId>mysql-connector-java</artifactId><scope>runtime</scope></dependency><dependency><groupId>com.baomidou</groupId><artifactId>mybatis-plus-boot-starter</artifactId><version>3.4.3</version></dependency><!-- https://mvnrepository.com/artifact/com.alibaba/druid --><dependency><groupId>com.alibaba</groupId><artifactId>druid</artifactId><version>1.2.5</version></dependency></dependencies><build><plugins><plugin><groupId>org.springframework.boot</groupId><artifactId>spring-boot-maven-plugin</artifactId><configuration><excludes><exclude><groupId>org.projectlombok</groupId><artifactId>lombok</artifactId></exclude></excludes></configuration></plugin></plugins></build></project>server:port: 81spring:datasource:driver-class-name: com.mysql.cj.jdbc.Driverurl: jdbc:mysql://localhost:3306/db1username: rootpassword: 123456type: com.alibaba.druid.pool.DruidDataSourcemybatis-plus:global-config:db-config:table-prefix: tb_user
package com.example.domain;import com.baomidou.mybatisplus.annotation.TableName;
import lombok.Data;@Data
@TableName(schema = "db1", value = "tb_user")
public class User {private int id;private String username;private String password;
}
-----------------------------------------------------------
package com.example.dao;import com.baomidou.mybatisplus.core.mapper.BaseMapper;
import com.example.domain.User;
import org.apache.ibatis.annotations.*;import java.util.List;//用户增删改查接口
@Mapper
public interface UserDaoPlus extends BaseMapper<User> {}
测试
package com.example.dao;import com.example.domain.User;
import org.junit.jupiter.api.Test;
import org.springframework.beans.factory.annotation.Autowired;
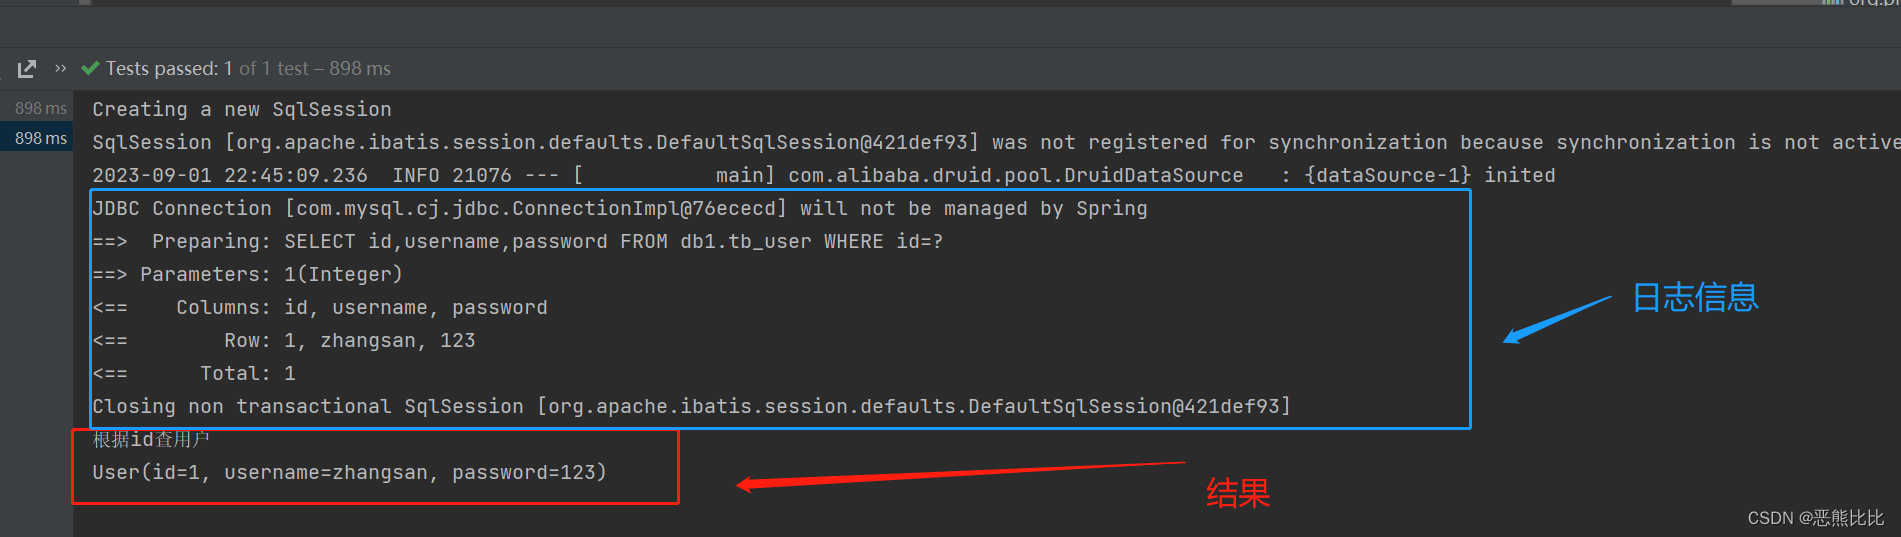
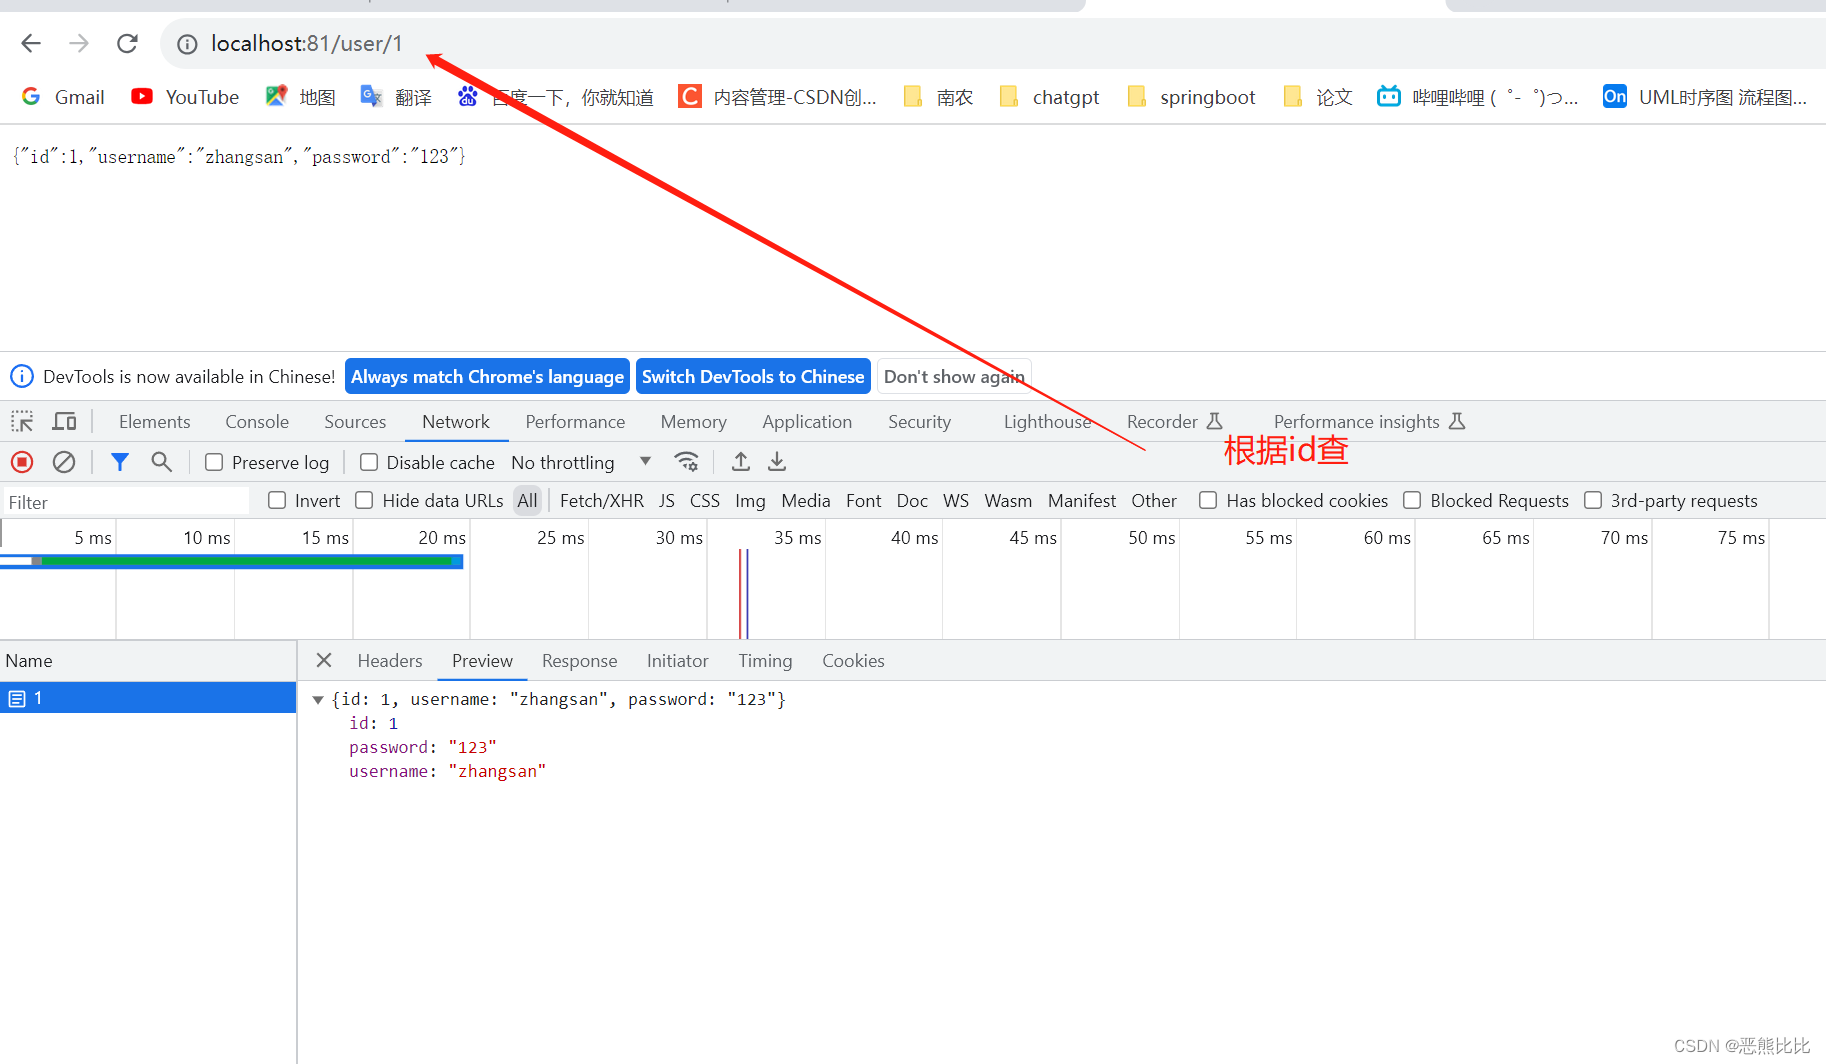
import org.springframework.boot.test.context.SpringBootTest;import java.util.List;@SpringBootTest
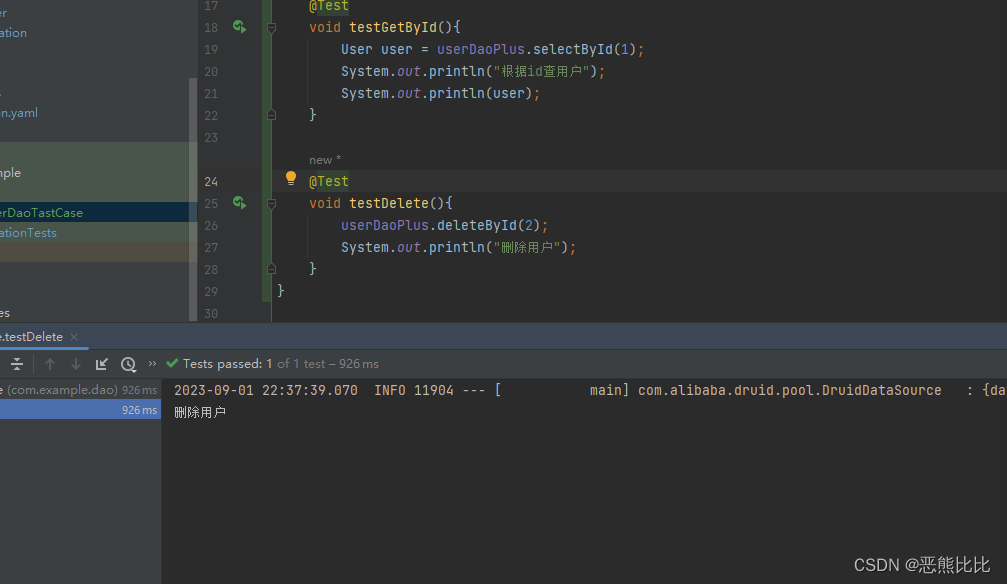
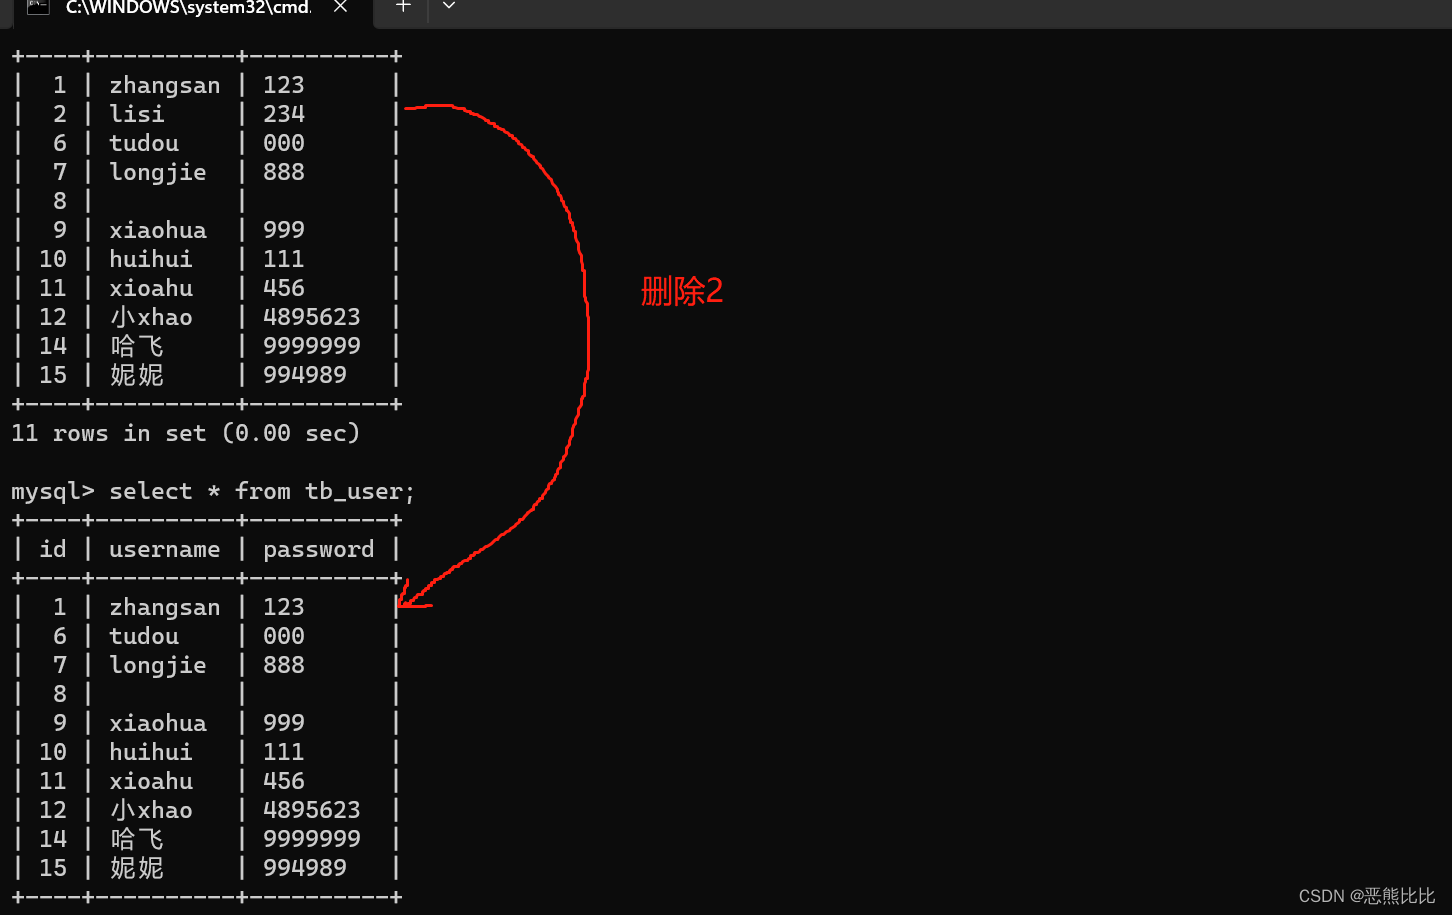
public class UserDaoTastCase {@Autowiredprivate UserDaoPlus userDaoPlus;@Testvoid testGetById(){User user = userDaoPlus.selectById(1);System.out.println("根据id查用户");System.out.println(user);}@Testvoid testDelete(){userDaoPlus.deleteById(2);System.out.println("删除用户");}
}
2.2 调试日志
配置方式开启日志,设置日志输出方式为标准输出
mybatis-plus:global-config:db-config:table-prefix: tb_userconfiguration:log-impl: org.apache.ibatis.logging.stdout.StdOutImpl
2.3 分页
步骤
- 使用IPage封装分页数据
- 分页操作依赖MyBatisPlus分页拦截器实现功能
- 借助MyBatisPlus日志查阅执行SQL语句
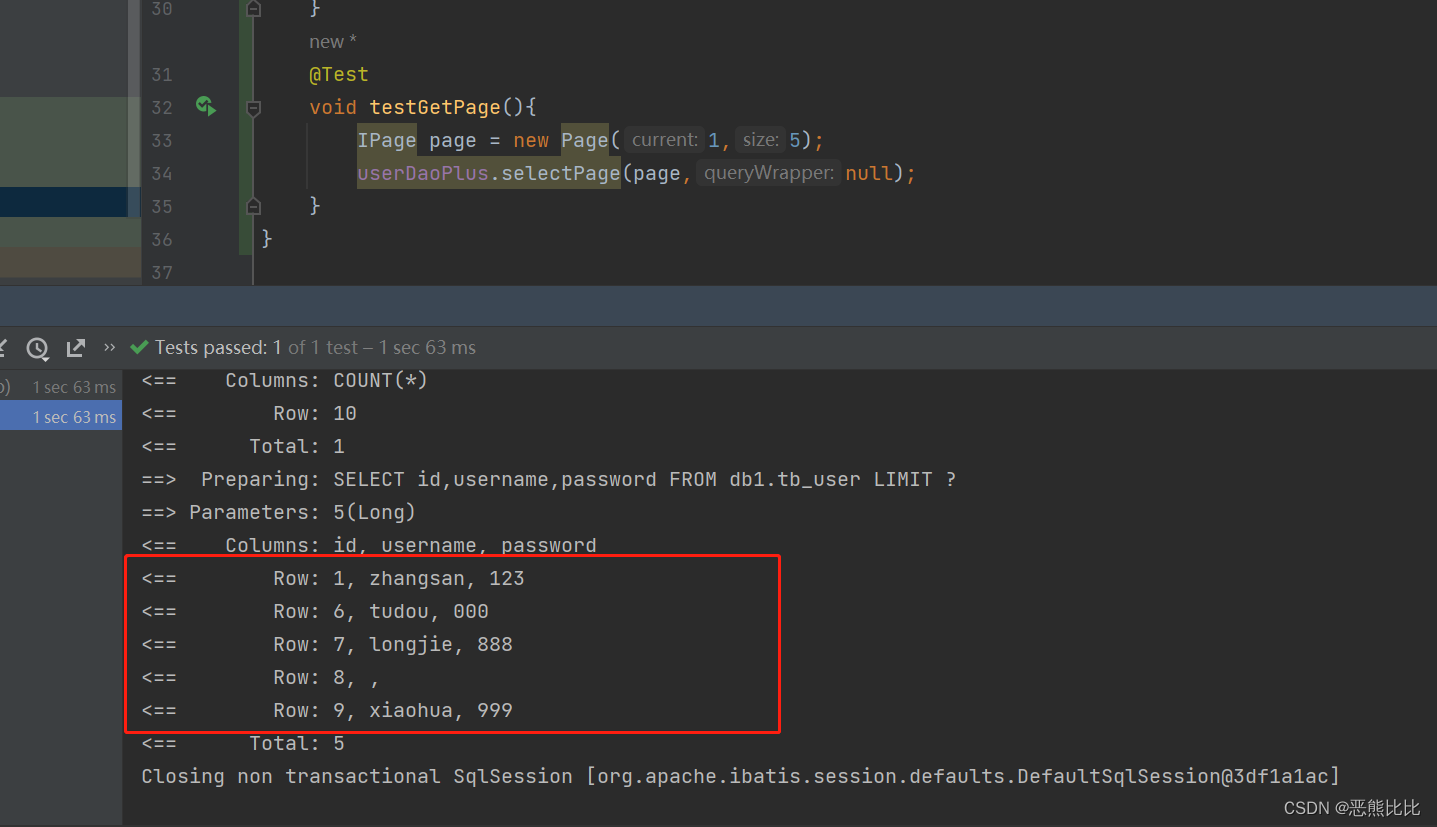
@Test
void testGetPage(){IPage page = new Page(1,5);bookDao.selectPage(page,null);
}

IPage对象中封装了分页操作中的所有数据
- 数据;当前页面值;每页数据总量;最大页码值;数据总量;

使用MyBatisPlus拦截器实现条件限制
package com.example.config;import com.baomidou.mybatisplus.extension.plugins.MybatisPlusInterceptor;
import com.baomidou.mybatisplus.extension.plugins.inner.PaginationInnerInterceptor;
import org.springframework.context.annotation.Bean;
import org.springframework.context.annotation.Configuration;@Configuration
public class MpConfig {@Beanpublic MybatisPlusInterceptor mybatisPlusInterceptor(){//1.定义Mp拦截器MybatisPlusInterceptor mpInterceptor = new MybatisPlusInterceptor();//2.添加具体的拦截器mpInterceptor.addInnerInterceptor(new PaginationInnerInterceptor());return mpInterceptor;}
}
再次运行
2.4 条件查询
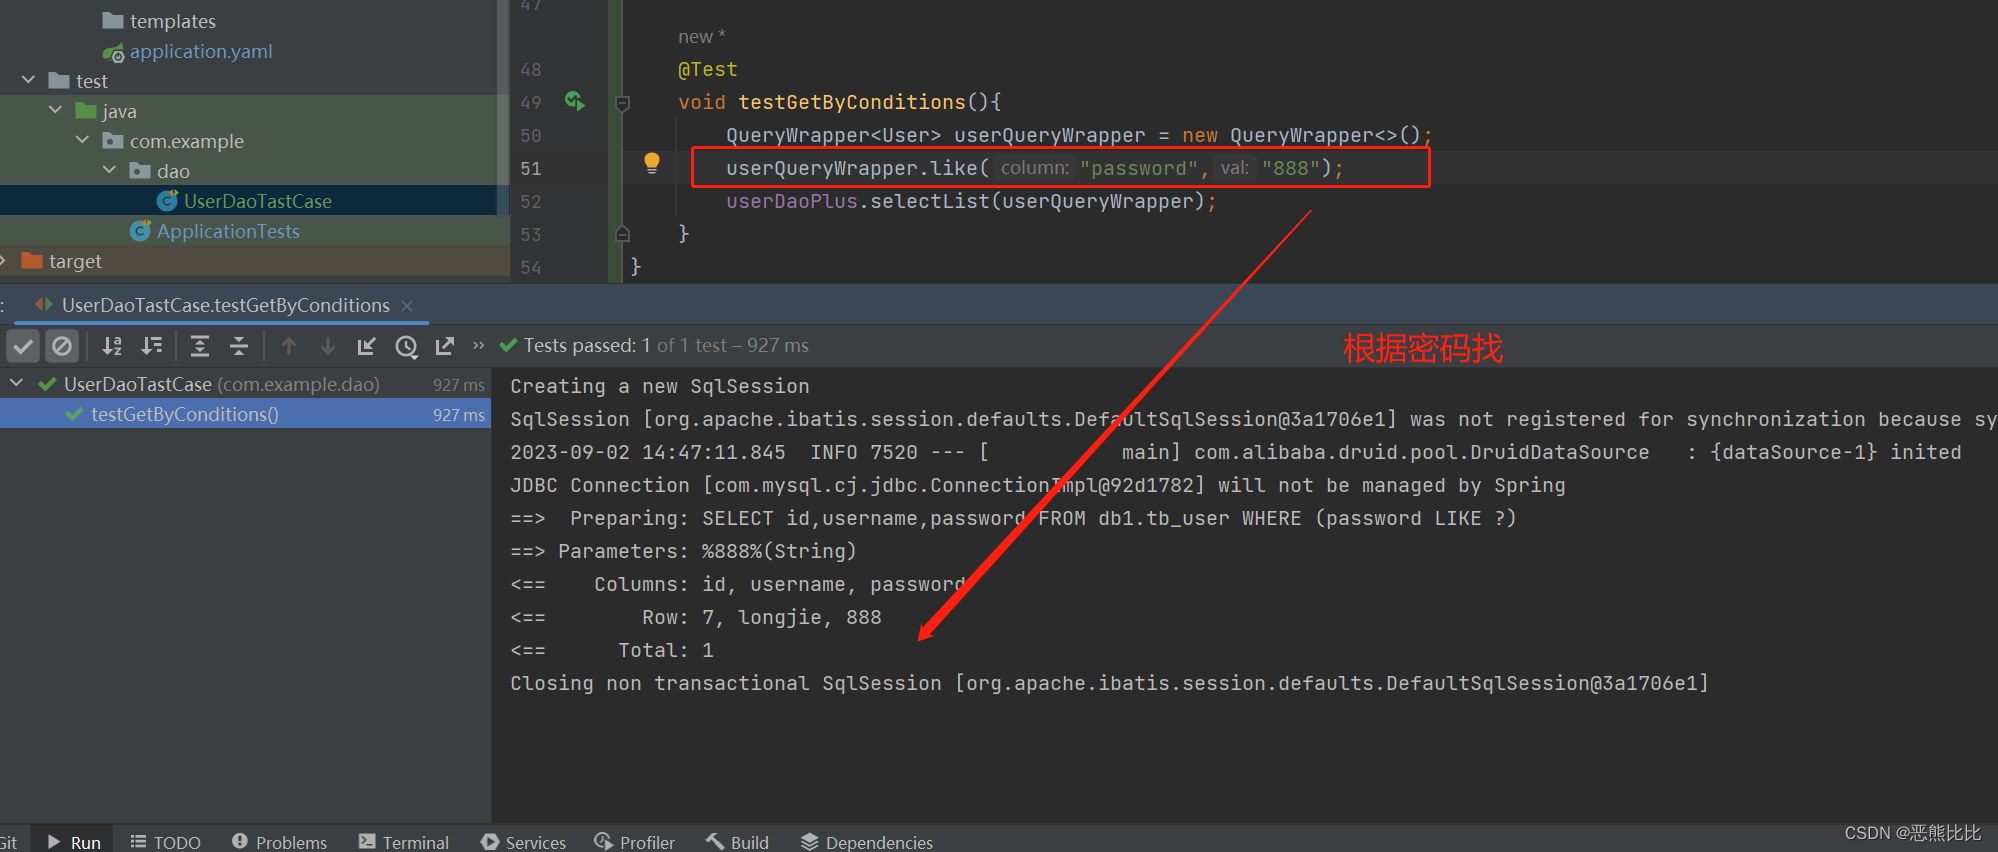
步骤
- 使用QueryWrapper对象封装查询条件
- 推荐使用LambdaQueryWrapper对象
- 所有查询操作封装成方法调用
- 查询条件支持动态条件拼装
//使用QueryWrapper对象封装查询条件,推荐使用LambdaQueryWrapper对象,所有查询操作封装成方法调用@Testvoid testGetByCondition(){IPage page = new Page(1,10);LambdaQueryWrapper<User> wrapper = new LambdaQueryWrapper<>();wrapper.like(User::getUsername,"tudou");userDaoPlus.selectPage(page, wrapper);}@Testvoid testGetByConditions(){QueryWrapper<User> userQueryWrapper = new QueryWrapper<>();userQueryWrapper.like("password","888");userDaoPlus.selectList(userQueryWrapper);}

3.业务层
3.1 业务层定义
- 接口
- 实现类
package com.example.service;import com.example.domain.User;import java.util.List;public interface UserService {boolean save(User user);boolean delete(Integer id);boolean update(User user);User getById(Integer id);List<User> getAll();}package com.example.service.impl;import com.example.dao.UserDaoPlus;
import com.example.domain.User;
import com.example.service.UserService;
import org.springframework.beans.factory.annotation.Autowired;import java.util.List;public class UserServiceImpl implements UserService {@AutowiredUserDaoPlus userDaoPlus;@Overridepublic boolean save(User user) {return userDaoPlus.insert(user)>0;}@Overridepublic boolean delete(Integer id) {return userDaoPlus.deleteById(id)>0;}@Overridepublic boolean update(User user) {return userDaoPlus.updateById(user)>0;}@Overridepublic User getById(Integer id) {return userDaoPlus.selectById(id);}@Overridepublic List<User> getAll() {return userDaoPlus.selectList(null);}
}测试定义
package com.example.service;import com.example.domain.User;
import org.junit.jupiter.api.Test;
import org.springframework.beans.factory.annotation.Autowired;
import org.springframework.boot.test.context.SpringBootTest;@SpringBootTest
public class UserServiceTestCase {@Autowiredprivate UserService userService;@Testvoid testGetById(){userService.getById(7);}@Testvoid testGetAll(){userService.getAll();}@Testvoid testInsert(){User user = new User();user.setUsername("新生");user.setPassword("202392");userService.save(user);}
}
测试结果
3.2 业务层快速开发
- 使用MyBatisPlus提供有业务层通用接口(ISerivce)与业务层通用实现类(ServiceImpl<M,T>)
- 在通用类基础上做功能重载或功能追加
接口
package com.example.service;import com.baomidou.mybatisplus.extension.service.IService;
import com.example.domain.User;import java.io.Serializable;//定义业务层接口
public interface IUserService extends IService<User> {@Overridedefault boolean save(User entity) {return IService.super.save(entity);}@Overridedefault boolean removeById(Serializable id) {return IService.super.removeById(id);}@Overridedefault boolean updateById(User entity) {return IService.super.updateById(entity);}@Overridedefault User getById(Serializable id) {return IService.super.getById(id);}
}
接口实现类
package com.example.service.impl;import com.baomidou.mybatisplus.extension.service.impl.ServiceImpl;
import com.example.dao.UserDaoPlus;
import com.example.domain.User;
import com.example.service.IUserService;
import org.springframework.stereotype.Service;@Service
public class IUserServiceImpl extends ServiceImpl<UserDaoPlus, User> implements IUserService {}
测试
package com.example.service;import com.example.domain.User;
import org.junit.jupiter.api.Test;
import org.springframework.beans.factory.annotation.Autowired;
import org.springframework.boot.test.context.SpringBootTest;@SpringBootTest
public class UserServiceTestCase {@Autowiredprivate IUserService iUserService;@Testvoid testGetById(){iUserService.getById(1);}@Testvoid testInsert(){User user = new User();user.setUsername("又梨");user.setPassword("221133");iUserService.save(user);}@Testvoid deleteTest(){iUserService.removeById(7);}
}
4. 表现层
4.1 表现层定义
- 基于Restful制作表现层接口
新增:POST
删除:DELETE
修改:PUT
查询:GET- 接收参数
实体数据:@RequestBody
路径变量:@PathVariable
package com.example.controller;import com.example.domain.User;
import com.example.service.IUserService;
import org.springframework.beans.factory.annotation.Autowired;
import org.springframework.web.bind.annotation.*;import java.util.List;@RestController
@RequestMapping("/user")
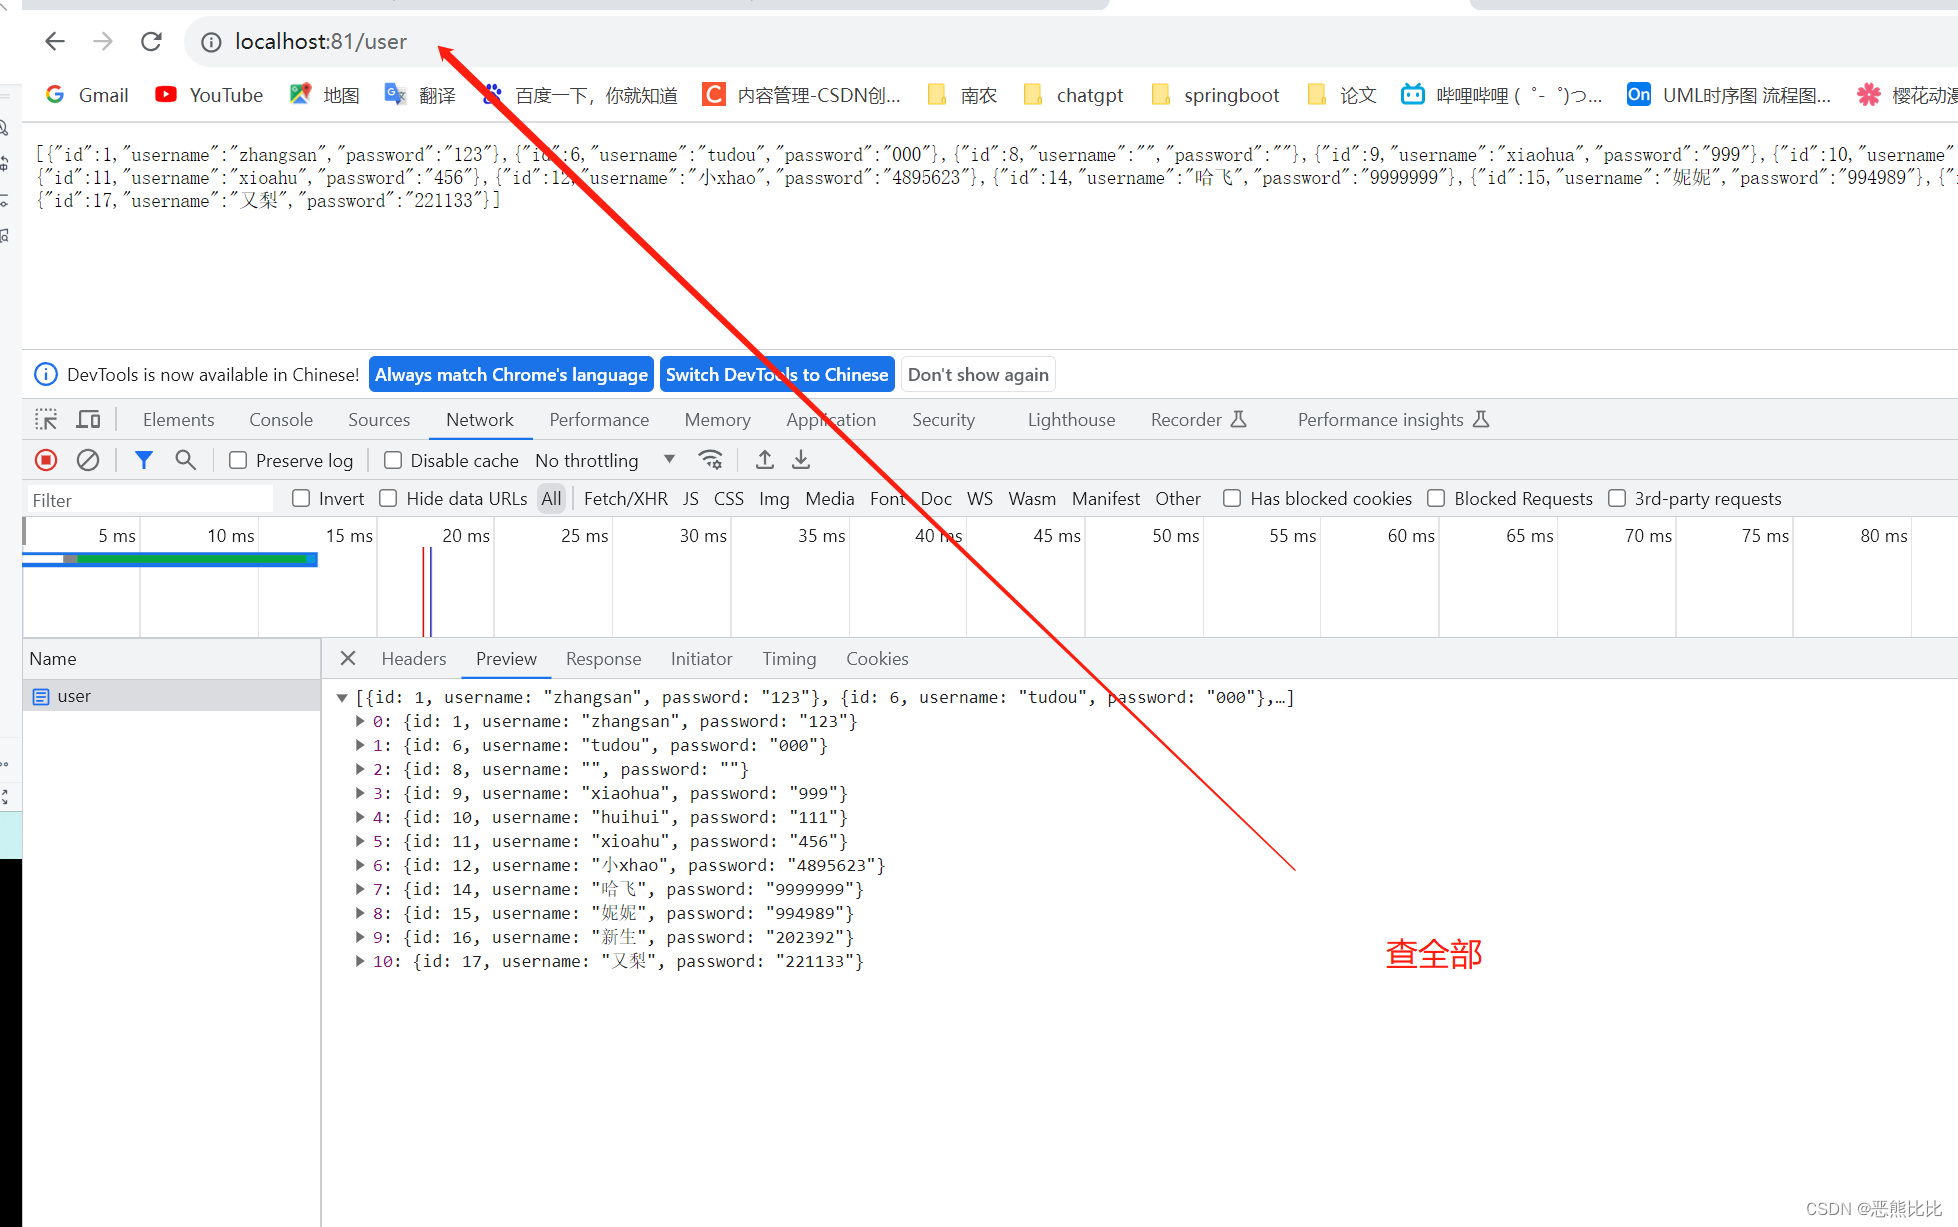
public class UserController {@Autowiredprivate IUserService userService;@GetMappingList<User> getAll(){return userService.list();}@GetMapping("/{id}")User getById(@PathVariable Integer id){return userService.getById(id);}@PostMappingBoolean save(@RequestBody User user){return userService.save(user);}
}

4.2 消息一致性处理
- 设计表现层返回结果的模型类,用于后端与前端进行数据格式统一,也称为前后端数据协议。
- 表现层接口统一返回值类型结果
package com.example.controller;import lombok.Data;//返回结果的模型类
@Data
public class ResultModel {private Boolean flag;private Object data;public ResultModel() {}public ResultModel(Boolean flag) {this.flag = flag;}public ResultModel(Boolean flag, Object data) {this.flag = flag;this.data = data;}
}
package com.example.controller;import com.example.domain.User;
import com.example.service.IUserService;
import org.springframework.beans.factory.annotation.Autowired;
import org.springframework.web.bind.annotation.*;import java.util.List;@RestController
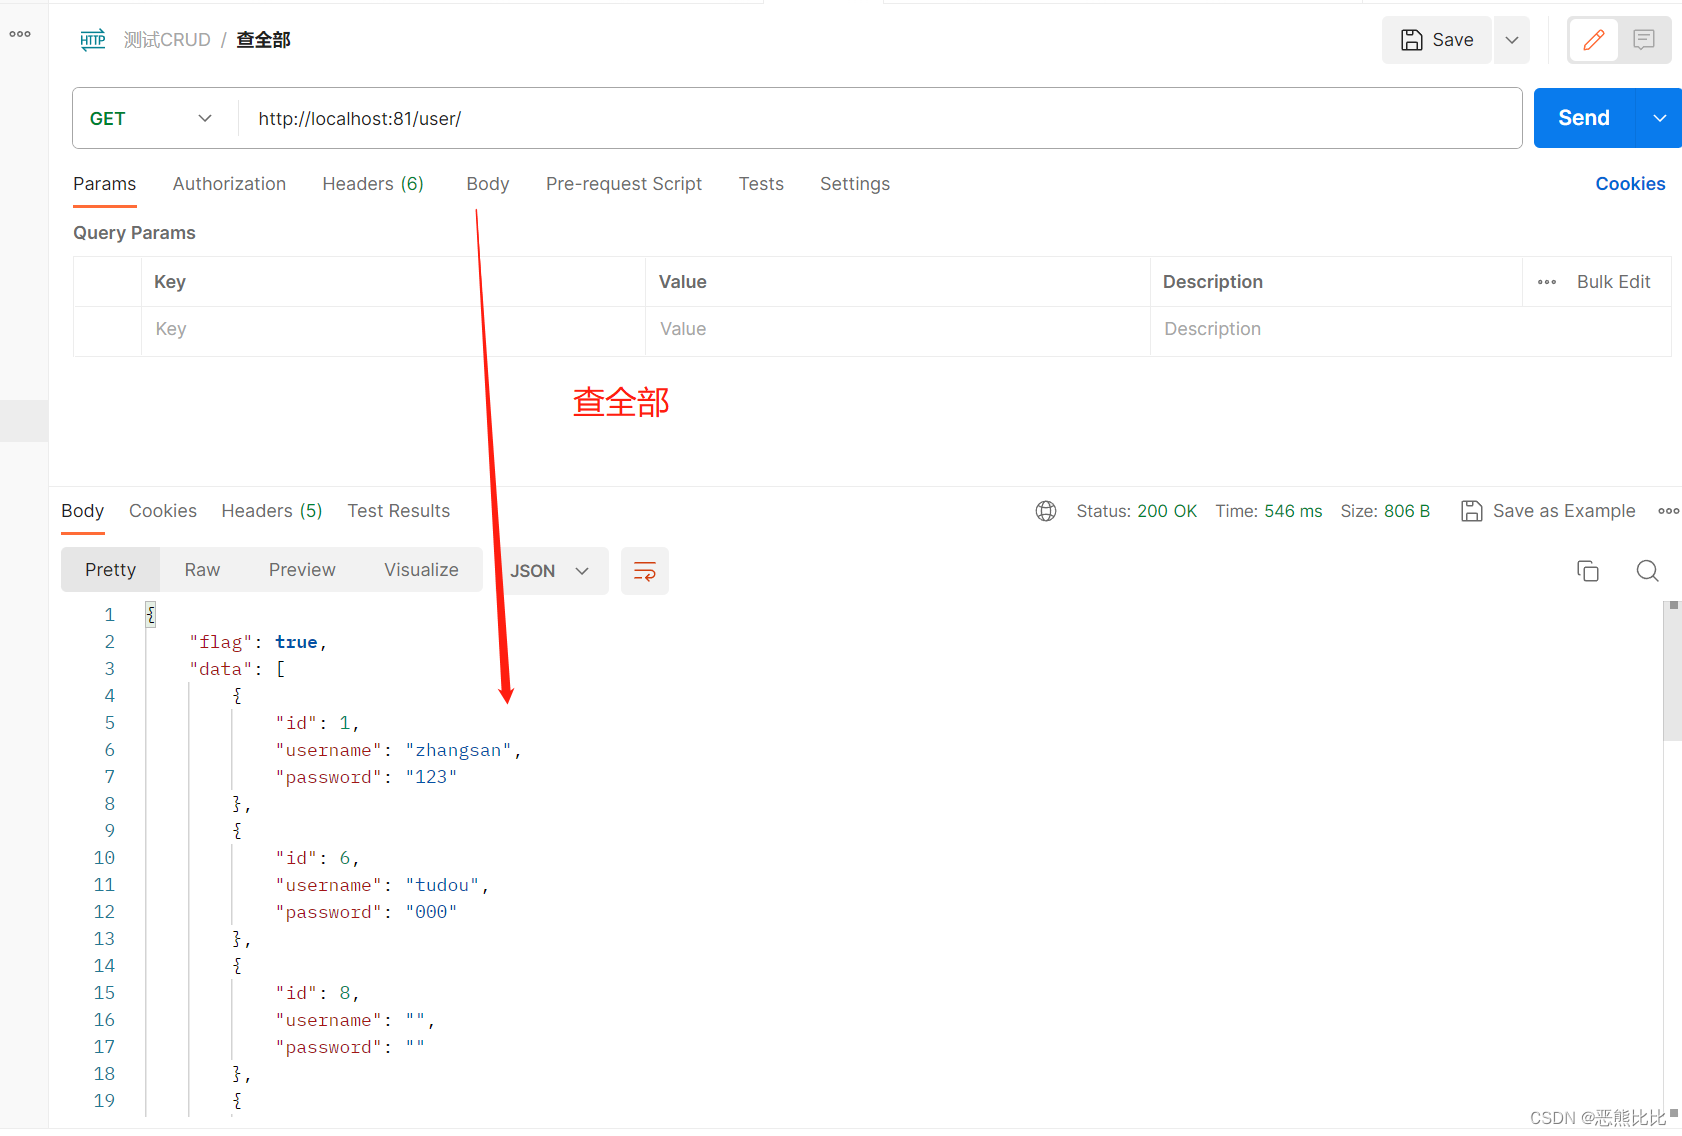
@RequestMapping("/user")
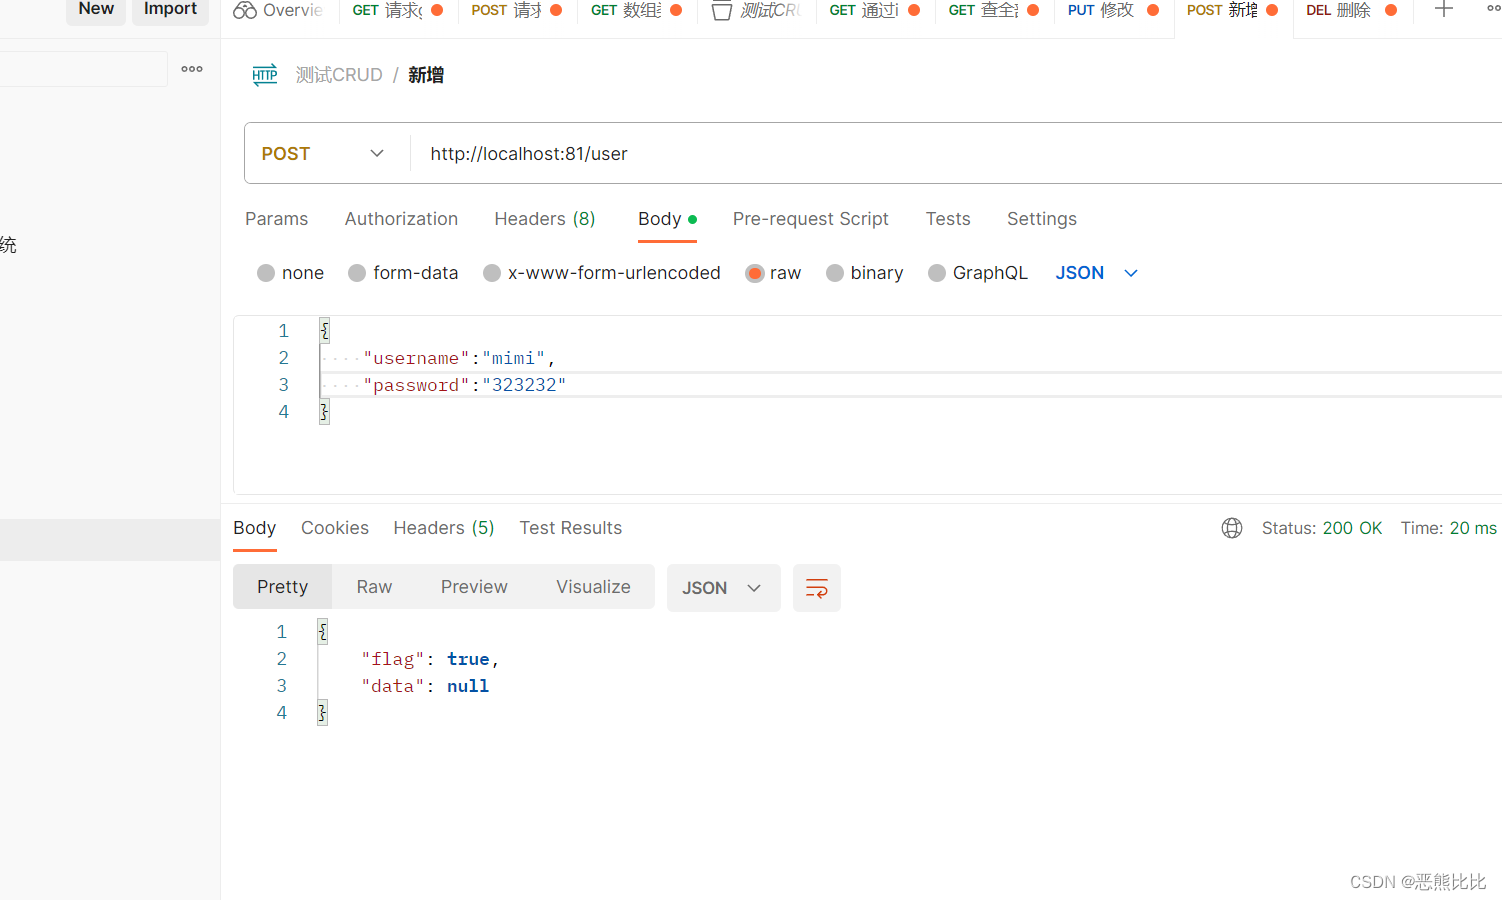
public class UserController {@Autowiredprivate IUserService userService;@GetMappingResultModel getAll(){List<User> list = userService.list();return new ResultModel(true,list);}@GetMapping("/{id}")ResultModel getById(@PathVariable Integer id){User byId = userService.getById(id);return new ResultModel(true,byId);}@PostMappingResultModel save(@RequestBody User user){boolean save = userService.save(user);return new ResultModel(save);}
}
4.3 前后端联调
- 前后端分离结构设计中页面归属前端服务器
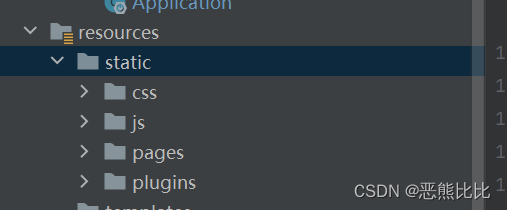
- 单体工程中页面放置在resources目录下的static目录中(建议执行clean)

Vue.js是一种流行的JavaScript框架,用于构建用户界面。
它的核心思想是组件化,即将应用程序分解为一系列可复用的组件,这些组件可以组合起来构建更复杂的应用程序。
- Vue.js作为前端框架,主要负责处理用户界面和用户交互,将用户的操作转化为数据并展示出来。
在前端开发中,Vue.js作为视图层,与业务逻辑层进行交互,接收来自业务逻辑层的数据,并将其展示到页面上。同时,也可以将用户的操作转化为数据发送给业务逻辑层进行处理。
<script>var vue = new Vue({el: '#app',data:{dataList: [],//当前页要展示的列表数据dialogFormVisible: false,//添加表单是否可见dialogFormVisible4Edit:false,//编辑表单是否可见formData: {},//表单数据rules: {//校验规则type: [{ required: true, message: '图书类别为必填项', trigger: 'blur' }],name: [{ required: true, message: '图书名称为必填项', trigger: 'blur' }]},pagination: {//分页相关模型数据currentPage: 1,//当前页码pageSize:10,//每页显示的记录数total:0//总记录数}},//钩子函数,VUE对象初始化完成后自动执行created() {},methods: {//列表getAll() {},//弹出添加窗口handleCreate() {},//重置表单resetForm() {},//添加handleAdd () {},//取消cancel(){},// 删除handleDelete(row) {},//弹出编辑窗口handleUpdate(row) {},//修改handleEdit() {},//分页查询//切换页码handleCurrentChange(currentPage) {},//条件查询}})</script>
钩子函数
是一种特殊的函数,其主要作用是处理拦截在软件组件之间传递的函数调用或事件或消息。钩子函数可以用来处理特定事件,或者在特定的函数调用前后执行自定义的逻辑。
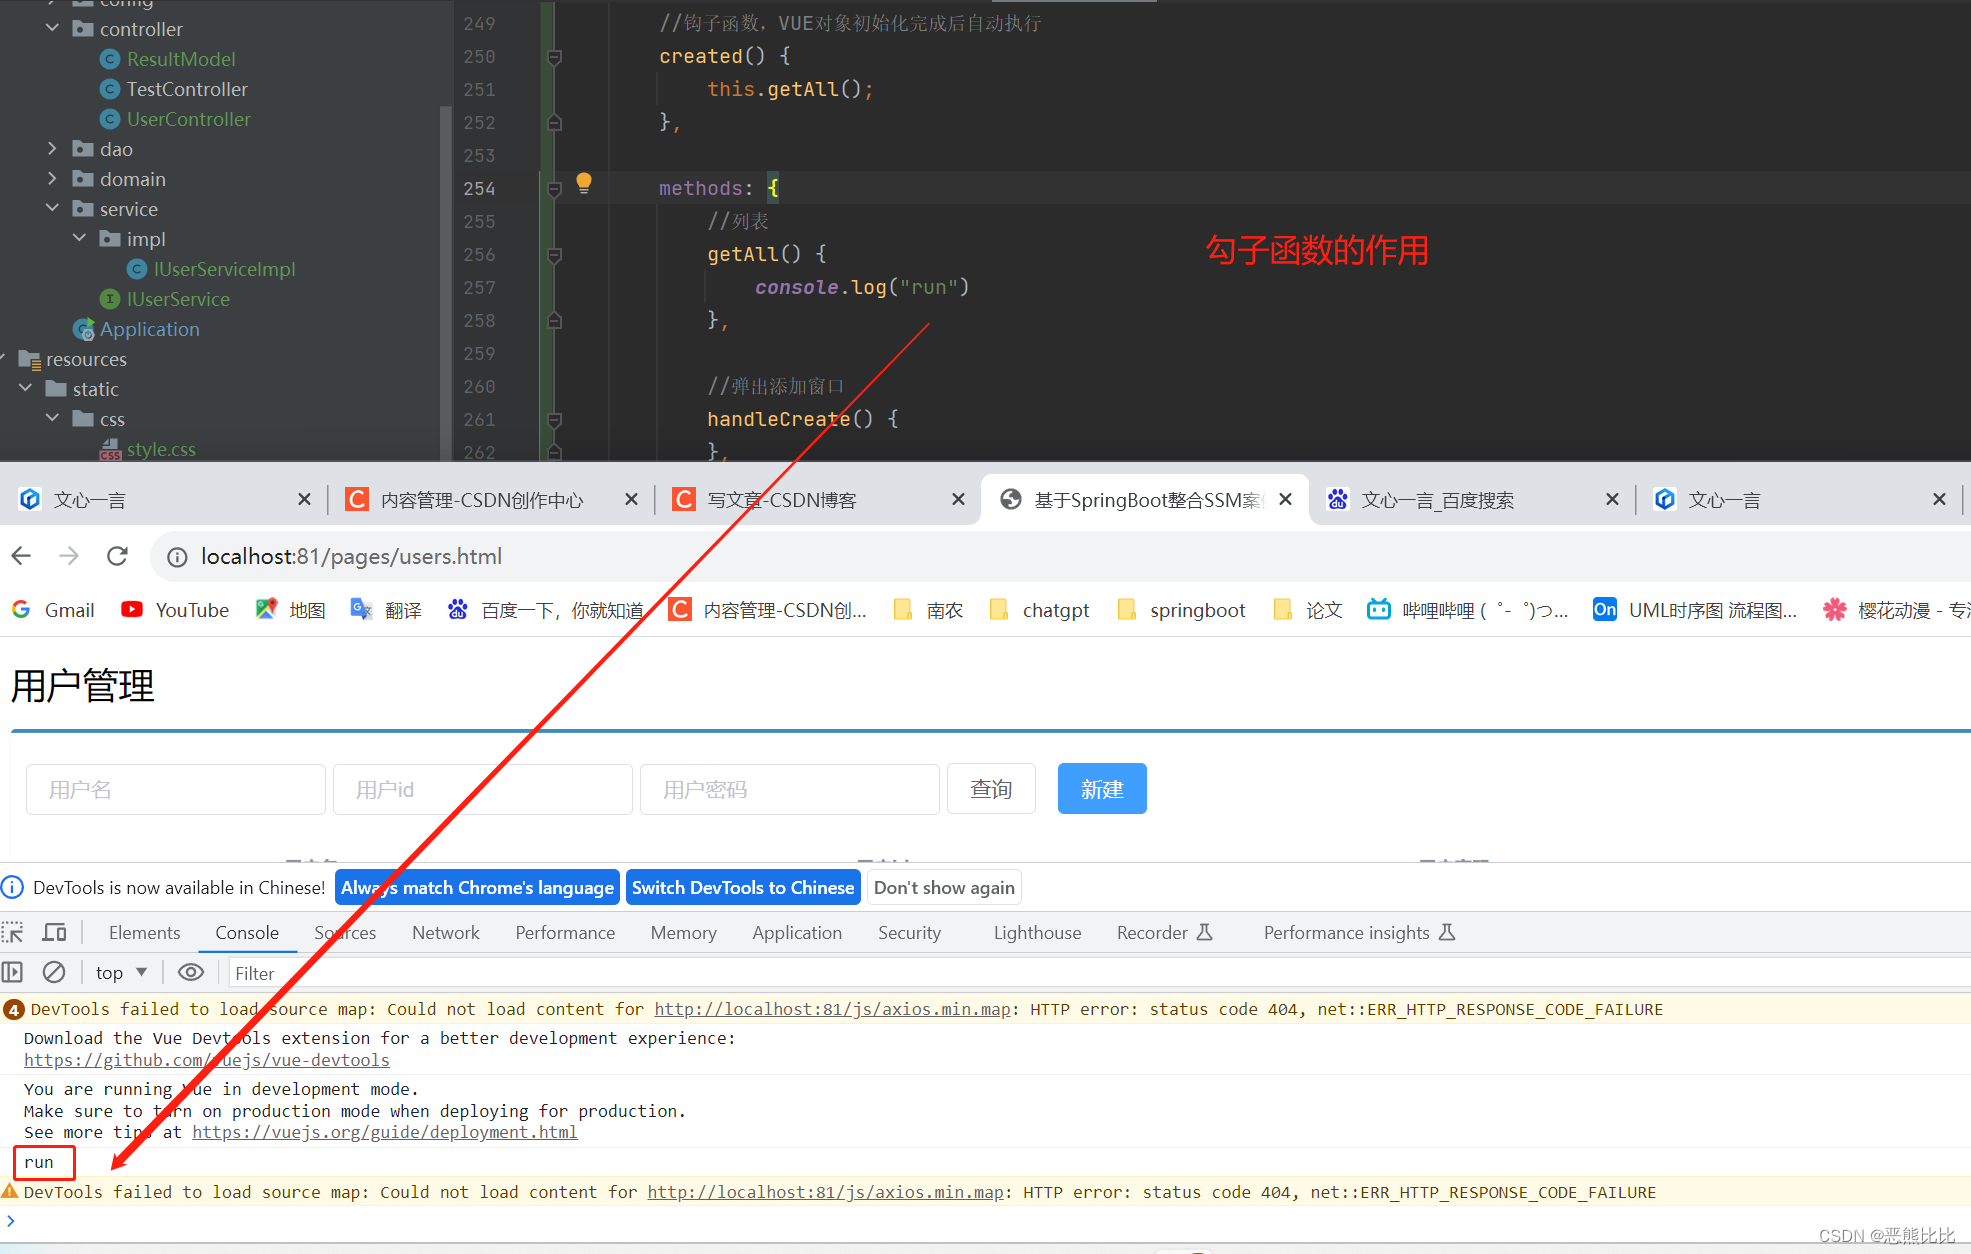
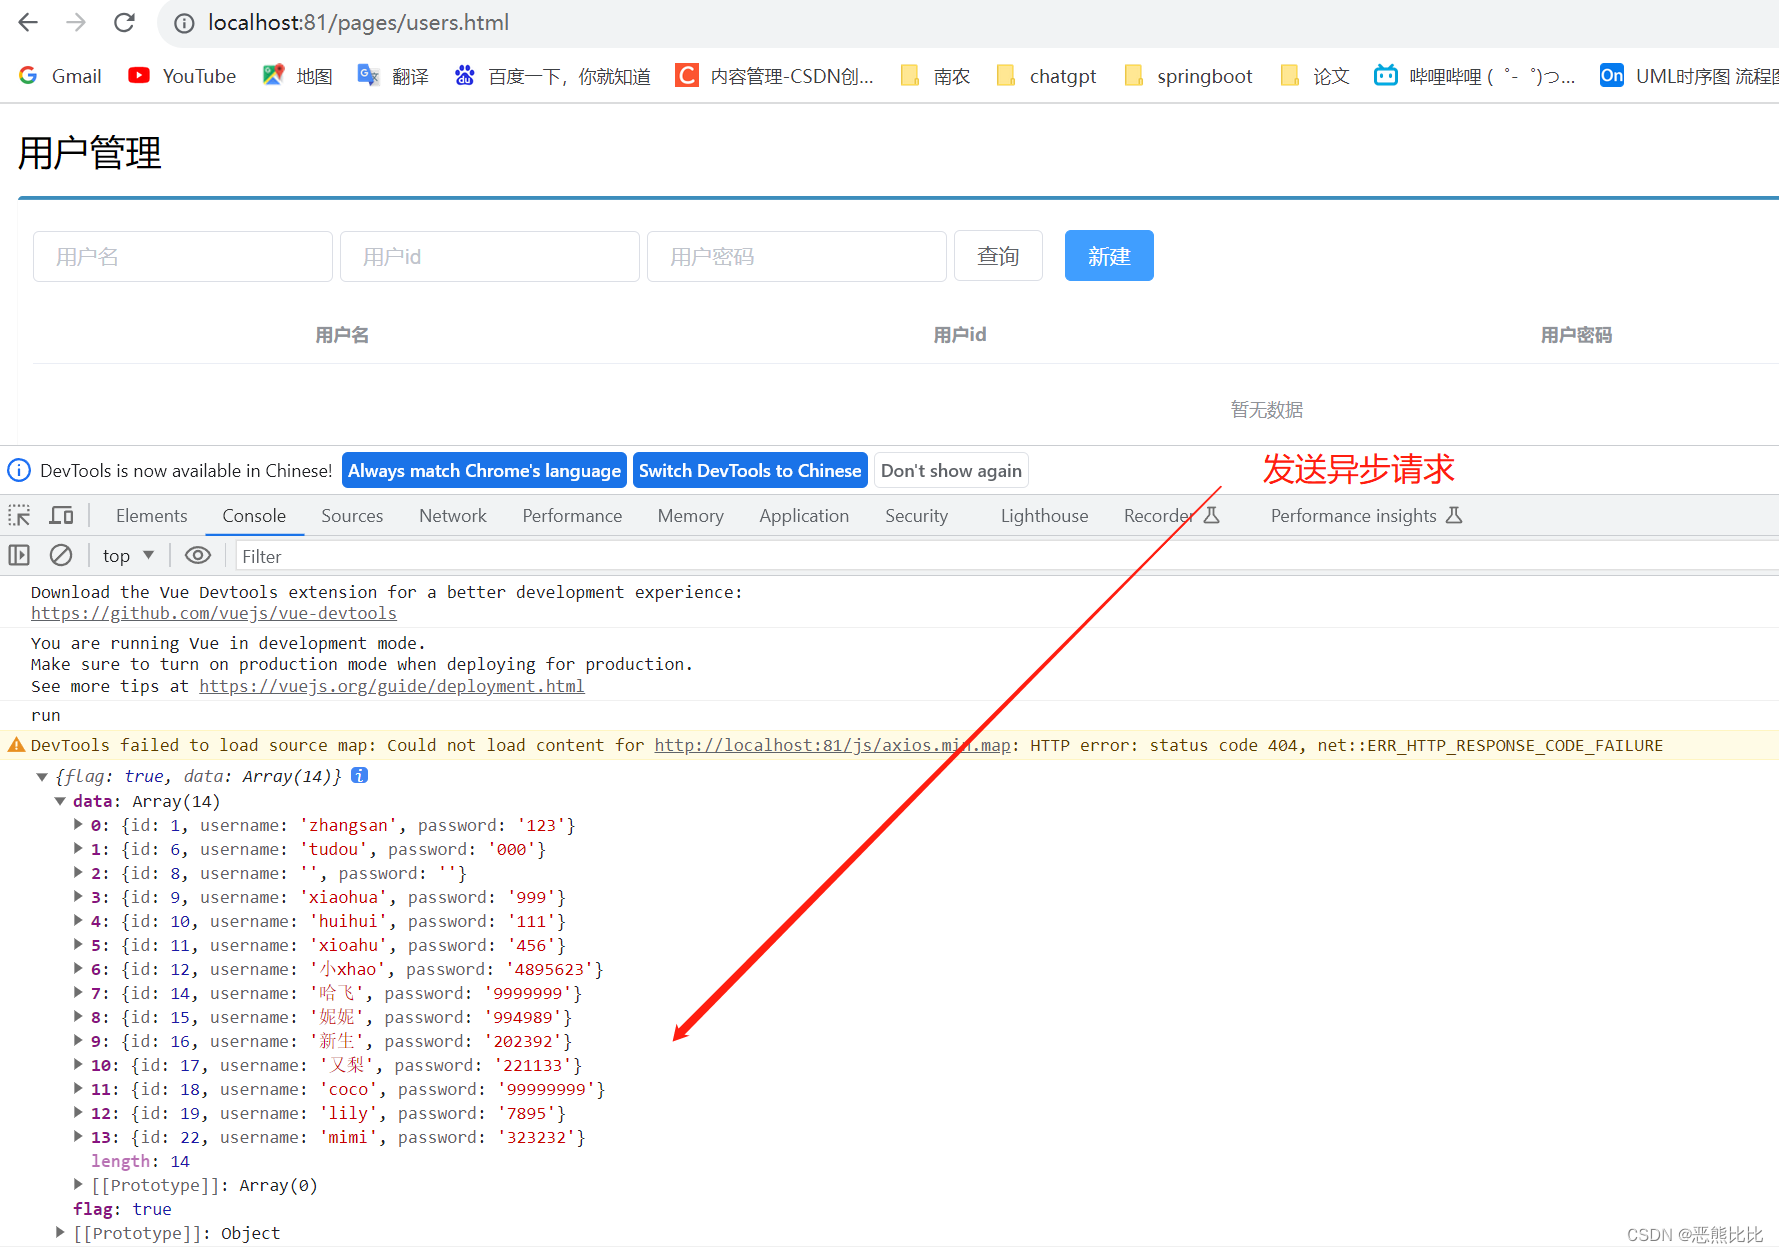
/钩子函数,VUE对象初始化完成后自动执行created() {this.getAll();},methods: {//列表getAll() {console.log("run")//发送异步请求axios.get("/user").then((res)=>{console.log(res.data);});},
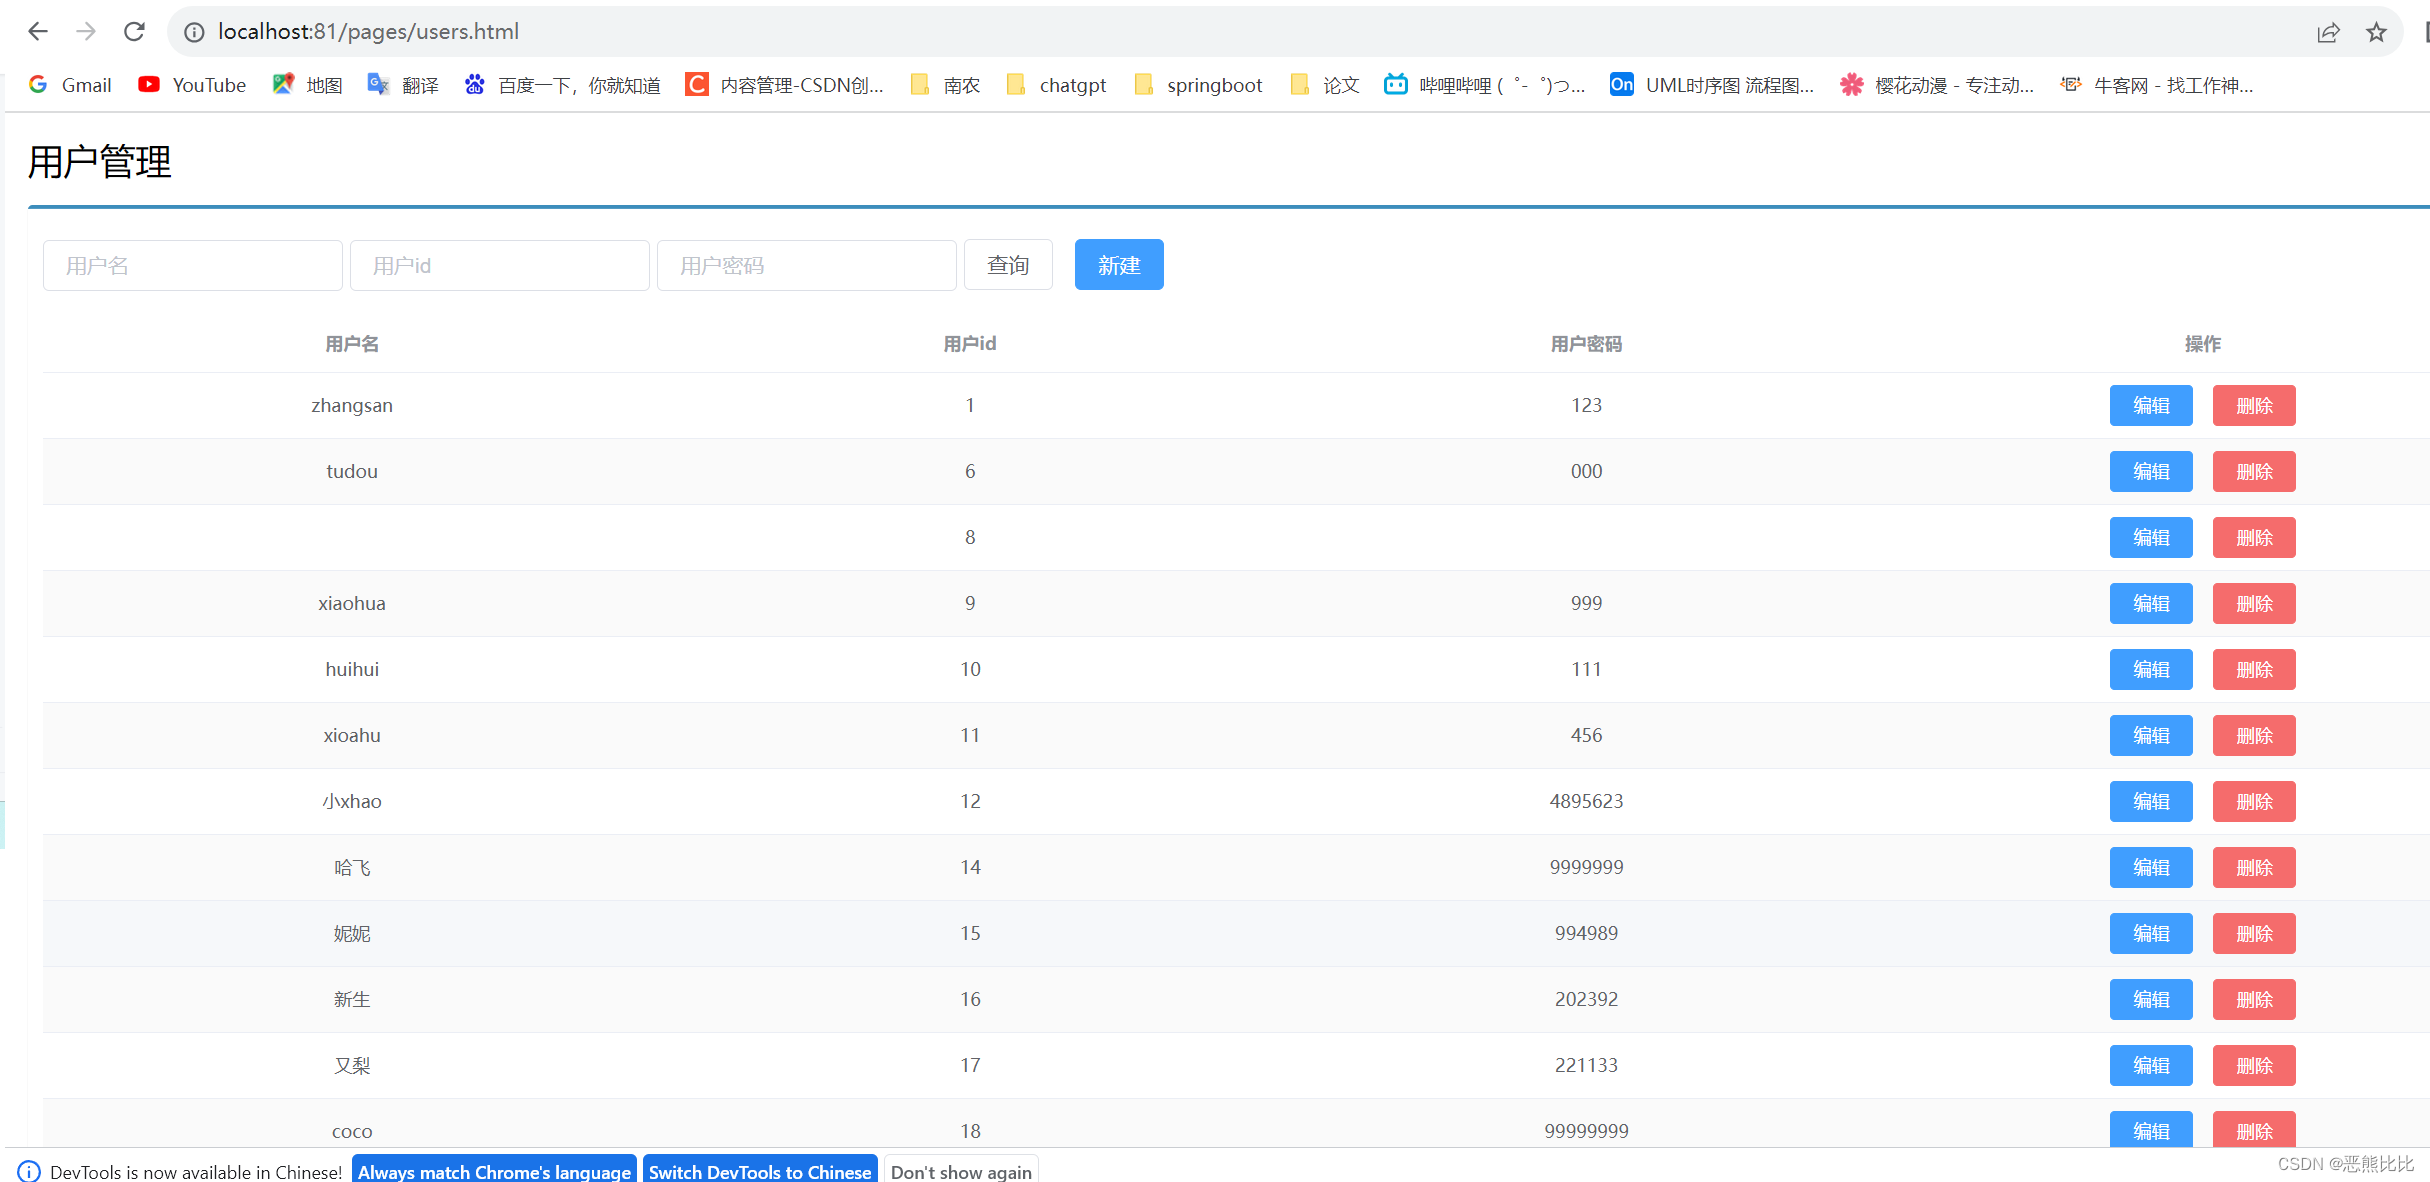
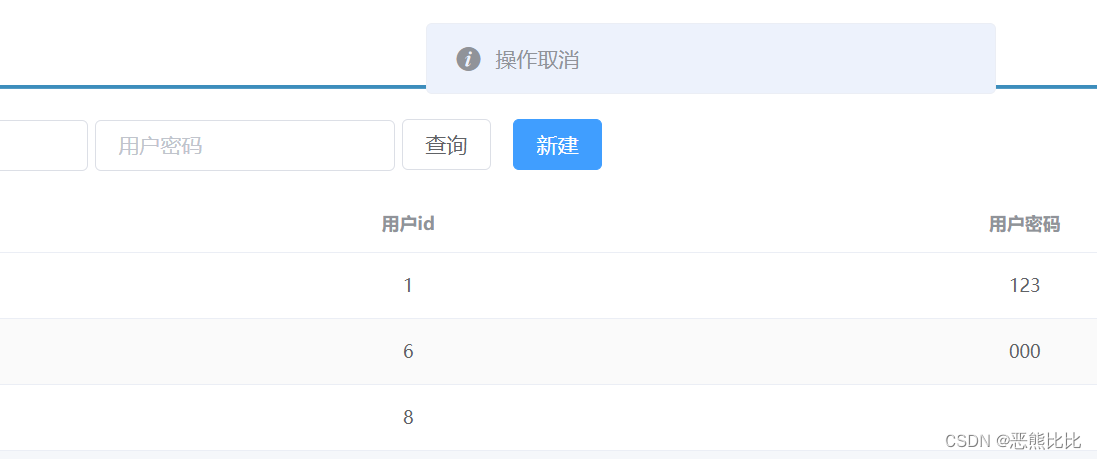
4.4 页面列表数据展示
将查询数据返回到页面,利用前端数据双向绑定进行数据展示
//钩子函数,VUE对象初始化完成后自动执行created() {this.getAll();},methods: {//列表getAll() {//发送异步请求axios.get("/user").then((res)=>{this.dataList=res.data.data;});}
列表页
4.5 列表操作
- 请求方式使用POST调用后台对应操作
- 添加操作结束后动态刷新页面加载数据
- 根据操作结果不同,显示对应的提示信息
- 弹出添加Div时清除表单数据
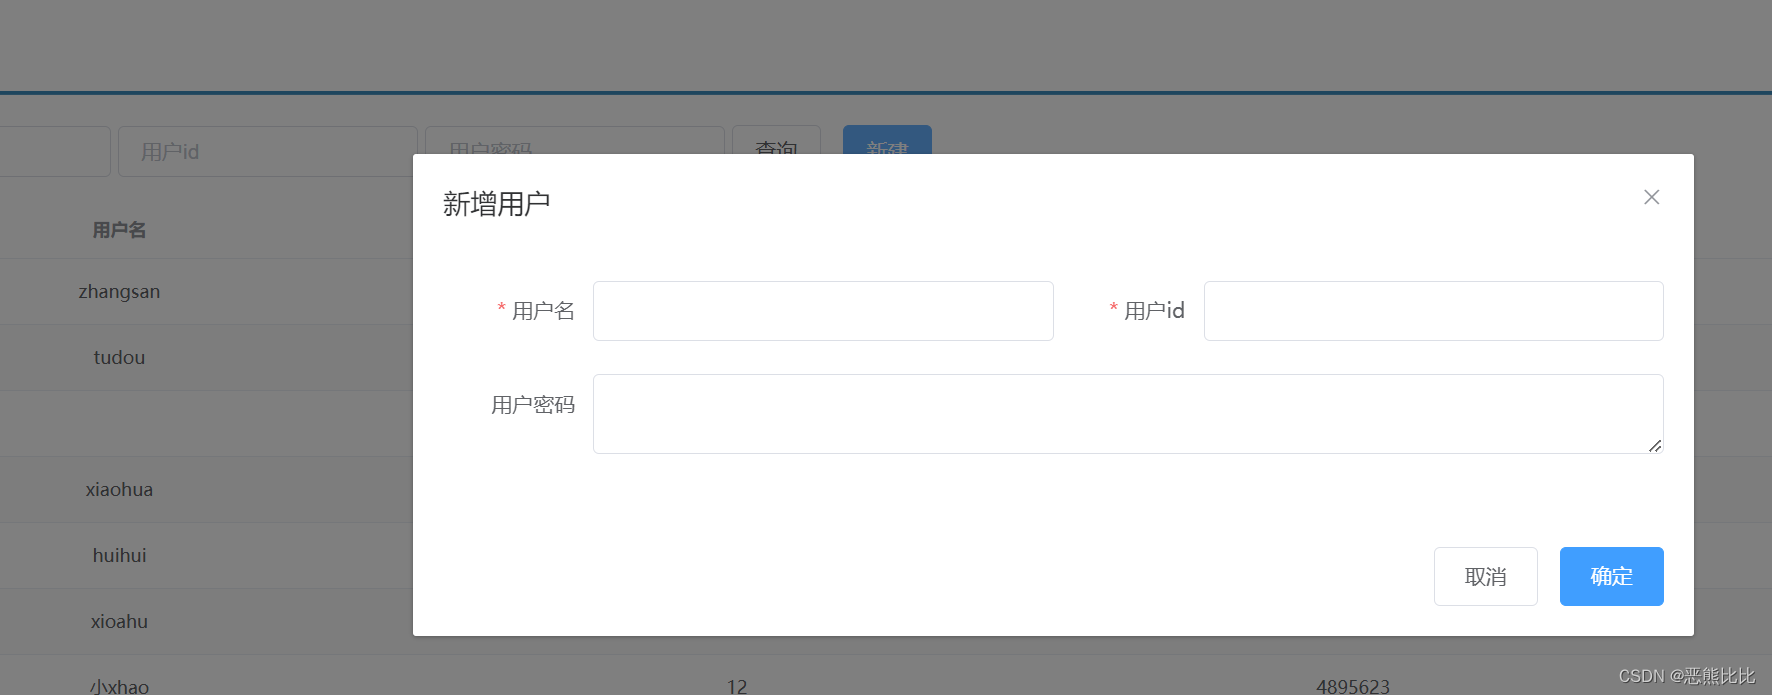
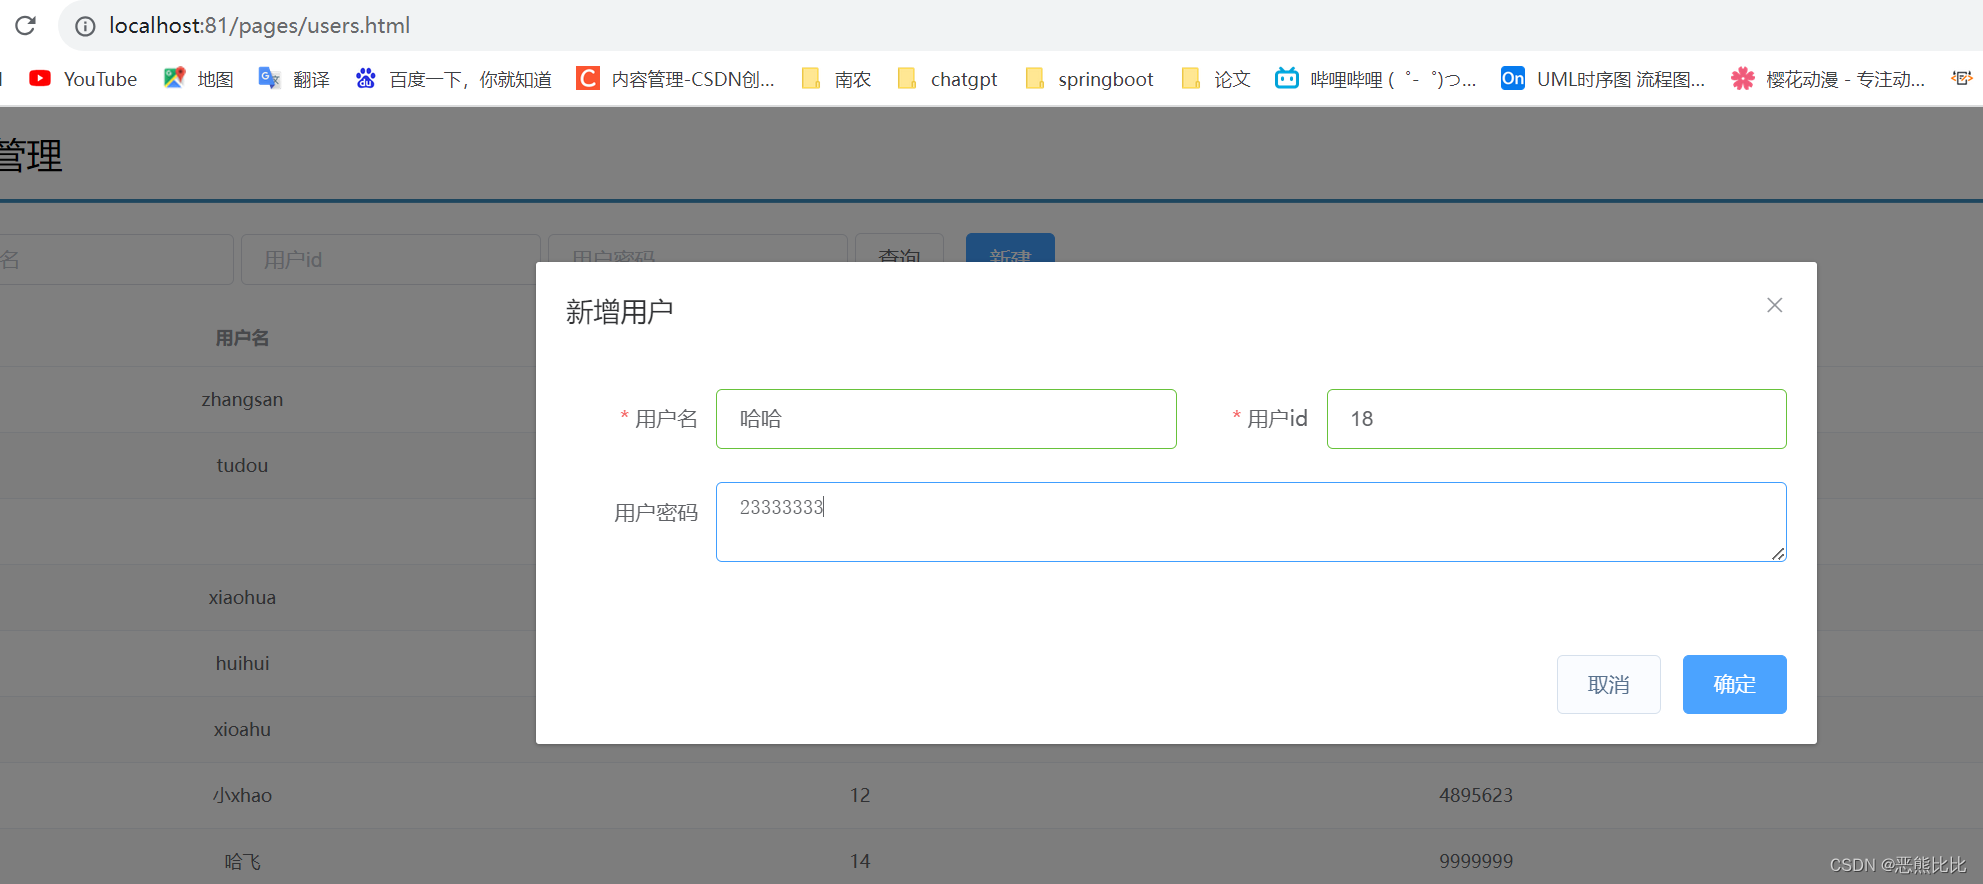
新增
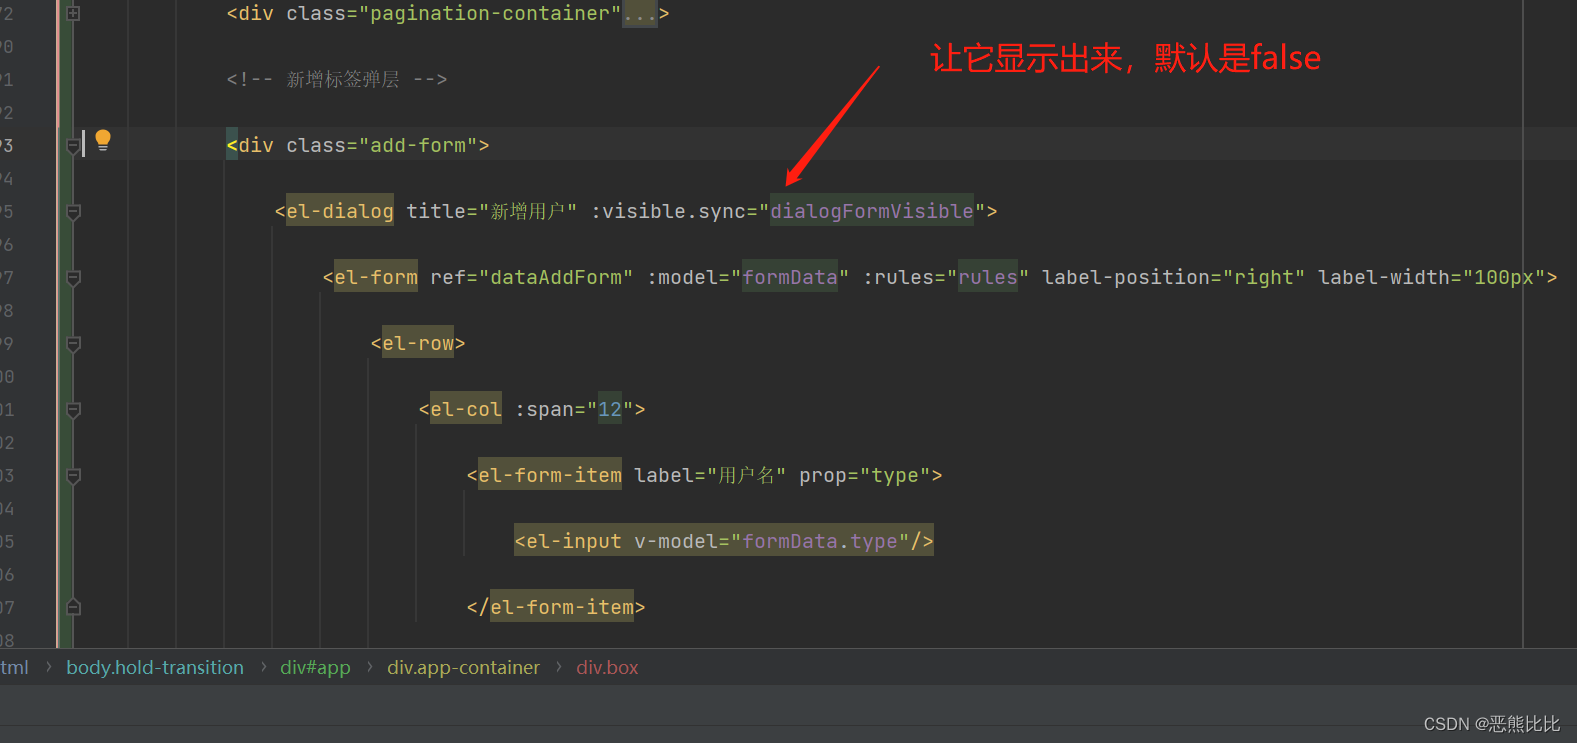
//弹出添加窗口handleCreate() {this.dialogFormVisible = true;},
清除数据
resetForm() {
this.formData = {};
},
//弹出添加窗口
handleCreate() {
this.dialogFormVisible = true;
this.resetForm();
}
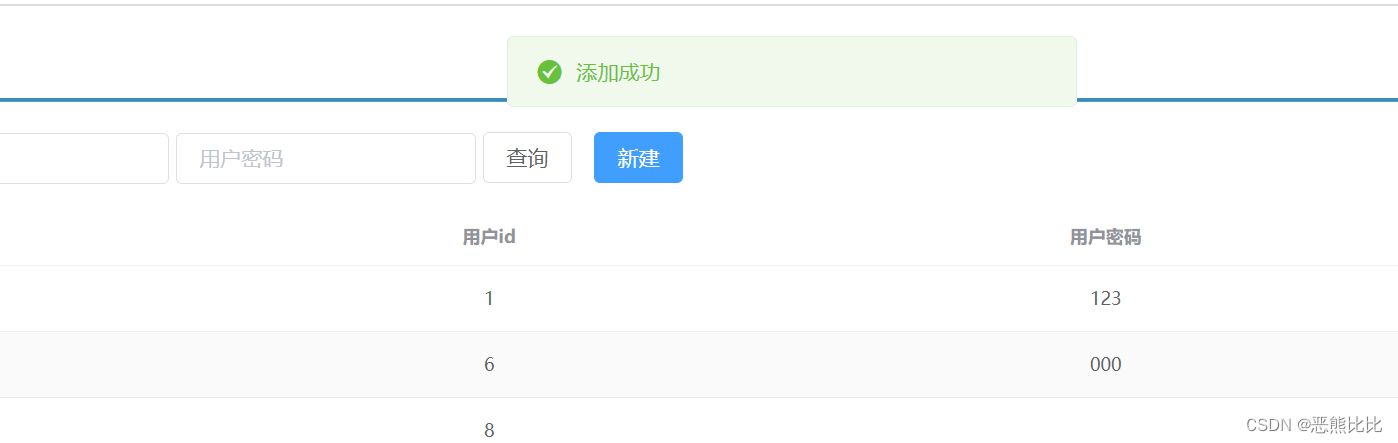
添加
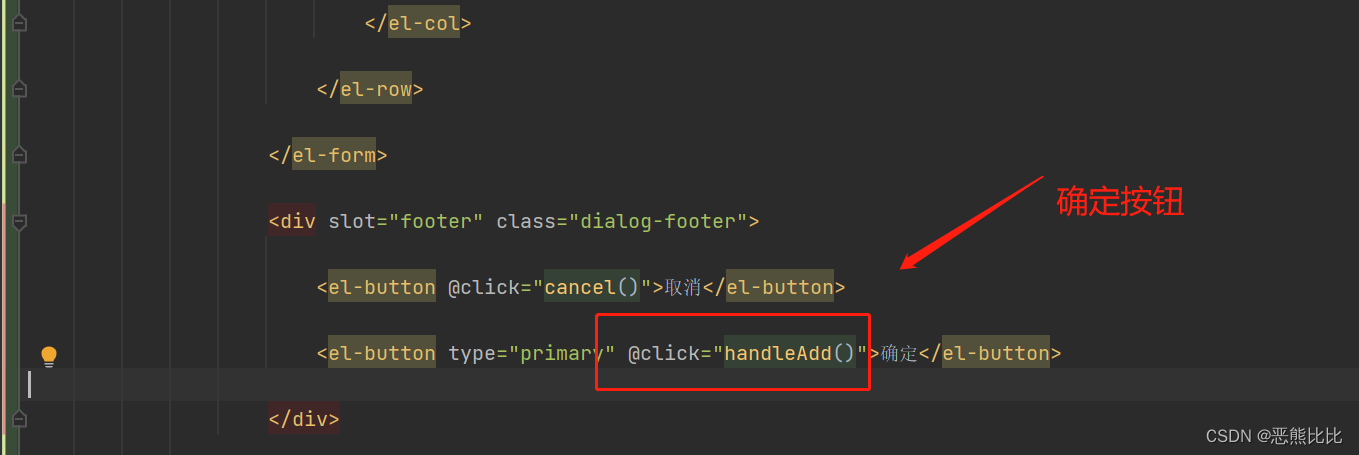
//添加handleAdd () {//发送异步请求axios.post("/user",this.formData).then((res)=>{//如果操作成功,关闭弹层,显示数据if(res.data.flag){this.dialogFormVisible = false;this.$message.success("添加成功");}else {this.$message.error("添加失败");}}).finally(()=>{this.getAll();});},

取消添加
//取消
cancel(){
this.dialogFormVisible = false;
this.$message.info("操作取消");
},


![java八股文面试[多线程]——newWorkStealingPool](https://img-blog.csdnimg.cn/img_convert/d0c2462eb37bb188a353ec04b9d3c69e.png)