HikariCP-4.0.3
修改HikariCP源码,使其连接池支持Kerberos认证
修改后的Hikari源码地址:https://github.com/Raray-chuan/HikariCP-4.0.3
Springboot使用hikari连接池并进行Kerberos认证访问Impala的demo地址:https://github.com/Raray-chuan/springboot-kerberos-hikari-impala
1. Java连接impala的Kerberos认证
import org.apache.hadoop.conf.Configuration;
import org.apache.hadoop.security.UserGroupInformation;import java.io.IOException;
import java.security.PrivilegedAction;
import java.sql.Connection;
import java.sql.DriverManager;
import java.sql.ResultSet;
import java.sql.Statement;
/*** @Author Xichuan* @Date 2022/10/28 17:53* @Description*/
public class TestKerberosImpala {public static final String KRB5_CONF = "D:\\development\\license_dll\\krb5.conf";public static final String PRINCIPAL = "xichuan/admin@XICHUAN.COM";public static final String KEYTAB = "D:\\development\\license_dll\\xichuan.keytab";public static String connectionUrl = "jdbc:impala://node01:21050/;AuthMech=1;KrbRealm=XICHUAN.COM;KrbHostFQDN=node01;KrbServiceName=impala";public static String jdbcDriverName = "com.cloudera.impala.jdbc41.Driver";public static void main(String[] args) throws Exception {UserGroupInformation loginUser = kerberosAuth(KRB5_CONF,KEYTAB,PRINCIPAL);int result = loginUser.doAs((PrivilegedAction<Integer>) () -> {int result1 = 0;try {Class.forName(jdbcDriverName);} catch (ClassNotFoundException e) {e.printStackTrace();}try (Connection con = DriverManager.getConnection(connectionUrl)) {Statement stmt = con.createStatement();ResultSet rs = stmt.executeQuery("SELECT count(1) FROM test_dws.dws_test_id");while (rs.next()) {result1 = rs.getInt(1);}stmt.close();con.close();} catch (Exception e) {e.printStackTrace();}return result1;});System.out.println("count: "+ result);}/*** kerberos authentication* @param krb5ConfPath* @param keyTabPath* @param principle* @return* @throws IOException*/public static UserGroupInformation kerberosAuth(String krb5ConfPath, String keyTabPath, String principle) throws IOException {System.setProperty("java.security.krb5.conf", krb5ConfPath);Configuration conf = new Configuration();conf.set("hadoop.security.authentication", "Kerberos");UserGroupInformation.setConfiguration(conf);UserGroupInformation loginInfo = UserGroupInformation.loginUserFromKeytabAndReturnUGI(principle, keyTabPath);if (loginInfo.hasKerberosCredentials()) {System.out.println("kerberos authentication success!");System.out.println("login user: "+loginInfo.getUserName());} else {System.out.println("kerberos authentication fail!");}return loginInfo;}
}
2. 解读源码,了解Hikari连接池如何保持Connection个数在一定数目上
1.在我们初始化Hikari Pool参数后,第一次调用com.zaxxer.hikari.HikariDataSource#getConnection()的时候,会进行初始化HikariPool,HikariPool正式管理Connection的类
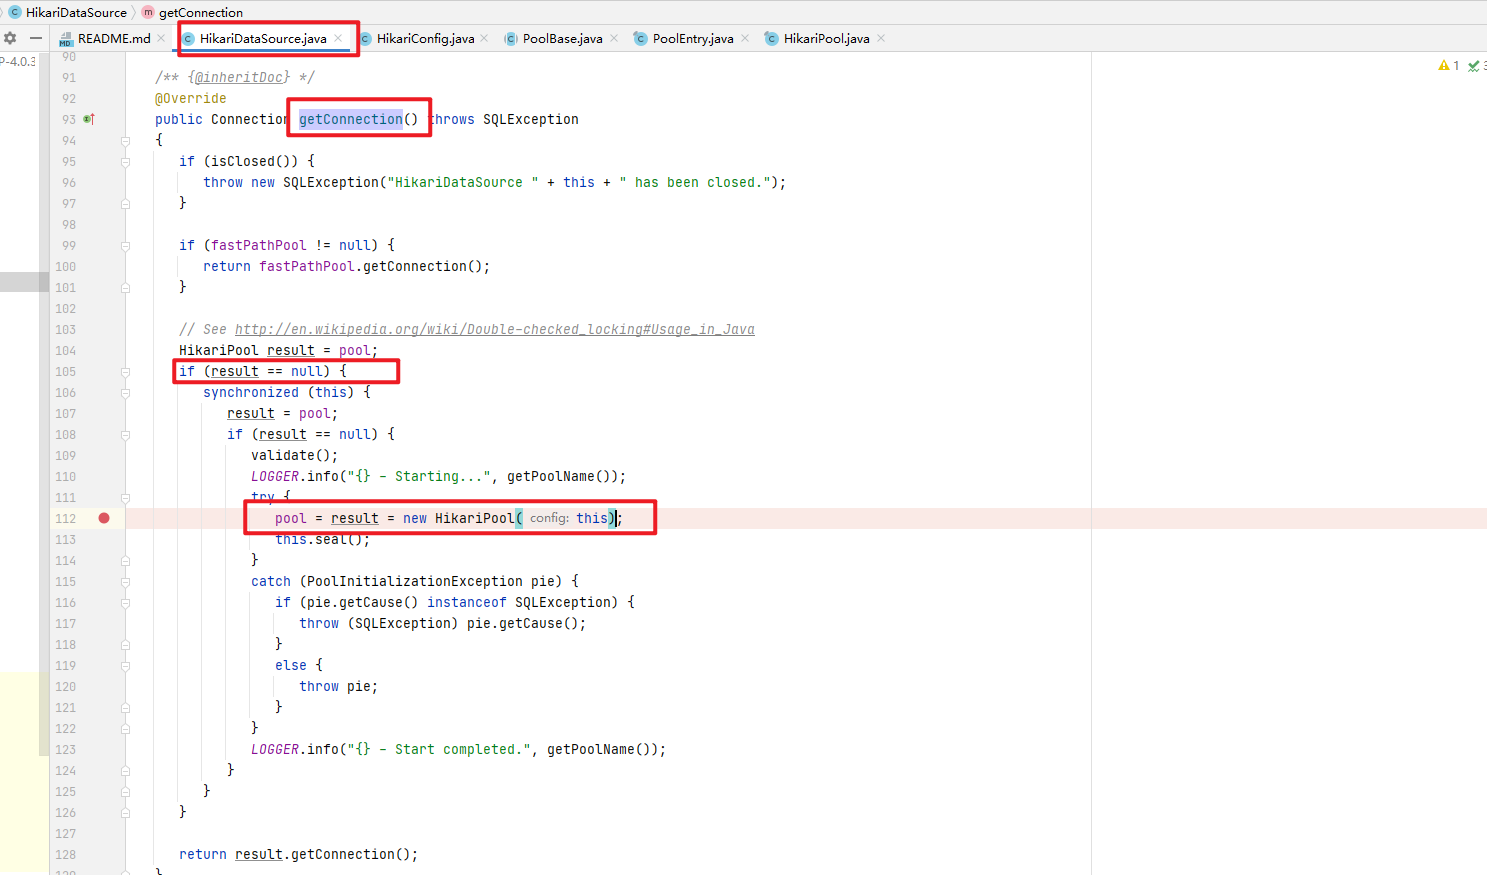
2.进入com.zaxxer.hikari.pool.HikariPool#HikariPool类中,查看HikariPool如何初始化连接池的
HikariPool初始化的前面参数先不管,不是研究重点,看红框中,HikariPool会初始化一个HouseKeeper的线程,HouseKeeper的作用的是保持连接池的idle数据在一定的数目
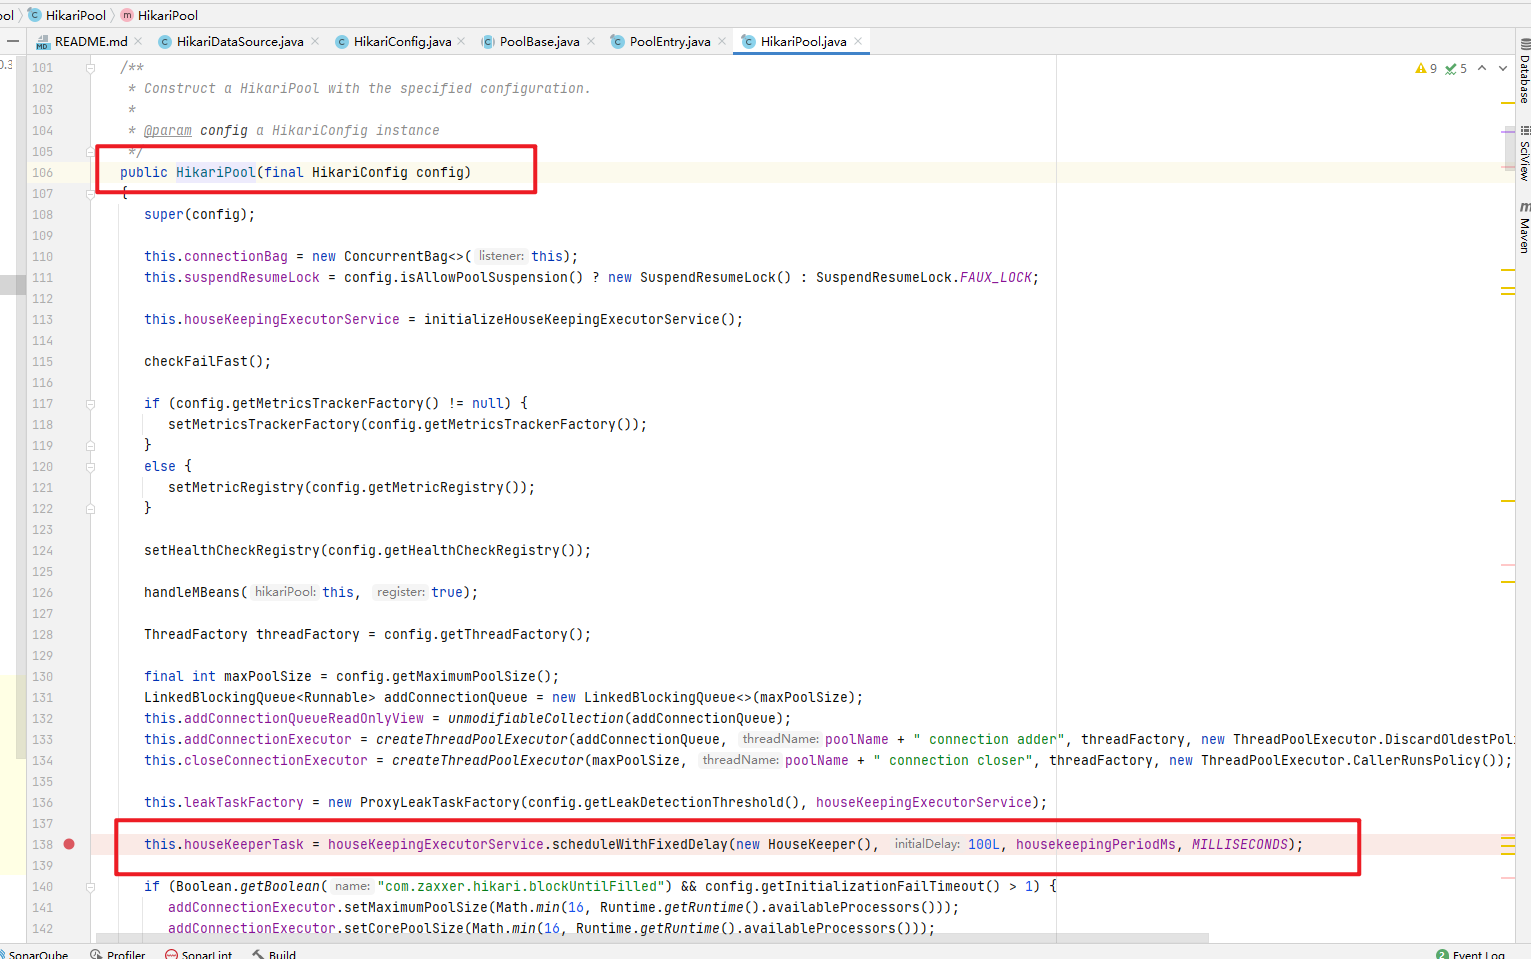
3.进入com.zaxxer.hikari.pool.HikariPool.HouseKeeper类,看它如何是保持Connection的数据在一定的数据

我们可以看到,HouseKeeper是一个内部类,继续往下看代码,有一个fillPool()方法,看注解,这个方法可以保持连接数在一定数据上

4.进入com.zaxxer.hikari.pool.HikariPool#fillPool方法

从上图我们可以看出,此方法会判断pool是否需要新添加Connection,如果需要,则在pool中添加Connection。添加Connection方式是提交一个线程,我们直接看PoolEntryCreator如何添加Connection即可。下面只会跟踪Hikari最终创建Connection的代码地方,不会解释每个方法以及类的作用
5.跟踪代码,找到Hikari最终创建Connection的代码地方
进入com.zaxxer.hikari.pool.HikariPool.PoolEntryCreator类,

可以看出该线程会创建一个PoolEntry类,PoolEntry类就是用来保存Connection的.
继续进入com.zaxxer.hikari.pool.HikariPool#createPoolEntry方法,看如何创建PoolEntry类的

可以看出,创建PoolEntry是通过newPoolEntry()方法进行创建的
继续进入com.zaxxer.hikari.pool.PoolBase#newPoolEntry方法,看如何创建PoolEntry的


可以看出newPoolEntry()方法创建PoolEntry对象,是通过PoolEntry构造方法创建的,进入此构造方法,第一个参数就是Connection,那我们就需要进入newConnection()方法看此Connection是如何创建的
进入com.zaxxer.hikari.pool.PoolBase#newConnection方法

我们看出Connection的创建是通过dataSource.getConnection()来创建的,那这个dataSource的实现类是哪个?打断点可以看出是DriverDataSource类
进入com.zaxxer.hikari.util.DriverDataSource#getConnection()方法,查看Connection是如何创建的

可以看出创建connection是通过调用impala、mysql、h2等驱动包的接口创建的
6.总结
通过上面的源码跟踪,可以发现,创建Connection是在HikariPool类中的HouseKeeper线程中进行的。所以我们在com.zaxxer.hikari.HikariDataSource#getConnection()中,在HikariPool初始化的时候进行Kerberos认证是行不通的,因为Kerberos默认24小时就失效了; 但Kerberos失效后,HouseKeeper创建Connection的时候并没有再次认证。
所以我们思路可以是,修改hikari的源码,在com.zaxxer.hikari.util.DriverDataSource#getConnection()方法调用 driver.connect(jdbcUrl, driverProperties)之前认证即可。并且hikari连接池的max-lifetime参数要小于Kerberos的过期时长
3. 修改Hikari源码,使其支持Kerberos认证
3.1 修改HikariConfig类,添加Kerberos的四个参数
四个参数分别是:
authenticationType:安全验证的类型,如果值是"kerberos",则进行Kerberos认证,如果为null,则不进行认证
krb5FilePath:krb5.conf文件的路径
principal:principal的名称
keytabPath:对应principal的keytab的路径
//kerberos paramsprivate volatile String authenticationType;private volatile String krb5FilePath;private volatile String keytabPath;private volatile String principal;public String getAuthenticationType() {return authenticationType;}public void setAuthenticationType(String authenticationType) {this.authenticationType = authenticationType;}public String getKrb5FilePath() {return krb5FilePath;}public void setKrb5FilePath(String krb5FilePath) {this.krb5FilePath = krb5FilePath;}public String getKeytabPath() {return keytabPath;}public void setKeytabPath(String keytabPath) {this.keytabPath = keytabPath;}public String getPrincipal() {return principal;}public void setPrincipal(String principal) {this.principal = principal;}3.2 在PoolBase类中初始化DriverDataSource的时候,添加Kerberos参数
private void initializeDataSource(){final String jdbcUrl = config.getJdbcUrl();final String username = config.getUsername();final String password = config.getPassword();final String dsClassName = config.getDataSourceClassName();final String driverClassName = config.getDriverClassName();final String dataSourceJNDI = config.getDataSourceJNDI();final Properties dataSourceProperties = config.getDataSourceProperties();//add kerberos propertiesdataSourceProperties.setProperty("authenticationType",config.getAuthenticationType());dataSourceProperties.setProperty("keytabPath",config.getKeytabPath());dataSourceProperties.setProperty("krb5FilePath",config.getKrb5FilePath());dataSourceProperties.setProperty("principal",config.getPrincipal());DataSource ds = config.getDataSource();if (dsClassName != null && ds == null) {ds = createInstance(dsClassName, DataSource.class);PropertyElf.setTargetFromProperties(ds, dataSourceProperties);}else if (jdbcUrl != null && ds == null) {ds = new DriverDataSource(jdbcUrl, driverClassName, dataSourceProperties, username, password);}else if (dataSourceJNDI != null && ds == null) {try {InitialContext ic = new InitialContext();ds = (DataSource) ic.lookup(dataSourceJNDI);} catch (NamingException e) {throw new PoolInitializationException(e);}}if (ds != null) {setLoginTimeout(ds);createNetworkTimeoutExecutor(ds, dsClassName, jdbcUrl);}this.dataSource = ds;}
3.3 DriverDataSource类在getConnection()的时候进Kerberos认证
public final class DriverDataSource implements DataSource{......//kerberos paramsprivate String authenticationType = "";private String krb5FilePath;private String keytabPath;private String principal;public DriverDataSource(String jdbcUrl, String driverClassName, Properties properties, String username, String password) {this.jdbcUrl = jdbcUrl;this.driverProperties = new Properties();//init kerberos propertiesif (properties.getProperty("authenticationType") != null && properties.getProperty("authenticationType").equals("kerberos")){authenticationType = properties.getProperty("authenticationType");krb5FilePath = properties.getProperty("krb5FilePath");keytabPath = properties.getProperty("keytabPath");principal = properties.getProperty("principal");}...}......@Overridepublic Connection getConnection() throws SQLException {//if authenticationType=kerberos,it must be kerberos authentication first!if (authenticationType != null && authenticationType.equals("kerberos")){UserGroupInformation ugi = authentication();try {return ugi.doAs(new XichuanGenerateConnectionAction(jdbcUrl, driverProperties));} catch (IOException | InterruptedException e) {e.printStackTrace();}return null;}else{return driver.connect(jdbcUrl, driverProperties);}}@Overridepublic Connection getConnection(final String username, final String password) throws SQLException{final Properties cloned = (Properties) driverProperties.clone();if (username != null) {cloned.put(USER, username);if (cloned.containsKey("username")) {cloned.put("username", username);}}if (password != null) {cloned.put(PASSWORD, password);}//if authenticationType=kerberos,it must be kerberos authentication first!if (authenticationType != null && authenticationType.equals("kerberos")){UserGroupInformation ugi = authentication();try {return ugi.doAs(new XichuanGenerateConnectionAction(jdbcUrl, cloned));} catch (IOException | InterruptedException e) {e.printStackTrace();}return null;}else{return driver.connect(jdbcUrl, cloned);}}/*** generate connection action*/public class XichuanGenerateConnectionAction implements PrivilegedExceptionAction<Connection> {private String jdbcUrl;private Properties driverProperties;public XichuanGenerateConnectionAction(String jdbcUrl, Properties driverProperties){this.jdbcUrl = jdbcUrl;this.driverProperties = driverProperties;}@Overridepublic Connection run() throws Exception {return driver.connect(jdbcUrl, driverProperties);}}/*** kerberos authentication*/private UserGroupInformation authentication() {if(authenticationType != null && "kerberos".equalsIgnoreCase(authenticationType.trim())) {LOGGER.info("kerberos authentication is begin");} else {LOGGER.info("kerberos authentication is not open");return null;}System.setProperty("java.security.krb5.conf", krb5FilePath);org.apache.hadoop.conf.Configuration conf = new org.apache.hadoop.conf.Configuration();conf.set("hadoop.security.authentication", authenticationType);try {UserGroupInformation.setConfiguration(conf);UserGroupInformation userGroupInformation = UserGroupInformation.loginUserFromKeytabAndReturnUGI(principal, keytabPath);LOGGER.info("kerberos authentication success!, krb5FilePath:{}, principal:{}, keytab:{}", krb5FilePath, principal, keytabPath);LOGGER.info("login user::{}", userGroupInformation.getUserName());return userGroupInformation;} catch (IOException e1) {LOGGER.info("kerberos authentication fail!");LOGGER.error(e1.getMessage() + ", detail:{}", e1);}return null;}...
}
4. 对修改后的源码打包
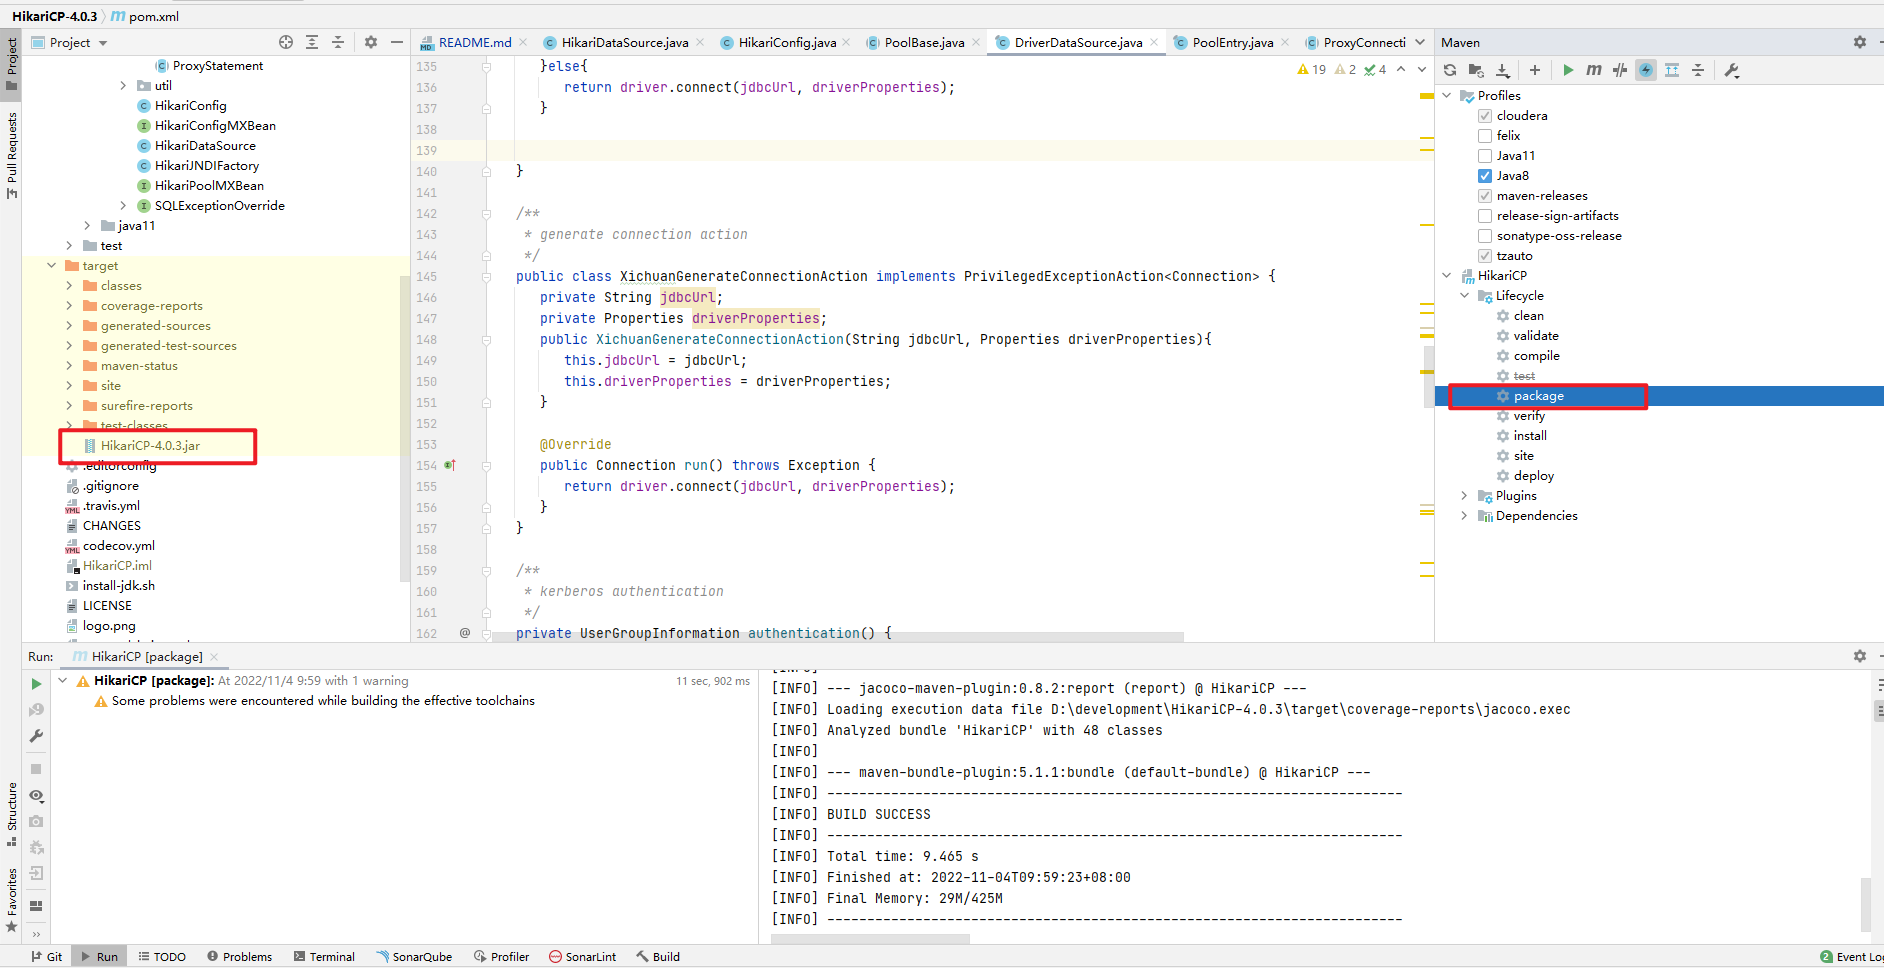
1.maven一定要用HikariCP的对应版本的maven版本
HikariCP-4.0.3要求的maven版本是3.3.9,必须使用apache-maven-3.3.9才能打包

2.添加toolchains.xml文档
toolchains.xml文件的内容:
<?xml version="1.0" encoding="UTF-8"?>
<toolchains xmlns="http://maven.apache.org/TOOLCHAINS/1.1.0" xmlns:xsi="http://www.w3.org/2001/XMLSchema-instance"xsi:schemaLocation="http://maven.apache.org/TOOLCHAINS/1.1.0 http://maven.apache.org/xsd/toolchains-1.1.0.xsd"><toolchain><type>jdk</type><provides><version>1.8</version><vendor>sun</vendor></provides><configuration><!--jdkHome是jdk的安装home路径--><jdkHome>D:\development tool\Java\jdk1.8.0_211</jdkHome></configuration></toolchain></toolchains>
将此文件放在apache-maven-3.3.9\conf目录中
如果打包的时候还是报缺失toolchains.xml文件,可以将此文件放到本地仓库的路径中,如下图:


3.进行package,然后在本地仓库中将HikariCP-4.0.3.jar替换即可
5.在springboot中使用hikari连接池并进行Kerberos认证
1. 在application.yml添加四个参数
# kerberos
# authenticationType:安全验证的类型,如果值是"kerberos",则进行Kerberos认证,如果为null,则不进行认证
authentication.type=kerberos
# krb5FilePath:krb5.conf文件的路径
authentication.kerberos.krb5FilePath=D:\\development\\license_dll\\krb5.conf
# principal:principal的名称
authentication.kerberos.principal=xichuan/admin@XICHUAN.COM
# keytabPath:对应principal的keytab的路径
authentication.kerberos.keytabPath=D:\\development\\license_dll\\xichuan.keytab# datasource and pool
datasource.xichuan.url=jdbc:impala://node01:21050/;AuthMech=1;KrbRealm=XICHUAN.COM;KrbHostFQDN=node01;KrbServiceName=impala
datasource.xichuan.driver-class-name=com.cloudera.impala.jdbc41.Driver
datasource.xichuan.username=
datasource.xichuan.password=
datasource.xichuan.pool-name=xichuan-pool
datasource.xichuan.read-only=false
datasource.xichuan.auto-commit=true
datasource.xichuan.maximum-pool-size=3
#此值务必要小于Kerberos的过期时长(默认24小时)
datasource.xichuan.max-lifetime=35000
datasource.xichuan.idle-timeout=10000
datasource.xichuan.validation-timeout=5000
2.获取DataSourceProperties并封装成类
import org.springframework.boot.context.properties.ConfigurationProperties;
import org.springframework.stereotype.Component;/*** @Author Xichuan* @Date 2022/11/1 17:44* @Description*/
@Component
@ConfigurationProperties(prefix = "datasource.xichuan")
public class DataSourceProperties {private String url;private String driverClassName;private String username;private String password;private String poolName;private boolean readOnly;private boolean autoCommit;private int maximumPoolSize;private long maxLifetime;private long idleTimeout;private long validationTimeout;public String getPoolName() {return poolName;}public void setPoolName(String poolName) {this.poolName = poolName;}public boolean isReadOnly() {return readOnly;}public void setReadOnly(boolean readOnly) {this.readOnly = readOnly;}public boolean isAutoCommit() {return autoCommit;}public void setAutoCommit(boolean autoCommit) {this.autoCommit = autoCommit;}public int getMaximumPoolSize() {return maximumPoolSize;}public void setMaximumPoolSize(int maximumPoolSize) {this.maximumPoolSize = maximumPoolSize;}public long getMaxLifetime() {return maxLifetime;}public void setMaxLifetime(long maxLifetime) {this.maxLifetime = maxLifetime;}public long getIdleTimeout() {return idleTimeout;}public void setIdleTimeout(long idleTimeout) {this.idleTimeout = idleTimeout;}public long getValidationTimeout() {return validationTimeout;}public void setValidationTimeout(long validationTimeout) {this.validationTimeout = validationTimeout;}public String getUrl() {return url;}public void setUrl(String url) {this.url = url;}public String getDriverClassName() {return driverClassName;}public void setDriverClassName(String driverClassName) {this.driverClassName = driverClassName;}public String getUsername() {return username;}public void setUsername(String username) {this.username = username;}public String getPassword() {return password;}public void setPassword(String password) {this.password = password;}
}
3. 在配置文件中创建dataSource的bean
/*** @Author Xichuan* @Date 2022/11/1 15:15* @Description*/
@Configuration
public class DataSourceConfig {private Logger logger = LoggerFactory.getLogger(DataSourceConfig.class);@Value("${authentication.type}")private String authenticationType;@Value("${authentication.kerberos.krb5FilePath}")private String krb5FilePath;@Value("${authentication.kerberos.principal}")private String principal;@Value("${authentication.kerberos.keytabPath}")private String keytabPath;/*** inint datasource* @return*/@Beanpublic DataSource dataSource(DataSourceProperties dataSourceProperties) throws SQLException {HikariConfig config = new HikariConfig();//kerberos configconfig.setAuthenticationType(authenticationType);config.setKrb5FilePath(krb5FilePath);config.setPrincipal(principal);config.setKeytabPath(keytabPath);//jdbc and pool configconfig.setJdbcUrl(dataSourceProperties.getUrl());config.setDriverClassName(dataSourceProperties.getDriverClassName());config.setUsername(dataSourceProperties.getUsername());config.setPassword(dataSourceProperties.getPassword());config.setPoolName(dataSourceProperties.getPoolName());config.setReadOnly(dataSourceProperties.isReadOnly());config.setAutoCommit(dataSourceProperties.isAutoCommit());config.setMaximumPoolSize(dataSourceProperties.getMaximumPoolSize());//maxLifetime 池中连接最长生命周期config.setMaxLifetime(dataSourceProperties.getMaxLifetime());//等待来自池的连接的最大毫秒数 30000config.setIdleTimeout(dataSourceProperties.getIdleTimeout());//连接将被测试活动的最大时间量config.setValidationTimeout(dataSourceProperties.getValidationTimeout());HikariDataSource dataSource = new HikariDataSource(config);logger.info("init new dataSource: {}", dataSource);return dataSource;}
}
4.使用
此时使用与其他数据库连接池的使用方式没什么区别了
详细的Springboot使用hikari连接池并进行Kerberos认证访问Impala的demo地址:https://github.com/Raray-chuan/springboot-kerberos-hikari-impala