1、概述
人脸识别的一个比较常用的网络arcface,依赖于其特殊设计的loss函数,使得模型在训练的时候能够实现类间距离增大,类内的距离不断减小,最终使得所训练的backbone能够获取鉴别性很高的特征,便于人脸识别。
本文以专家博主Bubbliiiing所提供的仓库代码实现的arcface为基础,主要分享实现arcface模型动态batch推理的python和C++代码实现,至于训练和测试,可以参考仓库使用说明。仓库地址为:https://github.com/bubbliiiing/arcface-pytorch
2、cuda版本python快速推理
本节主要包含使用python实现arcface模型转化为onnx通用平台模型,然后转化为TensorRT所支持的加速engine全过程。
2.1 arcface模型转化为ONNX模型
深度学习训练的模型转化为ONNX都是通用的代码使用方法,利用torch.onnx.export函数进行相应的导出,博主这里考虑在测试时会同时计算多张图片的特征图,因此将batch设置为动态,以方便后续使用。
代码实现如下:
def export_onnx(model, img, onnx_path, opset, dynamic=False, simplify=True, batch_size=1):torch.onnx.export(model, img, onnx_path, verbose=True, opset_version=opset,export_params=True,do_constant_folding=True,input_names=['images'],output_names=['output'],dynamic_axes={'images': {0: 'batch_size'}, # shape(1,3,112,112)'output': {0: 'batch_size'} # shape(1,128)} if dynamic else None)# Checksmodel_onnx = onnx.load(onnx_path) # load onnx modelonnx.checker.check_model(model_onnx) # check onnx modelif simplify:try:model_onnx, check = onnxsim.simplify(model_onnx,dynamic_input_shape=dynamic,test_input_shapes={'images': list(img.shape)} if dynamic else None)assert check, 'assert check failed'onnx.save(model_onnx, onnx_path)print('simplify onnx success')except Exception as e:print('simplify onnx failure')
具体的使用方案如下所示:
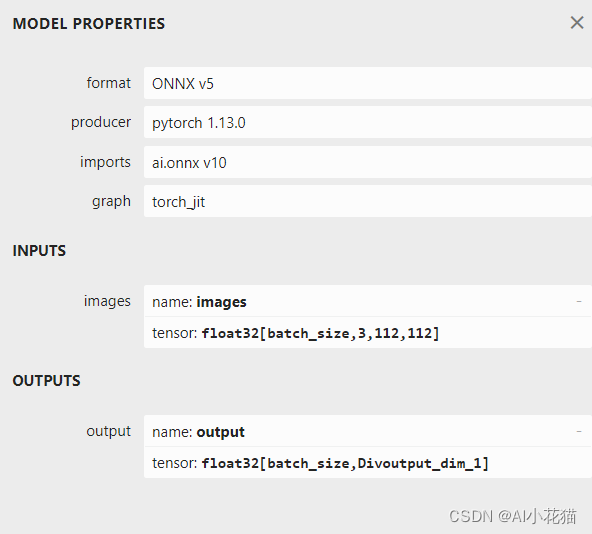
def convert2onnx_demo():model_path = './model_data/arcface_mobilefacenet.pth'device = torch.device('cuda' if torch.cuda.is_available() else 'cpu')print('Loading weights into state dict...')net = arcface(backbone='mobilefacenet', mode="predict").eval()net.load_state_dict(torch.load(model_path, map_location=device), strict=True)net = net.to(device)batch_size = 4print('{} model loaded.'.format(model_path))dummy_input = torch.randn(batch_size, 3, 112, 112).to(device)onnx_path = './model_data/arcface_mobilefacenet.onnx'opset = 10export_onnx(net, dummy_input, onnx_path, opset, dynamic=True, simplify=True)ort_session = ort.InferenceSession(onnx_path)outputs = ort_session.run(None, {'images': np.random.randn(batch_size, 3, 112, 112).astype(np.float32)})print(outputs[0])导出的onnx模型的输入输出如下所示:可以清楚的看到输入维度batch是动态变换的。
2.2 arcface ONNX模型转化为engine
onnx转换为engine方式有很多,可以借助trtexec.exe进行转换,也可以使用python编写相应的代码进行使用,博主采用python编写相应的脚本进行转换,具体代码转化如下:
def onnx2engine():import tensorrt as trtdef export_engine(onnx_path, engine_path, half, workspace=4, verbose=False):print('{} starting export with TensorRT {}...'.format(onnx_path, trt.__version__))# assert img.device.type != 'cpu', 'export running on CPU but must be on GPU, i.e. `python export.py --device 0`'if not os.path.exists(onnx_path):print(f'failed to export ONNX file: {onnx_path}')logger = trt.Logger(trt.Logger.INFO)if verbose:logger.min_severity = trt.Logger.Severity.VERBOSEbuilder = trt.Builder(logger)config = builder.create_builder_config()config.max_workspace_size = workspace * 1 << 30flag = (1 << int(trt.NetworkDefinitionCreationFlag.EXPLICIT_BATCH))network = builder.create_network(flag)parser = trt.OnnxParser(network, logger)if not parser.parse_from_file(str(onnx_path)):raise RuntimeError(f'failed to load ONNX file: {onnx_path}')## 支持动态batch使用必须profile = builder.create_optimization_profile()profile.set_shape("images", (1, 3, 112, 112), (8, 3, 112, 112), (16, 3, 112, 112))config.add_optimization_profile(profile)inputs = [network.get_input(i) for i in range(network.num_inputs)]outputs = [network.get_output(i) for i in range(network.num_outputs)]print('Network Description:')for inp in inputs:print('input {} with shape {} and dtype is {}\n'.format(inp.name, inp.shape, inp.dtype))for out in outputs:print('output {} with shape {} and dtype is {}\n'.format(out.name, out.shape, out.dtype))half &= builder.platform_has_fast_fp16print('building FP{} engine in {}'.format(16 if half else 32, engine_path))if half:config.set_flag(trt.BuilderFlag.FP16)with builder.build_engine(network, config) as engine, open(engine_path, 'wb') as t:t.write(engine.serialize())print("max_batch_szie = {}".format(builder.max_batch_size))print("flag= {}".format(flag))print('export success, saved as {f} ({file_size(f):.1f} MB)')onnx_path = './model_data/arcface_mobilefacenet.onnx'engine_path = './model_data/arcface_mobilefacenet.engine'half = Trueverbose = Trueexport_engine(onnx_path, engine_path, half, verbose=verbose)
其中需要重点注意的是,要使用动态batch完成engine的构建,必须要对profile 进行相应的设定,使得engine知道最小推理batch、最优推理batch以及最大推理batch。
2.3 arcface TensorRT快速推理
推理的代码还是相对比较简单的,简单总结如下:
- 图像组合成相应的推理batch
- 初始化TensorRT所需要的context
- 给动态输入的batch和输出结果分配host以及device上的内存空间
- 调用接口完成推理
- 相关后处理代码
本文具体代码如下所示:
"""
An example that uses TensorRT's Python api to make inferences.
"""
import ctypes
import os
import shutil
import random
import sys
import threading
import time
import cv2
import numpy as np
import pycuda.autoinit
import pycuda.driver as cuda
import tensorrt as trtLEN_ALL_RESULT = 128def get_img_path_batches(batch_size, img_dir):ret = []batch = []for root, dirs, files in os.walk(img_dir):for name in files:suffix = os.path.splitext(name)[-1]if suffix in ['.jpg', '.png', '.JPG', '.jpeg']:if len(batch) == batch_size:ret.append(batch)batch = []batch.append(os.path.join(root, name))if len(batch) > 0:ret.append(batch)return retclass ArcFaceTRT(object):"""description: A arcface class that warps TensorRT ops, preprocess and postprocess ops."""def __init__(self, engine_file_path, batch_size=1):self.ctx = cuda.Device(0).make_context()stream = cuda.Stream()TRT_LOGGER = trt.Logger(trt.Logger.INFO)runtime = trt.Runtime(TRT_LOGGER)with open(engine_file_path, 'rb') as f:engine = runtime.deserialize_cuda_engine(f.read())context = engine.create_execution_context()context.set_binding_shape(0, (batch_size, 3, 112, 112))  # 这句非常重要!!!定义batch为动态维度#host_inputs = []cuda_inputs = []host_outputs = []cuda_outputs = []bindings = []for binding in engine:print('binding: ', binding, engine.get_tensor_shape(binding))## 动态 batchdims = engine.get_tensor_shape(binding)if dims[0] == -1:dims[0] = batch_size# size = trt.volume(engine.get_tensor_shape(binding)) * engine.max_batch_sizesize = trt.volume(dims) * engine.max_batch_sizedtype = trt.nptype(engine.get_tensor_dtype(binding))# allocate host and device buffershost_mem = cuda.pagelocked_empty(size, dtype)cuda_mem = cuda.mem_alloc(host_mem.nbytes)# append the device buffer to device bindingsbindings.append(int(cuda_mem))# append to the appropriate listif engine.get_tensor_mode(binding).value == 1: ##  0 是NONE 1是INPUT 2是OUTPUT# if engine.binding_is_input(binding):self.input_w = engine.get_tensor_shape(binding)[-1]self.input_h = engine.get_tensor_shape(binding)[-2]host_inputs.append(host_mem)cuda_inputs.append(cuda_mem)else:host_outputs.append(host_mem)cuda_outputs.append(cuda_mem)# storeself.stream = streamself.context = contextself.engine = engineself.host_inputs = host_inputsself.cuda_inputs = cuda_inputsself.host_outputs = host_outputsself.cuda_outputs = cuda_outputsself.bindings = bindingsself.batch_size = batch_size# self.batch_size = engine.max_batch_sizedef infer(self, raw_image_generator):threading.Thread.__init__(self)# Make self the active context, pushing it on top of the context stack.self.ctx.push()# Restorestream = self.streamcontext = self.contextengine = self.enginehost_inputs = self.host_inputscuda_inputs = self.cuda_inputshost_outputs = self.host_outputscuda_outputs = self.cuda_outputsbindings = self.bindings# Do image preprocessbatch_image_raw = []batch_origin_h = []batch_origin_w = []batch_input_image = np.empty(shape=[self.batch_size, 3, self.input_h, self.input_w])# 组合为相应的batch进行处理for i, image_raw in enumerate(raw_image_generator):input_image, image_raw, origin_h, origin_w = self.preprocess_image(image_raw)batch_image_raw.append(image_raw)batch_origin_h.append(origin_h)batch_origin_w.append(origin_w)np.copyto(batch_input_image[i], input_image)batch_input_image = np.ascontiguousarray(batch_input_image)# Copy input image to host buffernp.copyto(host_inputs[0], batch_input_image.ravel())start = time.time()# Transfer input data  to the GPU.cuda.memcpy_htod_async(cuda_inputs[0], host_inputs[0], stream)# Run inference.context.execute_async_v2(bindings=bindings, stream_handle=stream.handle)# context.execute_async(batch_size=self.batch_size, bindings=bindings, stream_handle=stream.handle)# Transfer predictions back from the GPU.cuda.memcpy_dtoh_async(host_outputs[0], cuda_outputs[0], stream)# Synchronize the streamstream.synchronize()end = time.time()# Remove any context from the top of the context stack, deactivating it.self.ctx.pop()# Here we use the first row of output in that batch_size = 1output = host_outputs[0]# Do postprocessfeatures = []for i in range(self.batch_size):feature = output[i * LEN_ALL_RESULT:(i + 1) * LEN_ALL_RESULT]features.append(feature)print(feature.shape)return batch_image_raw, end - start, featuresdef destroy(self):# Remove any context from the top of the context stack, deactivating it.self.ctx.pop()def get_raw_image(self, image_path_batch):"""description: Read an image from image path"""for img_path in image_path_batch:yield cv2.imread(img_path)def get_vedio_frame(self, cap):for _ in range(self.batch_size):yield cap.read()def get_raw_image_zeros(self, image_path_batch=None):"""description: Ready data for warmup"""for _ in range(self.batch_size):yield np.zeros([self.input_h, self.input_w, 3], dtype=np.uint8)def preprocess_image(self, raw_bgr_image):"""description: Convert BGR image to RGB,resize and pad it to target size, normalize to [0,1],transform to NCHW format.param:input_image_path: str, image pathreturn:image:  the processed imageimage_raw: the original imageh: original heightw: original width"""image_raw = raw_bgr_imageh, w, c = image_raw.shapeimage = cv2.cvtColor(image_raw, cv2.COLOR_BGR2RGB)image = cv2.resize(image, (112, 112))image = image.astype(np.float32)image /= 255.0# HWC to CHW format:image = np.transpose(image, [2, 0, 1])# CHW to NCHW formatimage = np.expand_dims(image, axis=0)# Convert the image to row-major order, also known as "C order":image = np.ascontiguousarray(image)return image, image_raw, h, wdef img_infer(ArcFaceWraper, image_path_batch):batch_image_raw, use_time, res = ArcFaceWraper.infer(ArcFaceWraper.get_raw_image(image_path_batch))for i, feature in enumerate(res):print('input->{}, time->{:.2f}ms, feature shape = {}'.format(image_path_batch[i], use_time * 1000, feature.shape))def vedio_infer(ArcFaceWraper, cap):batch_image_raw, use_time = ArcFaceWraper.infer(ArcFaceWraper.get_vedio_frame(cap))print('input->{}, time->{:.2f}ms, saving into output/'.format(1, use_time * 1000))cv2.namedWindow('vedio', cv2.WINDOW_NORMAL)cv2.imshow('vedio', batch_image_raw[0])cv2.waitKey(1)def warmup(ArcFaceWraper):batch_image_raw, use_time, _ = ArcFaceWraper.infer(ArcFaceWraper.get_raw_image_zeros())print('warm_up->{}, time->{:.2f}ms'.format(batch_image_raw[0].shape, use_time * 1000))if __name__ == '__main__':from tqdm import tqdmbatch = 4# engine_file_path = r"D:\personal\project\code\arcface-pytorch-main\model_data\arcface_mobilefacenet.engine"engine_file_path = r"arcface\arcface_mobilefacenet.engine"arcface_wrapper = ArcFaceTRT(engine_file_path, batch_size=batch)try:print('batch size is', batch)image_dir = r"datasets"# image_path_batches = get_img_path_batches(arcface_wrapper.batch_size, image_dir)image_path_batches = get_img_path_batches(batch, image_dir)# warmup# for i in range(10):#     warmup(arcface_wrapper)for batch in tqdm(image_path_batches):img_infer(arcface_wrapper, batch)finally:# destroy the instancearcface_wrapper.destroy()
重点需要注意的是:
1、context需要batch动态维度,这也是进行动态batch推理的前提条件
2、针对输入的binding,需要将其dim[0]设置batch大小
2.4 测试效果
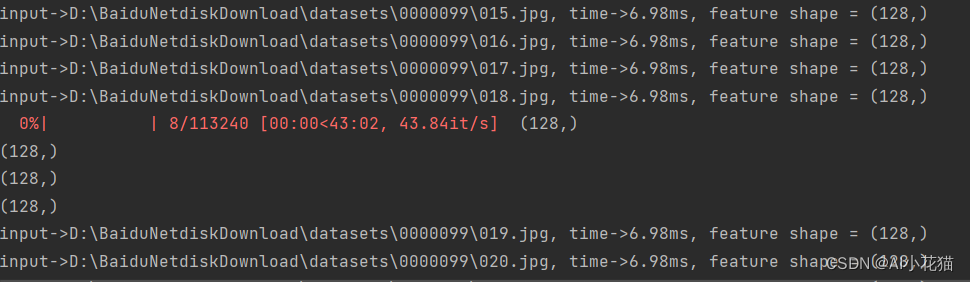
博主这边使用的是batch为4进行的推理,推理速度大概是6.98ms每个batch。
如果设置为batch为8,则推理时间如下:
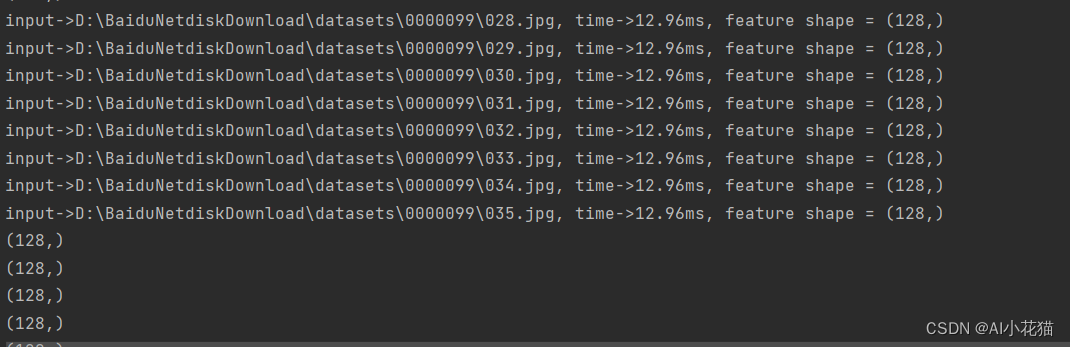
也可以设置为1~16之间的任意数值进行推理,具体数值区间和你生成engine时候所设定的kmin和kmax对应的shape是相关联的,比起单张推理速度会提升一部分,但是不成相应比例。
3、cuda版本C++快速推理
本节主要包含使用C++实现arcface模型转化为onnx通用平台模型,然后转化为TensorRT所支持的加速engine全过程。
由于模型的.pth模型转换为ONNX模型和前述2.1节的内容是一致的,因此本部分从模型已经成功转换为ONNX模型开始阐述。
3.1 arcface ONNX模型转化为engine
转换为engine的方式其实和python的转化相类似,主要还都是利用C++的TensorRT相应的API进行编写的。
具体实现如下所示:
void CreateEngine::trtFromOnnx(const std::string onnx_path,const std::string engine_out_path, unsigned int max_batch_size,size_t workspace ,bool half)
{if (onnx_path.empty()) {printf("failed to export ONNX file\n");}printf("***************start to create model engine********************\n");IBuilder* builder = createInferBuilder(gLogger);IBuilderConfig* config = builder->createBuilderConfig();config->setMaxWorkspaceSize(static_cast<size_t>(workspace*1) << 30);NetworkDefinitionCreationFlags flag = (1U << int(NetworkDefinitionCreationFlag::kEXPLICIT_BATCH));INetworkDefinition* network = builder->createNetworkV2(flag);IParser* parser = createParser(*network, gLogger);if (! parser->parseFromFile(onnx_path.c_str(), static_cast<int>(ILogger::Severity::kWARNING))) {//wrong information for (int32_t i = 0; i < parser->getNbErrors(); i++){std::cout << parser->getError(i)->desc() << std::endl;}}std::cout << "******************successfully parse the onnx model*********************" << std::endl;//danamic batch auto profile = builder->createOptimizationProfile();auto input_tensor = network->getInput(0);auto input_dims = input_tensor->getDimensions();// 配置最小:kMIN、最优:kOPT、最大范围:kMAX       指的是BatchSizeinput_dims.d[0] = 1;profile->setDimensions(input_tensor->getName(), OptProfileSelector::kMIN, input_dims);profile->setDimensions(input_tensor->getName(), OptProfileSelector::kOPT, input_dims);input_dims.d[0] = max_batch_size;profile->setDimensions(input_tensor->getName(), OptProfileSelector::kMAX, input_dims);//TensorRT – Using PreviewFeaturekFASTER_DYNAMIC_SHAPES_0805 can help improve performance and resolve potential functional issuesconfig->setPreviewFeature(PreviewFeature::kFASTER_DYNAMIC_SHAPES_0805, true);config->addOptimizationProfile(profile);//build enginehalf &= builder->platformHasFastFp16();if (half){config->setFlag(nvinfer1::BuilderFlag::kFP16);}ICudaEngine* engine = builder->buildEngineWithConfig(*network, *config);assert(engine != nullptr);IHostMemory* serialized_engine = engine->serialize();assert(serialized_engine != nullptr);// save enginestd::ofstream p(engine_out_path, std::ios::binary);if (!p) {std::cerr << "could not open output engine path" << std::endl;assert(false);}p.write(reinterpret_cast<const char*>(serialized_engine->data()), serialized_engine->size());//releasenetwork->destroy();parser->destroy();engine->destroy();config->destroy();serialized_engine->destroy();builder->destroy();std::cout << "**************successed transfer onnx to trt engine***************" << std::endl;
}
实现和python一个样,主要是添加profile以及指定动态batch的最大、最小和最优值。由于kFASTER_DYNAMIC_SHAPES_0805可以提升性能,此处使用的时候对其进行了添加。
3.2 arcface TensorRT快速推理
推理大致过程如下:
- 组装图片为相应的batch,并进行数据前处理
- 分别分配host以及device上的内存
- cuda加速推理获取结果
- 结果解码+后处理计算相似度
- 释放相应的内存
void ArcFaceInference::inference(std::vector<cv::Mat>& imgs, std::vector<cv::Mat>& res_batch)
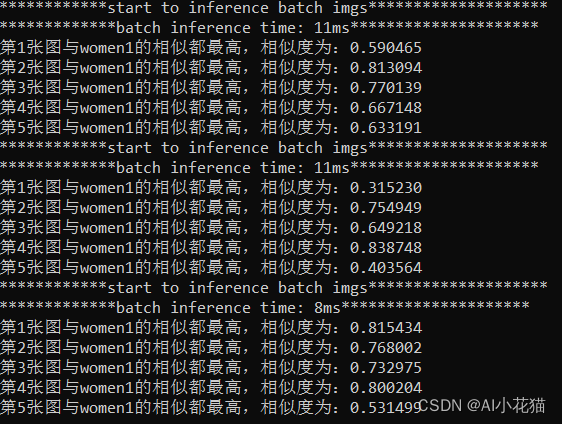
{int batch = imgs.size();cudaStream_t stream;CUDA_CHECK(cudaStreamCreate(&stream));//inputint input_numel = batch * 3 * imgs[0].cols * imgs[0].rows;float* cpu_input_buffer = nullptr;float* gpu_input_buffer = nullptr;CUDA_CHECK(cudaMallocHost((void**)(&cpu_input_buffer), input_numel * sizeof(float)));CUDA_CHECK(cudaMalloc((void**)(&gpu_input_buffer), input_numel * sizeof(float)));//outputauto output_dims = this->initEngine->engine->getBindingDimensions(1);output_dims.d[0] = batch;int output_numel = output_dims.d[0] * output_dims.d[1];float* cpu_output_buffer = nullptr;float* gpu_output_buffer = nullptr;CUDA_CHECK(cudaMallocHost((void**)(&cpu_output_buffer), output_numel * sizeof(float)));CUDA_CHECK(cudaMalloc((void**)(&gpu_output_buffer), output_numel * sizeof(float)));// set input dimauto input_dims = this->initEngine->engine->getBindingDimensions(0);input_dims.d[0] = batch;this->initEngine->context->setBindingDimensions(0, input_dims);//batch processbatchPreprocess(imgs,cpu_input_buffer);auto start = std::chrono::system_clock::now();std::cout << "************start to inference batch imgs********************" << std::endl;CUDA_CHECK(cudaMemcpyAsync(gpu_input_buffer, cpu_input_buffer, input_numel * sizeof(float), cudaMemcpyHostToDevice, stream));float* bindings[] = { gpu_input_buffer,gpu_output_buffer };bool success = this->initEngine->context->enqueueV2((void**)(bindings), stream, nullptr);CUDA_CHECK(cudaMemcpyAsync(cpu_output_buffer, gpu_output_buffer, output_numel * sizeof(float), cudaMemcpyDeviceToHost, stream));CUDA_CHECK(cudaStreamSynchronize(stream));auto end = std::chrono::system_clock::now();std::cout << "*************batch inference time: " << std::chrono::duration_cast<std::chrono::milliseconds>(end - start).count() << "ms" <<"*********************" << std::endl;//postprocessfor (int i = 0; i < batch; i++){cv::Mat result = cv::Mat(1, output_dims.d[1], CV_32FC1, static_cast<float*>(&cpu_output_buffer[i * output_dims.d[1]]));res_batch.emplace_back(result.clone());// 计算相似度float max_similarity = 0.0;std::string name = "";for (std::map<std::string, cv::Mat>::iterator iter = obsInfo.begin(); iter != obsInfo.end(); ++iter){float similarity = getSimilarity(result.clone(), iter->second);if (similarity>max_similarity){max_similarity = similarity;name = iter->first;}}if (!GETVECTOR){printf("第%i张图与%s的相似都最高,相似度为:%f\n", i + 1, name.c_str(), max_similarity);}}//releaseCUDA_CHECK(cudaStreamDestroy(stream));CUDA_CHECK(cudaFreeHost(cpu_input_buffer));CUDA_CHECK(cudaFreeHost(cpu_output_buffer));CUDA_CHECK(cudaFree(gpu_input_buffer));CUDA_CHECK(cudaFree(gpu_output_buffer));}3.3 测试效果
测试以人脸检测中的五个类别数据,先分一部分数据,提取其相对应的平均特征并进行保存,测试推理时候,用推理获取的特征与既有的特征进行相似度比对,取相似度最高者为对应的类别。
具体结果如下:
4 总结
arcface部署实际上还是比较简单的,难点在于如何快速实现多batch推理,以及如何能够更有效的让新来的特征加入table中,以达到动态扩充的目的。
本篇文章通过实际使用案例,详述了Arcface动态batch推理的详细过程部署的,如有不足指出,请大家多多指教。
———END————