硬件:STM32F103ZET6、ST-LINK、usb转串口工具、4个LED灯、1个蜂鸣器、4个1k电阻、2个按键、面包板、杜邦线
文章目录
- 前言
- 一、cubemx配置
- 二、board.c文件修改
- 2.rtconfig.h文件修改
- 三、主程序
- 1. main函数
- 2. task函数
- 总结
前言
利用RT_Thread操作系统实现三种不同的LED等闪烁
提示:以下是本篇文章正文内容,下面案例可供参考
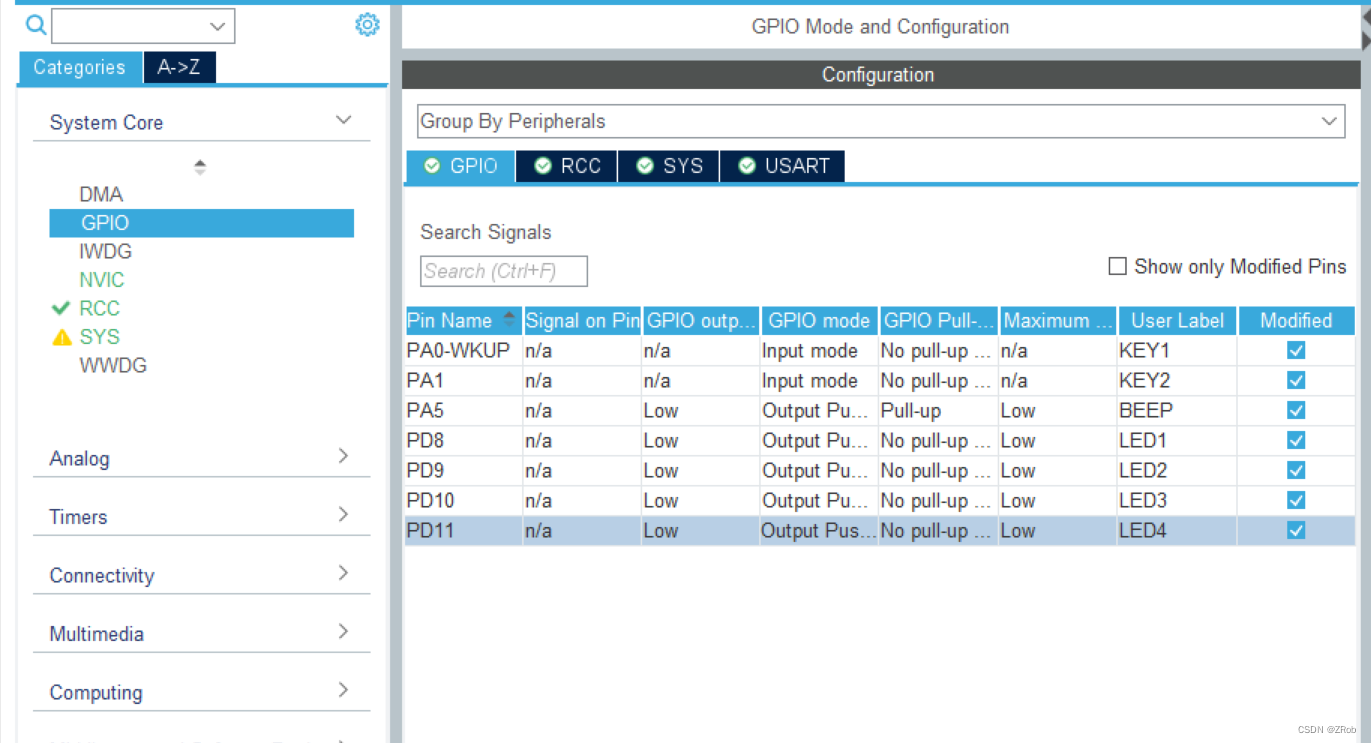
一、cubemx配置
cubemx配置参考教程:
基于 CubeMX 移植 RT-Thread Nano
后面程序所需的引脚
二、board.c文件修改
/** Copyright (c) 2006-2019, RT-Thread Development Team** SPDX-License-Identifier: Apache-2.0** Change Logs:* Date           Author       Notes* 2021-05-24                  the first version*/#include <rthw.h>
#include <rtthread.h>#include "main.h"
#include "usart.h"// 使用cubemx产生的MX_USART1_UART_Init()
#include "gpio.h" // 使用cubemx产生的MX_GPIO_Init()#if defined(RT_USING_USER_MAIN) && defined(RT_USING_HEAP)
/** Please modify RT_HEAP_SIZE if you enable RT_USING_HEAP* the RT_HEAP_SIZE max value = (sram size - ZI size), 1024 means 1024 bytes*/
#define RT_HEAP_SIZE (15*1024)
static rt_uint8_t rt_heap[RT_HEAP_SIZE];RT_WEAK void *rt_heap_begin_get(void)
{return rt_heap;
}RT_WEAK void *rt_heap_end_get(void)
{return rt_heap + RT_HEAP_SIZE;
}
#endifvoid SysTick_Handler(void)
{rt_interrupt_enter();rt_tick_increase();rt_interrupt_leave();
}/*** This function will initial your board.*/
void rt_hw_board_init(void)
{extern void SystemClock_Config(void);HAL_Init();SystemClock_Config();SystemCoreClockUpdate();/* * 1: OS Tick Configuration* Enable the hardware timer and call the rt_os_tick_callback function* periodically with the frequency RT_TICK_PER_SECOND. */HAL_SYSTICK_Config(HAL_RCC_GetHCLKFreq()/RT_TICK_PER_SECOND);/* Call components board initial (use INIT_BOARD_EXPORT()) */MX_GPIO_Init();//【增加】#ifdef RT_USING_COMPONENTS_INITrt_components_board_init();
#endif#if defined(RT_USING_USER_MAIN) && defined(RT_USING_HEAP)rt_system_heap_init(rt_heap_begin_get(), rt_heap_end_get());
#endif
}#ifdef RT_USING_CONSOLEstatic UART_HandleTypeDef UartHandle;
static int uart_init(void)
{/* TODO: Please modify the UART port number according to your needs */UartHandle.Instance = USART1;//【修改为USART1】UartHandle.Init.BaudRate = 115200;UartHandle.Init.WordLength = UART_WORDLENGTH_8B;UartHandle.Init.StopBits = UART_STOPBITS_1;UartHandle.Init.Parity = UART_PARITY_NONE;UartHandle.Init.Mode = UART_MODE_TX_RX;UartHandle.Init.HwFlowCtl = UART_HWCONTROL_NONE;UartHandle.Init.OverSampling = UART_OVERSAMPLING_16;if (HAL_UART_Init(&UartHandle) != HAL_OK){while (1);}return 0;
}
INIT_BOARD_EXPORT(uart_init);void rt_hw_console_output(const char *str)
{rt_size_t i = 0, size = 0;char a = '\r';__HAL_UNLOCK(&UartHandle);size = rt_strlen(str);for (i = 0; i < size; i++){if (*(str + i) == '\n'){HAL_UART_Transmit(&UartHandle, (uint8_t *)&a, 1, 1);}HAL_UART_Transmit(&UartHandle, (uint8_t *)(str + i), 1, 1);}
}
#endif#ifdef RT_USING_FINSH
char rt_hw_console_getchar(void)
{/* Note: the initial value of ch must < 0 */int ch = -1;if (__HAL_UART_GET_FLAG(&UartHandle, UART_FLAG_RXNE) != RESET){ch = UartHandle.Instance->DR & 0xff;}else{rt_thread_mdelay(10);}return ch;
}
#endif
2.rtconfig.h文件修改
RT-Thread Nano 的配置在 rtconfig.h 中进行,通过开关宏定义来使能或关闭某些功能,接下来对该配置文件中的宏定义进行说明。
/* RT-Thread config file */#ifndef __RTTHREAD_CFG_H__
#define __RTTHREAD_CFG_H__// <<< Use Configuration Wizard in Context Menu >>>
// <h>Basic Configuration
// <o>Maximal level of thread priority <8-256>
//  <i>Default: 32
#define RT_THREAD_PRIORITY_MAX 32// <o>OS tick per second
//  <i>Default: 1000   (1ms)
#define RT_TICK_PER_SECOND 1000// <o>Alignment size for CPU architecture data access
//  <i>Default: 4
#define RT_ALIGN_SIZE 4// <o>the max length of object name<2-16>
//  <i>Default: 8
#define RT_NAME_MAX 8// <c1>Using RT-Thread components initialization
//  <i>Using RT-Thread components initialization
#define RT_USING_COMPONENTS_INIT
// </c>// <c1>Using user main
//  <i>Using user main
#define RT_USING_USER_MAIN
// </c>// <o>the size of main thread<1-4086>
//  <i>Default: 512
#define RT_MAIN_THREAD_STACK_SIZE 1024
// </h>// <h>Debug Configuration
// <c1>enable kernel debug configuration
//  <i>Default: enable kernel debug configuration
//#define RT_DEBUG
// </c>// <o>enable components initialization debug configuration<0-1>
//  <i>Default: 0
#define RT_DEBUG_INIT 0// <c1>thread stack over flow detect
//  <i> Diable Thread stack over flow detect
//#define RT_USING_OVERFLOW_CHECK
// </c>
// </h>// <h>Hook Configuration
// <c1>using hook
//  <i>using hook
//#define RT_USING_HOOK
// </c>// <c1>using idle hook
//  <i>using idle hook
//#define RT_USING_IDLE_HOOK
// </c>
// </h>// <h>Software timers Configuration
// <c1> Enables user timers
// <i> Enables user timers
//#define RT_USING_TIMER_SOFT
// </c>// <o>The priority level of timer thread <0-31>
//  <i>Default: 4
#define RT_TIMER_THREAD_PRIO 4// <o>The stack size of timer thread <0-8192>
//  <i>Default: 512
#define RT_TIMER_THREAD_STACK_SIZE 512
// </h>// <h>IPC(Inter-process communication) Configuration
// <c1>Using Semaphore
//  <i>Using Semaphore
#define RT_USING_SEMAPHORE
// </c>// <c1>Using Mutex
//  <i>Using Mutex
//#define RT_USING_MUTEX
// </c>// <c1>Using Event
//  <i>Using Event
//#define RT_USING_EVENT
// </c>// <c1>Using MailBox
//  <i>Using MailBox
//#define RT_USING_MAILBOX
// </c>// <c1>Using Message Queue
//  <i>Using Message Queue
//#define RT_USING_MESSAGEQUEUE
// </c>
// </h>// <h>Memory Management Configuration
// <c1>Using Mempool Management
//  <i>Using Mempool Management
//#define RT_USING_MEMPOOL
// </c>
// <c1>Dynamic Heap Management
//  <i>Dynamic Heap Management
#define RT_USING_HEAP//是否使用 内存堆
// </c>
// <c1>using small memory
//  <i>using small memory
#define RT_USING_SMALL_MEM// 是否使用 内存堆
// </c>// <c1>using tiny size of memory
//  <i>using tiny size of memory
//#define RT_USING_TINY_SIZE
// </c>
// </h>// <h>Console Configuration
// <c1>Using console
//  <i>Using console
#define RT_USING_CONSOLE
// </c>// <o>the buffer size of console <1-1024>
//  <i>the buffer size of console
//  <i>Default: 128  (128Byte)
#define RT_CONSOLEBUF_SIZE 128
// </h>// <h>Enable FinSH Configuration
// <c1>include shell config
//  <i> Select this choice if you using FinSH
//当系统加入 FinSH 组件源码后,需要在 rtconfig.h 中开启以下项
#include "finsh_config.h"
// </c>
// </h>// <h>Device Configuration
// <c1>using device framework
//  <i>using device framework
//#define RT_USING_DEVICE
// </c>
// </h>// <<< end of configuration section >>>#endif
三、主程序
1. main函数
/* USER CODE BEGIN Header */
/********************************************************************************* @file           : main.c* @brief          : Main program body******************************************************************************* @attention** Copyright (c) 2023 STMicroelectronics.* All rights reserved.** This software is licensed under terms that can be found in the LICENSE file* in the root directory of this software component.* If no LICENSE file comes with this software, it is provided AS-IS.********************************************************************************/
/* USER CODE END Header */
/* Includes ------------------------------------------------------------------*/
#include "main.h"
#include "usart.h"
#include "gpio.h"
#include <rtthread.h>/* Private includes ----------------------------------------------------------*/
/* USER CODE BEGIN Includes *//* USER CODE END Includes *//* Private typedef -----------------------------------------------------------*/
/* USER CODE BEGIN PTD *//* USER CODE END PTD *//* Private define ------------------------------------------------------------*/
/* USER CODE BEGIN PD *//* USER CODE END PD *//* Private macro -------------------------------------------------------------*/
/* USER CODE BEGIN PM *//* USER CODE END PM *//* Private variables ---------------------------------------------------------*//* USER CODE BEGIN PV */
/* 栈空间地址对齐 */
ALIGN( RT_ALIGN_SIZE )
/* 定义一个数组,栈的空间大小就是1024*8字节 */
rt_uint8_t rt_led1_thread_stack[1024];
/* 初始化线程栈 */
struct rt_thread rt_led1_thread;rt_uint8_t rt_led2_thread_stack[1024];
/* 定义线程控制块指针 */
rt_thread_t rt_led2_thread = RT_NULL;/* USER CODE END PV *//* Private function prototypes -----------------------------------------------*/
void SystemClock_Config(void);
/* USER CODE BEGIN PFP *//* USER CODE END PFP *//* Private user code ---------------------------------------------------------*/
/* USER CODE BEGIN 0 */void led1_thread_entry(void *parameter)
{while(1){HAL_GPIO_TogglePin(LED1_GPIO_Port,LED1_Pin);rt_thread_mdelay(1000);}
}void led2_thread_entry(void *parameter)
{while(1){HAL_GPIO_TogglePin(LED2_GPIO_Port,LED2_Pin);rt_thread_mdelay(100);}
} /* USER CODE END 0 *//*** @brief  The application entry point.* @retval int*/
int main(void)
{/* USER CODE BEGIN 1 *//* USER CODE END 1 *//* MCU Configuration--------------------------------------------------------*//* Reset of all peripherals, Initializes the Flash interface and the Systick. */HAL_Init();/* USER CODE BEGIN Init *//* USER CODE END Init *//* Configure the system clock */
//  SystemClock_Config();/* USER CODE BEGIN SysInit *//* USER CODE END SysInit *//* Initialize all configured peripherals */MX_GPIO_Init();MX_USART1_UART_Init();/* USER CODE BEGIN 2 *//**************************** 静态创建 **************************************/rt_err_t rst_led1;rst_led1 = rt_thread_init(&rt_led1_thread,"led1line",led1_thread_entry,RT_NULL,&rt_led1_thread_stack[0],sizeof(rt_led1_thread_stack),RT_THREAD_PRIORITY_MAX-2,20);if(rst_led1 == RT_EOK){rt_thread_startup(&rt_led1_thread);}/***************************** 动态创建 ******************************************/rt_led2_thread = rt_thread_create( "led2line",led2_thread_entry,RT_NULL,sizeof(rt_led2_thread_stack),RT_THREAD_PRIORITY_MAX-3,20);if( rt_led2_thread != RT_NULL )/* rt_thread_startup() 的形参是一个线程控制块指针,动态创建线程时返回的就是线程控制块指针,所以直接传入即可 */rt_thread_startup( rt_led2_thread );elsereturn -1;							/* USER CODE END 2 *//* Infinite loop *//* USER CODE BEGIN WHILE */while (1){/* USER CODE END WHILE *//* USER CODE BEGIN 3 */rt_thread_mdelay(1000);}/* USER CODE END 3 */
}/*** @brief System Clock Configuration* @retval None*/
void SystemClock_Config(void)
{RCC_OscInitTypeDef RCC_OscInitStruct = {0};RCC_ClkInitTypeDef RCC_ClkInitStruct = {0};/** Initializes the RCC Oscillators according to the specified parameters* in the RCC_OscInitTypeDef structure.*/RCC_OscInitStruct.OscillatorType = RCC_OSCILLATORTYPE_HSI;RCC_OscInitStruct.HSIState = RCC_HSI_ON;RCC_OscInitStruct.HSICalibrationValue = RCC_HSICALIBRATION_DEFAULT;RCC_OscInitStruct.PLL.PLLState = RCC_PLL_NONE;if (HAL_RCC_OscConfig(&RCC_OscInitStruct) != HAL_OK){Error_Handler();}/** Initializes the CPU, AHB and APB buses clocks*/RCC_ClkInitStruct.ClockType = RCC_CLOCKTYPE_HCLK|RCC_CLOCKTYPE_SYSCLK|RCC_CLOCKTYPE_PCLK1|RCC_CLOCKTYPE_PCLK2;RCC_ClkInitStruct.SYSCLKSource = RCC_SYSCLKSOURCE_HSI;RCC_ClkInitStruct.AHBCLKDivider = RCC_SYSCLK_DIV1;RCC_ClkInitStruct.APB1CLKDivider = RCC_HCLK_DIV1;RCC_ClkInitStruct.APB2CLKDivider = RCC_HCLK_DIV1;if (HAL_RCC_ClockConfig(&RCC_ClkInitStruct, FLASH_LATENCY_0) != HAL_OK){Error_Handler();}
}/* USER CODE BEGIN 4 *//* USER CODE END 4 *//*** @brief  This function is executed in case of error occurrence.* @retval None*/
void Error_Handler(void)
{/* USER CODE BEGIN Error_Handler_Debug *//* User can add his own implementation to report the HAL error return state */__disable_irq();while (1){}/* USER CODE END Error_Handler_Debug */
}#ifdef  USE_FULL_ASSERT
/*** @brief  Reports the name of the source file and the source line number*         where the assert_param error has occurred.* @param  file: pointer to the source file name* @param  line: assert_param error line source number* @retval None*/
void assert_failed(uint8_t *file, uint32_t line)
{/* USER CODE BEGIN 6 *//* User can add his own implementation to report the file name and line number,ex: printf("Wrong parameters value: file %s on line %d\r\n", file, line) *//* USER CODE END 6 */
}
#endif /* USE_FULL_ASSERT */
2. task函数
#include "main.h"
#include "rtthread.h"
#define DBG_TAG "main"
#define DBG_LVL DBG_LOG
#include <rtdbg.h>#define THREAD1_PRIORITY  27
#define THREAD_STACK_SIZE 512
#define THREAD_TIMESLICE  5    ALIGN(RT_ALIGN_SIZE)
rt_thread_t result = RT_NULL;static void rt_led1_flash_entry(void *parameter)
{while(1){HAL_GPIO_WritePin(LED3_GPIO_Port,LED3_Pin,GPIO_PIN_SET);rt_thread_mdelay(500);HAL_GPIO_WritePin(LED3_GPIO_Port,LED3_Pin,GPIO_PIN_RESET);rt_thread_mdelay(500);}
}int rt_user_thread_entry(void)
{result = rt_thread_create("led3line", rt_led1_flash_entry,NULL,THREAD_STACK_SIZE,THREAD1_PRIORITY,THREAD_TIMESLICE);if (result != RT_NULL) {rt_thread_startup(result);}else{LOG_D("can not create LED thread!");return -1;}}
INIT_APP_EXPORT(rt_user_thread_entry);
总结
以上便是基于 CubeMX 移植 RT-Thread Nano,然后实现3个不同LED灯的闪烁的程序