文章目录
- 前言
- 一、MVC各层职责
- 1.1、controller层
- 1.2、model层
- 1.3、view层
- 二、总结
- 三、优缺点
- 3.1、优点
- 3.2、缺点
- 四、代码示例
前言
MVC模式的目的是实现一种动态的程序设计,使后续对程序的修改和扩展简化,并且使程序某一部分的重复利用成为可能。除此之外,此模式通过对复杂度的简化,使程序结构更加直观
一、MVC各层职责
1.1、controller层
- 生成view,然后组装view
- 响应View的事件和作为view的代理
- 处理view的生命周期
- 处理界面之间的跳转
- 调用model的数据获取接口,拿到返回数据,处理加工,渲染到view显示
1.2、model层
- 业务逻辑封装
- 提供数据接口给controller使用
- 数据持久化存储和读取
- 作为数据模型存储数据
1.3、view层
- 界面元素搭建,动画效果,数据展示
- 接受用户操作并反馈视觉效果
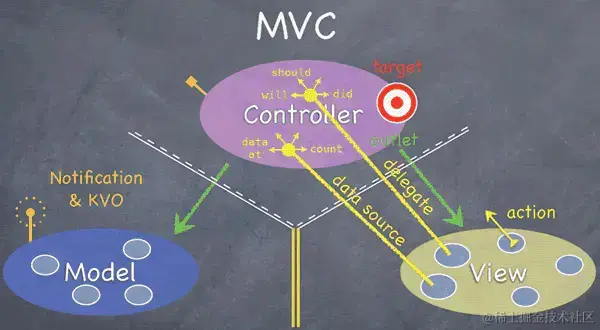
二、总结
用户点击 View–> 视图响应事件 -->通过代理传递事件到Controller–>发起网络请求更新Model—>Model处理完数据–>代理或通知给Controller–>改变视图样式–>完成
三、优缺点
3.1、优点
通过Controller来控制全局,同时将view和Model的变化分开,对于复杂混乱的项目结构,有了明确的组织方式。
3.2、缺点
随着业务逻辑增加,大量的逻辑代码放进了Controller,导致Controller越来越臃肿,后期维护成本高。
四、代码示例
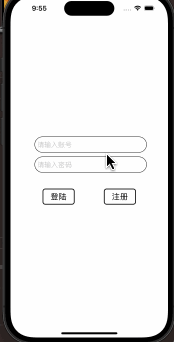
我们用一个登录注册小demo来实现我们的MVC框架,首先看一下我们的文件命名:
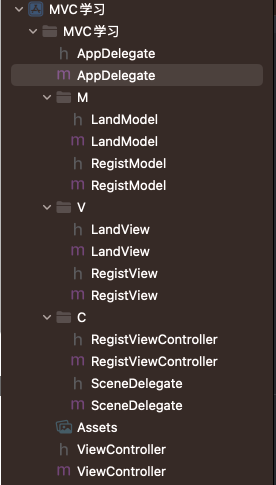
可以看到笔者的登录注册都分别实现了MVC,这里给出以登录的MVC进行讲解
Model:
//
//  LandModel.h
//  MVC学习
//
//  Created by 夏楠 on 2023/9/9.
//#import <Foundation/Foundation.h>NS_ASSUME_NONNULL_BEGIN@interface LandModel : NSObject
@property(nonatomic, copy)NSMutableArray *accoutArray;
@property(nonatomic, copy)NSMutableArray *passwordArray;
- (void)InitLandModel;
@endNS_ASSUME_NONNULL_END
//
//  LandModel.m
//  MVC学习
//
//  Created by 夏楠 on 2023/9/9.
//#import "LandModel.h"@implementation LandModel
- (void)InitLandModel {_passwordArray = [[NSMutableArray alloc] init];_accoutArray = [[NSMutableArray alloc] init];
}
@end
View:
//
//  LandView.h
//  MVC学习
//
//  Created by 夏楠 on 2023/9/9.
//#import <UIKit/UIKit.h>NS_ASSUME_NONNULL_BEGIN@interface LandView : UIView
@property(retain, nonatomic)UITextField *textField1;
@property(retain, nonatomic)UITextField *textField2;
@property (nonatomic, strong) UIButton *loginBtn;
@property (nonatomic, strong) UIButton *registeBtn;
- (void)InitView;
@endNS_ASSUME_NONNULL_END
//
// LandView.m
// MVC学习
//
// Created by 夏楠 on 2023/9/9.
//#import "LandView.h"@implementation LandView- (void)InitView {//账号self.textField1 = [[UITextField alloc]init];self.textField1.frame = CGRectMake(60, 350, 280, 40);self.textField1.placeholder = @"请输入账号";self.textField1.borderStyle = UITextBorderStyleRoundedRect;// 设置文本框的圆角self.textField1.layer.cornerRadius = self.textField1.bounds.size.height / 2.0;self.textField1.layer.masksToBounds = YES;self.textField1.backgroundColor = [UIColor whiteColor]; // 设置背景颜色self.textField1.layer.borderColor = [UIColor blackColor].CGColor; // 设置边框颜色self.textField1.layer.borderWidth = 1.0; // 设置边框宽度[self.textField1 becomeFirstResponder];[self addSubview:self.textField1];//self.textField1.delegate = self;
// [[NSNotificationCenter defaultCenter] addObserver:self selector:@selector(keyboardWillShow:) name:UIKeyboardWillShowNotification object:nil];
// [[NSNotificationCenter defaultCenter] addObserver:self selector:@selector(keyboardWillHide:) name:UIKeyboardWillHideNotification object:nil];//用在Controller层//密码self.textField2 = [[UITextField alloc]init];self.textField2.frame = CGRectMake(60, 400, 280, 40);self.textField2.placeholder = @"请输入密码";self.textField2.borderStyle = UITextBorderStyleRoundedRect;// 设置文本框的圆角self.textField2.layer.cornerRadius = self.textField2.bounds.size.height / 2.0;self.textField2.layer.masksToBounds = YES;self.textField2.backgroundColor = [UIColor whiteColor]; // 设置背景颜色self.textField2.layer.borderColor = [UIColor blackColor].CGColor; // 设置边框颜色self.textField2.layer.borderWidth = 1.0; // 设置边框宽度self.textField2.secureTextEntry = YES;[self.textField2 becomeFirstResponder];[self addSubview:self.textField2];// self.textField2.delegate = self;
// [[NSNotificationCenter defaultCenter] addObserver:self selector:@selector(keyboardWillShow:) name:UIKeyboardWillShowNotification object:nil];
// [[NSNotificationCenter defaultCenter] addObserver:self selector:@selector(keyboardWillHide:) name:UIKeyboardWillHideNotification object:nil];//用在Controller层_loginBtn = [UIButton buttonWithType:UIButtonTypeRoundedRect];_loginBtn.frame = CGRectMake(80, 480, 80, 40);_loginBtn.layer.cornerRadius = _loginBtn.frame.size.height / 6.0;_loginBtn.layer.masksToBounds = YES;_loginBtn.layer.borderWidth = 2.0;_loginBtn.layer.borderColor = [UIColor whiteColor].CGColor;[_loginBtn setTitle:@"登陆" forState:UIControlStateNormal];_loginBtn.tintColor = [UIColor blackColor];_loginBtn.titleLabel.font = [UIFont systemFontOfSize:20];_loginBtn.layer.borderColor = [UIColor blackColor].CGColor; // 设置边框颜色[self addSubview:self.loginBtn];// [_loginBtn addTarget:self action:@selector(login) forControlEvents:UIControlEventTouchUpInside];//用在controller层_registeBtn = [UIButton buttonWithType:UIButtonTypeRoundedRect];_registeBtn.frame = CGRectMake(233, 480, 80, 40);_registeBtn.layer.cornerRadius = _registeBtn.frame.size.height / 6.0;_registeBtn.layer.masksToBounds = YES;_registeBtn.layer.borderWidth = 2.0;_registeBtn.layer.borderColor = [UIColor whiteColor].CGColor;[_registeBtn setTitle:@"注册" forState:UIControlStateNormal];_registeBtn.tintColor = [UIColor blackColor];_registeBtn.titleLabel.font = [UIFont systemFontOfSize:20];_registeBtn.layer.borderColor = [UIColor blackColor].CGColor; // 设置边框颜色[self addSubview:self.registeBtn];//添加注册时间// [_registeBtn addTarget:self action:@selector(registe) forControlEvents:UIControlEventTouchUpInside];}Controller:
//
//  ViewController.h
//  MVC学习
//
//  Created by 夏楠 on 2023/9/9.
//#import <UIKit/UIKit.h>
#import "RegistViewController.h"
#import "LandModel.h"
#import "LandView.h"@interface ViewController : UIViewController<UITextFieldDelegate, ConfirmDelegate>
@property (nonatomic, strong)LandView *landView;
@property (nonatomic, strong)LandModel *landModel;
@property (retain, nonatomic)UIAlertController *alert;
@property (nonatomic, strong)RegistViewController *rVC;@end
//
// ViewController.m
// MVC学习
//
// Created by 夏楠 on 2023/9/9.
//#import "ViewController.h"@interface ViewController ()@end@implementation ViewController- (void)viewDidLoad {[super viewDidLoad];_landModel = [[LandModel alloc] init];[_landModel InitLandModel];_landView = [[LandView alloc] initWithFrame:self.view.frame];[_landView InitView];[self.view addSubview:_landView];[_landView.loginBtn addTarget:self action:@selector(login) forControlEvents:UIControlEventTouchUpInside];[_landView.registeBtn addTarget:self action:@selector(registe) forControlEvents:UIControlEventTouchUpInside];
}登陆函数
- (void)login {int boo1 = 0;for (int i = 0; i < _landModel.accoutArray.count; i ++) {if ([_landModel.accoutArray[i] isEqualToString:_landView.textField1.text] && [_landModel.passwordArray[i] isEqualToString:_landView.textField2.text]) {boo1 = 1;break;}}if (boo1 == 1) {self.alert = [UIAlertController alertControllerWithTitle:@"提示" message:@"登陆成功" preferredStyle:UIAlertControllerStyleAlert];UIAlertAction *confirmAction = [UIAlertAction actionWithTitle:@"确认" style:UIAlertActionStyleDefault handler:^(UIAlertAction * _Nonnull action) {}];[self.alert addAction:confirmAction];[self presentViewController:self.alert animated:YES completion:nil];} else {self.alert = [UIAlertController alertControllerWithTitle:@"提示" message:@"用户名或密码错误" preferredStyle:UIAlertControllerStyleAlert];UIAlertAction *confirmAction = [UIAlertAction actionWithTitle:@"确认" style:UIAlertActionStyleDefault handler:^(UIAlertAction * _Nonnull action) {}];[self.alert addAction:confirmAction];[self presentViewController:self.alert animated:YES completion:nil];}}- (void)registe {if (!_rVC)_rVC = [[RegistViewController alloc] init];_rVC.delegate = self;NSLog(@"%@, %@", _landModel.accoutArray, _landModel.passwordArray);[self presentViewController:_rVC animated:YES completion:nil];
}- (void)confirm:(NSMutableArray *)account password:(NSMutableArray *)password {_landModel.accoutArray = [NSMutableArray arrayWithArray:account];_landModel.passwordArray = [NSMutableArray arrayWithArray:password];
}@end运行动画: