目录
实验:部署发布镜像(cubefile:0.4.0)
需求分析:
1、部署Kubenetes环境:
2、撰写 cubefile-deployment.yaml 文件
代码解释:
遇到的问题:
问题解决 :
3、撰写 cubefile-service.yaml 文件
代码解释:
遇到的问题:
4、最后测验
查看端口和进程:编辑
浏览器访问:编辑
实验:部署发布镜像(cubefile:0.4.0)
需求分析:
部署一个关于cubefile镜像的deployment
其中包含了2个副本,1CPU,2G内存,并创建暴露一个host port 的service服务
固定端口为8088:31326
1、部署Kubenetes环境:
参考:Kubernetes的介绍(组件、Pod)和 安装使用_Claylpf的博客-CSDN博客
2、撰写 cubefile-deployment.yaml 文件
(base) root@sd-cluster-04:~# cat cubefile-deployment.yaml
apiVersion: apps/v1
kind: Deployment
metadata:name: cubefile-deploymentnamespace: cubechat
spec:replicas: 2  selector:matchLabels:app: cubefiletemplate:metadata:labels:app: cubefilespec:containers:- name: cubefileimage: cubefile:0.4.0resources:requests:cpu: "1"memory: "2Gi"command: ["poetry", "run", "python"]args: ["cubefile/main.py"]
(base) root@sd-cluster-04:~#
代码解释:
apiVersion: apps/v1  # 使用的Kubernetes API版本
kind: Deployment  # 定义一个Deployment对象metadata:  # 元数据,包含Deployment的名称和所在的命名空间name: cubefile-deployment  # Deployment的名称namespace: cubechat  # 部署所在的命名空间spec:  # 指定Deployment的规范replicas: 2  # 指定要创建的Pod副本数,这里是2,表示要创建两个相同的Pod副本selector:  # 指定用于选择要管理的Pod的标签选择器matchLabels:  # 使用标签选择器匹配Podapp: cubefile  # 标签选择器,选择具有标签"app: cubefile"的Podtemplate:  # 指定要创建的Pod的模板metadata:  # 模板的元数据,包括Pod的标签labels:  # 定义Pod的标签,用于与Deployment中的标签选择器匹配app: cubefile  # Pod的标签,与Deployment中的标签选择器匹配spec:  # 指定Pod的规范containers:  # 定义Pod中的容器- name: cubefile  # 容器的名称image: cubefile:0.4.0  # 指定要使用的Docker镜像(自定义镜像)resources:  # 定义容器的资源请求和限制requests:  # 定义资源请求cpu: "1"  # 请求1个CPU单位memory: "2Gi"  # 请求2GB内存command: ["poetry", "run", "python"]  # 容器启动时执行的命令args: ["cubefile/main.py"]  # 启动命令的参数
遇到的问题:
其中比较重要的部分是我使用了 command: ["poetry", "run", "python"] (容器启动时执行的命令)
和args: ["cubefile/main.py"] (启动命令的参数),目的是用于代替镜像中错误的运行命令
在部署过程中遇到的错误:

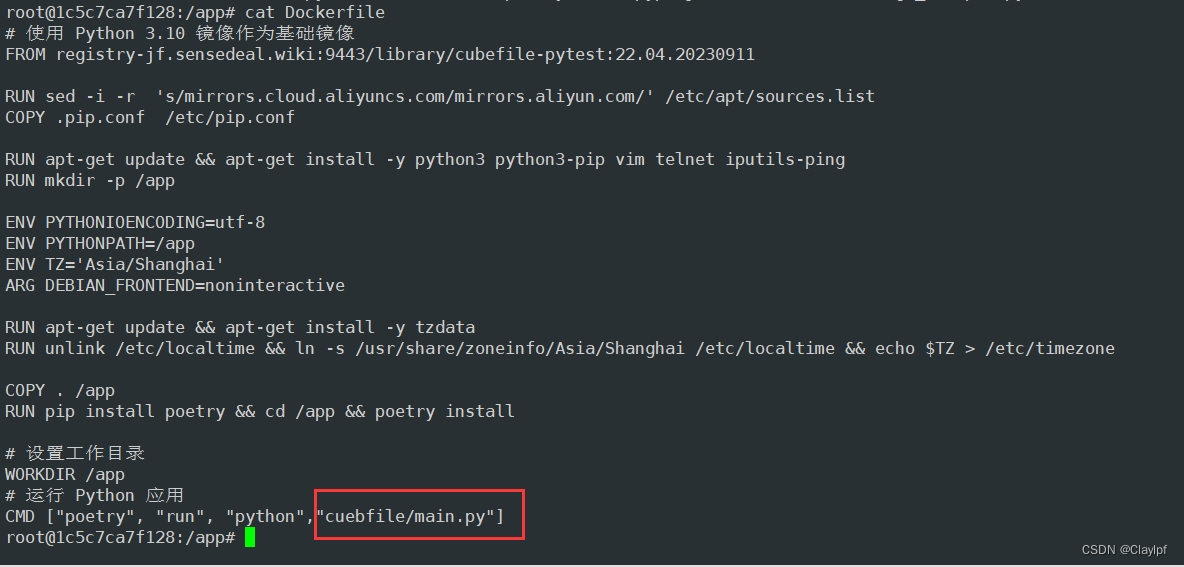
![]() 其实就是找不到/app/cuebfile/main.py文件
其实就是找不到/app/cuebfile/main.py文件
但是我进入镜像中,发现目录是:

所以是镜像中的运行地址输入错误了
问题解决 :
可以更改错误的方式有两种,一种是修改Dockerfile文件,重新打包镜像,但是问题是,如果这个镜像是别人上传到镜像库中的,你无法修改镜像,那应该怎么办呢,那么你就应该想到使用Kubernetes里面的命令来解决了。
所以我使用了 command和args命令的组合,替代了错误的CMD命令,从而实现镜像正常的部署。
3、撰写 cubefile-service.yaml 文件
(base) root@sd-cluster-04:~# cat cubefile-service.yaml
apiVersion: v1
kind: Service
metadata:name: cubefile-servicenamespace: cubechat  labels:app: cubefile
spec:type: NodePortselector:app: cubefileports:- protocol: TCPport: 8088targetPort: 8088nodePort: 31326
(base) root@sd-cluster-04:~#
代码解释:
apiVersion: v1  # 使用的Kubernetes API版本
kind: Service  # 定义一个Service对象metadata:  # 元数据,包含Service的名称和所在的命名空间name: cubefile-service  # Service的名称namespace: cubechat  # Service所在的命名空间labels:  # 定义Service的标签,用于与其他资源关联app: cubefile  # Service的标签,用于与与之匹配的Pod关联spec:  # 指定Service的规范type: NodePort  # 指定Service的类型为NodePort,这将使Service通过Node上的端口暴露服务selector:  # 指定用于选择要关联的Pod的标签选择器app: cubefile  # 标签选择器,选择具有标签"app: cubefile"的Podports:  # 指定Service要监听的端口配置- protocol: TCP  # 指定协议为TCPport: 8088  # Service监听的端口targetPort: 8088  # Service路由到的Pod的端口nodePort: 31326  # NodePort,用于暴露Service的端口到每个Node上的指定端口
遇到的问题:
其中遇到了一个问题,就是在定义port: 8088(Service监听的端口)和targetPort: 8088(Service路由到的Pod的端口)的时候,必须是我们Pod内容器打开的端口,如nginx默认打开80,Mysql默认打开3306,redis默认打开6379,必须要确定容器或者程序打开的端口,否则就会访问不到,最后通过nodePort固定端口即可。


