文章目录
- 一、为什么要自研一套即时通讯系统
- 1、实现一个即时通讯系统有哪些方式
- 1.1、使用开源产品做二次开发或直接使用
- 1.2、使用付费的云服务商
- 1.3、自研
- 2、如何自研一套即时通讯系统
- 2.1、早期即时通讯系统是如何实现
- 2.2、一套即时通讯系统的基本组成
- 2.3、当下的即时通讯系统常用架构
- 2.4、总结
- 二、基础数据的开发
- 1、导入用户资料、删除用户资料、修改用户资料、查询用户资料
- 2、即时通讯中最有价值的数据—关系链模块业务分析与数据库设计
- 2.1、最有价值的数据—好友关系链
- 2.2、好友关系
- 2.3、数据库设计
- 3、导入、添加、更新好友、删除好友、删除所有好友、拉取指定好友、拉取所有好友业务的功能实现
- 4、校验好友关系其实远比你想的要复杂
- 5、添加、删除、校验黑名单业务实现
- 6、好友申请列表的拉取、新建好友申请、好友申请审批、好友申请列表已读业务实现
- 7、好友分组业务介绍和数据库设计
- 8、好友分组的创建、获取、添加、删除成员、分组删除业务的实现
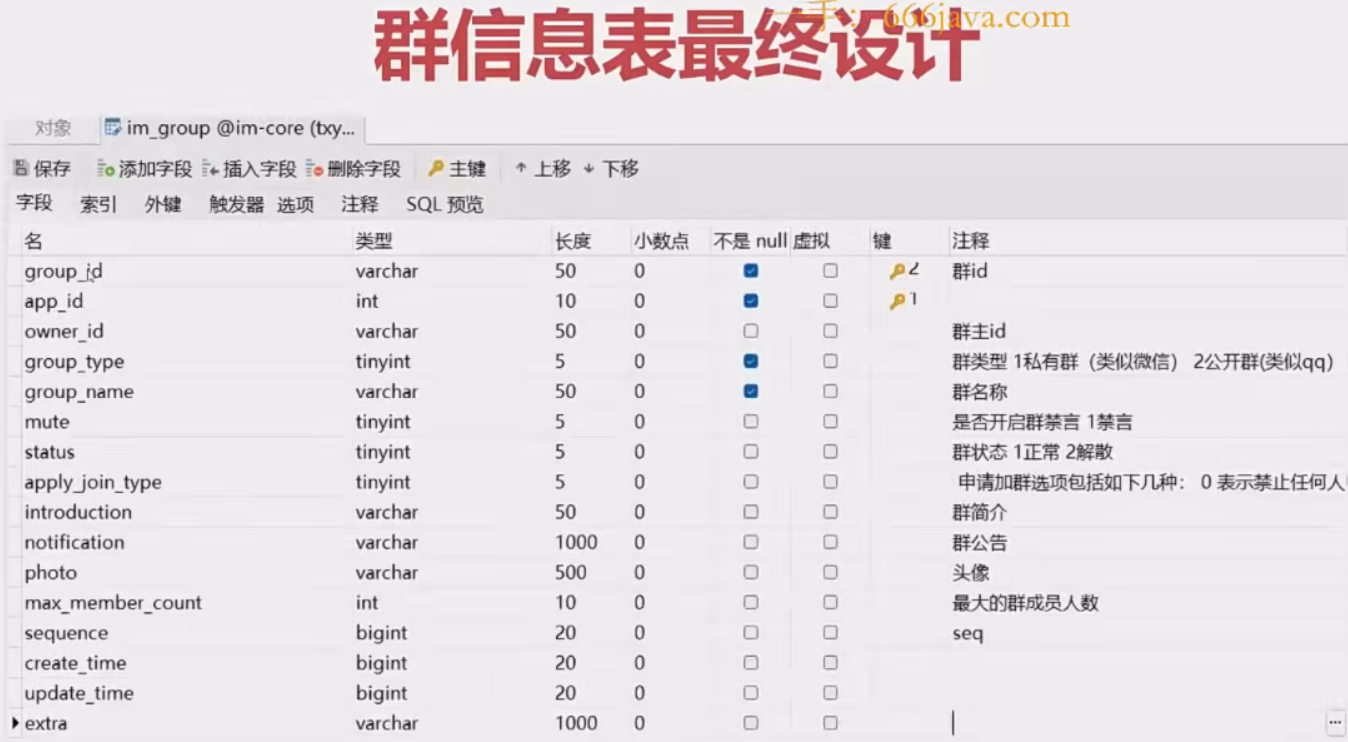
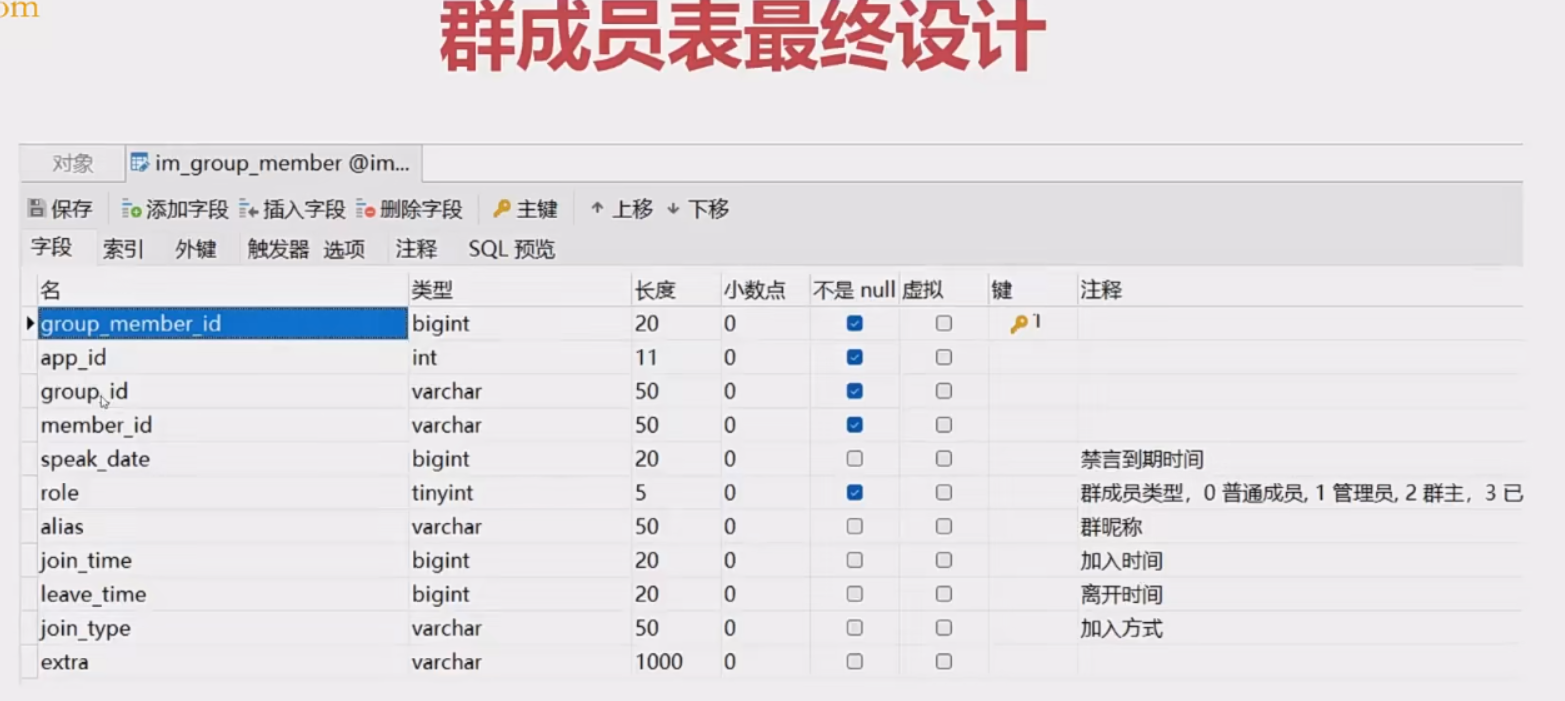
- 9、即时通讯最复杂的模块—群组模块业务分析和数据库设计
- 10、导入群和群成员业务实现
- 11、创建群组、修改群信息、获取群信息业务功能实现
- 12、获取用户加入的群列表业务功能实现
- 13、解散群组、转让群组的业务功能实现
- 14、拉人入群成员、移出群聊、退出群聊业务功能实现
- 15、获取群组成员信息、修改群组成员信息业务功能实现
- 16、禁言群、禁言群成员业务功能实现
- 三、BIO、NIO和Netty入门
- 1、BIO、NIO
- 2、netty
- 四、Netty企业开发必须掌握的技能
- 1、使用netty实现简单的聊天室
- 2、netty的编解码
- 3、底层数据流转的核心—pipline机制
- 4、传输层协议TCP留给我们的难题—Netty解决半包、粘包方
- 4.1、TCP传输中的问题(半包、黏包)
- 4.2、Netty怎么解决半包、黏包
- 5、传输层协议TCP留给我们的难题—使用私有协议解决半包、黏包、byteBuf底层API
- 6、IdleStateHandler心跳机制源码详解
- 7、使用Netty实现文件上下传
- 五、IM开发核心之构建TCP网关(上)
- 1、编写LimServer
- 2、编写LimWebSocketServer
- 3、使用snakeyaml动态配置文件
- 4、大白话讲通信协议—详解主流通讯协议
- 4.1、文本协议
- 4.2、二进制协议
- 4.3、xml协议
- 4.4、可以落地使用的协议
- 5、私有协议编解码—设计篇
- 6、私有协议编解码—实现篇
- 6.1、LimServer的编解码器
- 6.2、LimWebSocketServer的编解码器
- 六、IM开发核心之建构TCP网关(下)
- 1、登录消息—保存用户NioSocketChannel
- 2、分布式缓存中间件—Redisson快速入门操作
- 3、用户登录网关层—保存用户Session
- 4、用户退出网关层—离线删除用户Session
- 5、服务端心跳检测
- 6、RabbitMQ的安装、发布订阅、路由模式详解
- 7、TCP接入RabbitMQ、打通和逻辑层的交互
- 8、分布式TCP服务注册中心的选型
- 9、TCP服务注册—Zookeeper注册TCP服务
- 10、服务改造-TCP服务分布式改造
- 10.1、 广播模式
- 10.2、 一致性Hash
- 10.3、 构建路由层
- 11、即时通讯系统支持多端登录模式—应对多端登录的场景
- 七、打通业务服务器与IM服务器多端同步
- 1、负载均衡策略—随机模式
- 2、负载均衡策略—轮询模式
- 3、负载均衡策略—一致性Hash
- 4、配置负载均衡策略
- 5、使用Apache—HttpClient封装http请求工具
- 6、用户资料变更、群组模块回调
- 7、数据多端同步
- 8、封装查询用户Session工具类
- 9、封装MessageProducer给用户发送消息
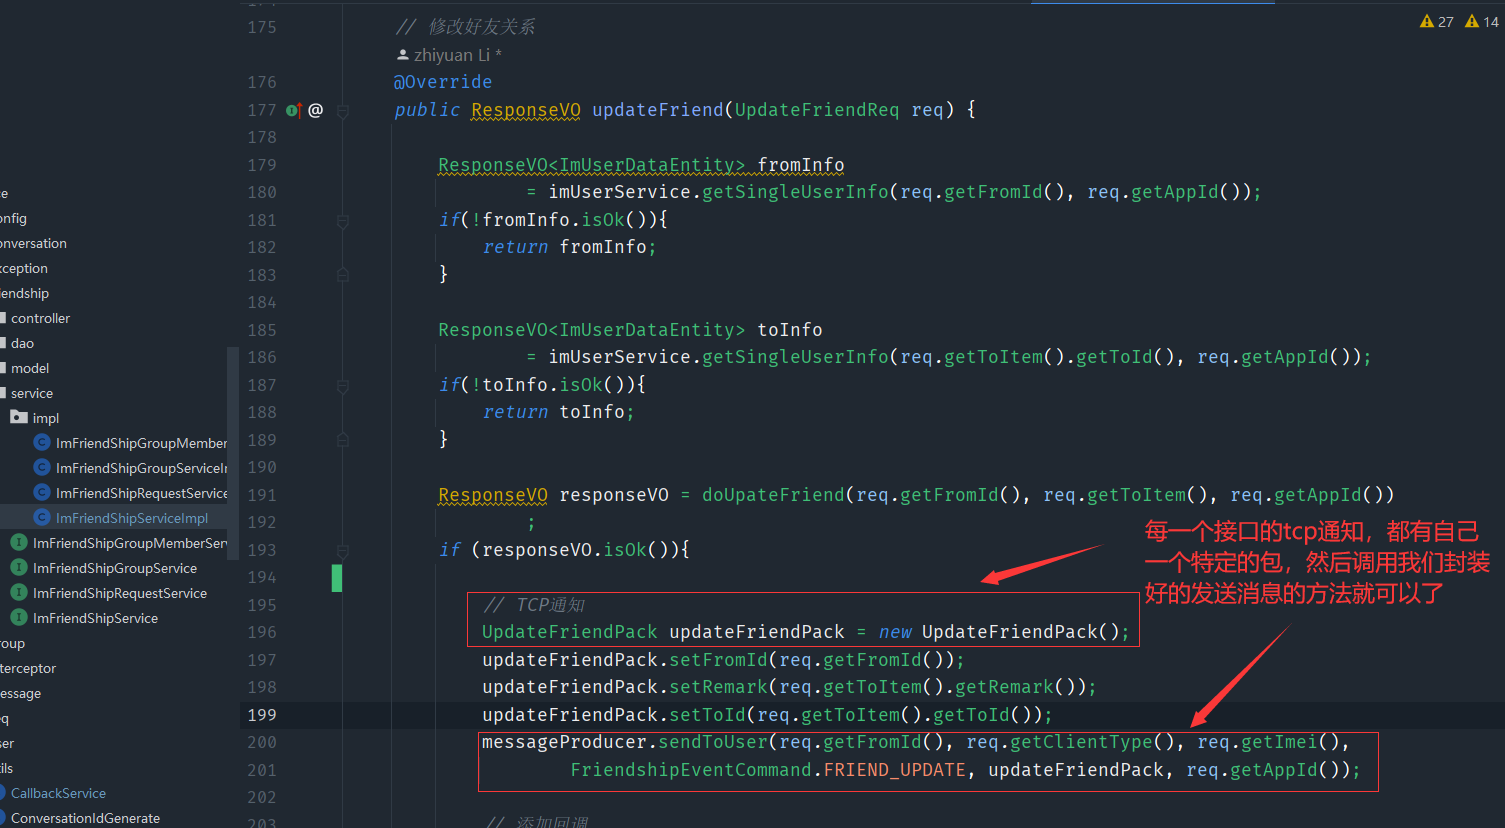
- 10、编写用户资料、好友模块变更通知
- 11、封装GroupMessageProducer给用户发送消息
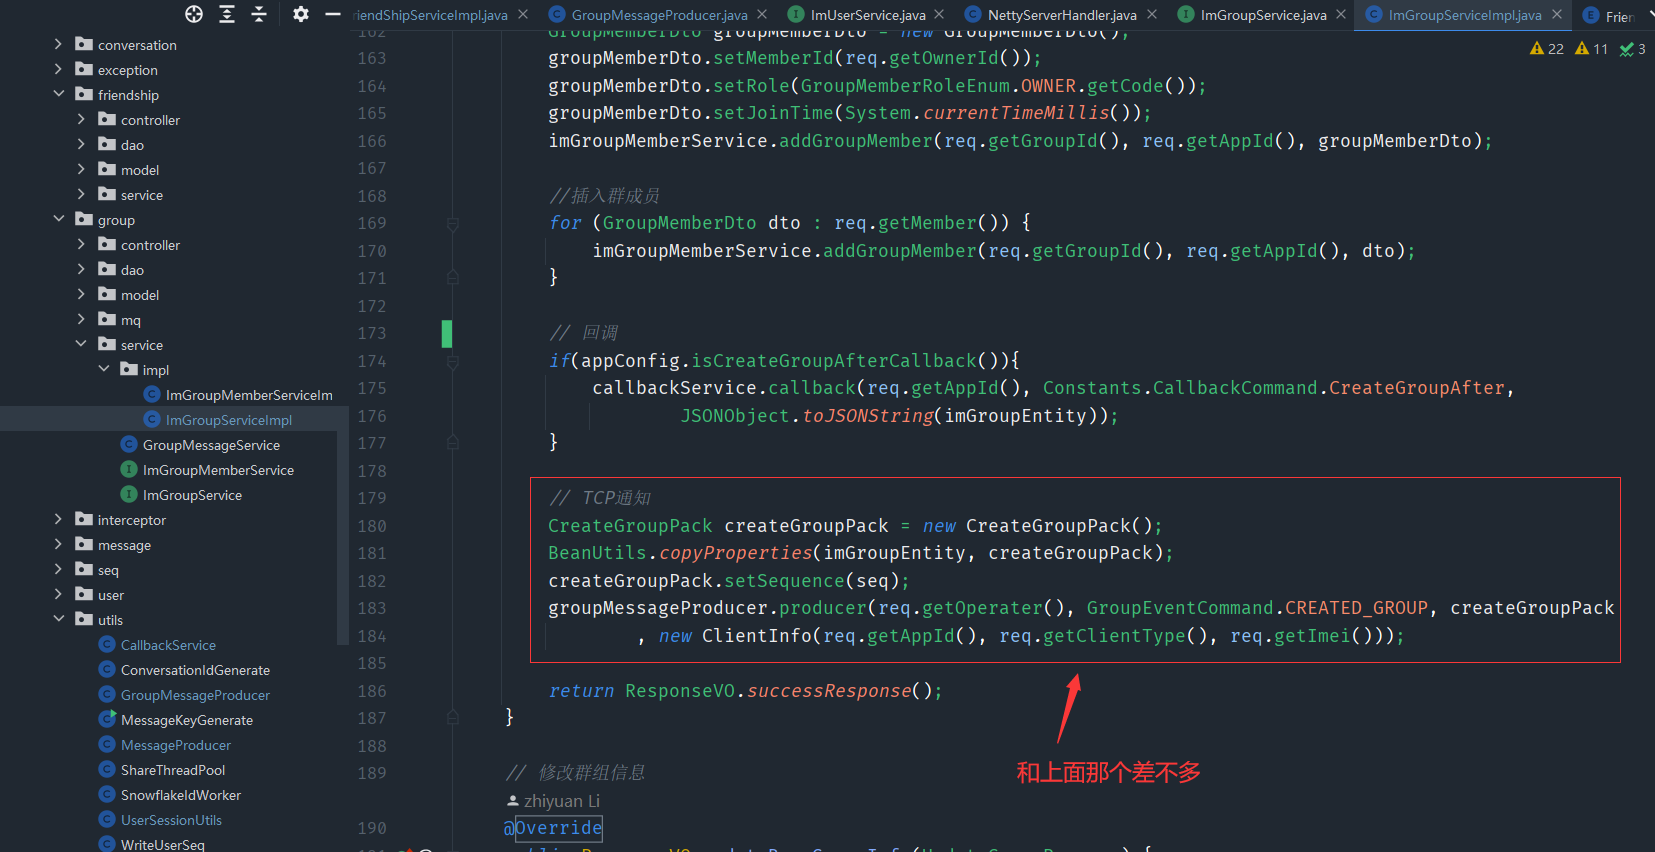
- 12、编写群组模块TCP通知
- 13、TCP服务处理逻辑层投递的MQ消息
- 14、接口调用鉴权加密—加解密算法HMAC-SHA256
- 八、消息业务的流程之打通消息收发核心
- 1、消息收发的核心流程
- 2、单聊消息分发逻辑—RabbitMQ连接tcp层和网关层
- 3、单聊消息分发逻辑—发送消息前置校验
- 4、单聊消息分发逻辑—消息分发的主流程
- 5、详细分析群聊业务
- 6、发送群聊消息前置校验
- 7、群聊消息的分发逻辑
- 8、聊天记录存储结构单聊群聊读扩散、写扩散选型
- 9、 IM消息ID专题—分布式自增id解决方案介绍
- 10、如何将单聊、群聊消息持久化到DB
- 11、实现发送单聊和群聊的接口
- 九、消息业务的核心之消息可达性、一致性、幂等性、实时性
- 1、消息实时性—利用多线程解决消息串行的问题,提高处理效率
- 2、消息实时性—校验逻辑前置由tcp通过feign接口提前校验
- 3、消息实时性—利用mq异步持久化消息
- 4、用了TCP就不会丢包、丢消息了吗?
- 5、单人消息可靠性—双重ACK保证上下行消息可靠
- 6、单人消息有序性—消息并行可能导致消息乱序
- 7、单人消息幂等性—保证消息不重复
- 8、群聊消息实时性—消息并行、持久化解耦、前置校验
- 9、群聊消息有序性—消息并行可能导致消息乱序
- 10、群聊消息消息幂等性—保证消息不重复
- 11、详解消息已读等的实现方案
- 12、构建聊天会话—消息已读功能实现
- 13、离线消息—离线消息设计和实现
- 十、揭秘QQ、微信数据同步的演进
- 1、剖析qq和微信背后数据同步的完整过程
- 2、如何将好友关系链、会话、群组全量拉取改为增量拉取
- 3、手把手带你实现增量同步接口
- 4、获取某个用户的req
- 5、如何实现增量拉取离线消息
- 十一、打造QQ在线状态功能之为你的应用增添色彩
- 1、在线状态设计
- 2、Netty网关用户状态变更通知、登录ack
- 3、逻辑层处理用户上线下线
- 4、在线状态订阅—临时订阅
- 5、实现手动设置客户端状态接口
- 6、推拉结合实现在线状态更新
- 十二、IM扩展—能做的事情还有很多
- 1、如何让陌生人只能发送几条消息
- 2、如何实现消息的撤回
- 3、如何设计亿级聊天记录存储方案
总结一下
一、为什么要自研一套即时通讯系统
1、实现一个即时通讯系统有哪些方式
首先从市面上看im系统(无非就这三种方式):
- 使用开源产品做二次开发或者直接使用
- 使用付费的云服务商
- 自研
1.1、使用开源产品做二次开发或直接使用
优点:可以快速的上手,使用
缺点:功能缺失,可持续性不强,没有团队做后期的维护和扩展,是否和自己公司的技术栈相匹配
1.2、使用付费的云服务商
优点:既不用开发im系统,也不需要运维服务器,大型的服务商技术比较成熟,消息传递的可靠性高,根据服务商官方的sdk和ui库,很容易的给自己的服务加上im功能
缺点:无法窥探服务商的源码(闭源),定制化的需求很难满足,官方的扩展如果没有解决你的需求,基本上就无解了,还要有信息和数据是重要的资产,放在别人的手里不太好,服务的费用高
1.3、自研
优点:切合公司技术栈进行开发,不用担心后期维护,定制自己的需求,数据安全得到保护
缺点:需要有特别熟悉im系统的人开发,对技术水平有一定的要求,人力成本增加
2、如何自研一套即时通讯系统
2.1、早期即时通讯系统是如何实现
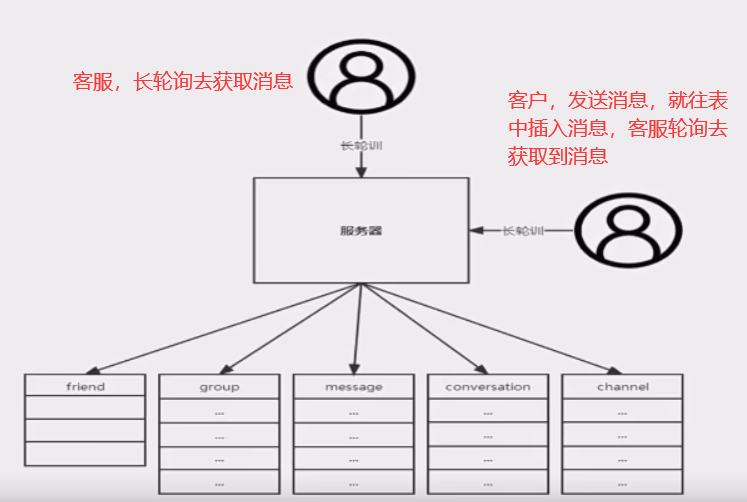
这是早期的京东客服实现的技术架构
这个架构会造成资源的浪费,没有消息发送的时候,轮询也不会停止
2.2、一套即时通讯系统的基本组成

-
客户端:PC端(MAC、WINDOS)、手机端(安卓、苹果)、WEB端 -
服务层:接入层:im系统的门户,是im系统中较为核心的模块,维护着客户端和服务端的长链接,消息由客户端发送给接入层,接入层交递给逻辑层进行处理;接入层主要分为四个功能:第一个是保持长链接、第二个是协议解析、第三个是我们的session维护、第四个是消息推送;当消息处理完成后,也是由接入层投递给客户端;在接入层和客户端中必须要有协议(应用层协议:文本协议和二进制协议—MQTT、XMPP、HTPP等协议;私有协议)逻辑层:业务系统的一个又一个的模块:用户、关系链、群组、消息
-
存储层:MySQL、Redis
2.3、当下的即时通讯系统常用架构

-
长连接在收发消息即时,有消息来可以通过长连接可以直接投递给用户,对比长轮询而言,避免了许多的空循环(可以参考本文:web通讯的四种方式)
-
接入层和逻辑层可以通过
rpc调用或者mq解耦 -
逻辑层连接的各大持久层完成持久化工作
2.4、总结
接入层:去维护我们客户端的长连接和消息的收发,协议可以考虑使用TCP协议(可靠的);选择一个合适的应用层协议(MQTT、XMPP、私有协议);接入层还要做好用户session的维护,接入层和传统的web开发有不同,接入层是有状态的服务,传统的http是无状态的服务
逻辑层:处理消息收发的核心逻辑,配合接入层和存储层,真正的做到消息的不丢、不漏、不串
存储层:要有合理的设计,为逻辑层提供数据服务,能够承载海量的聊天记录数据
二、基础数据的开发
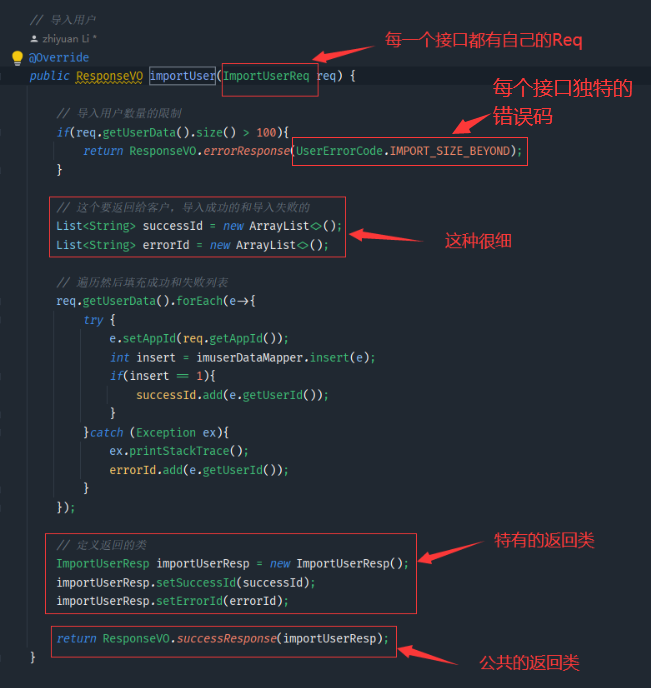
1、导入用户资料、删除用户资料、修改用户资料、查询用户资料
这里我觉得不错的地方,用导入用户资料的逻辑做示范:
然后这里就是一些增删改查的逻辑,这里就不写了,自己过一遍知道大致意思,后面也一样
2、即时通讯中最有价值的数据—关系链模块业务分析与数据库设计
2.1、最有价值的数据—好友关系链
为什么要这么说呢?你看微信、QQ为什么地位这么牢固呢?就是因为他们里面有你的好友,如果你换了一款聊天软件这些好友你就都没有了,你说这是不是价值挺高。
2.2、好友关系
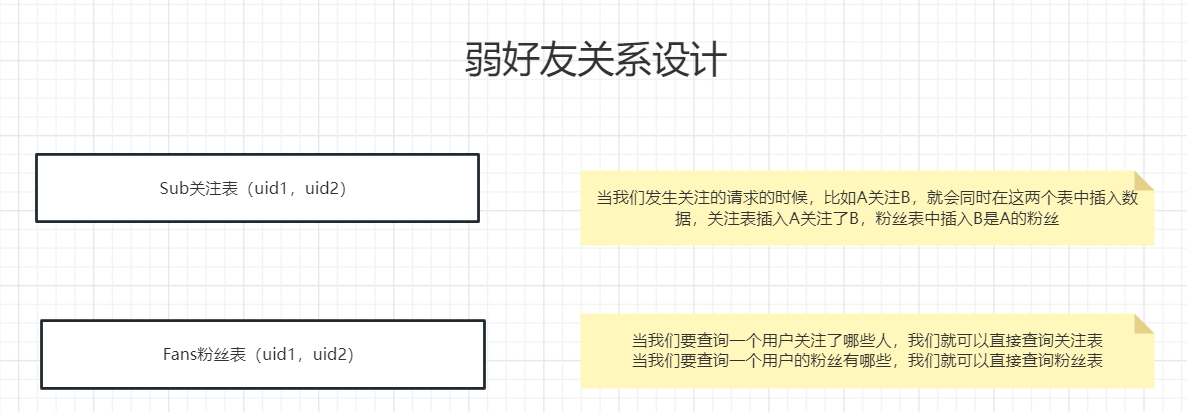
- 弱好友关系:微博那种订阅的方式
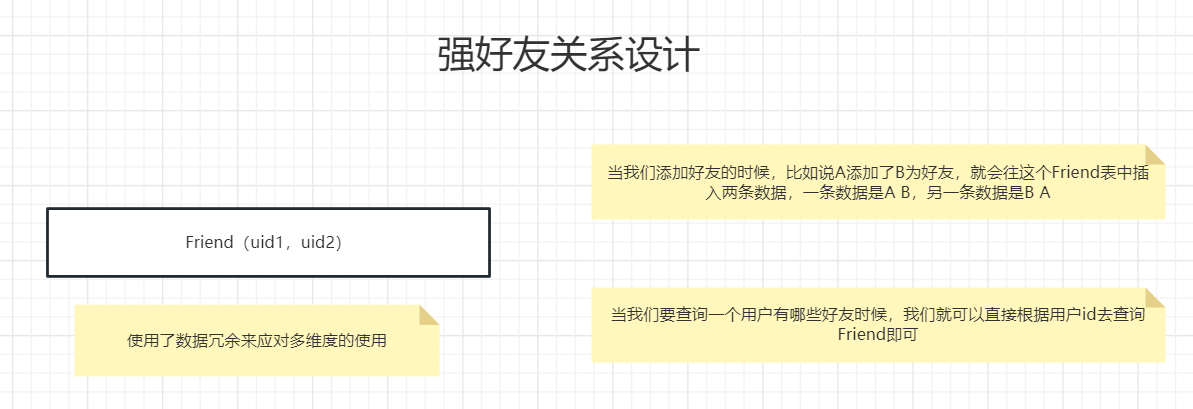
- 强好友关系:像是微信这种(本系统采用的方式)
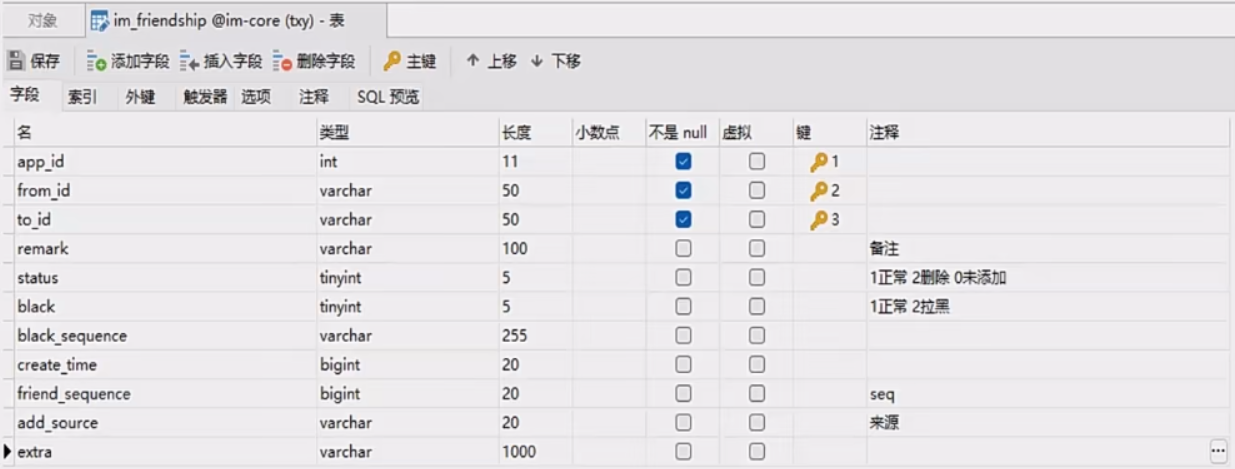
2.3、数据库设计
-
弱好友好关系设计:
-
强好友关系设计:
- 最终设计
3、导入、添加、更新好友、删除好友、删除所有好友、拉取指定好友、拉取所有好友业务的功能实现
这里贴一个添加好友的具体逻辑的代码,其他的和这个大致思路差不多
// 添加好友的逻辑
@Transactional
public ResponseVO doAddFriend(RequestBase requestBase, String fromId, FriendDto dto, Integer appId){// A-B// Friend表插入 A 和 B 两条记录// 查询是否有记录存在,如果存在则判断状态,如果是已经添加,则提示已经添加了,如果是未添加,则修改状态// 第一条数据的插入LambdaQueryWrapper<ImFriendShipEntity> lqw = new LambdaQueryWrapper<>();lqw.eq(ImFriendShipEntity::getAppId, appId);lqw.eq(ImFriendShipEntity::getFromId, fromId);lqw.eq(ImFriendShipEntity::getToId, dto.getToId());ImFriendShipEntity entity = imFriendShipMapper.selectOne(lqw);long seq = 0L;// 不存在这条消息if(entity == null){// 直接添加entity = new ImFriendShipEntity();seq = redisSeq.doGetSeq(appId + ":" + Constants.SeqConstants.Friendship);entity.setAppId(appId);entity.setFriendSequence(seq);entity.setFromId(fromId);BeanUtils.copyProperties(dto, entity);entity.setStatus(FriendShipStatusEnum.FRIEND_STATUS_NORMAL.getCode());entity.setCreateTime(System.currentTimeMillis());int insert = imFriendShipMapper.insert(entity);if(insert != 1){// TODO 添加好友失败return ResponseVO.errorResponse(FriendShipErrorCode.ADD_FRIEND_ERROR);}writeUserSeq.writeUserSeq(appId, fromId, Constants.SeqConstants.Friendship, seq);}else{// 存在这条消息,去根据状态做判断// 他已经是你的好友了if(entity.getStatus() == FriendShipStatusEnum.FRIEND_STATUS_NORMAL.getCode()){// TODO 对方已经是你的好友return ResponseVO.errorResponse(FriendShipErrorCode.TO_IS_YOUR_FRIEND);}else{ImFriendShipEntity update = new ImFriendShipEntity();if(StringUtils.isNotEmpty(dto.getAddSource())){update.setAddSource(dto.getAddSource());}if(StringUtils.isNotEmpty(dto.getRemark())){update.setRemark(dto.getRemark());}if(StringUtils.isNotEmpty(dto.getExtra())){update.setExtra(dto.getExtra());}seq = redisSeq.doGetSeq(appId + ":" + Constants.SeqConstants.Friendship);update.setFriendSequence(seq);update.setStatus(FriendShipStatusEnum.FRIEND_STATUS_NORMAL.getCode());int res = imFriendShipMapper.update(update, lqw);if(res != 1){// TODO 添加好友失败return ResponseVO.errorResponse(FriendShipErrorCode.ADD_FRIEND_ERROR);}writeUserSeq.writeUserSeq(appId, fromId, Constants.SeqConstants.Friendship, seq);}}// 第二条数据的插入LambdaQueryWrapper<ImFriendShipEntity> lqw1 = new LambdaQueryWrapper<>();lqw1.eq(ImFriendShipEntity::getAppId, appId);lqw1.eq(ImFriendShipEntity::getFromId, dto.getToId());lqw1.eq(ImFriendShipEntity::getToId, fromId);ImFriendShipEntity entity1 = imFriendShipMapper.selectOne(lqw1);// 不存在就直接添加if(entity1 == null){entity1 = new ImFriendShipEntity();entity1.setAppId(appId);entity1.setFromId(dto.getToId());BeanUtils.copyProperties(dto, entity1);entity1.setToId(fromId);entity1.setFriendSequence(seq);entity1.setStatus(FriendShipStatusEnum.FRIEND_STATUS_NORMAL.getCode());entity1.setCreateTime(System.currentTimeMillis());int insert = imFriendShipMapper.insert(entity1);if(insert != 1){// TODO 添加好友失败return ResponseVO.errorResponse(FriendShipErrorCode.ADD_FRIEND_ERROR);}writeUserSeq.writeUserSeq(appId, dto.getToId(), Constants.SeqConstants.Friendship, seq);}else{// 存在就判断状态if(FriendShipStatusEnum.FRIEND_STATUS_NORMAL.getCode() != entity1.getStatus()){// TODO 对方已经是你的好友return ResponseVO.errorResponse(FriendShipErrorCode.TO_IS_YOUR_FRIEND);}else{ImFriendShipEntity entity2 = new ImFriendShipEntity();entity2.setFriendSequence(seq);entity2.setStatus(FriendShipStatusEnum.FRIEND_STATUS_NORMAL.getCode());imFriendShipMapper.update(entity2, lqw1);writeUserSeq.writeUserSeq(appId, dto.getToId(), Constants.SeqConstants.Friendship, seq);}}// TODO TCP通知// A B 添加好友,要把添加好友的信息,发送给除了A其他的端,还要发送给B的所有端// 发送给fromAddFriendPack addFriendPack = new AddFriendPack();BeanUtils.copyProperties(entity, addFriendPack);addFriendPack.setSequence(seq);if(requestBase != null){messageProducer.sendToUser(fromId, requestBase.getClientType(), requestBase.getImei(),FriendshipEventCommand.FRIEND_ADD, addFriendPack, requestBase.getAppId());}else{messageProducer.sendToUser(fromId,FriendshipEventCommand.FRIEND_ADD, addFriendPack, requestBase.getAppId());}// 发送给toAddFriendPack addFriendToPack = new AddFriendPack();BeanUtils.copyProperties(entity1, addFriendToPack);messageProducer.sendToUser(entity1.getFromId(), FriendshipEventCommand.FRIEND_ADD, addFriendToPack,requestBase.getAppId());// 之后回调if(appConfig.isDestroyGroupAfterCallback()){AddFriendAfterCallbackDto addFriendAfterCallbackDto = new AddFriendAfterCallbackDto();addFriendAfterCallbackDto.setFromId(fromId);addFriendAfterCallbackDto.setToItem(dto);callbackService.callback(appId, Constants.CallbackCommand.AddFriendAfter,JSONObject.toJSONString(addFriendAfterCallbackDto));}return ResponseVO.successResponse();
}
后面的seq和回调、TCP通知可以先不看
4、校验好友关系其实远比你想的要复杂
这里的校验好友可以分为两种,一种是单向好友校验,一种是双向好友校验,这里贴出代码
// 校验好友关系
@Override
public ResponseVO checkFriendShip(CheckFriendShipReq req) {// 双向校验的修改// 1、先是把req中的所有的toIds都转化为key为属性,value为0的mapMap<String, Integer> result= req.getToIds().stream().collect(Collectors.toMap(Function.identity(), s-> 0));List<CheckFriendShipResp> resp = new ArrayList<>();if(req.getCheckType() == CheckFriendShipTypeEnum.SINGLE.getType()){resp = imFriendShipMapper.checkFriendShip(req);}else{resp = imFriendShipMapper.checkFriendShipBoth(req);}// 2、将复杂sql查询出来的数据转换为mapMap<String, Integer> collect = resp.stream().collect(Collectors.toMap(CheckFriendShipResp::getToId,CheckFriendShipResp::getStatus));// 3、最后比对之前result中和collect是否完全相同,collect中没有的话,就将这个数据封装起来放到resp中去for (String toId : result.keySet()){if(!collect.containsKey(toId)){CheckFriendShipResp checkFriendShipResp = new CheckFriendShipResp();checkFriendShipResp.setFromId(req.getFromId());checkFriendShipResp.setToId(toId);checkFriendShipResp.setStatus(result.get(toId));resp.add(checkFriendShipResp);}}return ResponseVO.successResponse(resp);
}
这里还要一个点,就是那个result最后和collect 里面的做一下对比,如果我们要校验的用户,不存在于数据库(双向校验在下面出现status=4的情况是,那个用户存在于数据库但是它的status为0),collect就查询不出来,也就要把那个数据也要加到resp中去,此时它的status=0
重要的点就是imFriendShipMapper这里面的两个sql语句
== checkFriendShip(单向校验) ==
@Select("<script>" +"select from_id as fromId, to_id as toId, if(status = 1, 1, 0) as status from im_friendship where from_id = #{fromId} and to_id in " +"<foreach collection='toIds' index = 'index' item = 'id' separator = ',' close = ')' open = '('>" +"#{id}" +"</foreach>" +"</script>")public List<CheckFriendShipResp> checkFriendShip(CheckFriendShipReq req);

也就是我通过fromId和toId只要能查到,就算是校验成功,校验结果再通过if(status = 1, 1, 0) as status 来做判断,最后返回给前面
checkFriendShipBoth(双向校验)
@Select("<script>" +"select a.fromId, a.toId, ( " +"case " +"when a.status = 1 and b.status = 1 then 1 " +"when a.status = 1 and b.status != 1 then 2 " +"when a.status != 1 and b.status = 1 then 3 " +"when a.status != 1 and b.status != 1 then 4 " +"end" +")" +"as status from " +"(select from_id as fromId, to_id as toId, if(status = 1, 1, 0) as status from im_friendship where app_id = #{appId} and from_id = #{fromId} and to_id in " +"<foreach collection='toIds' index='index' item='id' separator=',' close=')' open='('>" +"#{id}" +"</foreach>" +") as a inner join" +"(select from_id as fromId, to_id as toId, if(status = 1, 1, 0) as status from im_friendship where app_id = #{appId} and to_id = #{fromId} and from_id in " +"<foreach collection='toIds' index='index' item='id' separator=',' close=')' open='('>" +"#{id}" +"</foreach>" +") as b " +"on a.fromId = b.toId and a.toId = b.fromId" +"</script>")
public List<CheckFriendShipResp> checkFriendShipBoth(CheckFriendShipReq req);

5、添加、删除、校验黑名单业务实现
这里的校验黑名单业务和上面的校验好友业务是差不多的,这里也贴一下代码
// 校验黑名单
@Override
public ResponseVO checkFriendBlack(CheckFriendShipReq req) {Map<String, Integer> toIdMap= req.getToIds().stream().collect(Collectors.toMap(Function.identity(),s -> 0));List<CheckFriendShipResp> resp = new ArrayList<>();if(req.getCheckType() == CheckFriendShipTypeEnum.SINGLE.getType()){resp = imFriendShipMapper.checkFriendShipBlack(req);}else {resp = imFriendShipMapper.checkFriendShipBlackBoth(req);}Map<String, Integer> collect= resp.stream().collect(Collectors.toMap(CheckFriendShipResp::getToId, CheckFriendShipResp::getStatus));for (String toId : toIdMap.keySet()) {if(!collect.containsKey(toId)){CheckFriendShipResp checkFriendShipResp = new CheckFriendShipResp();checkFriendShipResp.setToId(toId);checkFriendShipResp.setFromId(req.getFromId());checkFriendShipResp.setStatus(toIdMap.get(toId));resp.add(checkFriendShipResp);}}return ResponseVO.successResponse(resp);
}
checkFriendShipBlack(单向校验)
@Select("<script>" +" select from_id AS fromId, to_id AS toId , if(black = 1,1,0) as status from im_friendship where app_id = #{appId} and from_id = #{fromId} and to_id in " +"<foreach collection='toIds' index='index' item='id' separator=',' close=')' open='('>" +" #{id} " +"</foreach>" +"</script>"
)
List<CheckFriendShipResp> checkFriendShipBlack(CheckFriendShipReq req);
checkFriendShipBlackBoth(双向校验)
@Select("<script>" +" select a.fromId,a.toId , ( \n" +" case \n" +" when a.black = 1 and b.black = 1 then 1 \n" +" when a.black = 1 and b.black != 1 then 2 \n" +" when a.black != 1 and b.black = 1 then 3 \n" +" when a.black != 1 and b.black != 1 then 4 \n" +" end \n" +" ) \n " +" as status from "+" (select from_id AS fromId , to_id AS toId , if(black = 1,1,0) as black from im_friendship where app_id = #{appId} and from_id = #{fromId} AND to_id in " +"<foreach collection='toIds' index='index' item='id' separator=',' close=')' open='('>" +" #{id} " +"</foreach>" +" ) as a INNER join" +" (select from_id AS fromId, to_id AS toId , if(black = 1,1,0) as black from im_friendship where app_id = #{appId} and to_id = #{fromId} AND from_id in " +"<foreach collection='toIds' index='index' item='id' separator=',' close=')' open='('>" +" #{id} " +"</foreach>" +" ) as b " +" on a.fromId = b.toId AND b.fromId = a.toId "+"</script>"
)
List<CheckFriendShipResp> checkFriendShipBlackBoth(CheckFriendShipReq toId);
6、好友申请列表的拉取、新建好友申请、好友申请审批、好友申请列表已读业务实现
这里的新建好友申请是在添加好友的业务中实现的,会根据用户的一个字段,是否需要申请才能加好友,代码如下
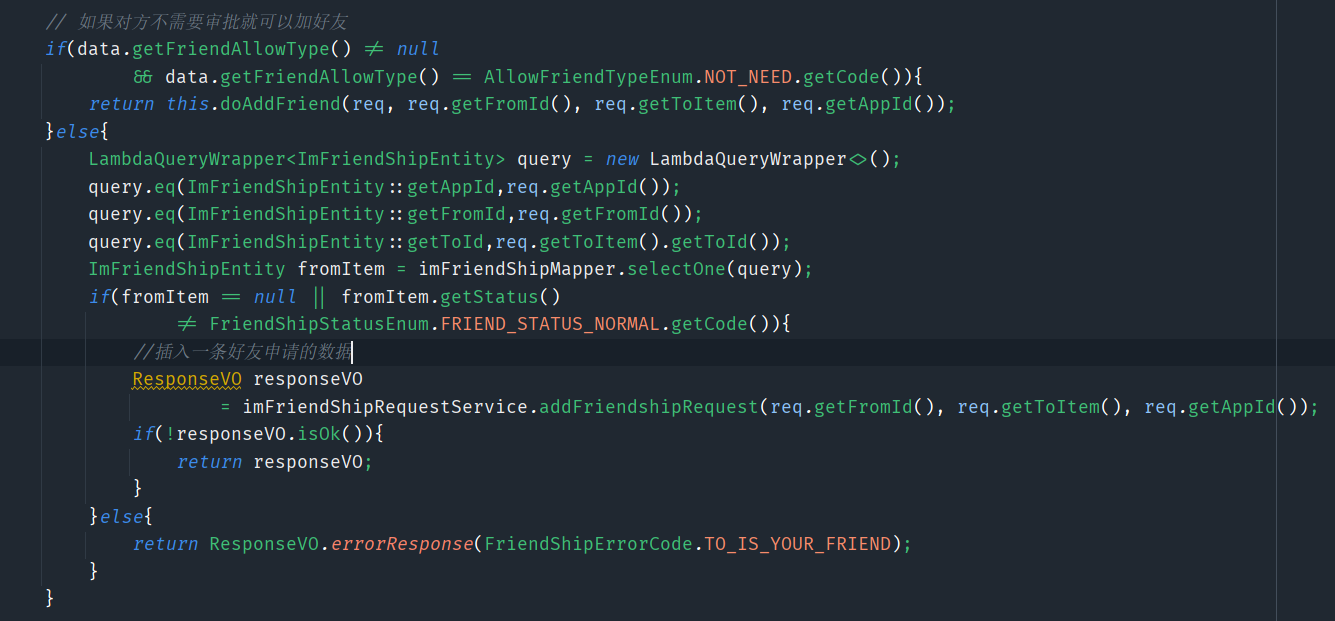
还有审批申请的代码
// 审批好友请求
@Override
@Transactional
public ResponseVO approverFriendRequest(ApproverFriendRequestReq req) {ImFriendShipRequestEntity imFriendShipRequestEntity = imFriendShipRequestMapper.selectById(req.getId());if(imFriendShipRequestEntity == null){throw new ApplicationException(FriendShipErrorCode. FRIEND_REQUEST_IS_NOT_EXIST);}if(!req.getOperater().equals(imFriendShipRequestEntity.getToId())){//只能审批发给自己的好友请求throw new ApplicationException(FriendShipErrorCode.NOT_APPROVER_OTHER_MAN_REQUEST);}long seq = redisSeq.doGetSeq(req.getAppId() + ":" + Constants.SeqConstants.FriendshipRequest);ImFriendShipRequestEntity update = new ImFriendShipRequestEntity();// 这里审批是指同意或者拒绝,所以要写活update.setApproveStatus(req.getStatus());update.setUpdateTime(System.currentTimeMillis());update.setId(req.getId());update.setSequence(seq);imFriendShipRequestMapper.updateById(update);writeUserSeq.writeUserSeq(req.getAppId(),req.getOperater(), Constants.SeqConstants.FriendshipRequest,seq);// 如果是统一的话,就可以直接调用添加好友的逻辑了if(ApproverFriendRequestStatusEnum.AGREE.getCode() == req.getStatus()){FriendDto dto = new FriendDto();dto.setAddSource(imFriendShipRequestEntity.getAddSource());dto.setAddWorking(imFriendShipRequestEntity.getAddWording());dto.setRemark(imFriendShipRequestEntity.getRemark());dto.setToId(imFriendShipRequestEntity.getToId());ResponseVO responseVO = imFriendShipService.doAddFriend(req, imFriendShipRequestEntity.getFromId(), dto, req.getAppId());if(!responseVO.isOk() && responseVO.getCode() != FriendShipErrorCode.TO_IS_YOUR_FRIEND.getCode()){return responseVO;}}// TODO TCP通知// 通知审批人的其他端ApproverFriendRequestPack approverFriendRequestPack = new ApproverFriendRequestPack();approverFriendRequestPack.setStatus(req.getStatus());approverFriendRequestPack.setId(req.getId());approverFriendRequestPack.setSequence(seq);messageProducer.sendToUser(imFriendShipRequestEntity.getToId(), req.getClientType(), req.getImei(),FriendshipEventCommand.FRIEND_REQUEST_APPROVER, approverFriendRequestPack, req.getAppId());return ResponseVO.successResponse();
}
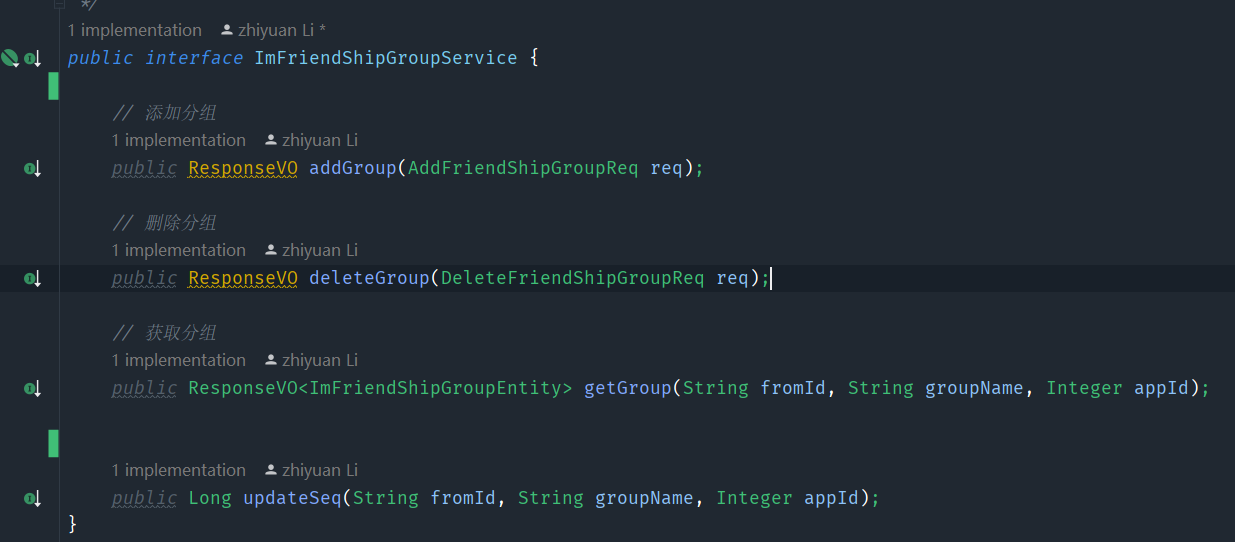
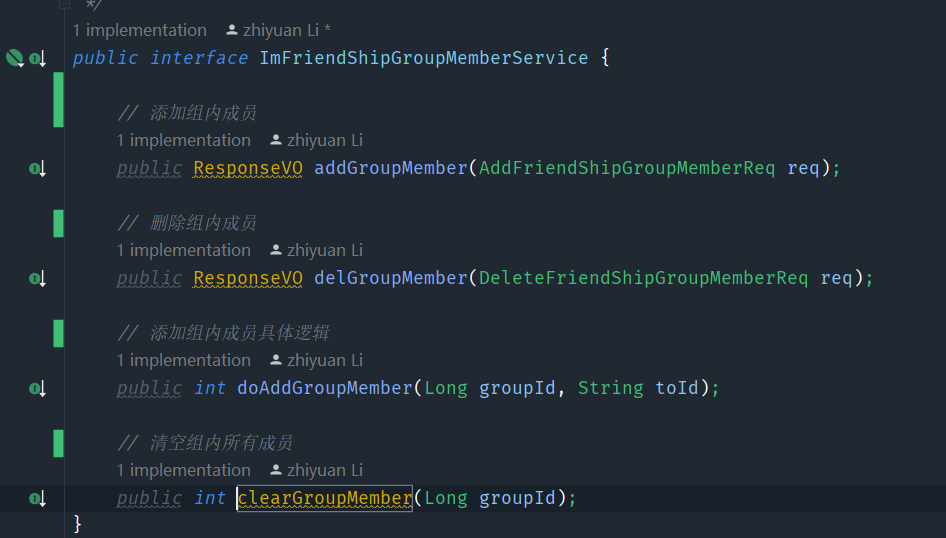
7、好友分组业务介绍和数据库设计
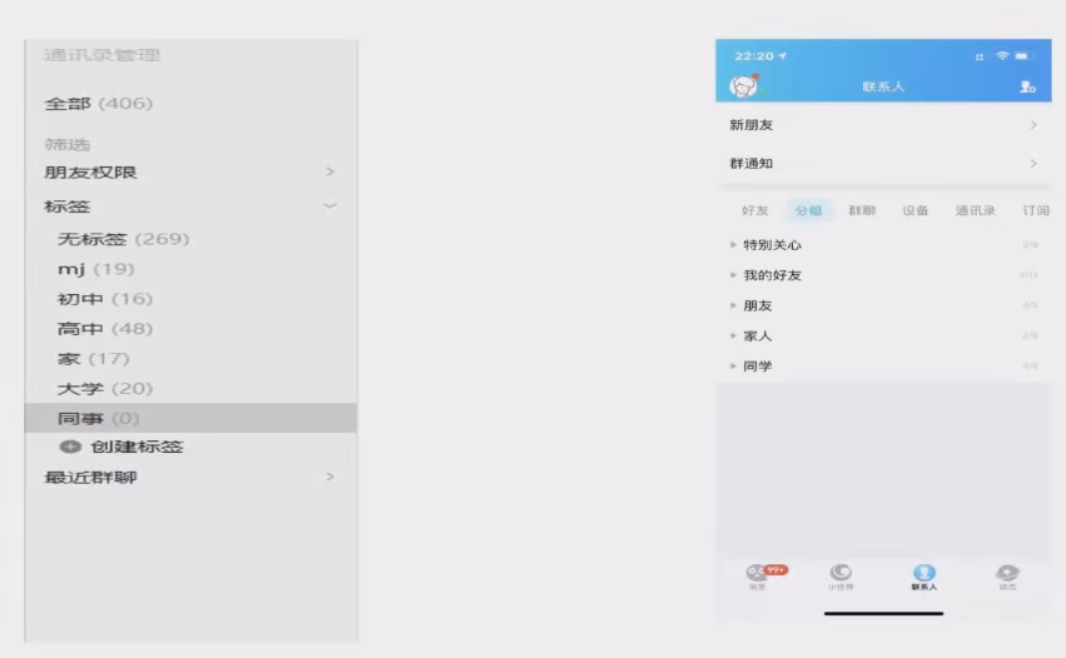
上图中左面的是微信的,一个用户可以在多个组内,右面的是qq的,一个用户只能在一个分组内,本系统实现的左边的方式,所以要设计一下数据库

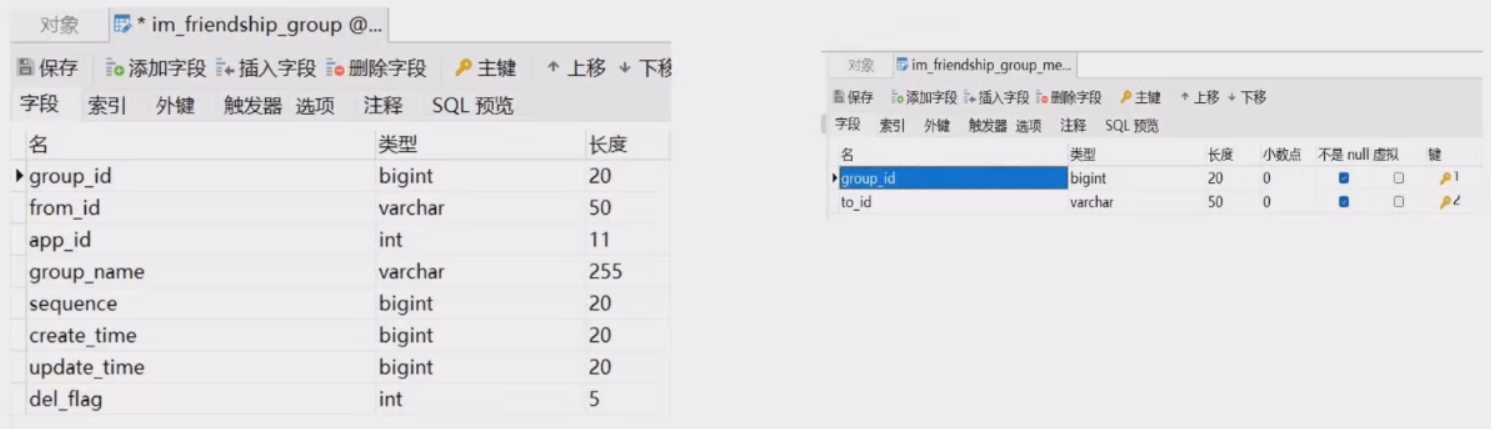
8、好友分组的创建、获取、添加、删除成员、分组删除业务的实现
这部分主打的就是一个联合,像好友分组创建需要用到添加成员,删除好友分组,也需要清空组内的成员,添加群组成员的时候,也需要获取群组,耦合性很强
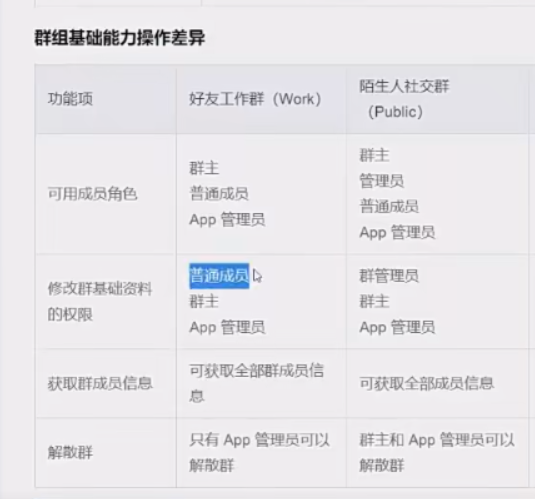
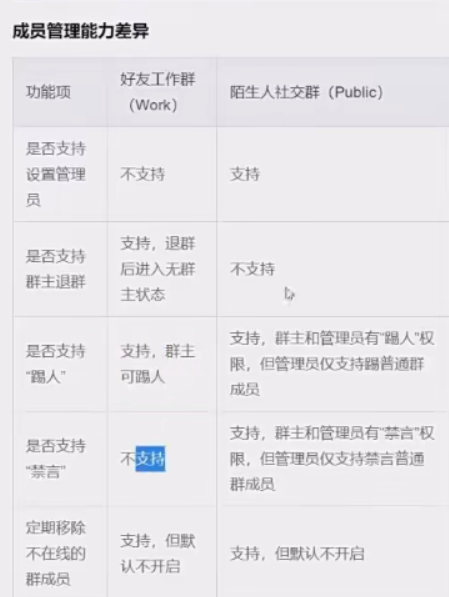
9、即时通讯最复杂的模块—群组模块业务分析和数据库设计
单聊不能像群聊那样聊的热火朝天的,所以我们要实现群聊
下面是腾讯云

本系统实现的是这两种群组类型

10、导入群和群成员业务实现
这里没啥说的
11、创建群组、修改群信息、获取群信息业务功能实现
复杂、耦合度高
12、获取用户加入的群列表业务功能实现
这里也没啥,就是查询这个group_member就可以找到用户加入的群了
@Select("select group_id from im_group_member where app_id = #{appId} and member_id = #{memberId}")
List<String> getJoinedGroupId(Integer appId, String memberId);
13、解散群组、转让群组的业务功能实现
略
14、拉人入群成员、移出群聊、退出群聊业务功能实现
略
15、获取群组成员信息、修改群组成员信息业务功能实现
略
16、禁言群、禁言群成员业务功能实现
略
三、BIO、NIO和Netty入门
1、BIO、NIO
这个可以看我的另一篇文章 IO线程模型
2、netty
这个东西很大,这里就做一点基础的阐述
官网:Netty is an asynchronous event-driven network application framework
for rapid development of maintainable high performance protocol servers & clients.
Netty是一个异步事件驱动的网络应用程序框架。用于快速开发可维护的高性能协议服务器和客户端。
官网:Netty is an NIO client server framework which enables quick and easy development of network applications such as protocol servers and clients. It greatly simplifies and streamlines network programming such as TCP and UDP socket server.
Netty是一个NIO客户端-服务器框架,可以快速轻松地开发网络应用程序,如协议服务器和客户端。它极大地简化和优化了网络编程,如TCP和UDP套接字服务器。
什么应用场景下会用到Netty?
- 开发任何网络编程,实现自己的rpc框架
- 能够作为一些公有协议的broker组件,如mqtt、http
- 不少的开源框架及大数据领域间的通信也会使用到netty
四、Netty企业开发必须掌握的技能
1、使用netty实现简单的聊天室
DiscardServerHandler
public class DiscardServerHandler extends ChannelInboundHandlerAdapter {static Set<Channel> channelList = new HashSet<>();// 有客户端连接进来就触发@Overridepublic void channelActive(ChannelHandlerContext ctx) throws Exception {// 通知其他人我上线了channelList.forEach((e)->{e.writeAndFlush("[客户端]" + ctx.channel().remoteAddress() + "上线了");});channelList.add(ctx.channel());}// 有读写事件发生的时候触发这个方法@Overridepublic void channelRead(ChannelHandlerContext ctx, Object msg) throws Exception {String message = (String) msg;System.out.println("收到数据: " + message);
//        // 通知分发给聊天室内所有的客户端
//        channelList.forEach((e)->{
//            if(e == ctx.channel()){
//                e.writeAndFlush("[自己]: " + message);
//            }else{
//                e.writeAndFlush("[客户端]:" + ctx.channel().remoteAddress() + "     " + message);
//            }
//        });}/***  channel 处于不活跃的时候会调用* @param ctx* @throws Exception*/@Overridepublic void channelInactive(ChannelHandlerContext ctx) throws Exception {// 通知其他客户端 我下线了channelList.remove(ctx.channel());// 通知其他人我上线了channelList.forEach((e)->{e.writeAndFlush("[客户端]" + ctx.channel().remoteAddress() + "下线了");});}
}
主要就是写Handler,把复杂的逻辑,用几个API就可以弄好了
DiscardServer
public class DiscardServer {private int port;public DiscardServer(int port){this.port = port;}public void run(){EventLoopGroup bossGroup = new NioEventLoopGroup(1); // 线程池EventLoopGroup workerGroup = new NioEventLoopGroup();try {ServerBootstrap b = new ServerBootstrap(); // (2)b.group(bossGroup, workerGroup).channel(NioServerSocketChannel.class) // (3).childHandler(new ChannelInitializer<SocketChannel>() { // (4)@Overridepublic void initChannel(SocketChannel ch) throws Exception {ch.pipeline().addLast(new DiscardServerHandler());}}).option(ChannelOption.SO_BACKLOG, 128)          // (5).childOption(ChannelOption.SO_KEEPALIVE, true); // (6)// Bind and start to accept incoming connections.System.out.println("tcp start success");ChannelFuture f = b.bind(port).sync(); // (7)// Wait until the server socket is closed.// In this example, this does not happen, but you can do that to gracefully// shut down your server.f.channel().closeFuture().sync();} catch (InterruptedException e) {throw new RuntimeException(e);} finally {workerGroup.shutdownGracefully();bossGroup.shutdownGracefully();}}
}
Starter
public class Starter {public static void main(String[] args) {new DiscardServer(8001).run();}
}
2、netty的编解码
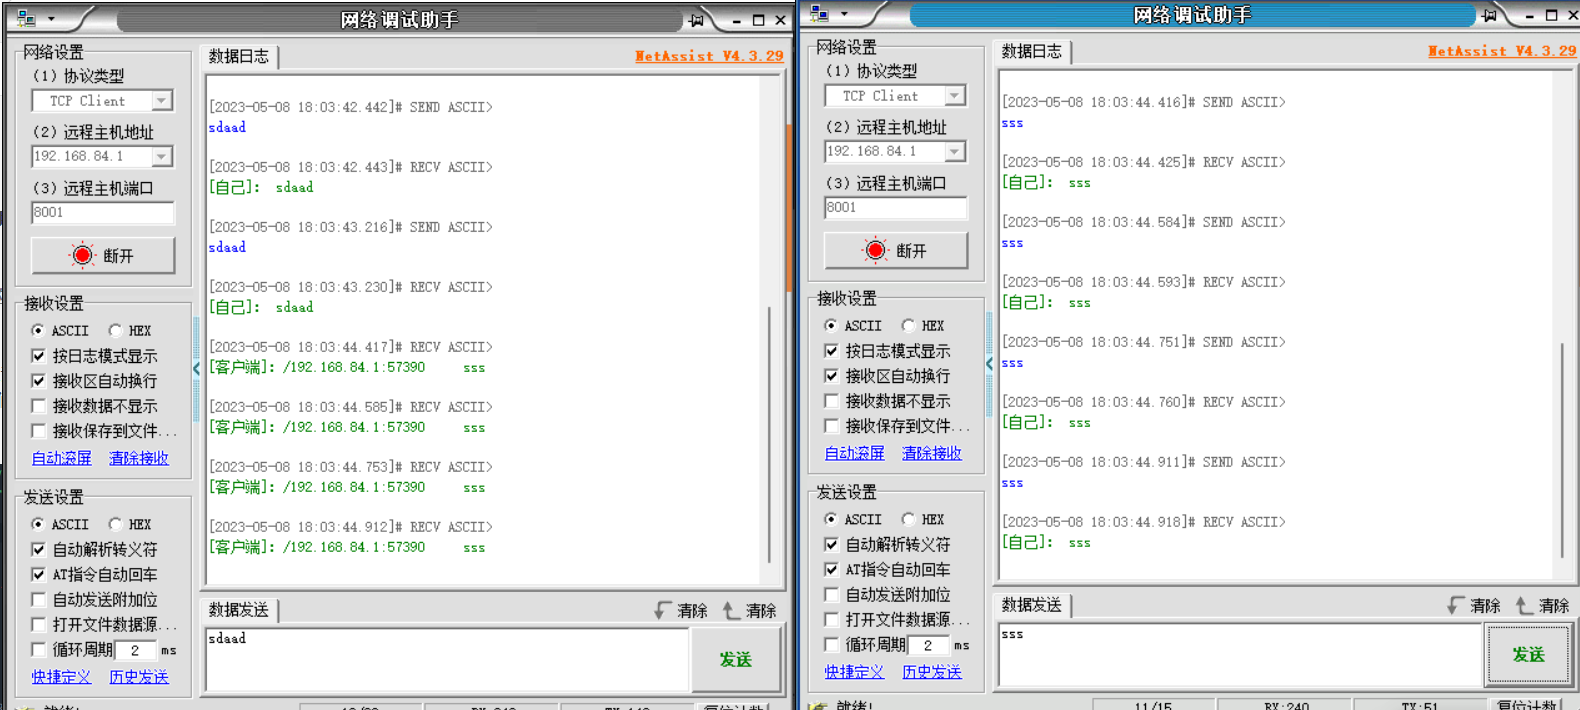
网络调试助手——》操作系统——》网路——》对方操作系统——》找到对应的进程(传过去的不是字符串)
这里使用的是网络调试助手
Netty底层只认ByteBuf,我们不能将字符串直接发送给客户端,所以要在Server中加上一些编解码的代码,然后我们在接受消息的时候,就不用自己去解码了,直接就可以用了

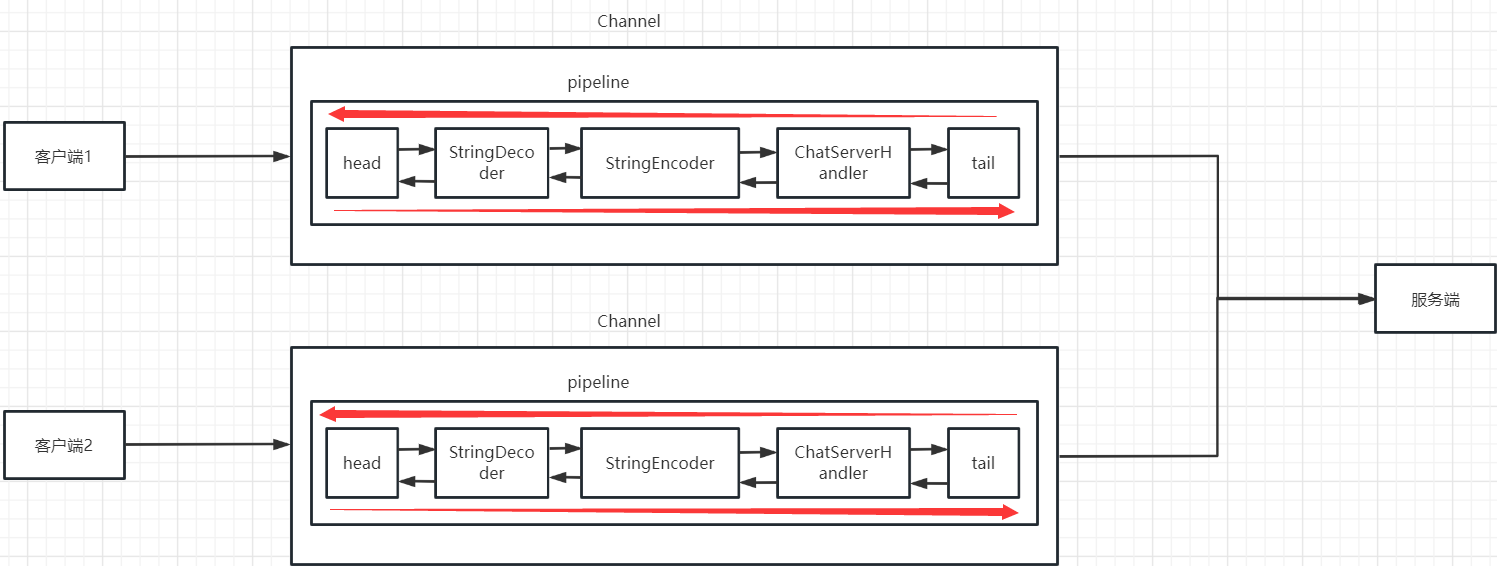
3、底层数据流转的核心—pipline机制
public class DiscardServer {private int port;public DiscardServer(int port){this.port = port;}public void run(){EventLoopGroup bossGroup = new NioEventLoopGroup(1); // 线程池EventLoopGroup workerGroup = new NioEventLoopGroup();try {ServerBootstrap b = new ServerBootstrap(); // (2)b.group(bossGroup, workerGroup).channel(NioServerSocketChannel.class) // (3).childHandler(new ChannelInitializer<SocketChannel>() { // (4)@Overridepublic void initChannel(SocketChannel ch) throws Exception {Charset gbk = Charset.forName("GBK");ch.pipeline().addLast("decoder", new StringDecoder(gbk));ch.pipeline().addLast("encoder", new StringEncoder(gbk));ch.pipeline().addLast(new DiscardServerHandler());}}).option(ChannelOption.SO_BACKLOG, 128)          // (5).childOption(ChannelOption.SO_KEEPALIVE, true); // (6)// Bind and start to accept incoming connections.System.out.println("tcp start success");ChannelFuture f = b.bind(port).sync(); // (7)// Wait until the server socket is closed.// In this example, this does not happen, but you can do that to gracefully// shut down your server.f.channel().closeFuture().sync();} catch (InterruptedException e) {throw new RuntimeException(e);} finally {workerGroup.shutdownGracefully();bossGroup.shutdownGracefully();}}
}
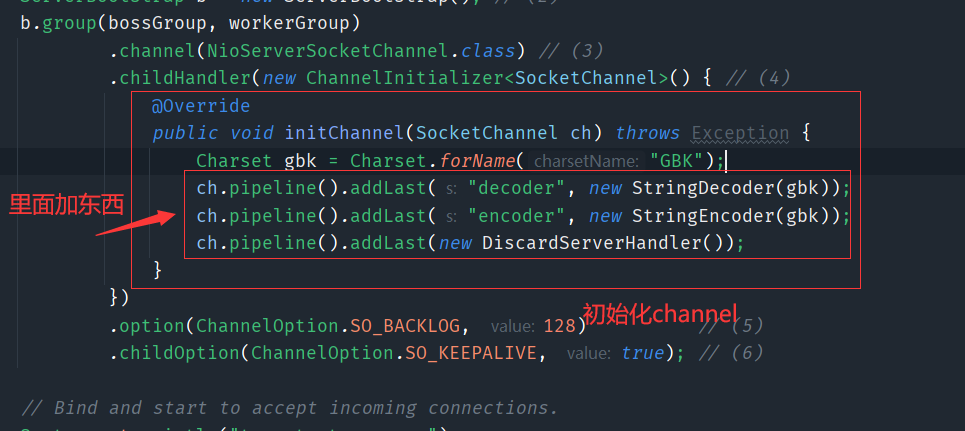
里面的这些Handler都要注意位置
4、传输层协议TCP留给我们的难题—Netty解决半包、粘包方
4.1、TCP传输中的问题(半包、黏包)
这里启动好聊天室的程序并启动一个python脚本向服务端循环发送消息
== python ==
import sockets=socket.socket(socket.AF_INET,socket.SOCK_STREAM)
s.connect(("127.0.0.1",8001))for i in range(100):print(i)string = "hello1哈"body = bytes(string, 'gbk')s.sendall(body)
当我们执行这个脚本,就会在服务端的控制台看到信息,我们看到的应该是100条一行一行的hello哈应该才是合理的,但是执行后会发现100条消息都显示在同一行了,第二次有的在同一行,有的各自在一行中

第一次发送
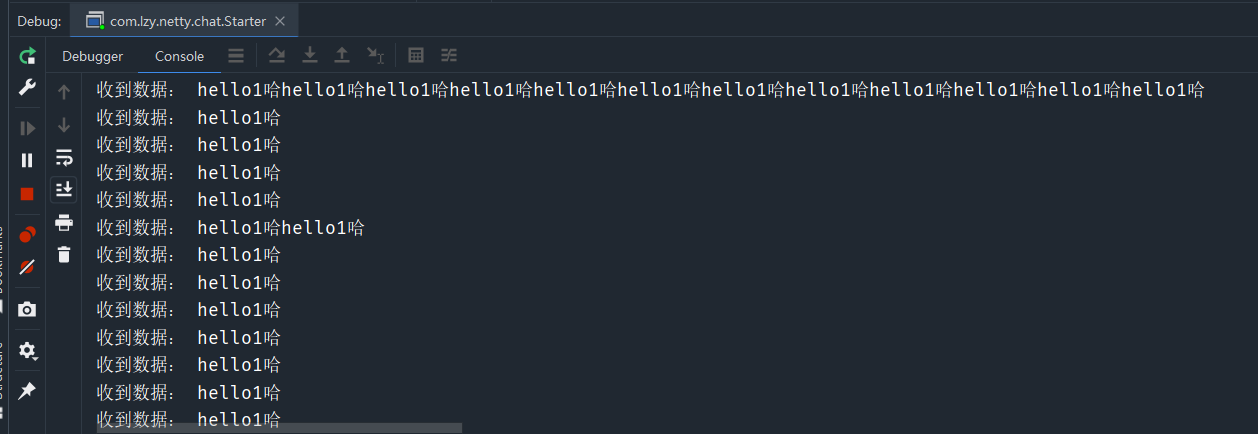
第二次发送
产生这个现象的原因就是TCP发送是流式发送的,有的时候发送的一套完整的,有的时候发送的是一段一段的数据,要怎么解决这个问题
4.2、Netty怎么解决半包、黏包
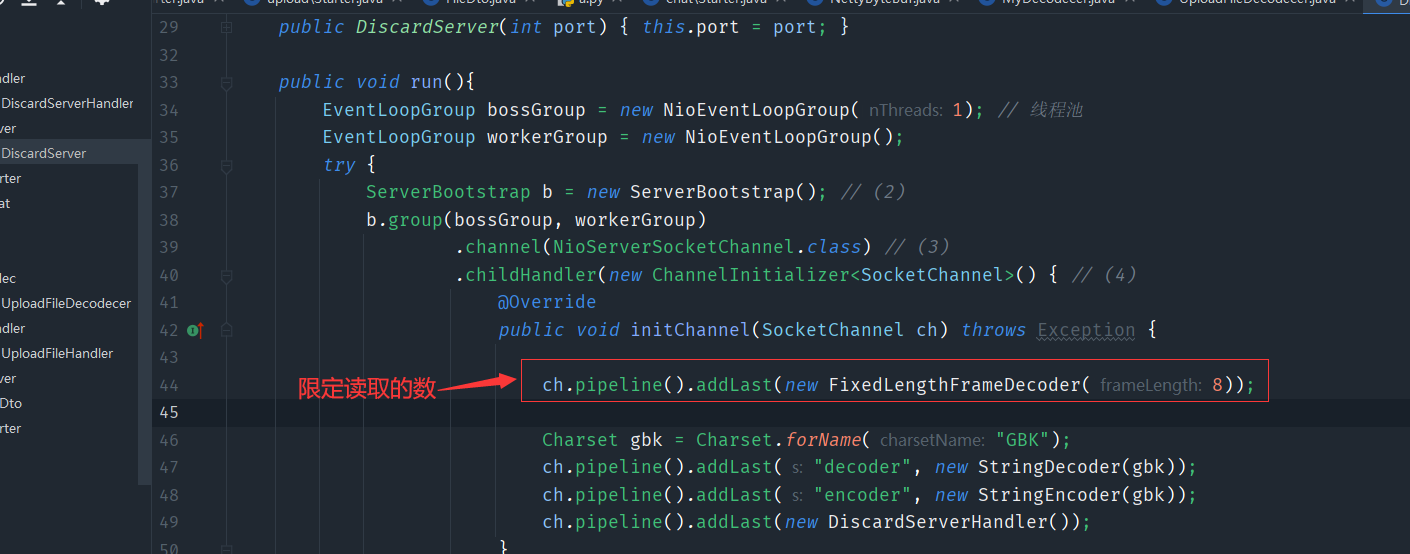
第一种解决方案
可以在server的pipeline中加一些东西,去限制读取的字节数,缺点是可能要考虑数据大小的问题
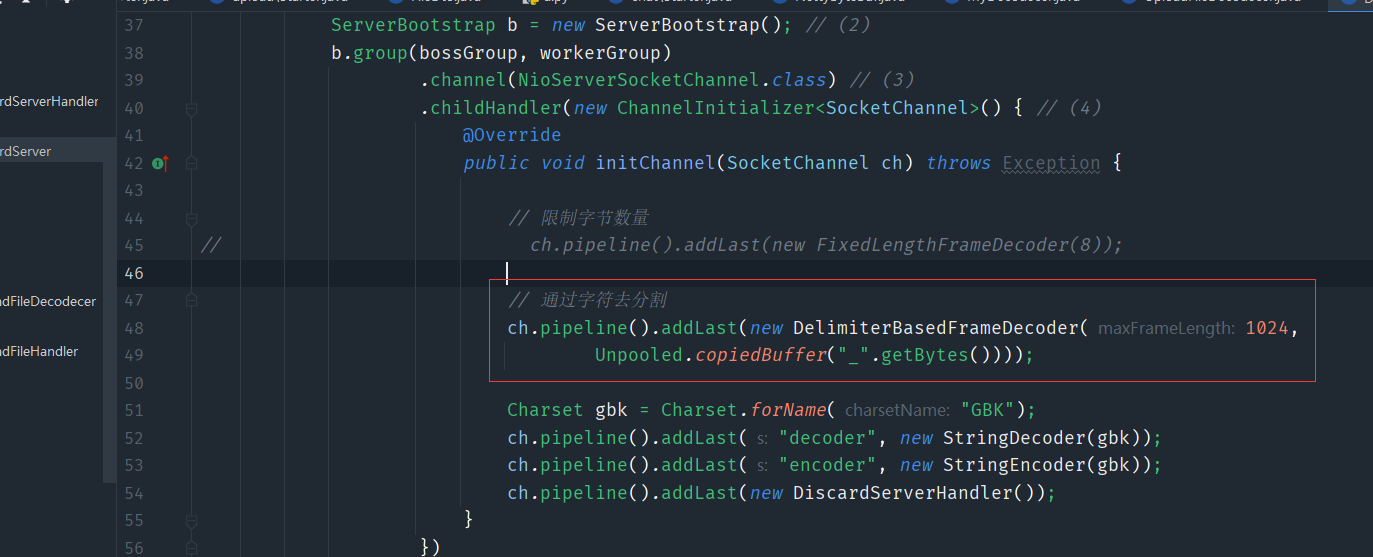
第二种解决方案
加这个分割符号,这个的缺点是正经要读取的数据中,不能在出现分割的字符串了
5、传输层协议TCP留给我们的难题—使用私有协议解决半包、黏包、byteBuf底层API
这里给出用私有协议去解决,也就是比如6123456,第一个6是要读取后面6个数字

这里先提到ByteBuf的核心API
public class NettyByteBuf {public static void main(String[] args) {// 创建byteBuf对象,该对象内部包含一个字节数组byte[10]ByteBuf byteBuf = Unpooled.buffer(10);System.out.println("byteBuf=" + byteBuf);for (int i = 0; i < 8; i++) {byteBuf.writeByte(i);}System.out.println("byteBuf=" + byteBuf);for (int i = 0; i < 5; i++) {System.out.println(byteBuf.getByte(i));}System.out.println("byteBuf=" + byteBuf);for (int i = 0; i < 5; i++) {System.out.println(byteBuf.readByte());}System.out.println("byteBuf=" + byteBuf);System.out.println(byteBuf.readableBytes());}
}
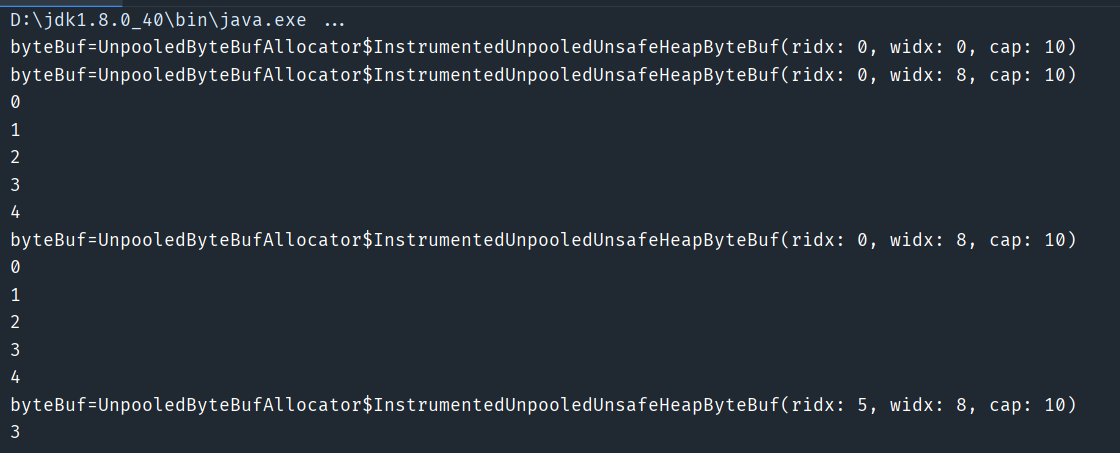
从上面控制台的结果不难看出,ridx的意思是已经读取到哪里了,widx已经占用了多少了,cap是一共的容量有多少

ridx也就是读索引,widx是写索引
| 常用API | 作用 |
|---|---|
| Unpooled.buffer(10) | 创建一个字节数组[10] |
| byteBuf.writeByte(i) | 往byteBuf中写入i |
| byteBuf.getByte(i) | 获取btyeBuf中第i个字节,读索引不动 |
| byteBuf.readByte() | 从开头开始读字节,读索引自动的向后移动 |
| byteBuf.readableBytes() | 获取到byteBuf中还没有读取到的字节 |
| byteBuf.markReaderIndex() | 记录读索引的位置 |
| byteBuf.resetReaderIndex() | 返回记录的读索引的位置 |
// 继承了这个类就可以去 自定义协议了
public class MyDecodecer extends ByteToMessageDecoder {// 数据长度 + 数据@Overrideprotected void decode(ChannelHandlerContext channelHandlerContext, ByteBuf byteBuf, List<Object> list) throws Exception {// 一个int是4字节,可读长度要大于4才可以继续执行if(byteBuf.readableBytes() < 4){return;}// 数据长度int i = byteBuf.readInt();if(byteBuf.readableBytes() < i){byteBuf.resetReaderIndex();return;} // 开辟一个byte数组去接收数据byte[] data = new byte[i];byteBuf.readBytes(data);System.out.println(new String(data));byteBuf.markReaderIndex();}
}
所以就可以自定义一个私有协议,按照你的规则去读取数据,记得把这个放到pipeline里面哦!
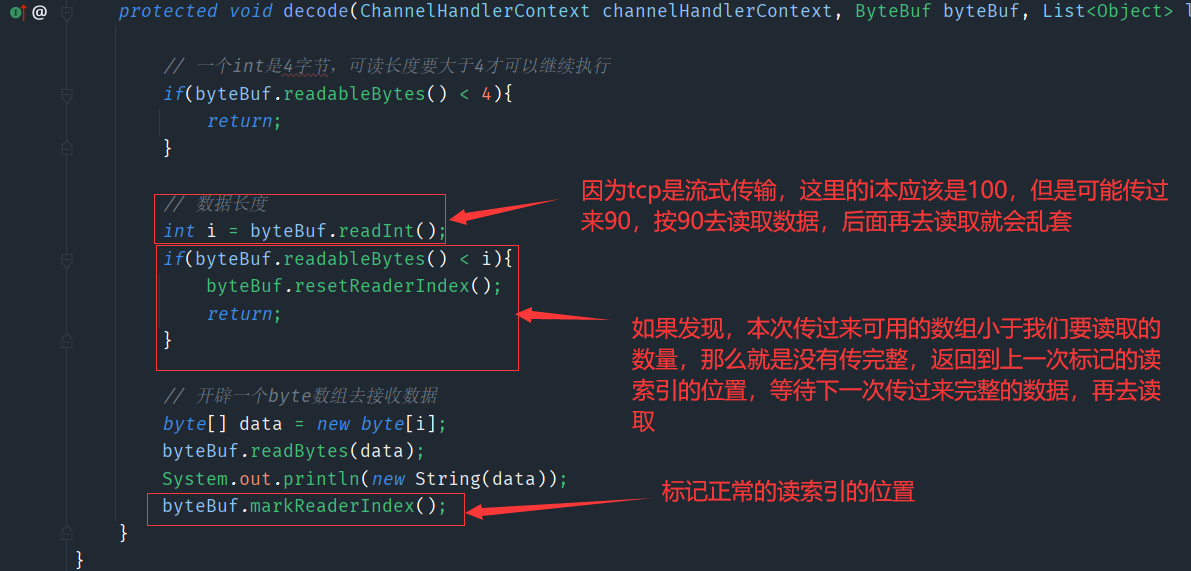
这样就可以解决半包和黏包问题了
6、IdleStateHandler心跳机制源码详解
可以先了解一下短连接和长连接 HTTP长连接和短连接
public class HeartbeatHandler extends ChannelInboundHandlerAdapter {int readTimeout = 0;@Overridepublic void userEventTriggered(ChannelHandlerContext ctx, Object evt) throws Exception {
//        // IdleStateEven 超时类型IdleStateEvent event = (IdleStateEvent) evt;// ALL_IDLE : 一段时间内没有数据接收或者发送// READER_IDLE : 一段时间内没有数据接收// WRITER_IDLE : 一段时间内没有数据发送if(event.state() == IdleState.READER_IDLE){readTimeout++;}if(readTimeout >= 3){System.out.println("超时超过3次,断开连接");ctx.close();}System.out.println("触发了:" + event.state() + "事件");}
}

这个实现的效果就是读超时3秒就会触发一次心跳检测,逻辑是超过三次就会断开连接
7、使用Netty实现文件上下传
==UploadFileDecodecer ==
public class UploadFileDecodecer extends ByteToMessageDecoder {// 数据长度 + 数据@Overrideprotected void decode(ChannelHandlerContext channelHandlerContext, ByteBuf byteBuf, List<Object> list) throws Exception {// 一个int是4字节,可读长度要大于4才可以继续执行if(byteBuf.readableBytes() < 8){return;}// 数据长度int command = byteBuf.readInt();FileDto fileDto = new FileDto();fileDto.setCommand(command);// 文件名长度int fileNameLen = byteBuf.readInt();if(byteBuf.readableBytes() < fileNameLen){byteBuf.resetReaderIndex();return;}// 开辟一个byte数组去接收数据byte[] data = new byte[fileNameLen];byteBuf.readBytes(data);String fileName = new String(data);fileDto.setFileName(fileName);if(command == 2){int dataLen = byteBuf.readInt();if(byteBuf.readableBytes() < dataLen){byteBuf.resetReaderIndex();return;}byte[] fileData = new byte[dataLen];byteBuf.readBytes(fileData);fileDto.setBytes(fileData);}byteBuf.markReaderIndex();list.add(fileDto);}
}
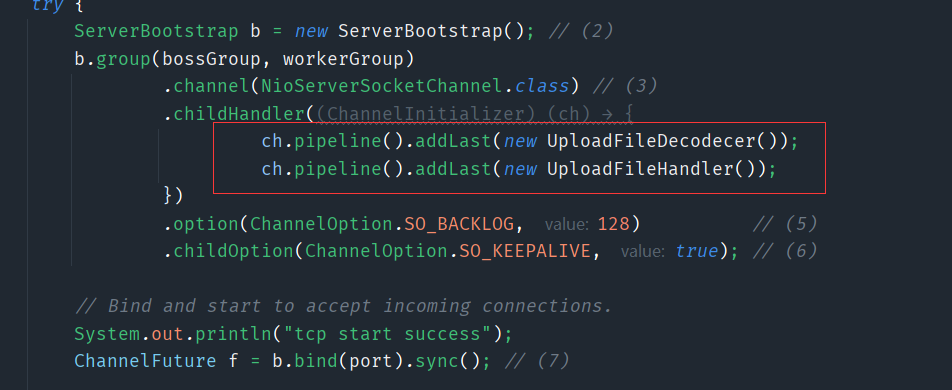
把这部分放到pipeline中放到UploadFileHandler前面,这里面通过自定义的协议解析出,文件的命令和文件名,文件的具体数据,然后封装到FileDto中,最后放到pipeline中,后面使用即可
UploadFileHandler
public class UploadFileHandler extends ChannelInboundHandlerAdapter {// 有客户端连接进来就触发@Overridepublic void channelActive(ChannelHandlerContext ctx) throws Exception {}// 有读写事件发生的时候触发这个方法@Overridepublic void channelRead(ChannelHandlerContext ctx, Object msg) throws Exception {if(msg instanceof FileDto){FileDto fileDto = (FileDto) msg;if(fileDto.getCommand() == 1){// 创建文件File file = new File("E://" + fileDto.getFileName());if(!file.exists()){file.createNewFile();}}else if(fileDto.getCommand() == 2){// 写入文件save2File("E://" + fileDto.getFileName(), fileDto.getBytes());}}}public static boolean save2File(String fname, byte[] msg){OutputStream fos = null;try{File file = new File(fname);File parent = file.getParentFile();boolean bool;if ((!parent.exists()) &(!parent.mkdirs())) {return false;}fos = new FileOutputStream(file,true);fos.write(msg);fos.flush();return true;}catch (FileNotFoundException e){return false;}catch (IOException e){File parent;return false;}finally{if (fos != null) {try{fos.close();}catch (IOException e) {}}}}
}
这里用到从解码的地方拿到的FileDto中,没有就创建,有就写
可以使用下面的python脚本测试
#-*- coding: UTF-8 -*-
import socket,os,struct
s=socket.socket(socket.AF_INET,socket.SOCK_STREAM)
s.connect(("127.0.0.1",8001))filepath = "D://txt.txt"
if os.path.isfile(filepath):filename = os.path.basename(filepath).encode('utf-8')# 请求传输文件command = 1body_len = len(filename)fileNameData = bytes(filename)i = body_len.to_bytes(4, byteorder='big')c = command.to_bytes(4, byteorder='big')s.sendall(c + i + fileNameData) fo = open(filepath,'rb')while True:command = 2;c = command.to_bytes(4, byteorder='big')filedata = fo.read(1024)print(len(filedata))b = len(filedata).to_bytes(4, byteorder='big')if not filedata:breaks.sendall(c + i + fileNameData + b + filedata)fo.close()#s.close()
else:print(False)
五、IM开发核心之构建TCP网关(上)
1、编写LimServer
==LimServer ==
public class LimServer {// 日志类private final static Logger logger = LoggerFactory.getLogger(LimServer.class);// 端口号private int port;// 端口号和两个Group的值都是从配置文件中取出来的EventLoopGroup mainGroup;EventLoopGroup subGroup;ServerBootstrap server;public LimServer(Integer port){this.port = port;// 两个GroupmainGroup = new NioEventLoopGroup();subGroup = new NioEventLoopGroup();// serverserver = new ServerBootstrap();server.group(mainGroup, subGroup).channel(NioServerSocketChannel.class)// 服务端可连接队列大小.option(ChannelOption.SO_BACKLOG, 10240)// 参数表示允许重复使用本地地址和端口.option(ChannelOption.SO_REUSEADDR, true)// 是否禁用Nagle算法 简单点说是否批量发送数据 true关闭 false开启。 开启的话可以减少一定的网络开销,但影响消息实时性.childOption(ChannelOption.TCP_NODELAY, true)// 保活开关2h没有数据服务端会发送心跳包.childOption(ChannelOption.SO_KEEPALIVE, true).childHandler(new ChannelInitializer<SocketChannel>() {@Overrideprotected void initChannel(SocketChannel ch) throws Exception {}});}server.bind(port);
}
Starter
public class Starter {public static void main(String[] args) throws FileNotFoundException {new LimServer(9000);}
}
简单编写完这两部分后,用网络调试助手连接一下本机的9000端口,没有报错就是连接成功了
2、编写LimWebSocketServer
LimWebSocketServer
public class LimWebSocketServer {private final static Logger logger = LoggerFactory.getLogger(LimWebSocketServer.class);int port;EventLoopGroup mainGroup;EventLoopGroup subGroup;ServerBootstrap server;public LimWebSocketServer(int port) {this.port= port;mainGroup = new NioEventLoopGroup();subGroup = new NioEventLoopGroup();server = new ServerBootstrap();server.group(mainGroup, subGroup).channel(NioServerSocketChannel.class).option(ChannelOption.SO_BACKLOG, 10240) // 服务端可连接队列大小.option(ChannelOption.SO_REUSEADDR, true) // 参数表示允许重复使用本地地址和端口.childOption(ChannelOption.TCP_NODELAY, true) // 是否禁用Nagle算法 简单点说是否批量发送数据 true关闭 false开启。 开启的话可以减少一定的网络开销,但影响消息实时性.childOption(ChannelOption.SO_KEEPALIVE, true) // 保活开关2h没有数据服务端会发送心跳包.childHandler(new ChannelInitializer<SocketChannel>() {@Overrideprotected void initChannel(SocketChannel ch) throws Exception {ChannelPipeline pipeline = ch.pipeline();// websocket 基于http协议,所以要有http编解码器pipeline.addLast("http-codec", new HttpServerCodec());// 对写大数据流的支持pipeline.addLast("http-chunked", new ChunkedWriteHandler());// 几乎在netty中的编程,都会使用到此hanlerpipeline.addLast("aggregator", new HttpObjectAggregator(65535));/*** websocket 服务器处理的协议,用于指定给客户端连接访问的路由 : /ws* 本handler会帮你处理一些繁重的复杂的事* 会帮你处理握手动作: handshaking(close, ping, pong) ping + pong = 心跳* 对于websocket来讲,都是以frames进行传输的,不同的数据类型对应的frames也不同*/pipeline.addLast(new WebSocketServerProtocolHandler("/ws"));}});}server.bind(port);logger.info("web start");
}
Starter
public class Starter {public static void main(String[] args) throws FileNotFoundException {new LimServer(9000);new LimWebSocketServer(19000);}
}
然后在启动,使用web.html验证

3、使用snakeyaml动态配置文件
<!-- yaml解析 -->
<dependency><groupId>org.yaml</groupId><artifactId>snakeyaml</artifactId>
</dependency>
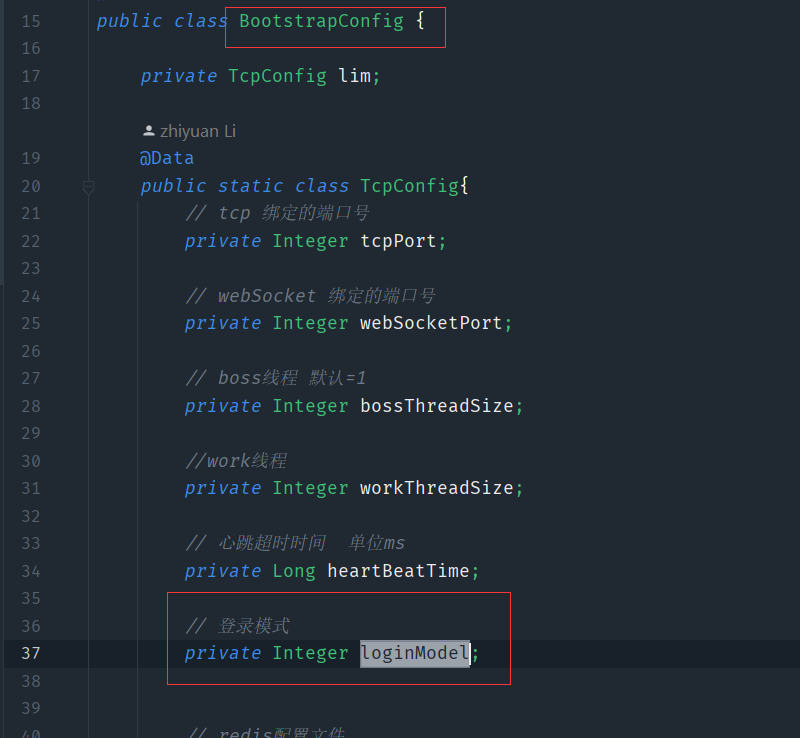
@Data
public class BootstrapConfig {private TcpConfig lim;@Datapublic static class TcpConfig{// tcp 绑定的端口号private Integer tcpPort;// webSocket 绑定的端口号private Integer webSocketPort;// boss线程 默认=1private Integer bossThreadSize;//work线程private Integer workThreadSize;// 心跳超时时间  单位msprivate Long heartBeatTime;// 登录模式private Integer loginModel;// redis配置文件private RedisConfig redis;/*** rabbitmq配置*/private Rabbitmq rabbitmq;/*** zk配置*/private ZkConfig zkConfig;/*** brokerId*/private Integer brokerId;private String logicUrl;}
}
将需要的配置文件中的数据做一个实体类,用于后面的接,收然后改造一下
LimServer
public class LimServer {// 日志类private final static Logger logger = LoggerFactory.getLogger(LimServer.class);// 端口号private int port;// 端口号和两个Group的值都是从配置文件中取出来的BootstrapConfig.TcpConfig config;EventLoopGroup mainGroup;EventLoopGroup subGroup;ServerBootstrap server;public LimServer(BootstrapConfig.TcpConfig config){this.config = config;// 两个GroupmainGroup = new NioEventLoopGroup(config.getBossThreadSize());subGroup = new NioEventLoopGroup(config.getWorkThreadSize());// serverserver = new ServerBootstrap();server.group(mainGroup, subGroup).channel(NioServerSocketChannel.class)// 服务端可连接队列大小.option(ChannelOption.SO_BACKLOG, 10240)// 参数表示允许重复使用本地地址和端口.option(ChannelOption.SO_REUSEADDR, true)// 是否禁用Nagle算法 简单点说是否批量发送数据 true关闭 false开启。 开启的话可以减少一定的网络开销,但影响消息实时性.childOption(ChannelOption.TCP_NODELAY, true)// 保活开关2h没有数据服务端会发送心跳包.childOption(ChannelOption.SO_KEEPALIVE, true).childHandler(new ChannelInitializer<SocketChannel>() {@Overrideprotected void initChannel(SocketChannel ch) throws Exception {}});}public void start(){this.server.bind(config.getTcpPort());}
}
LimWebSocket
public class LimWebSocketServer {private final static Logger logger = LoggerFactory.getLogger(LimWebSocketServer.class);BootstrapConfig.TcpConfig config;EventLoopGroup mainGroup;EventLoopGroup subGroup;ServerBootstrap server;public LimWebSocketServer(BootstrapConfig.TcpConfig config) {this.config = config;mainGroup = new NioEventLoopGroup();subGroup = new NioEventLoopGroup();server = new ServerBootstrap();server.group(mainGroup, subGroup).channel(NioServerSocketChannel.class).option(ChannelOption.SO_BACKLOG, 10240) // 服务端可连接队列大小.option(ChannelOption.SO_REUSEADDR, true) // 参数表示允许重复使用本地地址和端口.childOption(ChannelOption.TCP_NODELAY, true) // 是否禁用Nagle算法 简单点说是否批量发送数据 true关闭 false开启。 开启的话可以减少一定的网络开销,但影响消息实时性.childOption(ChannelOption.SO_KEEPALIVE, true) // 保活开关2h没有数据服务端会发送心跳包.childHandler(new ChannelInitializer<SocketChannel>() {@Overrideprotected void initChannel(SocketChannel ch) throws Exception {ChannelPipeline pipeline = ch.pipeline();// websocket 基于http协议,所以要有http编解码器pipeline.addLast("http-codec", new HttpServerCodec());// 对写大数据流的支持pipeline.addLast("http-chunked", new ChunkedWriteHandler());// 几乎在netty中的编程,都会使用到此hanlerpipeline.addLast("aggregator", new HttpObjectAggregator(65535));/*** websocket 服务器处理的协议,用于指定给客户端连接访问的路由 : /ws* 本handler会帮你处理一些繁重的复杂的事* 会帮你处理握手动作: handshaking(close, ping, pong) ping + pong = 心跳* 对于websocket来讲,都是以frames进行传输的,不同的数据类型对应的frames也不同*/pipeline.addLast(new WebSocketServerProtocolHandler("/ws"));}});}public void start(){this.server.bind(this.config.getWebSocketPort());}
}
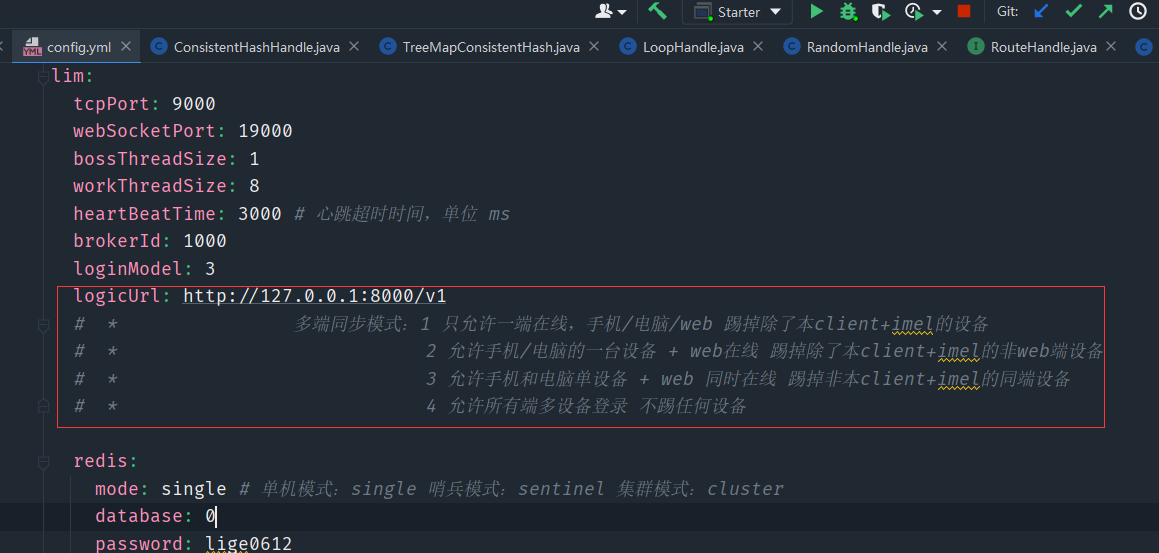
lim:tcpPort: 9000webSocketPort: 19000bossThreadSize: 1workThreadSize: 8heartBeatTime: 3000 # 心跳超时时间,单位 msbrokerId: 1000loginModel: 3logicUrl: http://127.0.0.1:8000/v1
这两个将端口号和两个Group的大小都使用了配置文件动态配置
Starter
public class Starter {public static void main(String[] args) throws FileNotFoundException {if(args.length > 0){start(args[0]);}}private static void start(String path) throws FileNotFoundException {try {// 加载yml文件Yaml yaml = new Yaml();InputStream fileInputStream = new FileInputStream(path);// 搞一个实体BootstrapConfig bootstrapConfig = yaml.loadAs(fileInputStream, BootstrapConfig.class);// 启动new LimServer(bootstrapConfig.getLim()).start();new LimWebSocketServer(bootstrapConfig.getLim()).start();} catch (Exception e) {e.printStackTrace();System.exit(500);}}
}

这样所以的配置文件,就可以通过修改yaml文件,然后对BootstrapConfig实体类修改,最后在Starter中配置一下即可
4、大白话讲通信协议—详解主流通讯协议
4.1、文本协议
- 贴近人类书面表达的协议,如http协议
- 特点:
- 可读性好,便于调试
- 扩展性也好(通过key:value扩展)
- 解析效率一般
4.2、二进制协议
- 一段的传输内容里面,其中的固定的一位或者几位表示固定的意思(就和我们上面netty中解决半包、黏包用的私有协议差不多),如ip协议
- 特点:
- 可读性差,难于调试
- 扩展性不好(设计的好可以规避)
- 解析效率高
4.3、xml协议
- 特点
- 标准协议,可以跨域互通
- xml的优点,可读性好,扩展性好
- 解析代价高
- 有效数据传输率低(有大量的标签)
4.4、可以落地使用的协议
xmpp协议
- 优点:基于xml协议,容易理解,使用广泛,易于扩展
- 缺点:流量大,在移动端很耗电,交互过程复杂
mqtt协议
- 优点:适配多平台,相比xmpp,数据包更小
- 缺点:协议简单,公有协议无法自定义一些数据格式
私有协议(基于二进制协议)
- 优点:随心所欲,定制化较强,流量小
- 缺点:工作量巨大,扩展性差,需要考虑全面
5、私有协议编解码—设计篇
6、私有协议编解码—实现篇
6.1、LimServer的编解码器
ByteBufToMessageUtils
public class ByteBufToMessageUtils {public static Message transition(ByteBuf in){/** 获取command*/int command = in.readInt();/** 获取version*/int version = in.readInt();/** 获取clientType*/int clientType = in.readInt();/** 获取messageType*/int messageType = in.readInt();/** 获取appId*/int appId = in.readInt();/** 获取imeiLength*/int imeiLength = in.readInt();/** 获取bodyLen*/int bodyLen = in.readInt();if(in.readableBytes() < bodyLen + imeiLength){in.resetReaderIndex();return null;}byte [] imeiData = new byte[imeiLength];in.readBytes(imeiData);String imei = new String(imeiData);byte [] bodyData = new byte[bodyLen];in.readBytes(bodyData);MessageHeader messageHeader = new MessageHeader();messageHeader.setAppId(appId);messageHeader.setClientType(clientType);messageHeader.setCommand(command);messageHeader.setLength(bodyLen);messageHeader.setVersion(version);messageHeader.setMessageType(messageType);messageHeader.setImei(imei);Message message = new Message();message.setMessageHeader(messageHeader);if(messageType == 0x0){String body = new String(bodyData);JSONObject parse = (JSONObject) JSONObject.parse(body);message.setMessagePack(parse);}in.markReaderIndex();return message;}
}
MessageDecoder(解码)
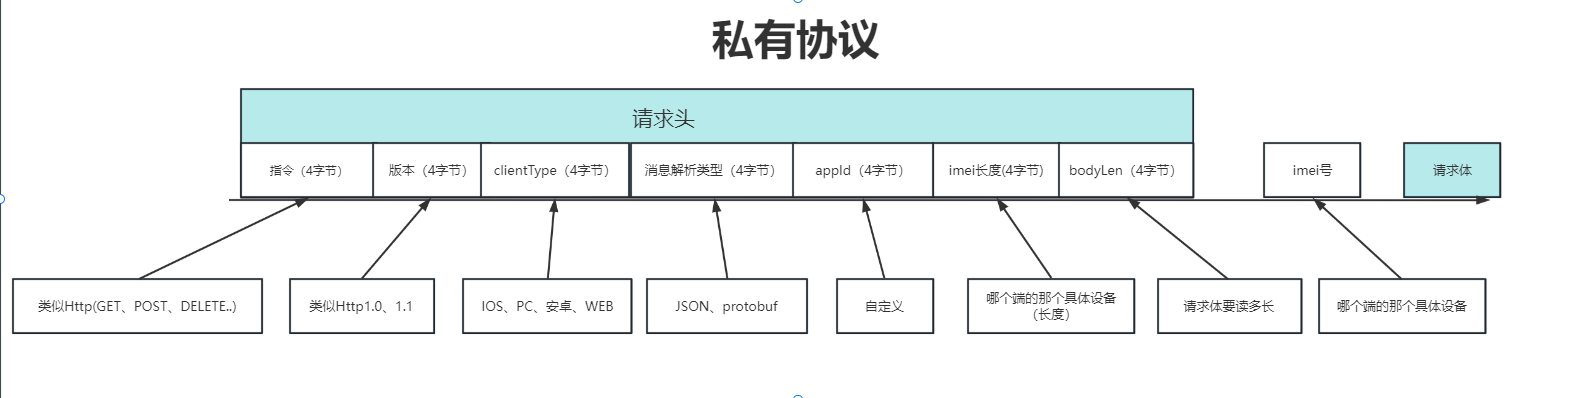
public class MessageDecoder extends ByteToMessageDecoder {@Overrideprotected void decode(ChannelHandlerContext ctx,ByteBuf in, List<Object> out) throws Exception {//请求头(指令// 版本// clientType// 消息解析类型// appId// imei长度// bodylen)+ imei号 + 请求体if(in.readableBytes() < 28){return;}Message message = ByteBufToMessageUtils.transition(in);if(message == null){return;}out.add(message);}
}
MessageEncoder(编码)
public class MessageEncoder extends MessageToByteEncoder {@Overrideprotected void encode(ChannelHandlerContext ctx, Object msg, ByteBuf out) throws Exception {if(msg instanceof MessagePack){MessagePack msgBody = (MessagePack) msg;String s = JSONObject.toJSONString(msgBody.getData());byte[] bytes = s.getBytes();out.writeInt(msgBody.getCommand());out.writeInt(bytes.length);out.writeBytes(bytes);}}
}
接受消息的实体类
@Data
public class Message {// 请求头private MessageHeader messageHeader;// 请求体private Object messagePack;@Overridepublic String toString() {return "Message{" +"messageHeader=" + messageHeader +", messagePack=" + messagePack +'}';}
}
@Data
public class MessageHeader {//消息操作指令 十六进制 一个消息的开始通常以0x开头//4字节private Integer command;//4字节 版本号private Integer version;//4字节 端类型private Integer clientType;/*** 应用ID*/
//    4字节 appIdprivate Integer appId;/*** 数据解析类型 和具体业务无关,后续根据解析类型解析data数据 0x0:Json,0x1:ProtoBuf,0x2:Xml,默认:0x0*///4字节 解析类型private Integer messageType = 0x0;//4字节 imel长度private Integer imeiLength;//4字节 包体长度private int length;//imei号private String imei;
}
@Data
public class MessagePack<T> implements Serializable {private String userId;private Integer appId;/*** 接收方*/private String toId;/*** 客户端标识*/private int clientType;/*** 消息ID*/private String messageId;/*** 客户端设备唯一标识*/private String imei;private Integer command;/*** 业务数据对象,如果是聊天消息则不需要解析直接透传*/private T data;//    /** 用户签名*/
//    private String userSign;
}

加到这里面
6.2、LimWebSocketServer的编解码器
WebSocketMessageDecoder
public class WebSocketMessageDecoder extends MessageToMessageDecoder<BinaryWebSocketFrame> {@Overrideprotected void decode(ChannelHandlerContext ctx, BinaryWebSocketFrame msg, List<Object> out) throws Exception {ByteBuf content = msg.content();if (content.readableBytes() < 28) {return;}Message message = ByteBufToMessageUtils.transition(content);if(message == null){return;}out.add(message);}
}
WebSocketMessageEncoder
public class WebSocketMessageEncoder extends MessageToMessageEncoder<MessagePack> {private static Logger log = LoggerFactory.getLogger(WebSocketMessageEncoder.class);@Overrideprotected void encode(ChannelHandlerContext ctx, MessagePack msg, List<Object> out)  {try {String s = JSONObject.toJSONString(msg);ByteBuf byteBuf = Unpooled.directBuffer(8+s.length());byte[] bytes = s.getBytes();byteBuf.writeInt(msg.getCommand());byteBuf.writeInt(bytes.length);byteBuf.writeBytes(bytes);out.add(new BinaryWebSocketFrame(byteBuf));}catch (Exception e){e.printStackTrace();}}
}
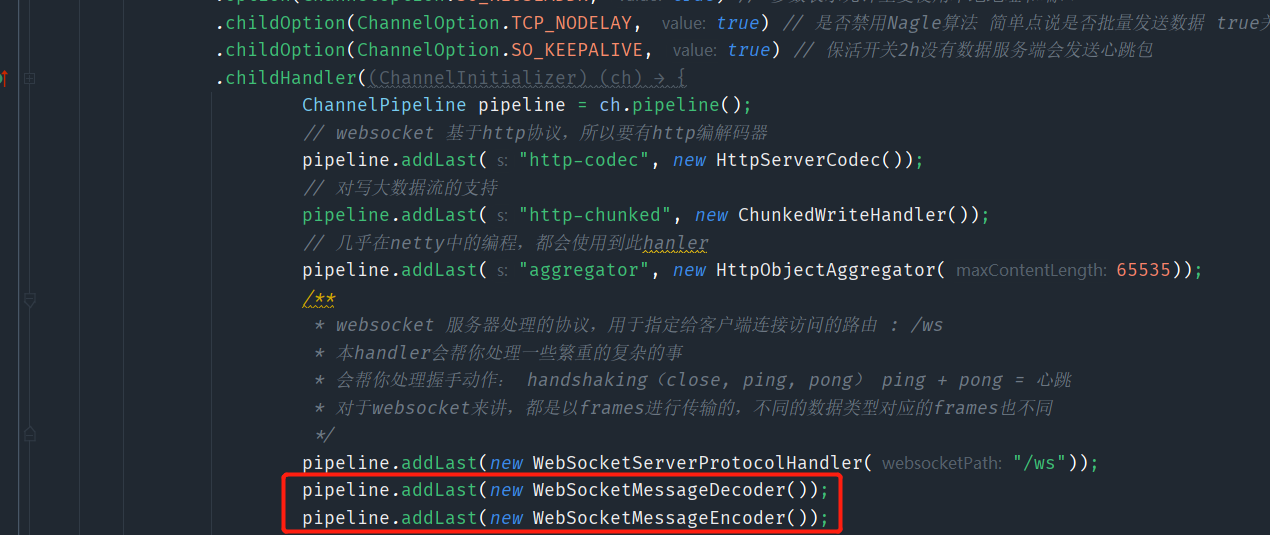
加到这里面
这样一来,我们为LImServer和LImWebSocketServer提供了编解码器,这样我们的客户端只要按照我们的协议发送数据,我们就会拿到争取的数据,我们也可以将信息进行编码,发送给客户端,客户端也要遵守我们的编码规则,也就可以正常的拿到服务端发送给客户端的数据
六、IM开发核心之建构TCP网关(下)
1、登录消息—保存用户NioSocketChannel
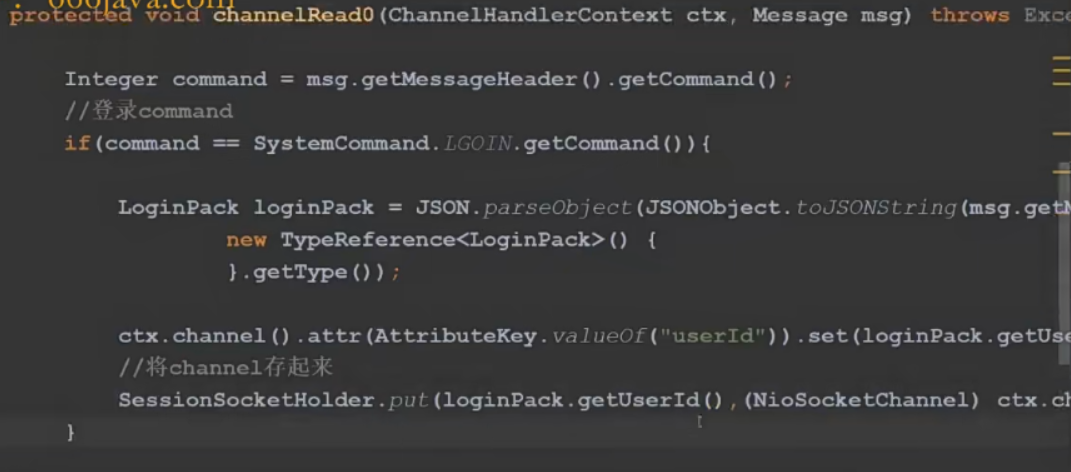
这里也就是创建了一个Handler然后通过解析message中的command的命令,对应做出登录的逻辑,通过将每个用户登录进来的channel保存起来,维护每一个channel
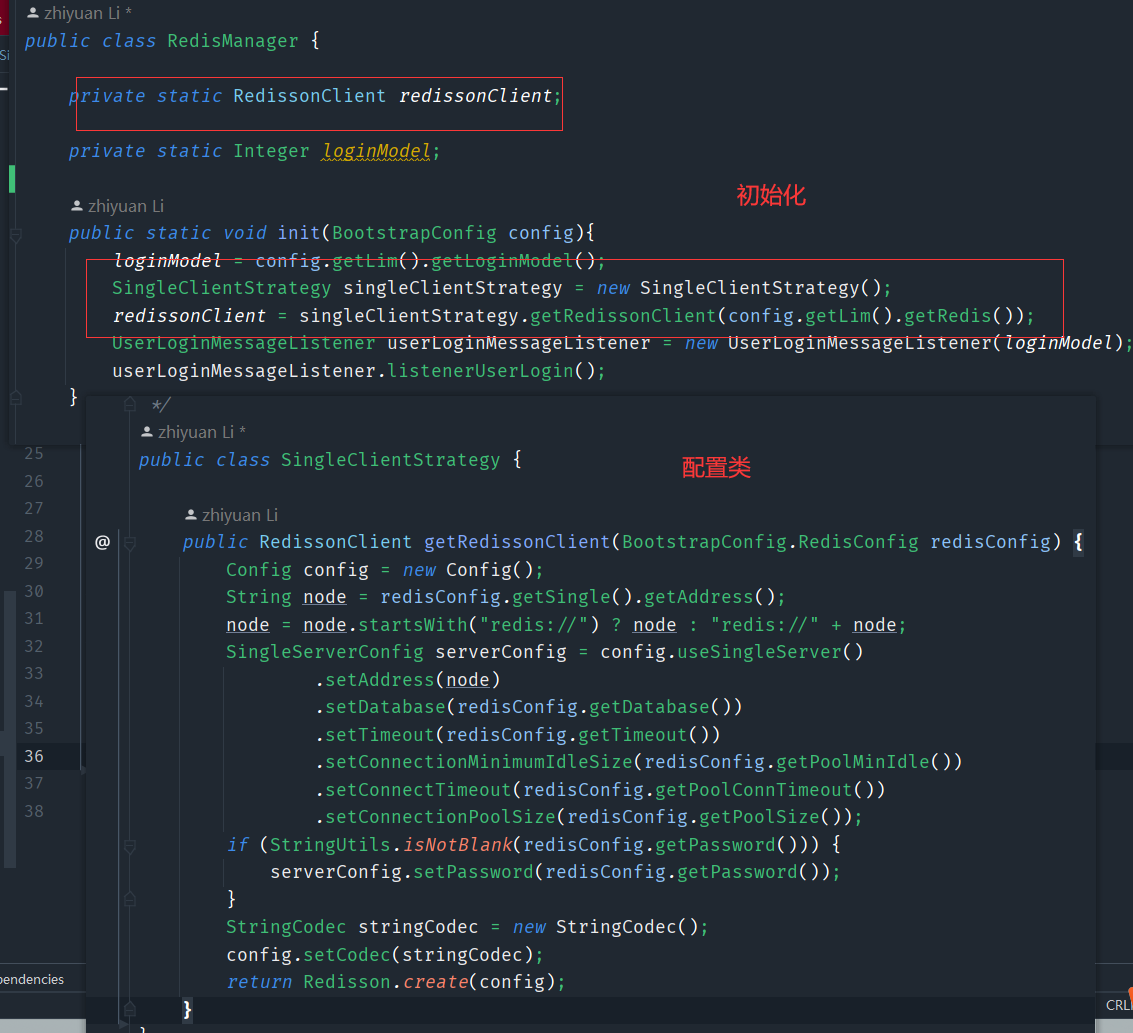
2、分布式缓存中间件—Redisson快速入门操作
Redisson操作快速入门
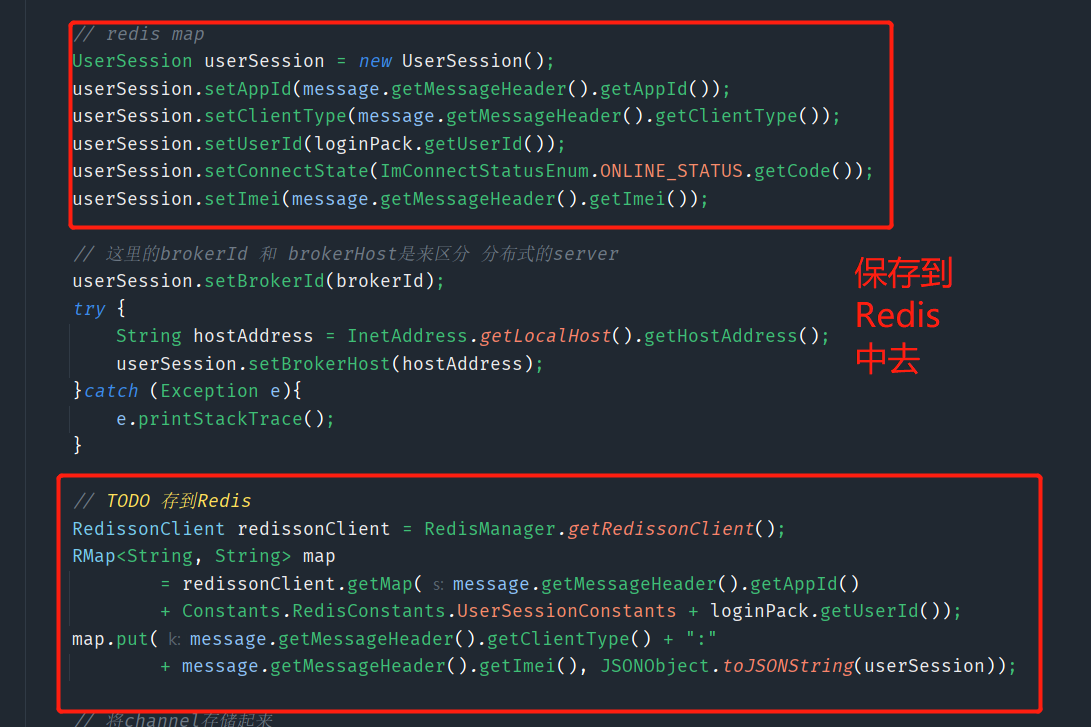
3、用户登录网关层—保存用户Session
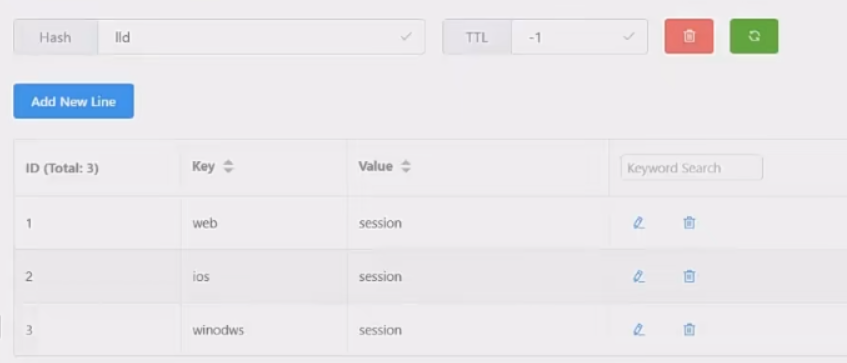
先考虑用什么Redis的数据结构,因为这个应用那个会支出多端登录,所以使用HashMap的数据结构,就可以使用一个key来存储多个端的session,这样比String类型更好
这里使用的是Redisson,所以要搞一些配置属性,修改BootStrap和Yaml文件,然后再创建Redis的管理类,最后将配置好的Redis放在Starter中去启动,在Handler中将设置好的UserSession保存到map中去。

4、用户退出网关层—离线删除用户Session
逻辑
- 先删除掉Channel
- 再删除掉Redis中存储的session
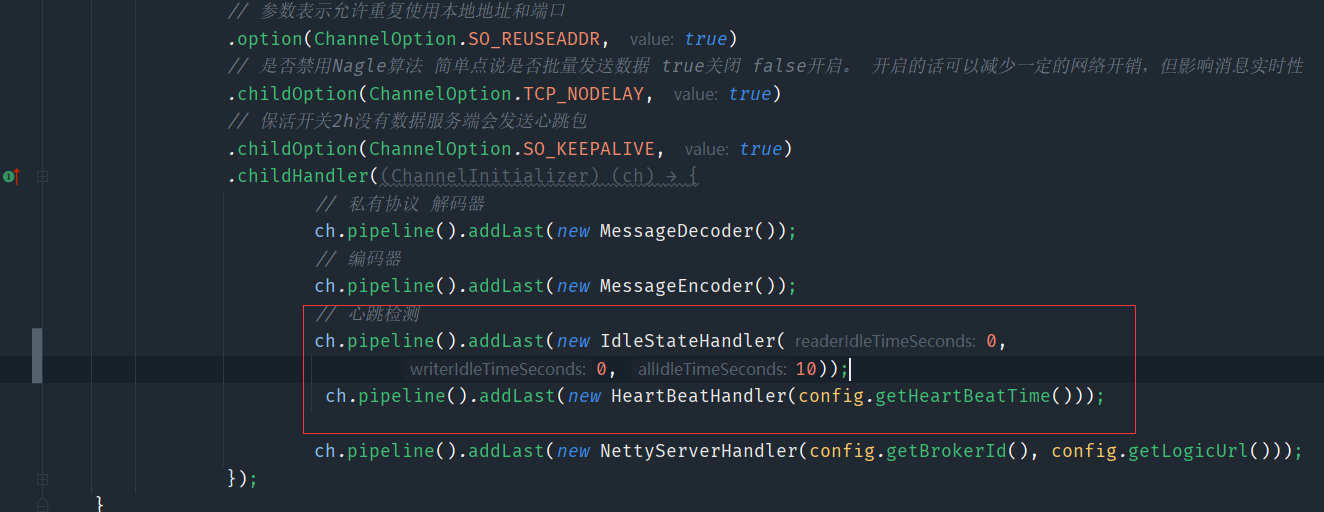
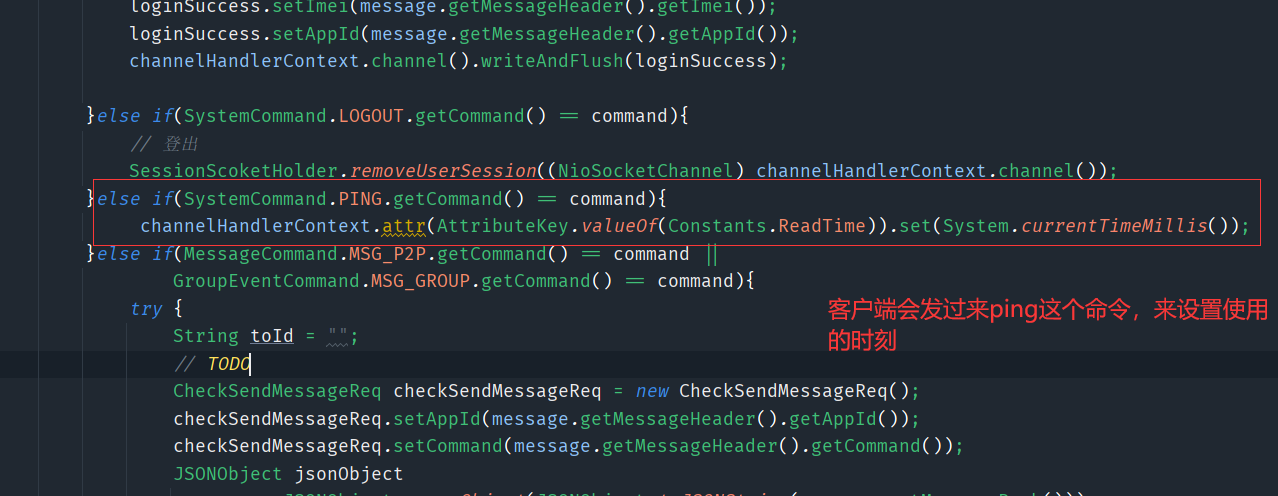
5、服务端心跳检测
和上面那个netty入门时候说的心跳检测差不多,没有读操作或者写操作,或者全操作就会触发userEventTriggered,然后进行一些你规定好的操作,这里我们实现的就是没有操作的每10秒触发一次心跳检测,检测你上次ping的时间和当前时间,如果超过了你规定的超时时间,就认为该用户已经离线了,触发离线逻辑
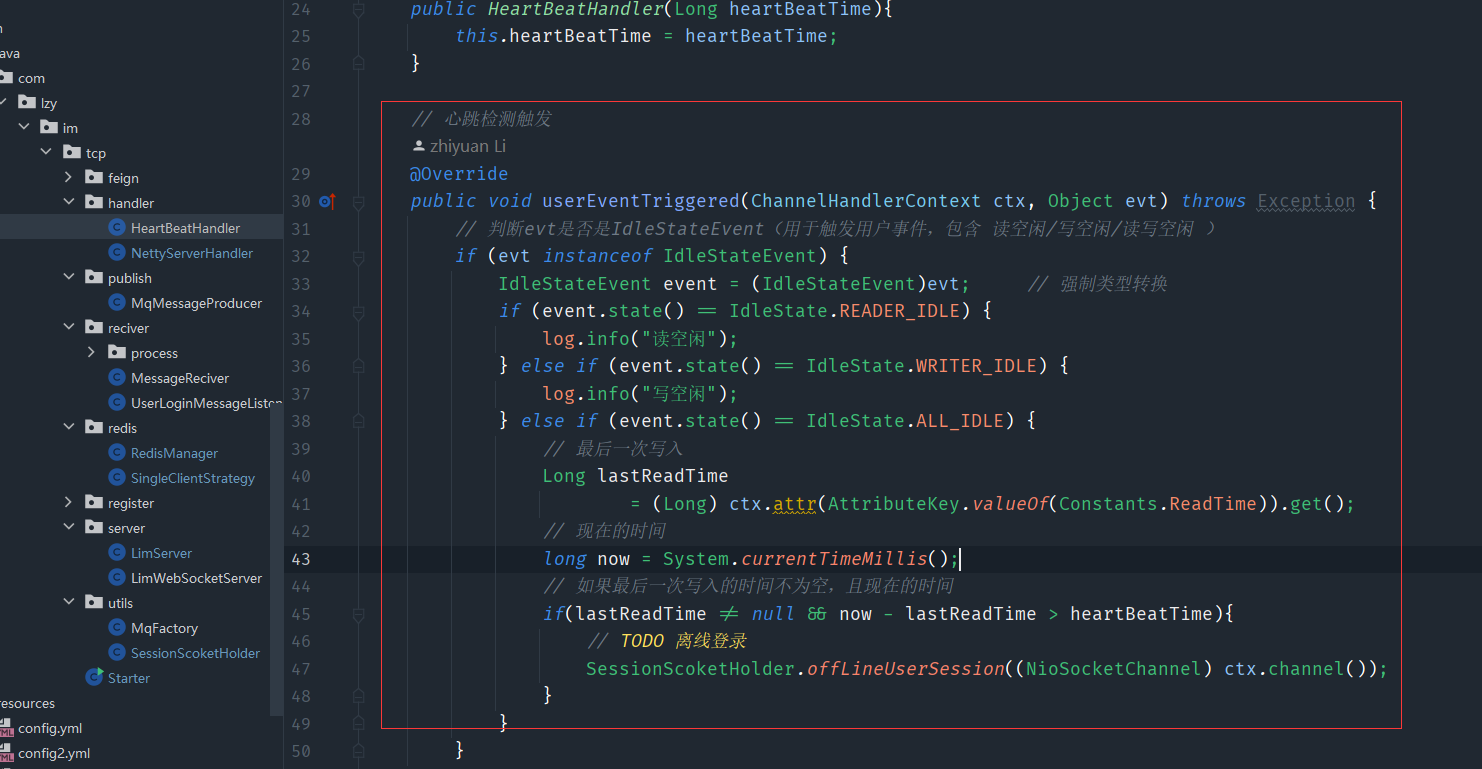
// 离线
public static void offLineUserSession(NioSocketChannel channel){// 删除sessionString userId = (String) channel.attr(AttributeKey.valueOf(Constants.UserId)).get();Integer appId = (Integer) channel.attr(AttributeKey.valueOf(Constants.AppId)).get();Integer clientType = (Integer) channel.attr(AttributeKey.valueOf(Constants.ClientType)).get();String imei = (String) channel.attr(AttributeKey.valueOf(Constants.Imei)).get();SessionScoketHolder.remove(appId, userId, clientType, imei);// 修改redis中的session的ConnectStateRedissonClient redissonClient = RedisManager.getRedissonClient();RMap<String, String> map= redissonClient.getMap(appId + Constants.RedisConstants.UserSessionConstants + userId);// 获取sessionString sessionStr = map.get(clientType.toString() + ":" + imei);if(!StringUtils.isBlank(sessionStr)){// 将session转换为对象UserSession userSession = JSONObject.parseObject(sessionStr, UserSession.class);// 修改连接状态为离线userSession.setConnectState(ImConnectStatusEnum.OFFLINE_STATUS.getCode());// 再写入redis中map.put(clientType.toString() + ":" + imei, JSONObject.toJSONString(userSession));}
}
触发离线逻辑,和上面那个登出的区别就是修改Redis中的session状态变成离线,那个是直接删除了
6、RabbitMQ的安装、发布订阅、路由模式详解
安装教程
如果自己有腾讯云、阿里云的虚拟的话,可以直接搞一个docker的RabbitMQ,这样更加方便,教程啥的网上搜一下就好
快速入门
7、TCP接入RabbitMQ、打通和逻辑层的交互
实现一个Mq的工具类
public class MqFactory {// ConnectionFactoryprivate static ConnectionFactory factory = null;// 这里一个存放channel的mapprivate static ConcurrentHashMap<String, Channel> channelMap = new ConcurrentHashMap<>();public static void init(BootstrapConfig.Rabbitmq rabbitmq){// 如果连接为空才进行初始化if(factory == null){factory = new ConnectionFactory();factory.setHost(rabbitmq.getHost());factory.setUsername(rabbitmq.getUserName());factory.setPassword(rabbitmq.getPassword());factory.setPort(rabbitmq.getPort());factory.setVirtualHost(rabbitmq.getVirtualHost());}}// 通过channel名字来获取不同的channelpublic static Channel getChannel(String channelName) throws IOException, TimeoutException {Channel channel = channelMap.get(channelName);if(channel == null){channel = getConnection().createChannel();channelMap.put(channelName, channel);}return channel;}// 获取connectionprivate static Connection getConnection() throws IOException, TimeoutException {Connection connection = factory.newConnection();return connection;}
}
创建一个MqReciver类
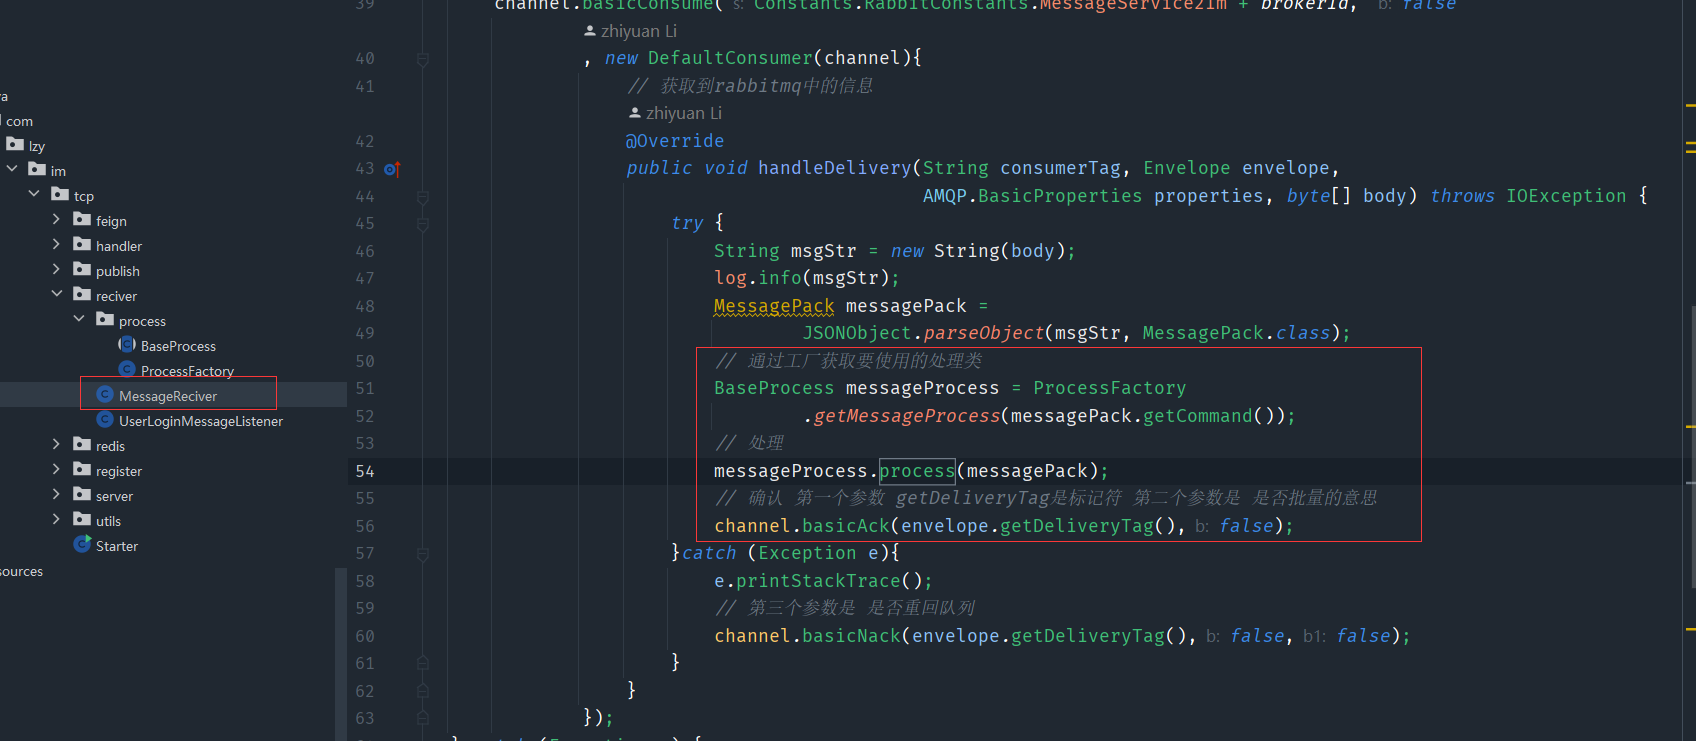
@Slf4j
public class MessageReciver {private static String brokerId;public static void startReciverMessage() {try {Channel channel = MqFactory.getChannel(Constants.RabbitConstants.MessageService2Im+ brokerId);// 绑定队列channel.queueDeclare(Constants.RabbitConstants.MessageService2Im + brokerId,true,false, false, null);// 绑定交换机channel.queueBind(Constants.RabbitConstants.MessageService2Im  + brokerId,Constants.RabbitConstants.MessageService2Im,brokerId);channel.basicConsume(Constants.RabbitConstants.MessageService2Im + brokerId, false, new DefaultConsumer(channel){// 获取到rabbitmq中的信息@Overridepublic void handleDelivery(String consumerTag, Envelope envelope,AMQP.BasicProperties properties, byte[] body) throws IOException {try {String msgStr = new String(body);log.info(msgStr);}}});} catch (Exception e) {throw new RuntimeException(e);}}
}

这样的话就TCP就可以从RabiitMq中获取到消息了,这样的话,只要逻辑层往对应的交换机中投递消息,TCP就可以收到了,也就是打通了和逻辑层的交互
8、分布式TCP服务注册中心的选型
如果要接入多个服务,单台机器肯定是撑不住这么大的并发的,要考虑分布式,这就不得不考虑服务发现的问题,所以要引入服务注册来解决这个问题
现在的开发,都会把服务做拆分,就会引出网关和逻辑服务直接发现的问题,这里有一种土办法,把服务的ip地址配置在网关中,A服务有这几个ip,B服务有这几个ip,如果采用这种方案,我们在增加或者删除一台服务器的时候,所有的网关服务都要手动的去修改配置,去重启,这样不太长久,不现实
如果是http服务器,我们可以通过反向代理,把请求转发给可用的服务,但是这个方案在即时通讯系统中是行不通的,因为它是有状态服务,和普通的http服务不一样,有状态服务会保留用户活跃的信息,比如我们客户和A服务器建立了连接Channel,用户的信息保存在了A服务器里面,可以互通数据,当我们用B服务器,用户和B服务器之间没有交互数据的,我们拿不到Channel里面的信息
CAP理论
- 一致性
- 可用性
- 分区容错性
主流注册中心
- Eureka:SpringCloud配套的,但是已经停止维护了,最好不要用
- Consul:轻量级的注册中心,但是Java领域覆盖面不是很广
- Kubernetes:配套使用K8S较好
- Nacos:是首选的注册中心,它既可以支持AP、也可以支持CP
- Zookeeper:临时节点和watch机制,创建连接会生成节点,节点发生改变会通知,感知力强
本系统采取Zookeeper作为注册中心
9、TCP服务注册—Zookeeper注册TCP服务
安装教程
ZKit
/*** @author li* 直接用来创建Zookeeper目录的* @data 2023/4/19* @time 14:37*/
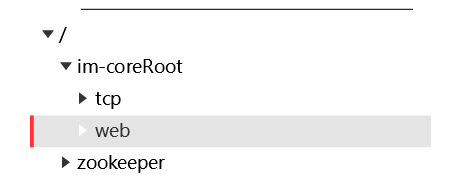
public class ZKit {private ZkClient zkClient;public ZKit(ZkClient client){this.zkClient = client;}// im-coreRoot/tcp/ip:portpublic void createRootNode(){boolean exists = zkClient.exists(Constants.ImCoreZkRoot);if(!exists){zkClient.createPersistent(Constants.ImCoreZkRoot);}boolean tcpExists = zkClient.exists(Constants.ImCoreZkRoot +Constants.ImCoreZkRootTcp);if(!tcpExists){zkClient.createPersistent(Constants.ImCoreZkRoot +Constants.ImCoreZkRootTcp);}boolean webExists = zkClient.exists(Constants.ImCoreZkRoot +Constants.ImCoreZkRootWeb);if(!webExists){zkClient.createPersistent(Constants.ImCoreZkRoot +Constants.ImCoreZkRootWeb);}}// ip:portpublic void createNode(String path){if(!zkClient.exists(path)){zkClient.createPersistent(path);}}
}
RegistryZk
@Slf4j
public class RegistryZk implements Runnable{private ZKit zKit;private String ip;private BootstrapConfig.TcpConfig tcpConfig;public RegistryZk(ZKit zKit, String ip, BootstrapConfig.TcpConfig tcpConfig) {this.zKit = zKit;this.ip = ip;this.tcpConfig = tcpConfig;}@Overridepublic void run() {// 注册Zookeeper// 先注册1级目录zKit.createRootNode();// 再注册2级目录String tcpPath = Constants.ImCoreZkRoot + Constants.ImCoreZkRootTcp+ "/" + ip + ":" + this.tcpConfig.getTcpPort();zKit.createNode(tcpPath);log.info("Registry zookeeper tcpPath success, msg=[{}]", tcpPath);String webPath = Constants.ImCoreZkRoot + Constants.ImCoreZkRootWeb+ "/" + ip + ":" + this.tcpConfig.getWebSocketPort();zKit.createNode(webPath);log.info("Registry zookeeper webPath success, msg=[{}]", webPath);}
}
Starter
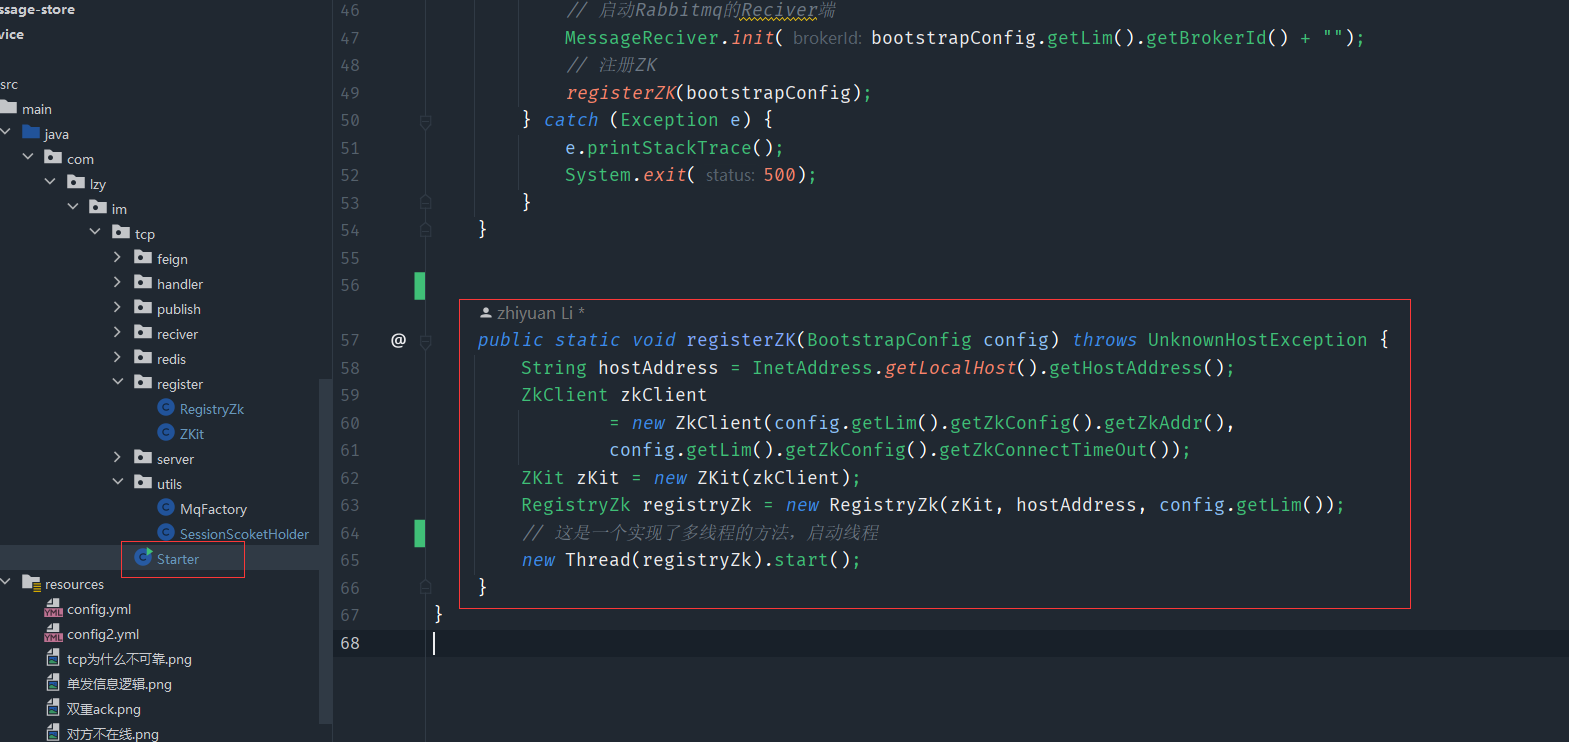
这样在我们启动这个Starter这个服务的时候,连接Zookeeper的客户端就可以查看到你创建的目录了
10、服务改造-TCP服务分布式改造
因为我们要实现的即时通讯系统是有状态的服务,所以我们要考虑的更多
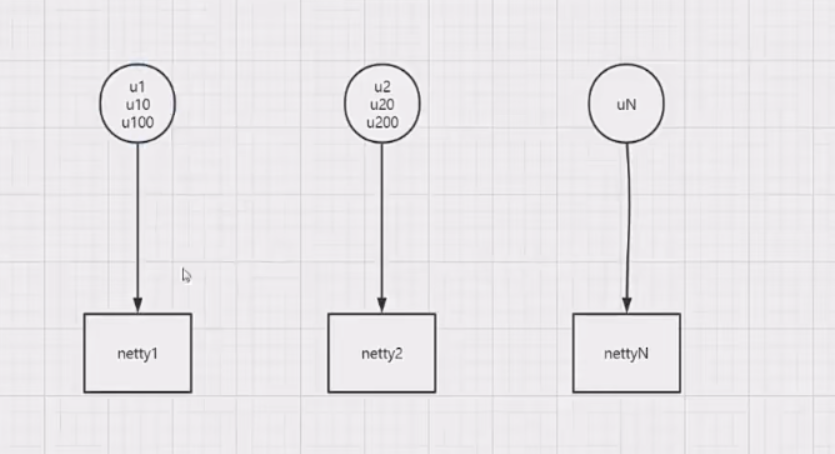
比如每个netty1都维护着对应的用户,netty1维护着u1、u10、u100,netty2维护者u2、u20、u200,当我们u1向u2发送一条消息的时候,netty1中并没有连接netty2的Channel,消息就会丢失,这样目前还是不妥的,所以我们要加以改造
这里提供集中解决方法
10.1、 广播模式
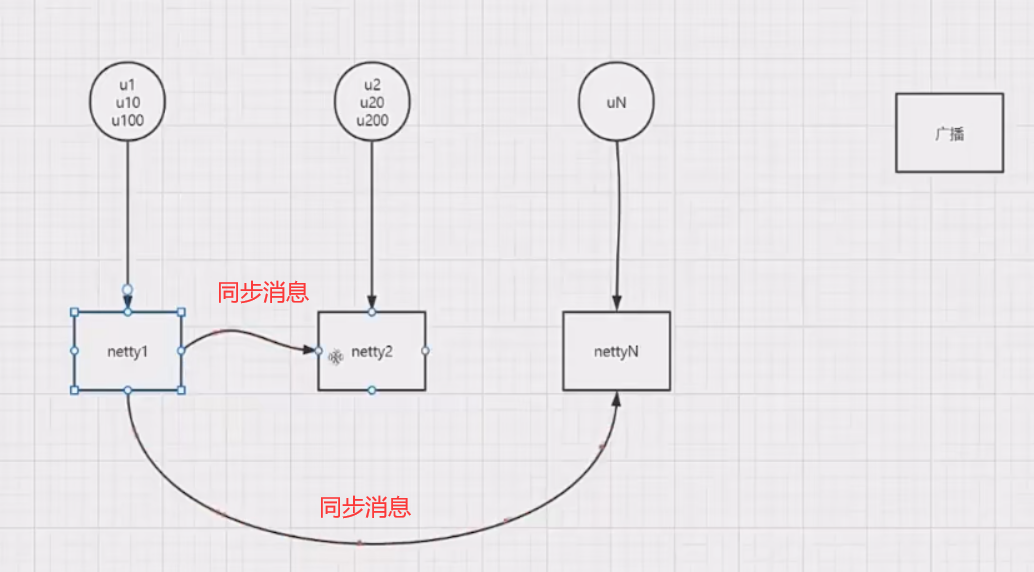
这样实现起来很简单,可以使用RabiitMq,但是容易产生消息风暴,如果要发送100个消息,这样就会变成200个,造成一些浪费、无效的通讯
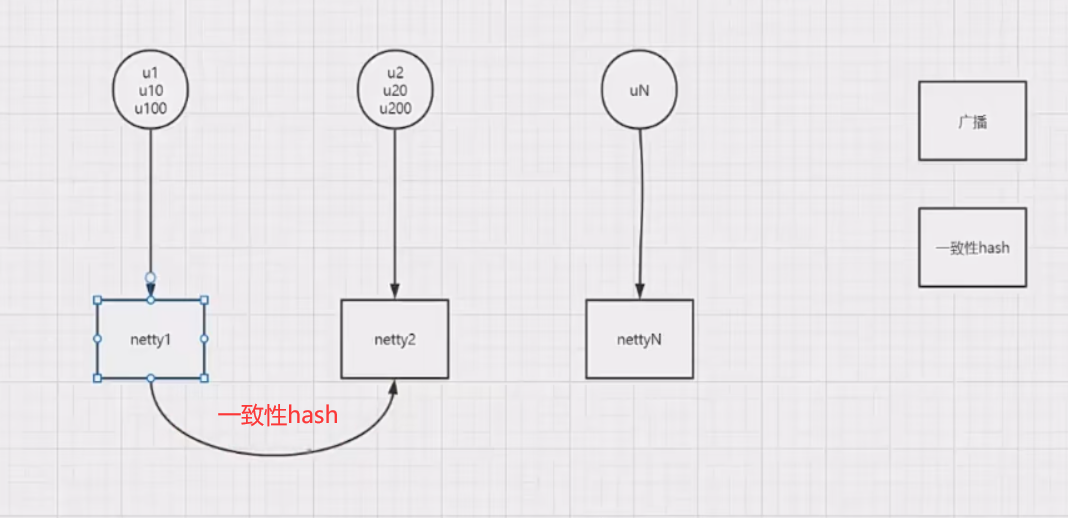
10.2、 一致性Hash
这种方式的实现方式是,u1这个用户根据一些id等的属性,会在注册的时候去做一个hash运算,直接就给他注册到算好的netty上,比如是u1,根据这个1算出它在netty1上,u2根据2算出它在netty2上,当u1要给u2发消息的时候,就会根据u2计算出u2在哪个netty2中,点对点的给他发送过去,不用发那么多份,但是缺点也很明显,重度的依赖服务的发现的稳定性,要及时的感知到netty2是否存在,netty2下线的时候要及时的通知
10.3、 构建路由层
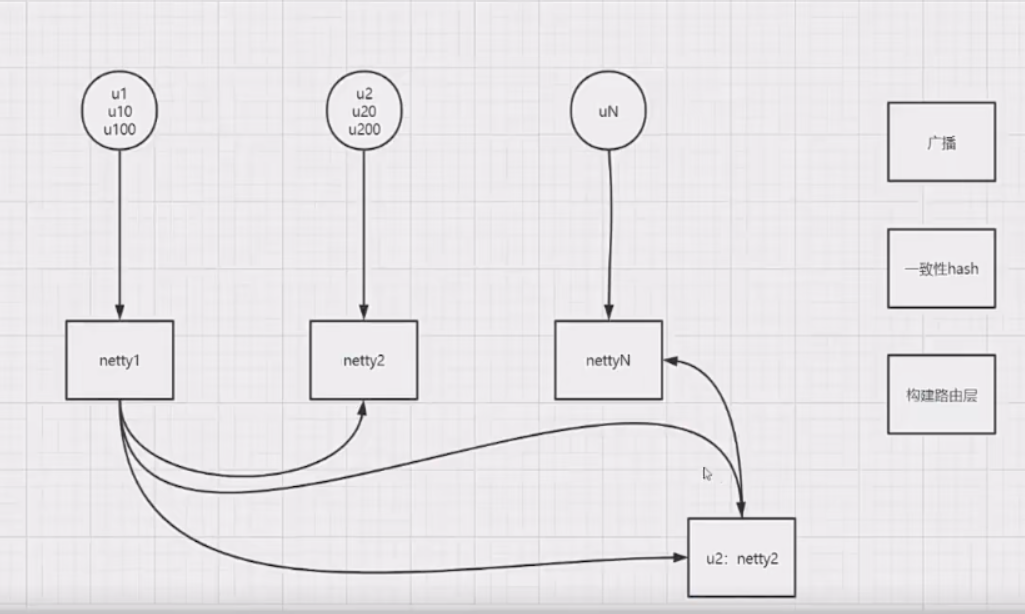
通过构建路由层,比如说把注册的用户和对应的netty服务ip存储到里面,当u1给u2消息的时候,就会在路由层去寻找,然后发送,可靠性比较高,并且可以用mq解耦,路由层是无状态的可以水平拓展,可以扩展多个,缺点是很复杂,多了一层东西就多了代码,多了一些组件,并且需要独立维护路由层,也会依赖路由层的依赖性和可靠性
11、即时通讯系统支持多端登录模式—应对多端登录的场景

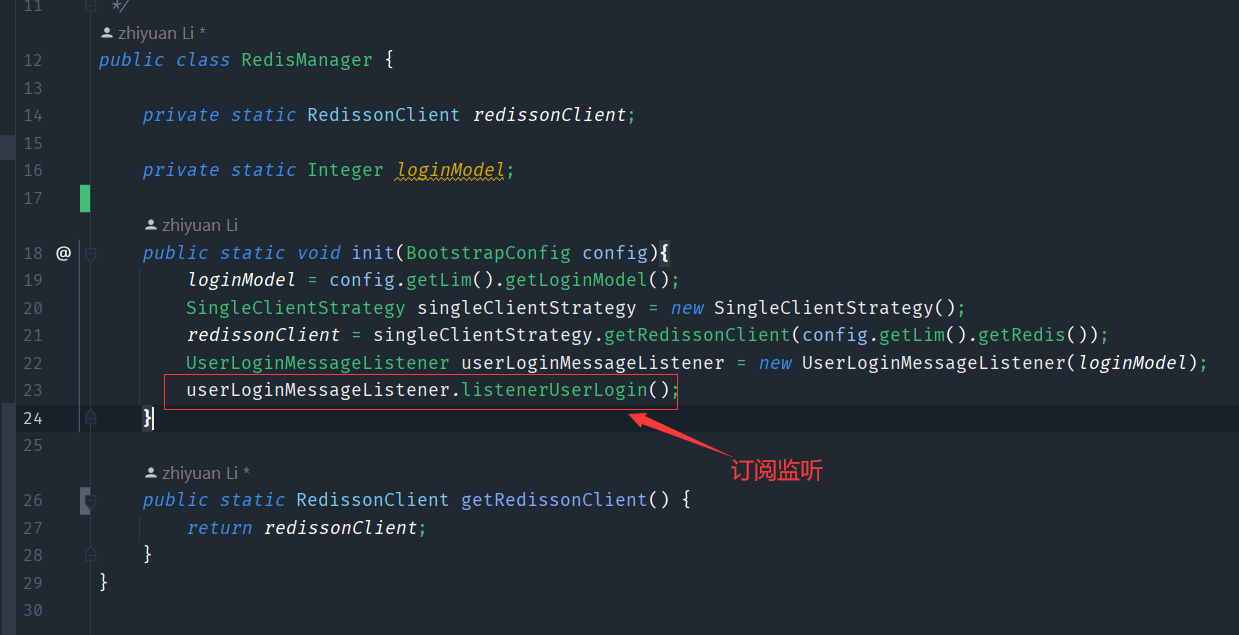
仿腾讯Im即时通讯系统的多端登录模式
做好一些配置的东西
多端登录在有状态的分布式下,推荐使用广播(或者一致性hash)的模式,因为你不知道某个用户到底在几个端登录,这样是最容易的方法了。
UserLoginMessageListener
public class UserLoginMessageListener {private final static Logger logger = LoggerFactory.getLogger(UserLoginMessageListener.class);private Integer loginModel;public UserLoginMessageListener(Integer loginModel){this.loginModel = loginModel;}// 监听用户登录public void listenerUserLogin(){RTopic topic = RedisManager.getRedissonClient().getTopic(Constants.RedisConstants.UserLoginChannel);// 使用Redisson的订阅模式做  监听  当有用户的某个端登录就会topic.addListener(String.class, new MessageListener<String>() {@Overridepublic void onMessage(CharSequence charSequence, String message) {logger.info("收到用户上线:" + message);UserClientDto userClientDto = JSONObject.parseObject(message, UserClientDto.class);// 获取所有的CHANNELSList<NioSocketChannel> nioSocketChannels= SessionScoketHolder.get(userClientDto.getAppId(), userClientDto.getUserId());for (NioSocketChannel nioSocketChannel : nioSocketChannels) {// 单端登录if(loginModel == DeviceMultiLoginEnum.ONE.getLoginMode()){// 获取clietTypeInteger clientType = (Integer) nioSocketChannel.attr(AttributeKey.valueOf(Constants.ClientType)).get();// 获取imei号String imei = (String)nioSocketChannel.attr(AttributeKey.valueOf(Constants.Imei)).get();if(!(clientType + ":" + imei).equals(userClientDto.getClientType() + ":" + userClientDto.getImei())){// TODO 踢掉客户端// 告诉客户端 其他端登录MessagePack<Object> messagePack = new MessagePack<>();messagePack.setToId((String) nioSocketChannel.attr(AttributeKey.valueOf(Constants.UserId)).get());messagePack.setUserId((String) nioSocketChannel.attr(AttributeKey.valueOf(Constants.UserId)).get());messagePack.setCommand(SystemCommand.MUTUALLOGIN.getCommand());nioSocketChannel.writeAndFlush(messagePack);}}else if(loginModel == DeviceMultiLoginEnum.TWO.getLoginMode()){if(userClientDto.getClientType() == ClientType.WEB.getCode()){continue;}Integer clientType = (Integer) nioSocketChannel.attr(AttributeKey.valueOf(Constants.ClientType)).get();if(clientType == ClientType.WEB.getCode()){continue;}// 获取imei号String imei = (String)nioSocketChannel.attr(AttributeKey.valueOf(Constants.Imei)).get();if(!(clientType + ":" + imei).equals(userClientDto.getClientType() + ":" + userClientDto.getImei())){// TODO 踢掉客户端MessagePack<Object> messagePack = new MessagePack<>();messagePack.setToId((String) nioSocketChannel.attr(AttributeKey.valueOf(Constants.UserId)).get());messagePack.setUserId((String) nioSocketChannel.attr(AttributeKey.valueOf(Constants.UserId)).get());messagePack.setCommand(SystemCommand.MUTUALLOGIN.getCommand());nioSocketChannel.writeAndFlush(messagePack);}}else if(loginModel == DeviceMultiLoginEnum.THREE.getLoginMode()){Integer clientType = (Integer) nioSocketChannel.attr(AttributeKey.valueOf(Constants.ClientType)).get();String imei = (String)nioSocketChannel.attr(AttributeKey.valueOf(Constants.Imei)).get();if(clientType == ClientType.WEB.getCode()){continue;}Boolean isSameClient = false;// 如果新登录的端和旧的端都是手机端,做处理if((clientType == ClientType.IOS.getCode()|| clientType == ClientType.ANDROID.getCode()) &&(userClientDto.getClientType() == ClientType.IOS.getCode()|| userClientDto.getClientType() == ClientType.ANDROID.getCode())){isSameClient = true;}// 如果新登录的端和旧的端都是电脑端,做处理if((clientType == ClientType.MAC.getCode()|| clientType == ClientType.WINDOWS.getCode()) &&(userClientDto.getClientType() == ClientType.MAC.getCode()|| userClientDto.getClientType() == ClientType.WINDOWS.getCode())){isSameClient = true;}if(isSameClient && !(clientType + ":" + imei).equals(userClientDto.getClientType() + ":" + userClientDto.getImei())){// TODO 踢掉客户端MessagePack<Object> messagePack = new MessagePack<>();messagePack.setToId((String) nioSocketChannel.attr(AttributeKey.valueOf(Constants.UserId)).get());messagePack.setUserId((String) nioSocketChannel.attr(AttributeKey.valueOf(Constants.UserId)).get());messagePack.setCommand(SystemCommand.MUTUALLOGIN.getCommand());nioSocketChannel.writeAndFlush(messagePack);}}}}});}
}
这东西理解起来有点抽象
因为这是Redis的订阅模式,就要在启动Redis的时候一起启动了
七、打通业务服务器与IM服务器多端同步
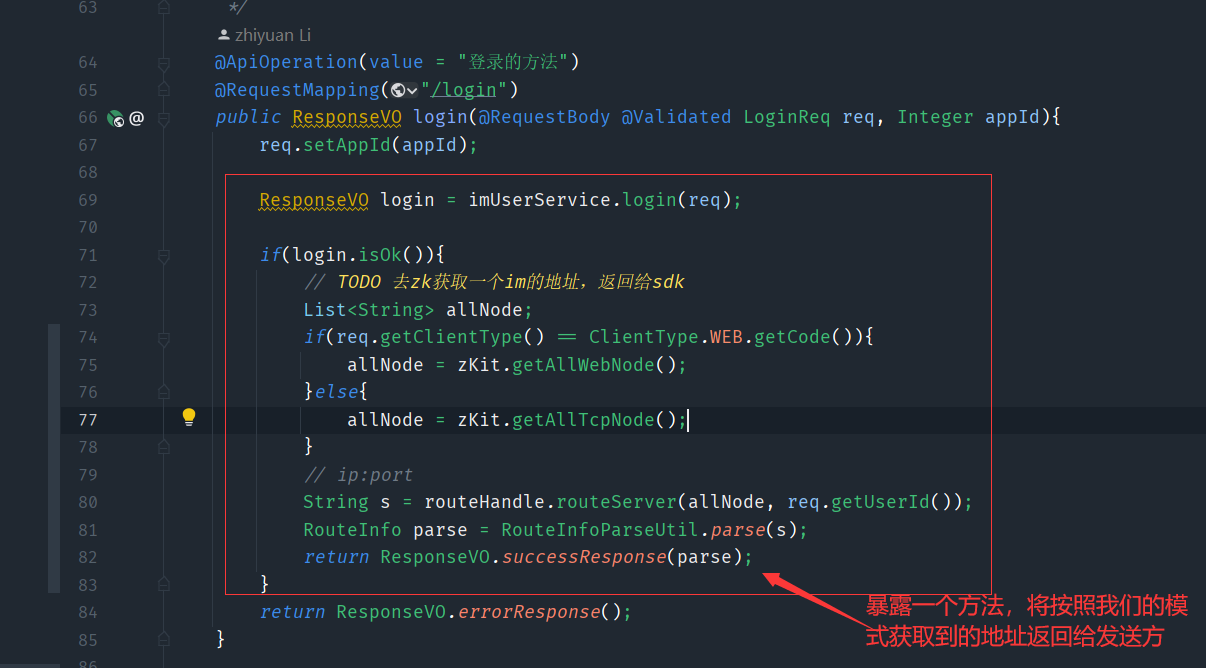
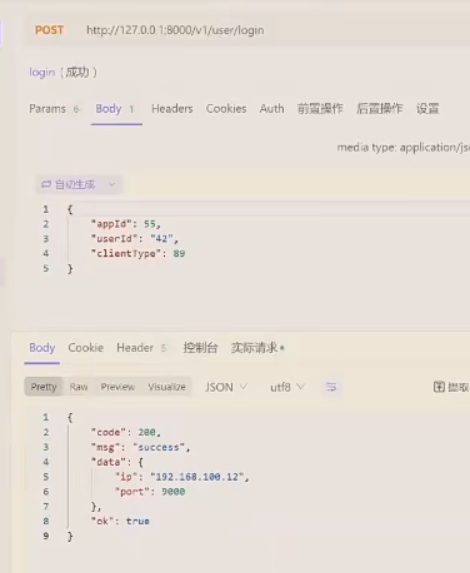
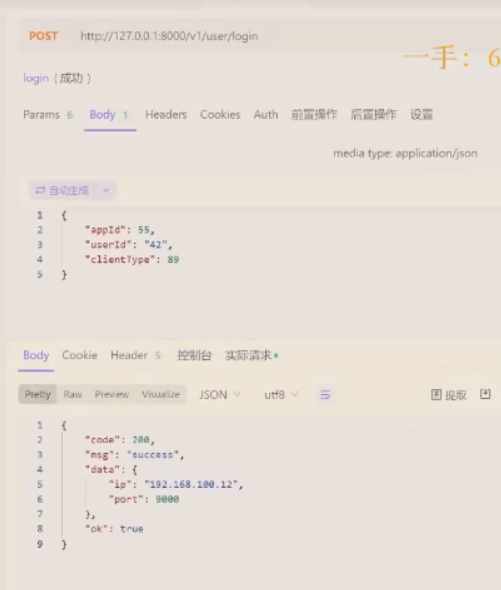
这里考虑到SDK如何获取到tcp服务的地址
- 可以在SDK上写死一个ip,让这个SDK一直去连接这个地址。如果这个地址挂了,这个服务就会挂掉,这个sdk就得进行修改
- 也可以在SDK上写多个ip,如果这四个ip都挂了,才算挂了
- 暴露一个http请求,每次用户登录的时候,都会往这个请求,拿一次tcp的连接地址,如果是web端获取到web的地址,如果是tcp就拿到tcp的地址
这里我们要使用上面的第三种方式来实现,所以要在逻辑层导入zk方面的东西
@Component
public class ZKit {private static Logger logger = LoggerFactory.getLogger(ZKit.class);@Autowiredprivate ZkClient zkClient;/*** get all TCP server node from zookeeper** @return*/public List<String> getAllTcpNode() {List<String> children = zkClient.getChildren(Constants.ImCoreZkRoot + Constants.ImCoreZkRootTcp);
//        logger.info("Query all node =[{}] success.", JSON.toJSONString(children));return children;}/*** get all WEB server node from zookeeper** @return*/public List<String> getAllWebNode() {List<String> children = zkClient.getChildren(Constants.ImCoreZkRoot + Constants.ImCoreZkRootWeb);
//        logger.info("Query all node =[{}] success.", JSON.toJSONString(children));return children;}
}
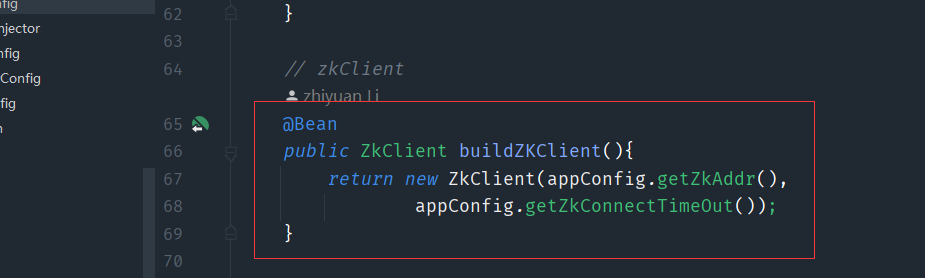
通过配置文件动态注入zk的地址和超时间,然后就可以使用上面那个获取到tcp和web的服务地址了
1、负载均衡策略—随机模式
public interface RouteHandle {public String routeServer(List<String> values, String key);
}
public class RandomHandle implements RouteHandle {@Overridepublic String routeServer(List<String> values, String key) {int size = values.size();if(size == 0){throw new ApplicationException(UserErrorCode.SERVER_NOT_AVAILABLE);}// 随机获取一个im地址值int i = ThreadLocalRandom.current().nextInt(size);return values.get(i);}
}
将上面的随机算法注入到里面
当我们访问这个接口的时候,就可以随机的获取到地址和端口号
2、负载均衡策略—轮询模式
public class LoopHandle implements RouteHandle {private AtomicLong index = new AtomicLong();@Overridepublic String routeServer(List<String> values, String key) {int size = values.size();if(size == 0){throw new ApplicationException(UserErrorCode.SERVER_NOT_AVAILABLE);}Long l = index.incrementAndGet() % size;if(l < 0){l = 0L;}return values.get(l.intValue());}
}
这里使用的是一个原子类,每次放温暖的时候都去加1,然后再取模,达到轮询的目的去取地址

将轮询策略注入,测试的时候,每点击一次,就能看到轮询的结果
3、负载均衡策略—一致性Hash
实现一致性hash还需要实现不同的HashMap,这里使用了抽象类,来保证扩展性
public class ConsistentHashHandle implements RouteHandle {private AbstractConsistentHash abstractConsistentHash;public void setAbstractConsistentHash(AbstractConsistentHash abstractConsistentHash) {this.abstractConsistentHash = abstractConsistentHash;}// TreeMap实现一致性hash@Overridepublic String routeServer(List<String> values, String key) {return abstractConsistentHash.process(values, key);}
}
public abstract class AbstractConsistentHash {// addprotected abstract void add(long key, String value);// sortprotected void sort(){};// 获取节点 getprotected abstract String getFirstNodeValue(String value);// 处理之前事件protected abstract void processBefore();// 传入节点列表以及客户端信息获取一个服务节点public synchronized String process(List<String> values, String key){processBefore();for (String value : values) {add(hash(value), value);}sort();return getFirstNodeValue(key) ;}// hash运算public Long hash(String value){MessageDigest md5;try {md5 = MessageDigest.getInstance("MD5");} catch (NoSuchAlgorithmException e) {throw new RuntimeException("MD5 not supported", e);}md5.reset();byte[] keyBytes = null;try {keyBytes = value.getBytes("UTF-8");} catch (UnsupportedEncodingException e) {throw new RuntimeException("Unknown string :" + value, e);}md5.update(keyBytes);byte[] digest = md5.digest();// hash code, Truncate to 32-bitslong hashCode = ((long) (digest[3] & 0xFF) << 24)| ((long) (digest[2] & 0xFF) << 16)| ((long) (digest[1] & 0xFF) << 8)| (digest[0] & 0xFF);long truncateHashCode = hashCode & 0xffffffffL;return truncateHashCode;}
}
public class TreeMapConsistentHash extends AbstractConsistentHash{// mapprivate TreeMap<Long, String> treeMap = new TreeMap<>();//private static final int NODE_SIZE = 2;@Overrideprotected void add(long key, String value) {for (int i = 0; i < NODE_SIZE; i++) {treeMap.put(super.hash("node" + key + i), value);}treeMap.put(key, value);}@Overrideprotected String getFirstNodeValue(String value) {Long hash = super.hash(value);SortedMap<Long, String> last = treeMap.tailMap(hash);if(!last.isEmpty()){return last.get(last.firstKey());}if(treeMap.size() == 0){throw  new ApplicationException(UserErrorCode.SERVER_NOT_AVAILABLE);}return treeMap.firstEntry().getValue();}@Overrideprotected void processBefore() {treeMap.clear();}
}
这里实现的是TreeMap,也可以使用其他的Map去实现,这里一些方法要被重写,一些不用,这个TreeMap要重写add、get方法
这里还要考虑一个问题,比如我们计算出来的hash值是一个10和一个1000000,两个数相差过大,当我们根据userId去获取服务地址的时候,通过调用tailMap可能总是会选择到10或100000,造成一种不均衡的状态,所以这里引入了一种添加虚拟节点的方式,每一个普通节点附加两个虚拟节点,虚拟节点的key是普通节点的key加一些东西,然后value和普通节点的一样,也就是最终比如之前就有10、1000000,但是添加了之后有了10、100、1000、10000、100060、100000,就可以在一定程度上解决老是获取到那固定的服务地址,避免造成涝的涝死,旱死的旱死的局面
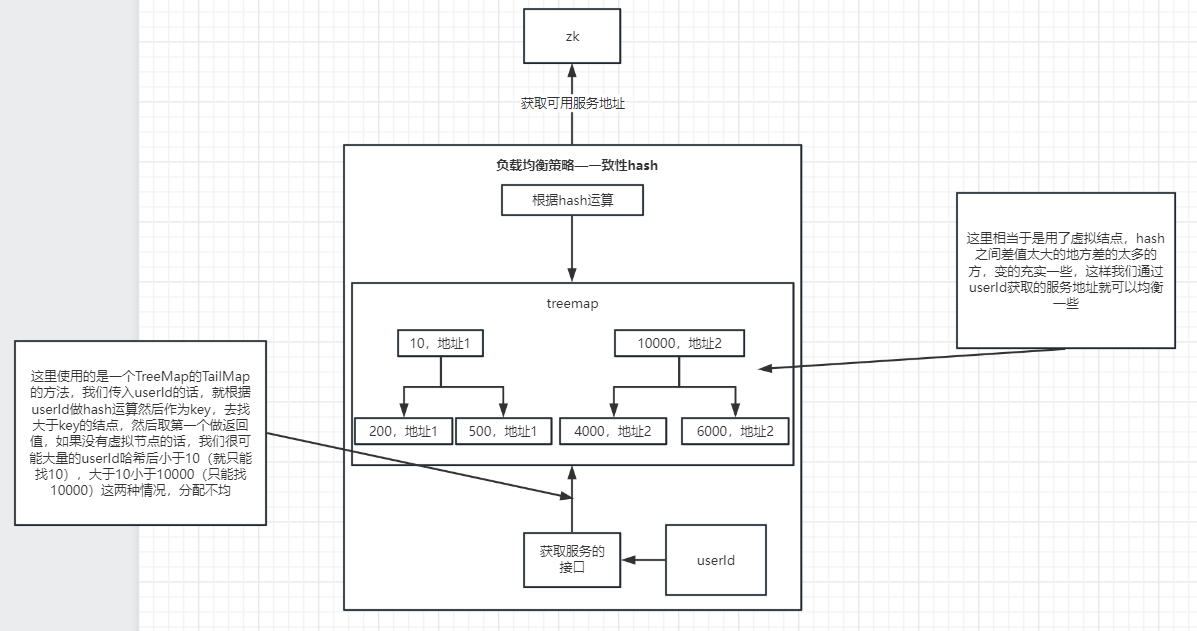
测试的时候就可以通过不同的userId去尝试获取不同的服务地址了
4、配置负载均衡策略
之前我们使用的策略都是手动在BeabConfig中修改的,这样的肯定不使用,所以我们要把这个放到配置文件中去,下面的就是去做一些优化
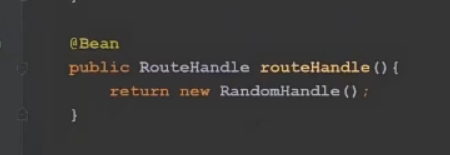
@Configuration
public class BeanConfig {@Autowiredprivate AppConfig appConfig;@Beanpublic RouteHandle routeHandle() throws Exception {// 获取配置文件中使用的哪个路由策略Integer imRouteWay = appConfig.getImRouteWay();// 使用的路由策略的具体的路径String routWay = "";// 通过配置文件中的路由策略的代表值去Enum获取到具体路径的类ImUrlRouteWayEnum handler = ImUrlRouteWayEnum.getHandler(imRouteWay);// 赋值给具体路径routWay = handler.getClazz();// 通过反射拿到路由策略的类RouteHandle routeHandle = (RouteHandle) Class.forName(routWay).newInstance();// 如果是hash策略的话,还要搞一个具体的hash算法if (handler == ImUrlRouteWayEnum.HASH){// 通过反射拿到ConsistentHashHandle中的方法Method method = Class.forName(routWay).getMethod("setAbstractConsistentHash", AbstractConsistentHash.class);// 从配置文件中拿到指定hash算法的代表值Integer consistentHashWay = appConfig.getConsistentHashWay();// 具体hash算法的类的路径String hashWay = "";// 通过Enue拿到对象RouteHashMethodEnum handler1 = RouteHashMethodEnum.getHandler(consistentHashWay);// 赋值hashWay = handler1.getClazz();// 通过反射拿到hash算法AbstractConsistentHash abstractConsistentHash = (AbstractConsistentHash) Class.forName(hashWay).newInstance();method.invoke(routeHandle, abstractConsistentHash);}return routeHandle;}
}
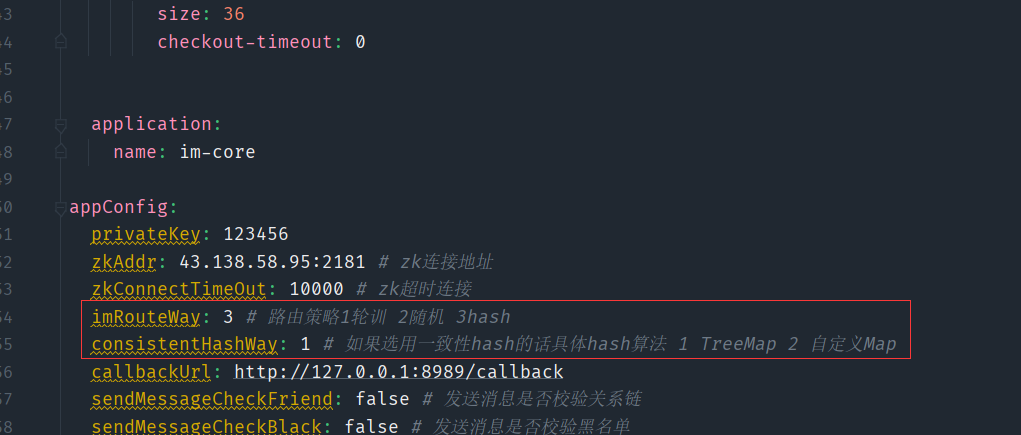
配置
5、使用Apache—HttpClient封装http请求工具
@Configuration
@ConfigurationProperties(prefix = "httpclient")
public class GlobalHttpClientConfig {private Integer maxTotal; // 最大连接数private Integer defaultMaxPerRoute; // 最大并发链接数private Integer connectTimeout; // 创建链接的最大时间private Integer connectionRequestTimeout; // 链接获取超时时间private Integer socketTimeout; // 数据传输最长时间private boolean staleConnectionCheckEnabled; // 提交时检查链接是否可用PoolingHttpClientConnectionManager manager = null;HttpClientBuilder httpClientBuilder = null;// 定义httpClient链接池@Bean(name = "httpClientConnectionManager")public PoolingHttpClientConnectionManager getPoolingHttpClientConnectionManager() {return getManager();}private PoolingHttpClientConnectionManager getManager() {if (manager != null) {return manager;}manager = new PoolingHttpClientConnectionManager();manager.setMaxTotal(maxTotal); // 设定最大链接数manager.setDefaultMaxPerRoute(defaultMaxPerRoute); // 设定并发链接数return manager;}/*** 实例化连接池,设置连接池管理器。 这里需要以参数形式注入上面实例化的连接池管理器** @Qualifier 指定bean标签进行注入*/@Bean(name = "httpClientBuilder")public HttpClientBuilder getHttpClientBuilder(@Qualifier("httpClientConnectionManager") PoolingHttpClientConnectionManager httpClientConnectionManager) {// HttpClientBuilder中的构造方法被protected修饰,所以这里不能直接使用new来实例化一个HttpClientBuilder,可以使用HttpClientBuilder提供的静态方法create()来获取HttpClientBuilder对象httpClientBuilder = HttpClientBuilder.create();httpClientBuilder.setConnectionManager(httpClientConnectionManager);return httpClientBuilder;}/*** 注入连接池,用于获取httpClient** @param httpClientBuilder* @return*/@Beanpublic CloseableHttpClient getCloseableHttpClient(@Qualifier("httpClientBuilder") HttpClientBuilder httpClientBuilder) {return httpClientBuilder.build();}public CloseableHttpClient getCloseableHttpClient() {if (httpClientBuilder != null) {return httpClientBuilder.build();}httpClientBuilder = HttpClientBuilder.create();httpClientBuilder.setConnectionManager(getManager());return httpClientBuilder.build();}/*** Builder是RequestConfig的一个内部类 通过RequestConfig的custom方法来获取到一个Builder对象* 设置builder的连接信息** @return*/@Bean(name = "builder")public RequestConfig.Builder getBuilder() {RequestConfig.Builder builder = RequestConfig.custom();return builder.setConnectTimeout(connectTimeout).setConnectionRequestTimeout(connectionRequestTimeout).setSocketTimeout(socketTimeout).setStaleConnectionCheckEnabled(staleConnectionCheckEnabled);}/*** 使用builder构建一个RequestConfig对象** @param builder* @return*/@Beanpublic RequestConfig getRequestConfig(@Qualifier("builder") RequestConfig.Builder builder) {return builder.build();}public Integer getMaxTotal() {return maxTotal;}public void setMaxTotal(Integer maxTotal) {this.maxTotal = maxTotal;}public Integer getDefaultMaxPerRoute() {return defaultMaxPerRoute;}public void setDefaultMaxPerRoute(Integer defaultMaxPerRoute) {this.defaultMaxPerRoute = defaultMaxPerRoute;}public Integer getConnectTimeout() {return connectTimeout;}public void setConnectTimeout(Integer connectTimeout) {this.connectTimeout = connectTimeout;}public Integer getConnectionRequestTimeout() {return connectionRequestTimeout;}public void setConnectionRequestTimeout(Integer connectionRequestTimeout) {this.connectionRequestTimeout = connectionRequestTimeout;}public Integer getSocketTimeout() {return socketTimeout;}public void setSocketTimeout(Integer socketTimeout) {this.socketTimeout = socketTimeout;}public boolean isStaleConnectionCheckEnabled() {return staleConnectionCheckEnabled;}public void setStaleConnectionCheckEnabled(boolean staleConnectionCheckEnabled) {this.staleConnectionCheckEnabled = staleConnectionCheckEnabled;}
}
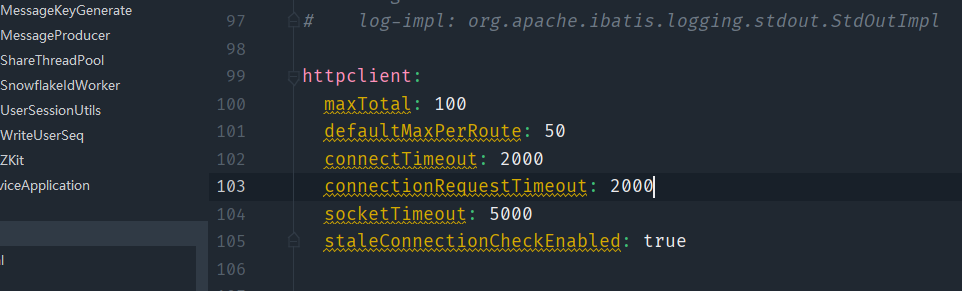
这样就可以根据这个类上面的注解获取到httpclient中的配置文件的属性了
@Component
public class HttpRequestUtils {@Autowiredprivate CloseableHttpClient httpClient;@Autowiredprivate RequestConfig requestConfig;@AutowiredGlobalHttpClientConfig httpClientConfig;public String doGet(String url, Map<String, Object> params, String charset) throws Exception {return doGet(url,params,null,charset);}/*** 通过给的url地址,获取服务器数据** @param url     服务器地址* @param params  封装用户参数* @param charset 设定字符编码* @return*/public String doGet(String url, Map<String, Object> params, Map<String, Object> header, String charset) throws Exception {if (StringUtils.isEmpty(charset)) {charset = "utf-8";}URIBuilder uriBuilder = new URIBuilder(url);// 判断是否有参数if (params != null) {// 遍历map,拼接请求参数for (Map.Entry<String, Object> entry : params.entrySet()) {uriBuilder.setParameter(entry.getKey(), entry.getValue().toString());}}// 声明 http get 请求HttpGet httpGet = new HttpGet(uriBuilder.build());httpGet.setConfig(requestConfig);if (header != null) {// 遍历map,拼接header参数for (Map.Entry<String, Object> entry : header.entrySet()) {httpGet.addHeader(entry.getKey(),entry.getValue().toString());}}String result = "";try {// 发起请求CloseableHttpResponse response = httpClient.execute(httpGet);// 判断状态码是否为200if (response.getStatusLine().getStatusCode() == 200) {// 返回响应体的内容result = EntityUtils.toString(response.getEntity(), charset);}} catch (IOException e) {e.printStackTrace();throw new RuntimeException(e);}return result;}/*** GET请求, 含URL 参数** @param url* @param params* @return 如果状态码为200,则返回body,如果不为200,则返回null* @throws Exception*/public String doGet(String url, Map<String, Object> params) throws Exception {return doGet(url, params, null);}/*** GET 请求,不含URL参数** @param url* @return* @throws Exception*/public String doGet(String url) throws Exception {return doGet(url, null, null);}public String doPost(String url, Map<String, Object> params, String jsonBody, String charset) throws Exception {return doPost(url,params,null,jsonBody,charset);}/*** 带参数的post请求** @param url* @return* @throws Exception*/public String doPost(String url, Map<String, Object> params, Map<String, Object> header, String jsonBody, String charset) throws Exception {if (StringUtils.isEmpty(charset)) {charset = "utf-8";}URIBuilder uriBuilder = new URIBuilder(url);// 判断是否有参数if (params != null) {// 遍历map,拼接请求参数for (Map.Entry<String, Object> entry : params.entrySet()) {uriBuilder.setParameter(entry.getKey(), entry.getValue().toString());}}// 声明httpPost请求HttpPost httpPost = new HttpPost(uriBuilder.build());// 加入配置信息httpPost.setConfig(requestConfig);// 判断map是否为空,不为空则进行遍历,封装from表单对象if (StringUtils.isNotEmpty(jsonBody)) {StringEntity s = new StringEntity(jsonBody, charset);s.setContentEncoding(charset);s.setContentType("application/json");// 把json body放到post里httpPost.setEntity(s);}if (header != null) {// 遍历map,拼接header参数for (Map.Entry<String, Object> entry : header.entrySet()) {httpPost.addHeader(entry.getKey(),entry.getValue().toString());}}String result = "";
//		CloseableHttpClient httpClient = HttpClients.createDefault(); // 单个CloseableHttpResponse response = null;try {// 发起请求response = httpClient.execute(httpPost);// 判断状态码是否为200if (response.getStatusLine().getStatusCode() == 200) {// 返回响应体的内容result = EntityUtils.toString(response.getEntity(), charset);}} catch (IOException e) {e.printStackTrace();throw new RuntimeException(e);}return result;}/*** 不带参数post请求* @param url* @return* @throws Exception*/public String doPost(String url) throws Exception {return doPost(url, null,null,null);}/*** get 方法调用的通用方式* @param url* @param tClass* @param map* @param charSet* @return* @throws Exception*/public <T> T doGet(String url, Class<T> tClass, Map<String, Object> map, String charSet) throws Exception {String result = doGet(url, map, charSet);if (StringUtils.isNotEmpty(result))return JSON.parseObject(result, tClass);return null;}/*** get 方法调用的通用方式* @param url* @param tClass* @param map* @param charSet* @return* @throws Exception*/public <T> T doGet(String url, Class<T> tClass, Map<String, Object> map, Map<String, Object> header, String charSet) throws Exception {String result = doGet(url, map, header, charSet);if (StringUtils.isNotEmpty(result))return JSON.parseObject(result, tClass);return null;}/*** post 方法调用的通用方式* @param url* @param tClass* @param map* @param jsonBody* @param charSet* @return* @throws Exception*/public <T> T doPost(String url, Class<T> tClass, Map<String, Object> map, String jsonBody, String charSet) throws Exception {String result = doPost(url, map,jsonBody,charSet);if (StringUtils.isNotEmpty(result))return JSON.parseObject(result, tClass);return null;}public <T> T doPost(String url, Class<T> tClass, Map<String, Object> map, Map<String, Object> header, String jsonBody, String charSet) throws Exception {String result = doPost(url, map, header,jsonBody,charSet);if (StringUtils.isNotEmpty(result))return JSON.parseObject(result, tClass);return null;}/*** post 方法调用的通用方式* @param url* @param map* @param jsonBody* @param charSet* @return* @throws Exception*/public String  doPostString(String url, Map<String, Object> map, String jsonBody, String charSet) throws Exception {return doPost(url, map,jsonBody,charSet);}/*** post 方法调用的通用方式* @param url* @param map* @param jsonBody* @param charSet* @return* @throws Exception*/public String  doPostString(String url, Map<String, Object> map, Map<String, Object> header, String jsonBody, String charSet) throws Exception {return doPost(url, map, header, jsonBody,charSet);}
}
然后用封装的http请求工具封装一个回调的类
@Component
public class CallbackService {private Logger logger = LoggerFactory.getLogger(CallbackService.class);@Autowiredprivate HttpRequestUtils httpRequestUtils;@Autowiredprivate AppConfig appConfig;@Autowiredprivate ShareThreadPool shareThreadPool;public void callback(Integer appId, String callbackCommand, String jsonBody){shareThreadPool.submit(()->{try {httpRequestUtils.doPost(appConfig.getCallbackUrl(), Object.class, builderUrlParams(appId, callbackCommand),jsonBody, null);} catch (Exception e) {logger.error("callback 回调{} : {}出现异常 : {} ",callbackCommand , appId, e.getMessage());}});}public ResponseVO beforecallback(Integer appId, String callbackCommand, String jsonBody){try {ResponseVO responseVO= httpRequestUtils.doPost("", ResponseVO.class, builderUrlParams(appId, callbackCommand), jsonBody, null);return responseVO;} catch (Exception e) {logger.error("callback 之前 回调{} : {}出现异常 : {} ",callbackCommand , appId, e.getMessage());return ResponseVO.successResponse();}}public Map builderUrlParams(Integer appId, String command){Map map = new HashMap();map.put("appId", appId);map.put("command", command);return map;}
}
这个回调的地址也是可以配置在配置文件中的,当你需要得知服务端的状态的时候就可以设置这个回调地址,添加了回调逻辑的操作,就会给你发送一条消息,以便你知晓请求的怎么样了
6、用户资料变更、群组模块回调
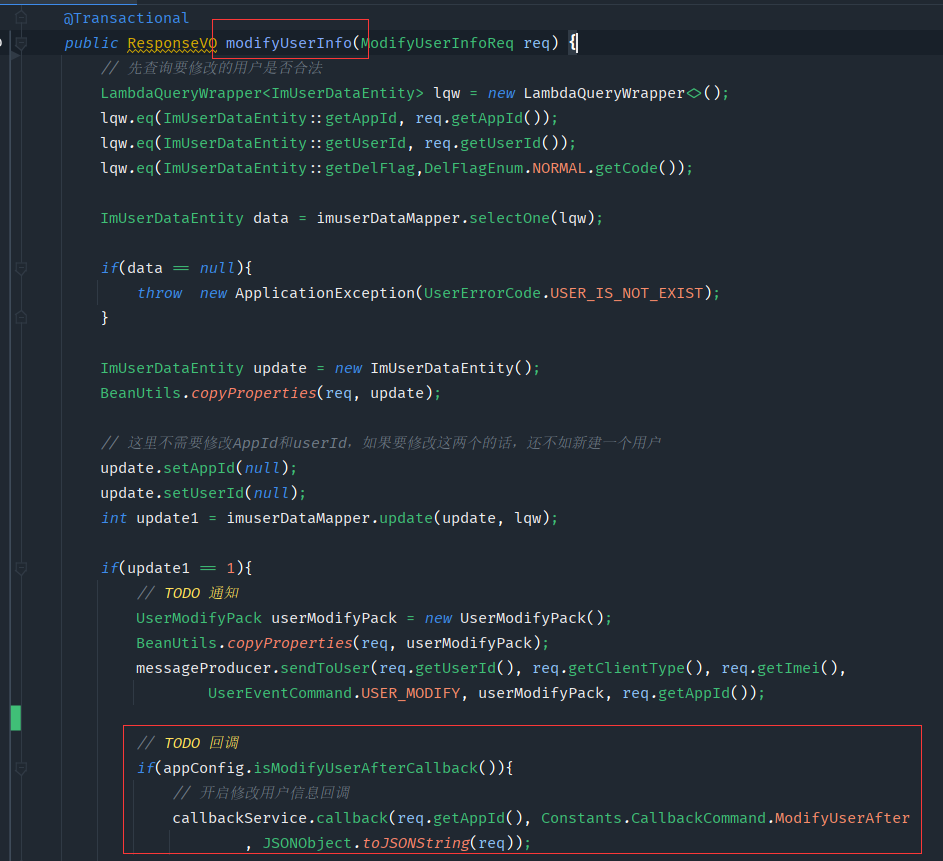
这些回调函数的开关都放在配置文件中了,当我们这个修改用户信息成功了以后,调用这个回调函数,往设置好回调地址的地方用http发一条信息,修改群组模块也如此。
7、数据多端同步
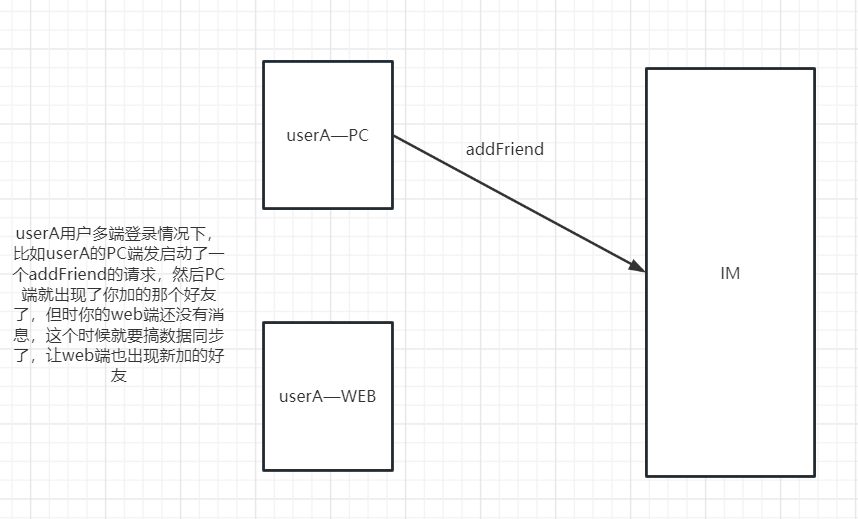
技术选取
- 轮询拉取:两台设备每隔一段时间就去拉取,这样做性能有很大的浪费,尤其是移动端,非电费流量
- 业务回调:之前实现了这个,让业务服务器知道谁加谁为好友,这时候调用一个专门用来发消息的接口,告诉A的所有客户端,我加了一次好友,然后去拉取一次好友列表
缺点:一是与Im服务端增加了交互,并且数据的同步强依赖于业务服务器,如果回调的不同,两面的数据还是不同步的;二是如果是客户端通过sdk去拉取好友列表的话,那是一次全量拉取,改变一个好友,就重新拉取所有的列表,又点浪费了
- TCP通知:到收到好友请求后,并且处理成功后,就主动的去发送特定的指令给这个用户的其他端,并且将新添加的好友信息也附带过去,这时候收到这条特色树消息的用户,不需要请求服务器,只是根据这条消息进行更本地好友列表即可,这样既解决了空轮训,也解决了和业务系统强依赖的问题
8、封装查询用户Session工具类
因为要给多端进行同步,所以就要获取到userSession列表,才能给他们去做同步,所以要在service加入redis。
@Component
public class UserSessionUtils {@Autowiredprivate StringRedisTemplate stringRedisTemplate;// 1、获取用户所有的sessionpublic List<UserSession> getUserSession(Integer appId, String userId){// 获取session的keyString userSessionKey = appId + Constants.RedisConstants.UserSessionConstants + userId;// 获取到这个mapMap<Object, Object> entries =stringRedisTemplate.opsForHash().entries(userSessionKey);List<UserSession> list = new ArrayList<>();Collection<Object> values = entries.values();for (Object value : values) {String str = (String)value;UserSession userSession= JSONObject.parseObject(str, UserSession.class);// 只获取在线的if(userSession.getConnectState() == ImConnectStatusEnum.ONLINE_STATUS.getCode()){list.add(userSession);}}return list;}// 获取指定端的sessionpublic UserSession getUserSession(Integer appId, String userId, Integer clientType, String imei){// 获取session的keyString userSessionKey = appId + Constants.RedisConstants.UserSessionConstants + userId;String hashKey = clientType + ":" + imei;Object o = stringRedisTemplate.opsForHash().get(userSessionKey, hashKey);UserSession userSession= JSONObject.parseObject(o.toString(), UserSession.class);return userSession;}
}
9、封装MessageProducer给用户发送消息
上一个是封装的获取Session的,这个封装的是给提取出的userSession发送消息的工具类,逻辑层不能给客户端发消息,所以要通过rabbitmq将要发送的消息扔到tcp层,然后再发送给客户端,完成一次发送消息的逻辑
@Service
public class MessageProducer {private static Logger logger = LoggerFactory.getLogger(MessageProducer.class);@Autowiredprivate RabbitTemplate rabbitTemplate;@Autowiredprivate UserSessionUtils userSessionUtils;private String queueName = Constants.RabbitConstants.MessageService2Im;// 将要发送的信息弄到rabbitmq中去public boolean sendMessage(UserSession userSession, Object message){try {logger.info("send message == " + message);rabbitTemplate.convertAndSend(queueName, userSession.getBrokerId() + "", message);return true;}catch (Exception e){logger.error("send error :" + e.getMessage());return false;}}// 发送数据报包,包装数据,调用sendMessagepublic boolean sendPack(String toId, Command command, Object msg, UserSession userSession){MessagePack messagePack = new MessagePack();messagePack.setCommand(command.getCommand());messagePack.setToId(toId);messagePack.setClientType(userSession.getClientType());messagePack.setAppId(userSession.getAppId());messagePack.setImei(userSession.getImei());JSONObject jsonObject = JSONObject.parseObject(JSONObject.toJSONString(msg));messagePack.setData(jsonObject);String body = JSONObject.toJSONString(messagePack);return sendMessage(userSession, body);}// 发送给某个用户所有端public List<ClientInfo> sendToUser(String toId, Command command, Object msg, Integer appId){List<UserSession> userSession= userSessionUtils.getUserSession(appId, toId);List<ClientInfo> list = new ArrayList<>();for (UserSession session : userSession) {boolean b = sendPack(toId, command, msg, session);if(b){list.add(new ClientInfo(session.getAppId(), session.getClientType(), session.getImei()));}}return list;}// 发送给除了某一端的其他端(这个相当于是对下面那个方法做了一个再封装)public void sendToUser(String toId, Integer clientType, String imei,Command command, Object msg, Integer appId){// 如果imei好和clientType不为空的话,说明就是正常的用户,那就把这个信息发送给除了这个端的其他用户if(clientType != null && StringUtils.isNotBlank(imei)){ClientInfo clientInfo = new ClientInfo(appId, clientType, imei);sendToUserExceptClient(toId, command, msg, clientInfo);}else{sendToUser(toId, command, msg, appId);}}// 发送给除了某一端的其他端public void sendToUserExceptClient(String toId, Command command, Object msg, ClientInfo clientInfo){List<UserSession> userSession= userSessionUtils.getUserSession(clientInfo.getAppId(), toId);for (UserSession session : userSession) {if(!isMatch(session, clientInfo)){sendPack(toId, command, msg, session);}}}// 发送给某个用户的指定客户端public void sendToUser(String toId, Command command, Object data, ClientInfo clientInfo){UserSession userSession = userSessionUtils.getUserSession(clientInfo.getAppId(),toId, clientInfo.getClientType(), clientInfo.getImei());sendPack(toId, command, data, userSession);}private boolean isMatch(UserSession sessionDto, ClientInfo clientInfo) {return Objects.equals(sessionDto.getAppId(), clientInfo.getAppId())&& Objects.equals(sessionDto.getImei(), clientInfo.getImei())&& Objects.equals(sessionDto.getClientType(), clientInfo.getClientType());}
}
10、编写用户资料、好友模块变更通知
大致意思就是这样,要加的模块按照功能的需求加就完事了
11、封装GroupMessageProducer给用户发送消息
这个和普通的消息还不太一样,因为群组的特殊性,有的操作只用通知群主管理员和被操作人,有的需要都告诉
@Component
public class GroupMessageProducer {@Autowiredprivate MessageProducer messageProducer;@Autowiredprivate ImGroupMemberService imGroupMemberService;public void producer(String userId, Command command, Object data, ClientInfo clientInfo){JSONObject o = (JSONObject) JSONObject.toJSON(data);String groupId = o.getString("groupId");// 获取群内的所有群成员的idList<String> groupMemberId= imGroupMemberService.getGroupMemberId(groupId, clientInfo.getAppId());// 加人的时候的TCP通知,只用告诉管理员和本人即可if(command.equals(GroupEventCommand.ADDED_MEMBER)){// 发送给管理员和被加入人本身List<GroupMemberDto> groupManager= imGroupMemberService.getGroupManager(groupId, clientInfo.getAppId());AddGroupMemberPack addGroupMemberPack = o.toJavaObject(AddGroupMemberPack.class);List<String> members = addGroupMemberPack.getMembers();// 发送给管理员for (GroupMemberDto groupMemberDto : groupManager) {if(clientInfo.getClientType() != ClientType.WEBAPI.getCode()&& groupMemberDto.getMemberId().equals(userId)){messageProducer.sendToUserExceptClient(groupMemberDto.getMemberId(), command, data, clientInfo);}else{messageProducer.sendToUser(groupMemberDto.getMemberId(), command, data, clientInfo.getAppId());}}// 发送给本人的其他端for (String member : members) {if(clientInfo.getClientType() != ClientType.WEBAPI.getCode() && member.equals(userId)){messageProducer.sendToUserExceptClient(member, command, data, clientInfo);}else{messageProducer.sendToUser(member, command, data, clientInfo.getAppId());}}}// 踢人出群的时候的tcp通知else if(command.equals(GroupEventCommand.DELETED_MEMBER)){// 获取RemoveGroupMemberPack pack = o.toJavaObject(RemoveGroupMemberPack.class);// 删除哪个成员idString member = pack.getMember();// 走到这步骤的时候,这个已经被删除了,所以这里查出所有的成员id没有,哪个删除的人List<String> members= imGroupMemberService.getGroupMemberId(groupId, clientInfo.getAppId());// 这里加一下members.add(member);// 然后全部通知一下for (String memberId : members) {if(clientInfo.getClientType() != ClientType.WEBAPI.getCode() && member.equals(userId)){messageProducer.sendToUserExceptClient(memberId,command,data,clientInfo);}else{messageProducer.sendToUser(memberId,command,data,clientInfo.getAppId());}}}// 修改成员信息的时候的tcp通知,通知所有管理员else if(command.equals(GroupEventCommand.UPDATED_MEMBER)){UpdateGroupMemberPack pack = o.toJavaObject(UpdateGroupMemberPack.class);// 被修改人的idString memberId = pack.getGroupId();// 获取到所有的管理员List<GroupMemberDto> groupManager= imGroupMemberService.getGroupManager(groupId, clientInfo.getAppId());// 将被修改人也要通知到,所以搞一个dtoGroupMemberDto groupMemberDto = new GroupMemberDto();groupMemberDto.setMemberId(memberId);groupManager.add(groupMemberDto);// 全发一遍for (GroupMemberDto member : groupManager) {if(clientInfo.getClientType() != ClientType.WEBAPI.getCode() && member.equals(userId)){messageProducer.sendToUserExceptClient(member.getMemberId(),command,data,clientInfo);}else{messageProducer.sendToUser(member.getMemberId(),command,data,clientInfo.getAppId());}}}else{for (String memberId : groupMemberId) {// 如果clientType不为空,并且类型不是Web,那么一定就是app端发送的if(clientInfo.getClientType() != null&& clientInfo.getClientType() != ClientType.WEBAPI.getCode() && memberId.equals(userId)){// 发送给除了本端的其他端messageProducer.sendToUserExceptClient(memberId, command, data, clientInfo);}else{// 全发messageProducer.sendToUser(memberId, command, data, clientInfo.getAppId());}}}}
}
12、编写群组模块TCP通知
其他就省略了!
13、TCP服务处理逻辑层投递的MQ消息
从mq中获取到消息,然后处理消息,这里用到了工厂模式
public class ProcessFactory {private static BaseProcess defaultProcess;static {defaultProcess = new BaseProcess() {@Overridepublic void processBefore() {}@Overridepublic void processAfter() {}};}public static BaseProcess getMessageProcess(Integer command) {return defaultProcess;}
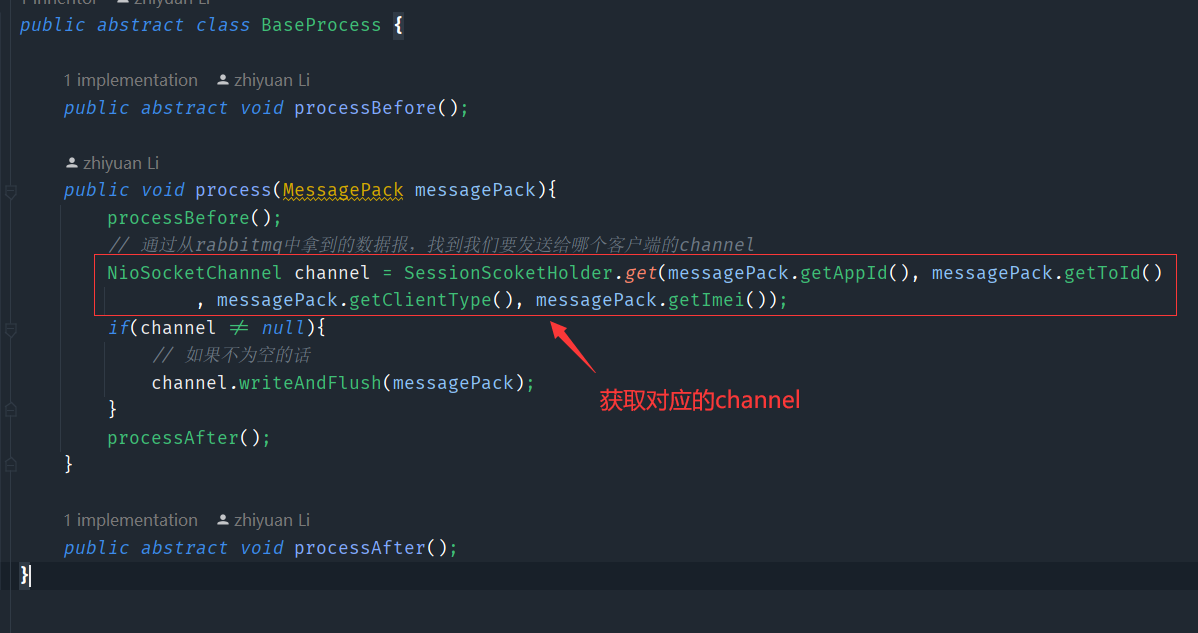
}

public abstract class BaseProcess {public abstract void processBefore();public void process(MessagePack messagePack){processBefore();// 通过从rabbitmq中拿到的数据报,找到我们要发送给哪个客户端的channelNioSocketChannel channel = SessionScoketHolder.get(messagePack.getAppId(), messagePack.getToId(), messagePack.getClientType(), messagePack.getImei());if(channel != null){// 如果不为空的话channel.writeAndFlush(messagePack);}processAfter();}public abstract void processAfter();
}
14、接口调用鉴权加密—加解密算法HMAC-SHA256
因为调用接口的人,可能是app的用户,也有可能是后台管理员,所以要选择一个可逆的加密
加密
public class Base64URL {public static byte[] base64EncodeUrl(byte[] input) {byte[] base64 = new BASE64Encoder().encode(input).getBytes();for (int i = 0; i < base64.length; ++i)switch (base64[i]) {case '+':base64[i] = '*';break;case '/':base64[i] = '-';break;case '=':base64[i] = '_';break;default:break;}return base64;}public static byte[] base64EncodeUrlNotReplace(byte[] input) {byte[] base64 = new BASE64Encoder().encode(input).getBytes(Charset.forName("UTF-8"));for (int i = 0; i < base64.length; ++i)switch (base64[i]) {case '+':base64[i] = '*';break;case '/':base64[i] = '-';break;case '=':base64[i] = '_';break;default:break;}return base64;}public static byte[] base64DecodeUrlNotReplace(byte[] input) throws IOException {for (int i = 0; i < input.length; ++i)switch (input[i]) {case '*':input[i] = '+';break;case '-':input[i] = '/';break;case '_':input[i] = '=';break;default:break;}return new BASE64Decoder().decodeBuffer(new String(input,"UTF-8"));}public static byte[] base64DecodeUrl(byte[] input) throws IOException {byte[] base64 = input.clone();for (int i = 0; i < base64.length; ++i)switch (base64[i]) {case '*':base64[i] = '+';break;case '-':base64[i] = '/';break;case '_':base64[i] = '=';break;default:break;}return new BASE64Decoder().decodeBuffer(base64.toString());}
}
public class SigAPI {final private long appId;final private String key;public SigAPI(long appId, String key) {this.appId = appId;this.key = key;}public static void main(String[] args) throws InterruptedException {SigAPI asd = new SigAPI(10000, "123456");String sign = asd.genUserSig("lld", 1000000);
//        Thread.sleep(2000L);JSONObject jsonObject = decodeUserSig(sign);System.out.println("sign:" + sign);System.out.println("decoder:" + jsonObject.toString());}/*** @description: 解密方法* @param* @return com.alibaba.fastjson.JSONObject* @author lld*/public static JSONObject decodeUserSig(String userSig) {JSONObject sigDoc = new JSONObject(true);try {byte[] decodeUrlByte = Base64URL.base64DecodeUrlNotReplace(userSig.getBytes());byte[] decompressByte = decompress(decodeUrlByte);String decodeText = new String(decompressByte, "UTF-8");if (StringUtils.isNotBlank(decodeText)) {sigDoc = JSONObject.parseObject(decodeText);}} catch (Exception ex) {ex.printStackTrace();}return sigDoc;}/*** 解压缩** @param data 待压缩的数据* @return byte[] 解压缩后的数据*/public static byte[] decompress(byte[] data) {byte[] output = new byte[0];Inflater decompresser = new Inflater();decompresser.reset();decompresser.setInput(data);ByteArrayOutputStream o = new ByteArrayOutputStream(data.length);try {byte[] buf = new byte[1024];while (!decompresser.finished()) {int i = decompresser.inflate(buf);o.write(buf, 0, i);}output = o.toByteArray();} catch (Exception e) {output = data;e.printStackTrace();} finally {try {o.close();} catch (IOException e) {e.printStackTrace();}}decompresser.end();return output;}/*** 【功能说明】用于签发 IM 服务中必须要使用的 UserSig 鉴权票据* <p>* 【参数说明】*/public String genUserSig(String userid, long expire) {return genUserSig(userid, expire, null);}private String hmacsha256(String identifier, long currTime, long expire, String base64Userbuf) {String contentToBeSigned = "TLS.identifier:" + identifier + "\n"+ "TLS.appId:" + appId + "\n"+ "TLS.expireTime:" + currTime + "\n"+ "TLS.expire:" + expire + "\n";if (null != base64Userbuf) {contentToBeSigned += "TLS.userbuf:" + base64Userbuf + "\n";}try {byte[] byteKey = key.getBytes(StandardCharsets.UTF_8);Mac hmac = Mac.getInstance("HmacSHA256");SecretKeySpec keySpec = new SecretKeySpec(byteKey, "HmacSHA256");hmac.init(keySpec);byte[] byteSig = hmac.doFinal(contentToBeSigned.getBytes(StandardCharsets.UTF_8));return (Base64.getEncoder().encodeToString(byteSig)).replaceAll("\\s*", "");} catch (NoSuchAlgorithmException | InvalidKeyException e) {return "";}}private String genUserSig(String userid, long expire, byte[] userbuf) {long currTime = System.currentTimeMillis() / 1000;JSONObject sigDoc = new JSONObject();sigDoc.put("TLS.identifier", userid);sigDoc.put("TLS.appId", appId);sigDoc.put("TLS.expire", expire);sigDoc.put("TLS.expireTime", currTime);String base64UserBuf = null;if (null != userbuf) {base64UserBuf = Base64.getEncoder().encodeToString(userbuf).replaceAll("\\s*", "");sigDoc.put("TLS.userbuf", base64UserBuf);}String sig = hmacsha256(userid, currTime, expire, base64UserBuf);if (sig.length() == 0) {return "";}sigDoc.put("TLS.sig", sig);Deflater compressor = new Deflater();compressor.setInput(sigDoc.toString().getBytes(StandardCharsets.UTF_8));compressor.finish();byte[] compressedBytes = new byte[2048];int compressedBytesLength = compressor.deflate(compressedBytes);compressor.end();return (new String(Base64URL.base64EncodeUrl(Arrays.copyOfRange(compressedBytes,0, compressedBytesLength)))).replaceAll("\\s*", "");}public String genUserSig(String userid, long expire, long time,byte [] userbuf) {JSONObject sigDoc = new JSONObject();sigDoc.put("TLS.identifier", userid);sigDoc.put("TLS.appId", appId);sigDoc.put("TLS.expire", expire);sigDoc.put("TLS.expireTime", time);String base64UserBuf = null;if (null != userbuf) {base64UserBuf = Base64.getEncoder().encodeToString(userbuf).replaceAll("\\s*", "");sigDoc.put("TLS.userbuf", base64UserBuf);}String sig = hmacsha256(userid, time, expire, base64UserBuf);if (sig.length() == 0) {return "";}sigDoc.put("TLS.sig", sig);Deflater compressor = new Deflater();compressor.setInput(sigDoc.toString().getBytes(StandardCharsets.UTF_8));compressor.finish();byte[] compressedBytes = new byte[2048];int compressedBytesLength = compressor.deflate(compressedBytes);compressor.end();return (new String(Base64URL.base64EncodeUrl(Arrays.copyOfRange(compressedBytes,0, compressedBytesLength)))).replaceAll("\\s*", "");}
}
Handler
@Component
public class GateWayInterceptor implements HandlerInterceptor {@Autowiredprivate IdentityCheck identityCheck;@Overridepublic boolean preHandle(HttpServletRequest request, HttpServletResponse response, Object handler) throws Exception {// 方便测试if(1 == 1){return true;}// 获取appid 操作人 usersignString appIdStr = request.getParameter("appId");if(StringUtils.isBlank(appIdStr)){resp(ResponseVO.errorResponse(GateWayErrorCode.APPID_NOT_EXIST), response);return false;}String identifier = request.getParameter("identifier");if(StringUtils.isBlank(identifier)){resp(ResponseVO.errorResponse(GateWayErrorCode.OPERATER_NOT_EXIST), response);return false;}String userSign = request.getParameter("userSign");if(StringUtils.isBlank(userSign)){resp(ResponseVO.errorResponse(GateWayErrorCode.USERSIGN_IS_ERROR), response);return false;}// 校验签名和操作人和appId是否匹配ApplicationExceptionEnum applicationExceptionEnum= identityCheck.checkUserSign(identifier, appIdStr, userSign);if(applicationExceptionEnum != BaseErrorCode.SUCCESS){resp(ResponseVO.errorResponse(applicationExceptionEnum), response);return false;}return true;}private void resp(ResponseVO responseVO, HttpServletResponse response){PrintWriter writer = null;response.setCharacterEncoding("UTF-8");response.setContentType("text/html; charset=utf-8");try {String resp = JSONObject.toJSONString(responseVO);writer = response.getWriter();writer.write(resp);}catch (Exception e){e.printStackTrace();}finally {if(writer != null){writer.close();}}}
}
IdentityCheck
@Component
public class IdentityCheck {private static Logger logger = LoggerFactory.getLogger(IdentityCheck.class);@Autowiredprivate ImUserService imUserService;@Autowiredprivate AppConfig appConfig;@Autowiredprivate StringRedisTemplate stringRedisTemplate;public ApplicationExceptionEnum checkUserSign(String identifier, String appId, String userSign){String cacheUserSig= stringRedisTemplate.opsForValue().get(appId + ":"+ Constants.RedisConstants.userSign + ":" + identifier + userSign);if(!StringUtils.isBlank(cacheUserSig) && Long.valueOf(cacheUserSig) > System.currentTimeMillis() / 1000){return BaseErrorCode.SUCCESS;}// 获取秘钥String privatekey = appConfig.getPrivatekey();// 根据appId + 秘钥 创建 signApiSigAPI sigAPI = new SigAPI(Long.valueOf(appId), privatekey);// 调用 signApi 对 userSign解密JSONObject jsonObject = sigAPI.decodeUserSig(userSign);// 取出解密后的appId, 和操作人  和过期时间 做匹配,不通过则提示错误Long expireTime = 0L;Long expireSec = 0L;Long time = 0L;String decoderAppId = "";String decoderIdentifier = "";try {// 取出解密后的数据decoderAppId = jsonObject.getString("TLS.appId");decoderIdentifier = jsonObject.getString("TLS.identifier");String expireStr = jsonObject.get("TLS.expire").toString();String expireTimeStr = jsonObject.get("TLS.expireTime").toString();time =  Long.valueOf(expireTimeStr);expireSec = Long.valueOf(expireStr);expireTime = time + expireSec;}catch (Exception e){logger.error("checkUserSig-error: {}", e.getMessage());e.printStackTrace();}// 进行比对// 用户签名和操作人不匹配if(!decoderIdentifier.equals(identifier)){return GateWayErrorCode.USERSIGN_OPERATE_NOT_MATE;}// 用户签名不正确if(!decoderAppId.equals(appId)){return GateWayErrorCode.USERSIGN_IS_ERROR;}// 过期时间if(expireSec == 0){return GateWayErrorCode.USERSIGN_IS_EXPIRED;}if(expireTime < System.currentTimeMillis() / 1000){return GateWayErrorCode.USERSIGN_IS_EXPIRED;}// 把userSign存储到redis中去// appid + "xxx" + "userId" + signString genSig = sigAPI.genUserSig(identifier, expireSec,time,null);if (genSig.toLowerCase().equals(userSign.toLowerCase())) {String key = appId + ":" + Constants.RedisConstants.userSign + ":" + identifier + userSign;Long etime = expireTime - System.currentTimeMillis() / 1000;stringRedisTemplate.opsForValue().set(key, expireTime.toString(), etime, TimeUnit.SECONDS);this.setIsAdmin(identifier,Integer.valueOf(appId));return BaseErrorCode.SUCCESS;}return BaseErrorCode.SUCCESS;}private void setIsAdmin(String identifier, Integer appId) {//去DB或Redis中查找, 后面写ResponseVO<ImUserDataEntity> singleUserInfo = imUserService.getSingleUserInfo(identifier, appId);if(singleUserInfo.isOk()){RequestHolder.set(singleUserInfo.getData().getUserType() == ImUserTypeEnum.APP_ADMIN.getCode());}else{RequestHolder.set(false);}}
}
把Handler加到spring中
@Configuration
public class WebConfig implements WebMvcConfigurer {@Autowiredprivate GateWayInterceptor gateWayInterceptor;@Overridepublic void addInterceptors(InterceptorRegistry registry) {registry.addInterceptor(gateWayInterceptor).addPathPatterns("/**").excludePathPatterns("/v1/user/login").excludePathPatterns("/v1/message/checkSend");}@Overridepublic void addCorsMappings(CorsRegistry registry) {registry.addMapping("/**").allowedOrigins("*").allowedMethods("GET", "HEAD", "POST", "PUT", "DELETE", "OPTIONS").allowCredentials(true).maxAge(3600).allowedHeaders("*");}
}
这样我们在访问接口的时候,就要带上appId、identifier、userSign,就可以了
八、消息业务的流程之打通消息收发核心
1、消息收发的核心流程
在我们发消息的时候,一条消息前面就会出现一个转圈圈的东西,也就是此时将这个消息发送到了tcp层,然后tcp层再去投递到逻辑层,最终实现消息处理的还是逻辑层,当逻辑层处理完成之后,再投递到tcp层,最终tcp层将消息返回给sdk,app收到这条消息后,将那个圈圈去掉
还有其他的情况,消息前有感叹号,也就是逻辑层判断了这条消息不能被发送,然后就要通过tcp层去告知sdk他不能被发送,sdk告诉app这条消息不能发送,就搞一个红色的感叹号
2、单聊消息分发逻辑—RabbitMQ连接tcp层和网关层
先搞清楚,业务回调是因为连接客户端的是Tcp层,而service层不会直接连接到客户端,所以要通过一个http的业务回调机制,可以让客户端和service层进行感知,而数据多端同步是通过向tcp层的队列中投递消息,然后再由tcp层去分发到其他的客户端上,做数据同步,而这里只是单方面的service层连接到tcp层,service层没有接收到tcp层的rabbitmq的消息,所以这里要打通这个关系
下面的就是service层接受tcp层投递给service层的消息
@Component
public class ChatOperateReceiver {private static Logger logger = LoggerFactory.getLogger(ChatOperateReceiver.class);@Autowiredprivate P2PMessageService p2PMessageService;@Autowiredprivate MessageSyncService messageSyncService;// 这个注解就是消费者获取rabbitmq中的信息@RabbitListener(bindings = @QueueBinding(value = @Queue(value = Constants.RabbitConstants.Im2MessageService, durable = "true"),exchange = @Exchange(value = Constants.RabbitConstants.Im2MessageService, durable = "true")),concurrency = "1")public void onChatMessage(@Payload Message message, @Headers Map<String, Object> headers,Channel channel) throws IOException {String msg = new String(message.getBody(), "utf-8");logger.info("CHAT MSG FROM QUEUE ::: {}", msg);long deliveryTag = (long) headers.get(AmqpHeaders.DELIVERY_TAG);try {JSONObject jsonObject = JSONObject.parseObject(msg);Integer command = jsonObject.getInteger("command");if(command.equals(MessageCommand.MSG_P2P.getCommand())){// 处理消息MessageContent messageContent= jsonObject.toJavaObject(MessageContent.class);p2PMessageService.process(messageContent);}else if(command.equals(MessageCommand.MSG_RECIVE_ACK.getCommand())){// 消息接受确认MessageReciveAckContent messageContent= jsonObject.toJavaObject(MessageReciveAckContent.class);messageSyncService.receiveMark(messageContent);}else if(command.equals(MessageCommand.MSG_READED.getCommand())){MessageReadedContent messageReadedContent= jsonObject.toJavaObject(MessageReadedContent.class);messageSyncService.readMark(messageReadedContent);}else if(Objects.equals(command, MessageCommand.MSG_RECALL.getCommand())){RecallMessageContent messageContent = JSON.parseObject(msg, new TypeReference<RecallMessageContent>() {}.getType());messageSyncService.recallMessage(messageContent);}channel.basicAck(deliveryTag, false);}catch (Exception e){logger.error("处理消息出现异常:{}", e.getMessage());logger.error("RMQ_CHAT_TRAN_ERROR", e);logger.error("NACK_MSG:{}", msg);//第一个false 表示不批量拒绝,第二个false表示不重回队列channel.basicNack(deliveryTag, false, false);}}
}
通过解析出消息中的comman命令,然后做进一步的处理
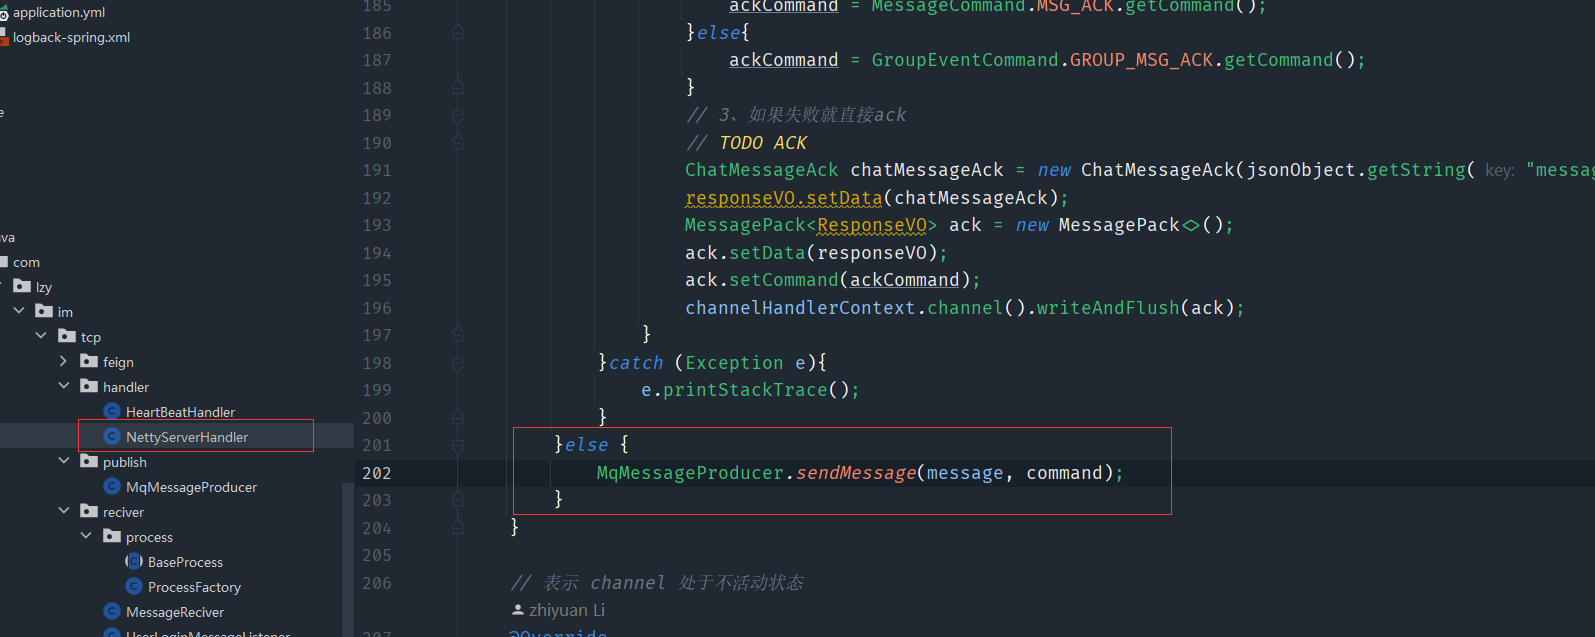
然后在tcp层向service层投递,这样当客户端发送过来消息的时候,就会投递到service层中去
3、单聊消息分发逻辑—发送消息前置校验
前置校验要校验的是双方是否被禁用或者禁言,双方是否是好友关系
@Service
public class CheckSendMessageService {@Autowiredprivate ImUserService imUserService;@Autowiredprivate ImFriendShipService imFriendShipService;@Autowiredprivate AppConfig appConfig;@Autowiredprivate ImGroupService imGroupService;@Autowiredprivate ImGroupMemberService imGroupMemberService;// 判断发送发是否被禁用或者禁言public ResponseVO checkSenderForvidAndMute(String fromId, Integer appId){// 获取单个用户ResponseVO<ImUserDataEntity> singleUserInfo= imUserService.getSingleUserInfo(fromId, appId);if(!singleUserInfo.isOk()){return singleUserInfo;}// 取出用户ImUserDataEntity user = singleUserInfo.getData();// 是否被禁用if(user.getForbiddenFlag() == UserForbiddenFlagEnum.FORBIBBEN.getCode()){return ResponseVO.errorResponse(MessageErrorCode.FROMER_IS_FORBIBBEN);}// 是否被禁言else if(user.getSilentFlag() == UserSilentFlagEnum.MUTE.getCode()){return ResponseVO.errorResponse(MessageErrorCode.FROMER_IS_MUTE);}return ResponseVO.successResponse();}// 判断好友关系public ResponseVO checkFriendShip(String fromId, String toId, Integer appId){if(appConfig.isSendMessageCheckFriend()){// 判断双方好友记录是否存在GetRelationReq fromReq = new GetRelationReq();fromReq.setFromId(fromId);fromReq.setToId(toId);fromReq.setAppId(appId);ResponseVO<ImFriendShipEntity> fromRelation = imFriendShipService.getRelation(fromReq);if(!fromRelation.isOk()){return fromRelation;}GetRelationReq toReq = new GetRelationReq();toReq.setFromId(toId);toReq.setToId(fromId);toReq.setAppId(appId);ResponseVO<ImFriendShipEntity> toRelation = imFriendShipService.getRelation(toReq);if(!toRelation.isOk()){return toRelation;}// 判断好友关系记录是否正常if(FriendShipStatusEnum.FRIEND_STATUS_NORMAL.getCode() != fromRelation.getData().getStatus()){return ResponseVO.errorResponse(FriendShipErrorCode.FRIEND_IS_DELETED);}if(FriendShipStatusEnum.FRIEND_STATUS_NORMAL.getCode() != toRelation.getData().getStatus()){return ResponseVO.errorResponse(FriendShipErrorCode.FRIEND_IS_DELETED);}// 判断是否在黑名单里面if(appConfig.isSendMessageCheckBlack()){if(FriendShipStatusEnum.BLACK_STATUS_NORMAL.getCode()!= fromRelation.getData().getBlack()){return ResponseVO.errorResponse(FriendShipErrorCode.FRIEND_IS_BLACK);}if(FriendShipStatusEnum.BLACK_STATUS_NORMAL.getCode()!= toRelation.getData().getBlack()){return ResponseVO.errorResponse(FriendShipErrorCode.TARGET_IS_BLACK_YOU);}}}return ResponseVO.successResponse();}
}
然后就可以去调用前置校验在真正处理消息的之前了
4、单聊消息分发逻辑—消息分发的主流程
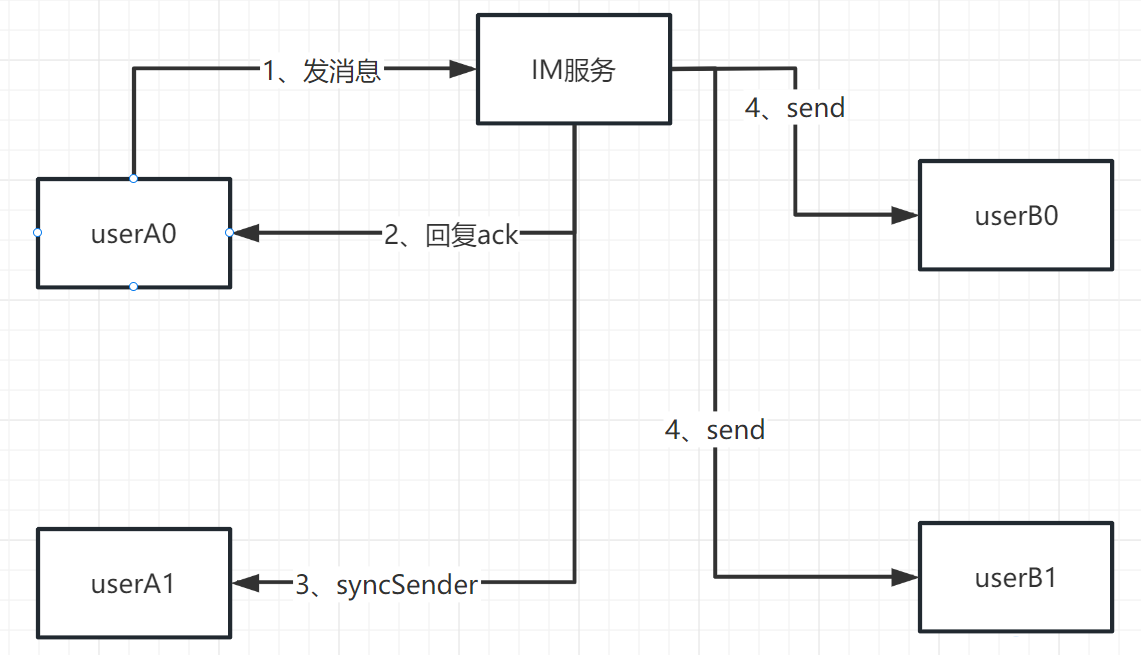
- 前置校验
- 回复ack
- 同步我方在线对端
- 分发给对方所有端

5、详细分析群聊业务
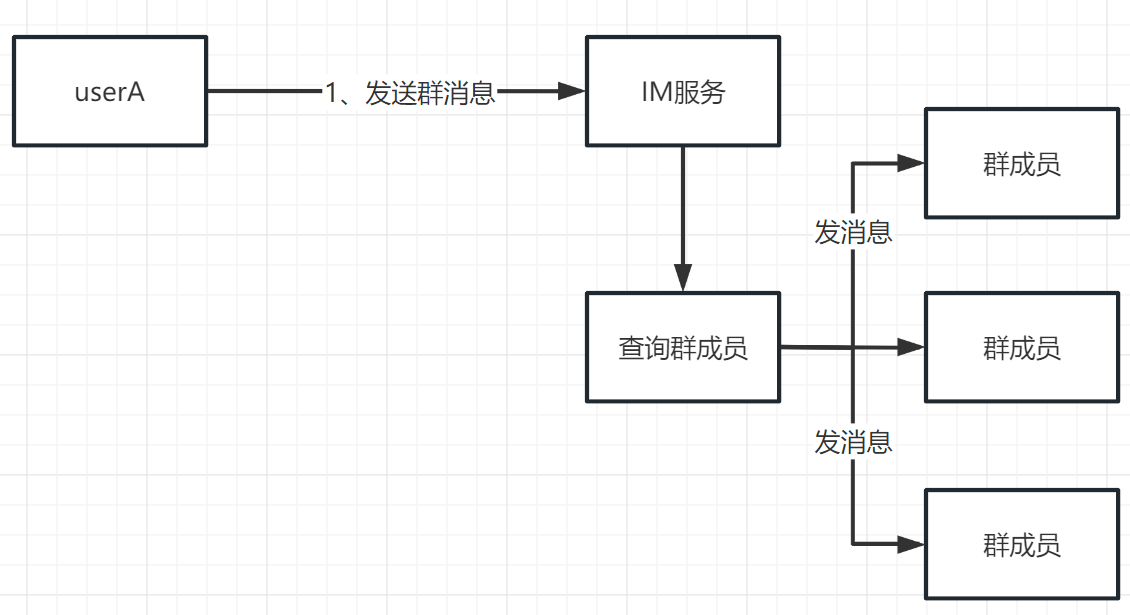
6、发送群聊消息前置校验
和上面单聊的差不多
// 前置校验群组消息
public ResponseVO checkGroupMessage(String fromId, String groupId, Integer appId){// 发送方是否被禁言ResponseVO responseVO = checkSenderForvidAndMute(fromId, appId);if(!responseVO.isOk()){return responseVO;}// 判断群逻辑ResponseVO<ImGroupEntity> group = imGroupService.getGroup(groupId, appId);if(!group.isOk()){return group;}// 判断群成员是否在群内ResponseVO<GetRoleInGroupResp> roleInGroupOne= imGroupMemberService.getRoleInGroupOne(groupId, fromId, appId);if(!roleInGroupOne.isOk()){return roleInGroupOne;}GetRoleInGroupResp data = roleInGroupOne.getData();// 判断群是否被禁言//如果禁言,只有群管理和群主可以发言ImGroupEntity groupdata = group.getData();// 如果群组已经禁言并且 发言人不是群管理或者群主if(groupdata.getMute() == GroupMuteTypeEnum.MUTE.getCode()&& (data.getRole() != GroupMemberRoleEnum.MAMAGER.getCode() ||data.getRole() != GroupMemberRoleEnum.OWNER.getCode())){return ResponseVO.errorResponse(GroupErrorCode.THIS_GROUP_IS_MUTE);}// 如果是个人禁言,并且还在禁言时长中if(data.getSpeakDate() != null && data.getSpeakDate() > System.currentTimeMillis()){return ResponseVO.errorResponse(GroupErrorCode.GROUP_MEMBER_IS_SPEAK);}return ResponseVO.successResponse();
}
7、群聊消息的分发逻辑
- 前置校验
- 回复ack
- 同步我方在线对端
- 分发给对方所有端
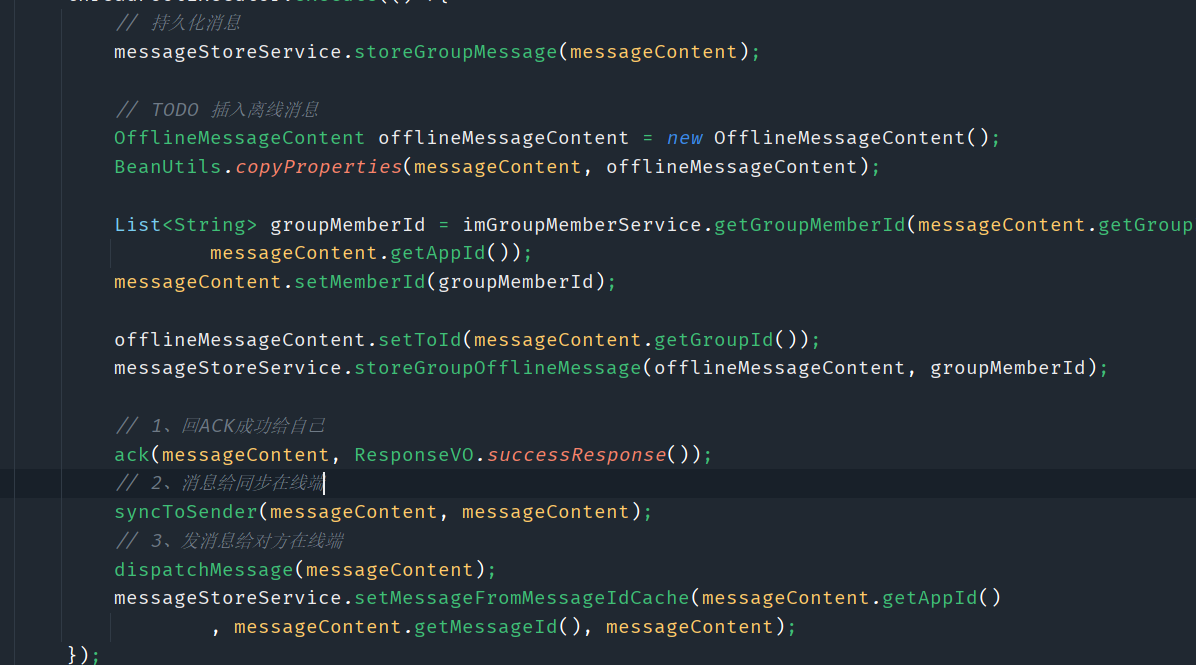
8、聊天记录存储结构单聊群聊读扩散、写扩散选型
读扩散
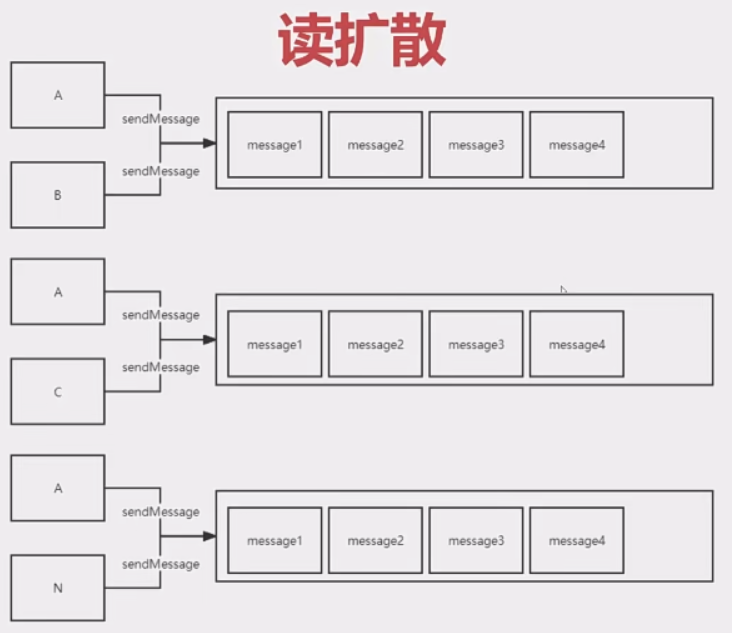
举一个微博大V的例子,如果大V发一条消息,那么关注了大V的用户,就会从大V的队列中倒序拉取就可以获取到大V的消息了
写扩散
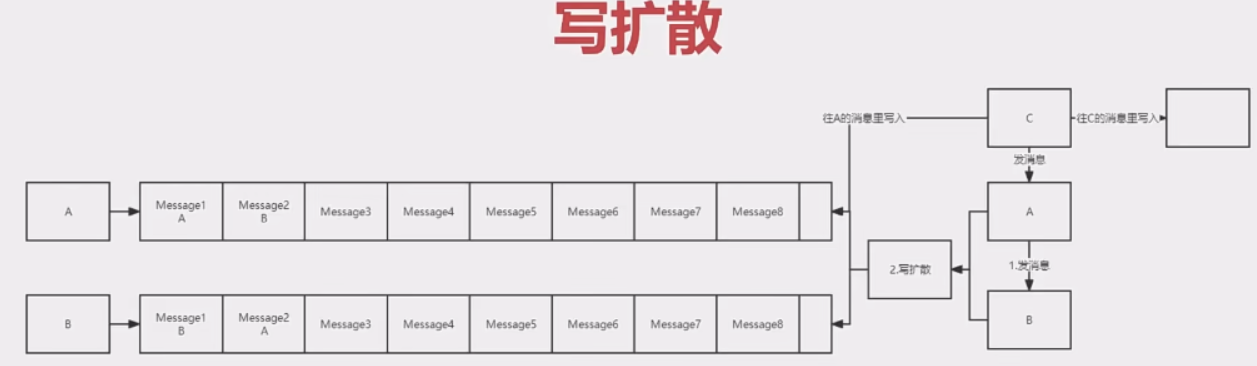
也举一个微博大V的例子,如果大V发一条消息,每个用户都有自己的一个队列,大V会将消息写到所有订阅他的用户的队列中
从这上面看的话,要是查询聊天记录的话,如果面对好多好多的用户来说的,写扩散要写好多的东西,读扩散反而只需要去读取即可,看起来读扩散比写扩散好一些
基础数据
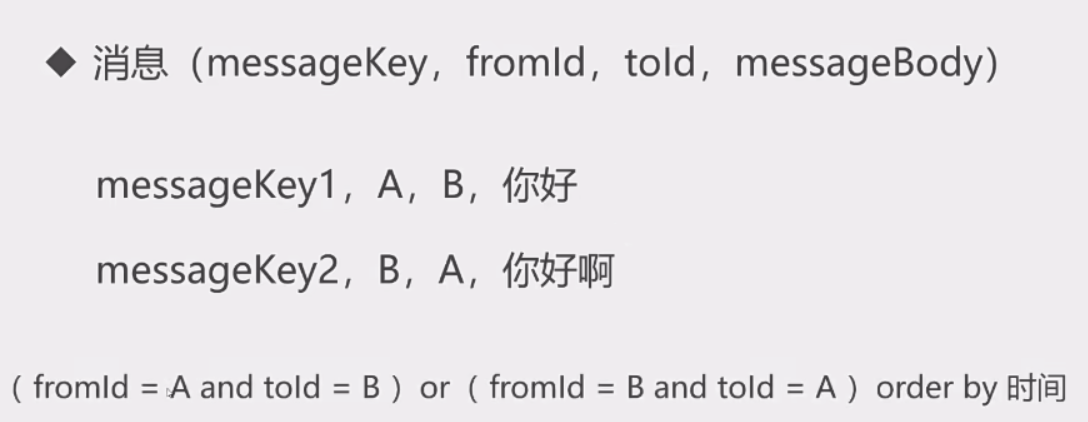
这样使用读扩散似乎是减轻了写操作的压力,但是增加了读操作的压力,这样子的查询语句根本不好去建立索引
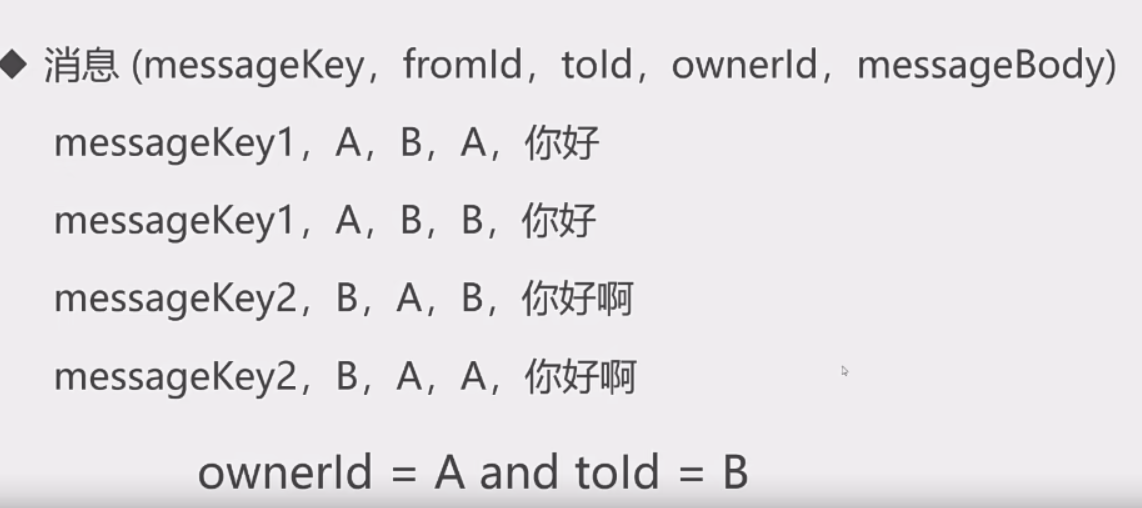
使用写扩散的话,写起来会些麻烦,但是查询聊天记录很快速
如果说聊天记录很多,我们上上升到分库分表的场景,读扩散没有给合适的分片键,没有像写扩散那样的ownerId那样的标识。
存储结构
拆分开来
选型:
- 单聊服务建议使用写扩散,也就是写操作X2,不会一下子给服务器太多的压力,而且比较好查询
- 群聊服务建议使用读扩散,群聊有群id作为分片键,在群id上建立索引,就可以查询出这个群的所有的消息
9、 IM消息ID专题—分布式自增id解决方案介绍
- UUID:id长、无序、字符串
- 时间戳:存在重复性问题,而且不能保证唯一性
- 雪花算法:用一个64位的长整型作为全局唯一id,基于时间戳实现,性能高,但是基于时间戳会依赖于机器时钟,如果时间回拨会导致号段重复
- 自定义算法:像私有协议一样
10、如何将单聊、群聊消息持久化到DB
将私聊消息转换成对应的实体,然后分别存储到body和history中去
// 3、转化成 MessageHistory
public List<ImMessageHistoryEntity> extractToP2PMessageHistory(MessageContent messageContent, ImMessageBodyEntity imMessageBodyEntity){List<ImMessageHistoryEntity> list = new ArrayList<>();ImMessageHistoryEntity fromHistory = new ImMessageHistoryEntity();BeanUtils.copyProperties(messageContent, fromHistory);fromHistory.setOwnerId(messageContent.getFromId());// 雪花算法生成fromHistory.setMessageKey(imMessageBodyEntity.getMessageKey());fromHistory.setCreateTime(System.currentTimeMillis());ImMessageHistoryEntity toHistory = new ImMessageHistoryEntity();BeanUtils.copyProperties(messageContent, toHistory);toHistory.setOwnerId(messageContent.getToId());toHistory.setMessageKey(imMessageBodyEntity.getMessageKey());toHistory.setCreateTime(System.currentTimeMillis());list.add(fromHistory);list.add(toHistory);return list;
}
public ImMessageBody extractMessageBody(MessageContent messageContent){ImMessageBody imMessageBodyEntity = new ImMessageBody();imMessageBodyEntity.setAppId(messageContent.getAppId());imMessageBodyEntity.setMessageKey(snowflakeIdWorker.nextId());imMessageBodyEntity.setCreateTime(System.currentTimeMillis());imMessageBodyEntity.setSecurityKey("");imMessageBodyEntity.setExtra(messageContent.getExtra());imMessageBodyEntity.setDelFlag(DelFlagEnum.NORMAL.getCode());imMessageBodyEntity.setMessageTime(messageContent.getMessageTime());imMessageBodyEntity.setMessageBody(messageContent.getMessageBody());return imMessageBodyEntity;
}
 // 转化成 MessageHistory
public ImGroupMessageHistoryEntity extractToGroupMessageHistory(GroupChatMessageContent groupChatMessageContent,ImMessageBodyEntity imMessageBodyEntity){ImGroupMessageHistoryEntity result= new ImGroupMessageHistoryEntity();BeanUtils.copyProperties(groupChatMessageContent, result);result.setGroupId(groupChatMessageContent.getGroupId());// 雪花算法生成result.setMessageKey(imMessageBodyEntity.getMessageKey());result.setCreateTime(System.currentTimeMillis());return result;
}
11、实现发送单聊和群聊的接口
// 发送群聊消息
public SendMessageResp send(SendGroupMessageReq req) {SendMessageResp sendMessageResp = new SendMessageResp();GroupChatMessageContent message = new GroupChatMessageContent();BeanUtils.copyProperties(req, message);// 插入messageStoreService.storeGroupMessage(message);sendMessageResp.setMessageKey(message.getMessageKey());sendMessageResp.setMessageTime(System.currentTimeMillis());// 我方同步在线端syncToSender(message, message);// 对方同步dispatchMessage(message);return sendMessageResp;
}
// 发送单聊消息
public SendMessageResp send(SendMessageReq req) {SendMessageResp sendMessageResp = new SendMessageResp();MessageContent message = new MessageContent();BeanUtils.copyProperties(req, message);// 插入数据messageStoreService.storeP2PMessage(message);sendMessageResp.setMessageKey(message.getMessageKey());sendMessageResp.setMessageTime(System.currentTimeMillis());// 同步我方在线端syncToSender(message, message);// 同步对方在线端dispatchMessage(message);return sendMessageResp;
}
九、消息业务的核心之消息可达性、一致性、幂等性、实时性
- 实时性:发送的消息很快的发送到对方(苹果手机的微信)
- 有序性:发送的消息按照发送的消息顺序到达对方
- 可靠性:发送的消息一定要到达对方
- 幂等性:发送的一条消息要保证到对方只收到这一条消息的一份,而不是多份
1、消息实时性—利用多线程解决消息串行的问题,提高处理效率
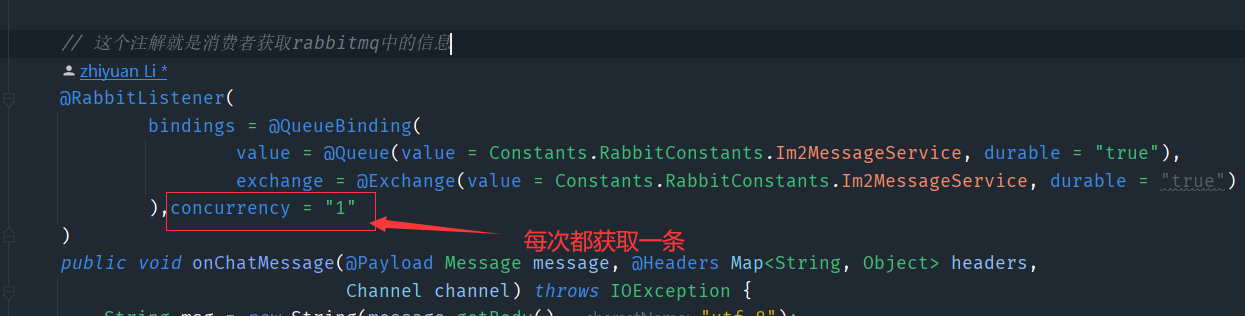
也就是整个流程目前是串行的,执行完这一个,才去执行下一个,可以引入线程池去解决串行的问题,可以参考我的另一篇文章 JUC快速入门
 private final ThreadPoolExecutor threadPoolExecutor;{final AtomicInteger atomicInteger = new AtomicInteger(0);threadPoolExecutor= new ThreadPoolExecutor(8, 8,60, TimeUnit.SECONDS, new LinkedBlockingQueue<>(1000),new ThreadFactory() {@Overridepublic Thread newThread(Runnable r) {Thread thread = new Thread(r);thread.setDaemon(true);thread.setName("message-process-thread-" + atomicInteger.getAndIncrement());return thread;}});
}
用静态代码块初始化线程池
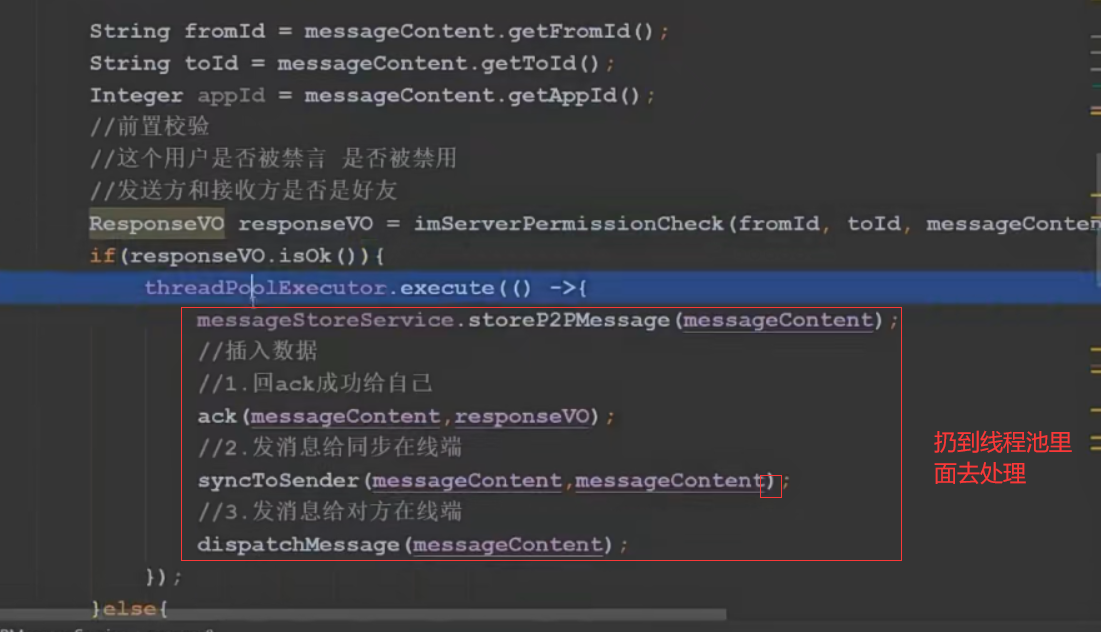
2、消息实时性—校验逻辑前置由tcp通过feign接口提前校验
前置校验,会校验禁言和好友关系,群组关系等,要进行数据库查询,而且如果这个校验没有通过的话,还会浪费rabbitmq的资源,这时候如果能把前置校验提到tcp层,那么我们逻辑层收到的消息类的mq都是合法的直接进行操作,避免浪费mq的资源,这里可以使用feign这个基于HTTP 的REST API 进行通信,或者也可以使用rpc,在tcp层调用service的方法进行前置校验即可。
<!-- feign调用依赖 -->
<dependency><groupId>com.netflix.feign</groupId><artifactId>feign-core</artifactId>
</dependency>
<dependency><groupId>com.netflix.feign</groupId><artifactId>feign-jackson</artifactId>
</dependency>
tcp层调用feign的配置
public interface FeignMessageService {@Headers({"Content-Type: application/json", "Accept: application/json"})@RequestLine("POST /message/checkSend")public ResponseVO checkSendMessage(CheckSendMessageReq checkSendMessageReq);
}
这个是逻辑层的接口
@RequestMapping("/checkSend")
public ResponseVO checkSend(@RequestBody CheckSendMessageReq req){return p2PMessageService.imeServerPermissionCheck(req.getFromId(), req.getToId(), req.getAppId());
}
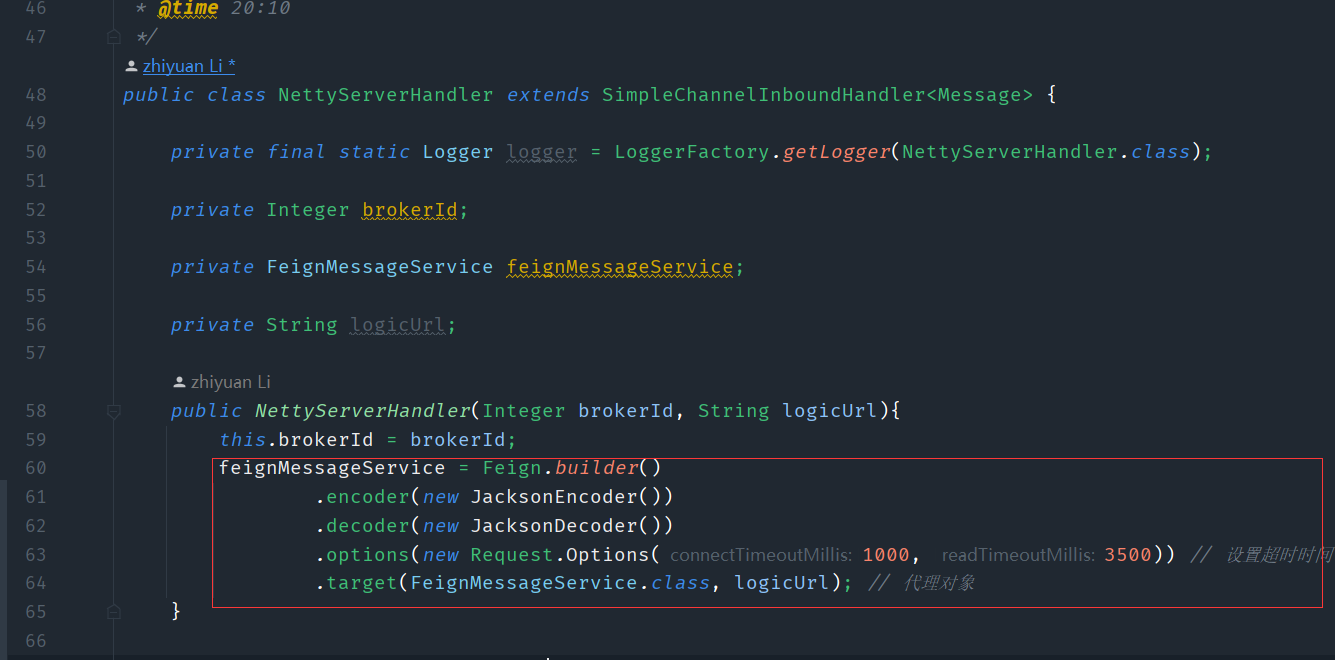
初始化feign
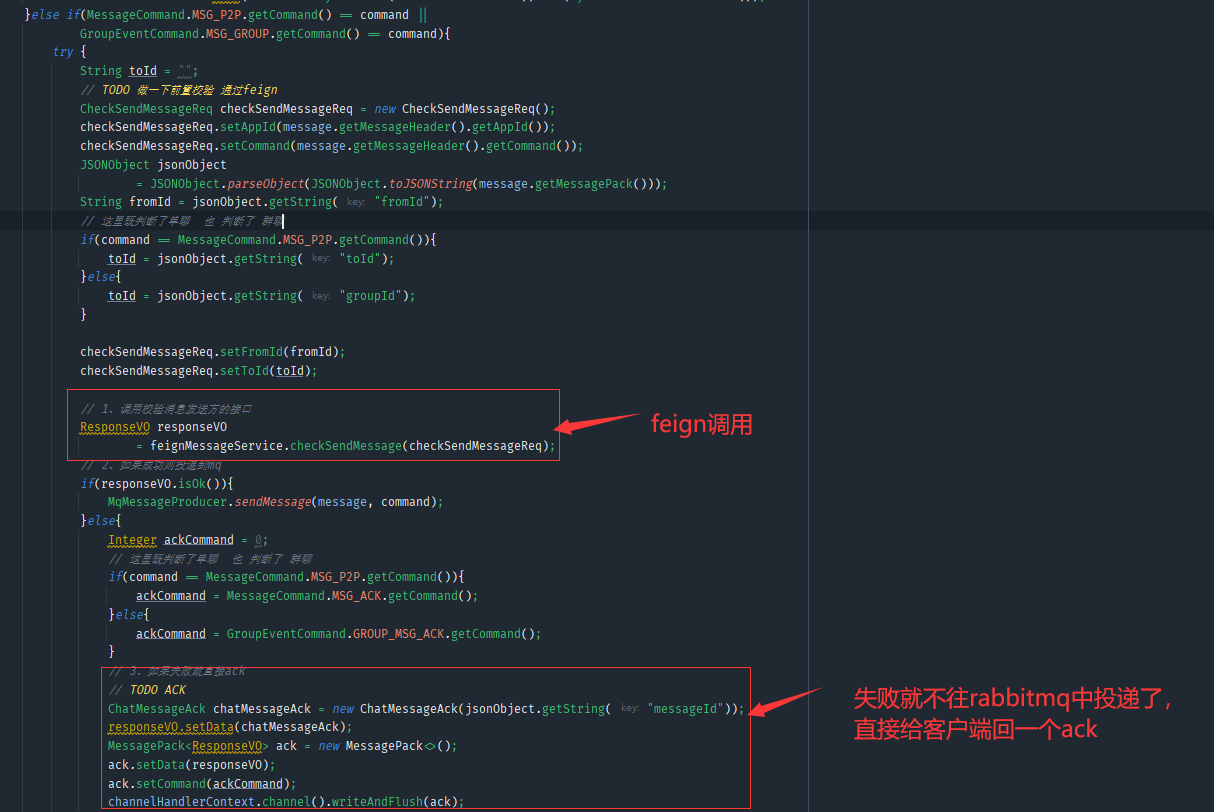
然后就可以把service层单聊和群聊的process中的前置校验给去掉了,已经在tcp层做好了
3、消息实时性—利用mq异步持久化消息
突然想到了实时性也就是尽量让im服务处理的效率更快,所以如果将单独的存储服务通过mq异步解耦出去的话,也会优化很大一部分的
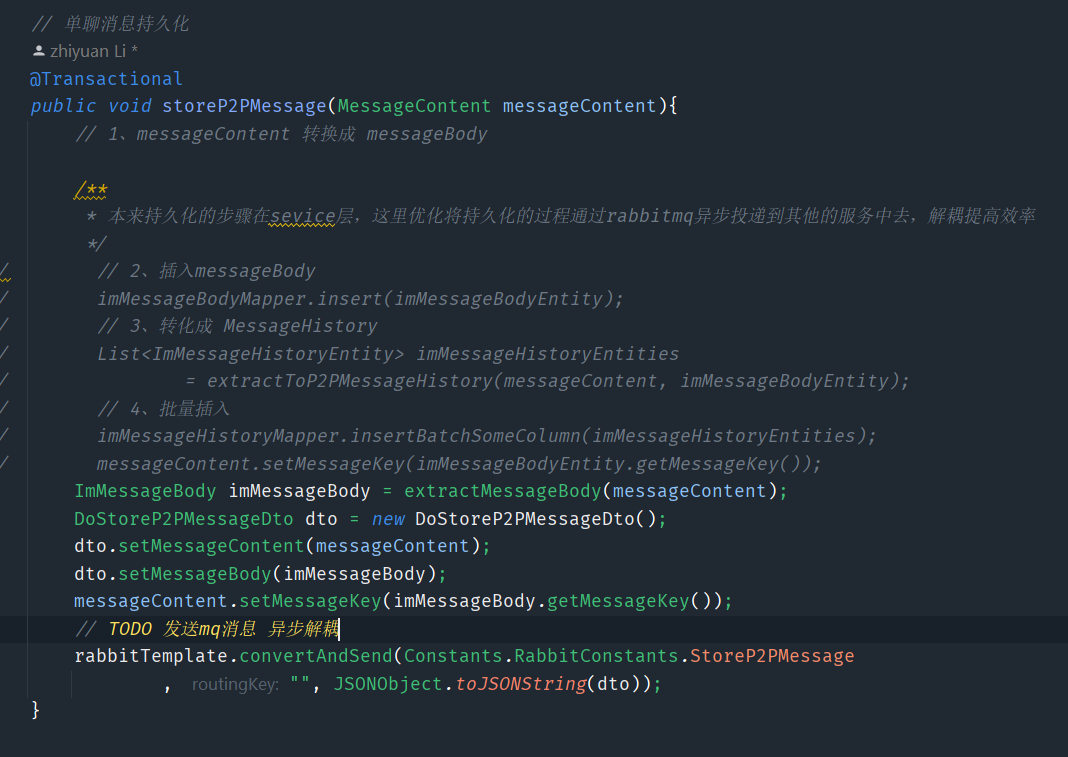
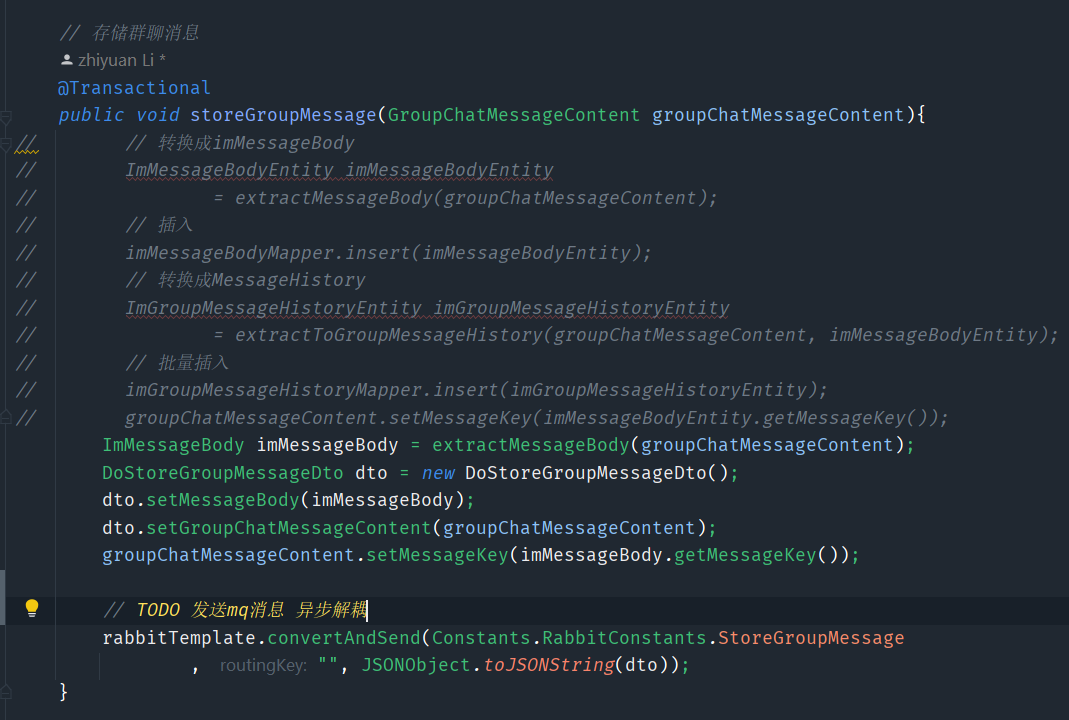

4、用了TCP就不会丢包、丢消息了吗?
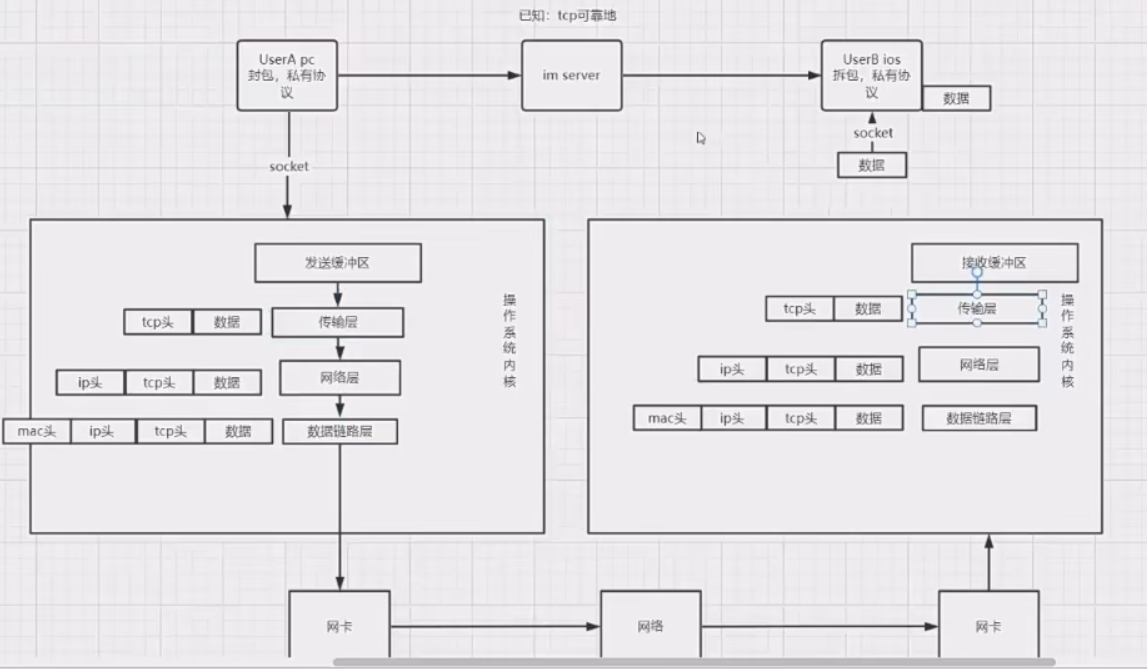
- tcp是保证传输层到传输层之间是可靠的,到达对方的接收缓冲区是可靠的,但是到接收缓冲区到上层的时候,就不保证是不是可靠的,如果上层是一个手机,数据从接收缓冲区出去,但是手机关机了,这个数据就算丢了
- 还有如果我们发送完一条消息以后,消息需要持久化到本地,这时手机没电了,这个持久化的数据就可能不会被存储起来了
- 所以说我们还要自己完善一下消息的可靠性
5、单人消息可靠性—双重ACK保证上下行消息可靠
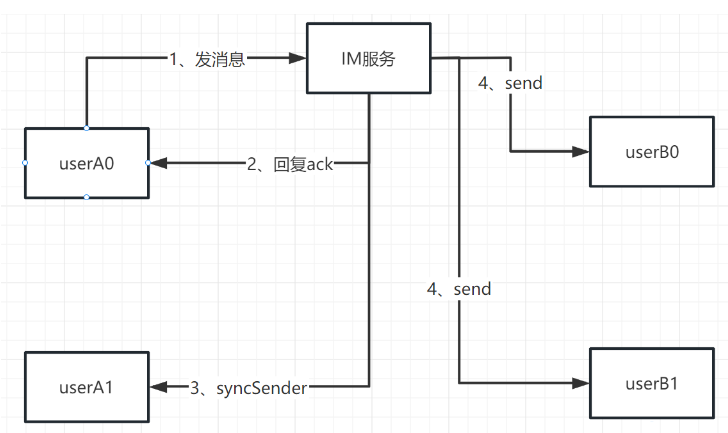
这时之前的单发的逻辑
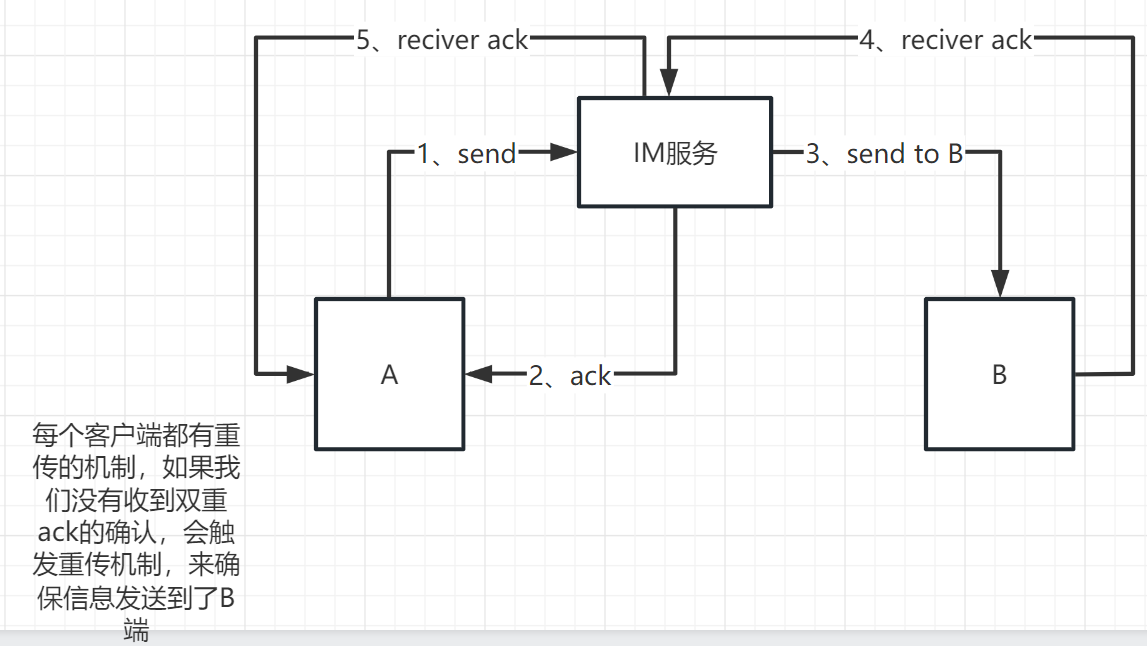
双重ack的逻辑
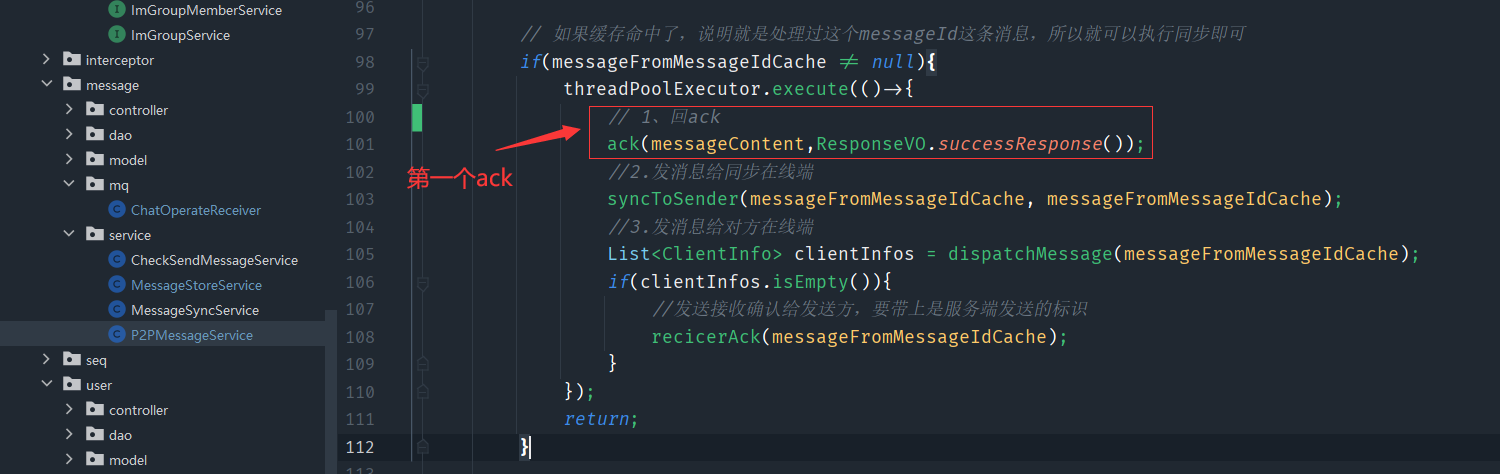
然后im服务把消息同步到我端和对方端,对方客户端收到了之后,就会发起一个MSG_RECIVE_ACK的请求,这就是第二个ack,当imserver收到这个请求的时候
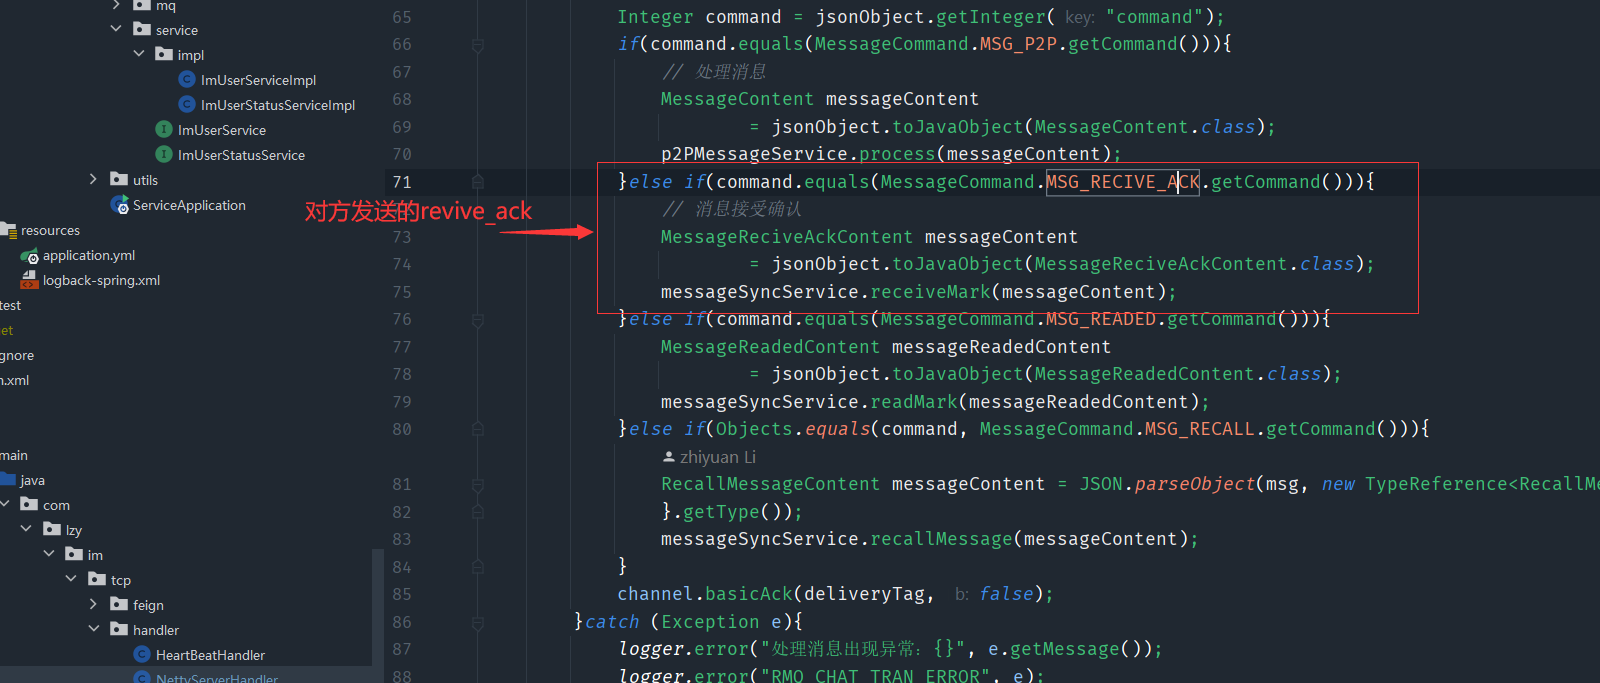
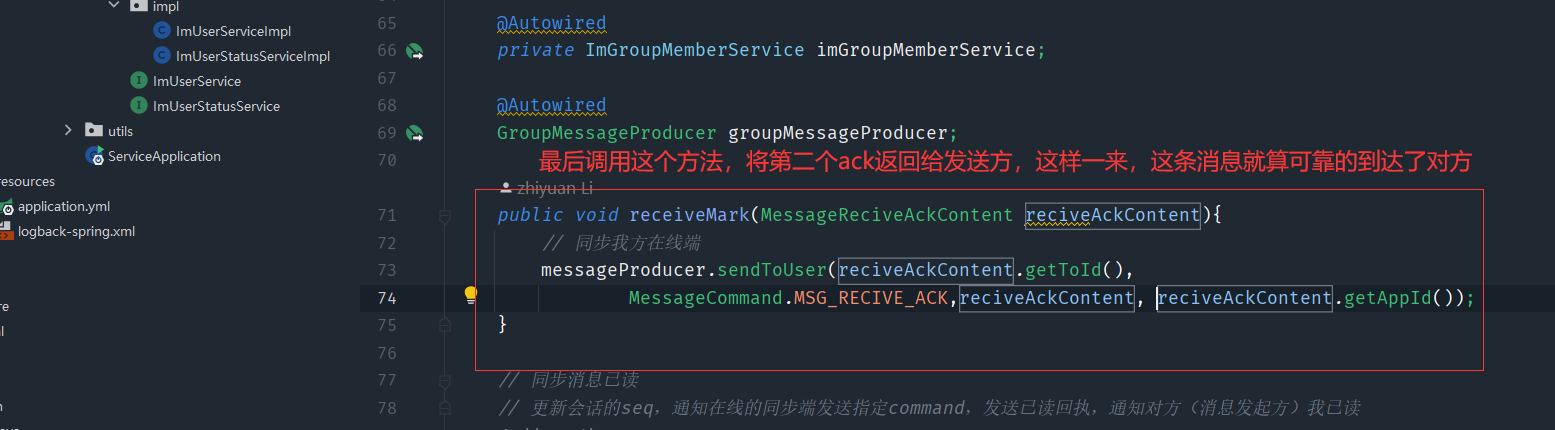
这样大致就是实现过程,但是这只是对方在线的状态,如果对方没有在线的话
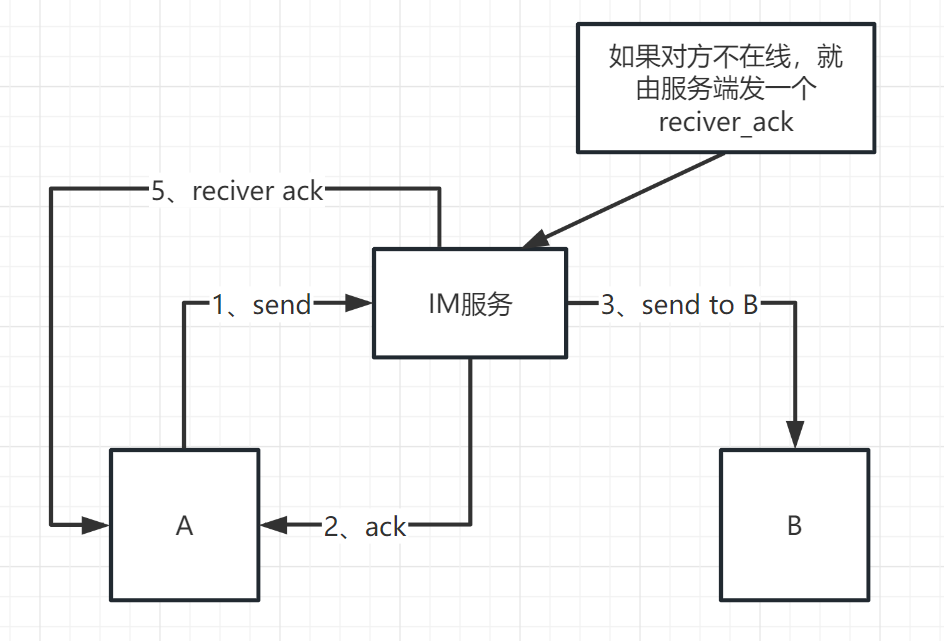
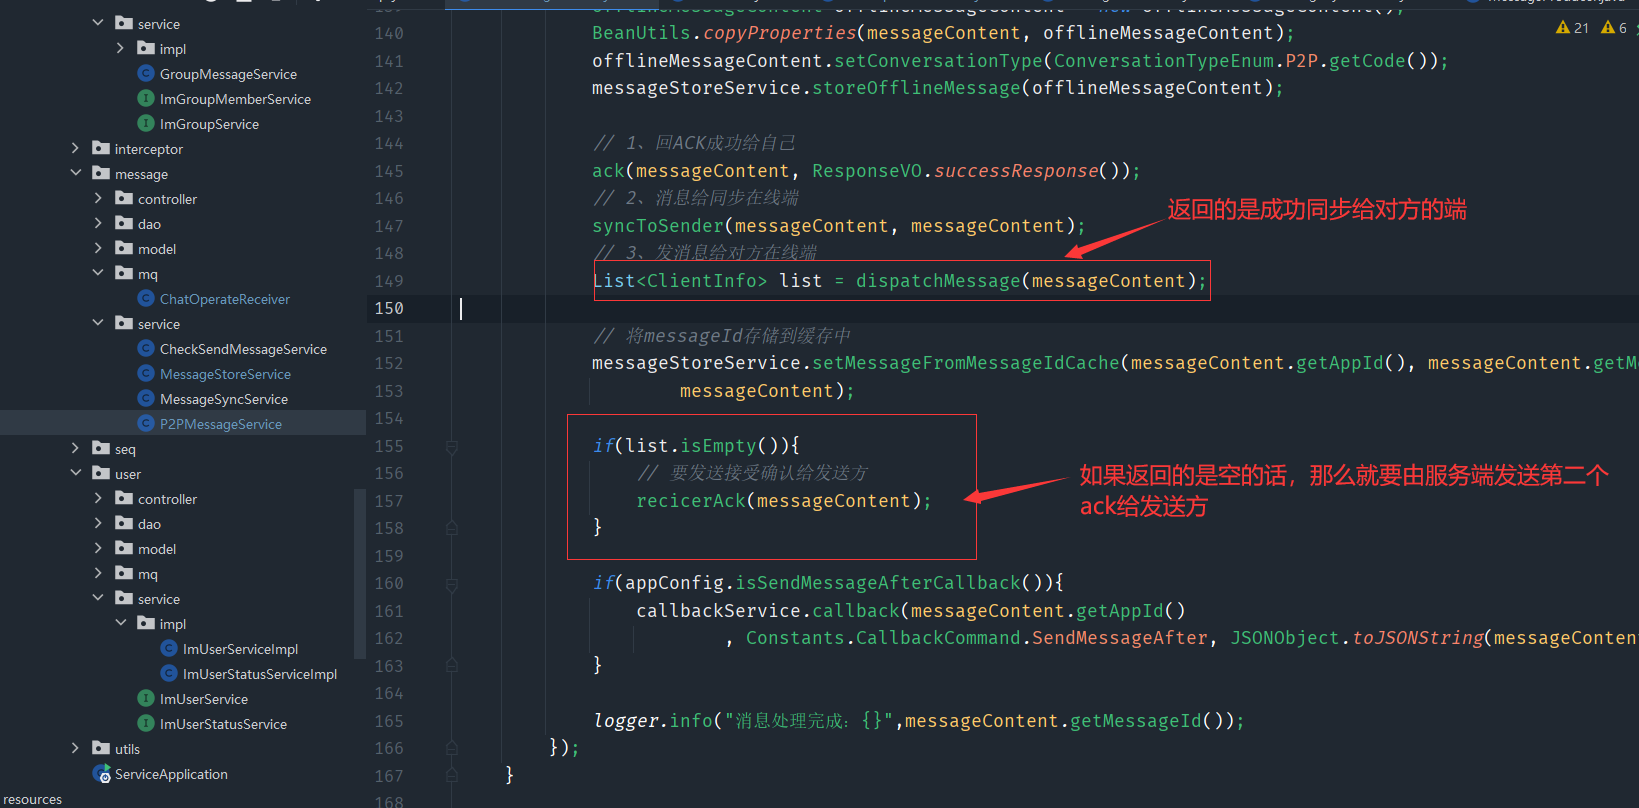
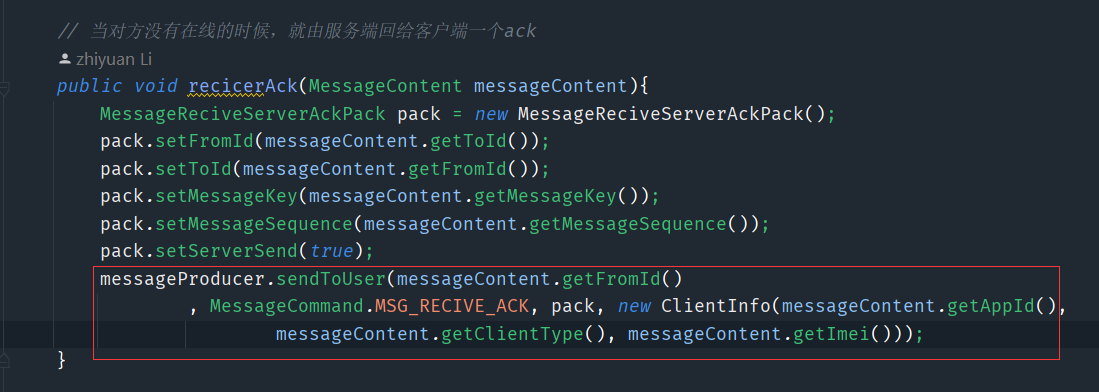
6、单人消息有序性—消息并行可能导致消息乱序
串行执行不会导致消息乱序,但是对于高并发的场景,串行的效率是在是太低了,所以不得不使用并行的方式,所以要寻找一种方案来解决乱序
方案:
- 发送时间作为排序的标准,但是客户端的时间是可以自己去修改的,这也就导致了不确定性
- 雪花算法:用生成的key去做排序,生成的key是趋势递增的,不是绝对递增的,在一定的场景下,他还是可能导致消息的乱序
- 服务端可以用一些手段生成绝对递增的序列号,比如使用redis,但是比较依赖redis的可用性
这里采用的是第三种方案
封装一个Redis的工具类
@Service
public class RedisSeq {@AutowiredStringRedisTemplate stringRedisTemplate;public long doGetSeq(String key){return stringRedisTemplate.opsForValue().increment(key);}
}
每次调用这个都会有固定的原子性加一
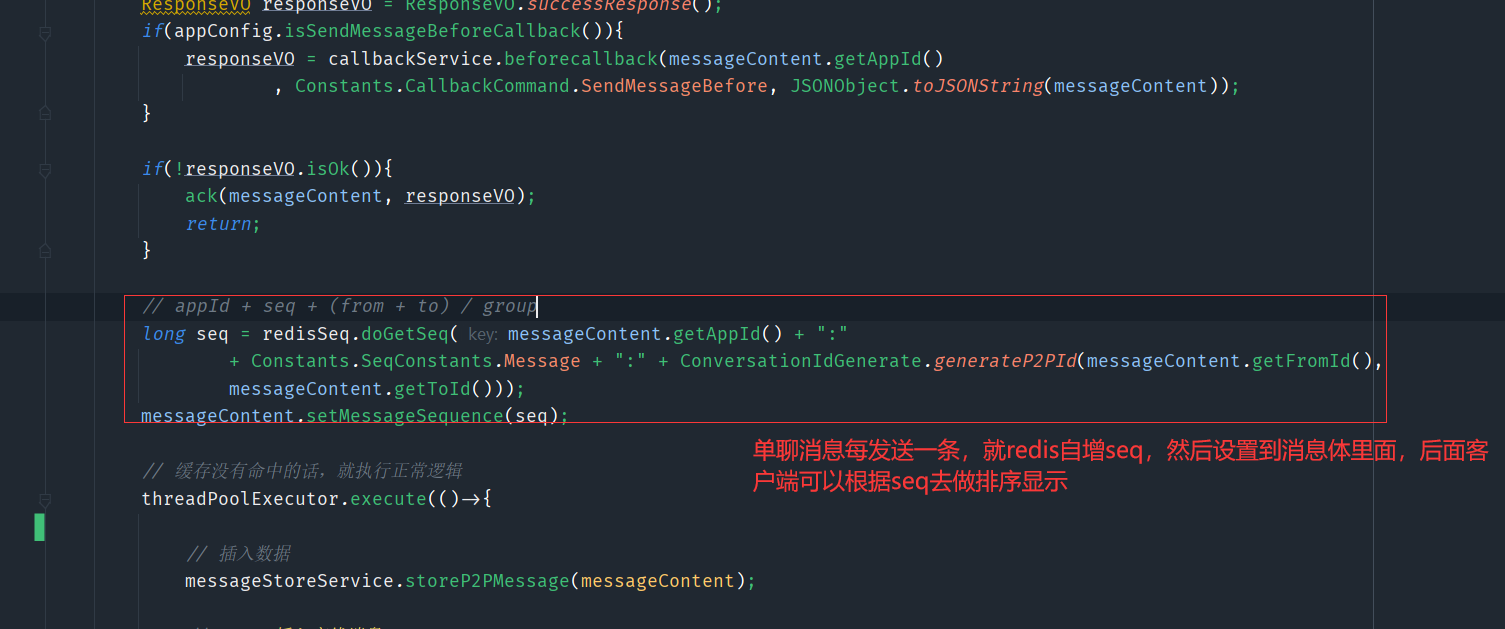
也就是说只要消息经过了im服务端,就都会获得一个绝对自增的seq做为排序的条件,无论是发送还是存储(没有写全,这里就说个大致的意思)
7、单人消息幂等性—保证消息不重复
因为有重传的机制,所以有可能有网络延迟导致没有收到双重ack,会导致消息重传,最后导致接收方可能收到多条相同的消息,并且相同的消息我们可能会在imserver处理两次(比如说持久化,这样就很不好了),我们要处理这个问题
方案
-
im服务端搞点文章,比如第一次处理该消息的时候,可以将它缓存到redis中(设置过期时间),当第二次处理的时候,可以从redis寻找这个消息,如果找到了就说明处理过了,所以就不二次持久化了,只用去同步消息即可
-
我们也可以在客户端做一些改造,比如说重传的消息都会是同一个messageId(可以当做上面那个查询redis的依据),客户端收到多条messageId的消息,可以过滤掉重复的,只显示一条消息即可
-
如果说一条消息,重传了一定的时间段后,还没有收到ack的话,就可以将它放弃了(就像微信没有网络,最后出现一个红色的感叹号),当我们再手动点击红色的感叹号,sdk就会生成一个新的id和旧的消息体,再次去发送

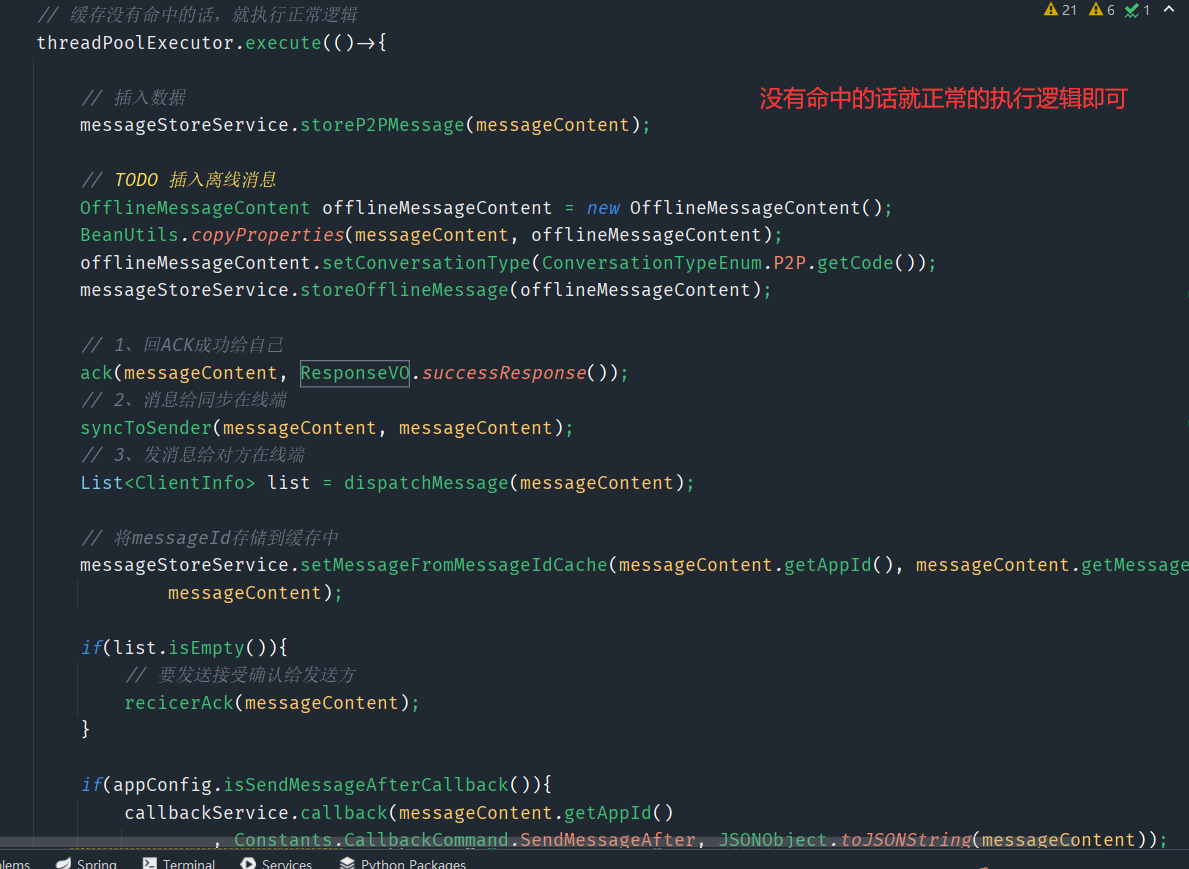
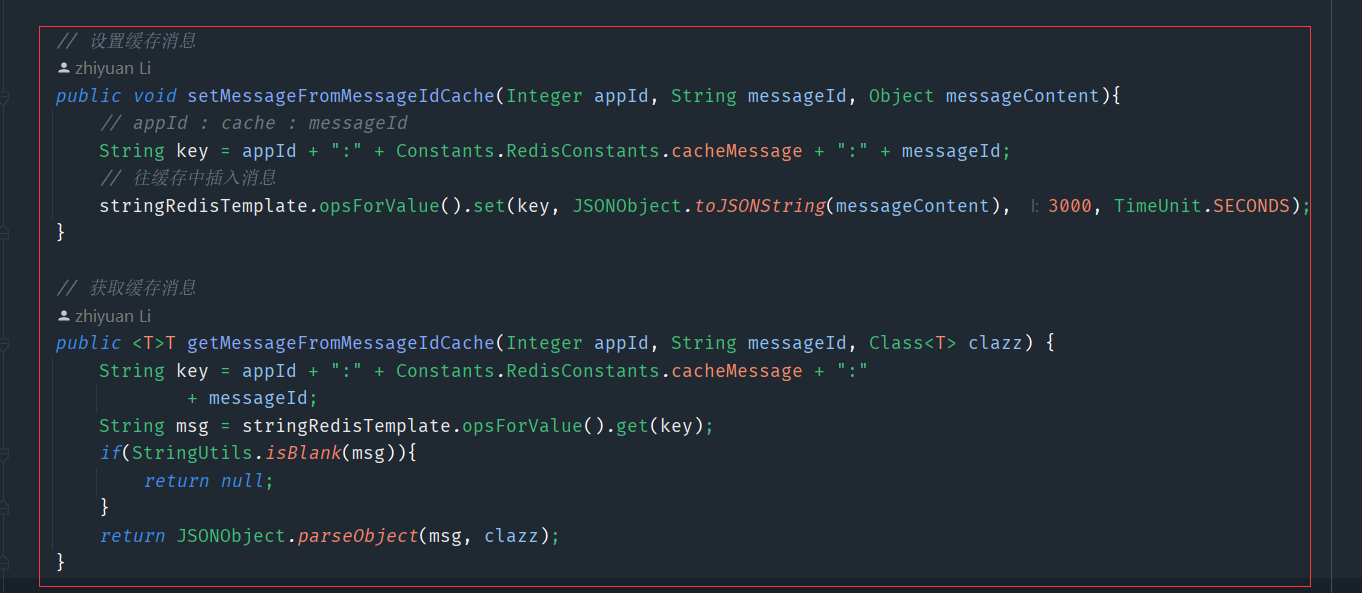
单聊优化总结
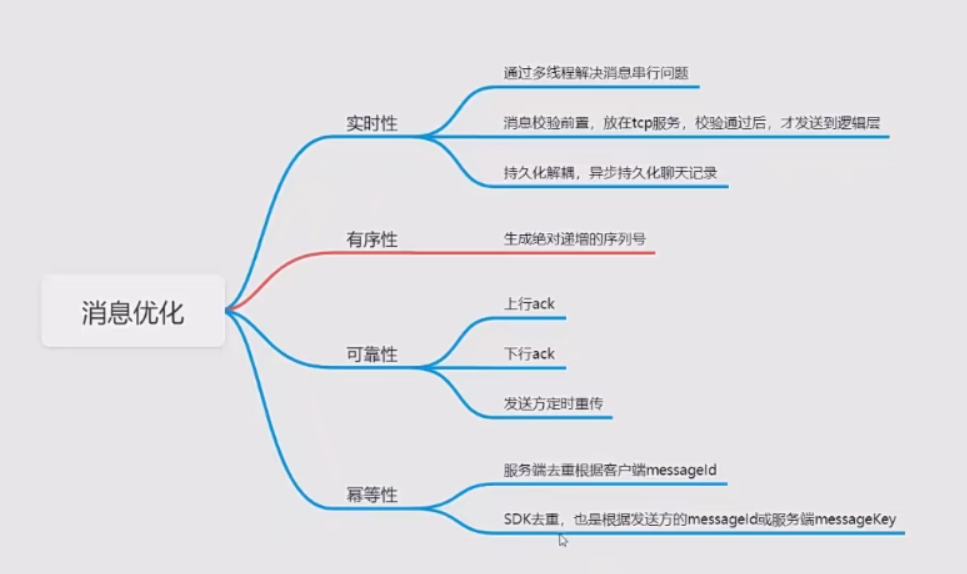
8、群聊消息实时性—消息并行、持久化解耦、前置校验
像单聊一样,把这些东西再重复的做一遍
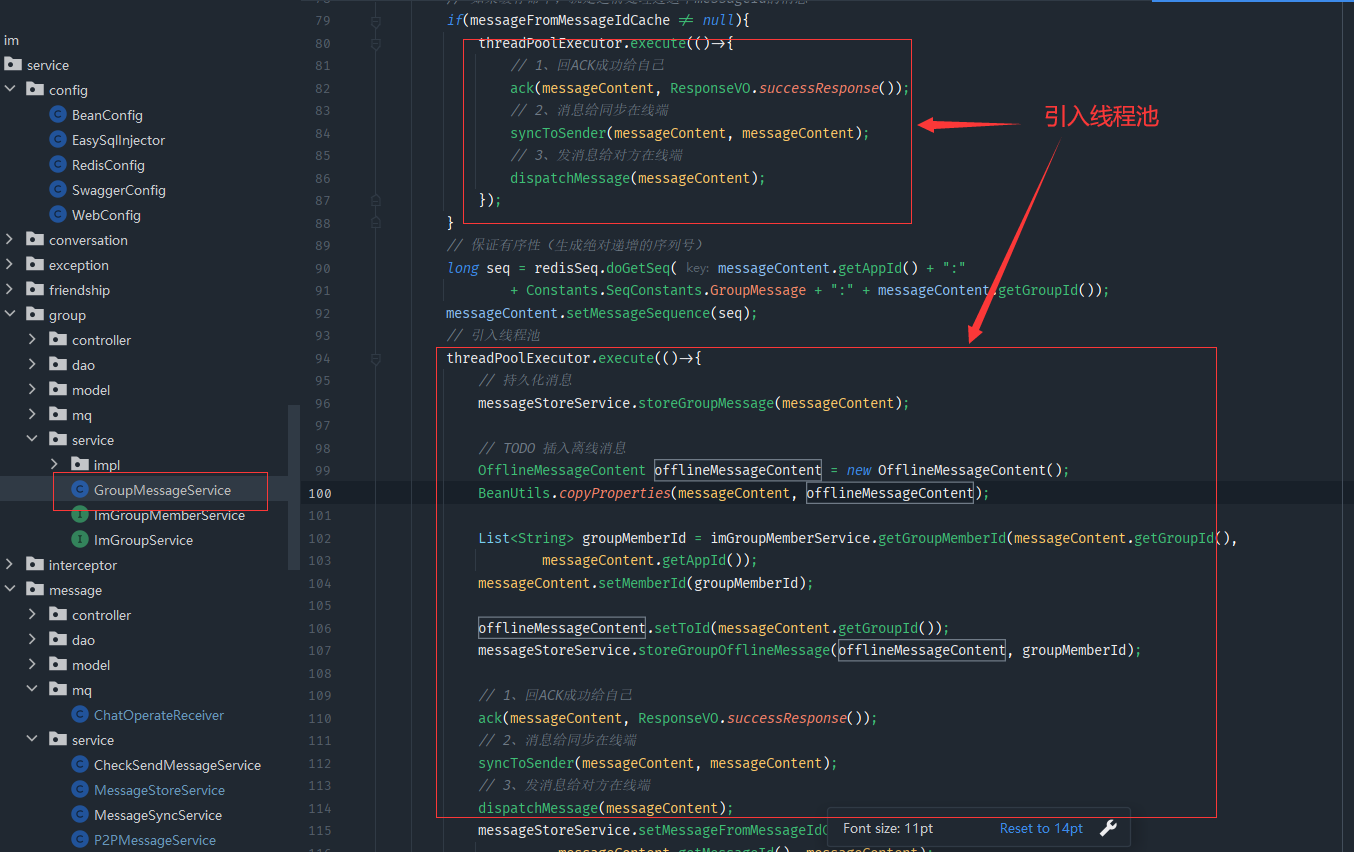

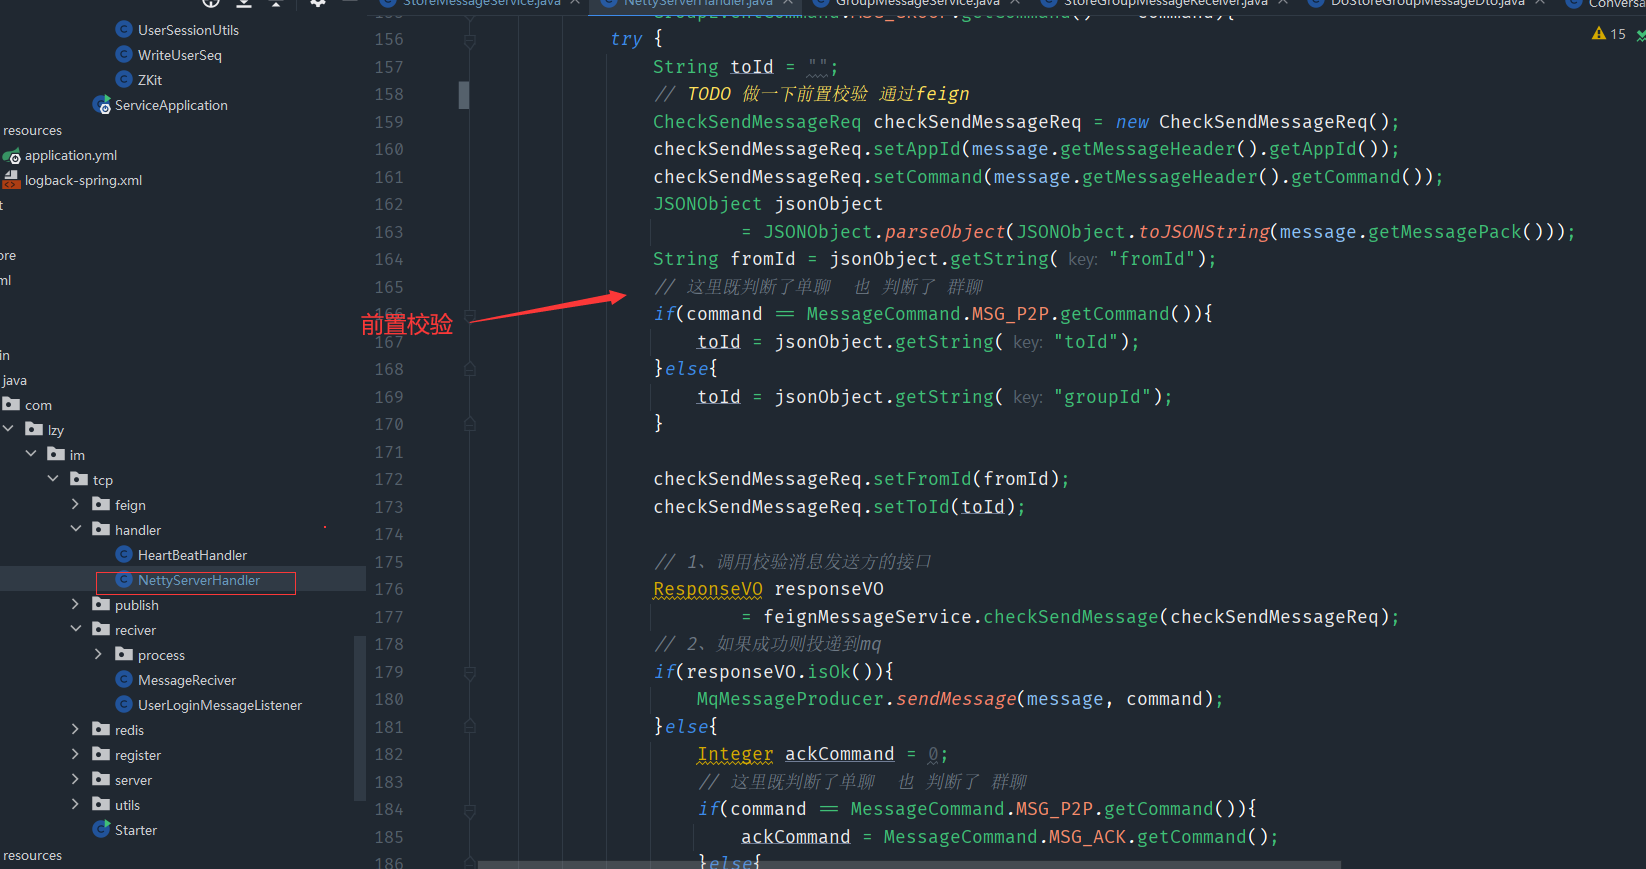
9、群聊消息有序性—消息并行可能导致消息乱序
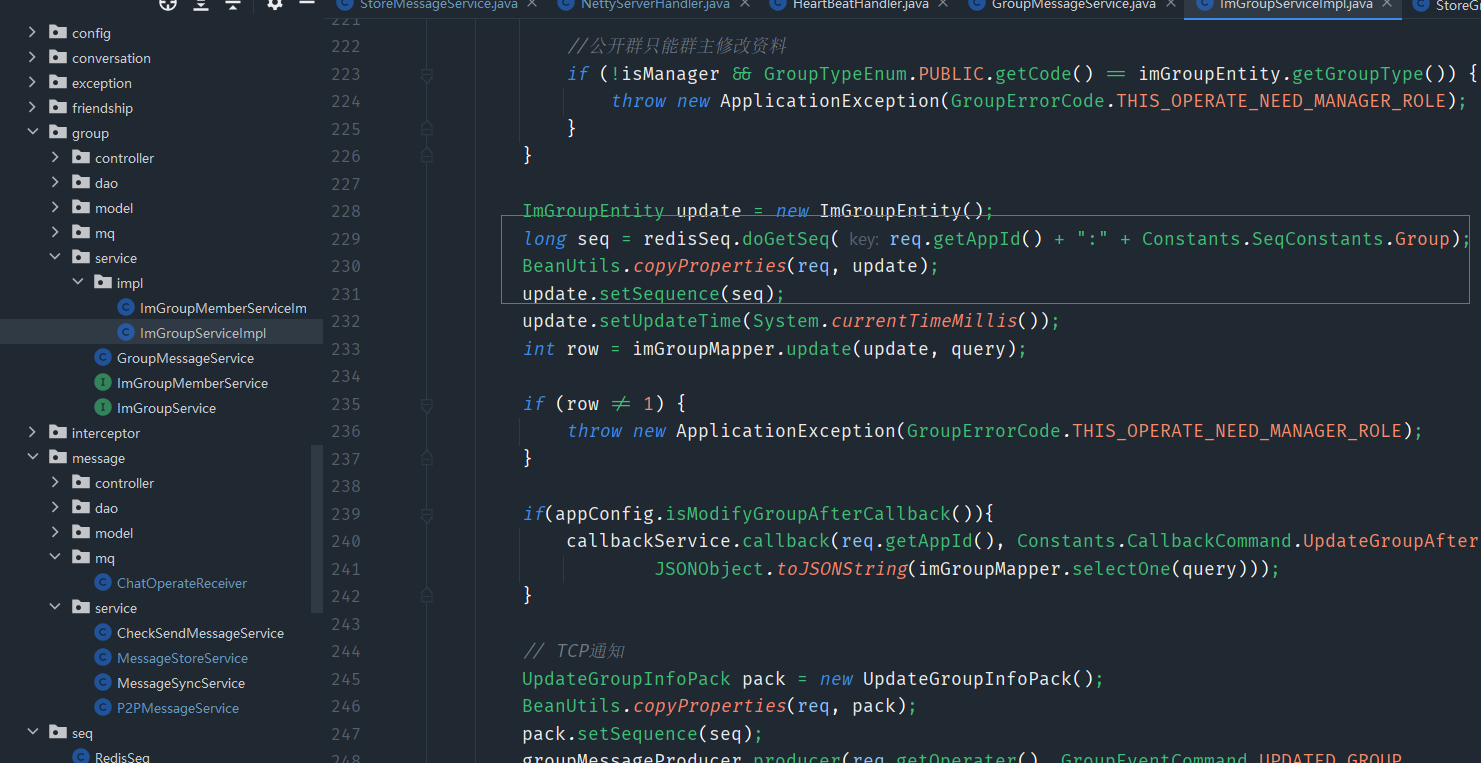
10、群聊消息消息幂等性—保证消息不重复
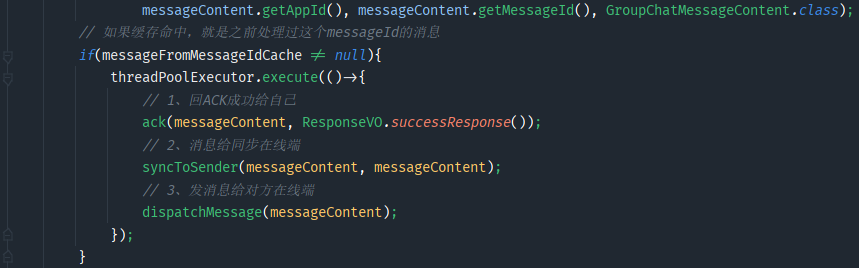
和单聊的都差不多的思路,这个也就是加一个缓存,大部分还是要在sdk做修改
11、详解消息已读等的实现方案
是否实现已读功能还是基于你的业务
方案
- 写扩散:我们的消息索引数据有很多份,我们可以给每条消息索引加上一条字段,是否已读的字段,当我们进入聊天界面的时候,可以给服务端上报,将已读的messagekey上报给服务端,服务端根据已读的messagekey修改消息的已读的状态
- 读扩散:用一个值来记录群成员读到了哪条消息,这个值前面的消息都算已读,有两个地方可以加上这个值,一个是群成员表,将最后一条消息的seq设置到对应群成员的字段上,还有一种方案,将这个值和会话绑定,比如说群里面有500个成员,就有500个会话,构建一个会话的概念,每一个会话都有自己的一个值来记录已读到哪条数据了,用一张表记录用户和用户之间的已读的消息篇序
12、构建聊天会话—消息已读功能实现
当对方读取了这条消息后,我们要接收到已读的这条命令,然后做出对应的处理
- 更新会话的seq
- 同步我方的端
- 并且给原发送端发送已读回执
@Service
public class WriteUserSeq {// redis// uid friend group conversation@Autowiredprivate RedisTemplate redisTemplate;// 修改消息的seq值public void writeUserSeq(Integer appId, String userId, String type, Long seq){String key = appId + ":" + Constants.RedisConstants.SeqPrefix + ":" + userId;redisTemplate.opsForHash().put(key, type, seq);}
}
修改redis中存储已读消息的seq的工具类
public void messageMarkRead(MessageReadedContent messageReadedContent){// 如果是单聊就是toIdString toId = messageReadedContent.getToId();// 如果是群聊的话就是groupIdif(messageReadedContent.getConversationType() == ConversationTypeEnum.GROUP.getCode()){toId = messageReadedContent.getGroupId();}String conversationId = conversationConversationId(messageReadedContent.getConversationType(), messageReadedContent.getFromId(), toId);// 获取会话 通过 appId 和 会话idLambdaQueryWrapper<ImConversationSetEntity> lqw = new LambdaQueryWrapper<>();lqw.eq(ImConversationSetEntity::getConversationId, conversationId);lqw.eq(ImConversationSetEntity::getAppId, messageReadedContent.getAppId());ImConversationSetEntity imConversationSetEntity = imConversationSetMapper.selectOne(lqw);if(imConversationSetEntity == null){// 不存在imConversationSetEntity = new ImConversationSetEntity();long seq = redisSeq.doGetSeq(messageReadedContent.getAppId() + ":" + Constants.SeqConstants.Conversation);imConversationSetEntity.setConversationId(conversationId);BeanUtils.copyProperties(messageReadedContent, imConversationSetEntity);imConversationSetEntity.setReadedSequence(messageReadedContent.getMessageSequence());imConversationSetEntity.setToId(toId);imConversationSetEntity.setReadedSequence(seq);imConversationSetMapper.insert(imConversationSetEntity);writeUserSeq.writeUserSeq(messageReadedContent.getAppId(),messageReadedContent.getFromId(), Constants.SeqConstants.Conversation, seq);}else{long seq = redisSeq.doGetSeq(messageReadedContent.getAppId() + ":" + Constants.SeqConstants.Conversation);// 存在,就更新已读的标志imConversationSetEntity.setReadedSequence(seq);imConversationSetEntity.setReadedSequence(messageReadedContent.getMessageSequence());imConversationSetMapper.readMark(imConversationSetEntity);writeUserSeq.writeUserSeq(messageReadedContent.getAppId(),messageReadedContent.getFromId(),Constants.SeqConstants.Conversation, seq);}
}
这就是第一步更新会话的seq
// 同步消息已读
// 更新会话的seq,通知在线的同步端发送指定command,发送已读回执,通知对方(消息发起方)我已读
public void readMark(MessageReadedContent messageReadedContent) {// 更新会话已读的位置conversationService.messageMarkRead(messageReadedContent);MessageReadedPack messageReadedPack = new MessageReadedPack();BeanUtils.copyProperties(messageReadedContent, messageReadedPack);// 把已读消息同步到自己的其他端syncToSender(messageReadedPack, messageReadedContent, MessageCommand.MSG_READED_NOTIFY);// 发送给原消息发送端messageProducer.sendToUser(messageReadedContent.getToId(), MessageCommand.MSG_READED_RECEIPT,messageReadedPack, messageReadedContent.getAppId());
}// 把已读消息同步到自己的其他端
public void syncToSender(MessageReadedPack pack, MessageReadedContent messageReadedContent, Command command){// 发送给自己的其它端messageProducer.sendToUserExceptClient(pack.getFromId(),command, pack, messageReadedContent);
}
然后是第二步第三步,同步我方,和回执
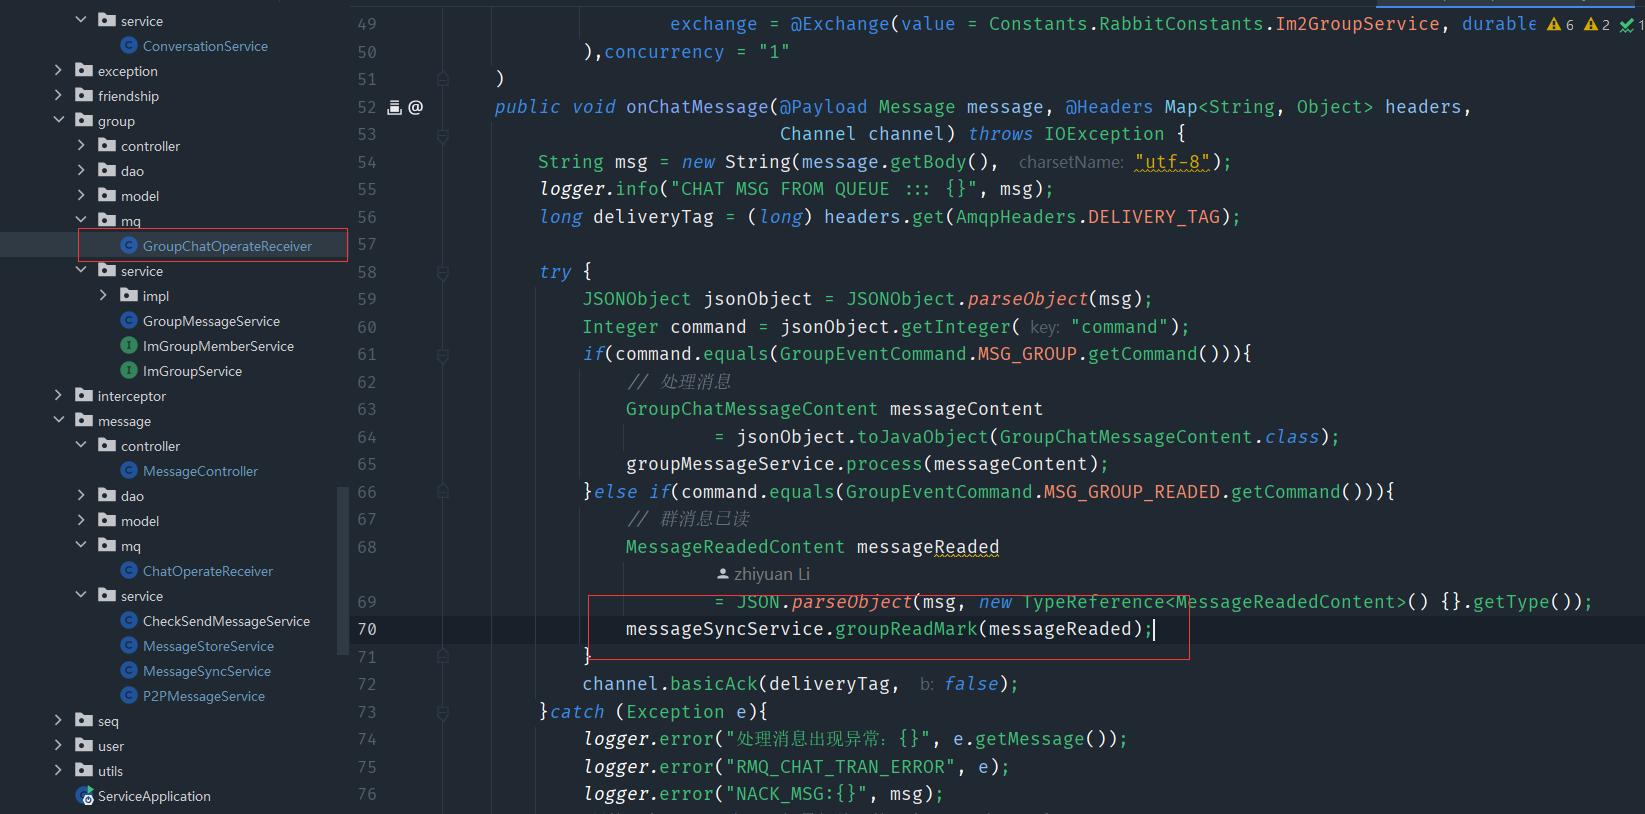

群组也是一样的道理
13、离线消息—离线消息设计和实现
把每条消息都放到离线消息里面,当用户上线后去里面去拉取离线消息,所以这里在处理单聊消息和群聊消息这里,就可以将离线消息也给存储了
// 存储单人离线消息(Redis)
// 存储策略是数量
public void storeOfflineMessage(OfflineMessageContent offlineMessageContent){// 找到fromId的队列String fromKey = offlineMessageContent.getAppId() + ":"+ Constants.RedisConstants.OfflineMessage + ":" + offlineMessageContent.getFromId();// 找到toId的队列String toKey = offlineMessageContent.getAppId() + ":"+ Constants.RedisConstants.OfflineMessage + ":" + offlineMessageContent.getToId();ZSetOperations<String, String> operations = stringRedisTemplate.opsForZSet();// 判断 队列中的数据 是否 超过设定值if(operations.zCard(fromKey) > appConfig.getOfflineMessageCount()){operations.remove(fromKey, 0, 0);}offlineMessageContent.setConversationId(conversationService.conversationConversationId(ConversationTypeEnum.P2P.getCode(), offlineMessageContent.getFromId(), offlineMessageContent.getToId()));// 插入 数据 根据messageKey 作为分值operations.add(fromKey, JSONObject.toJSONString(offlineMessageContent),offlineMessageContent.getMessageKey());if(operations.zCard(toKey) > appConfig.getOfflineMessageCount()){operations.remove(toKey, 0, 0);}offlineMessageContent.setConversationId(conversationService.conversationConversationId(ConversationTypeEnum.P2P.getCode(), offlineMessageContent.getToId(), offlineMessageContent.getFromId()));// 插入 数据 根据messageKey 作为分值operations.add(toKey, JSONObject.toJSONString(offlineMessageContent),offlineMessageContent.getMessageKey());
}
// 存储群组离线消息(Redis)
// 存储策略是数量
public void storeGroupOfflineMessage(OfflineMessageContent offlineMessageContent,List<String> memberIds){ZSetOperations<String, String> operations = stringRedisTemplate.opsForZSet();offlineMessageContent.setConversationType(ConversationTypeEnum.GROUP.getCode());for (String memberId : memberIds) {// 找到toId的队列String toKey = offlineMessageContent.getAppId() + ":"+ Constants.RedisConstants.OfflineMessage + ":" + memberId;offlineMessageContent.setConversationId(conversationService.conversationConversationId(ConversationTypeEnum.GROUP.getCode(), memberId, offlineMessageContent.getToId()));// 判断 队列中的数据 是否 超过设定值if(operations.zCard(toKey) > appConfig.getOfflineMessageCount()){operations.remove(toKey, 0, 0);}// 插入 数据 根据messageKey 作为分值operations.add(toKey, JSONObject.toJSONString(offlineMessageContent),offlineMessageContent.getMessageKey());}
}
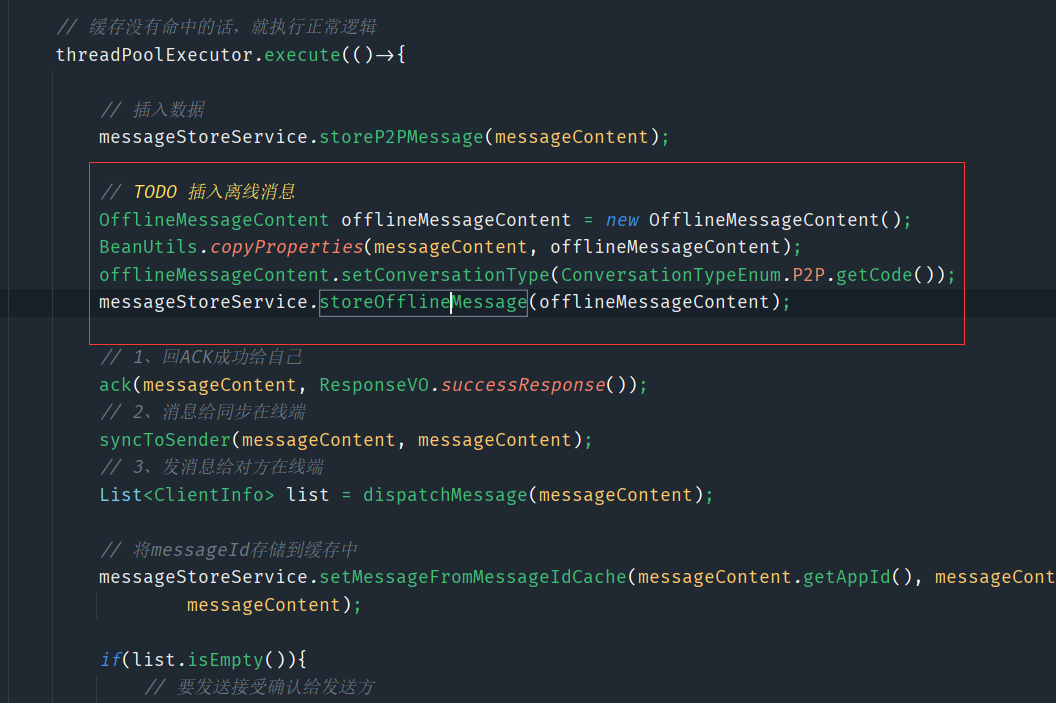

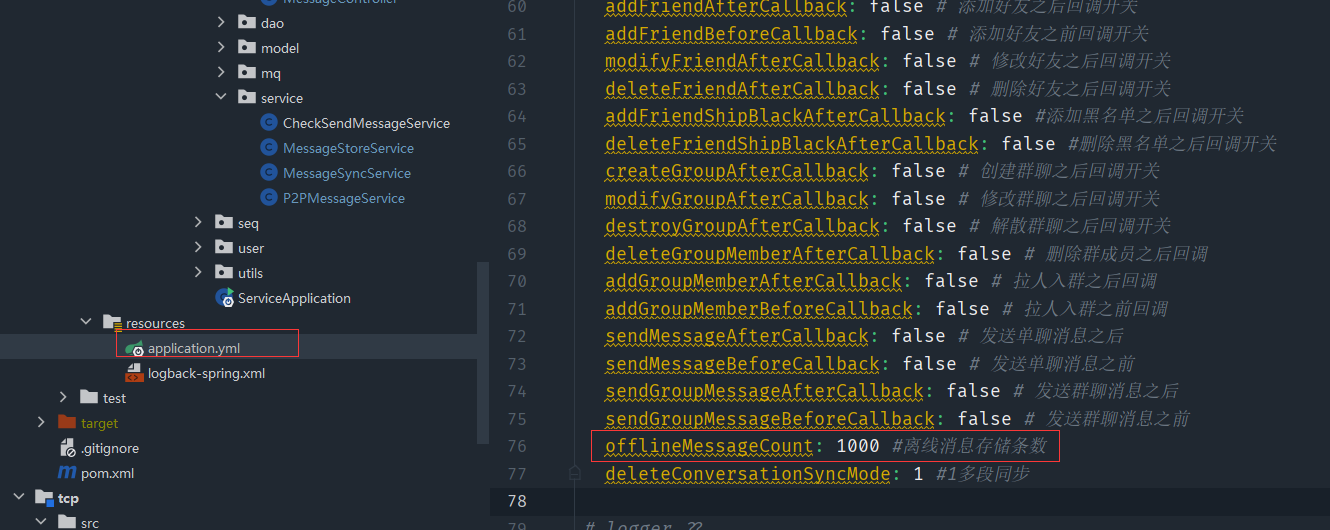
我们可以把离线消息多少条数据维护在配置文件中
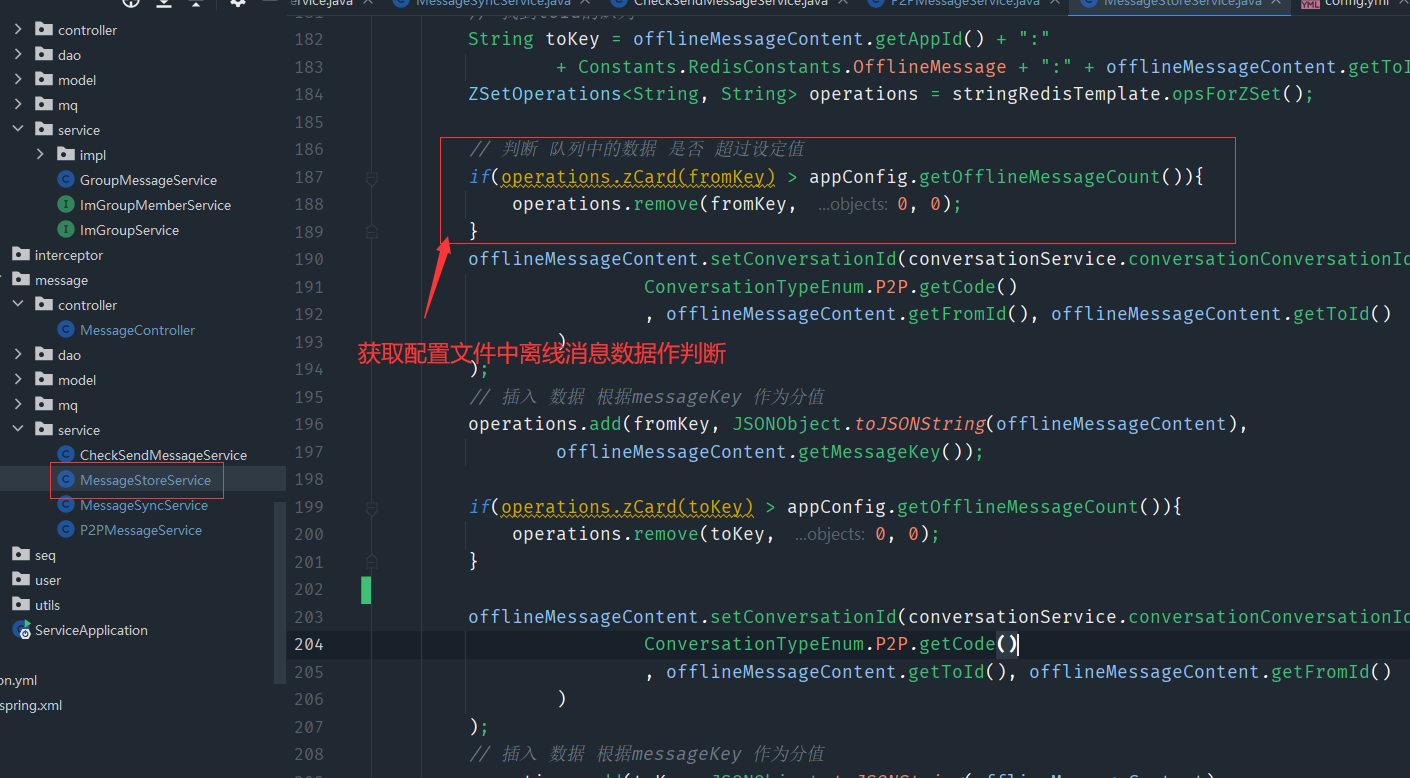
十、揭秘QQ、微信数据同步的演进
1、剖析qq和微信背后数据同步的完整过程
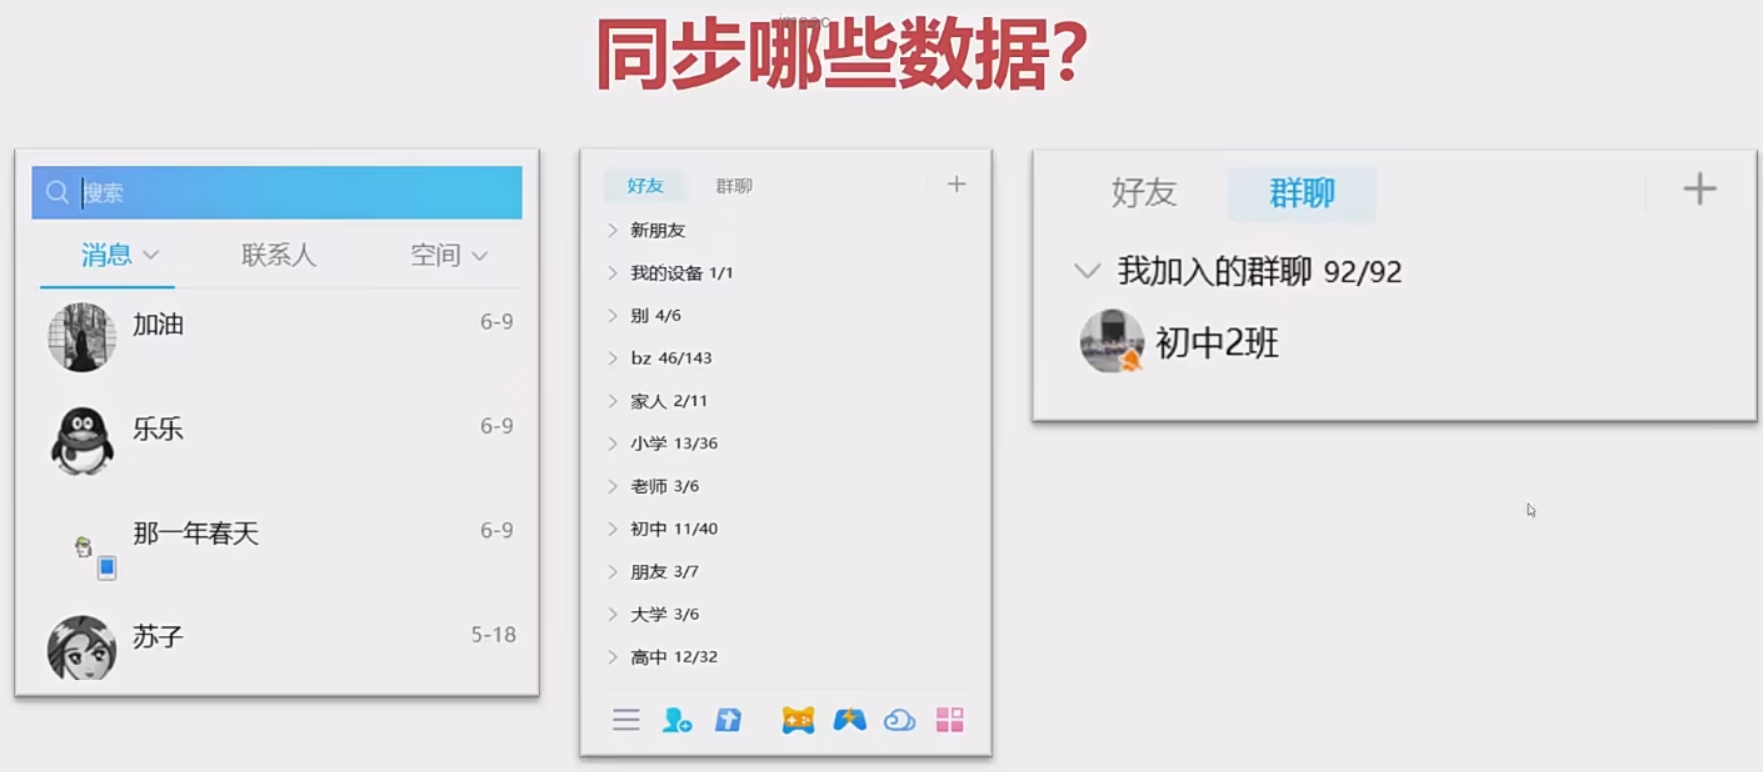
为什么我们第一次登录进入微信啥的,要等待好久,这是因为要进行同步会话、分组、群聊等等的数据。而且这个还是全量拉取,等待时间很长
优化一
- 延迟拉取:不是从一开始就去拉取所用数据,而是在用到的时候才去拉取,延迟拉取的本质是分摊时间,而不是分摊时间,该等待还要等待
- 按需拉取:第一次拉取所有数据后存储到本地空间中,后面的拉取的数据都是根据第一次拉取的数据进行增量更新的。
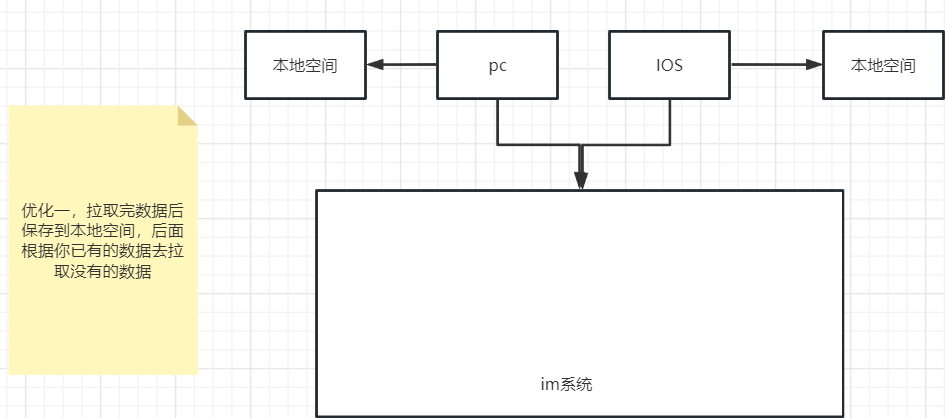
优化二:
增加数据序列号(版本号):比如是单聊的中客户端的最大的seq是10,服务端最大seq是20,那么客户端发起增量拉取,拉取的就是11-20的数据
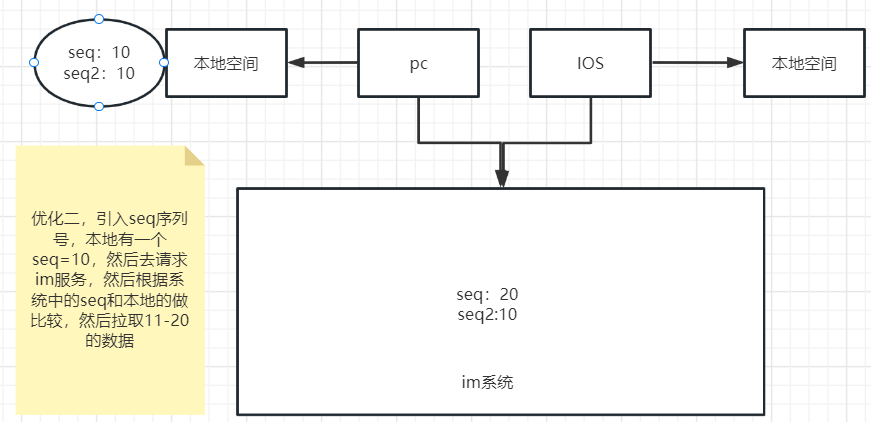
优化三:
服务端seq变更后额外写入用户的seq值

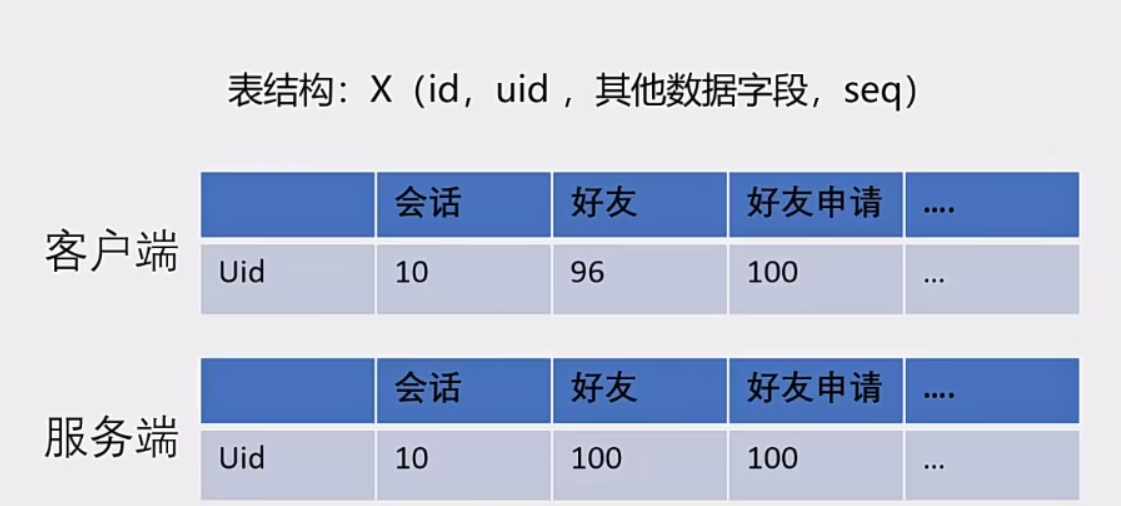
2、如何将好友关系链、会话、群组全量拉取改为增量拉取
我们可以使用redis的hash结构去存储一个用户的所有类型(消息、群聊、关系链、分组等等)的seq
@Service
public class WriteUserSeq {// redis// uid friend group conversation@Autowiredprivate RedisTemplate redisTemplate;// 修改消息的seq值public void writeUserSeq(Integer appId, String userId, String type, Long seq){String key = appId + ":" + Constants.RedisConstants.SeqPrefix + ":" + userId;redisTemplate.opsForHash().put(key, type, seq);}
}
上面这个类就是用来存储seq的类,这里我们举几个例子表示一下(其他的也和下面的差不多,也就是当那个地方做出了修改,那么我们就要生成对应模块的seq值然后记录起来,以便于后期的客户端直接拉取该用户的各个模块的seq集合,和自己本地数据的seq做对比,然后进行增量拉取做铺垫)
这里的模块有会话、群聊、关系链,群聊不用存储redis中,这个因为是比较特殊,一个群里可能好多好多的人,如果群里一个人发消息,其他群友的seq都要发生改变,这太离谱了所以说就不存储到redis中去
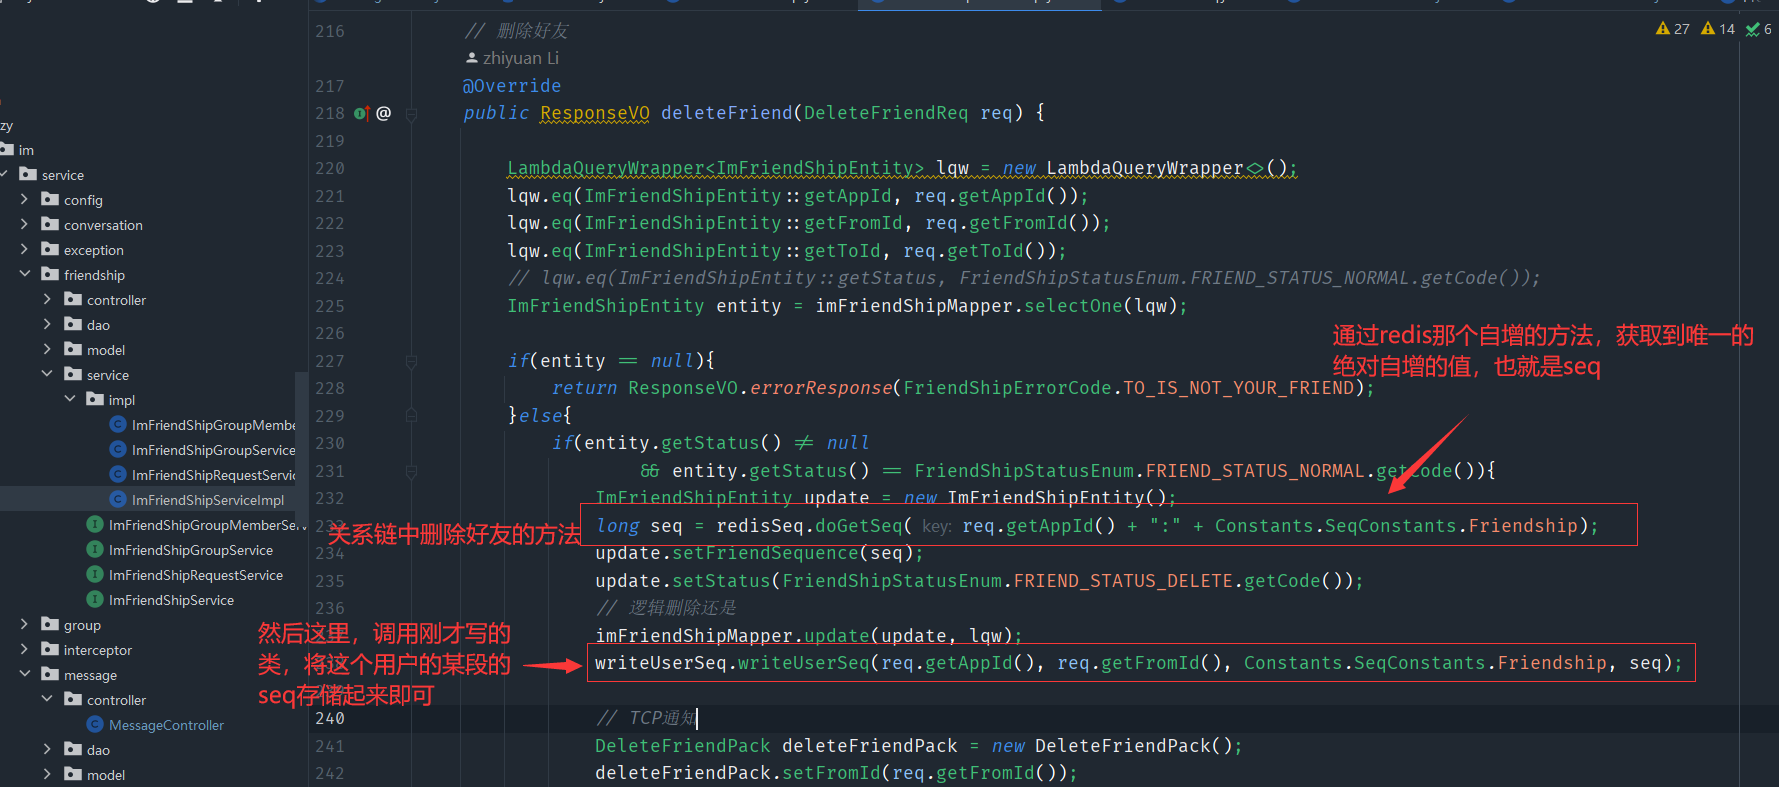
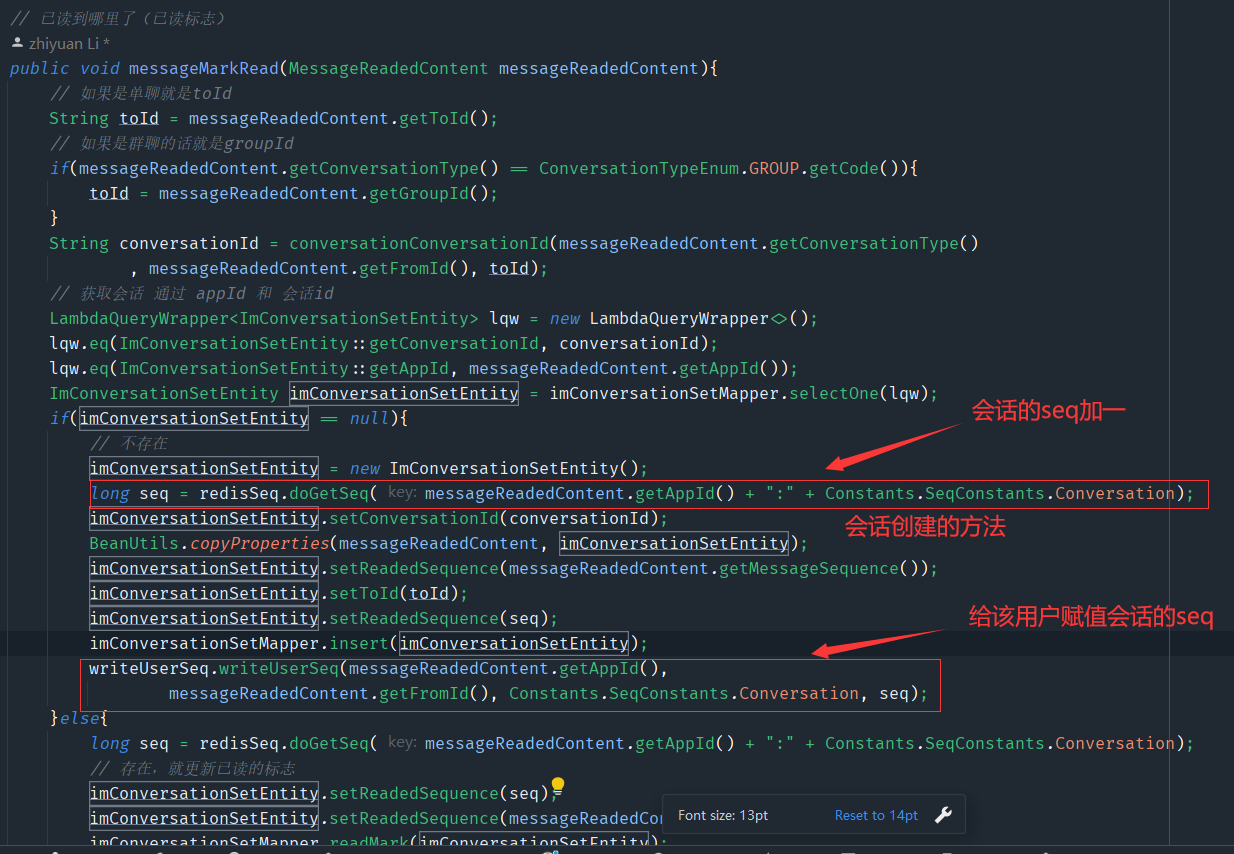
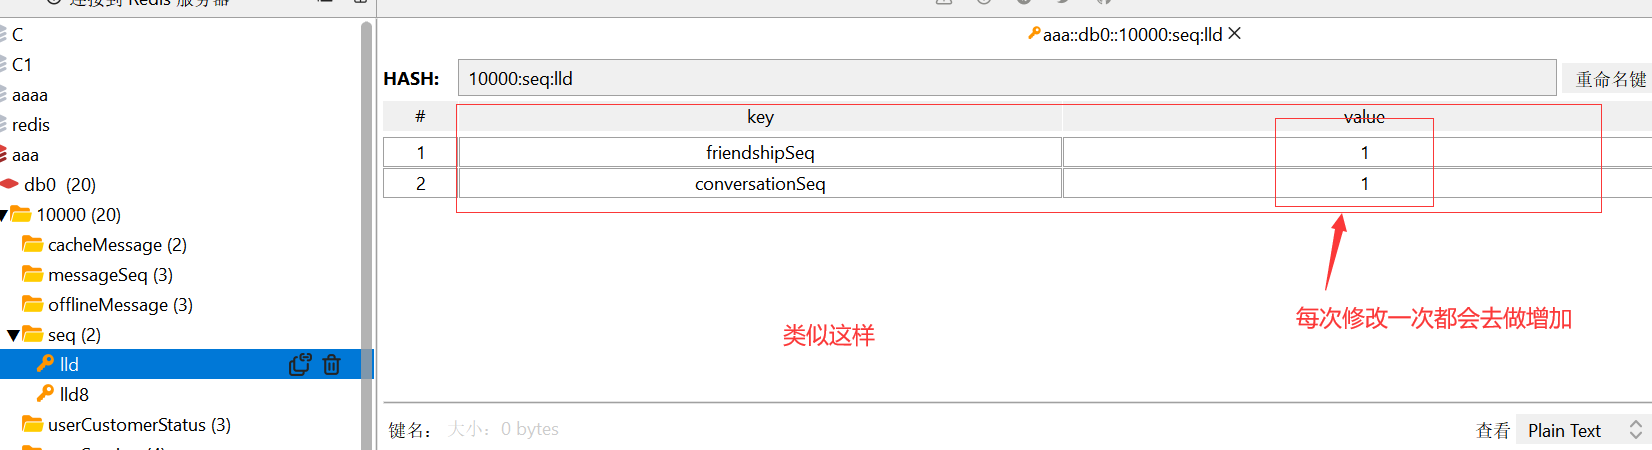
3、手把手带你实现增量同步接口
这里用那个好友关系链来举个例子

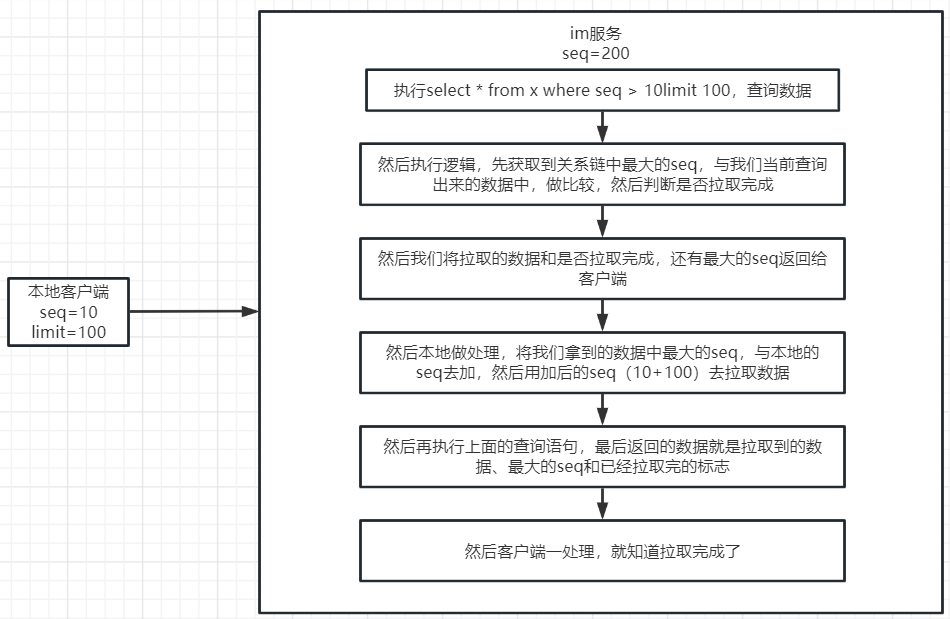
// 同步好友列表信息 增量拉取
@Override
public ResponseVO syncFriendShipList(SyncReq req) {// 单次最大拉取数量if(req.getMaxLimit() > 100){req.setMaxLimit(100);}// 返回体SyncResp<ImFriendShipEntity> resp = new SyncResp<>();// seq > req.getseq limit maxlimitLambdaQueryWrapper<ImFriendShipEntity> lqw = new LambdaQueryWrapper<>();lqw.eq(ImFriendShipEntity::getFromId, req.getOperater());lqw.gt(ImFriendShipEntity::getFriendSequence, req.getLastSequence());lqw.eq(ImFriendShipEntity::getAppId, req.getAppId());lqw.last("limit " + req.getMaxLimit());lqw.orderByAsc(ImFriendShipEntity::getFriendSequence);List<ImFriendShipEntity> dataList = imFriendShipMapper.selectList(lqw);if(!CollectionUtils.isEmpty(dataList)){ImFriendShipEntity maxSeqEntity = dataList.get(dataList.size() - 1);resp.setDataList(dataList);// 设置最大seqLong friendShipMaxSeq = imFriendShipMapper.getFriendShipMaxSeq(req.getAppId(), req.getOperater());resp.setMaxSequence(friendShipMaxSeq);// 设置是否拉取完毕resp.setCompleted(maxSeqEntity.getFriendSequence() >= friendShipMaxSeq);return ResponseVO.successResponse(resp);}resp.setCompleted(true);return ResponseVO.successResponse(resp);
}
其他的贴一下代码得行了
群组
// 增量同步群组成员列表
@Override
public ResponseVO syncJoinedGroupList(SyncReq req) {// 单次拉取最大if(req.getMaxLimit() > 100){req.setMaxLimit(100);}SyncResp<ImGroupEntity> resp = new SyncResp<>();// 获取该用户加入的所有的群 的 groupIdResponseVO<Collection<String>> collectionResponseVO= imGroupMemberService.syncMemberJoinedGroup(req.getOperater(), req.getAppId());if(collectionResponseVO.isOk()){Collection<String> data = collectionResponseVO.getData();LambdaQueryWrapper<ImGroupEntity> lqw = new LambdaQueryWrapper<>();lqw.eq(ImGroupEntity::getAppId, req.getAppId());lqw.in(ImGroupEntity::getGroupId, data);lqw.gt(ImGroupEntity::getSequence, req.getLastSequence());lqw.last("limit " + req.getMaxLimit());lqw.orderByAsc(ImGroupEntity::getSequence);List<ImGroupEntity> list = imGroupMapper.selectList(lqw);if(!CollectionUtils.isEmpty(list)){ImGroupEntity maxSeqEntity = list.get(list.size() - 1);resp.setDataList(list);// 设置最大seqLong maxSeq = imGroupMapper.getGroupMaxSeq(data, req.getAppId());resp.setMaxSequence(maxSeq);// 设置是否拉取完毕resp.setCompleted(maxSeqEntity.getSequence() >= maxSeq);return ResponseVO.successResponse(resp);}}resp.setCompleted(true);return ResponseVO.successResponse(resp);
}// 动态获取群组列表中最大的seq
@Override
public Long getUserGroupMaxSeq(String userId, Integer appId) {// 该用户加入的groupIdResponseVO<Collection<String>> memberJoinedGroup= imGroupMemberService.syncMemberJoinedGroup(userId, appId);if(!memberJoinedGroup.isOk()){throw new ApplicationException(500,"");}// 获取他加入的群组列表中最大的seqLong maxSeq =imGroupMapper.getGroupMaxSeq(memberJoinedGroup.getData(),appId);return maxSeq;
}
会话
// 增量拉取会话
public ResponseVO syncConversationSet(SyncReq req) {// 单次拉取最大数if(req.getMaxLimit() > 100){req.setMaxLimit(100);}SyncResp<ImConversationSetEntity> resp = new SyncResp<>();LambdaQueryWrapper<ImConversationSetEntity> lqw = new LambdaQueryWrapper<>();lqw.eq(ImConversationSetEntity::getFromId, req.getOperater());lqw.gt(ImConversationSetEntity::getSequence, req.getLastSequence());lqw.eq(ImConversationSetEntity::getAppId, req.getAppId());lqw.last("limit " + req.getMaxLimit());lqw.orderByAsc(ImConversationSetEntity::getReadedSequence);List<ImConversationSetEntity> list = imConversationSetMapper.selectList(lqw);if(!CollectionUtils.isEmpty(list)){ImConversationSetEntity maxSeqEntity = list.get(list.size() - 1);resp.setDataList(list);// 设置最大seqLong maxSeq= imConversationSetMapper.getConversationSetMaxSeq(req.getAppId(), req.getOperater());resp.setMaxSequence(maxSeq);// 设置是否拉取完resp.setCompleted(maxSeqEntity.getReadedSequence() >= maxSeq);return ResponseVO.successResponse(resp);}resp.setCompleted(true);return ResponseVO.successResponse(resp);
}
4、获取某个用户的req
这个就是在开篇的那个优化三中的实现,这个加上我们上面实现的增量接口,就可以去做完整的增量拉取了
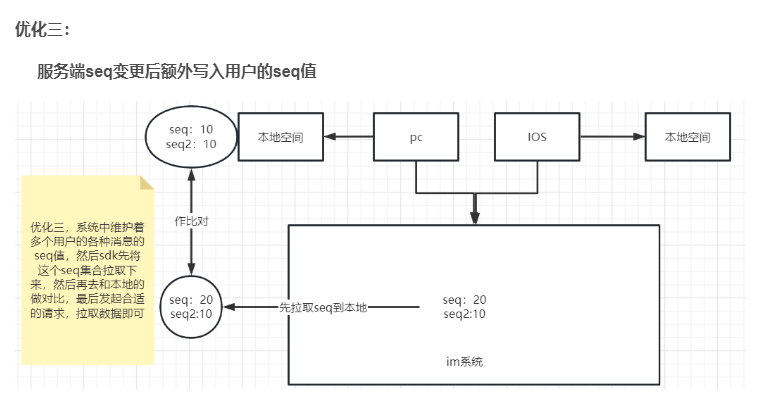
// 获取用户的seq
@Override
public ResponseVO getUserSequence(GetUserSequenceReq req) {// 这里的map中有  好友关系的 好友申请的  会话的,没有群组的,因为之前设计的时候,// 就考虑到如果一个群组里面的任何成员,发生了修改都会去修改// 该群的seq值,每次修改都要去redis中去更新seq,太繁琐了// 但是我觉得可以用那个Redis绝对自增序列的那个,不用非得从数据库中获取最新的,可能是数据库的比redis中的更加精准,// 我这个想法有待考量Map<Object, Object> map = stringRedisTemplate.opsForHash().entries(req.getAppId() + ":" + Constants.RedisConstants.SeqPrefix + ":" + req.getUserId());Long groupSeq = imGroupService.getUserGroupMaxSeq(req.getUserId(), req.getAppId());map.put(Constants.SeqConstants.Group, groupSeq);return ResponseVO.successResponse(map);
}
5、如何实现增量拉取离线消息
离线消息是不可避免的,所以一上线就要拉取离线消息,看看有没有离线消息要获取
// 增量拉取离线消息
public ResponseVO syncOfflineMessage(SyncReq req) {SyncResp<OfflineMessageContent> resp = new SyncResp<>();String key = req.getAppId() + ":" + Constants.RedisConstants.OfflineMessage + ":" + req.getOperater();// 获取最大的seqLong maxSeq = 0L;// 获取到有序集合ZSetOperations zSetOperations = redisTemplate.opsForZSet();// 调用api获取到最大的那哥有序集合的setSet set = zSetOperations.reverseRangeWithScores(key, 0, 0);if(!CollectionUtils.isEmpty(set)){List list = new ArrayList(set);DefaultTypedTuple o = (DefaultTypedTuple)list.get(0);// 获取到最大的seqmaxSeq = o.getScore().longValue();}resp.setMaxSequence(maxSeq);List<OfflineMessageContent> respList = new ArrayList<>();// 这里就像是查数据库一样// 调用api 截取limit的数量的  满足分值区间的 setSet<ZSetOperations.TypedTuple> querySet = zSetOperations.rangeByScoreWithScores(key, req.getLastSequence(), maxSeq, 0, req.getMaxLimit());for (ZSetOperations.TypedTuple<String> typedTuple : querySet) {// 获取道符合条件的离线消息String value = typedTuple.getValue();// Json转换OfflineMessageContent offlineMessageContent = JSONObject.parseObject(value, OfflineMessageContent.class);// 放到respList中respList.add(offlineMessageContent);}resp.setDataList(respList);if(!CollectionUtils.isEmpty(respList)){OfflineMessageContent offlineMessageContent = respList.get(respList.size() - 1);resp.setCompleted(offlineMessageContent.getMessageKey() >= maxSeq);}return ResponseVO.successResponse(resp);
}
这里面好几个api都是不怎么熟悉的,还得学学
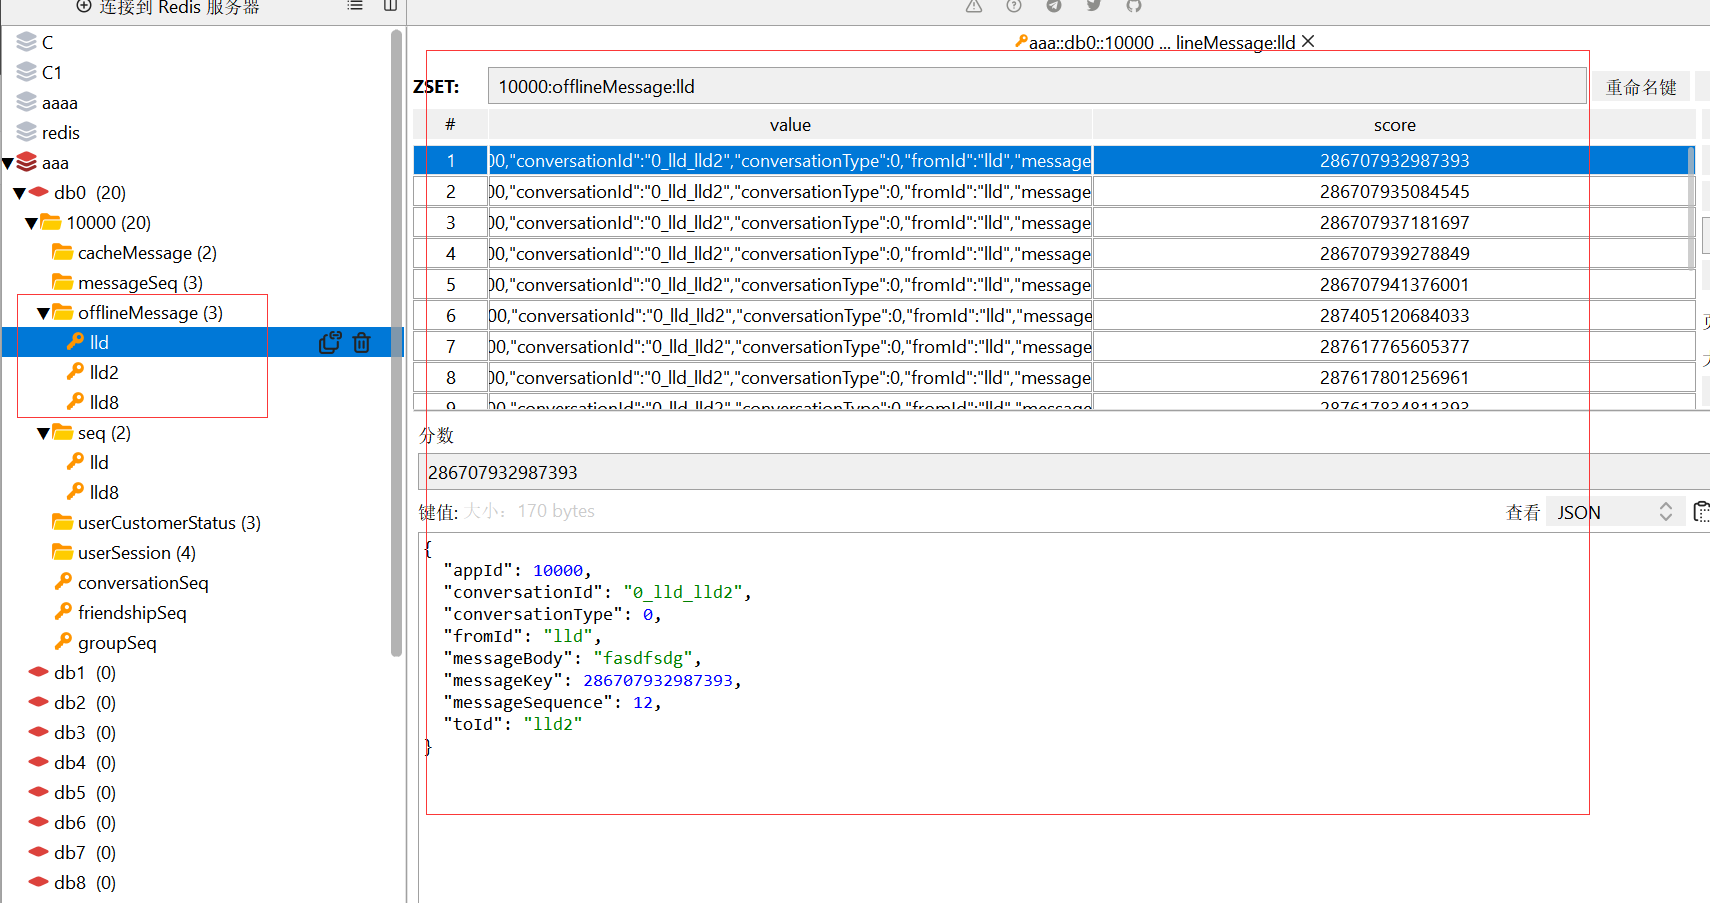
十一、打造QQ在线状态功能之为你的应用增添色彩
这个状态是指用户的状态,最先接触的也是qq,还有一种状态叫服务端状态,实现一套在线机制对服务端性能消耗是极大的,手机端在线离线的频率是很高的,微信切进来看几眼算上线,退出去又算离线,假设有100个好友一个操作就会裂变成100个操作,设计这个在线功能也还是从业务需求的角度来设计的
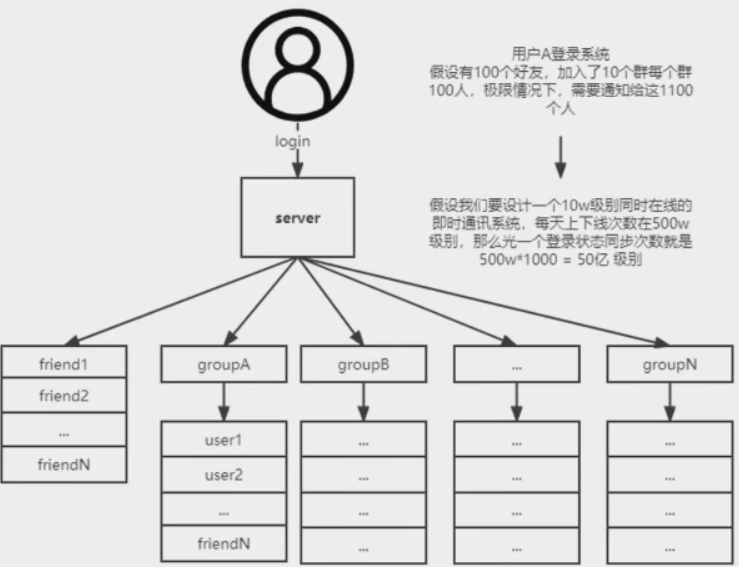
1、在线状态设计
需求一:需要实时的更新好友的状态,有一个标识可以辨别在线和离线,在线和离线可以实时得到感知,手动修改忙碌啥的状态可以实时通知到好友
需求二:打开群组等,可以获取到这一批人的在线状态,在线的会有一个在线的标识,和好友一样可以实时感知到用户下线了,可以实时的将在线修改为离线
改进
- 改进一:状态变更只推送给在线的用户
- 改进二:使用按需拉取、临时订阅的方式
2、Netty网关用户状态变更通知、登录ack
在tcp层通知逻辑层某个用户上线了
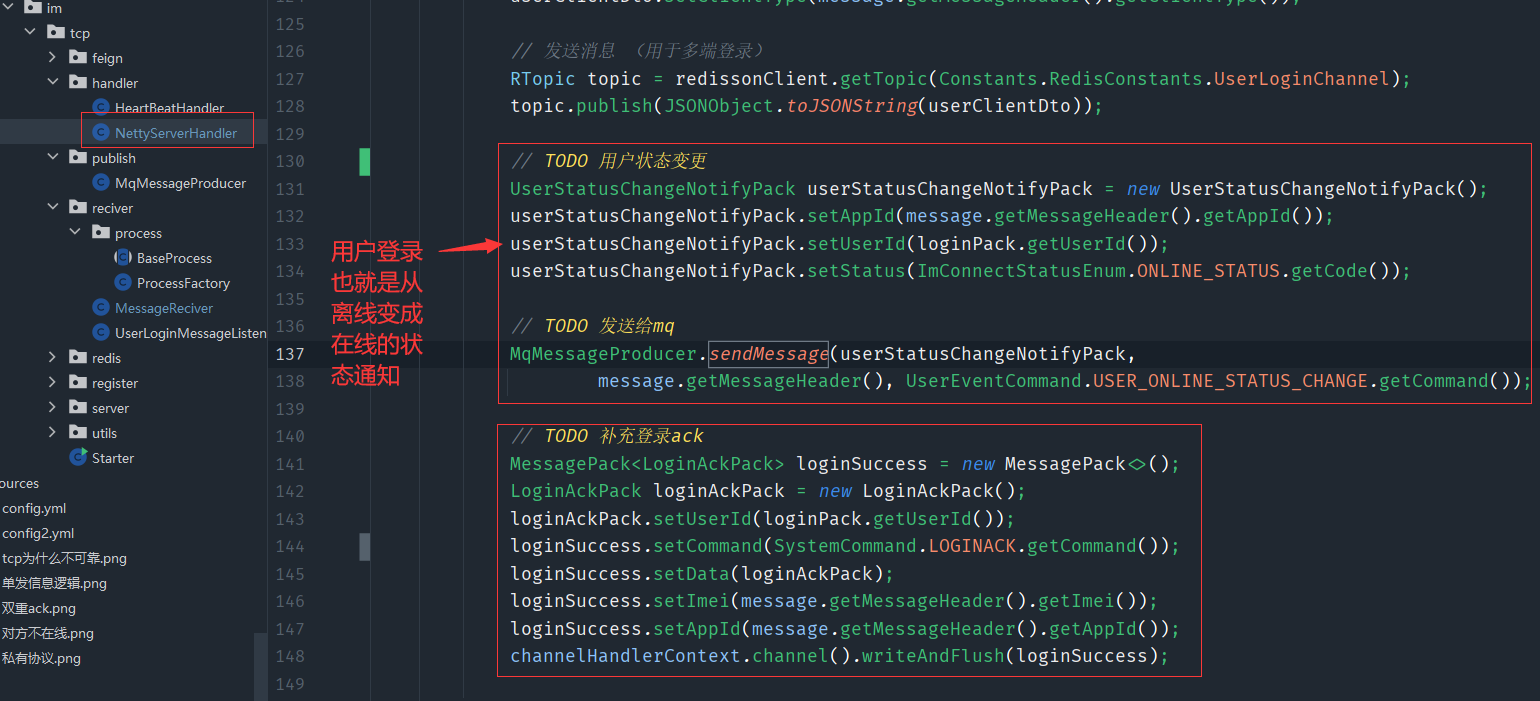
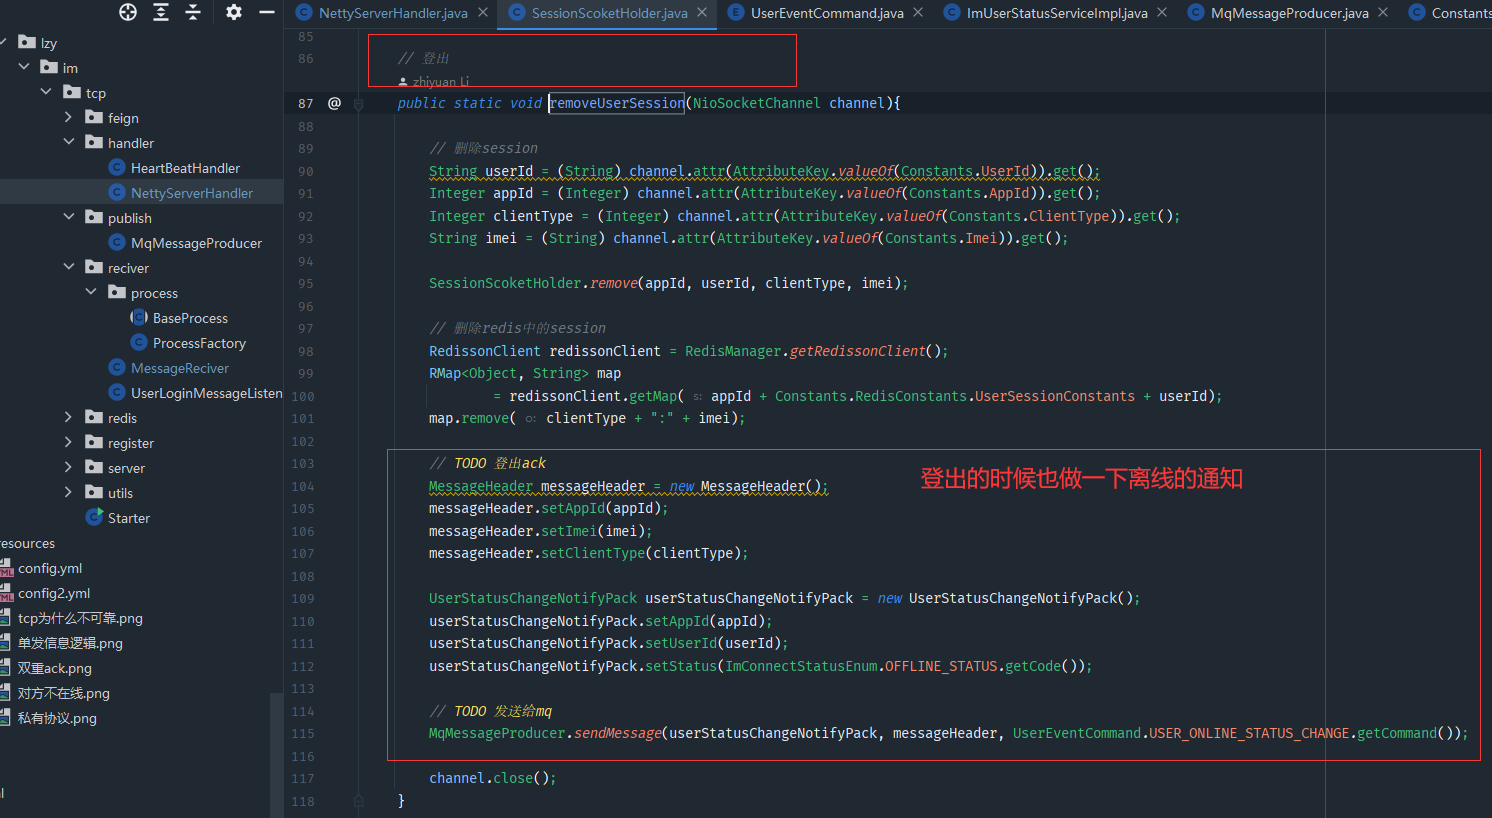
3、逻辑层处理用户上线下线
首先在user里面搞一个mq接收类去接收状态变更消息

然后当处理到了用户状态变更的命令就处理
@Override
public void processUserOnlineStatusNotify(UserStatusChangeNotifyContent content) {// 1、获取到该用户的所有 session,并将其设置到pack中List<UserSession> userSessions= userSessionUtils.getUserSession(content.getAppId(), content.getUserId());UserStatusChangeNotifyPack userStatusChangeNotifyPack = new UserStatusChangeNotifyPack();BeanUtils.copyProperties(content, userStatusChangeNotifyPack);userStatusChangeNotifyPack.setClient(userSessions);// TODO 发送给自己的同步端syncSender(userStatusChangeNotifyPack, content.getUserId(),UserEventCommand.USER_ONLINE_STATUS_CHANGE_NOTIFY_SYNC, content);// TODO 同步给好友和订阅了自己的人dispatcher(userStatusChangeNotifyPack, content.getUserId(), UserEventCommand.USER_ONLINE_STATUS_CHANGE_NOTIFY,content.getAppId());
}// 同步自己端private void syncSender(Object pack, String userId, Command command, ClientInfo clientInfo){messageProducer.sendToUserExceptClient(userId, command,pack, clientInfo);}// 同步对方端口
private void dispatcher(Object pack, String userId, Command command, Integer appId){// TODO 获取指定用户的所有好友idList<String> allFriendId = imFriendShipService.getAllFriendId(userId, appId);for (String fid : allFriendId) {messageProducer.sendToUser(fid, command,pack, appId);}// TODO 发送给临时订阅的人String key = appId+ ":" + Constants.RedisConstants.subscribe + ":" + userId;// 取出key中的所有keySet<Object> keys = stringRedisTemplate.opsForHash().keys(key);// 遍历for (Object k : keys) {String filed = (String)k;// 取出其中的过期时间Long expired = Long.valueOf((String) Objects.requireNonNull(stringRedisTemplate.opsForHash().get(key, filed)));// 如果没有过期,就要给他发送if(expired > 0 && expired > System.currentTimeMillis()){messageProducer.sendToUser(filed, UserEventCommand.USER_ONLINE_STATUS_CHANGE_NOTIFY,pack, appId);}else{stringRedisTemplate.opsForHash().delete(key, filed);}}
}
要通知自己其他端登录,还要通知好友和订阅了改用户的用户们
4、在线状态订阅—临时订阅
// 订阅用户状态
@Override
public void subscribeUserOnlineStatus(SubscribeUserOnlineStatusReq req) {Long subExpireTime = 0L;if(req != null && req.getSubTime() > 0){subExpireTime = System.currentTimeMillis() + req.getSubTime();}// 使用redis的hash结构存储订阅用户的状态for (String subUserId : req.getSubUserId()) {String key = req.getAppId() + ":" + Constants.RedisConstants.subscribe + ":" + subUserId;stringRedisTemplate.opsForHash().put(key, req.getOperater(), subExpireTime.toString());}
}
这其中涉及到了一个用户被多个用户订阅,所以要选择一种合适的redis的数据结构去存储,也就是使用hash不错
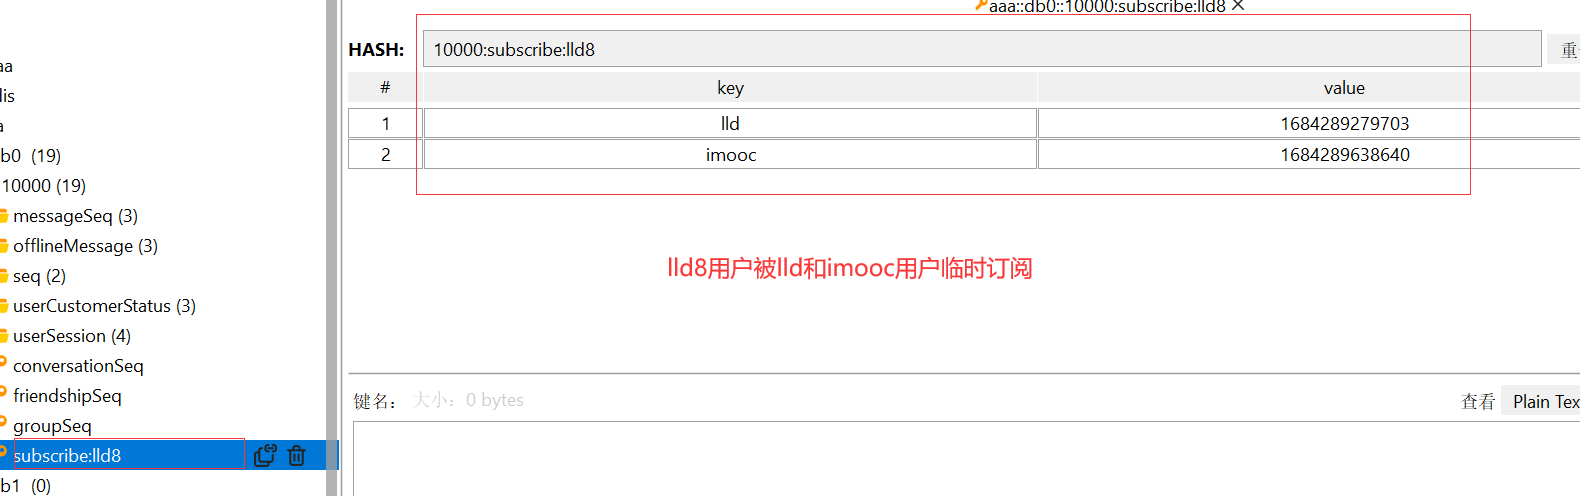
逻辑层处理用户上线下线的时候,同步给临时订阅的人消息的时候,也是通过获取这个redis中的数据去做的分发处理
5、实现手动设置客户端状态接口
// 设置客户端状态
@Override
public void setUserCustomerStatus(SetUserCustomerStatusReq req) {// 包UserCustomStatusChangeNotifyPack userCustomStatusChangeNotifyPack = new UserCustomStatusChangeNotifyPack();userCustomStatusChangeNotifyPack.setCustomStatus(req.getCustomStatus());userCustomStatusChangeNotifyPack.setCustomText(req.getCustomText());userCustomStatusChangeNotifyPack.setUserId(req.getUserId());// 将状态存储到redis中String key = req.getAppId() + ":" + Constants.RedisConstants.userCustomerStatus + ":" + req.getUserId();stringRedisTemplate.opsForValue().set(key, JSONObject.toJSONString(userCustomStatusChangeNotifyPack));syncSender(userCustomStatusChangeNotifyPack, req.getUserId(), UserEventCommand.USER_ONLINE_STATUS__SET_CHANGE_NOTIFY_SYNC,new ClientInfo(req.getAppId(), req.getClientType(), req.getImei()));dispatcher(userCustomStatusChangeNotifyPack, req.getUserId(), UserEventCommand.USER_ONLINE_STATUS__SET_CHANGE_NOTIFY, req.getAppId());
}
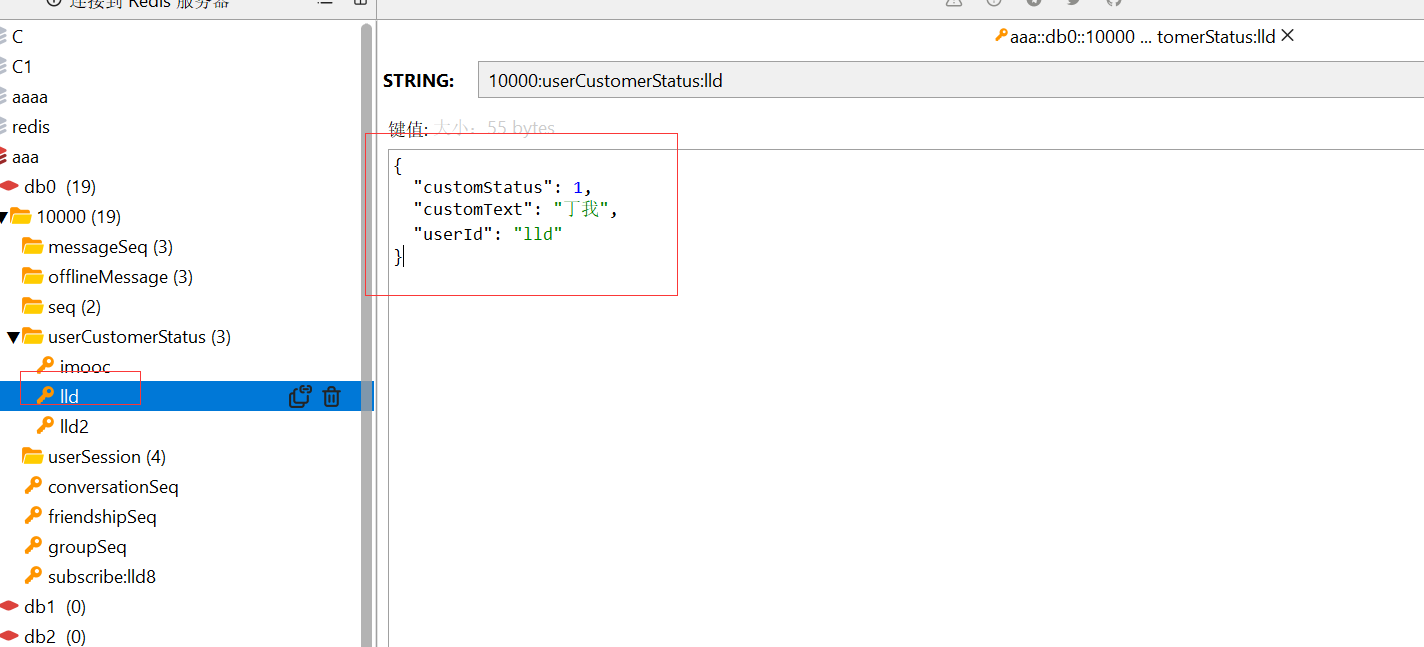
6、推拉结合实现在线状态更新
// 拉取指定用户的状态
@Override
public Map<String, UserOnlineStatusResp> queryUserOnlineStatus(PullUserOnlineStatusReq req) {return getUserOnlineStatus(req.getUserList(), req.getAppId());
}// 拉取所有用户的状态
@Override
public Map<String, UserOnlineStatusResp> queryFriendOnlineStatus(PullFriendOnlineStatusReq req) {List<String> allFriendId = imFriendShipService.getAllFriendId(req.getOperater(), req.getAppId());return getUserOnlineStatus(allFriendId, req.getAppId());
}// 拉取用户在线状态
private Map<String, UserOnlineStatusResp> getUserOnlineStatus(List<String> userId,Integer appId){// 返回类Map<String, UserOnlineStatusResp> res = new HashMap<>(userId.size());for (String uid : userId) {UserOnlineStatusResp resp = new UserOnlineStatusResp();// 拉取服务端的状态List<UserSession> userSession = userSessionUtils.getUserSession(appId, uid);resp.setSession(userSession);// 拉取客户端的状态String key = appId + ":" + Constants.RedisConstants.userCustomerStatus + ":" + uid;String s = stringRedisTemplate.opsForValue().get(key);if(StringUtils.isNotBlank(s)){JSONObject parse = (JSONObject) JSON.parse(s);resp.setCustomText(parse.getString("customText"));resp.setCustomStatus(parse.getInteger("customStatus"));}res.put(uid, resp);}return res;
}
拉取用户的状态信息的各种接口
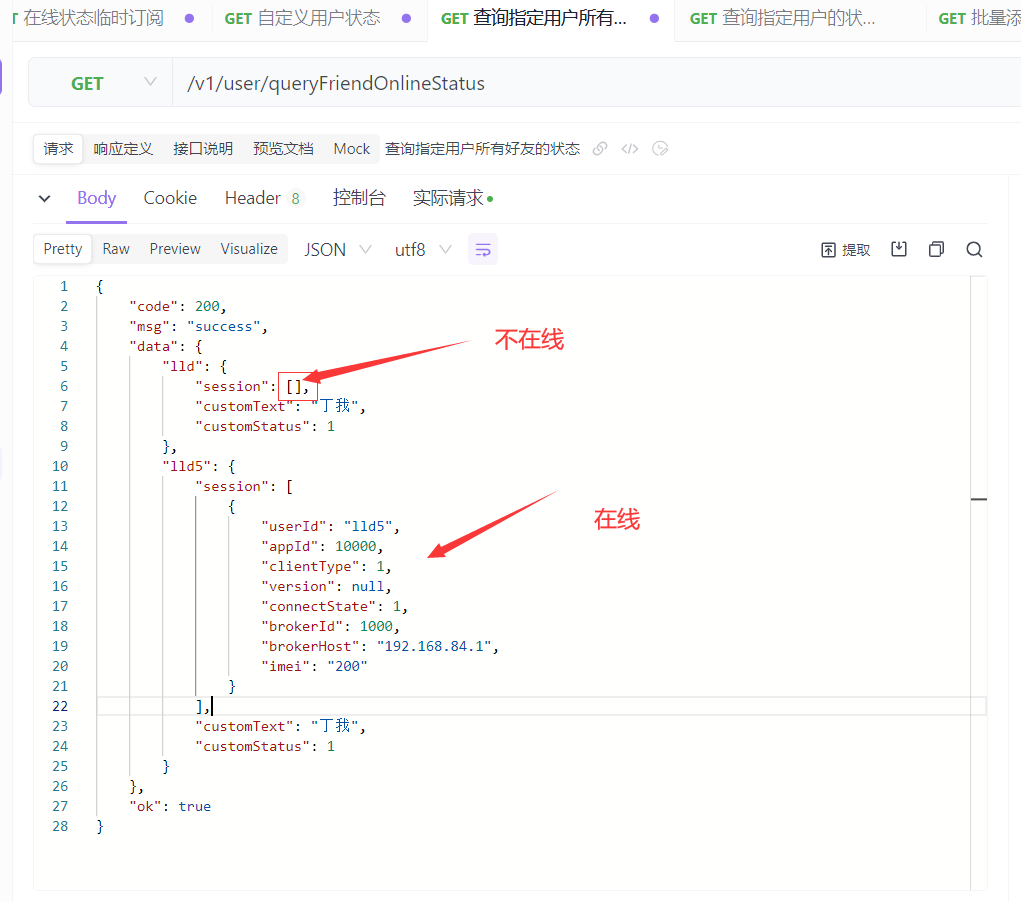
十二、IM扩展—能做的事情还有很多
1、如何让陌生人只能发送几条消息
有一些软件是没有称为好友的话,只能发送3条呀几条的消息消息,这个功能要怎么实现呢
这里采用的方案是用回调,在回调前和回调后做一些逻辑上的判断,来决定下面的操作是否执行
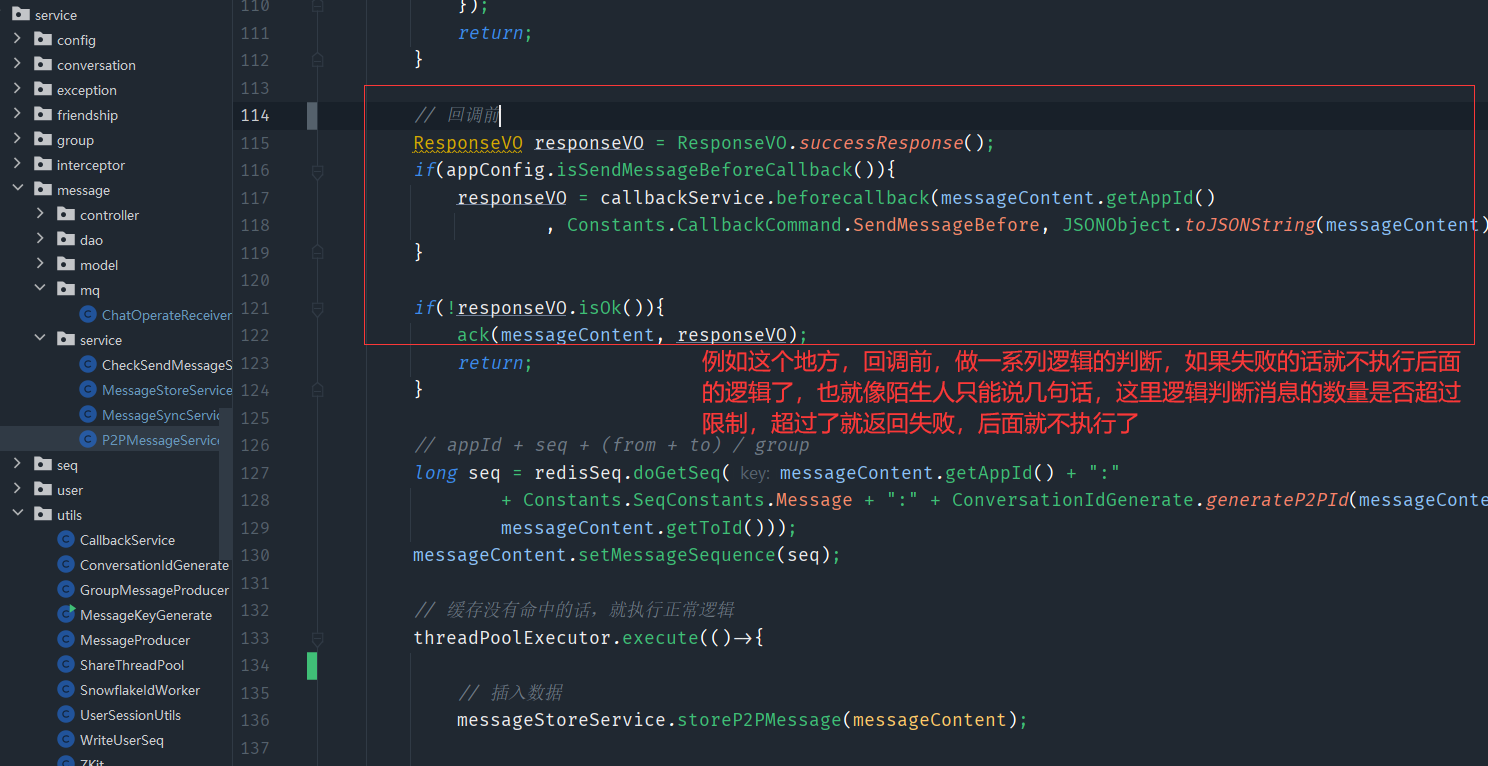
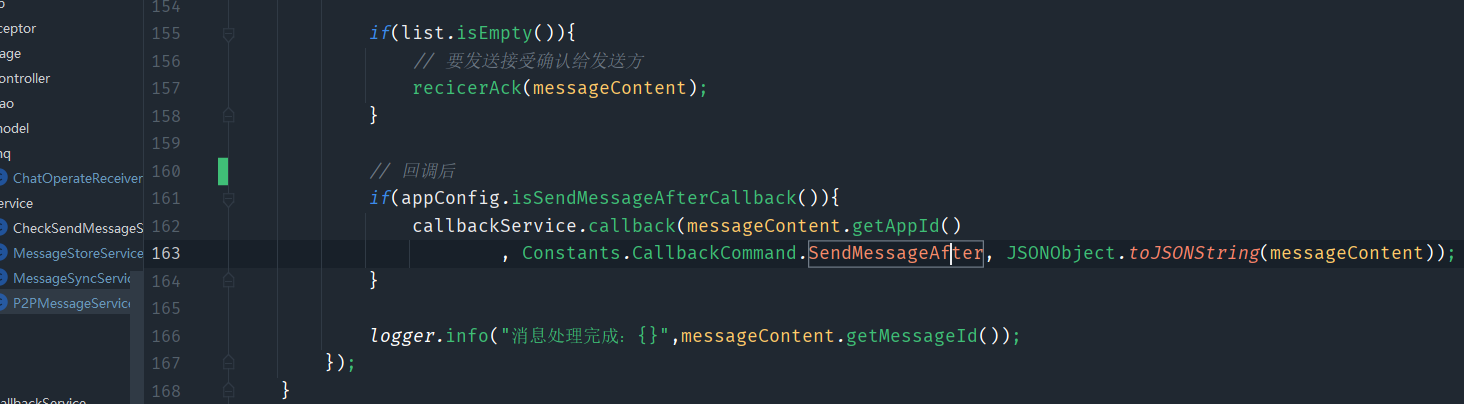
2、如何实现消息的撤回
只能由im系统撤回,是一个command指令
撤回的本质就是将要撤回的那条消息变成,谁谁谁撤回了消息,将原消息变更称为一条新的消息,并且插入一条新的消息
逻辑:
- 修改历史消息的状态
- 修改离线消息的状态
- ack给发送方
- 发送给同步端
- 分发给消息的接收方
// 撤回消息
public void recallMessage(RecallMessageContent messageContent) {// 如果消息发送超过一定的时间就不可以撤回了Long messageTime = messageContent.getMessageTime();Long now = System.currentTimeMillis();RecallMessageNotifyPack pack = new RecallMessageNotifyPack();BeanUtils.copyProperties(messageContent, pack);if(120000L < now - messageTime){recallAck(pack, ResponseVO.errorResponse(MessageErrorCode.MESSAGE_RECALL_TIME_OUT), messageContent);return;}LambdaQueryWrapper<ImMessageBodyEntity> lqw = new LambdaQueryWrapper<>();lqw.eq(ImMessageBodyEntity::getAppId, messageContent.getAppId());lqw.eq(ImMessageBodyEntity::getMessageKey, messageContent.getMessageKey());ImMessageBodyEntity body = imMessageBodyMapper.selectOne(lqw);// 如果查不到该消息的话if(body == null){// TODO ack失败 不存在的消息体不能撤回recallAck(pack, ResponseVO.errorResponse(MessageErrorCode.MESSAGEBODY_IS_NOT_EXIST), messageContent);return;}// 如果该消息已经被撤回if(body.getDelFlag() == DelFlagEnum.DELETE.getCode()){recallAck(pack, ResponseVO.errorResponse(MessageErrorCode.MESSAGE_IS_RECALLED), messageContent);return;}// 经过上面的判断,这时候的该信息就是没有撤回且正常的消息,下面就该进行修改历史信息body.setDelFlag(DelFlagEnum.DELETE.getCode());imMessageBodyMapper.update(body, lqw);// 如果撤回的消息的单聊的话if(messageContent.getConversationType() == ConversationTypeEnum.P2P.getCode()){// fromId的队列String fromKey = messageContent.getAppId() + ":"+ Constants.RedisConstants.OfflineMessage + ":" + messageContent.getFromId();// toId的队列String toKey = messageContent.getAppId() + ":"+ Constants.RedisConstants.OfflineMessage + ":" + messageContent.getToId();// 构建离线消息体OfflineMessageContent offlineMessageContent = new OfflineMessageContent();BeanUtils.copyProperties(messageContent, offlineMessageContent);offlineMessageContent.setDelFlag(DelFlagEnum.DELETE.getCode());offlineMessageContent.setMessageKey(messageContent.getMessageKey());offlineMessageContent.setConversationType(ConversationTypeEnum.P2P.getCode());offlineMessageContent.setConversationId(conversationService.conversationConversationId(offlineMessageContent.getConversationType(), messageContent.getFromId(), messageContent.getToId()));offlineMessageContent.setMessageBody(body.getMessageBody());long seq = redisSeq.doGetSeq(messageContent.getAppId()+ ":" + Constants.SeqConstants.Message+ ":" + ConversationIdGenerate.generateP2PId(messageContent.getFromId(), messageContent.getToId()));offlineMessageContent.setMessageSequence(seq);long messageKey = SnowflakeIdWorker.nextId();redisTemplate.opsForZSet().add(fromKey, JSONObject.toJSONString(offlineMessageContent), messageKey);redisTemplate.opsForZSet().add(toKey, JSONObject.toJSONString(offlineMessageContent), messageKey);// ackrecallAck(pack, ResponseVO.successResponse(), messageContent);// 分发给同步端messageProducer.sendToUserExceptClient(messageContent.getFromId(), MessageCommand.MSG_RECALL_NOTIFY,pack, messageContent);// 分发给对方messageProducer.sendToUser(messageContent.getToId(), MessageCommand.MSG_RECALL_NOTIFY,pack, messageContent);}else{List<String> groupMemberId= imGroupMemberService.getGroupMemberId(messageContent.getToId(), messageContent.getAppId());long seq = redisSeq.doGetSeq(messageContent.getAppId() + ":" + Constants.SeqConstants.Message+ ":" + ConversationIdGenerate.generateP2PId(messageContent.getFromId(), messageContent.getToId()));// ackrecallAck(pack, ResponseVO.successResponse(), messageContent);// 发送给同步端messageProducer.sendToUserExceptClient(messageContent.getFromId(), MessageCommand.MSG_RECALL_NOTIFY,pack, messageContent);// 同步给对方端for (String memberId : groupMemberId) {String toKey = messageContent.getAppId() + ":" + Constants.RedisConstants.OfflineMessage + ":"+ memberId;OfflineMessageContent offlineMessageContent = new OfflineMessageContent();offlineMessageContent.setDelFlag(DelFlagEnum.DELETE.getCode());BeanUtils.copyProperties(messageContent, offlineMessageContent);offlineMessageContent.setConversationType(ConversationTypeEnum.GROUP.getCode());offlineMessageContent.setConversationId(conversationService.conversationConversationId(offlineMessageContent.getConversationType(), messageContent.getFromId(), messageContent.getToId()));offlineMessageContent.setMessageBody(body.getMessageBody());offlineMessageContent.setMessageSequence(seq);redisTemplate.opsForZSet().add(toKey, JSONObject.toJSONString(offlineMessageContent), seq);groupMessageProducer.producer(messageContent.getFromId(), MessageCommand.MSG_RECALL_NOTIFY,pack, messageContent);}}
}
3、如何设计亿级聊天记录存储方案
比较主流的qq、微信对于聊天记录的存储都是有期限的,也就是说我们查询的聊天记录,怎么存储的多怎么取的快
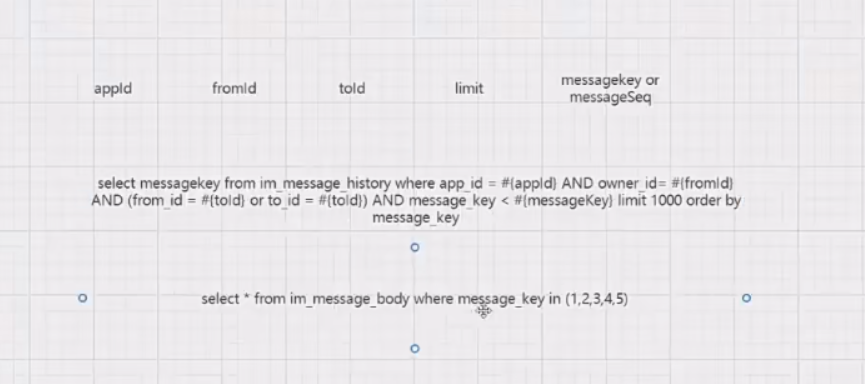
对owner_id加上索引,这个查询就变成了一次索引查询一次,主键查询,这样就满足了查的快了
但是如果只有一个应用的话没问题,但是如果有多个应用接入的情况下,全部的消息存储到这张表中的话,就有点难了
分库
按照appId进行分库,这样的只适用于你已知多少多少应用接入的情况下,才能准确的进行分库,而且也不能部署太多的库,每一个应用都要有一个库的话,太繁琐了
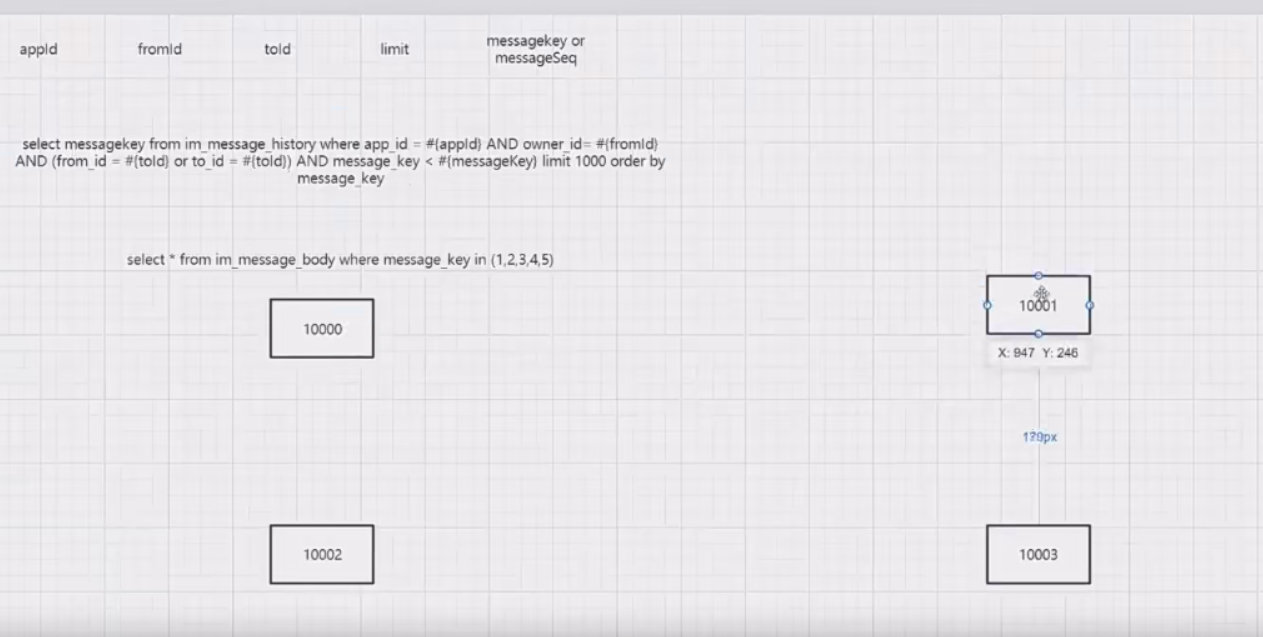
数据迁移
我们可以限定一个期限,超过的期限的记录就不允许用户去查了,但是后台可以查询,这些数据就被迁移到其他的地方,以供后台查询,而且后台慢的查也可以,原来的数据表中的数据就都没了,就变成一个新的表了,然后再放进去数据,查到的也就是最新的了
分表
比较适合已知有多少个应用接入,基于owener_id做分表

基于时间戳做分表,就不用考虑多少个应用接入,但是缺点就是一张表要固定存储一端时间的数据,有的时间段消息多,有的时间段消息少,可能不太好
public class MessageKeyGenerate {//标识从2020.1.1开始private static final long T202001010000 = 1577808000000L;//    private Lock lock = new ReentrantLock();AtomicReference<Thread> owner = new AtomicReference<>();private static volatile int rotateId = 0;private static int rotateIdWidth = 15;private static int rotateIdMask = 32767;private static volatile long timeId = 0;private int nodeId = 0;private static int nodeIdWidth = 6;private static int nodeIdMask = 63;public void setNodeId(int nodeId) {this.nodeId = nodeId;}public synchronized long generateId() throws Exception {//        lock.lock();this.lock();rotateId = rotateId + 1;long id = System.currentTimeMillis() - T202001010000;//不同毫秒数生成的id要重置timeId和自选次数if (id > timeId) {timeId = id;rotateId = 1;} else if (id == timeId) {//表示是同一毫秒的请求if (rotateId == rotateIdMask) {//一毫秒只能发送32768到这里表示当前毫秒数已经超过了while (id <= timeId) {//重新给id赋值id = System.currentTimeMillis() - T202001010000;}this.unLock();return generateId();}}id <<= nodeIdWidth;id += (nodeId & nodeIdMask);id <<= rotateIdWidth;id += rotateId;//        lock.unlock();this.unLock();return id;}public static int getSharding(long mid) {Calendar calendar = Calendar.getInstance();mid >>= nodeIdWidth;mid >>= rotateIdWidth;calendar.setTime(new Date(T202001010000 + mid));int month = calendar.get(Calendar.MONTH);int year = calendar.get(Calendar.YEAR);year %= 3;return (year * 12 + month);}public static long getMsgIdFromTimestamp(long timestamp) {long id = timestamp - T202001010000;id <<= rotateIdWidth;id <<= nodeIdWidth;return id;}public void lock() {Thread cur = Thread.currentThread();while (!owner.compareAndSet(null, cur)){}}public void unLock() {Thread cur = Thread.currentThread();owner.compareAndSet(cur, null);}public static void main(String[] args) throws Exception {MessageKeyGenerate messageKeyGenerate = new MessageKeyGenerate();for (int i = 0; i < 10; i++) {long l = messageKeyGenerate.generateId();System.out.println(l);}//im_message_history_12//10000  10001//0      1long msgIdFromTimestamp = getMsgIdFromTimestamp(1734529845000L);int sharding = getSharding(msgIdFromTimestamp);System.out.println(sharding);}
}
这个是优化后的基于时间戳生成message_id的策略
最后这点东西听不太懂了,就这样吧!