%matplotlib inline
import torch
from d2l import torch as d2l
torch.set_printoptions(2) # 让pytorch打印张量时,只打印到小数点后两位
将设一张图片,宽和高为2,2
X = torch.rand(size=(1,3,2,2))
Y = generate_anchors(X,sizes=[0.75,0.5,0.25],ratios=[1,2,0.5])
锚框中心点的设置
# 为每个像素可以生成 n+m-1个锚框,整个图像生成 wh(n+m-1)
def generate_anchors(data,sizes,ratios): # 书上的名字是 multibox_prior'''data:输入图像,sizes:缩放比 rations:宽高比:return: (批量数,锚框数量,4)''''''1.数据准备'''# 图片的shape为(样本数,h,w),取出图片的h,win_height,in_width = data.shape[-2:]# 取出数据的设备,缩放比的数量,宽高比的数量device,num_sizes,num_ratios = data.device,len(sizes),len(ratios)# 每个像素的锚框数boxes_per_pixel = (num_sizes+num_ratios-1)# 把缩放列表和宽高比列表转换为tensor格式size_tensor = torch.tensor(sizes,device=device)ratio_tensor = torch.tensor(ratios,device=device)'''设置锚框中心坐标 和 步长'''# 因为1像素的宽和高都是1,所以1像素的中心点是(0.5,0.5)offset_h,offset_w=0.5,0.5# 缩放步长steps_h = 1/in_heightsteps_w = 1/in_width
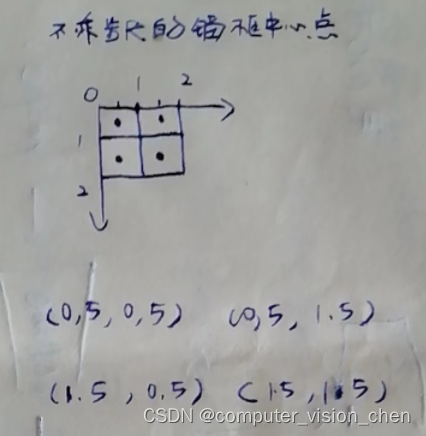
# 不乘以步长,垂直方向上锚框的中心点center_h = (torch.arange(in_height,device=device) + offset_h)print(center_h)
tensor([0.50, 1.50])
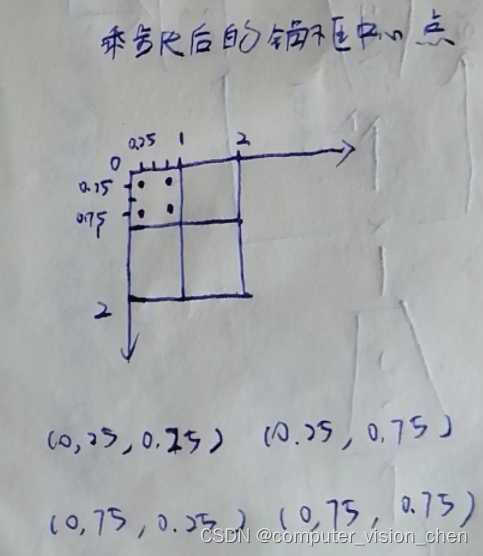
# 乘以步长时,垂直方向上锚框的中心点。center_h = (torch.arange(in_height,device=device) + offset_h) * steps_hprint(center_h)
tensor([0.25, 0.75])
# 不乘以步长,水平方向上锚框的中心点center_w = (torch.arange(in_width,device=device) + offset_w)print(center_w)
tensor([0.50, 1.50])
# 乘以步长,水平方向上锚框的中心点center_w = (torch.arange(in_width,device=device) + offset_w) * steps_wprint(center_w)
tensor([0.25, 0.75])
乘以步长和不乘步长,锚框中心点的区别
之所以要乘以步长,是为了对应/w,/h归一化后的锚框形状。
# 生成锚框的所有中心点shift_y,shift_x = torch.meshgrid(center_h,center_w)print(f'shift_y = {shift_y}')print(f'shift_x = {shift_x}')
shift_y = tensor([[0.25, 0.25], [0.75, 0.75]])
shift_x = tensor([[0.25, 0.75], [0.25, 0.75]])
#把tensor变成一维shift_y,shift_x = shift_y.reshape(-1),shift_x.reshape(-1)print(shift_y, shift_x)
tensor([0.25, 0.25, 0.75, 0.75]) tensor([0.25, 0.75, 0.25, 0.75])


参考链接
https://zhuanlan.zhihu.com/p/455807888
