文章目录
- 一、abstract的应用举例
- 二、接口的使用
- 1.概念
- 2.代码案例
- 三、try-catch-finally使用步骤
- 1.注意点
- 2.finally注意点
- 四、异常处理的方式二:throws + 异常类型
- 1.如图所示:
- 2.代码如下:
提示:以下是本篇文章正文内容,下面案例可供参考
一、abstract的应用举例
public abstract class Vehicle{public abstract double calaFuelEfficiency();  //计算燃料效率的抽象方法public abstract double clacTripDistance();  //计算行驶距离的抽象方法
}
public class Truck extends Vehicle{public double calaFuelEfficiency(){//写出计算卡车的燃料效率的具体方法}public double clacTripDistance(){//写出计算卡车行驶距离的具体方法}
}public class RiverBarge extends Vehicle{public double calaFuelEfficiency(){//写出计算卡车的燃料效率的具体方法}public double clacTripDistance(){//写出计算卡车行驶距离的具体方法}
}
二、接口的使用
1.概念
1.接口使用上也满足多态性
2.接口,实际上就是定义了一种规范
3.开发中,体会面向接口编程!
2.代码案例
public clas USBTest{main(){Computer com = new Computer();//1.创建了接口的非匿名实现类的非匿名对象Flash flash = new Flash();com.transferData(falsh);//2.创建了接口的非匿名实现类的匿名对象com.transferData(new Printer());//3.创建了接口的匿名实现类的非匿名对象USB phone = new USB(){public void start(){sysout("手机开始工作");}public void stop(){sysout("手机结束工作");}};com.transferData(phone);//4.创建了接口的匿名实现类的匿名对象com.transferData(new USB(){public void start(){sysout("mp3开始工作");}public void stop(){sysout("mp3结束工作");}});}
}class Computer{public void transferData(USB usb) { //USB usb = new Flash();usb.start();sysout("具体传输数据的细节");usb.stop();}
}
interface USB{//常量,定义了长、宽、最大最小的传输速度等。void start();void stop();
}
class Flash implements USB{public void start(){sysout("U盘开启工作");}@Overridepublic void stop() {System.out.println("U盘结束工作");}
}class Printer implements USB{public void start(){sysout("打印机开启工作");}@Overridepublic void stop() {System.out.println("打印机结束工作");}}
三、try-catch-finally使用步骤
1.注意点
- finally是可选的。
- 使用try将可能出现异常代码包装起来,在执行过程中,一旦出现异常,就会生成一个对应异常类的对象,根据此对象的类型,去catch中进行匹配
- 一旦try中的异常对象匹配到某一个catch时,就进入catch中进行异常的处理。一旦处理完成,就跳出当前的try-catch结构 (在没有写finally的情况),继读执行其后的代码。
- catch中的异常类型如果没有子父类关系,则谁声明在上,谁声明在下无所谓。catch中的异常类型如果满足子父类关系,则要求子类一定声明在父类的上面。否则,报错。
- 常用的异常对象处理的方式: @ String getMessage() printStackTrace()
- 在try结构中声明的变量,再出了try结构以后,就不能再被调用
使用try-catch-finally处理编译时异常,使得程序在编译时就不再报错,但是运行时仍可能报错。
相当于我们使用try-catch-finally将一个编译时可能出现的异常延迟到运行时出现。
2.finally注意点
1.finally是可选的
2.finally中声明的是一定会被执行的代码。即使catch中又出现异常了,try中有return语句,catch中有return语句等情况。
3.像数据库连接、输入输出流、网络编程Socket等资源JVM是不能自动的回收的,我们需要自己手动的进行资源的释放。此时的资源释放,就需要声明在finally中。
代码如下(示例):
public void test1() {try {int a = 10;int b = 0;System.out.println(a/b);}catch (ArithmeticException e) {//e.printStackTrace();int [] arr = new int[10];System.out.println(arr[10]);}catch(Exception e) {e.printStackTrace();}//System.out.println("我好美呀哈哈哈~~~");finally {System.out.println("我好美呀哈哈哈~~~");}}
public void test2() {FileInputStream fis = null;try {File file = new File("hello.txt");fis = new FileInputStream(file);int data = fis.read();while(data != -1) {System.out.println((char)data);data = fis.read();} }catch(FileNotFoundException e) {e.printStackTrace();}catch (IOException e) {e.printStackTrace();}finally {try {if(fis != null)fis.close();}catch(IOException e) {e.printStackTrace();}}}@Testpublic void testMethod() {int num = method();System.out.println(num);}public int method() {try {int [] arr = new int[10];System.out.println(arr[10]);return 1;}catch(ArrayIndexOutOfBoundsException e){e.printStackTrace();return 2;}finally {System.out.println("我一定会被执行");}}四、异常处理的方式二:throws + 异常类型
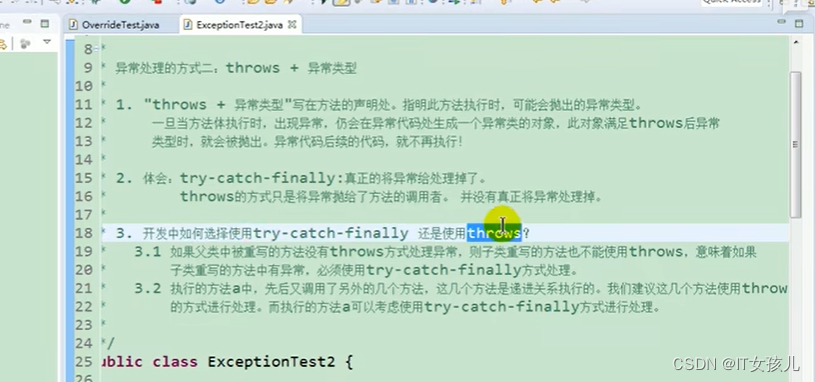
1.如图所示:
2.代码如下:
/*** @author YML*  异常处理的方式二:throws  +  异常类型*  1. "throws +异常类型"*/
public class ExpectionTest2 {public static void main(String[] args) {try {method2();	}catch(FileNotFoundException e) {e.printStackTrace();}catch(IOException e) {e.printStackTrace();}}public static void method3() {try {method2();}catch(IOException e) {e.printStackTrace();}}public static void method2() throws FileNotFoundException,IOException{method1();}public static void method1() throws FileNotFoundException,IOException{File file = new File("hello.txt");FileInputStream fis = new FileInputStream(file);int data = fis.read();while(data != -1) {System.out.println((char)data);data = fis.read();}	fis.close();}
}