文章目录
- 版权声明
- 组件的三大组成部分
- scoped解决样式冲突
- scoped原理
- 2.代码演示
- 组件data函数
- 说明
- 演示
- 组件通信
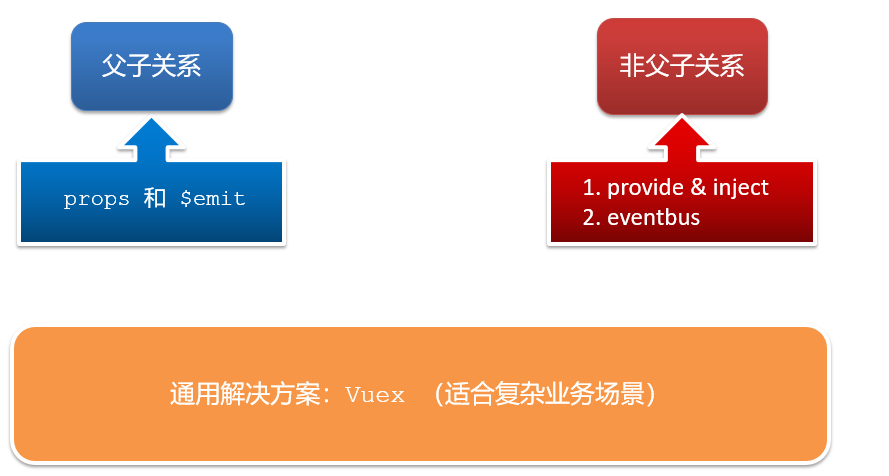
- 组件关系分类
- 通信解决方案
- 父子通信流程
- 子向父通信代
- props详解
- props校验
- props&data、单向数据流
- 小黑记事本(组件版)
- 基础组件结构
- 需求和实现思路
- 完整代码
- App.vue
- TodoHeader.vue
- TodoBody.vue
- TodoFoot.vue
版权声明
- 本博客的内容基于我个人学习黑马程序员课程的学习笔记整理而成。我特此声明,所有版权属于黑马程序员或相关权利人所有。本博客的目的仅为个人学习和交流之用,并非商业用途。
- 我在整理学习笔记的过程中尽力确保准确性,但无法保证内容的完整性和时效性。本博客的内容可能会随着时间的推移而过时或需要更新。
- 若您是黑马程序员或相关权利人,如有任何侵犯版权的地方,请您及时联系我,我将立即予以删除或进行必要的修改。
- 对于其他读者,请在阅读本博客内容时保持遵守相关法律法规和道德准则,谨慎参考,并自行承担因此产生的风险和责任。本博客中的部分观点和意见仅代表我个人,不代表黑马程序员的立场。
组件的三大组成部分
- 结构、样式、逻辑

scoped解决样式冲突
- 默认情况:写在组件中的样式会 全局生效,很容易造成多个组件之间的样式冲突问题。
- 全局样式: 默认组件中的样式会作用到全局,任何一个组件中都会受到此样式的影响
- 局部样式: 可以给组件加上scoped 属性,可以让样式只作用于当前组件
scoped原理
- 当前组件内标签都被添加data-v-hash值 的属性
- css选择器都被添加 [data-v-hash值] 的属性选择器
- 最终效果: 必须是当前组件的元素, 才会有这个自定义属性, 才会被这个样式作用到

2.代码演示
- BaseOne.vue
<template><div class="base-one">BaseOne</div>
</template><script>
export default {}
</script><style scoped>
/* 1.style中的样式 默认是作用到全局的2.加上scoped可以让样式变成局部样式组件都应该有独立的样式,推荐加scoped(原理)-----------------------------------------------------scoped原理:1.给当前组件模板的所有元素,都会添加上一个自定义属性data-v-hash值data-v-5f6a9d56  用于区分开不通的组件2.css选择器后面,被自动处理,添加上了属性选择器div[data-v-5f6a9d56]
*/
div{border: 3px solid blue;margin: 30px;
}
</style>
- BaseTwo.vue
<template><div class="base-one">BaseTwo</div>
</template><script>
export default {}
</script><style scoped>div{border: 3px solid red;margin: 30px;}
</style>
- App.vue
<template><div id="app"><BaseOne></BaseOne><BaseTwo></BaseTwo></div>
</template><script>
import BaseOne from './components/BaseOne'
import BaseTwo from './components/BaseTwo'
export default {name: 'App',components: {BaseOne,BaseTwo}
}
</script>
组件data函数
说明
- 在之前的基础阶段的练习中,data使用的是对象的写法,这是因为方便基础练习,全局只有唯一一个data对象
- data对象写法
Vue.component('my-component', {data: {message: 'Hello, Vue!'},template: '<div>{{ message }}</div>'
})
- data函数写法
Vue.component('my-component', {data: function () {return {count: 0}},template: '<div>{{ count }}</div>'
})
- 在Vue.js中,一个组件的data选项必须是一个函数,而不是一个对象。为了确保每个组件实例都能维护独立的数据对象,避免数据共享和潜在的问题。
- 每次创建一个新的组件实例时,Vue会调用这个函数来返回一个新的数据对象,以保证实例之间的数据隔离。
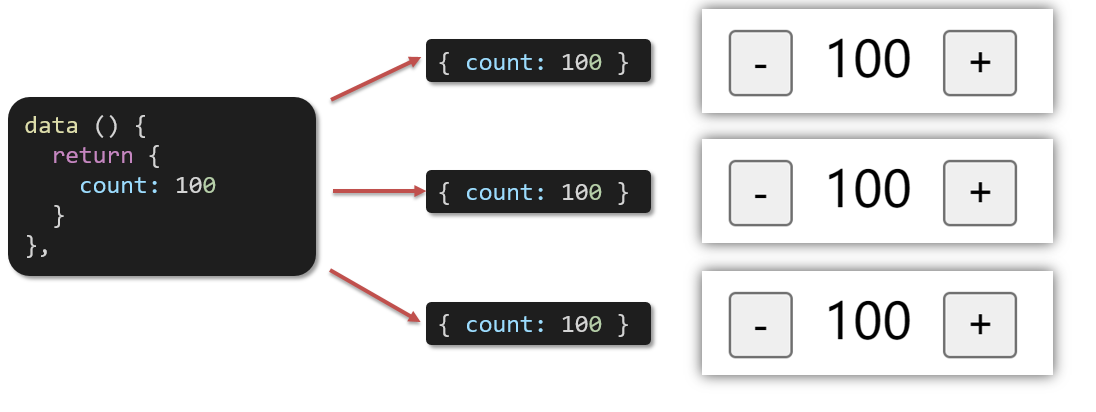
Vue.component('my-component', {data() {return {message: 'Hello, Vue!'}},template: '<div>{{ message }}</div>'
})
演示
- BaseCount.vue
<template><div class="base-count"><button @click="count--">-</button><span>{{ count }}</span><button @click="count++">+</button></div> </template><script> export default {data: function () {return {count: 100,}}, } </script><style> .base-count {margin: 20px; } </style> - App.vue
<template><div class="app"><baseCount></baseCount><baseCount></baseCount><baseCount></baseCount></div>
</template><script>
import baseCount from './components/BaseCount'
export default {components: {baseCount,},
}
</script>
<style>
</style>
组件通信
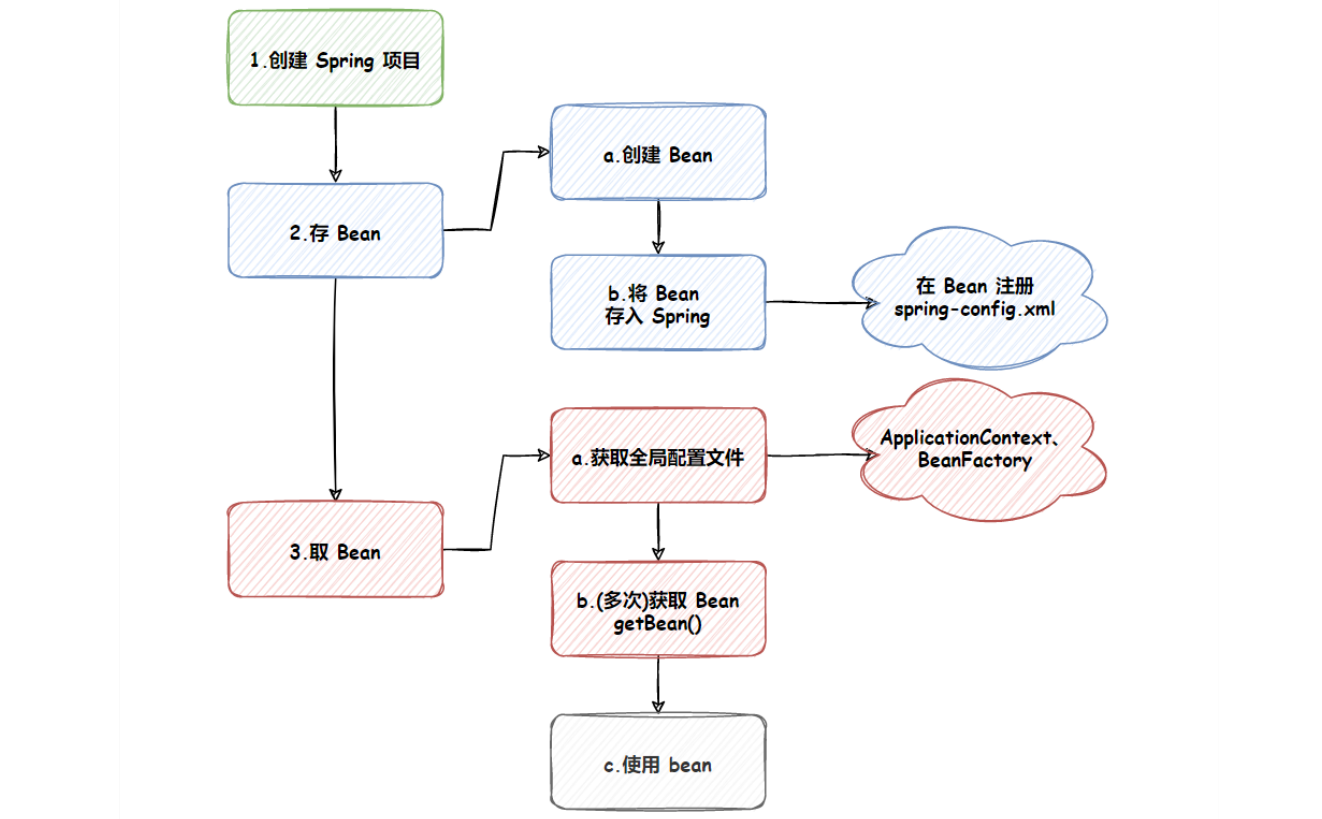
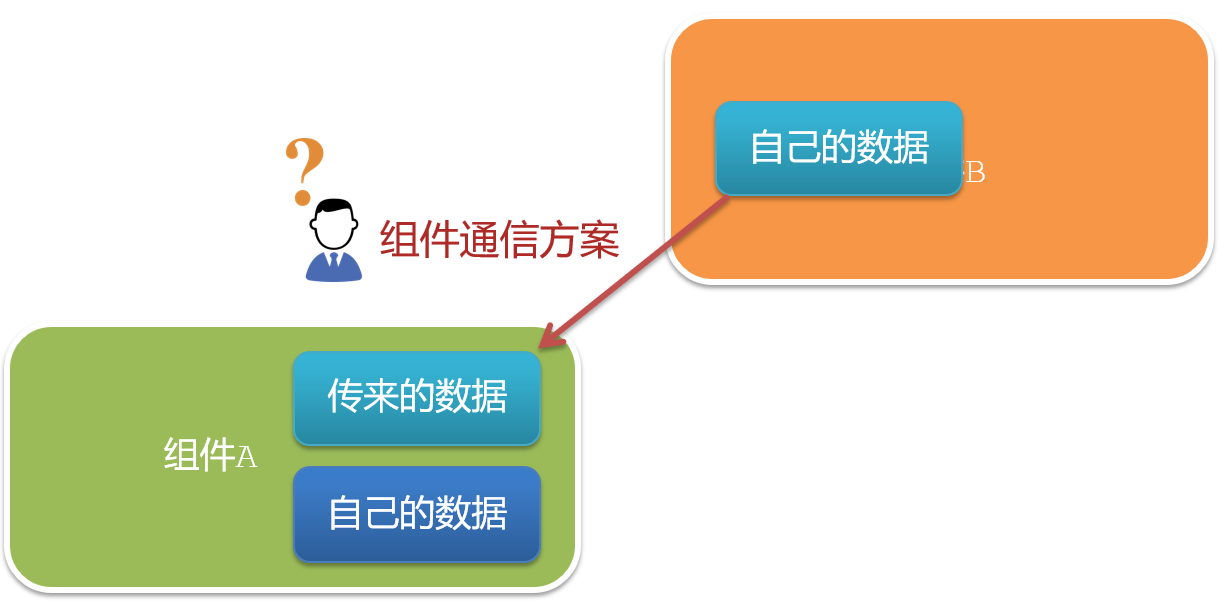
- 组件通信,就是指组件与组件之间的数据传递
- 组件的数据是独立的,无法直接访问其他组件的数据。想使用其他组件的数据,就需要组件通信
组件关系分类

通信解决方案
父子通信流程
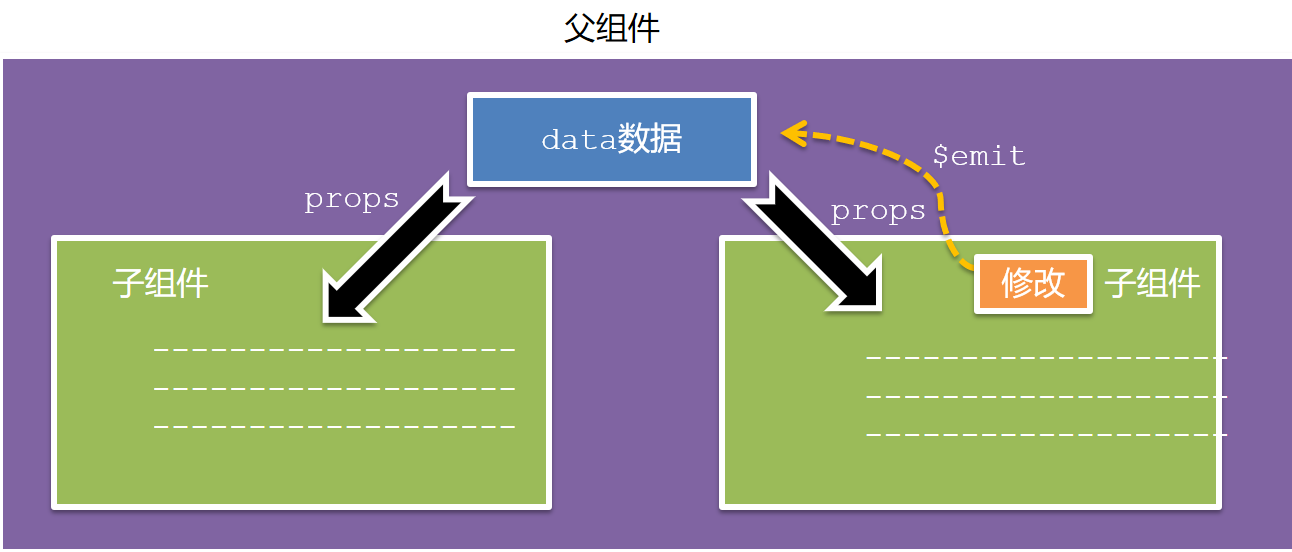
- 父组件通过 props 将数据传递给子组件
- 子组件利用 $emit 通知父组件修改更新
-
原因:再vue设定中数据是有属主的,只有创建数据其的属主组件可以修改该数据
-
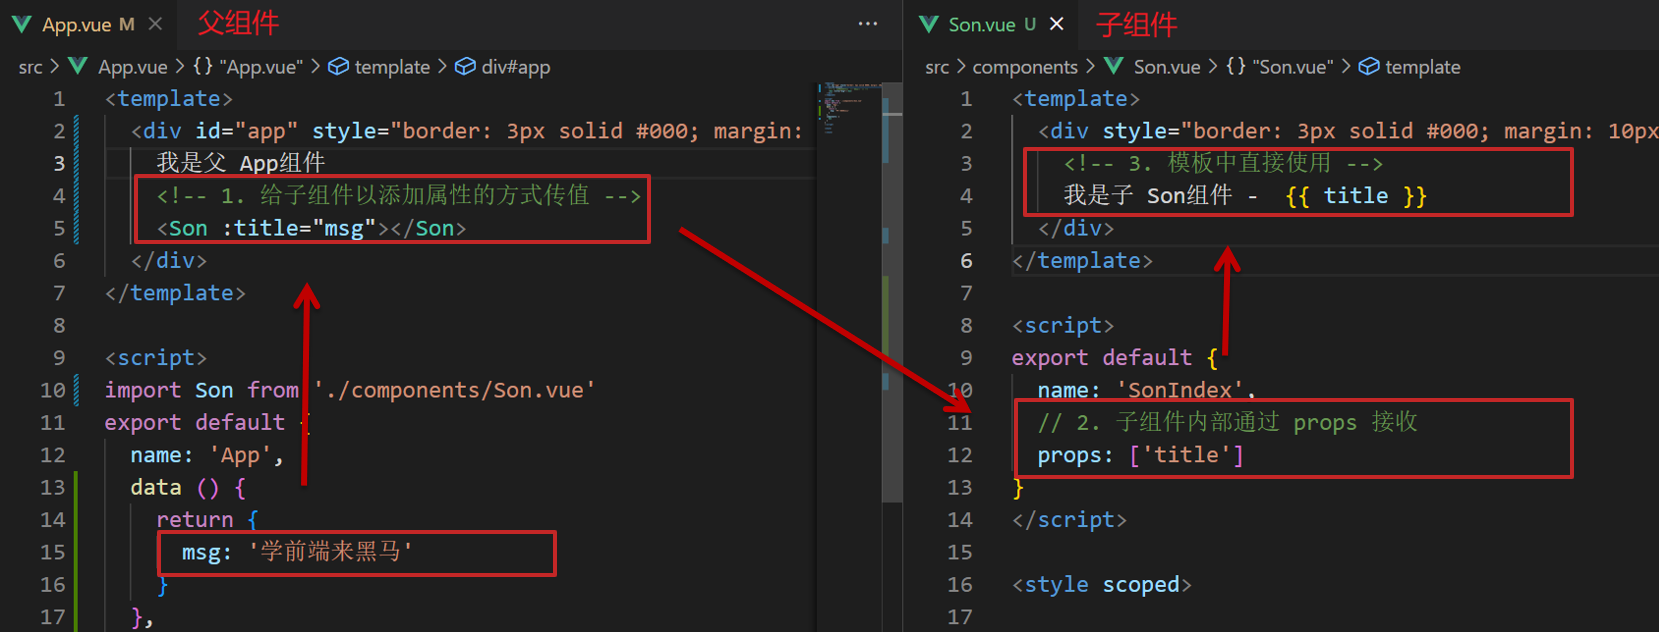
父向子传值步骤:
- 给子组件以添加属性的方式传值
- 子组件内部通过props接收
- 模板中直接使用 props接收的值
- 父组件代码
<template><div class="app" style="border: 3px solid #000; margin: 10px">我是APP组件<!-- 1.给组件标签,添加属性方式 赋值 --><Son :title="myTitle"></Son></div>
</template><script>
import Son from './components/Son.vue'
export default {name: 'App',data() {return {myTitle: '学前端',}},components: {Son,},
}
</script><style>
</style>
- 子组件代码
<template><div class="son" style="border:3px solid #000;margin:10px"><!-- 3.直接使用props的值 -->我是Son组件 {{title}}</div>
</template><script>
export default {name: 'Son-Child',// 2.通过props来接受props:['title']
}
</script><style></style>
子向父通信代
-
子组件利用 $emit 通知父组件,进行修改更新
-
子向父传值步骤
- $emit触发事件,给父组件发送消息通知
- 父组件监听$emit触发的事件
- 提供处理函数,在函数的形参中获取传过来的参数
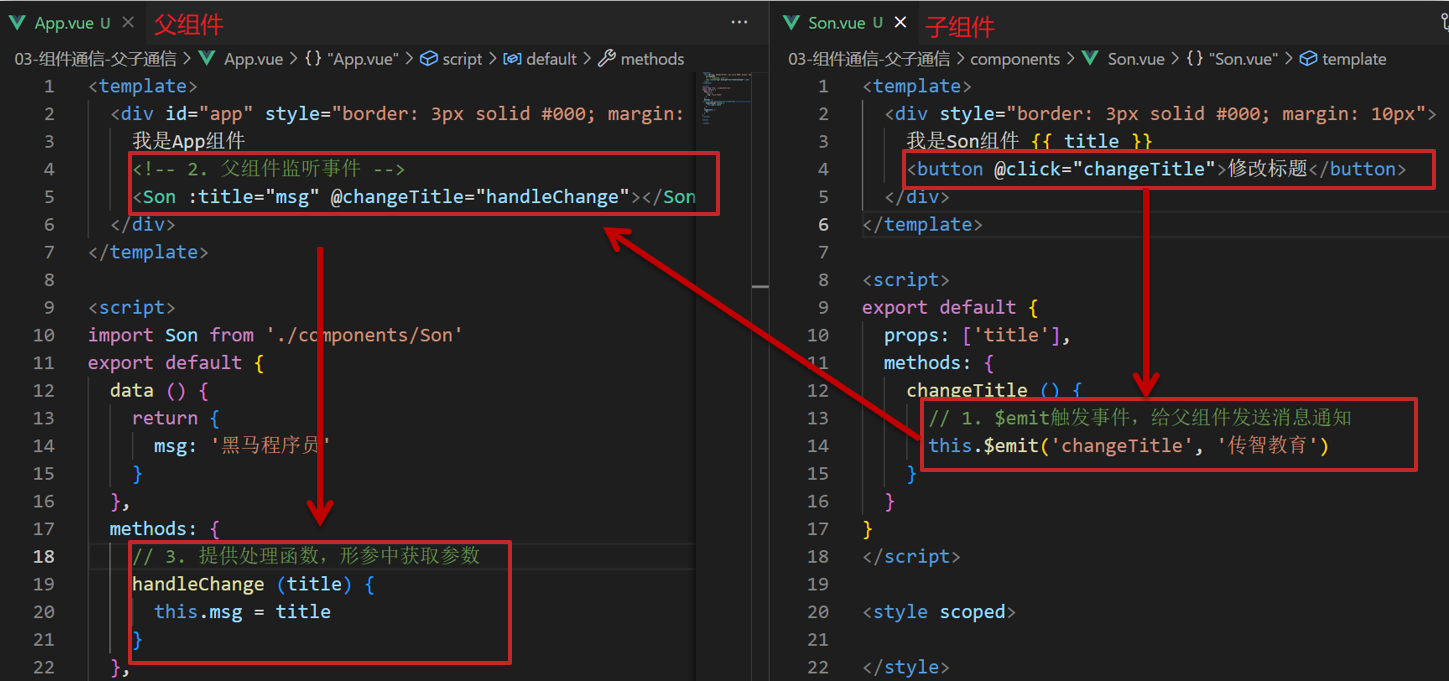
- 子组件代码
<template><div class="son" style="border: 3px solid #000; margin: 10px">我是Son组件 {{ title }}<button @click="changeFn">修改title</button></div>
</template><script>
export default {name: 'Son-Child',props: ['title'],methods: {changeFn() {// 通过this.$emit() 向父组件发送通知this.$emit('changTitle','son')},},
}
</script><style>
</style>
- 父组件代码
<template><div class="app" style="border: 3px solid #000; margin: 10px">我是APP组件<!-- 2.父组件对子组件的消息进行监听 --><Son :title="myTitle" @changTitle="handleChange"></Son></div>
</template><script>
import Son from './components/Son.vue'
export default {name: 'App',data() {return {myTitle: 'father',}},components: {Son,},methods: {// 3.提供处理函数,提供逻辑handleChange(newTitle) {this.myTitle = newTitle},},
}
</script><style>
</style>
props详解
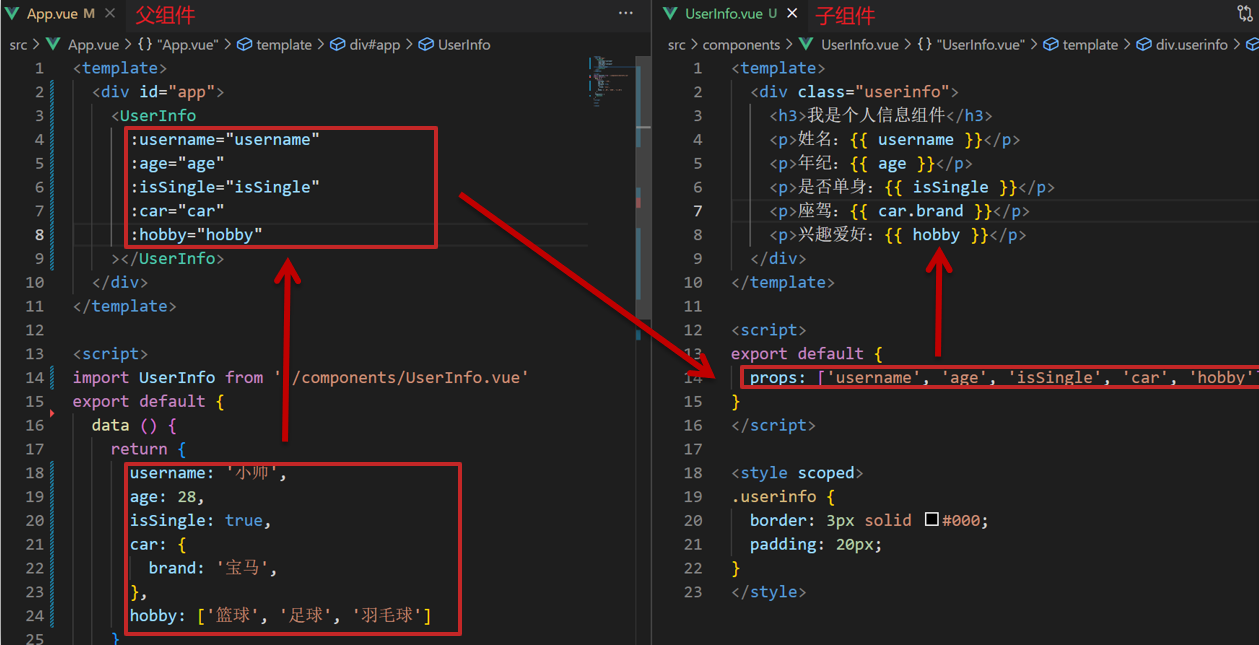
- 在Vue.js中,props(属性)是一种用于从父组件向子组件传递数据的机制。
- props 定义:组件上 注册的一些 自定义属性
- props 作用:向子组件传递数据
- 特点
- 可以 传递 任意数量 的prop
- 可以 传递 任意类型 的prop
props校验
- 作用:为组件的 prop 指定验证要求,不符合要求,控制台就会有错误提示 → 帮助开发者,快速发现错误
- 语法:
① 类型校验
② 非空校验
③ 默认值
④ 自定义校验 - 基础写法:

- 完整写法
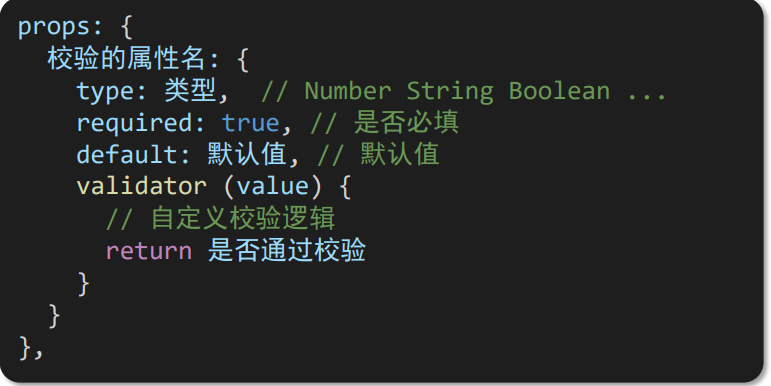
- default和required一般不同时写(因为当时必填项时,肯定是有值的)
- default后面如果是简单类型的值,可以直接写默认。如果是复杂类型的值,则需要以函数的形式return一个默认值
props: {w: {type: Number,required: true,default: 0,validator(val) {// console.log(val)if (val >= 100 || val <= 0) {console.error('传入的范围必须是0-100之间')return false} else {return true}},},}
props&data、单向数据流
-
共同点:都可以给组件提供数据
-
区别
- data 的数据是自己的 → 随便改
- prop 的数据是外部的 → 不能直接改,要遵循 单向数据流
-
单向数据流:父级props 的数据更新,会向下流动,影响子组件。这个数据流动是单向的

-
父组件代码
<template><div class="app"><BaseCount :count="count" @changeCount="handleChange"></BaseCount></div>
</template><script>
import BaseCount from './components/BaseCount.vue'
export default {components:{BaseCount},data(){return {count:100}},methods:{handleChange(newVal){this.count = newVal}}
}
</script><style></style>
- 子组件代码
<template><div class="base-count"><button @click="handleSub">-</button><span>{{ count }}</span><button @click="handleAdd">+</button></div>
</template><script>
export default {props: {count: {type: Number,},},methods: {handleSub() {this.$emit('changeCount', this.count - 1)},handleAdd() {this.$emit('changeCount', this.count + 1)},},
}
</script><style>
.base-count {margin: 20px;
}
</style>
小黑记事本(组件版)
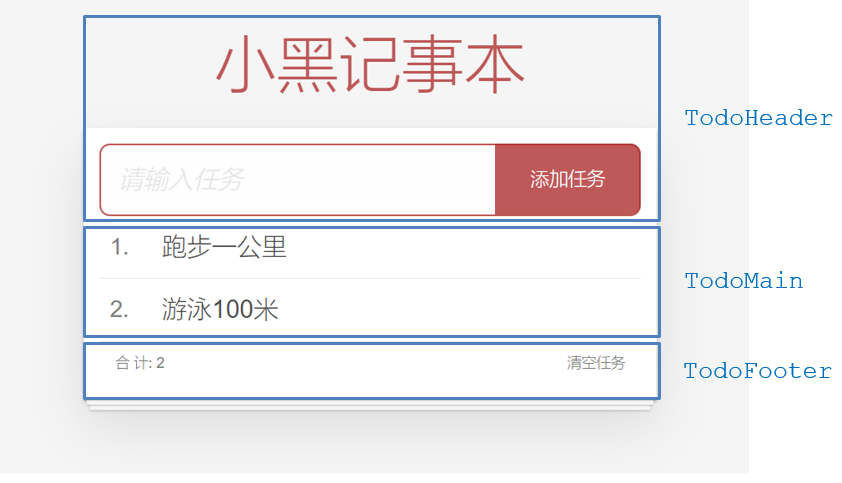
基础组件结构
需求和实现思路
需求说明:
① 拆分基础组件
② 渲染待办任务
③ 添加任务
④ 删除任务
⑤ 底部合计 和 清空功能
⑥ 持久化存储
- 列表渲染思路分析:
- 提供数据:提供在公共的父组件 App.vue
- 通过父传子,将数据传递给TodoMain
- 利用v-for进行渲染
- 添加功能思路分析:
- 收集表单数据 v-model
- 监听时间 (回车+点击 都要进行添加)
- 子传父,将任务名称传递给父组件App.vue
- 父组件接受到数据后 进行添加 unshift(自己的数据自己负责)
- 删除功能思路分析:
- 监听时间(监听删除的点击)携带id
- 子传父,将删除的id传递给父组件App.vue
- 进行删除 filter (自己的数据自己负责)
- 底部功能及持久化存储思路分析:
- 底部合计:父组件传递list到底部组件 —>展示合计
- 清空功能:监听事件 —> 子组件通知父组件 —>父组件清空
- 持久化存储:watch监听数据变化,持久化到本地
完整代码
App.vue
<template><!-- 主体区域 --><section id="app"><TodoHeader @add="handleAdd"></TodoHeader><TodoBody :list="list" @del="handleDel"></TodoBody><TodoFoot :len="list.length" @clear="handleClear"></TodoFoot></section>
</template><script>
import TodoHeader from "@/components/TodoHeader";
import TodoBody from "@/components/TodoBody";
import TodoFoot from "@/components/TodoFoot";// 渲染功能:
// 1.提供数据: 提供在公共的父组件 App.vue
// 2.通过父传子,将数据传递给TodoMain
// 3.利用 v-for渲染// 添加功能:
// 1.手机表单数据  v-model
// 2.监听事件(回车+点击都要添加)
// 3.子传父,讲任务名称传递给父组件 App.vue
// 4.进行添加 unshift(自己的数据自己负责)
// 5.清空文本框输入的内容
// 6.对输入的空数据 进行判断// 删除功能
// 1.监听事件(监听删除的点击) 携带id
// 2.子传父,讲删除的id传递给父组件的App.vue
// 3.进行删除filter(自己的数据 自己负责)// 底部合计:父传子  传list.length 渲染
// 清空功能:子传父  通知父组件 → 父组件进行更新
// 持久化存储:watch深度监视list的变化 -> 往本地存储 ->进入页面优先读取本地数据export default {components:{TodoHeader,TodoBody,TodoFoot},data () {return {//优先从本地存储读取list: JSON.parse(localStorage.getItem('list')) || [{id:1, name: "干饭"},{id:2, name: "干饭"},{id:3, name: "干饭"}]}},methods:{handleAdd(newVal) {//console.log(newVal)this.list.unshift({id: +new Date(),name: newVal})},handleDel(id) {this.list=this.list.filter(item=> item.id!==id)},handleClear() {this.list=[]}},watch:{list:{deep: true,handle(newValue) {localStorage.setItem('list',JSON.stringify(newValue))}}}
}
</script><style></style>
TodoHeader.vue
<template><!-- 输入框 --><header class="header"><h1>小黑记事本</h1><input placeholder="请输入任务" class="new-todo"  v-model="todoname" @keyup.enter="handleAdd"/><button class="add" @click="handleAdd">添加任务</button></header></template><script>
export default {name: "TodoHeader",data() {return{todoname: ''}},methods:{handleAdd() {if(this.todoname.trim()===''){alert("任务名称为空")return}this.$emit("add",this.todoname)this.todoname=''}}
}</script><style scoped></style>
TodoBody.vue
<template><!-- 列表区域 --><section class="main"><ul v-for="(item,index) in list" :key="item.id" class="todo-list"><li class="todo"><div class="view"><span class="index">{{index+1}}.</span> <label>{{item.name}}</label><button class="destroy" @click="handeleDel(item.id)"></button></div></li></ul></section>
</template><script>
export default {name: "TodoBody",props: {list: {type: Array}},methods:{handeleDel(id) {this.$emit('del',id)}}
}
</script><style scoped></style>
TodoFoot.vue
<template><!-- 统计和清空 --><footer class="footer"><!-- 统计 --><span class="todo-count">合 计:<strong> {{len}} </strong></span><!-- 清空 --><button class="clear-completed" @click="clear">清空任务</button></footer></template><script>
export default {name: "TodoFoot",props:{len: Number},methods:{clear() {this.$emit('clear')}}
}
</script><style scoped></style>