1. USB总线
1.1 usb总线定义
在linux 设备模型中,总线由bus_type 结构表示,我们所用的 I2C、SPI、USB 都是用这个结构体来定义的。该结构体定义在 include/linux/device.h文件中:
struct bus_type {const char              *name;const char              *dev_name;struct device           *dev_root;const struct attribute_group **bus_groups;const struct attribute_group **dev_groups;const struct attribute_group **drv_groups;int (*match)(struct device *dev, struct device_driver *drv);int (*uevent)(struct device *dev, struct kobj_uevent_env *env);int (*probe)(struct device *dev);int (*remove)(struct device *dev);void (*shutdown)(struct device *dev);int (*online)(struct device *dev);int (*offline)(struct device *dev);int (*suspend)(struct device *dev, pm_message_t state);int (*resume)(struct device *dev);int (*num_vf)(struct device *dev);int (*dma_configure)(struct device *dev);const struct dev_pm_ops *pm;const struct iommu_ops *iommu_ops;struct subsys_private *p;struct lock_class_key lock_key;bool need_parent_lock;
};
其中部分字段的含义如下:
- name:总线名称;
- bus_groups:总线属性;
- dev_groups:该总线上所有设备的默认属性;
- drv_groups:该总线上所有驱动的默认属性;
- match:当有新的设备或驱动添加到总线上时match函数被调用,如果设备和驱动可以匹配,返回0;
- uevent:当一个设备添加、移除或添加环境变量时,函数调用;
- probe:当有新设备或驱动添加时,probe函数调用,并且回调该驱动的probe函数来初始化相关联的设备;
- remove:设备移除时调用remove函数;
- shutdown:设备关机时调用shutdown函数;
- suspend:设备进入睡眠时调用suspend函数;
- resume:设备唤醒时调用resume函数;
- pm:总线的电源管理选项,并回调设备驱动的电源管理模块;
usb总线是 bus_type 类型的全局变量,这个变量已经被 linux 内核赋值好了,其结构体成员对应的函数也已经在内核里面写好,定义在drivers/usb/core/driver.c:
struct bus_type usb_bus_type = {.name =         "usb",.match =        usb_device_match,.uevent =       usb_uevent,.need_parent_lock =     true,
};
这里我们重点关注BUS匹配函数usb_device_match即可。
1.2 usb设备和驱动匹配
1.2.1 usb_device_match
usb_bus_type 中的usb_device_match就是用来进行驱动和设备匹配的函数,不同的总线对应的match 函数肯定不一样,这个我们不用管,内核都会写好。
我们所用的BUS总线对应的 match 函数是 usb_device_match函数,该函数定义在drivers/usb/core/driver.c:
static int usb_device_match(struct device *dev, struct device_driver *drv)
{/* devices and interfaces are handled separately */if (is_usb_device(dev)) {/* interface drivers never match devices */if (!is_usb_device_driver(drv))return 0;/* TODO: Add real matching code */return 1;} else if (is_usb_interface(dev)) {struct usb_interface *intf;struct usb_driver *usb_drv;const struct usb_device_id *id;/* device drivers never match interfaces */if (is_usb_device_driver(drv))return 0;intf = to_usb_interface(dev);usb_drv = to_usb_driver(drv);id = usb_match_id(intf, usb_drv->id_table);if (id)return 1;id = usb_match_dynamic_id(intf, usb_drv);if (id)return 1;}return 0;
}
在介绍这段之前,我们先来介绍一下usb设备和usb接口的区别:
- 对于usb设备,使用struct usb_device类型表示,dev成员的type成员会设置成usb_device_type;
- 对于usb接口,使用struct usb_interface类型表示,dev成员的type成员则会设成usb_if_device_type;
接着我们再来说一下usb设备驱动和usb接口驱动的区别:
- 对于usb设备驱动,使用struct usb_device_driver类型表示,是通过usb_register_device_driver函数来注册的,这个后面会介绍;
- 对于usb接口驱动,使用struct usb_driver类型表示,是通过usb_register函数来注册的,这个后面会介绍;
不管是设备驱动usb_device_driver,还是接口驱动usb_driver数据结构中都包含了struct usbdrv_wrap项,其定义如下:
struct usbdrv_wrap {struct device_driver driver;int for_devices;
}
数据结构中的for_devices用来表示该驱动是设备驱动还是接口驱动,如果为设备驱动,则在用usb_register_device_driver注册时,会将该变量for_devices设置成1,而接口驱动则设为0。usb_device_match中的is_usb_device_driver函数就是通过获取上而结构中的for_devices来进行判断是设备还是接口驱动的。
接着我们再来分析一下上面的代码,该函数有两个参数:设备和设备驱动,该函数可以分为两部分,一部分用于匹配usb设备,另一部分用于匹配usb接口;
- 对于usb设备,当匹配的是usb设备驱动时,将会匹配成功,实际上所有的usb设备对应的设备驱动都是usb_generic_driver,该设备驱动在usb子系统初始化时注册;
- 对于usb接口,先用is_usb_device_driver来进行判断,如果不是usb设备驱动则继续判断,否则退出;然后再通过usb_match_id函数来判断接口和接口驱动中的usb_device_id是否匹配。
驱动工程师的工作基本上集中在接口驱动上,所以通常是通过usb_register来注册usb接口驱动的。
1.2.2 usb_match_id
const struct usb_device_id *usb_match_id(struct usb_interface *interface,const struct usb_device_id *id)
{/* proc_connectinfo in devio.c may call us with id == NULL. */if (id == NULL)return NULL;/* It is important to check that id->driver_info is nonzero,since an entry that is all zeroes except for a nonzeroid->driver_info is the way to create an entry thatindicates that the driver want to examine everydevice and interface. */for (; id->idVendor || id->idProduct || id->bDeviceClass ||id->bInterfaceClass || id->driver_info; id++) {if (usb_match_one_id(interface, id))return id;}return NULL;
}
1.2.3 usb_match_one_id
/* returns 0 if no match, 1 if match */
int usb_match_device(struct usb_device *dev, const struct usb_device_id *id)
{if ((id->match_flags & USB_DEVICE_ID_MATCH_VENDOR) &&id->idVendor != le16_to_cpu(dev->descriptor.idVendor))return 0;if ((id->match_flags & USB_DEVICE_ID_MATCH_PRODUCT) &&id->idProduct != le16_to_cpu(dev->descriptor.idProduct))return 0;/* No need to test id->bcdDevice_lo != 0, since 0 is nevergreater than any unsigned number. */if ((id->match_flags & USB_DEVICE_ID_MATCH_DEV_LO) &&(id->bcdDevice_lo > le16_to_cpu(dev->descriptor.bcdDevice)))return 0;if ((id->match_flags & USB_DEVICE_ID_MATCH_DEV_HI) &&(id->bcdDevice_hi < le16_to_cpu(dev->descriptor.bcdDevice)))return 0;if ((id->match_flags & USB_DEVICE_ID_MATCH_DEV_CLASS) &&(id->bDeviceClass != dev->descriptor.bDeviceClass))return 0;if ((id->match_flags & USB_DEVICE_ID_MATCH_DEV_SUBCLASS) &&(id->bDeviceSubClass != dev->descriptor.bDeviceSubClass))return 0;if ((id->match_flags & USB_DEVICE_ID_MATCH_DEV_PROTOCOL) &&(id->bDeviceProtocol != dev->descriptor.bDeviceProtocol))return 0;return 1;
}/* returns 0 if no match, 1 if match */
int usb_match_one_id_intf(struct usb_device *dev,struct usb_host_interface *intf,const struct usb_device_id *id)
{/* The interface class, subclass, protocol and number should never be* checked for a match if the device class is Vendor Specific,* unless the match record specifies the Vendor ID. */if (dev->descriptor.bDeviceClass == USB_CLASS_VENDOR_SPEC &&!(id->match_flags & USB_DEVICE_ID_MATCH_VENDOR) &&(id->match_flags & (USB_DEVICE_ID_MATCH_INT_CLASS |USB_DEVICE_ID_MATCH_INT_SUBCLASS |USB_DEVICE_ID_MATCH_INT_PROTOCOL |USB_DEVICE_ID_MATCH_INT_NUMBER)))return 0;if ((id->match_flags & USB_DEVICE_ID_MATCH_INT_CLASS) &&(id->bInterfaceClass != intf->desc.bInterfaceClass))return 0;if ((id->match_flags & USB_DEVICE_ID_MATCH_INT_SUBCLASS) &&(id->bInterfaceSubClass != intf->desc.bInterfaceSubClass))return 0;if ((id->match_flags & USB_DEVICE_ID_MATCH_INT_PROTOCOL) &&(id->bInterfaceProtocol != intf->desc.bInterfaceProtocol))return 0;if ((id->match_flags & USB_DEVICE_ID_MATCH_INT_NUMBER) &&(id->bInterfaceNumber != intf->desc.bInterfaceNumber))return 0;return 1;
}/* returns 0 if no match, 1 if match */
int usb_match_one_id(struct usb_interface *interface,const struct usb_device_id *id)
{struct usb_host_interface *intf;struct usb_device *dev;/* proc_connectinfo in devio.c may call us with id == NULL. */if (id == NULL)return 0;intf = interface->cur_altsetting;dev = interface_to_usbdev(interface);if (!usb_match_device(dev, id))return 0;return usb_match_one_id_intf(dev, intf, id);
}
实际上这里就是将usb设备(usb设备的设备描述符信息、以及接口描述符信息)的信息和usb_driver驱动id_table信息进行匹配,如果匹配成功,则返回1,否则返回0.
1.3 usb总线注册
usb的总线注册是由usb_init函数完成,该函数也是usb子系统的入口函数,代码实现在drivers/usb/core/usb.c文件中,模块入口/出口函数如下:
subsys_initcall(usb_init);
module_exit(usb_exit);
usb_init函数代码:
/** Init*/
static int __init usb_init(void)
{int retval;if (usb_disabled()) {pr_info("%s: USB support disabled\n", usbcore_name);return 0;}usb_init_pool_max();usb_debugfs_init();usb_acpi_register();retval = bus_register(&usb_bus_type);if (retval)goto bus_register_failed;retval = bus_register_notifier(&usb_bus_type, &usb_bus_nb);if (retval)goto bus_notifier_failed;retval = usb_major_init();if (retval)goto major_init_failed;retval = usb_register(&usbfs_driver);if (retval)goto driver_register_failed;retval = usb_devio_init();if (retval)goto usb_devio_init_failed;retval = usb_hub_init();if (retval)goto hub_init_failed;retval = usb_register_device_driver(&usb_generic_driver, THIS_MODULE);if (!retval)goto out;usb_hub_cleanup();
hub_init_failed:usb_devio_cleanup();
usb_devio_init_failed:usb_deregister(&usbfs_driver);
driver_register_failed:usb_major_cleanup();
major_init_failed:bus_unregister_notifier(&usb_bus_type, &usb_bus_nb);
bus_notifier_failed:bus_unregister(&usb_bus_type);
bus_register_failed:usb_acpi_unregister();usb_debugfs_cleanup();
out:return retval;
}
在usb_init函数中主要有如下的三个主要函数:
- 通过usb_debugfs_init初始化usb debugfs;
- 通过bus_register注册usb总线usb_bus_type;
- 通过bus_register_notifier注册usb总线通知链;
- 通过usb_major_init注册usb控制器字符设备,主设备编号为181,字符设备名称为usb;
- 通过usb_register注册usbfs驱动;
- 通过usb_devio_init注册usb设备字符设备,主设备编号为189,字符设备名称为usb_device;
- 通过usb_hub_init初始化usb hub接口驱动;
- 通过usb_register_device_driver注册usb设备驱动.
2. usb子系统初始化
由于usb_init函数比较复杂,这里就单独一小节进行介绍。
2.1 usb_debugfs_init()
usb_debugfs_init函数定义在drivers/usb/core/usb.c文件中:
static void usb_debugfs_init(void)
{usb_debug_root = debugfs_create_dir("usb", NULL);debugfs_create_file("devices", 0444, usb_debug_root, NULL,&usbfs_devices_fops);
}
其主要作用就是在debug文件系统中创建一个usb目录,然后在usb目录下面创建一个devices的文件。
要使用debugfs下面的usb功能,需要先挂着debug文件系统,具体初始化了啥调试接口,看下usbfs_devices_fops操作函数集。
mount -t debugfs none $(debugfs)
2.2 bus_register(&usb_bus_type)
struct bus_type usb_bus_type = {.name =         "usb",.match =        usb_device_match,.uevent =       usb_uevent,.need_parent_lock =     true,
};
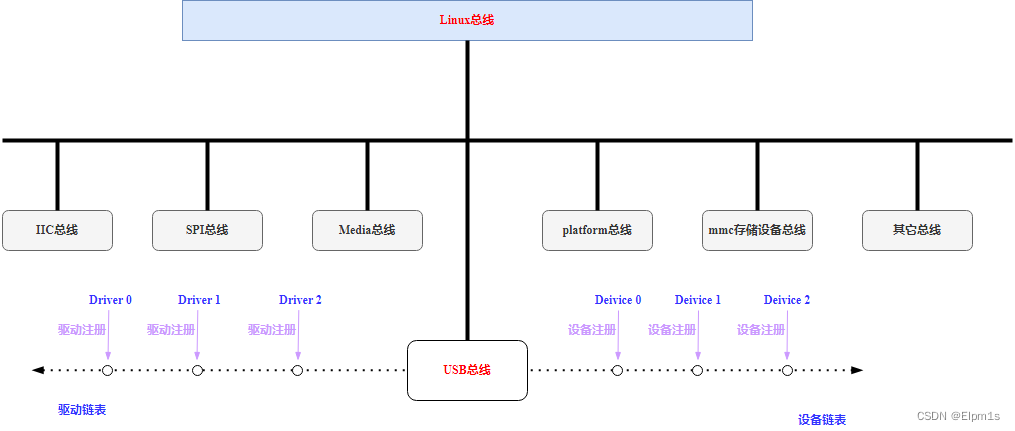
bus_register中创建了两个链表,一个为设备链表,一个为驱动链表:
klist_init(&priv->klist_devices, klist_devices_get, klist_devices_put);
klist_init(&priv->klist_drivers, NULL, NULL);
usb总线设备链表上挂载的是usb设备或者usb接口,而在usb总线驱动链表上挂在的是usb设备驱动或者是usb接口驱动。
无论是usb设备还是usb接口,其设备基类都是struct device,该类型包含一个成员是bus,类型为struct bus_type,会被初始化为usb_bus_type。
无论是usb设备驱动还是usb接口驱动,其驱动基类都是struct device_driver,该类型包含一个成员是bus,类型为struct bus_type,会被初始化为usb_bus_type。
usb总线上设备链表上的设备和驱动链表上的驱动的匹配函数是usb_device_match,这个上面已经介绍过了。
bus_register函数调用后,就会在用户空间生成usb相关文件,执行如下命令:
root:~# ls /sys/bus/usb
devices  drivers  drivers_autoprobe  drivers_probe  uevent
/sys/bus/usb/devices里用来存放的是usb设备,/sys/bus/usb/drivers里用来存放的是usb驱动:
root:~# ls /sys/bus/usb/devices
1-0:1.0  2-0:1.0  2-1  2-1:1.0  2-2  2-2.1  2-2:1.0  2-2.1:1.0  2-2.1:1.1  usb1  usb2
root:~# ls /sys/bus/usb/drivers
btusb  hub  usb  usbfs  usbhid
2.3 bus_register_notifier(&usb_bus_type,&usb_bus_nb)
bus_register_notifier函数定义在drivers/base/bus.c:
int bus_register_notifier(struct bus_type *bus, struct notifier_block *nb)
{return blocking_notifier_chain_register(&bus->p->bus_notifier, nb);
}
usb_bus_nb定义在drivers/usb/core/usb.c:
static struct notifier_block usb_bus_nb = {.notifier_call = usb_bus_notify,
};
这里注册了usb总线通知链,当向usb_bus_type添加删除设备的时候会调用usb_bus_nb指定的notifier_cal方法,即usb_bus_notify:
/** Notifications of device and interface registration*/
static int usb_bus_notify(struct notifier_block *nb, unsigned long action,void *data)
{struct device *dev = data;switch (action) {case BUS_NOTIFY_ADD_DEVICE:       // 添加设备if (dev->type == &usb_device_type)   // usb设备(void) usb_create_sysfs_dev_files(to_usb_device(dev));else if (dev->type == &usb_if_device_type)   // usb接口usb_create_sysfs_intf_files(to_usb_interface(dev));break;case BUS_NOTIFY_DEL_DEVICE:          // 删除设备if (dev->type == &usb_device_type)   // usb设备usb_remove_sysfs_dev_files(to_usb_device(dev));else if (dev->type == &usb_if_device_type)  // usb接口usb_remove_sysfs_intf_files(to_usb_interface(dev));break;}return 0;
}
2.4 usb_major_init()
usb_major_init函数定义在drivers/usb/core/file.c:
int usb_major_init(void)
{int error;error = register_chrdev(USB_MAJOR, "usb", &usb_fops);if (error)printk(KERN_ERR "Unable to get major %d for usb devices\n",USB_MAJOR);return error;
}
这里使用register_chrdev向内核注册usb主控制器字符设备,字符设备的名称为usb,字符设备的主设备号为USB_MAJOR(180),设备操作为usb_fops。
register_chrdev封装了register_chrdev_region、cdev_alloc、cdev_add相关逻辑,这里不介绍了。
其中usb_fops定义为:
static const struct file_operations usb_fops = {.owner =        THIS_MODULE,.open =         usb_open,.llseek =       noop_llseek,
};
2.5 usb_register(&usbfs_driver)
用usb_register宏向linux内核注册usb接口驱动usbfs_driver,usbfs_driver定义在drivers/usb/core/devio.c:
struct usb_driver usbfs_driver = {.name =         "usbfs",.probe =        driver_probe,.disconnect =   driver_disconnect,.suspend =      driver_suspend,.resume =       driver_resume,
};
usb_rigister宏定义在include/linux/usb.h文件中:
/* use a define to avoid include chaining to get THIS_MODULE & friends */
#define usb_register(driver) \usb_register_driver(driver, THIS_MODULE, KBUILD_MODNAME)
/*** usb_register_driver - register a USB interface driver* @new_driver: USB operations for the interface driver* @owner: module owner of this driver.* @mod_name: module name string** Registers a USB interface driver with the USB core.  The list of* unattached interfaces will be rescanned whenever a new driver is* added, allowing the new driver to attach to any recognized interfaces.** Return: A negative error code on failure and 0 on success.** NOTE: if you want your driver to use the USB major number, you must call* usb_register_dev() to enable that functionality.  This function no longer* takes care of that.*/
int usb_register_driver(struct usb_driver *new_driver, struct module *owner,const char *mod_name)
{int retval = 0;if (usb_disabled())return -ENODEV;new_driver->drvwrap.for_devices = 0;new_driver->drvwrap.driver.name = new_driver->name;new_driver->drvwrap.driver.bus = &usb_bus_type;new_driver->drvwrap.driver.probe = usb_probe_interface;new_driver->drvwrap.driver.remove = usb_unbind_interface;new_driver->drvwrap.driver.owner = owner;new_driver->drvwrap.driver.mod_name = mod_name;spin_lock_init(&new_driver->dynids.lock);INIT_LIST_HEAD(&new_driver->dynids.list);retval = driver_register(&new_driver->drvwrap.driver);if (retval)goto out;retval = usb_create_newid_files(new_driver);if (retval)goto out_newid;pr_info("%s: registered new interface driver %s\n",usbcore_name, new_driver->name);out:return retval;out_newid:driver_unregister(&new_driver->drvwrap.driver);printk(KERN_ERR "%s: error %d registering interface ""       driver %s\n",usbcore_name, retval, new_driver->name);goto out;
}
这里首先初始化usb接口驱动里的驱动基类driver,然后调用driver_register进行驱动注册,关于驱动注册函数driver_register具体参考linux驱动移植-总线设备驱动。
这里简单介绍一下driver_register函数执行流程:
- 将usb接口驱动添加到usb总线上(usb_bus_type);
- 遍历usb总线上的所有usb接口,然后调用usb_device_match进行usb接口驱动和usb接口的匹配;
- 匹配成功后最终会执行usb接口驱动的probe函数,过程中的驱动基类driver的probe函数和 usb_probe_interface 函数都是达到这个目的的中转函数而已。
2.6 usb_devio_init()
usb_devio_init函数实现在drivers/usb/core/devio.c:
int __init usb_devio_init(void)
{int retval;retval = register_chrdev_region(USB_DEVICE_DEV, USB_DEVICE_MAX,"usb_device");if (retval) {printk(KERN_ERR "Unable to register minors for usb_device\n");goto out;}cdev_init(&usb_device_cdev, &usbdev_file_operations);retval = cdev_add(&usb_device_cdev, USB_DEVICE_DEV, USB_DEVICE_MAX);if (retval) {printk(KERN_ERR "Unable to get usb_device major %d\n",USB_DEVICE_MAJOR);goto error_cdev;}usb_register_notify(&usbdev_nb);
out:return retval;error_cdev:unregister_chrdev_region(USB_DEVICE_DEV, USB_DEVICE_MAX);goto out;
}
首先使用register_chrdev_region来静态注册一组字符设备编号,主设备编号为USB_DEVICE_DEV(189),次设备编号从0~USB_DEVICE_MAX,字符设备名称为usb_device。
然后使用cdev_init初始化字符设备结构体cdev,usbdev_file_operations结构体放入cdev-> ops 里。
最后使用cdev_add将字符设备usb_device_cdev添加到系统,并将USB_DEVICE_DEV(定义为 MKDEV(USB_DEVICE_MAJOR, 0),即起始设备编号)放入cdev-> dev里, USB_DEVICE_MAX放入cdev->count里。
函数的最后又使用usb_register_notify注册了usb设备通知链。
2.7 usb_register_notify(&usbdev_nb)
usbdev_nb定义在 drivers/usb/core/devio.c:
static struct notifier_block usbdev_nb = {.notifier_call =        usbdev_notify,
};
usb_register_notify函数定义在drivers/usb/core/notify.c:
/*** usb_register_notify - register a notifier callback whenever a usb change happens* @nb: pointer to the notifier block for the callback events.** These changes are either USB devices or busses being added or removed.*/
void usb_register_notify(struct notifier_block *nb)
{blocking_notifier_chain_register(&usb_notifier_list, nb);
}
usb通知链表头为usb_notifier_list:
static BLOCKING_NOTIFIER_HEAD(usb_notifier_list);
在drivers/usb/core/notify.c文件中,有四个函数对usb_notifier_list中发送通知,这四个函数如下:
void usb_notify_add_device(struct usb_device *udev)
{blocking_notifier_call_chain(&usb_notifier_list, USB_DEVICE_ADD, udev);
}void usb_notify_remove_device(struct usb_device *udev)
{/* Protect against simultaneous usbfs open */mutex_lock(&usbfs_mutex);blocking_notifier_call_chain(&usb_notifier_list,USB_DEVICE_REMOVE, udev);mutex_unlock(&usbfs_mutex);
}void usb_notify_add_bus(struct usb_bus *ubus)
{blocking_notifier_call_chain(&usb_notifier_list, USB_BUS_ADD, ubus);
}void usb_notify_remove_bus(struct usb_bus *ubus)
{blocking_notifier_call_chain(&usb_notifier_list, USB_BUS_REMOVE, ubus);
}
当这些事件发生后会调用usbdev_nb指定的notifier_cal方法,即usbdev_notify:
static int usbdev_notify(struct notifier_block *self,unsigned long action, void *dev)
{switch (action) {case USB_DEVICE_ADD:  // 设备添加break;case USB_DEVICE_REMOVE:  // 设备删除usbdev_remove(dev);break;}return NOTIFY_OK;
}
2.8 usb_hub_init()
int usb_hub_init(void)
{if (usb_register(&hub_driver) < 0) {printk(KERN_ERR "%s: can't register hub driver\n",usbcore_name);return -1;}/** The workqueue needs to be freezable to avoid interfering with* USB-PERSIST port handover. Otherwise it might see that a full-speed* device was gone before the EHCI controller had handed its port* over to the companion full-speed controller.*/hub_wq = alloc_workqueue("usb_hub_wq", WQ_FREEZABLE, 0);if (hub_wq)return 0;/* Fall through if kernel_thread failed */usb_deregister(&hub_driver);pr_err("%s: can't allocate workqueue for usb hub\n", usbcore_name);return -1;
}
该函数主要做了以下工作:
- 通过usb_register向usb总线注册hub_driver接口驱动,指定了probe,disconnect,suspend,resume,id_table等相关函数。可以猜测,在根hub创建后,会执行此处的hub_probe函数。
- 创建新的工作队列,工作队列名称为usb_hub_wq,标志位为WQ_FREEZABLE;参数WQ_FREEZABLE表示工作线程在挂起时候,需要先完成当前队列的所有工作之后才能挂起。创建好队列后,需要定义一个工作用于完成实际的任务。
hub_driver全局变量定义如下:
static struct usb_driver hub_driver = {.name =         "hub",.probe =        hub_probe,.disconnect =   hub_disconnect,.suspend =      hub_suspend,.resume =       hub_resume,.reset_resume = hub_reset_resume,.pre_reset =    hub_pre_reset,.post_reset =   hub_post_reset,.unlocked_ioctl = hub_ioctl,.id_table =     hub_id_table,.supports_autosuspend = 1,
};
2.9 usb_register_device_drive(&usb_generic_driver, THIS_MODULE)
usb_register_device_driver函数用于注册通用设备驱动usb_generic_driver,usb_generic_driver定义在drivers/usb/core/generic.c:
struct usb_device_driver usb_generic_driver = {.name = "usb",.probe = generic_probe,.disconnect = generic_disconnect,
#ifdef  CONFIG_PM.suspend = generic_suspend,.resume = generic_resume,
#endif.supports_autosuspend = 1,
};
所有的usb设备注册到usb总线后,都会和usb_generic_driver驱动匹配成功,也就是都会会执行generic_probe。
usb_register_device_driver定义在drivers/usb/core/driver.c文件中:
/*** usb_register_device_driver - register a USB device (not interface) driver* @new_udriver: USB operations for the device driver* @owner: module owner of this driver.** Registers a USB device driver with the USB core.  The list of* unattached devices will be rescanned whenever a new driver is* added, allowing the new driver to attach to any recognized devices.** Return: A negative error code on failure and 0 on success.*/
int usb_register_device_driver(struct usb_device_driver *new_udriver,struct module *owner)
{int retval = 0;if (usb_disabled())return -ENODEV;new_udriver->drvwrap.for_devices = 1;new_udriver->drvwrap.driver.name = new_udriver->name;new_udriver->drvwrap.driver.bus = &usb_bus_type;new_udriver->drvwrap.driver.probe = usb_probe_device;new_udriver->drvwrap.driver.remove = usb_unbind_device;new_udriver->drvwrap.driver.owner = owner;retval = driver_register(&new_udriver->drvwrap.driver);if (!retval)pr_info("%s: registered new device driver %s\n",usbcore_name, new_udriver->name);elseprintk(KERN_ERR "%s: error %d registering device ""       driver %s\n",usbcore_name, retval, new_udriver->name);return retval;
}
这里首先初始化us设备口驱动里的驱动基类driver,然后调用driver_register进行驱动注册,关于驱动注册函数driver_register具体参考linux驱动移植-总线设备驱动。
这里简单介绍一下driver_register函数执行流程
- 将usb设备驱动添加到usb总线上;
- 遍历usb总线上的所有usb设备,然后进行usb设备驱动和usb设备的匹配;
- 匹配成功后最终会执行usb设备驱动的probe函数,过程中的驱动基类driver的probe函数和 usb_probe_device函数都是达到这个目的的中转函数而已。
3. usb接口驱动
3.1 usb接口驱动定义
在linux 设备模型中,usb接口驱动由usb_driver 结构表示,该结构体定义在 include/linux/usb.h文件中:
struct usb_driver {const char *name;int (*probe) (struct usb_interface *intf,const struct usb_device_id *id);void (*disconnect) (struct usb_interface *intf);int (*unlocked_ioctl) (struct usb_interface *intf, unsigned int code,void *buf);int (*suspend) (struct usb_interface *intf, pm_message_t message);int (*resume) (struct usb_interface *intf);int (*reset_resume)(struct usb_interface *intf);int (*pre_reset)(struct usb_interface *intf);int (*post_reset)(struct usb_interface *intf);const struct usb_device_id *id_table;struct usb_dynids dynids;struct usbdrv_wrap drvwrap;unsigned int no_dynamic_id:1;unsigned int supports_autosuspend:1;unsigned int disable_hub_initiated_lpm:1;unsigned int soft_unbind:1;
};
其中部分成员的含义如下:
- probe:当usb接口驱动和usb接口匹配成功之后,就会调用probe函数,usb接口驱动所有的资源的注册和初始化全部放在probe函数中;
- id_table:往往一个usb接口驱动可能能同时支持多个usb接口,这些usb接口的标识信息都放在该结构体数组中;
- drvwrap:为struct usbdrv_wrap结构体类型,其中有一个成员为struct device_driver类型,即驱动基类,驱动基类,内核维护的所有的驱动必须包含该成员;
usb_driver中的id_table在usb总线进行usb接口驱动和usb接口匹配时使用,id_table是一个数组,里面每个元素类型都是usb_device_id ,指定了满足某些规则的的usb接口会和usb接口驱动匹配,usb_device_id 结构定义在include/linux/mod_devicetable.h文件中:
struct usb_device_id {/* which fields to match against? */__u16           match_flags;/* Used for product specific matches; range is inclusive */__u16           idVendor;__u16           idProduct;__u16           bcdDevice_lo;__u16           bcdDevice_hi;/* Used for device class matches */__u8            bDeviceClass;__u8            bDeviceSubClass;__u8            bDeviceProtocol;/* Used for interface class matches */__u8            bInterfaceClass;__u8            bInterfaceSubClass;__u8            bInterfaceProtocol;/* Used for vendor-specific interface matches */__u8            bInterfaceNumber;/* not matched against */kernel_ulong_t  driver_info__attribute__((aligned(sizeof(kernel_ulong_t))));
};
usb_driver成员drvwrap中成员driver是一个驱动基类,相当于驱动具有的最基础的属性,driver是struct device_driver类型,定义在include/linux/device.h文件中。
3.2 usb接口驱动注册
用usb_register宏向linux内核注册usb接口驱动,usb_register这个上面介绍了,不再重复介绍。
3.3 usb接口驱动卸载
用usb_deregister函数卸载usb接口驱动,函数定义在drivers/usb/core/driver.c文件中:
void usb_deregister(struct usb_driver *driver)
{pr_info("%s: deregistering interface driver %s\n",usbcore_name, driver->name);usb_remove_newid_files(driver);driver_unregister(&driver->drvwrap.driver);usb_free_dynids(driver);
}
可以看到最终调用的driver_unregister,这里就不具体介绍了。
4. usb设备驱动
4.1 usb设备驱动定义
在linux 设备模型中,usb设备驱动由usb_device_driver 结构表示,该结构体定义在 include/linux/usb.h文件中:
struct usb_device_driver {const char *name;int (*probe) (struct usb_device *udev);void (*disconnect) (struct usb_device *udev);int (*suspend) (struct usb_device *udev, pm_message_t message);int (*resume) (struct usb_device *udev, pm_message_t message);struct usbdrv_wrap drvwrap;unsigned int supports_autosuspend:1;
};
4.2 usb设备驱动注册
用usb_device_driver 结构体定义好usb设备驱动后,用usb_register_device_driver函数向linux内核注册usb设备驱动,usb_register_device_driver这个上面介绍了,不再重复介绍。
4.3 usb设备驱动卸载
用usb_deregister_device_driver函数卸载us设备口驱动,函数定义在drivers/usb/core/driver.c文件中:
void usb_deregister_device_driver(struct usb_device_driver *udriver)
{pr_info("%s: deregistering device driver %s\n",usbcore_name, udriver->name);driver_unregister(&udriver->drvwrap.driver);
}