文章目录
- 前言
- 一、构建View界面
- 二、Model中进行数据处理
- 三、Controller层实现View与Model交互
- 总结
前言
在前两周组内进行了计算器的仿写,计算器仿写主要用到了MVC框架的思想以及数据结构中用栈进行四则运算的思想,还有就是对OC中的字符串进行各种判错操作处理。
接下来笔者将简单介绍一下利用OC实现计算机的基本思路
一、构建View界面
我们先来看一下计算机界面实现的具体效果:
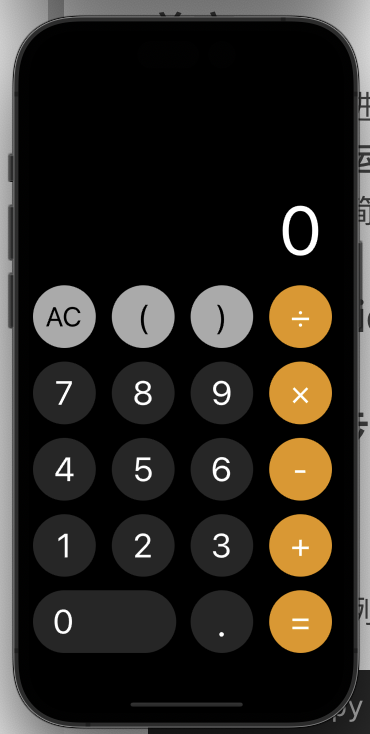
在实现View界面时,笔者使用了Masonry进行布局,因为计算器界面按钮的排序是有规律的,因此使用Masonry能让我们的布局更加轻松。
下面给出创建部分按钮的示例:
for (int i = 0; i < 4; i++) {//先循环创建16个按钮for (int j = 0; j < 4; j++) {_baseButton = [UIButton buttonWithType:UIButtonTypeRoundedRect];_baseButton.layer.cornerRadius = SIZE / 2;//圆形按钮_baseButton.titleLabel.font = [UIFont systemFontOfSize:42];_baseButton.tag = j + 4 + i * 4;[self addSubview:_baseButton];[_baseButton mas_makeConstraints:^(MASConstraintMaker *make) {//从底部开始约束make.bottom.equalTo(self).offset(-(75 + (SIZE + 17) * (i + 1)));make.left.equalTo(self).offset(5 + [UIScreen mainScreen].bounds.size.width / 4 * j);make.width.equalTo(@SIZE);make.height.equalTo(@SIZE);}];if (j < 3) {//竖列if (i < 3) {//横行[_baseButton setBackgroundColor:[UIColor colorWithWhite:0.15 alpha:1]];[_baseButton setTitle:[NSString stringWithFormat:@"%d", j + 1 + i * 3] forState:UIControlStateNormal];[_baseButton setTitleColor:[UIColor whiteColor] forState:UIControlStateNormal];} else {[_baseButton setBackgroundColor:[UIColor lightGrayColor]];[_baseButton setTitle:grayArray[j] forState:UIControlStateNormal];[_baseButton setTitleColor:[UIColor blackColor] forState:UIControlStateNormal];}} else {//橘色符号[_baseButton setBackgroundColor:[UIColor colorWithRed:0.9 green:0.58 blue:0 alpha:1]];[_baseButton setTitle:orangeArray[i] forState:UIControlStateNormal];[_baseButton setTitleColor:[UIColor whiteColor] forState:UIControlStateNormal];}if (j == 0 && i == 3) {_baseButton.titleLabel.font = [UIFont systemFontOfSize:34];}}}
二、Model中进行数据处理
根据MVC框架的思想,我们的Model层是负责提供数据接口给controller使用,因此我们需要将处理好的数据返回给controller层。我们在此对其进行四则运算的逻辑操作。
这里简单介绍一下我们的四则运算,本质上是使用运算符号优先级来判断是否入栈出栈,笔者后面会单独写博客讲述。这里有人会先将中缀表达式转为后缀表达式再去计算结果,笔者这里直接使用中缀表达式计算结果
代码:
- (instancetype)init {self = [super init];if (self) {self.stackArray = [NSMutableArray arrayWithCapacity:Maxsize];self.stackSize = Maxsize;}return self;
}char Precede(char theta1, char theta2) {int i, j;char pre[7][7] = {{'>', '>', '<', '<', '<', '>', '>'},{'>', '>', '<', '<', '<', '>', '>'},{'>', '>', '>', '>', '<', '>', '>'},{'>', '>', '>', '>', '<', '>', '>'},{'<', '<', '<', '<', '<', '=', '0'},{'>', '>', '>', '>', '0', '>', '>'},{'<', '<', '<', '<', '<', '0', '='}};switch (theta1) {case '+': i = 0; break;case '-': i = 1; break;case '*': i = 2; break;case '/': i = 3; break;case '(': i = 4; break;case ')': i = 5; break;case '=': i = 6; break;}switch (theta2) {case '+': j = 0; break;case '-': j = 1; break;case '*': j = 2; break;case '/': j = 3; break;case '(': j = 4; break;case ')': j = 5; break;case '=': j = 6; break;}return pre[i][j];
}double Operate(double a, char theta, double b) {switch (theta) {case '+': return a + b;case '-': return a - b;case '*': return a * b;case '/':if (b != 0) {return a / b;} else {NSLog(@"Divisor can not be zero!");exit(0);}}return 0;
}int In(char c) {switch (c) {case '+':case '-':case '*':case '/':case '(':case ')':case '=':return 1;default:return 0;}
}- (NSString *) evaluateExpression:(NSString *)exp {_OPND = [[Model alloc] init];//数字栈_OPTR = [[Model alloc] init];//符号栈double a, b, theta, X1, X2;char ch;NSInteger i = 0;NSInteger fuhaoFlag = 0;NSInteger kuohaoFlag = 0;NSInteger fuhaoBegin = 0;[_OPTR push:'='];ch = [exp characterAtIndex:i++];if (ch == '-') {ch = [exp characterAtIndex:i++];fuhaoFlag = 1;}while (ch != '=' || [_OPTR getTop] != '=') {if (In(ch)) {if (ch == '(') {kuohaoFlag = 1;}if (ch == '-' && [exp characterAtIndex:i - 2] == '(') {fuhaoFlag = 1;kuohaoFlag = 0;ch = [exp characterAtIndex:i++];continue;}switch (Precede([_OPTR getTop], ch)) {case '<':[_OPTR push:ch];ch = [exp characterAtIndex:i++];break;case '>':[_OPTR pop:&theta];[_OPND pop:&b];[_OPND pop:&a];if (theta == '/' && b == 0) {return @"error";}[_OPND push:Operate(a,theta,b)];break;case '=':[_OPTR pop:&theta];ch = [exp characterAtIndex:i++];break;}} else if (isdigit(ch)) {X1 = ch - '0';[_OPND push:X1];X2 = X1;ch = [exp characterAtIndex:i++];while (isdigit(ch)) {X1 = ch - '0';X2 = 10 * X2 + X1;ch = [exp characterAtIndex:i++];}if (ch == '.') {ch = [exp characterAtIndex:i++];double decimal = 0.0;double j = 1;while (isdigit(ch)) {double f = (double)(ch - '0');decimal = f / (pow(10, j));j++;ch = [exp characterAtIndex:i++];X2 += decimal;}}if (fuhaoFlag == 0 && fuhaoBegin == 0) {double tmpX1;[_OPND pop:&tmpX1];[_OPND push:X2];} else {double tmpX1;[_OPND pop:&tmpX1];[_OPND push:-X2];fuhaoFlag = 0;fuhaoFlag = 0;}} else {return @"error";}}double result = [_OPND getTop];NSString *resultString = [NSString stringWithFormat:@"%f", result];resultString = [self removeFloatAllZeroByString:resultString];return resultString;
}
在OC中我们初始化两个栈,一个存储数字,一个存储符号,然后不断将符号与数字入栈出栈,直至碰到“=”。
一些判错操作:
我们也需要对我们的表达式进行一些判错处理,例如运算符相连或事括号数量的不匹配等问题,演示结果如下:
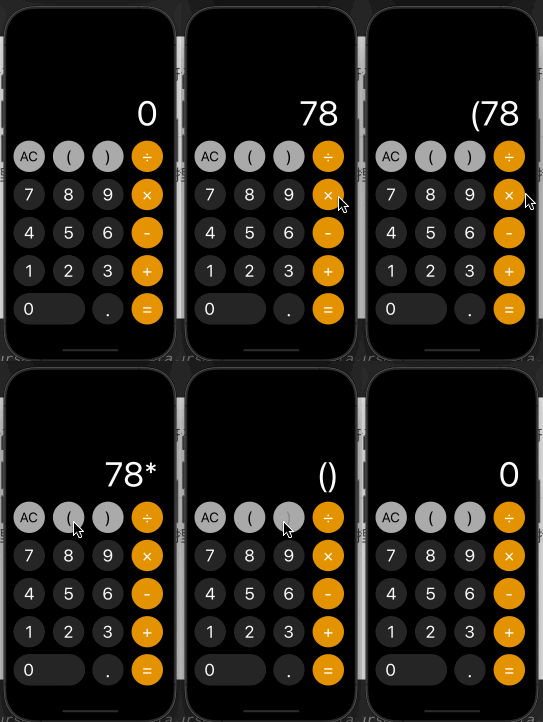
或是小数点不匹配与结果末尾有多余0的情况:
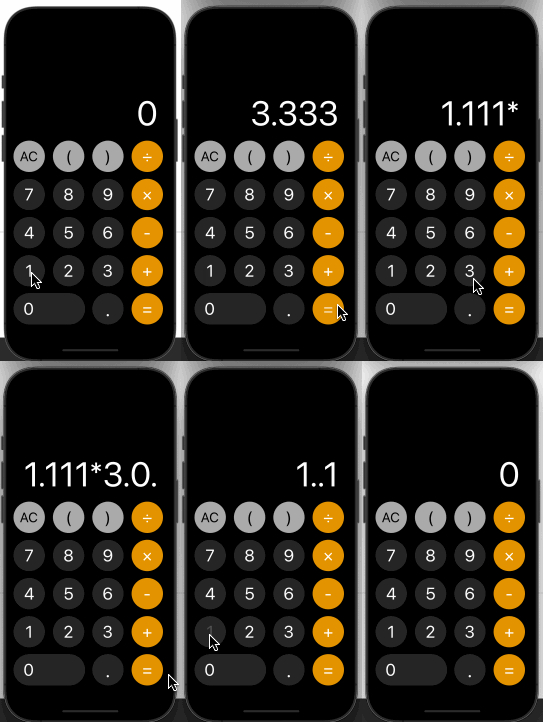
这些判错操作的部分是计算器最复杂的部分,需要多多琢磨。
三、Controller层实现View与Model交互
在MVC中我们的Controller的作用是实现View与Model交互,因此我们需要在Controller层中实现我们界面按钮的点击事件并将其转换为字符串,同时将生成的字符串传入Model层进行数据处理,如果没有判错则将其结果输出。
- (void)viewDidLoad {[super viewDidLoad];_calculatorView= [[View alloc] init];_calculatorView.frame = CGRectMake(0, 0, self.view.frame.size.width, self.view.frame.size.height);[self.view addSubview:_calculatorView];//为视图中的按钮在controller中添加事件for (UIView *subview in self.calculatorView.subviews) {if ([subview isKindOfClass:[UIButton class]]) {UIButton *button = (UIButton *)subview;[button addTarget:self action:@selector(pressButton:) forControlEvents:UIControlEventTouchUpInside];}}_calculatorModel= [[Model alloc] init];}
这里需要注意,因为笔者理解的MVC中View只负责界面的绘制,并不用处理界面的逻辑,例如界面中控件的点击事件,因此这里需要再controller中使用如下代码对其进行点击事件的添加:
for (UIView *subview in self.calculatorView.subviews) {if ([subview isKindOfClass:[UIButton class]]) {UIButton *button = (UIButton *)subview;[button addTarget:self action:@selector(pressButton:) forControlEvents:UIControlEventTouchUpInside];}}
接下来给出一些对按钮中的点击事件的代码:
//左右括号if (btn.tag == 17) {if (![_calculatorView.printfLabel.text isEqual: @"0"]) {_calculatorView.printfLabel.text = [_calculatorView.printfLabel.text stringByAppendingString:@"("];} else {_calculatorView.printfLabel.text = @"(";} }if (btn.tag == 18) {if (![_calculatorView.printfLabel.text isEqual: @"0"]) {_calculatorView.printfLabel.text = [_calculatorView.printfLabel.text stringByAppendingString:@")"];} else {_calculatorView.printfLabel.text = @")";} }if (btn.tag == 3) {if ([_calculatorModel error:_calculatorView.printfLabel.text] == 1 ) {_calculatorView.printfLabel.text = @"error";} else {_calculatorView.printfLabel.text = [_calculatorView.printfLabel.text stringByAppendingString:@"="];NSString *result = [_calculatorModel evaluateExpression:_calculatorView.printfLabel.text];NSLog(@"%@", result);_calculatorView.printfLabel.text = result;}}
这里需要注意我们在VIew中创建按钮时已经对其tag进行赋值,因此可在controller文件中直接使用
总结
计算器的仿写其实不难,最难的部分是对表达式的处理,有许多细节需要注意








![[LeetCode周赛复盘] 第 115 场双周赛20231014](https://img-blog.csdnimg.cn/f4e8bd78f411471dbc07908856ae9f86.png)