文章目录
- 前言
- 一、参考资料
- 二、电路图
- 三、驱动
- 四、makefile——添加驱动
- 五、dts——使能gpio
- 5.1 参考
- 5.2 改动1—— hx117节点
- 5.3 改动2——引脚节点
- 5.4 已经被定义的引脚
- 5.5 gpio源码
- 六、改动总结——使能hx711
- 七、验证驱动添加
- 八、编写测试文件
- 8.1 测试代码
- 8.2 配置编译环境变量
- 九、验证
- 十、其他——添加文件路径
- 小结
前言
本章介绍基于luckfox开发板添加压力传感器hx711,并编写测试
一、参考资料
Rockchip_RV1103_Datasheet_V1.1-20220427.pdf

二、电路图
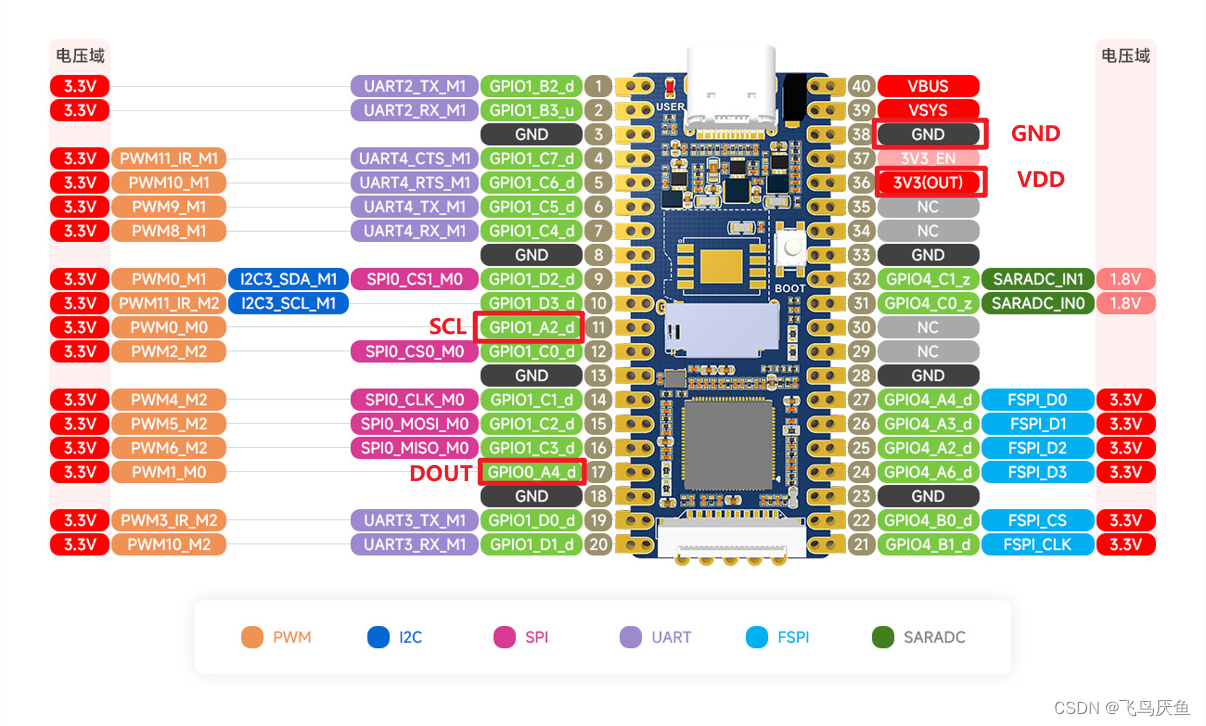
只有这两个io口没有复用其他功能,需要关掉PWM0_0/1_0。
三、驱动
luckfox-pico-main\sysdrv\source\kernel\drivers\iio\adc\hx711.c
这里匹配gpio
static int hx711_probe(struct platform_device *pdev)
{/** PD_SCK stands for power down and serial clock input of HX711* in the driver it is an output*/hx711_data->gpiod_pd_sck = devm_gpiod_get(dev, "sck", GPIOD_OUT_LOW);if (IS_ERR(hx711_data->gpiod_pd_sck)) {dev_err(dev, "failed to get sck-gpiod: err=%ld\n",PTR_ERR(hx711_data->gpiod_pd_sck));return PTR_ERR(hx711_data->gpiod_pd_sck);}/** DOUT stands for serial data output of HX711* for the driver it is an input*/hx711_data->gpiod_dout = devm_gpiod_get(dev, "dout", GPIOD_IN);if (IS_ERR(hx711_data->gpiod_dout)) {dev_err(dev, "failed to get dout-gpiod: err=%ld\n",PTR_ERR(hx711_data->gpiod_dout));return PTR_ERR(hx711_data->gpiod_dout);}hx711_data->reg_avdd = devm_regulator_get(dev, "avdd");if (IS_ERR(hx711_data->reg_avdd))return PTR_ERR(hx711_data->reg_avdd);
}static struct platform_driver hx711_driver = {.probe		= hx711_probe,.remove		= hx711_remove,.driver		= {.name		= "hx711-gpio",.of_match_table	= of_hx711_match,},
};
四、makefile——添加驱动
# luckfox-pico-main\sysdrv\source\kernel\drivers\Makefile
obj-$(CONFIG_IIO)		+= iio/# luckfox-pico-main\sysdrv\source\kernel\drivers\iio\Makefile
obj-y += adc/# luckfox-pico-main\sysdrv\source\kernel\drivers\iio\adc\Makefile
obj-$(CONFIG_HX711) += hx711.o
配置
luckfox-pico\sysdrv\source\kernel\arch\arm\configs\luckfox_rv1106_linux_defconfig
# sensor -- hx711
CONFIG_HX711=y
CONFIG_IIO=y
五、dts——使能gpio
5.1 参考
luckfox-pico\sysdrv\source\kernel\Documentation\devicetree\bindings\iio\adc\avia-hx711.yaml
examples:- |#include <dt-bindings/gpio/gpio.h>weight {compatible = "avia,hx711";sck-gpios = <&gpio3 10 GPIO_ACTIVE_HIGH>;dout-gpios = <&gpio0 7 GPIO_ACTIVE_HIGH>;avdd-supply = <&avdd>;clock-frequency = <100000>;};
注意,这里要改动下,需要匹配驱动中的of获取,移除gpios和supply。
//luckfox-pico-main\sysdrv\source\kernel\drivers\iio\adc\hx711.c
static const struct of_device_id of_hx711_match[] = {{ .compatible = "avia,hx711", },{},
};
5.2 改动1—— hx117节点
rv1103-luckfox-pico-ipc.dtsi
rv1103g-luckfox-pico.dts
rv1106-evb.dtsi
rv1106.dtsi
rv1103.dtsi
luckfox-pico-main\sysdrv\source\kernel\arch\arm\boot\dts\rv1103g-luckfox-pico.dts
hx711:hx711 {status = "okay";compatible = "avia,hx711"; sck-gpios = <&gpio1 RK_PA2 GPIO_ACTIVE_HIGH>;dout-gpios = <&gpio1 RK_PA4 GPIO_ACTIVE_HIGH>;avdd-supply = <&vcc_3v3>;//vcc3v3_sysclock-frequency = <400000>;
};
dtsi中sck-gpios是全的,但是在代码中只有sck,这个是在代码中省去了,注意区分。
这里只是给hx117增加了设备节点,但是rv1103和其他平台不太一样,还需要自己在dts中定义pin的节点
5.3 改动2——引脚节点
这点真就没注意到,导致我纠结了好久,还是没有获取到hx117的数据。
参考:https://wiki.luckfox.com/zh/Luckfox-Pico/Luckfox-Pico-GPIO/
	gpio1pa2:gpio1pa2 {compatible = "regulator-fixed";pinctrl-names = "default";pinctrl-0 = <&gpio1_pa2>;regulator-name = "gpio1_pa2";regulator-always-on;};gpio0pa4:gpio0pa4 {compatible = "regulator-fixed";pinctrl-names = "default";pinctrl-0 = <&gpio0_pa4>;regulator-name = "gpio0_pa4";regulator-always-on;};&pinctrl {gpio1-pa2 {gpio1_pa2:gpio1-pa2 {rockchip,pins =	<1 RK_PA2 RK_FUNC_GPIO &pcfg_pull_none>;};};gpio0-pa4 {gpio0_pa4:gpio0-pa4 {rockchip,pins =	<0 RK_PA4 RK_FUNC_GPIO &pcfg_pull_none>;};};
};
5.4 已经被定义的引脚
板子的21-27都被定义了,这是用于fspi
i2c3和spi0被enable了,需要disable后测试hx117
其中spi的cs选的是c0(28+0=16),不是d2(38+2=26),所以只需要关掉i2s3即可。
或者改用gpio1_A2和gpio_A4,这样不会有引脚复用,可以同时支持i2c、spi、adc。
5.5 gpio源码


都设为高电平有效GPIO_ACTIVE_HIGH
引脚作为输入还是输出由驱动中devm_gpiod_get定义
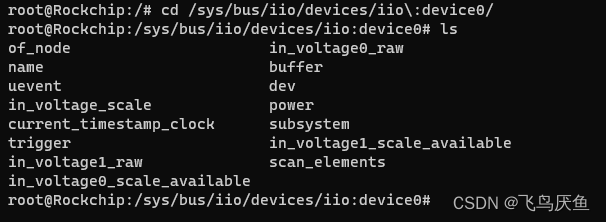
/sys/bus/iio/devices/iio:device0/
六、改动总结——使能hx711
diff --git a/sysdrv/source/kernel/arch/arm/boot/dts/rv1103g-luckfox-pico.dts b/sysdrv/source/kernel/arch/arm/boot/dts/rv1103g-luckfox-pico.dts
index 0f1a686fc..b08b1797d 100644
--- a/sysdrv/source/kernel/arch/arm/boot/dts/rv1103g-luckfox-pico.dts
+++ b/sysdrv/source/kernel/arch/arm/boot/dts/rv1103g-luckfox-pico.dts
@@ -63,6 +63,23 @@ gpio4pb1:gpio4pb1 {regulator-name = "gpio4_pb1";regulator-always-on;};
+
+       /* add hx711 */
+       gpio1pa2:gpio1pa2 {
+               compatible = "regulator-fixed";
+               pinctrl-names = "default";
+               pinctrl-0 = <&gpio1_pa2>;
+               regulator-name = "gpio1_pa2";
+               regulator-always-on;
+       };
+
+       gpio0pa4:gpio0pa4 {
+               compatible = "regulator-fixed";
+               pinctrl-names = "default";
+               pinctrl-0 = <&gpio0_pa4>;
+               regulator-name = "gpio0_pa4";
+               regulator-always-on;
+       };};/**********GPIO**********/&pinctrl {
@@ -102,6 +119,19 @@ gpio4_pb1:gpio4-pb1 {};};+       /* add hx711*/
+       gpio1-pa2 {
+               gpio1_pa2:gpio1-pa2 {
+                       rockchip,pins = <1 RK_PA2 RK_FUNC_GPIO &pcfg_pull_none>;
+               };
+       };
+
+       gpio0-pa4 {
+               gpio0_pa4:gpio0-pa4 {
+                       rockchip,pins = <0 RK_PA4 RK_FUNC_GPIO &pcfg_pull_none>;
+               };
+       };
+};@@ -178,19 +208,21 @@ &uart4 {/**********PWM**********/+&pwm0 {
-       status = "okay";
+       status = "disabled";pinctrl-names = "active";pinctrl-0 = <&pwm0m0_pins>;// pinctrl-0 = <&pwm0m1_pins>;};&pwm1 {
-       status = "okay";
+       status = "disabled";pinctrl-names = "active";pinctrl-0 = <&pwm1m0_pins>;// pinctrl-0 = <&pwm1m1_pins>;};// &pwm2 {//     status = "okay";//     pinctrl-names = "active";
@@ -251,4 +283,15 @@ &pwm11 {+/**********iio**********/
+/ {
+       hx711:hx711 {
+               status = "okay";
+               compatible = "avia,hx711";
+               sck-gpios = <&gpio1 RK_PA2 GPIO_ACTIVE_HIGH>;
+               dout-gpios = <&gpio0 RK_PA4 GPIO_ACTIVE_HIGH>;
+               avdd-supply = <&vcc_3v3>;//vcc3v3_sys
+               clock-frequency = <400000>;
+       };
+};diff --git a/sysdrv/source/kernel/arch/arm/configs/luckfox_rv1106_linux_defconfig b/sysdrv/source/kernel/arch/arm/configs/luckfox_rv1106_linux_defconfig
index 4c54b6965..28a2caf94 100755
--- a/sysdrv/source/kernel/arch/arm/configs/luckfox_rv1106_linux_defconfig
+++ b/sysdrv/source/kernel/arch/arm/configs/luckfox_rv1106_linux_defconfig
@@ -320,3 +320,7 @@ CONFIG_DEBUG_FS=y# CONFIG_SCHED_DEBUG is not set# CONFIG_FTRACE is not set# CONFIG_RUNTIME_TESTING_MENU is not set
+
+# sensor -- hx711
+CONFIG_HX711=y
+CONFIG_IIO=y
七、验证驱动添加
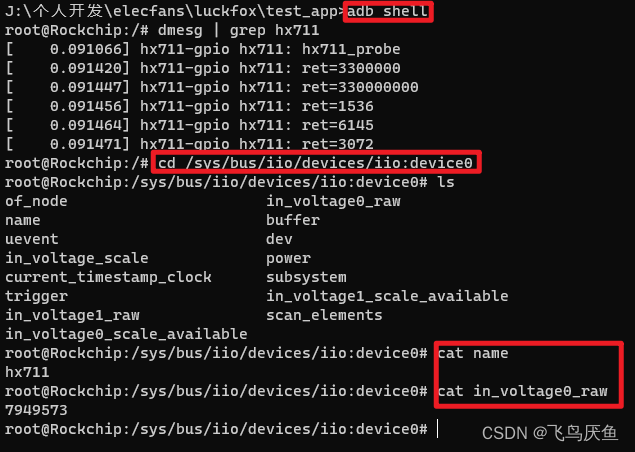
可以看到驱动正常加载了,注意dmesg中的hx711相关log是我自己在驱动中添加的,默认是没有的,可以直接获取iio属性判断驱动有没有添加成功。
root@Rockchip:/# dmesg | grep hx711
[    0.091066] hx711-gpio hx711: hx711_probe
[    0.091420] hx711-gpio hx711: ret=3300000
[    0.091447] hx711-gpio hx711: ret=330000000
[    0.091456] hx711-gpio hx711: ret=1536
[    0.091464] hx711-gpio hx711: ret=6145
[    0.091471] hx711-gpio hx711: ret=3072
root@Rockchip:/# cd /sys/bus/iio/devices/iio:device0
root@Rockchip:/sys/bus/iio/devices/iio:device0# ls
of_node                      in_voltage0_raw
name                         buffer
uevent                       dev
in_voltage_scale             power
current_timestamp_clock      subsystem
trigger                      in_voltage1_scale_available
in_voltage1_raw              scan_elements
in_voltage0_scale_available
root@Rockchip:/sys/bus/iio/devices/iio:device0# cat name
hx711
root@Rockchip:/sys/bus/iio/devices/iio:device0# cat in_voltage0_raw
7949573
root@Rockchip:/sys/bus/iio/devices/iio:device0#
八、编写测试文件
应用实例ko
https://wiki.luckfox.com/zh/Luckfox-Pico/Core3566-SDK
执行文件bin
https://wiki.luckfox.com/zh/Luckfox-Pico/Luckfox-Pico-GPIO
8.1 测试代码
hx711_app.c
#include <stdio.h>
#include <stdlib.h>
#include <fcntl.h>
#include <unistd.h>
// #include <linux/delay.h>
#include <sys/time.h>
#include <string.h>#define IIO_DEVICE "/sys/bus/iio/devices/iio:device0"
#define SENSOR_CALI_PATH_OFFSET "/root/hx711_cal_offset"
#define SENSOR_CALI_PATH_SCALE "/root/hx711_cal_scale"static int cal_offset = 8500000;    // save raw value without test itemsstatic int cal_scale = 475;         // when set phone, 1g is 475
static int cal_weight = 187;  // the weight of phone// static float weight = 0;
static int weight = 0;
// float convert_to_weight(int sensor_data) {
int convert_to_weight(int sensor_data) {int weight;// weight = (float)(sensor_data - cal_offset) / cal_scale;// printf("\nsensor_raw=%d,cal_offset=%d,cal_scale=%d\n",sensor_data,cal_offset,cal_scale);if(cal_scale != 0)weight = (sensor_data - cal_offset) / cal_scale;elseweight = 0;// printf("Sensor data: %.1f\n", weight);// printf("Sensor data: %d\n", weight);return weight;
}int get_hx711_raw(){int fd;char buf[64];ssize_t num_read;fd = open(IIO_DEVICE "/in_voltage0_raw", O_RDONLY);if (fd < 0) {perror("Failed to open iio device");return 1;}num_read = read(fd, buf, sizeof(buf) - 1);if (num_read < 0) {perror("Failed to read sensor data");close(fd);return 1;}close(fd);buf[num_read] = '\0';int sensor_data = atoi(buf);// printf("  raw sensor_data=%d\n",sensor_data);return sensor_data;
}// float get_hx711_value(){
int get_hx711_value(){int sensor_data = get_hx711_raw();weight = convert_to_weight(sensor_data);return weight;
}// save scale&offset to file
void set_cal_value(){int fd;char tmp_char[64];fd = open(SENSOR_CALI_PATH_OFFSET, O_CREAT|O_RDWR ,0777);if (fd < 0) {perror("Failed to open cal offset.");return;}// printf("-------\ncal_offset=%d\n",cal_offset);memset(tmp_char,0,sizeof(tmp_char));sprintf(tmp_char,"%d\0",cal_offset);// printf("xxx tmp_char=[%s]\n",tmp_char);write(fd, tmp_char, sizeof(tmp_char));close(fd);fd = open(SENSOR_CALI_PATH_SCALE, O_CREAT|O_RDWR ,0777);if (fd < 0) {perror("Failed to open cal offset.");return;}// printf("cal_scale=%d\n",cal_scale);memset(tmp_char,0,sizeof(tmp_char));sprintf(tmp_char,"%d\0",cal_scale) ;// printf("xxx tmp_char=[%s]\n-------\n",tmp_char);write(fd, tmp_char, sizeof(tmp_char)-1);close(fd);
}void print_cal_value_and_raw(int sensor_raw_tmp){printf("cal&raw:\n");printf("   cal_offset=%d sensor_raw=%d\n", cal_offset, sensor_raw_tmp);printf("   test_offset\t%d\n   cal_weight\t%d\n   cal_scale\t%d\n",sensor_raw_tmp - cal_offset, cal_weight, cal_scale);printf("\n");
}void print_cal_value(){printf("hx711 calibration value\n");printf("   cal_offset\t%d\n   cal_weight\t%d\n   cal_scale\t%d\n",cal_offset, cal_weight, cal_scale);printf("\n");
}void sns_calibration(){int cal_test_num = 10;int cal_average = 0;int cal_test_tmp = 0;int cal_scale_raw = 0;// test 10 times to get offset averagefor(int i=0; i<cal_test_num; i++){cal_test_tmp = get_hx711_raw();usleep(10);cal_average = (cal_average * i + cal_test_tmp)/(i+1);}cal_offset=cal_average;usleep(20);printf("!!! Please put test items on the board whose weight same with cmd3\nWaiting input char to continue ...\n");getchar();cal_test_tmp = get_hx711_raw();cal_scale_raw = cal_test_tmp - cal_offset;cal_scale = (cal_scale_raw)/cal_weight;print_cal_value_and_raw(cal_test_tmp);set_cal_value();
}void get_cal_value(){int tmp_offset;int tmp_scale;char tmp_file_value[64];int fd;// printf("get_cal_value\n");fd = open(SENSOR_CALI_PATH_OFFSET, O_RDWR,0777);if (fd < 0) {perror("Failed to open cal offset.");return;}read(fd, tmp_file_value, sizeof(tmp_file_value) - 1);// printf("tmp_file_value=%s\n",tmp_file_value);tmp_offset = atoi(tmp_file_value);// printf("tmp_offset=%d\n",tmp_offset);close(fd);fd = open(SENSOR_CALI_PATH_SCALE, O_RDWR,0777);if (fd < 0) {perror("Failed to open cal offset.");return;}memset(tmp_file_value,0,sizeof(tmp_file_value));read(fd, tmp_file_value, sizeof(tmp_file_value) - 1);tmp_scale = atoi(tmp_file_value);// printf("tmp_offset=%d\n",tmp_scale);close(fd);cal_offset = tmp_offset;cal_scale = tmp_scale;}int main(int argc, char *argv[]) {char cmd1[16];char cmd2[16];char cmd3[16];int ret;int val_tmp=0;// calibration: put the items whose weight is known. weight sends to cmd3// ./hx771_app -c 187if(argc == 3){strcpy(cmd2,argv[1]);strcpy(cmd3,argv[2]);printf("cmd2=%s cmd3=%s\n",cmd2,cmd3);if(strcmp(cmd2, "-c") == 0){printf("get cal cal_weight %s\n",cmd3);cal_weight=atoi(cmd3);        // save the weight of cal items} else {printf("hx711 no cal_weight\n");return 0;}sns_calibration();sleep(1);// test the calibration resultval_tmp = get_hx711_value();printf("sensor value: %d\n", val_tmp);return 0;}printf("-------------test-------------\n");get_cal_value();print_cal_value();int sensor_data;int test_num=5;while(test_num--){val_tmp = get_hx711_value();printf("%02d: %d\n",5 - test_num,val_tmp);sleep(1);}printf("--------------------------\n");return 0;
}
8.2 配置编译环境变量
需要在ubuntu环境下运行。
export PATH=/home/luckfox/Luckfox-Pico/luckfox-pico/tools/linux/toolchain/arm-rockchip830-linux-uclibcgnueabihf/bin:$PATH
source ~/.bashrc
cd ~/luckfox/luckfox-pico/project/app/test_app/hx711
arm-rockchip830-linux-uclibcgnueabihf-gcc hx711_app.c -o hx711_app

九、验证
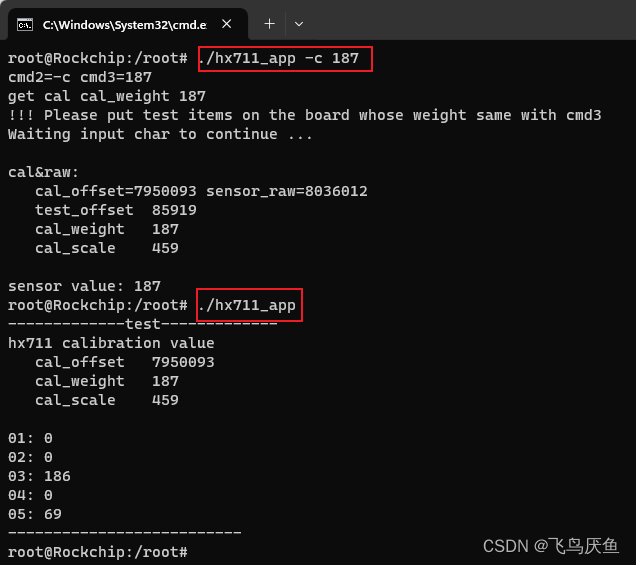
由于将虚拟机中生成的可执行文件复制到windows本地,再通过adb传入设备中,这部分流程比较重复,所以编写了一个简单的bat脚本进行刷入,需要输入虚拟机的登录密钥就可以执行了。
scp youkai@192.168.206.130:/home/youkai/luckfox/luckfox-pico/project/app/test_app/hx711/hx711_app .adb push hx711_app /root/adb shell "chmod 777 /root/hx711_app"
adb shell "./root/hx711_app -c 187"
直接运行这个bat脚本,然后输入密码就可以实现自动刷执行文件并校准。
刷完执行文件后也可以手动下命令进行测试。
root@Rockchip:/root# ./hx711_app -c 187
root@Rockchip:/root# ./hx711_app
十、其他——添加文件路径
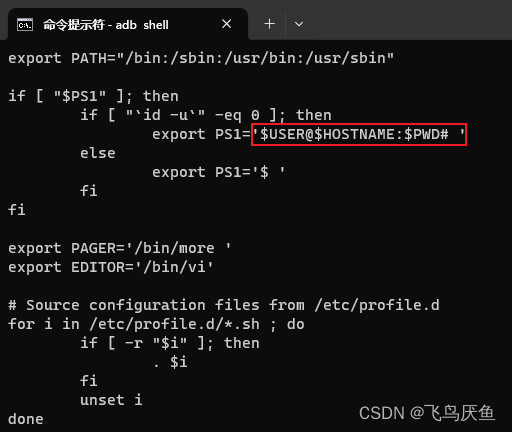
busybox vi /etc/profile'# ' --> '$USER@$HOSTNAME:$PWD# 'source /etc/profile

小结
本章实现了hx711的数据读取,以及计算出称量物品的重量,后续可以结合算法实现相关功能。


