目录
一、list的介绍及使用
什么是list?
list的基本操作
增删查改
获取list元素
不常见操作的使用说明
编辑
接合splice
编辑
移除remove
去重unique
二、模拟实现list
大框架
构造函数
尾插push_back
迭代器__list_iterator
list的迭代器要如何跑起来
iterator的构造函数
begin()与end()
operator++
operator*
operator!=
测试
operator->
const迭代器
增删查改
insert()
❗erase()
pop_back()
完整代码
List.h
test.cpp
一、list的介绍及使用
什么是list?
1.list是可以在常数范围内在任意位置进行插入和删除的序列式容器,并且该容器可以前后双向迭代。
2.其底层是双向链表结构。
双向链表中每个元素存储在互不相关的独立节点中,在节点中通过指针指向其前一个元素和后一个元素。
3.list与forward_list非常相似。
最主要的不同在于forward_list是单链表,只能朝前迭代。(这也使得它更加得简单高效)
4.与其他的序列式容器相比(array,vector,deque),list通常在任意位置进行插入、移除元素的执行效率 更好。
5.与其他序列式容器相比,list和forward_list最大的缺陷是不支持任意位置的随机访问。
比如:要访问list的第6个元素,必须从已知的位置(如头部 或 尾部)迭代到该位置,在这段位置上迭代需要线性的时间开销。
list还需要一些额外的空间,以保存每个节点的相关联信息。(对于存储类型较小元素的大list来说,这可能是一个重要的因素)
list的基本操作
包头文件:<list>

就和我们用过的vector一样,list也是个类模板:
#include<iostream>
#include<list>
using namespace std;
int main() {list<int> lt;return 0;
}list的大部分操作,我们不需要记忆,因为很多用起来和vector、string的差不多,就算忘了,直接查文档即可。所以这里就一笔带过。
增删查改
| 函数名 | 功能 |
|---|---|
| assign | 覆盖 |
| push_front | 头插 |
| pop_front | 头删 |
| push_back | 尾插 |
| pop_back | 尾删 |
| insert | 插入 |
| erase | 删除 |
| swap | 交换 |
| resize | 改变大小 |
| clear | 清空 |
注:
1.因为list不是连续的结构,它是指针串起来的链表,所以不支持随机访问,“方括号+下标”的访问方式不能用了!
2.我们要遍历list的话就用范围for 或者 迭代器。
3.和vector一样,list里没有专门再实现find,要想查找就用<algorithm>下的find。
在调用find时,用第二种方式:
因为find是函数模板,不是vector里的。

在学vector时,我们在insert和erase处,讲到了迭代器失效的问题。这个问题是否同样存在于list中呢?
实际上,list中进行insert操作是不存在迭代器失效的问题的,而erase操作则会有。
因为insert仅需要改变指针间的指向关系即可,不存在变成野指针的问题:
而erase会导致 指向被删节点的指针 变成野指针的问题,所以存在迭代器失效的情况。
获取list元素
| 函数名 | 功能 |
|---|---|
| front | 返回list的第一个节点中值的引用 |
| back | 返回list的最后一个节点中值的引用 |
不常见操作的使用说明
这些操作很少用,但由于很多我们之前没见过,所以这里也做下说明。

接合splice
splice意为“接合”,即把一个链表接合到另一个链表上去。
示例:
int main() {list<int> l1(4,0);for (auto e : l1) {cout << e << " ";}cout << endl;
list<int> l2(2, 1);for (auto e : l2) {cout << e << " ";}cout << endl;
l1.splice(l1.begin(), l2);for (auto e : l1) {cout << e << " ";}cout << endl;return 0;
}
移除remove
remove可以移除所有的待找元素。
示例:
int main() {list<int> lt;lt.push_back(1);lt.push_back(1);lt.push_back(1);lt.push_back(2);lt.push_back(3);lt.push_back(4);lt.remove(1);for (auto e : lt) {cout << e << " ";}return 0;
}
相关函数remove_if()用于删除 满足特定条件的元素。
去重unique
unique仅对 有序的元素集合 有效,所以,在使用unique前 要先对集合排序!
示例:
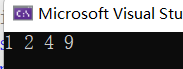
int main() {list<int> lt;lt.push_back(4);lt.push_back(1);lt.push_back(9);lt.push_back(2);lt.push_back(2);lt.push_back(4);lt.sort();lt.unique();for (auto e : lt) {cout << e << " ";}cout << endl;return 0;
}
其余还有:合并merge、排序sort、逆置reverse,就不详讲了,最重要的是 要培养阅读文档的能力。
二、模拟实现list
从0开始 实现一遍list,可以让我们清晰地认识list的结构。
大框架
先把大框架搭出来,再慢慢填充血肉。
list是链表结构,本身要定义出一个类去描述它;而list的每个节点list_node,也需要定义一个类来描述。
namespace jzy
{template<class T>class list_node{public:list_node<T>* _pre; list_node<T>* _next;T _data;};
template<class T>class list{typedef list_node<T> Node; //list_node太长了,改成Node用着顺手public:
private:Node* _head; //list是带头结点的链表,所以成员变量只需一个头节点};
}注:要把list_node的类设成public,这样类外才能访问到。如果不写public的话,默认权限是private。
或者设计成struct{};,struct的默认访问权限是public。
构造函数
先实现 节点的构造函数:
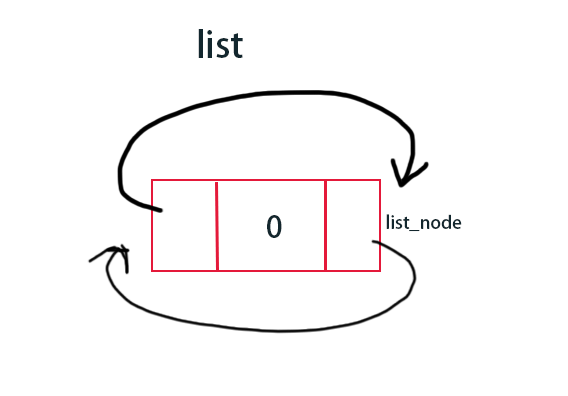
我们想要达到的效果是:构造出的list,内含一个头点node,这个node已被初始化过。
如图:list为双向循环链表,其node被初始化:
既然想要node在创建伊始就被初始化,那我们可以直接写个node的构造函数:
class list_node{public:T _data;list_node<T>* _pre;list_node<T>* _next;
list_node(const T& x = T()):_data(x),_pre(nullptr),_next(nullptr){}};这样,我们每创建出一个node,就是被初始化过的了。
class list_node
{
public:T _data;list_node<T>* _pre;list_node<T>* _next;list_node(const T& x = T()):_data(x),_pre(nullptr),_next(nullptr){}
};
再实现list的构造函数:
因为是带头双向循环列表,所以创建伊始,就有个哨兵位的头节点。
namespace jzy
{template<class T>class list_node{public:T _data;list_node<T>* _pre;list_node<T>* _next;
list_node(const T& x = T()):_data(x),_pre(nullptr),_next(nullptr){}};
template<class T>class list{typedef list_node<T> Node;public:list() {_head = new Node;_head->_next = _head;_head->_pre = _head;}
private:Node* _head;};
}
尾插push_back
步骤:
1.找到尾节点tail
2.创建newNode
3.改变_head、tail的指针与newNode的指向关系
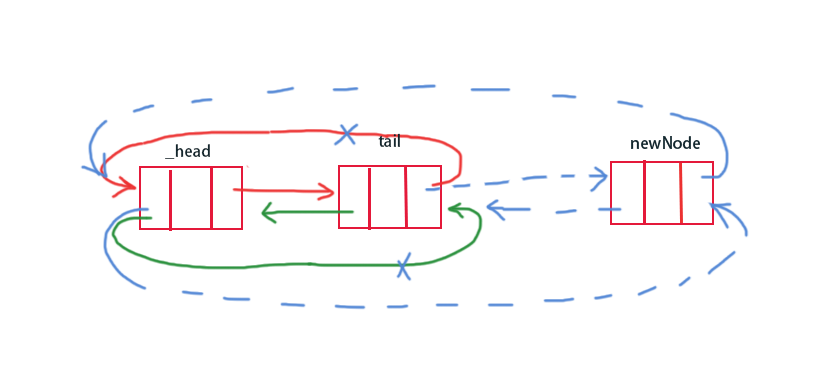
void push_back(const T& val) { Node* tail = _head->_pre;Node* newNode = new Node(val); //实例化出一个值为val的node
tail->_next = newNode; //改变指针的指向关系newNode->_pre = tail;newNode->_next = _head;_head->_pre = newNode;
}迭代器__list_iterator
list的迭代器要如何跑起来
我们之前实现过string、vector的迭代器,它们的迭代器都是原生指针,当时我们说过:“就当作指针来用”,可以解引用,也可以++。
所以迭代器用起来真的很方便:
vector<int>::iterator it=v.begin();
while(it!=v.end()){cout<<*it<<" ";it++;
}
list的迭代器本质也同样是一个指向node的指针。但是!list的迭代器不能 解引用和++,所以目前没法跑起来。
list不同于string、vector,它不是一块连续的存储空间,++是无法走到下一个节点的;节点是自定义类型,没法单纯地进行解引用。
对此的解决方案是:
封装一个list迭代器类,在类里将++、!=、*等运算符进行重载。
这样,就能让list迭代器 像string的一样直接使用,而不用关心它的底层实现。
接下来,我们先把 __list_iterator类 的框架搭出来,然后挨个实现里面的运算符。
list迭代器的框架:
template<class T>
class __list_iterator
{
public:typedef list_node<T> Node; //这俩名字都太长了,typedef个短点儿的,好使typedef __list_iterator<T> iterator;
Node* node; //list迭代器本质是一个指向node的指针
};注:
1.typedef是不受访问限定符控制的,访问限定符仅控制成员变量、成员函数的权限。
若是在类里定义typedef,其作用域仅限于类里;若是在类外定义,其作用域为整个文件。
2.__list_iterator类 要定义在list类 的前面,因为编译是从上往下的顺序,在list里遇到iterator只会往上找,不会往下找。
3.__list_iterator类 是定义在 list类 的外面的!不是list的内部类。
为了保证iterator的封装性,我们把它单独定义为了一个类。node、list、iterator三个类是分开定义的。

iterator的构造函数
template<class T>
class __list_iterator
{
public:typedef list_node<T> Node;typedef __list_iterator<T> iterator; Node* node;
//构造函数:当iterator被构造出来时,其实就是构造了一个指向特定节点的指针__list_iterator(Node* pn) //这里小心,返回值不能写成iterator:node(pn){}
};这里补充说明一下,返回值为什么不能写成iterator:
因为被重命名成iterator的对象是_ _list_iterator<T>,而不是 __list_iterator。后者是模板,前者是模板被实例化出的类型。
两者本质是不一样的,注意区分!我们用的iterator,不是模板了,它是指向具体类型的指针。
begin()与end()
begin()为第一个元素的位置,end()为最后一个元素的后一个位置:
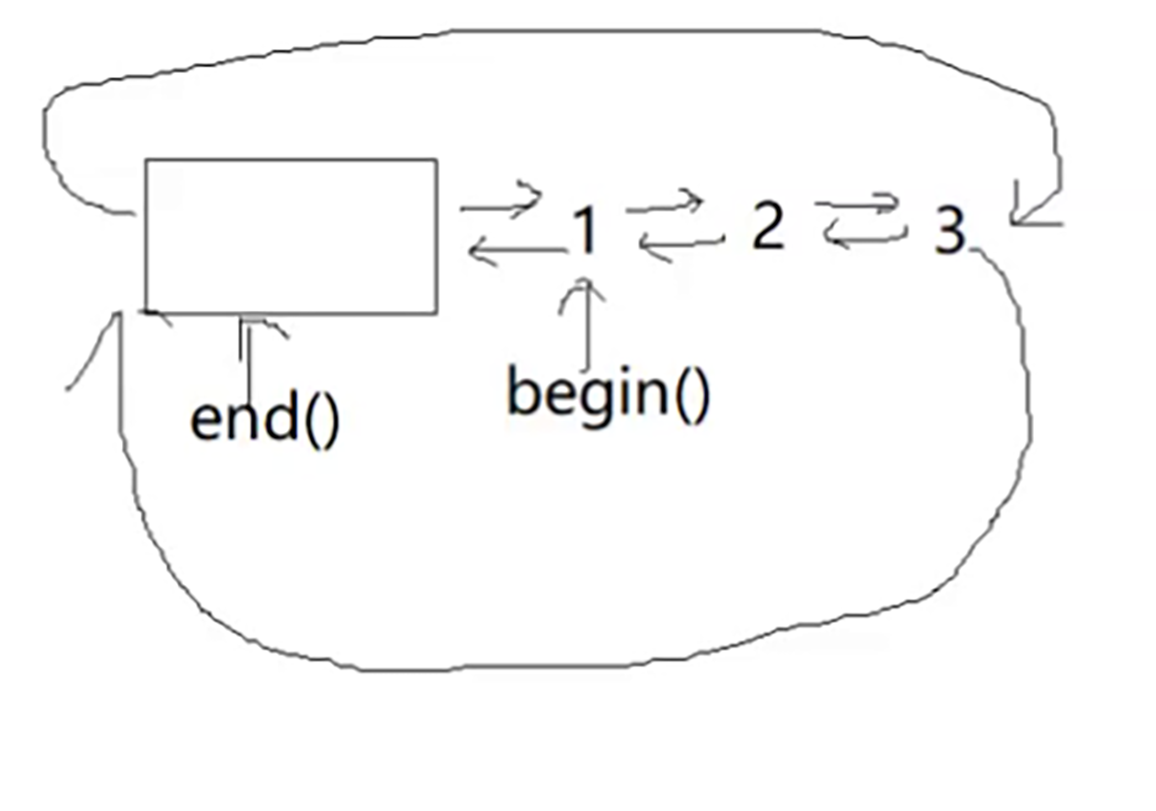
因为begin与end返回的是list的位置,所以要把这两个函数实现在list类里,而不是__list_iterator里。
iterator begin() {return iterator(_head->_next); //返回匿名对象
}
iterator end() {return iterator(_head);
}operator++
++操作包括:前置++、后置++。两者区分点在于后置++有占位符int。
注意:
后置加加的占位符就是int(这是规定)。不要写Node这种 其他类型。
//operator++
//前置++
iterator& operator++() { //为什么返回类型是iterator? 就跟int++完还是int一样,迭代器++完,还得是迭代器。。。node = node->_next;return *this;
}
//后置++
iterator operator++(int) { __list_iterator<T> copy_it(*this); node = node->_next;return copy_it;
}operator*
T& operator*() {return node->_data;
}
operator!=
bool operator!=(const iterator& it) {  return node != it.node;     //node是it的成员变量
}
注:这里的形参一定要被const修饰!
说到const修饰形参,我们就趁此回顾下这个知识点。
如果是传值传参,那没必要用const修饰。反正形参只是实参的拷贝,它的改变压根不会影响形参,所以对于实参而言,形参有没有被const修饰都一样。
如果是传指针传参or引用传参,那尽量给形参加上const修饰!
记住这句话:从现在起,要养成好习惯!传指针传参or传值传参时,加上const修饰形参!当然,前提是函数内不改变形参~
因为,const修饰的形参,既能接受普通实参,又能接收const实参。而未经const修饰的形参,只能接收普通实参,无法接受const实参。(因为权限大的能调用权限小的,而反过来不行)
所以说,使用引用传参时,如果函数内不作改变,那尽量采用const引用传参。
测试
测试一下:
#include"List.h"
using namespace jzy;
void test1()
{list<int> lt;lt.push_back(1);lt.push_back(2);lt.push_back(3);lt.push_back(4);
list<int>::iterator it = lt.begin();while (it != lt.end()) {cout << *it << " ";it++;}
}
int main()
{test1();return 0;
}
之前说过,范围for的底层就是替换成了迭代器。只要迭代器实现出来,那范围for也自然能用了。
operator->
迭代器模拟的是指针p,p在访问 自定义类型的成员 时,有两种方式:
1.(*p).XX
2.p->XX
我们已经实现了*运算符,现在就来完善下,实现箭头运算符。这样,迭代器就能通过->,访问自定义类型的成员了。
。。。
这个箭头运算符,我准备实现的时候i,发现一点头绪都没有。。。
所以我们还是看下源码,学习下大佬是怎么实现的吧。
源码:
T* operator->() {return &(operator*());
}
这个源码比较难理解,我来解释一下:
刚刚实现的operator*:
T& operator*() {return node->_data;
}
所以,operator->就相当于返回了&(node->_data),即指向T的指针。
在使用时,iterator->XX,其实是编译器做了省略之后的结果。
它原本的样子是iterator-> ->XX,两个箭头,可这样的话,代码可读性太差了,于是编译器做了优化,省略了一个箭头。
那实际上,应为( iterator.operator->() ).operator->() XX。对operator->做了两次调用。
第一次调用,返回一个指向T的指针。就相当于返回了一个原生指针,再用这个原生指针调用operator->,去访问它的成员。
测试一下:
先在List.h里写一个自定义类型,然后我们用迭代器去访问name。
struct student
{char name[100];size_t age;char tele[100];
};
test.cpp:
void test2() {list<student> lt;lt.push_back({ "Tom",12,"110" });lt.push_back({ "Billy",10,"888" });list<student>::iterator it = lt.begin();while (it != lt.end()) {cout << it->name << " ";     //->it++;}
}
const迭代器
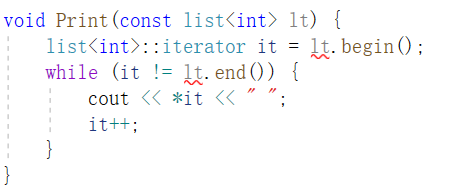
我们来看下面这个情境:
void Print(const list<int> lt) {      //lt被const修饰list<int>::iterator it = lt.begin();while (it != lt.end()) {cout << *it << " ";it++;}
}
void test3() {list<int> lt;lt.push_back(1);lt.push_back(2);lt.push_back(3);lt.push_back(4);Print(lt);
}
const对象lt 是没法调用普通迭代器的,因为权限小的 没法调用 权限大的。const对象要调用const迭代器。
那怎么实现const迭代器呢?
其实,const迭代器与普通迭代器 的内部实现是一样的,唯一区别就是普通迭代器返回T&,可读可写,而const迭代器返回const T&,可读不可写。
最笨的办法,就是copy一份刚刚的迭代器代码,然后给每个函数的返回值加上const修饰,再把名称改成_const __ list__iterator。
先来展示一下笨办法:
#pragma once
#include<iostream>
using namespace std;
namespace jzy
{template<class T>class list_node{……};
template<class T>class __list_iterator { ……};
template<class T> //拷贝一份__list_iterator的代码class _const__list_iterator //所做的修改:1.把iterator换成const_iterator(换个名字而已) 2.在T&、T*前加上const{ public:typedef list_node<T> Node;typedef _const__list_iterator<T> const_iterator; Node* node;
//构造函数_const__list_iterator(Node* pn) :node(pn){}
//operator++//前置++const_iterator& operator++() { node = node->_next;return *this;}
//后置++const_iterator operator++(int) {__list_iterator<T> copy_it(*this);node = node->_next;return copy_it;}
const T& operator*() {return node->_data;}
//operator--//前置--const_iterator& operator--() {node = node->_pre;return *this;}
//后置--const_iterator operator--(int) {__list_iterator copy_it(*this);node = node->_pre;return copy_it;}
bool operator!=(const const_iterator& it) {return node != it.node; }
const T* operator->() {return &(operator*());}};template<class T>class list{public:typedef list_node<T> Node;typedef __list_iterator<T> iterator;typedef _const__list_iterator<T> const_iterator; ……
iterator begin() {return iterator(_head->_next); }
const_iterator begin() const{ //begin()和end()也要实现const版本,供const对象调用return const_iterator(_head->_next); }
iterator end() {return iterator(_head);}
const_iterator end() const{return const_iterator(_head);}
private:Node* _head;};
}测试下,当我们尝试修改const对象:

很好,修改不了~
但是!上面的代码重复度太高了,并不是好的解决思路。库里的思路是:用模板实现const迭代器!
其实我们观察可以发现,iterator和const_iterator的实现中,只有operator* 和operator->的返回值不一样,普通迭代器的返回值是 T& 与T*,后者是const T&与const T *。
所以,可以把T&和T *用类模板Ref(reference)、Ptr(pointer)表示,即现在设三个模板参数:
template<class T,class Ref,class Ptr >这样一来,我们传iterator / const_iterator,编译器就能自动匹配。
你现在一定很多问号,这一块的确不好理解。
我就着下面这张图,为你解释下为什么传三个模板参数就能起到自动匹配的效果:
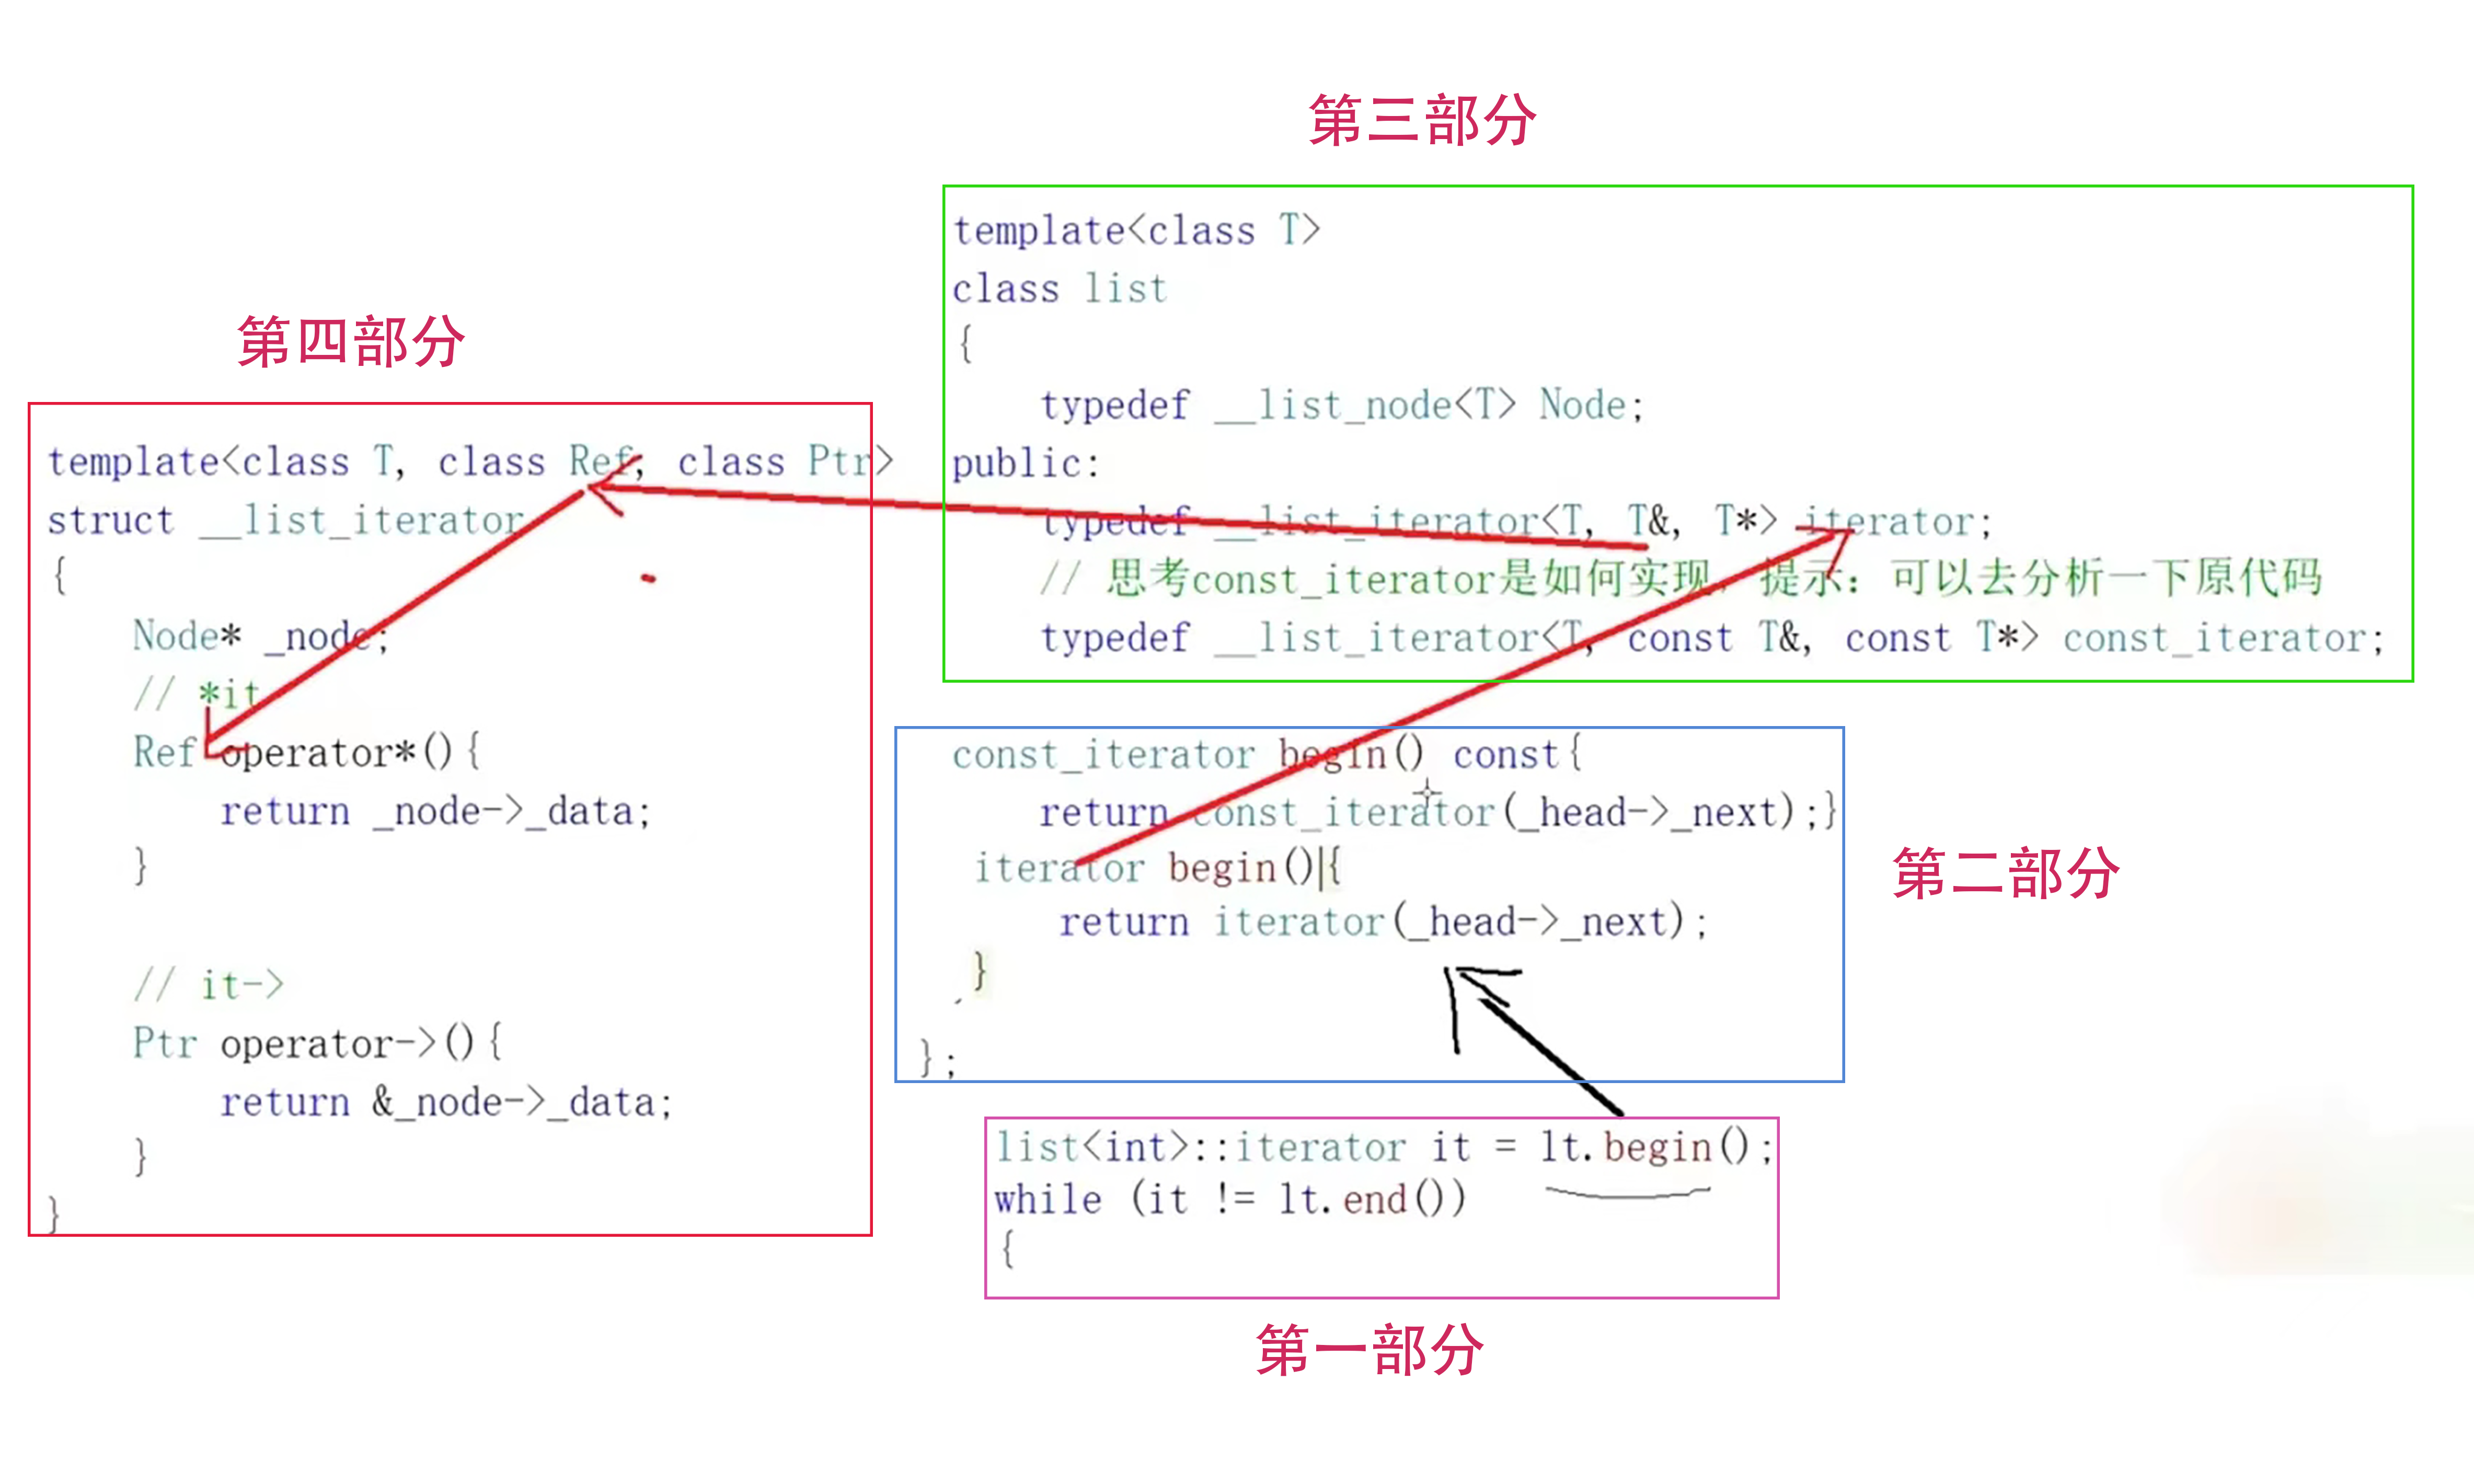
拿iterator的情况举例:
首先,程序的编译进行到了第一部分,lt要调用begin(),这里的lt没有被const修饰,那它的迭代器就是iterator,lt所调用的begin()函数 也是返回值为iterator的那个。(此时程序由第一部分跳至二)
而iterator追根溯源,找到当初被重命名的对象:__list _iterator<T,T&,T*>。(此时程序由第二部分跳至三)
__list _iterator<T,T&,T*>回到当初定义它的结构体 那边,此时<T,T&,T *>作为模板参数跟<class T,class Ref,class Ptr>一一匹配。
结构体中的Ref被自动匹配为T&,Ptr则被匹配为T*。(此时程序由第三部分跳至四)
const_iterator同理。
同时这里要注意,因为模板参数是三个:
template<class T,class Ref,class Ptr >所以我们在typedef时,也要注意同样写三个参数,不然没法与模板参数匹配:
typedef __list_iterator<T,T&, T*> iterator;   //√
typedef __list_iterator<T,T&> iterator;       //×
typedef __list_iterator<T,T*> iterator;       //×
我当初对typedef __ list_iterator<T,T&, T*> iterator;非常不理解,当时误以为,它可以拆分成 typedef __ list_iterator<T&> iterator;或者typedef __list_iterator<T *> iterator;
现在才明白,这个并不是拆分来看的,这里之所以要写T,T&,T*,是为了和参数模板一一匹配。
实现:
template<class T,class Ref,class Ptr>
class __list_iterator
{
public:typedef list_node<T> Node;typedef __list_iterator<T,Ref,Ptr> iterator;Node* node;
…… //省略掉的部分都和之前的一样
Ref operator*() {return node->_data;}
……
Ptr operator->() {return &(operator*());}
};不光是__list_iterator要改,list也要相应地作出改动:
template<class T>
class list
{
public:typedef list_node<T> Node;typedef __list_iterator<T,T&, T*> iterator;typedef __list_iterator<T, const T&, const T*> const_iterator;
…… //和之前相同的部分 省略不写
iterator begin() {return iterator(_head->_next); }
const_iterator begin() const{ return const_iterator(_head->_next); }
iterator end() {return iterator(_head);}
const_iterator end() const{return const_iterator(_head);}
private:Node* _head;
};增删查改
insert()
iterator insert(iterator pos, const T& val) { Node* cur = pos.node; //注意iterator和node的关系,node是它的成员Node* pre = cur->_pre;Node* pNew = new Node(val);
pre->_next = pNew; //注意:指针是双向的pNew->_pre = pre;pNew->_next = cur;cur->_pre = pNew;
return iterator(pNew);
}有了insert(),我们就可以复用它来进行头插了:
void push_front(const T& val) {insert(begin(), val);
}
❗erase()
void erase(iterator pos) {assert(pos!= end());
Node* cur = pos.node;Node* pre = cur->_pre;Node* next = cur->_next;pre->_next = next;next->_pre = pre;delete[] cur;
}但是,这样写真的对吗?
还记得我们在vector那里,花了很大篇幅说到的insert/erase迭代器失效的问题吗?
这里也同样要考虑迭代器失效的问题。
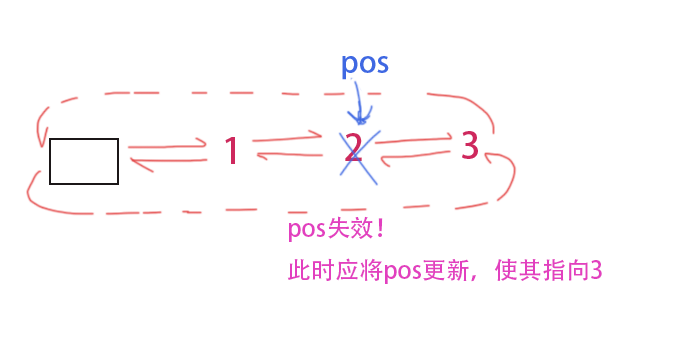
修改后的正确版本:
iterator erase(iterator pos) {assert(pos!= end());
Node* cur = pos.node;Node* pre = cur->_pre;Node* next = cur->_next;pre->_next = next;next->_pre = pre;delete[] cur;
return iterator(next);
}pop_back()
void pop_back() {Node* EndNode = end().node;Node* ToBeErase = EndNode->_pre;Node* pre = ToBeErase->_pre;pre->_next = EndNode;EndNode->_pre = pre;delete[] ToBeErase;
}
至于find(),你问我为啥不实现find()?没必要呀!算法库里就有find()模板,直接拿来用就好。
完整代码
List.h
#pragma once
#include<iostream>
#include<algorithm>
#include<assert.h>
using namespace std;
namespace jzy
{template<class T>class list_node{public:T _data;list_node<T>* _pre;list_node<T>* _next;
list_node(const T& x = T()):_data(x),_pre(nullptr),_next(nullptr){}};
template<class T,class Ref,class Ptr>class __list_iterator { public:typedef list_node<T> Node;typedef __list_iterator<T,Ref,Ptr> iterator;Node* node;
//构造函数__list_iterator(Node* pn) :node(pn){}
//operator++//前置++iterator& operator++() { node = node->_next;return *this; }
//后置++iterator operator++(int) { __list_iterator<T,Ref,Ptr> copy_it(*this); node = node->_next;return copy_it;}
Ref operator*() {return node->_data;}
//operator--//前置--iterator& operator--() {node = node->_pre;return *this;}
//后置--iterator operator--(int) {__list_iterator copy_it(*this);node = node->_pre;return copy_it;}
bool operator!=(const iterator& it) { return node != it.node; }
Ptr operator->() {return &(operator*());}};
//template<class T>//class _const__list_iterator //所做的修改:1.把iterator换成const_iterator(换个名字而已) 2.在T& 前加上const//{ //public:// typedef list_node<T> Node;// typedef _const__list_iterator<T> const_iterator; // Node* node;
// //构造函数// _const__list_iterator(Node* pn) // :node(pn)// {}
// //operator++// //前置++// const_iterator& operator++() { // node = node->_next;// return *this;// }
// //后置++// const_iterator operator++(int) {// __list_iterator<T> copy_it(*this);// node = node->_next;// return copy_it;// }
// const T& operator*() {// return node->_data;// }
// //operator--// //前置--// const_iterator& operator--() {// node = node->_pre;// return *this;// }
// //后置--// const_iterator operator--(int) {// __list_iterator copy_it(*this);// node = node->_pre;// return copy_it;// }
// bool operator!=(const const_iterator& it) {// return node != it.node; // }
// const T* operator->() {// return &(operator*());// }//};template<class T>class list{public:typedef list_node<T> Node;typedef __list_iterator<T,T&, T*> iterator;typedef __list_iterator<T, const T&, const T*> const_iterator;
list() {_head = new Node;_head->_next = _head;_head->_pre = _head;}void push_back(const T& val) { Node* tail = _head->_pre;Node* newNode = new Node(val);
tail->_next = newNode; newNode->_pre = tail;newNode->_next = _head;_head->_pre = newNode;}
iterator begin() {return iterator(_head->_next); }
const_iterator begin() const{ return const_iterator(_head->_next); }
iterator end() {return iterator(_head);}
const_iterator end() const{return const_iterator(_head);}
iterator insert(iterator pos, const T& val) { //注意iterator和node的关系,node是它的成员Node* cur = pos.node;Node* pre = cur->_pre;Node* pNew = new Node(val); pre->_next = pNew; //注意:指针是双向的pNew->_pre = pre;pNew->_next = cur;cur->_pre = pNew;
return iterator(pNew);}
void push_front(const T& val) {insert(begin(), val);}
iterator erase(iterator pos) {assert(pos!= end());
Node* cur = pos.node;Node* pre = cur->_pre;Node* next = cur->_next;pre->_next = next;next->_pre = pre;delete[] cur;
return iterator(next);}
void pop_back() {Node* EndNode = end().node;Node* ToBeErase = EndNode->_pre;Node* pre = ToBeErase->_pre;pre->_next = EndNode;EndNode->_pre = pre;delete[] ToBeErase;}
private:Node* _head;};
//这个是测试用的struct student{char name[100];size_t age;char tele[100];};
}test.cpp
#include"List.h"
using namespace jzy;
void test1()
{list<int> lt;lt.push_back(1);lt.push_back(2);lt.push_back(3);lt.push_back(4);list<int>::iterator it = lt.begin();while (it != lt.end()) {cout << *it << " ";it++;}cout << endl;for (auto e : lt) {cout << e << " ";}
}
void test2() {list<student> lt;lt.push_back({ "Tom",12,"110" });lt.push_back({ "Billy",10,"888" });list<student>::iterator it = lt.begin();while (it != lt.end()) {cout << it->name << " ";it++;}cout << endl;
}void Print(const list<int>& lt) {list<int>::const_iterator it = lt.begin();   //注意看它所调用的begin()函数!while (it != lt.end()) {//*it = 100;cout << *it << " ";       it++;}
}
void test3() {list<int> lt;lt.push_back(1);lt.push_back(2);lt.push_back(3);lt.push_back(4);Print(lt);
}
void test4() {list<int> lt;lt.push_back(1);lt.push_back(2);lt.push_back(3);list<int>::iterator pos = lt.begin();lt.insert(pos, 9);lt.push_front(99);list<int>::iterator pos2 = lt.begin();lt.erase(pos2);lt.pop_back();for (auto e : lt) {cout << e << " ";}
}
int main()
{//test1();//test2();//test3();test4();return 0;
}


![buuctf_练[GYCTF2020]FlaskApp](https://img-blog.csdnimg.cn/img_convert/16756c3a126348e1e74c0cd16fa55e0f.png)