首先我们要先了解什么是瀑布流:
瀑布流(Waterfall Flow)是一种常见的网页布局方式,也被称为瀑布式布局或砌砖式布局。它通常用于展示图片、博客文章、商品等多个不同大小和高度的元素。
瀑布流布局的特点是每个元素按照从上到下、从左到右的顺序排列,并且元素的宽度固定,高度可以不同。当元素的高度不同时,下一个元素会自动填充前面较短的列,从而形成类似瀑布流的效果。
瀑布流布局的优点在于能够更好地利用页面空间,使页面看起来更加丰富和动态。它适合展示大量的图片或内容,可以吸引用户的注意力,提升用户体验。
实现瀑布流布局的关键在于使用 CSS 的 Grid 布局或 Flex 布局来控制元素的排列和位置,并结合 JavaScript 来获取数据并动态渲染页面。在瀑布流布局中,通常需要计算元素的位置和大小,以及在加载更多数据时自动调整布局。
瀑布流布局在实际应用中非常广泛,特别是在图片展示、社交媒体平台、电子商务网站等领域。它能够呈现出独特的视觉效果和良好的用户体验,为用户提供更加丰富多样的内容展示方式。
那么怎么使用uniapp实现呢?
首先处理数据
由于我是将数据分为左右两部分渲染,所以要先处理数据;
const res = await Shop();console.log(res);const halfRight = Math.ceil(res.length / 2);this.leftList = res.slice(0, halfRight);const halfLength = Math.ceil(res.length / 2);this.rightList = res.slice(halfLength);
然后将数据渲染到页面上
这里需要注意一下;由于瀑布流是不需要图片高度的;要让它自适应,所以要给image标签加上mode属性
<view class="list"><view class="shop_list" v-for="(item,index) in leftList" :key="index" @click="product(item)"><image :src="https + item.img" mode="widthFix"></image><view class="shop_name">{{item.name}}</view><view class="shop_introdu">{{item.introdu}}</view></view></view><view class="list"><view class="shop_list" v-for="(item,index) in rightList" :key="index" @click="product(item)"><image :src="https + item.img" mode="widthFix"></image><view class="shop_name">{{item.name}}</view><view class="shop_introdu">{{item.introdu}}</view></view></view>
最后就是调整样式
.index_shop {width: 100%;height: auto;display: flex;justify-content: space-between;flex-wrap: wrap;}.list{width: 50%;display: flex;justify-content: center;flex-wrap: wrap;}.shop_list {width: 90%;height: auto;padding: 5px;margin: 0 auto;margin-top: 10px;background-color: #ffffff;border-radius: 5px;display: flex;flex-direction: column;align-items: flex-start;}.shop_list image {width: 100%;height: auto;border-radius: 5px;}
然后看看效果;
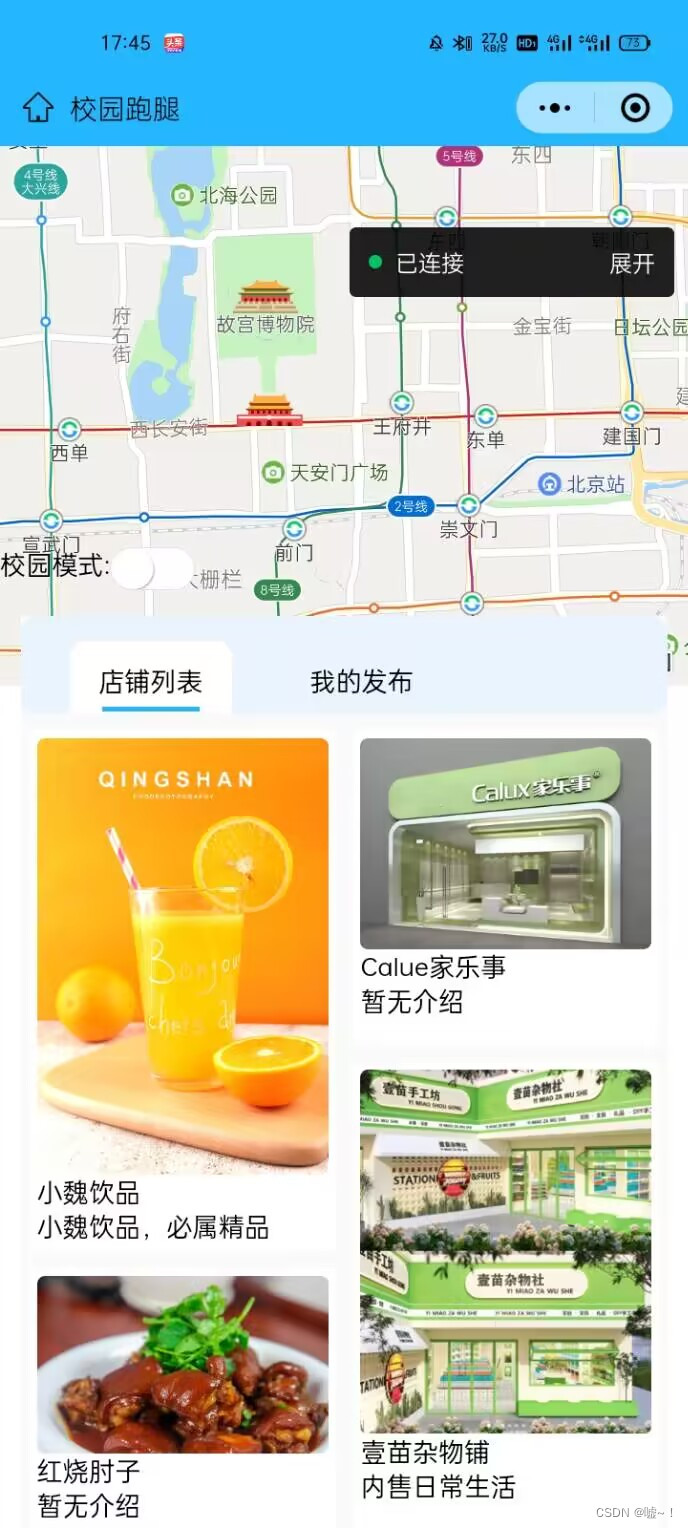
希望对你有所帮助;如有需要酌情修改

