今天给大家带来的是顺序表相关知识的分享,喜欢的朋友可以三连一波!!!
顺序表
顺序表的基本结构:

顺序表的实现
我们将顺序表的实现分装成函数大概分为下面几类:
//初始化
void InitSL(SL* psl);
//打印数据
void SLPrint(SL* psl);
//销毁顺序表
void SLDestroy(SL* psl);
//尾插和尾删数据
void SLPushBack(SL* psl, SLDataType x);
void SLPopBack(SL* psl);
//头插和头删数据
void SLPushFront(SL* psl, SLDataType x);
void SLPopFront(SL* psl);
//任意位置插入删除数据
void SLInsert(SL* psl, int pos, SLDataType x);
void SLErase(SL* psl, int pos);
其中我们用一个结构体来实现数据的存放和计数,其中存放数据使用指针指向开辟的空间,而计数使用常数来实现:
typedef int SLDataType;//这里将int重定义为SLDataType,方便使用其它数据类型typedef struct SeqLis//自定义结构体书写时更加方便
{SLDataType* a;//指向一块动态开辟的空间,实现数据存储空间的动态变化int sz;//用来统计存储数据的个数int capacity;//动态空间的大小
}SL;
文章中的相关代码我会放在的最后。
初始化
在使用顺序表之前当然要对该结构体进行初始化方便后续的使用。
void InitSL(SL* psl)
{assert(psl);psl->a = NULL;psl->sz = 0;psl->capacity = 0;
}
尾插数据、打印数据和销毁顺序表
尾插数据:
void SLPushBack(SL* psl, SLDataType x)
{assert(psl);//检查容量SLCheckCapacity(psl);//这里要进行容量的检查,我们在这里将容量的检查部分分装成函数,方便后续的使用。//尾插数据psl->a[psl->sz] = x;psl->sz++;
}
容量检查函数:
static void SLCheckCapacity(SL* psl)//因为该函数仅在辅助其它函数实现时进行使用,因此加上static修饰,进行保护,防止暴露在外部
{assert(psl);if (psl->capacity == psl->sz){SLDataType newcapacity = psl->capacity == 0 ? 4 : psl->capacity * 2;SLDataType* tmp = (SLDataType*)realloc(psl->a, newcapacity * sizeof(SLDataType));if (tmp == NULL){perror("realloc fail");return;}psl->a = tmp;psl->capacity = newcapacity;}
}
注意:

打印数据
已经在表中存入数据当然要进行打印出来看一眼,不然都不知道自己写了半天的代码对不对你说是不是?下面就是打印部分的代码:
void SLPrint(SL* psl)
{assert(psl);if (psl->sz == 0){printf("表中没有数据!\n");return;}for (int i = 0; i < psl->sz; i++){printf("%d ", psl->a[i]);}printf("\n");
}
使用完顺序表后要适时的将申请的空间返回给操作系统,这是一个很好的习惯,这就是我们销毁顺序表函数的由来。
void SLDestroy(SL* psl)
{assert(psl);if (psl->a != NULL){free(psl->a);psl->a = NULL;psl->sz = 0;psl->capacity = 0;}
}
下面看一下这部分的一个整体效果:
void Test1()
{SL s1;InitSL(&s1);SLPushBack(&s1, 1);SLPrint(&s1);SLPushBack(&s1, 2);SLPushBack(&s1, 3);SLPushBack(&s1, 4);SLPushBack(&s1, 5);SLPrint(&s1);SLDestroy(&s1);
}
运行结果: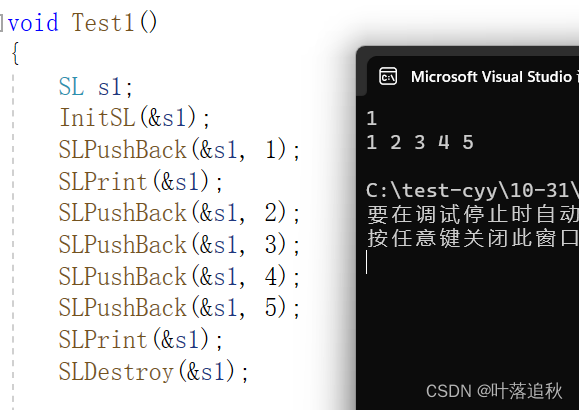
尾删数据、头删、头插数据
现在表中已经存入数据,下面当然是进行数据的删除,我们先从尾部开始删除数据:
void SLPopBack(SL* psl)
{assert(psl);if (psl->sz == 0)//判断是否满足删除数据的前提{printf("表中无数据,无需删除!\n");return;}psl->sz--;
}

效果展示:
void Test1()
{SL s1;InitSL(&s1);SLPushBack(&s1, 1);SLPrint(&s1);SLPushBack(&s1, 2);SLPushBack(&s1, 3);SLPushBack(&s1, 4);SLPushBack(&s1, 5);SLPrint(&s1);SLPopBack(&s1);SLPrint(&s1);SLPopBack(&s1);SLPrint(&s1);SLPopBack(&s1);SLPrint(&s1);SLPopBack(&s1);SLPrint(&s1);SLDestroy(&s1);
}
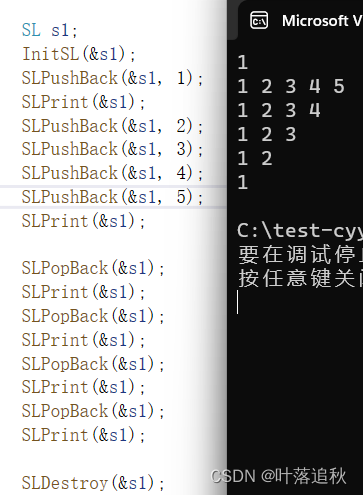
学完了尾插和尾删,下面给到头插和头删的代码:
//头插
void SLPushFront(SL* psl, SLDataType x)
{assert(psl);SLCheckCapacity(psl);int end = psl->sz - 1;while (end >= 0){psl->a[end + 1] = psl->a[end];end--;}psl->a[0] = x;psl->sz++;
}//头删
void SLPopFront(SL* psl)
{assert(psl);int begin = 1;while (begin < psl->sz){psl->a[begin - 1] = psl->a[begin];begin++;}psl->sz--;
}
这里就不给大家进行展示了,想要看一下代码效果的小伙伴可以将代码拷贝过去自行进行调试运行。
任意位置插入、删除数据
我们下面利用数组的下标来进行数据的插入和删除:
//插入数据
void SLInsert(SL* psl, int pos, SLDataType x)
{assert(psl);assert(pos >= 0 && pos <= psl->sz);SLCheckCapacity(psl);int end = psl->sz - 1;while (end >= pos){psl->a[end + 1] = psl->a[end];end--;}psl->a[pos] = x;psl->sz++;
}
//删除数据
void SLErase(SL* psl, int pos)
{assert(psl);assert(pos >= 0 && pos <= psl->sz);int begin = pos+1;while (begin < psl->sz){psl->a[begin - 1] = psl->a[begin];begin++;}psl->sz--;
}
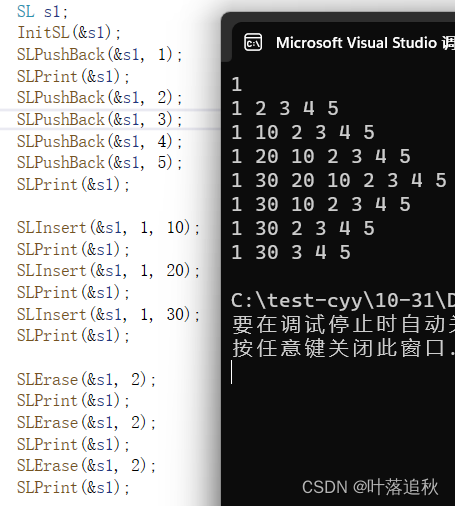
这里没有什么细节上的点需要注意,直接来看代码的实现:
void Test3()
{SL s1;InitSL(&s1);SLPushBack(&s1, 1);SLPrint(&s1);SLPushBack(&s1, 2);SLPushBack(&s1, 3);SLPushBack(&s1, 4);SLPushBack(&s1, 5);SLPrint(&s1);SLInsert(&s1, 1, 10);SLPrint(&s1);SLInsert(&s1, 1, 20);SLPrint(&s1);SLInsert(&s1, 1, 30);SLPrint(&s1);SLErase(&s1, 2);SLPrint(&s1);SLErase(&s1, 2);SLPrint(&s1);SLErase(&s1, 2);SLPrint(&s1);SLDestroy(&s1);
}
运行结果:
#pragma once#define _CRT_SECURE_NO_WARNINGS 1#include <stdio.h>
#include <assert.h>
#include <stdlib.h>typedef int SLDataType;typedef struct SeqList
{SLDataType* a;int sz;int capacity;
}SL;//初始化
void InitSL(SL* psl);
//打印数据
void SLPrint(SL* psl);
//销毁顺序表
void SLDestroy(SL* psl);
//尾插和尾删数据
void SLPushBack(SL* psl, SLDataType x);
void SLPopBack(SL* psl);
//头插和头删数据
void SLPushFront(SL* psl, SLDataType x);
void SLPopFront(SL* psl);
//任意位置插入删除数据
void SLInsert(SL* psl, int pos, SLDataType x);
void SLErase(SL* psl, int pos);
#include "SeqList.h"void InitSL(SL* psl)
{assert(psl);psl->a = NULL;psl->sz = 0;psl->capacity = 0;
}void SLDestroy(SL* psl)
{assert(psl);if (psl->a != NULL){free(psl->a);psl->a = NULL;psl->sz = 0;psl->capacity = 0;}
}void SLPrint(SL* psl)
{assert(psl);if (psl->sz == 0){printf("表中没有数据!\n");return;}for (int i = 0; i < psl->sz; i++){printf("%d ", psl->a[i]);}printf("\n");
}static void SLCheckCapacity(SL* psl)
{assert(psl);if (psl->capacity == psl->sz){SLDataType newcapacity = psl->capacity == 0 ? 4 : psl->capacity * 2;SLDataType* tmp = (SLDataType*)realloc(psl->a, newcapacity * sizeof(SLDataType));if (tmp == NULL){perror("realloc fail");return;}psl->a = tmp;psl->capacity = newcapacity;}
}void SLPushBack(SL* psl, SLDataType x)
{assert(psl);//检查容量SLCheckCapacity(psl);//尾插数据psl->a[psl->sz] = x;psl->sz++;
}void SLPopBack(SL* psl)
{assert(psl);if (psl->sz == 0){printf("表中无数据,无需删除!\n");return;}psl->sz--;
}void SLPushFront(SL* psl, SLDataType x)
{assert(psl);SLCheckCapacity(psl);int end = psl->sz - 1;while (end >= 0){psl->a[end + 1] = psl->a[end];end--;}psl->a[0] = x;psl->sz++;
}void SLPopFront(SL* psl)
{assert(psl);int begin = 1;while (begin < psl->sz){psl->a[begin - 1] = psl->a[begin];begin++;}psl->sz--;
}void SLInsert(SL* psl, int pos, SLDataType x)
{assert(psl);assert(pos >= 0 && pos <= psl->sz);SLCheckCapacity(psl);int end = psl->sz - 1;while (end >= pos){psl->a[end + 1] = psl->a[end];end--;}psl->a[pos] = x;psl->sz++;
}void SLErase(SL* psl, int pos)
{assert(psl);assert(pos >= 0 && pos <= psl->sz);int begin = pos+1;while (begin < psl->sz){psl->a[begin - 1] = psl->a[begin];begin++;}psl->sz--;
}
下面是测试函数功能实现使用的代码:
#include "SeqList.h"//void Test1()
//{
//	SL s1;
//	InitSL(&s1);
//	SLPushBack(&s1, 1);
//	SLPrint(&s1);
//	SLPushBack(&s1, 2);
//	SLPushBack(&s1, 3);
//	SLPushBack(&s1, 4);
//	SLPushBack(&s1, 5);
//	SLPrint(&s1);
//
//	SLPopBack(&s1);
//	SLPrint(&s1);
//	SLPopBack(&s1);
//	SLPrint(&s1);
//	SLPopBack(&s1);
//	SLPrint(&s1);
//	SLPopBack(&s1);
//	SLPrint(&s1);
//
//	SLDestroy(&s1);
//}//void Test2()
//{
//	SL s1;
//	InitSL(&s1);
//	SLPushBack(&s1, 1);
//	SLPrint(&s1);
//	SLPushBack(&s1, 2);
//	SLPushBack(&s1, 3);
//	SLPushBack(&s1, 4);
//	SLPushBack(&s1, 5);
//	SLPrint(&s1);
//
//	SLPushFront(&s1, 10);
//	SLPrint(&s1);
//	SLPushFront(&s1, 20);
//	SLPrint(&s1);
//	SLPushFront(&s1, 30);
//	SLPrint(&s1);
//
//	SLPopFront(&s1);
//	SLPrint(&s1);
//	SLPopFront(&s1);
//	SLPrint(&s1);
//	SLPopFront(&s1);
//	SLPrint(&s1);
//
//	SLDestroy(&s1);
//}void Test3()
{SL s1;InitSL(&s1);SLPushBack(&s1, 1);SLPrint(&s1);SLPushBack(&s1, 2);SLPushBack(&s1, 3);SLPushBack(&s1, 4);SLPushBack(&s1, 5);SLPrint(&s1);SLInsert(&s1, 1, 10);SLPrint(&s1);SLInsert(&s1, 1, 20);SLPrint(&s1);SLInsert(&s1, 1, 30);SLPrint(&s1);SLErase(&s1, 2);SLPrint(&s1);SLErase(&s1, 2);SLPrint(&s1);SLErase(&s1, 2);SLPrint(&s1);SLDestroy(&s1);
}int main()
{//初始化顺序表,尾插数据//Test1();//头插数据,头删数据//Test2();//任意下标插入数据,删除数据Test3();return 0;
}
好了,今天的分享就到这里了,感谢大家的阅读,我们下次再见!!!
