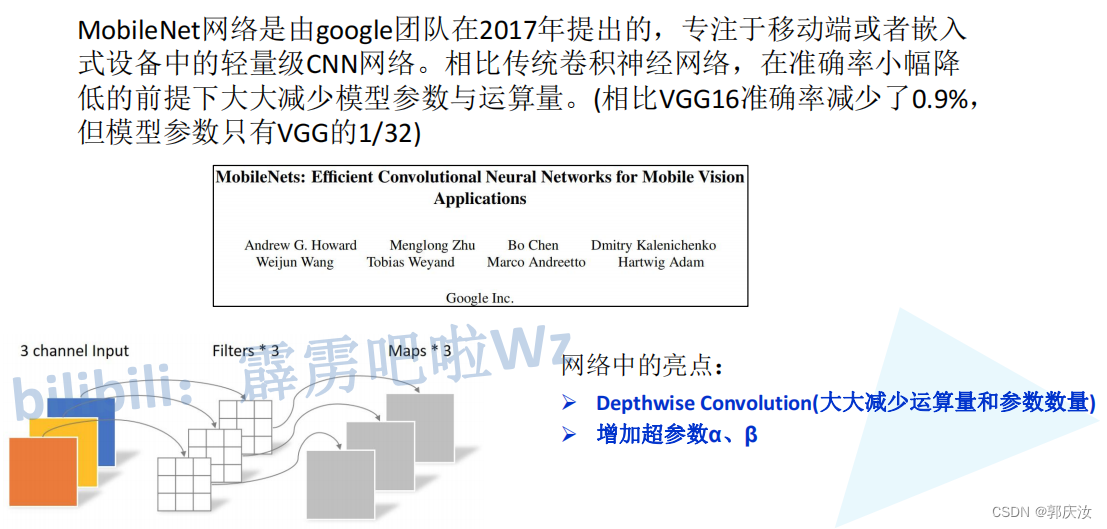
深度学习网络模型 MobileNet系列MobileNet V1、MobileNet V2、MobileNet V3网络详解以及pytorch代码复现
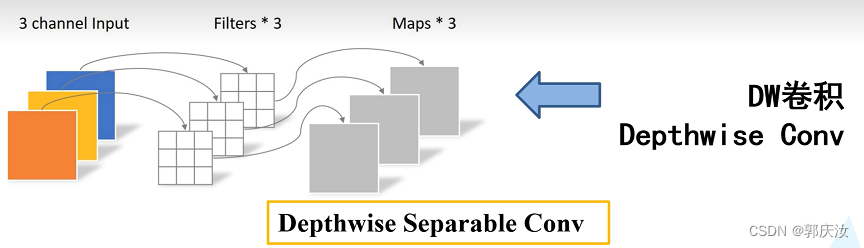
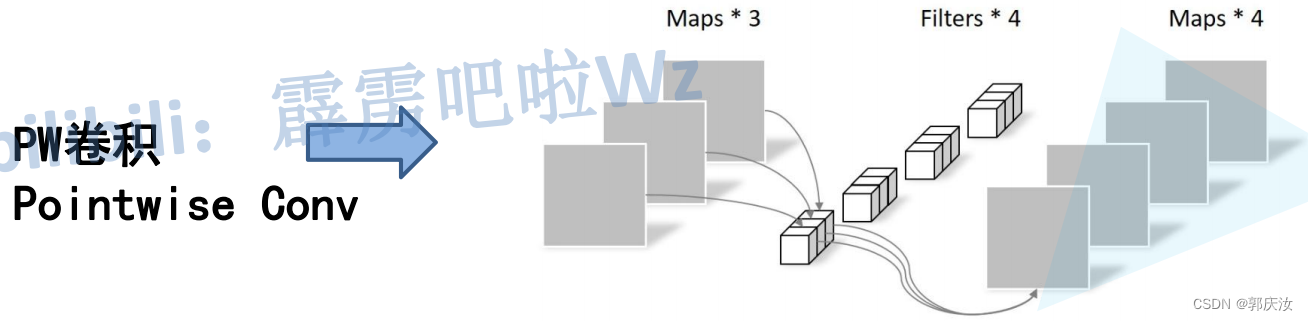
- 1、DW卷积与普通卷积计算量对比
- DW与PW计算量
- 普通卷积计算量
- 计算量对比
- 2、MobileNet V1
- MobileNet V1网络结构
- MobileNet V1网络结构代码
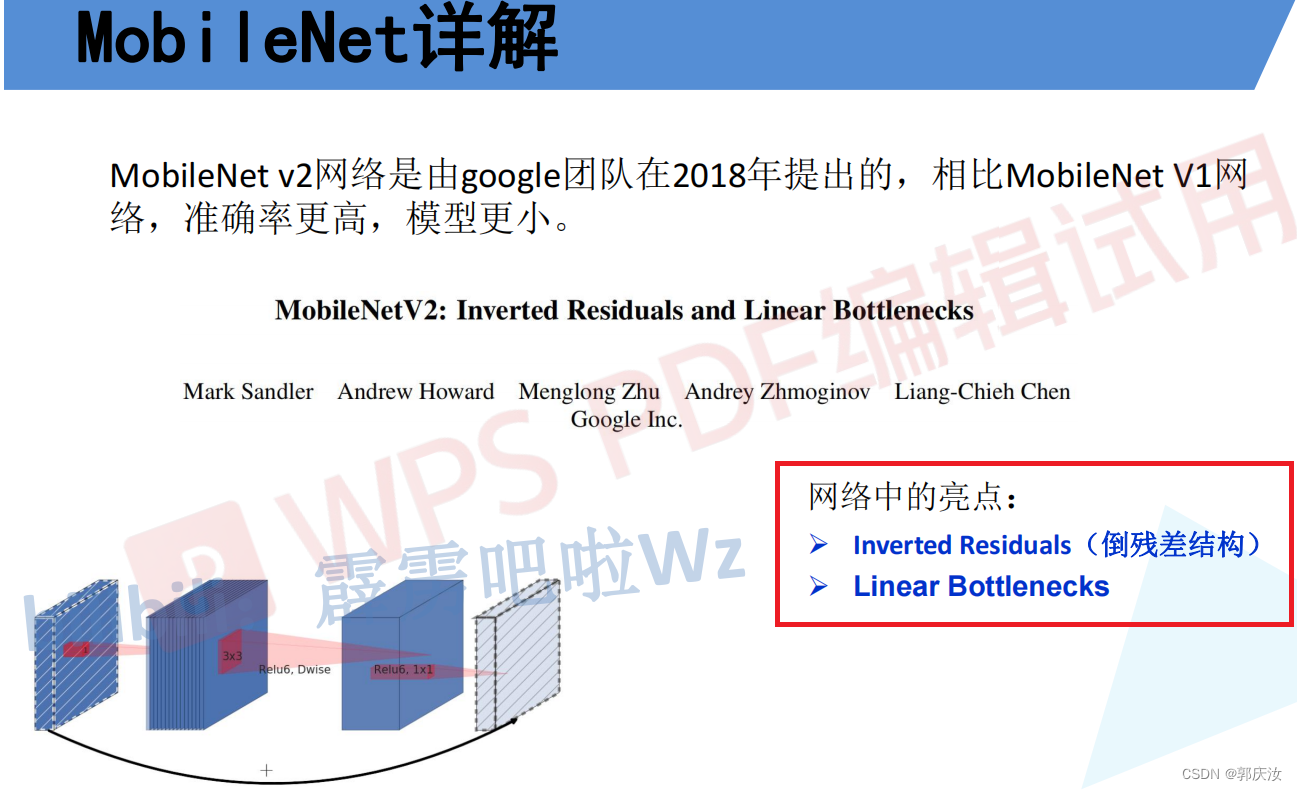
- 3、MobileNet V2
- 倒残差结构模块
- 倒残差模块代码
- MobileNet V2详细网络结构
- MobileNet V2网络结构代码
- 4、MobileNet V3
- 创新点
- MobileNet V3详细网络结构
- 注意力机制SE模块代码
- InvertedResidual模块代码
- 整体代码
- pytorch代码复现MobileNet V1~V2
- 项目目录
1、DW卷积与普通卷积计算量对比
DW与PW计算量
普通卷积计算量
计算量对比
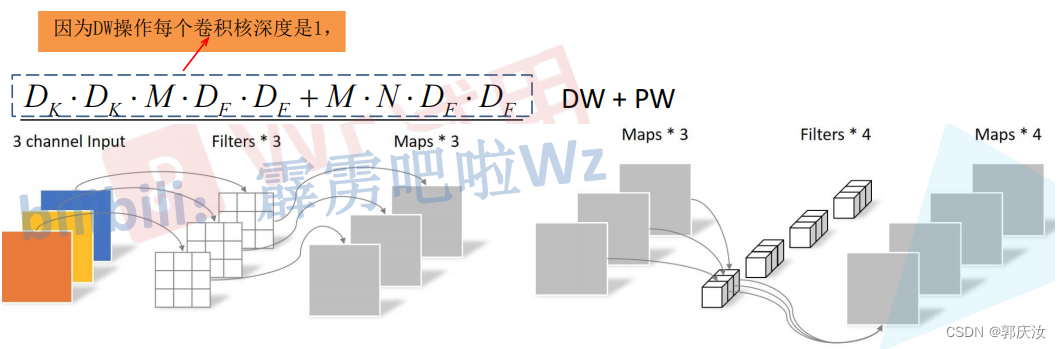
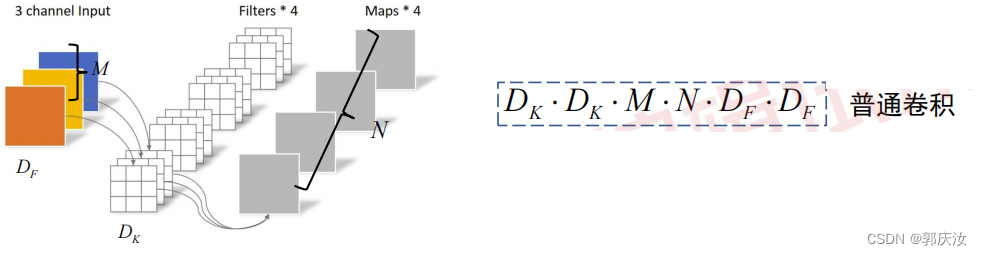

因此理论上普通卷积是DW+PW卷积的8到9倍
2、MobileNet V1
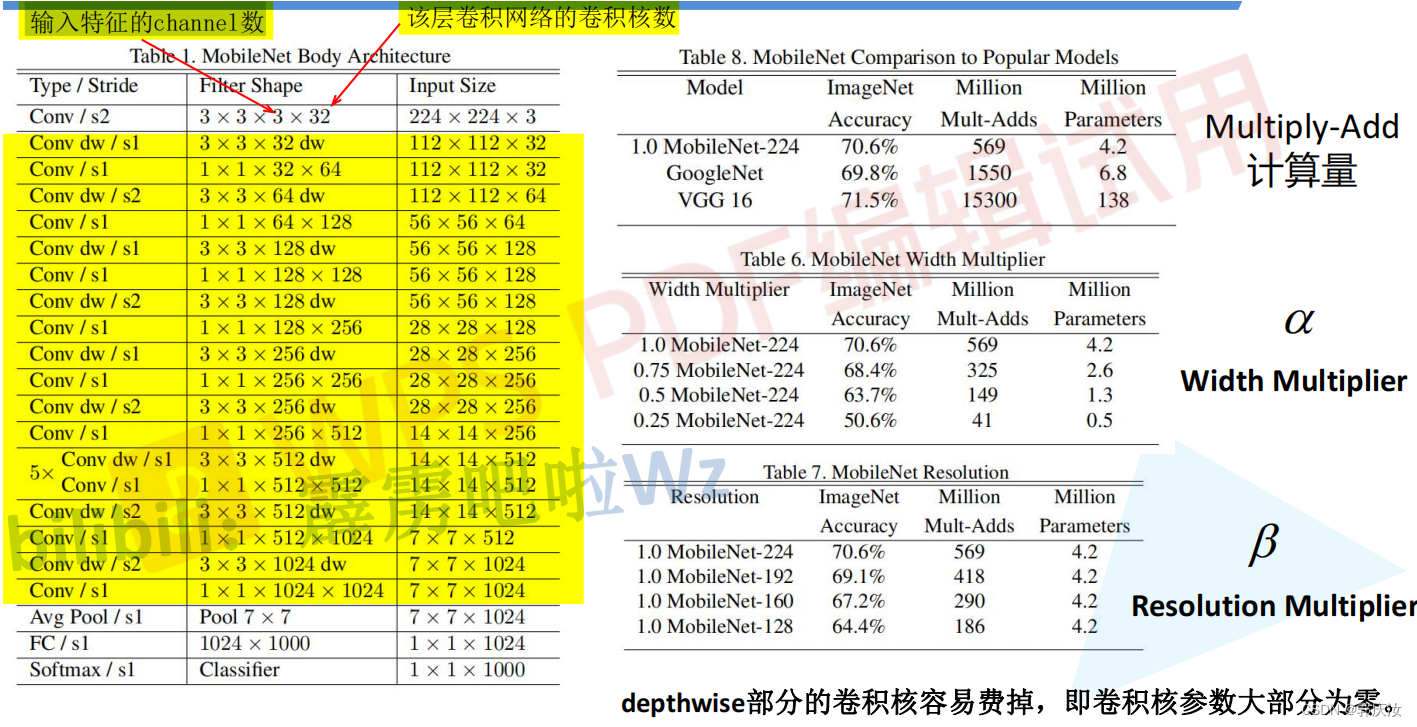
MobileNet V1网络结构
MobileNet V1网络结构代码
import torch.nn as nn
import torchclass MobileNetV1(nn.Module):def __init__(self, ch_in, n_classes):super(MobileNetV1, self).__init__()# 定义普通卷积、BN、激活模块def conv_bn(inp, oup, stride):return nn.Sequential(nn.Conv2d(inp, oup, 3, stride, 1, bias=False),nn.BatchNorm2d(oup),nn.ReLU(inplace=True))# 定义DW、PW卷积模块def conv_dw(inp, oup, stride):return nn.Sequential(# dwnn.Conv2d(inp, inp, 3, stride, 1, groups=inp, bias=False),   # DW卷积的卷积核输入与输出的数量一致,且等于分组数nn.BatchNorm2d(inp),nn.ReLU(inplace=True),# pwnn.Conv2d(inp, oup, 1, 1, 0, bias=False),nn.BatchNorm2d(oup),nn.ReLU(inplace=True),)self.model = nn.Sequential(conv_bn(ch_in, 32, 2),conv_dw(32, 64, 1),conv_dw(64, 128, 2),conv_dw(128, 128, 1),conv_dw(128, 256, 2),conv_dw(256, 256, 1),conv_dw(256, 512, 2),conv_dw(512, 512, 1),conv_dw(512, 512, 1),conv_dw(512, 512, 1),conv_dw(512, 512, 1),conv_dw(512, 512, 1),conv_dw(512, 1024, 2),conv_dw(1024, 1024, 1),nn.AdaptiveAvgPool2d(1))self.fc = nn.Linear(1024, n_classes)def forward(self, x):x = self.model(x)x = x.view(-1, 1024)x = self.fc(x)return xif __name__=='__main__':# model checkmodel = MobileNetV1(ch_in=3, n_classes=5)print(model)random_data=torch.rand([1,3,224,224])result = model(random_data)print(result)
3、MobileNet V2
倒残差结构模块
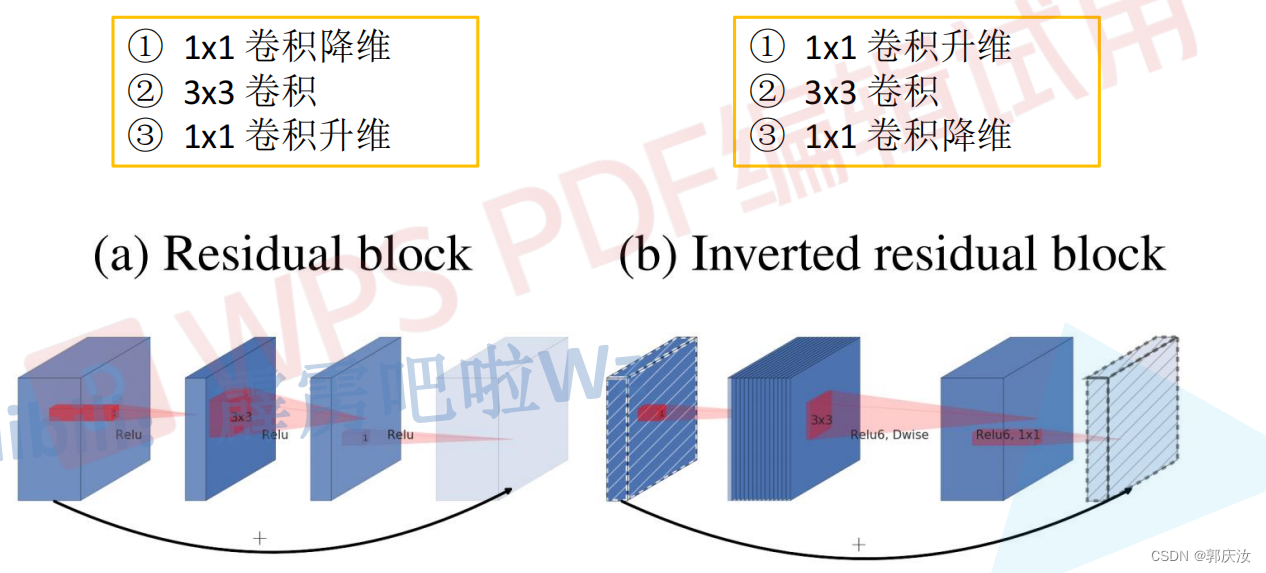
Residual blok与Inverted residual block对比:
- Residual blok:先采用1 x 1的卷积核来对特征矩阵进行压缩,减少输入特征矩阵的channel,再通过3 x 3的卷积核进行特征处理,再采用1 x 1的卷积核来扩充channel维度,形成了两头大中间小的瓶颈结构。并且3 x 3的卷积后面采用Relu激活函数。
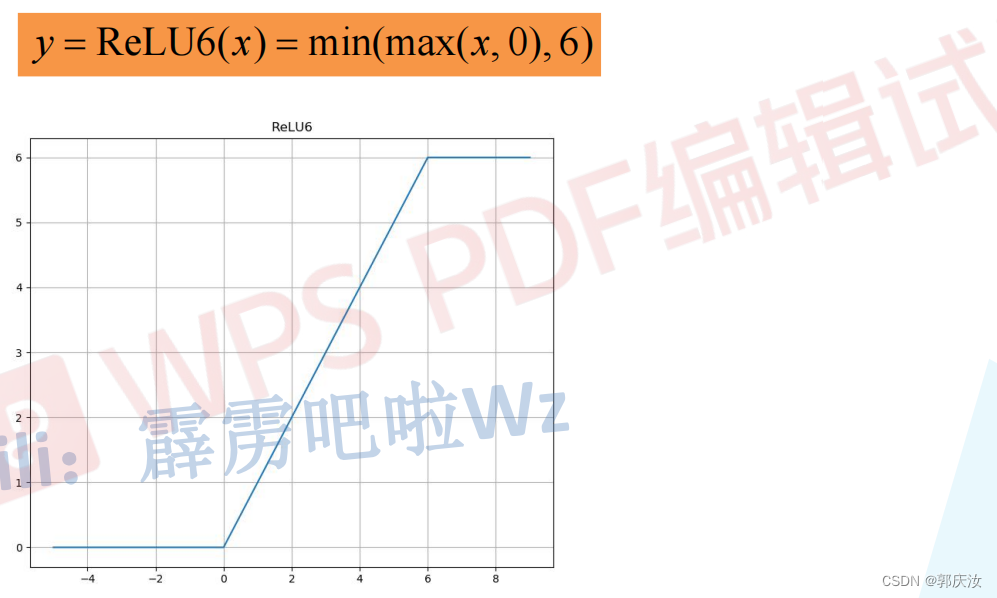
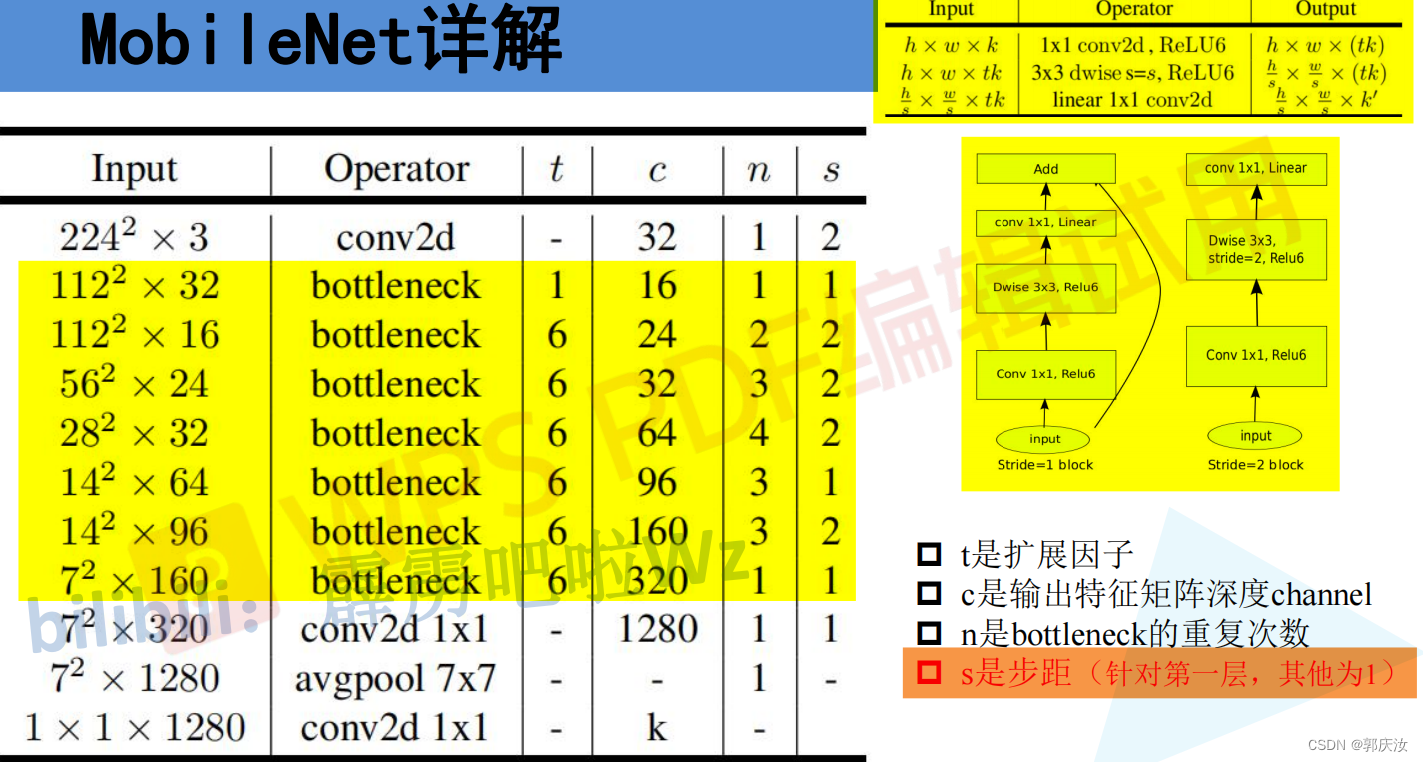
- Inverted residual block:先采用1 x 1的卷积核进行升高channel维度的操作,通过卷积核大小为3 x 3的DW模块进行卷积,再通过1 x 1的卷积进行降低channel维度的处理,形成两头小中间大的结构。并且3 x 3的卷积后面采用Relu6激活函数。
- Relu6激活函数
- 倒残差结构详细示意图

倒残差模块代码
# 定义普通卷积、BN结构
class ConvBNReLU(nn.Sequential):def __init__(self, in_channel, out_channel, kernel_size=3, stride=1, groups=1):padding = (kernel_size - 1) // 2  # padding的设置根据kernel_size来定,如果kernel_size为3,则padding设置为1;如果kernel_size为1,为padding为0super(ConvBNReLU, self).__init__(# 在pytorch中,如果设置的 group=1的话,就为普通卷积;如果设置的值为输入特征矩阵的深度的话(即in_channel),则为深度卷积(deptwise conv),并且Dw卷积的输出特征矩阵的深度等于输入特征矩阵的深度nn.Conv2d(in_channel, out_channel, kernel_size, stride, padding, groups=groups, bias=False),  # groups=1,表示普通的卷积;因为接下来要使用的是BN层,此处的偏置不起任何作用,所以设置为1nn.BatchNorm2d(out_channel),nn.ReLU6(inplace=True)    # 此处使用的是Relu6激活函数)
# 定义mobile网络基本结构--即到残差结构
class InvertedResidual(nn.Module):def __init__(self, in_channel, out_channel, stride, expand_ratio):super(InvertedResidual, self).__init__()hidden_channel = in_channel * expand_ratioself.use_shortcut = stride == 1 and in_channel == out_channel  # stride == 1 and in_channel == out_channel:保证输入矩阵与输出矩阵的shape一致,且通道数也一致,这样才可以进行shurtcutlayers = []if expand_ratio != 1:  # 表示如果扩展因子不为1时,则使用1x1的卷积层(即对输入特征矩阵的深度进行扩充)# 1x1 pointwise convlayers.append(ConvBNReLU(in_channel, hidden_channel, kernel_size=1))layers.extend([# 3x3 depthwise conv# 在pytorch中,如果设置的 group=1的话,就为普通卷积;如果设置的值为输入特征矩阵的深度的话(即in_channel),则为深度卷积(deptwise conv),并且Dw卷积的输出特征矩阵的深度等于输入特征矩阵的深度ConvBNReLU(hidden_channel, hidden_channel, stride=stride, groups=hidden_channel),# 1x1 pointwise conv(linear)  因为其后跟随的是线性激活函数,即y=x,所以其后面不在跟随激活函数nn.Conv2d(hidden_channel, out_channel, kernel_size=1, bias=False),nn.BatchNorm2d(out_channel),])self.conv = nn.Sequential(*layers)def forward(self, x):if self.use_shortcut:return x + self.conv(x)else:return self.conv(x)
MobileNet V2详细网络结构
MobileNet V2网络结构代码
from torch import nn
import torchdef _make_divisible(ch, divisor=8, min_ch=None):"""将输入的通道数(ch)调整到divisor的整数倍,方便硬件加速This function is taken from the original tf repo.It ensures that all layers have a channel number that is divisible by 8It can be seen here:https://github.com/tensorflow/models/blob/master/research/slim/nets/mobilenet/mobilenet.py"""if min_ch is None:min_ch = divisornew_ch = max(min_ch, int(ch + divisor / 2) // divisor * divisor)# Make sure that round down does not go down by more than 10%.if new_ch < 0.9 * ch:new_ch += divisorreturn new_ch# 定义普通卷积、BN结构
class ConvBNReLU(nn.Sequential):def __init__(self, in_channel, out_channel, kernel_size=3, stride=1, groups=1):padding = (kernel_size - 1) // 2  # padding的设置根据kernel_size来定,如果kernel_size为3,则padding设置为1;如果kernel_size为1,为padding为0super(ConvBNReLU, self).__init__(# 在pytorch中,如果设置的 group=1的话,就为普通卷积;如果设置的值为输入特征矩阵的深度的话(即in_channel),则为深度卷积(deptwise conv),并且Dw卷积的输出特征矩阵的深度等于输入特征矩阵的深度nn.Conv2d(in_channel, out_channel, kernel_size, stride, padding, groups=groups, bias=False),  # groups=1,表示普通的卷积;因为接下来要使用的是BN层,此处的偏置不起任何作用,所以设置为1nn.BatchNorm2d(out_channel),nn.ReLU6(inplace=True)    # 此处使用的是Relu6激活函数)# 定义mobile网络基本结构--即到残差结构
class InvertedResidual(nn.Module):def __init__(self, in_channel, out_channel, stride, expand_ratio):super(InvertedResidual, self).__init__()hidden_channel = in_channel * expand_ratioself.use_shortcut = stride == 1 and in_channel == out_channel  # stride == 1 and in_channel == out_channel:保证输入矩阵与输出矩阵的shape一致,且通道数也一致,这样才可以进行shurtcutlayers = []if expand_ratio != 1:  # 表示如果扩展因子不为1时,则使用1x1的卷积层(即对输入特征矩阵的深度进行扩充)# 1x1 pointwise convlayers.append(ConvBNReLU(in_channel, hidden_channel, kernel_size=1))layers.extend([# 3x3 depthwise conv# 在pytorch中,如果设置的 group=1的话,就为普通卷积;如果设置的值为输入特征矩阵的深度的话(即in_channel),则为深度卷积(deptwise conv),并且Dw卷积的输出特征矩阵的深度等于输入特征矩阵的深度ConvBNReLU(hidden_channel, hidden_channel, stride=stride, groups=hidden_channel),# 1x1 pointwise conv(linear)  因为其后跟随的是线性激活函数,即y=x,所以其后面不在跟随激活函数nn.Conv2d(hidden_channel, out_channel, kernel_size=1, bias=False),nn.BatchNorm2d(out_channel),])self.conv = nn.Sequential(*layers)def forward(self, x):if self.use_shortcut:return x + self.conv(x)else:return self.conv(x)# 定义mobileNetV2网络
class MobileNetV2(nn.Module):def __init__(self, num_classes=1000, alpha=1.0, round_nearest=8):super(MobileNetV2, self).__init__()block = InvertedResidualinput_channel = _make_divisible(32 * alpha, round_nearest)  # 将卷积核的个数调整为8的整数倍last_channel = _make_divisible(1280 * alpha, round_nearest)inverted_residual_setting = [# t, c, n, s[1, 16, 1, 1],[6, 24, 2, 2],[6, 32, 3, 2],[6, 64, 4, 2],[6, 96, 3, 1],[6, 160, 3, 2],[6, 320, 1, 1],]features = []# conv1 layerfeatures.append(ConvBNReLU(3, input_channel, stride=2))   # 添加第一层普通卷积层# building inverted residual residual blockesfor t, c, n, s in inverted_residual_setting:output_channel = _make_divisible(c * alpha, round_nearest)   # 根据alpha因子调整卷积核的个数for i in range(n):   # 循环添加倒残差模块stride = s if i == 0 else 1  # s表示的是倒残差模块结构中第一层卷积对应的步距,剩余层都是1features.append(block(input_channel, output_channel, stride, expand_ratio=t))  # 添加一系列倒残差结构input_channel = output_channel# building last several layersfeatures.append(ConvBNReLU(input_channel, last_channel, 1))  # 构建最后一层卷积层# combine feature layersself.features = nn.Sequential(*features)# building classifierself.avgpool = nn.AdaptiveAvgPool2d((1, 1))  # 采用自适应平均采样层self.classifier = nn.Sequential(nn.Dropout(0.2),nn.Linear(last_channel, num_classes))# weight initialization  初始化全只能怪for m in self.modules():if isinstance(m, nn.Conv2d):nn.init.kaiming_normal_(m.weight, mode='fan_out')if m.bias is not None:nn.init.zeros_(m.bias)elif isinstance(m, nn.BatchNorm2d):nn.init.ones_(m.weight)nn.init.zeros_(m.bias)elif isinstance(m, nn.Linear):nn.init.normal_(m.weight, 0, 0.01)   # 初始化为正态分布的函数,均值为0,方差为0.01nn.init.zeros_(m.bias)def forward(self, x):x = self.features(x)x = self.avgpool(x)x = torch.flatten(x, 1)x = self.classifier(x)return xif __name__ == '__main__':divisible = _make_divisible(1)print(divisible)
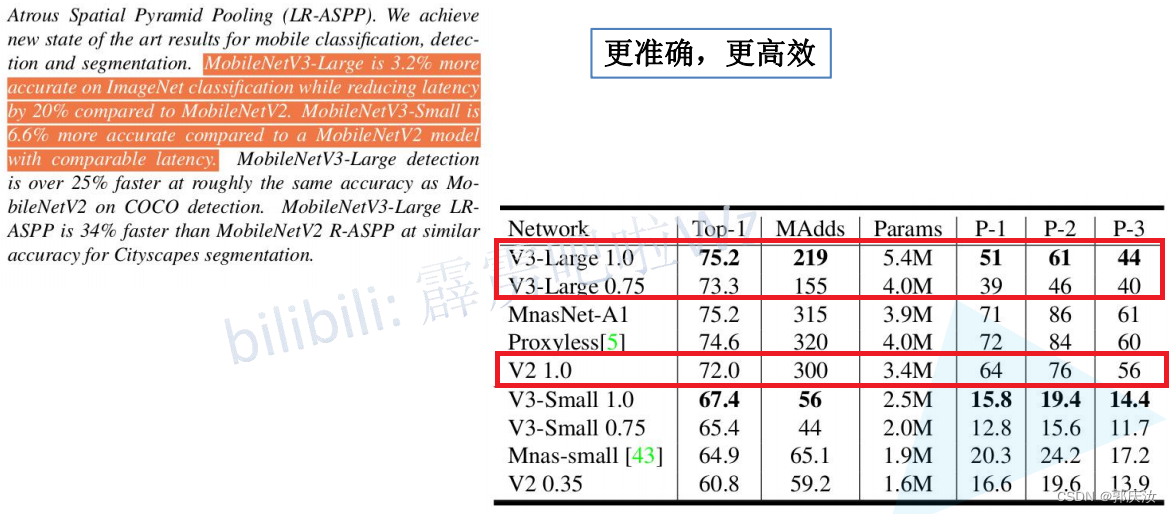
4、MobileNet V3
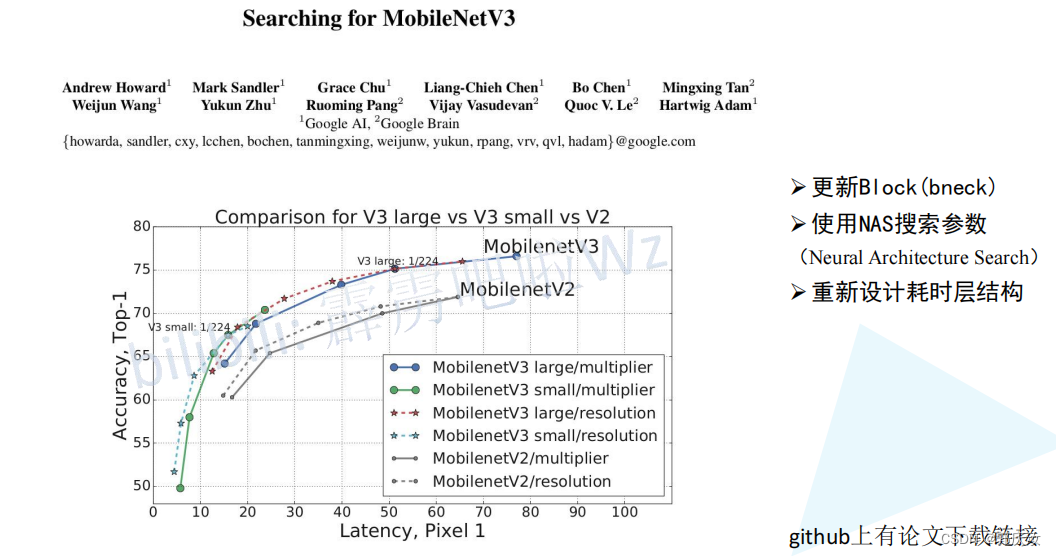
创新点
- 加入了注意力机制SE模块
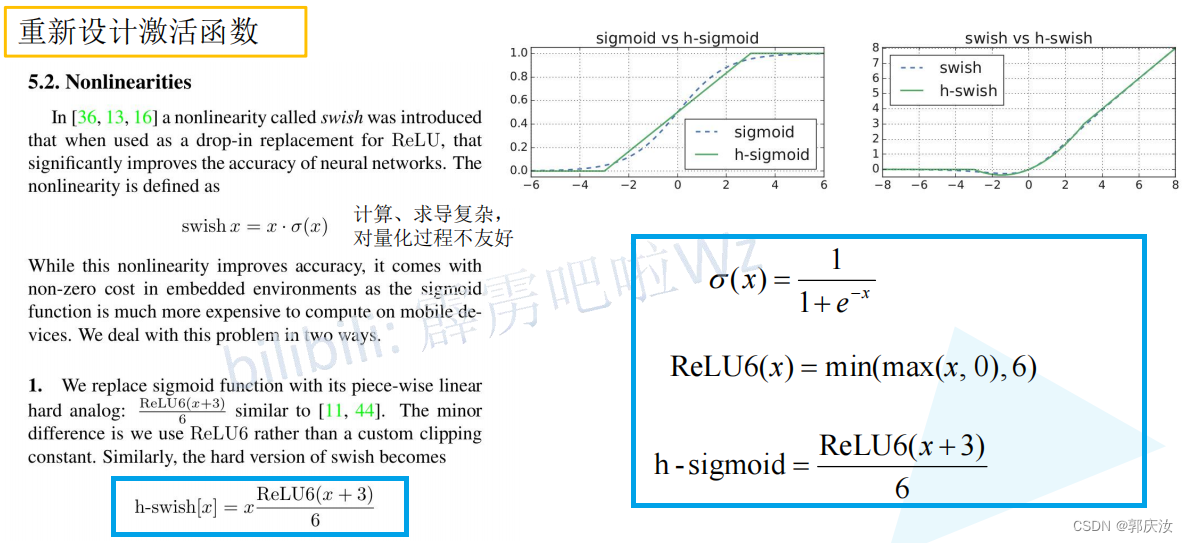
- 使用的新的激活函数
- 激活函数

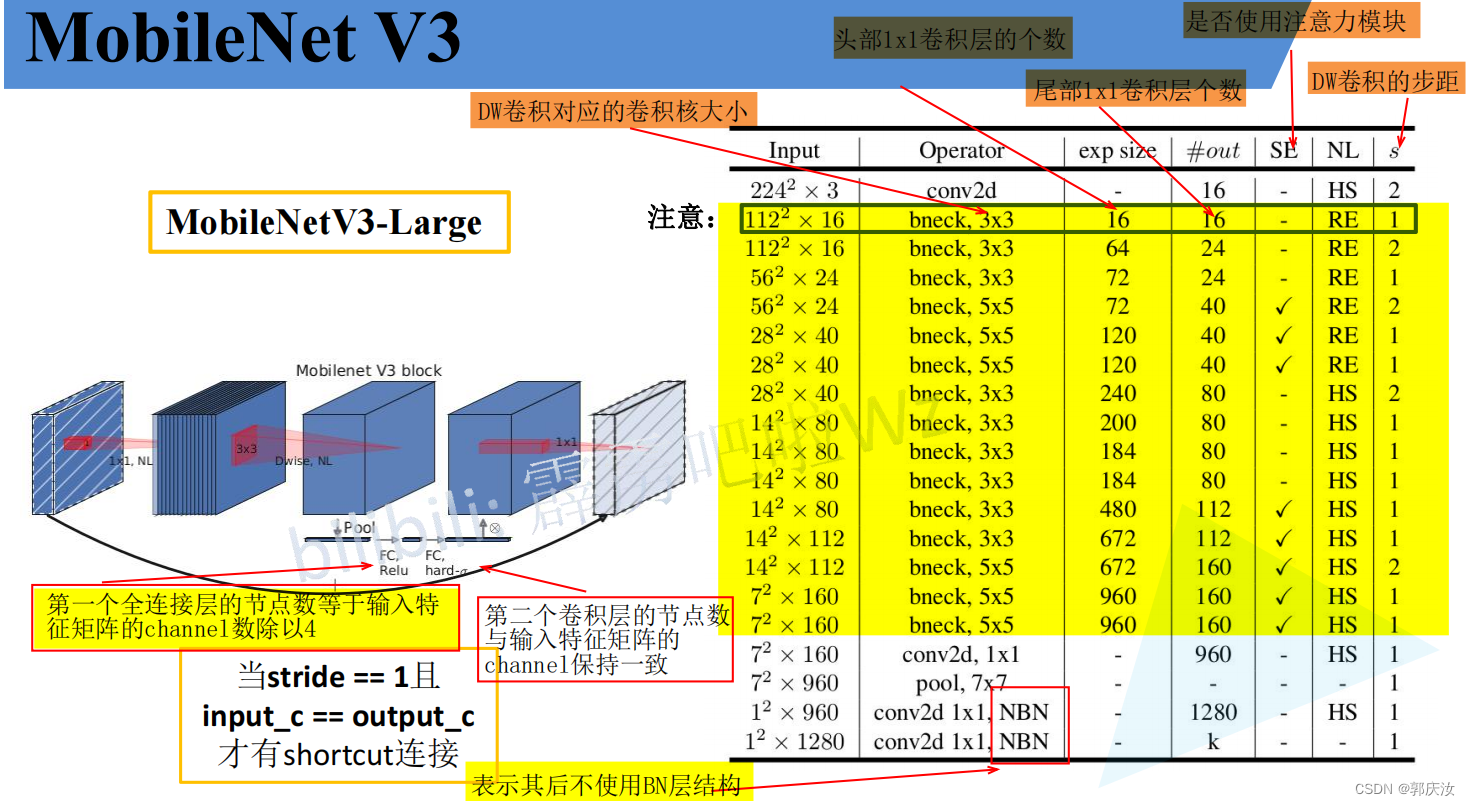
MobileNet V3详细网络结构
# 定义block的配置类
class InvertedResidualConfig:def __init__(self,input_c: int,  # block模块中的第一个1x1卷积层的输入channel数kernel: int,   # depthwise卷积的卷积核大小expanded_c: int,   # block模块中的第一个1x1卷积层的输出channel数out_c: int,  # 经过block模块中第二个1x1卷积层处理过后得到的channel数use_se: bool,  # 是否使用注意力机制模块activation: str,   # 激活方式stride: int,       # 步长width_multi: float):  # width_multi:调节每个卷积层所使用channel的倍率因子self.input_c = self.adjust_channels(input_c, width_multi)self.kernel = kernelself.expanded_c = self.adjust_channels(expanded_c, width_multi)self.out_c = self.adjust_channels(out_c, width_multi)self.use_se = use_seself.use_hs = activation == "HS"  # whether using h-swish activationself.stride = stride@staticmethoddef adjust_channels(channels: int, width_multi: float):return _make_divisible(channels * width_multi, 8)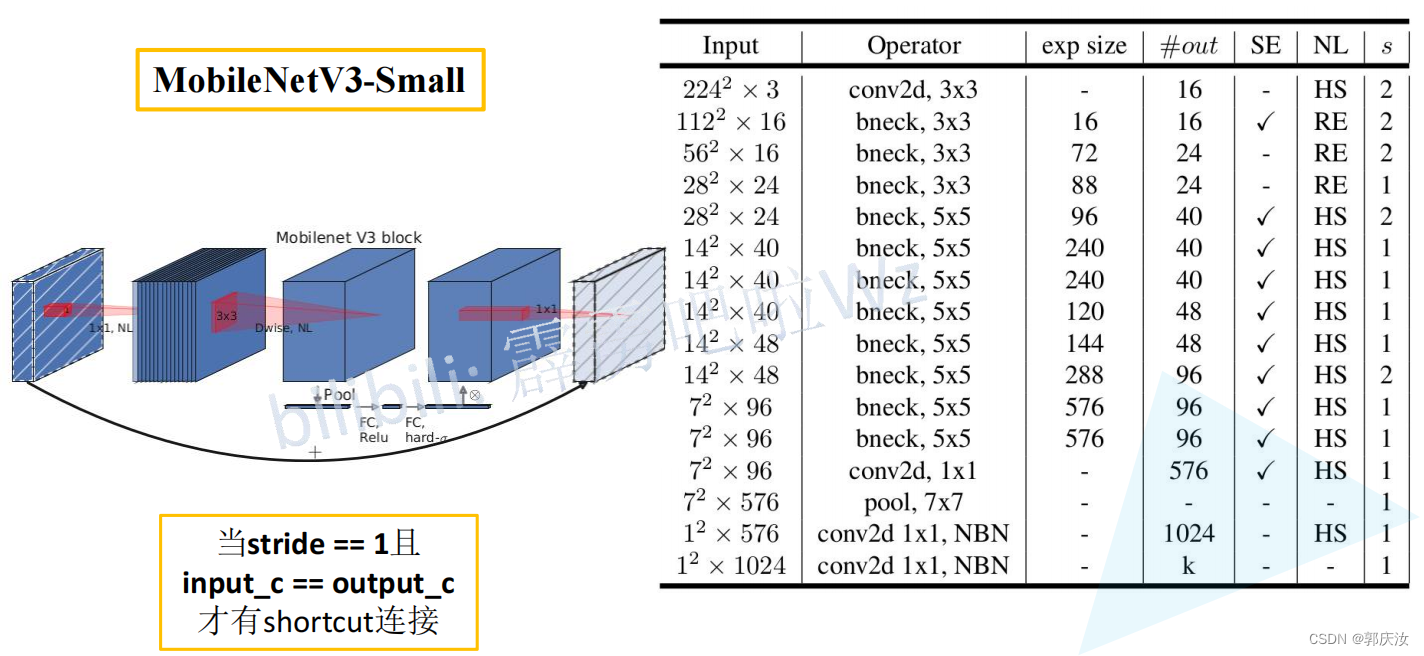
注意力机制SE模块代码
# 注意力机制模块(SE模块,即两个全连接层)   该模块的基本流程是:先进行自适应平均池化(1x1)———>1x1的卷积层———>relu激活层———>1x1的卷积池化———>hardsigmoid()激活函数激活
class SqueezeExcitation(nn.Module):def __init__(self, input_c: int, squeeze_factor: int = 4):super(SqueezeExcitation, self).__init__()squeeze_c = _make_divisible(input_c // squeeze_factor, 8)    # 获得距离该数最近的8的整数倍的数字self.fc1 = nn.Conv2d(input_c, squeeze_c, 1)    # 该卷积的输出的squeeze_c是输入input_c的1/4self.fc2 = nn.Conv2d(squeeze_c, input_c, 1)def forward(self, x: Tensor) -> Tensor:scale = F.adaptive_avg_pool2d(x, output_size=(1, 1))   # 将特征矩阵每一个channel上的数据给平均池化到1x1的大小scale = self.fc1(scale)scale = F.relu(scale, inplace=True)scale = self.fc2(scale)scale = F.hardsigmoid(scale, inplace=True)   # 激活函数return scale * x   # 将得到的数据与传入的对应channel数据进行相乘
InvertedResidual模块代码
# 定义block模块
# 此为block模块,其包含第一个1x1卷积层、DeptWis卷积层、SE注意力机制层(判断是否需求)、第二个1x1卷积层、激活函数(需要判断是否是非线性激活)
class InvertedResidual(nn.Module):def __init__(self,cnf: InvertedResidualConfig,   # cnf:配置类参数norm_layer: Callable[..., nn.Module]):      # norm_layer:# BN层super(InvertedResidual, self).__init__()if cnf.stride not in [1, 2]:  # 判断某一层的配置文件,其步长是否满足条件raise ValueError("illegal stride value.")# 判断是否进行短连接self.use_res_connect = (cnf.stride == 1 and cnf.input_c == cnf.out_c)  # 只有当步长为1,并且输入通道等于输出通道数layers: List[nn.Module] = []activation_layer = nn.Hardswish if cnf.use_hs else nn.ReLU    # 判断当前的激活函数类型# expand# 判断是否相等,如果相等,则不适用1x1的卷积层增加channel维度;不相等的话,才使用该层进行升维度if cnf.expanded_c != cnf.input_c:layers.append(ConvBNActivation(cnf.input_c,cnf.expanded_c,kernel_size=1,norm_layer=norm_layer,activation_layer=activation_layer))# depthwiselayers.append(ConvBNActivation(cnf.expanded_c,cnf.expanded_c,kernel_size=cnf.kernel,   # depthwise卷积的卷积核大小stride=cnf.stride,groups=cnf.expanded_c,norm_layer=norm_layer,   # BN层activation_layer=activation_layer))# 判断是否需要添加SE模块if cnf.use_se:layers.append(SqueezeExcitation(cnf.expanded_c))# projectlayers.append(ConvBNActivation(cnf.expanded_c,cnf.out_c,kernel_size=1,norm_layer=norm_layer,  # BN 层activation_layer=nn.Identity))   # 此层的activation_layer就是进行里普通的线性激活,没有做任何的处理self.block = nn.Sequential(*layers)self.out_channels = cnf.out_cself.is_strided = cnf.stride > 1def forward(self, x: Tensor) -> Tensor:result = self.block(x)if self.use_res_connect:result += x   # 进行shortcut连接return result
整体代码
from typing import Callable, List, Optionalimport torch
from torch import nn, Tensor
from torch.nn import functional as F
from functools import partial# 得到同传入数据最近的8的整数倍数值
def _make_divisible(ch, divisor=8, min_ch=None):"""This function is taken from the original tf repo.It ensures that all layers have a channel number that is divisible by 8It can be seen here:https://github.com/tensorflow/models/blob/master/research/slim/nets/mobilenet/mobilenet.py"""if min_ch is None:min_ch = divisornew_ch = max(min_ch, int(ch + divisor / 2) // divisor * divisor)# Make sure that round down does not go down by more than 10%.if new_ch < 0.9 * ch:new_ch += divisorreturn new_ch# 普通卷积、BN、激活层模块
class ConvBNActivation(nn.Sequential):def __init__(self,in_planes: int,   # 输入特征矩阵的通道out_planes: int,  # 输出特征矩阵的通道kernel_size: int = 3,stride: int = 1,groups: int = 1,norm_layer: Optional[Callable[..., nn.Module]] = None,   # 在卷积后的BN层activation_layer: Optional[Callable[..., nn.Module]] = None):  # 激活函数padding = (kernel_size - 1) // 2if norm_layer is None:norm_layer = nn.BatchNorm2dif activation_layer is None:activation_layer = nn.ReLU6super(ConvBNActivation, self).__init__(nn.Conv2d(in_channels=in_planes,out_channels=out_planes,kernel_size=kernel_size,stride=stride,padding=padding,groups=groups,bias=False),norm_layer(out_planes),   # BN层activation_layer(inplace=True))# 注意力机制模块(SE模块,即两个全连接层)   该模块的基本流程是:先进行自适应平均池化(1x1)———>1x1的卷积层———>relu激活层———>1x1的卷积池化———>hardsigmoid()激活函数激活
class SqueezeExcitation(nn.Module):def __init__(self, input_c: int, squeeze_factor: int = 4):super(SqueezeExcitation, self).__init__()squeeze_c = _make_divisible(input_c // squeeze_factor, 8)    # 获得距离该数最近的8的整数倍的数字self.fc1 = nn.Conv2d(input_c, squeeze_c, 1)    # 该卷积的输出的squeeze_c是输入input_c的1/4  其作用与全连接层一样self.fc2 = nn.Conv2d(squeeze_c, input_c, 1)def forward(self, x: Tensor) -> Tensor:scale = F.adaptive_avg_pool2d(x, output_size=(1, 1))   # 将特征矩阵每一个channel上的数据给平均池化到1x1的大小scale = self.fc1(scale)scale = F.relu(scale, inplace=True)scale = self.fc2(scale)scale = F.hardsigmoid(scale, inplace=True)   # 激活函数return scale * x   # 将得到的数据与传入的对应channel数据进行相乘# 定义block的配置类
class InvertedResidualConfig:def __init__(self,input_c: int,  # block模块中的第一个1x1卷积层的输入channel数kernel: int,   # depthwise卷积的卷积核大小expanded_c: int,   # block模块中的第一个1x1卷积层的输出channel数out_c: int,  # 经过block模块中第二个1x1卷积层处理过后得到的channel数use_se: bool,  # 是否使用注意力机制模块activation: str,   # 激活方式stride: int,       # 步长width_multi: float):  # width_multi:调节每个卷积层所使用channel的倍率因子self.input_c = self.adjust_channels(input_c, width_multi)self.kernel = kernelself.expanded_c = self.adjust_channels(expanded_c, width_multi)self.out_c = self.adjust_channels(out_c, width_multi)self.use_se = use_seself.use_hs = activation == "HS"  # whether using h-swish activationself.stride = stride@staticmethoddef adjust_channels(channels: int, width_multi: float):return _make_divisible(channels * width_multi, 8)# 定义block模块
# 此为block模块,其包含第一个1x1卷积层、DeptWis卷积层、SE注意力机制层(判断是否需求)、第二个1x1卷积层、激活函数(需要判断是否是非线性激活)
class InvertedResidual(nn.Module):def __init__(self,cnf: InvertedResidualConfig,   # cnf:配置类参数norm_layer: Callable[..., nn.Module]):      # norm_layer:# BN层super(InvertedResidual, self).__init__()if cnf.stride not in [1, 2]:  # 判断某一层的配置文件,其步长是否满足条件raise ValueError("illegal stride value.")# 判断是否进行短连接self.use_res_connect = (cnf.stride == 1 and cnf.input_c == cnf.out_c)  # 只有当步长为1,并且输入通道等于输出通道数layers: List[nn.Module] = []activation_layer = nn.Hardswish if cnf.use_hs else nn.ReLU    # 判断当前的激活函数类型# expand# 判断是否相等,如果相等,则不适用1x1的卷积层增加channel维度;不相等的话,才使用该层进行升维度if cnf.expanded_c != cnf.input_c:layers.append(ConvBNActivation(cnf.input_c,cnf.expanded_c,kernel_size=1,norm_layer=norm_layer,activation_layer=activation_layer))# depthwiselayers.append(ConvBNActivation(cnf.expanded_c,cnf.expanded_c,kernel_size=cnf.kernel,   # depthwise卷积的卷积核大小stride=cnf.stride,groups=cnf.expanded_c,    # 深度DW卷积norm_layer=norm_layer,   # BN层activation_layer=activation_layer))# 判断是否需要添加SE模块if cnf.use_se:layers.append(SqueezeExcitation(cnf.expanded_c))# projectlayers.append(ConvBNActivation(cnf.expanded_c,cnf.out_c,kernel_size=1,norm_layer=norm_layer,  # BN 层activation_layer=nn.Identity))   # 此层的activation_layer就是进行里普通的线性激活,没有做任何的处理self.block = nn.Sequential(*layers)self.out_channels = cnf.out_cself.is_strided = cnf.stride > 1def forward(self, x: Tensor) -> Tensor:result = self.block(x)if self.use_res_connect:result += x   # 进行shortcut连接return result# MobileNetV3网络结构基础框架:其包括:模型的第一层卷积层———>nx【bneckBlock模块】———>1x1的卷积层———>自适应平均池化层———>全连接层———>全连接层
class MobileNetV3(nn.Module):def __init__(self,inverted_residual_setting: List[InvertedResidualConfig],           # beneckBlock结构一系列参数列表last_channel: int,   # 对应的是倒数第二个全连接层输出节点数  1280num_classes: int = 1000,  # 类别个数block: Optional[Callable[..., nn.Module]] = None,   # InvertedResidual核心模块norm_layer: Optional[Callable[..., nn.Module]] = None):super(MobileNetV3, self).__init__()if not inverted_residual_setting:raise ValueError("The inverted_residual_setting should not be empty.")elif not (isinstance(inverted_residual_setting, List) andall([isinstance(s, InvertedResidualConfig) for s in inverted_residual_setting])):raise TypeError("The inverted_residual_setting should be List[InvertedResidualConfig]")if block is None:block = InvertedResidual   # block类if norm_layer is None:norm_layer = partial(nn.BatchNorm2d, eps=0.001, momentum=0.01)  # partial()为python方法,即为nn.BatchNorm2d传入默认的两个参数layers: List[nn.Module] = []# building first layer# 构建第一层卷积结构firstconv_output_c = inverted_residual_setting[0].input_c   # 表示第一个卷积层输出的channel数layers.append(ConvBNActivation(3,   # 输入图像数据的channel数firstconv_output_c,    # 输出channelkernel_size=3,stride=2,norm_layer=norm_layer,activation_layer=nn.Hardswish))# building inverted residual blocks# 利用循环的方式添加block模块,将每层的配置文件传给blockfor cnf in inverted_residual_setting:layers.append(block(cnf, norm_layer))# building last several layerslastconv_input_c = inverted_residual_setting[-1].out_c  # 最后的bneckblock的输出channellastconv_output_c = 6 * lastconv_input_c    # lastconv_output_c 与 最后的bneckblock的输出channel数是六倍的关系# 定义最后一层的卷积层layers.append(ConvBNActivation(lastconv_input_c,   # 最后的bneckblock的输出channel数lastconv_output_c,   # lastconv_output_c 与 最后的bneckblock的输出channel数是六倍的关系kernel_size=1,norm_layer=norm_layer,activation_layer=nn.Hardswish))self.features = nn.Sequential(*layers)self.avgpool = nn.AdaptiveAvgPool2d(1)self.classifier = nn.Sequential(nn.Linear(lastconv_output_c, last_channel),nn.Hardswish(inplace=True),nn.Dropout(p=0.2, inplace=True),nn.Linear(last_channel, num_classes))# initial weightsfor m in self.modules():if isinstance(m, nn.Conv2d):nn.init.kaiming_normal_(m.weight, mode="fan_out")if m.bias is not None:nn.init.zeros_(m.bias)elif isinstance(m, (nn.BatchNorm2d, nn.GroupNorm)):nn.init.ones_(m.weight)nn.init.zeros_(m.bias)elif isinstance(m, nn.Linear):nn.init.normal_(m.weight, 0, 0.01)nn.init.zeros_(m.bias)def _forward_impl(self, x: Tensor) -> Tensor:x = self.features(x)x = self.avgpool(x)x = torch.flatten(x, 1)x = self.classifier(x)return xdef forward(self, x: Tensor) -> Tensor:return self._forward_impl(x)### 构建large基础mobilenet_v3_large模型
def mobilenet_v3_large(num_classes: int = 1000,reduced_tail: bool = False) -> MobileNetV3:"""Constructs a large MobileNetV3 architecture from"Searching for MobileNetV3" <https://arxiv.org/abs/1905.02244>.weights_link:https://download.pytorch.org/models/mobilenet_v3_large-8738ca79.pthArgs:num_classes (int): number of classesreduced_tail (bool): If True, reduces the channel counts of all feature layersbetween C4 and C5 by 2. It is used to reduce the channel redundancy in thebackbone for Detection and Segmentation."""width_multi = 1.0bneck_conf = partial(InvertedResidualConfig, width_multi=width_multi)adjust_channels = partial(InvertedResidualConfig.adjust_channels, width_multi=width_multi)reduce_divider = 2 if reduced_tail else 1   # 是否较少网络参数标志,默认是False,即不减少# # beneckBlock结构一系列参数列表inverted_residual_setting = [# input_c, kernel, expanded_c, out_c, use_se, activation, stridebneck_conf(16, 3, 16, 16, False, "RE", 1),bneck_conf(16, 3, 64, 24, False, "RE", 2),  # C1bneck_conf(24, 3, 72, 24, False, "RE", 1),bneck_conf(24, 5, 72, 40, True, "RE", 2),  # C2bneck_conf(40, 5, 120, 40, True, "RE", 1),bneck_conf(40, 5, 120, 40, True, "RE", 1),bneck_conf(40, 3, 240, 80, False, "HS", 2),  # C3bneck_conf(80, 3, 200, 80, False, "HS", 1),bneck_conf(80, 3, 184, 80, False, "HS", 1),bneck_conf(80, 3, 184, 80, False, "HS", 1),bneck_conf(80, 3, 480, 112, True, "HS", 1),bneck_conf(112, 3, 672, 112, True, "HS", 1),bneck_conf(112, 5, 672, 160 // reduce_divider, True, "HS", 2),  # C4bneck_conf(160 // reduce_divider, 5, 960 // reduce_divider, 160 // reduce_divider, True, "HS", 1),bneck_conf(160 // reduce_divider, 5, 960 // reduce_divider, 160 // reduce_divider, True, "HS", 1),]last_channel = adjust_channels(1280 // reduce_divider)  # C5return MobileNetV3(inverted_residual_setting=inverted_residual_setting,last_channel=last_channel,num_classes=num_classes)### 构建small基础mobilenet_v3_small模型
def mobilenet_v3_small(num_classes: int = 1000,reduced_tail: bool = False) -> MobileNetV3:"""Constructs a large MobileNetV3 architecture from"Searching for MobileNetV3" <https://arxiv.org/abs/1905.02244>.weights_link:https://download.pytorch.org/models/mobilenet_v3_small-047dcff4.pthArgs:num_classes (int): number of classesreduced_tail (bool): If True, reduces the channel counts of all feature layersbetween C4 and C5 by 2. It is used to reduce the channel redundancy in thebackbone for Detection and Segmentation."""width_multi = 1.0bneck_conf = partial(InvertedResidualConfig, width_multi=width_multi)adjust_channels = partial(InvertedResidualConfig.adjust_channels, width_multi=width_multi)reduce_divider = 2 if reduced_tail else 1inverted_residual_setting = [# input_c, kernel, expanded_c, out_c, use_se, activation, stridebneck_conf(16, 3, 16, 16, True, "RE", 2),  # C1bneck_conf(16, 3, 72, 24, False, "RE", 2),  # C2bneck_conf(24, 3, 88, 24, False, "RE", 1),bneck_conf(24, 5, 96, 40, True, "HS", 2),  # C3bneck_conf(40, 5, 240, 40, True, "HS", 1),bneck_conf(40, 5, 240, 40, True, "HS", 1),bneck_conf(40, 5, 120, 48, True, "HS", 1),bneck_conf(48, 5, 144, 48, True, "HS", 1),bneck_conf(48, 5, 288, 96 // reduce_divider, True, "HS", 2),  # C4bneck_conf(96 // reduce_divider, 5, 576 // reduce_divider, 96 // reduce_divider, True, "HS", 1),bneck_conf(96 // reduce_divider, 5, 576 // reduce_divider, 96 // reduce_divider, True, "HS", 1)]last_channel = adjust_channels(1024 // reduce_divider)  # C5return MobileNetV3(inverted_residual_setting=inverted_residual_setting,last_channel=last_channel,num_classes=num_classes)
pytorch代码复现MobileNet V1~V2
本项目包含训练MobileNet V1、V2、V2模型
项目目录

项目代码下载地址:
项目代码下载地址