一.部署nodejs项目,映射端口,挂载数据卷
可以到https://hub.docker.com/去搜索node镜像,然后下载,也可以直接通过docker pull node下载镜像,然后用这个node镜像启动容器node,这样系统就集成了node服务了,在这里挂载www/node目录到容器中,并指定端口映射,运行nodejs程序,安装npm,以及对应的依赖,启动node目录下对应的项目,然后通过浏览器访问,看看是否成功
1.安装 nodejs
#下载node镜像
[root@localhost www]# docker pull node
Using default tag: latest
latest: Pulling from library/node
0a9573503463: Pull complete
a360c7bc21d1: Pull complete
1dc4b09d340f: Pull complete
d0daf3eb1098: Pull complete
Digest: sha256:1f937398bb207138bd26777f76d8b31b44f22d8baf6058705ad7433225c6f1aa
Status: Downloaded newer image for node:latest
docker.io/library/node:latest#查看是否存在镜像node
[root@localhost www]# docker images
REPOSITORY                       TAG                 IMAGE ID       CREATED         SIZE
node                             latest              51bf29046591   44 hours ago    1.1GB
2.启动node容器,映射端口,挂载数据卷
[root@localhost node]# docker run -it -d --name mynode -p 3000:3000 -v /var/www/node/:/var/www/node/ 51bf29046591 /bin/bash#查看启动的容器
[root@localhost node]# docker ps
CONTAINER ID   IMAGE          COMMAND                  CREATED         STATUS         PORTS                                       NAMES
c28cc83c4ba3   51bf29046591   "docker-entrypoint.s…"   6 minutes ago   Up 6 minutes   0.0.0.0:3000->3000/tcp, :::3000->3000/tcp   mynode
3.进入容器,查看node版本,以及安装cnpm,安装依赖
#进入容器
[root@localhost node]# docker exec -it c28cc83c4ba3 /bin/bash#查看node版本:发现存在,说明node安装完成,因为是使用docker安装nodejs,所以容器中就会自动安装node
root@c28cc83c4ba3:/var/www# node -v
v21.1.0#查看项目文件
root@c28cc83c4ba3:/var/www# ls
app.js	package.json#查看项目需要的依赖
root@c28cc83c4ba3:/var/www# cat package.json
{"dependencies": {"ejs": "^2.5.6","express": "^4.15.3","socket.io": "^2.0.3","body-parser": "~1.17.1"}
}#需要安装依赖:这里可以通过npm来下载,不过npm可能会失败,所以使用cnpm来安装
#要使用cnpm,就需要安装: npm install cnpm -g --registry=https://registry.nlark.com
root@c28cc83c4ba3:/var/www# npm install cnpm -g --registry=https://registry.nlark.com
added 40 packages in 21s
28 packages are looking for fundingrun `npm fund` for details
npm notice
npm notice New patch version of npm available! 10.2.0 -> 10.2.1
npm notice Changelog: https://github.com/npm/cli/releases/tag/v10.2.1
npm notice Run npm install -g npm@10.2.1 to update!
npm notice #查看npm版本
root@c28cc83c4ba3:/var/www# npm -v
10.2.0#查看cnpm版本
root@c28cc83c4ba3:/var/www# cnpm -v
cnpm@9.2.0 (/usr/local/lib/node_modules/cnpm/lib/parse_argv.js)
npm@9.9.0 (/usr/local/lib/node_modules/cnpm/node_modules/npm/index.js)
node@21.1.0 (/usr/local/bin/node)
npminstall@7.11.1 (/usr/local/lib/node_modules/cnpm/node_modules/npminstall/lib/index.js)
prefix=/usr/local
linux x64 4.18.0-348.el8.x86_64
registry=https://registry.npmmirror.com#通过cnpm i 安装依赖
root@c28cc83c4ba3:/var/www# cnpm i
✔ Linked 88 latest versions fallback to /var/www/node_modules/.store/node_modules
deprecate socket.io@2.5.0 › debug@~4.1.0 Debug versions >=3.2.0 <3.2.7 || >=4 <4.3.1 have a low-severity ReDos regression when used in a Node.js environment. It is recommended you upgrade to 3.2.7 or 4.3.1. (https://github.com/visionmedia/debug/issues/797)
Recently updated (since 2023-10-20): 3 packages (detail see file /var/www/node_modules/.recently_updates.txt)
✔ Run 1 script(s) in 131ms.
✔ Installed 4 packages on /var/www
✔ All packages installed (106 packages installed from npm registry, used 3s(network 3s), speed 747.79KB/s, json 88(572.5KB), tarball 1.56MB, manifests cache hit 0, etag hit 0 / miss 0)
4.后台运行程序,浏览器访问
#后台运行程序: nohup node app.js &, 当然,也可以node app.js,这个命令会卡死在这儿,不会后台运行
root@c28cc83c4ba3:/var/www# nohup node app.js &
[1] 209
root@c28cc83c4ba3:/var/www# nohup: ignoring input and appending output to 'nohup.out'#容器内访问,看看是否成功,发现成功
root@c28cc83c4ba3:/var/www# curl 127.0.0.1:3000
首页root@c28cc83c4ba3:/var/www# #退出容器
root@c28cc83c4ba3:/var/www# exit
exit#查看ip,然后通过ip在浏览器中访问
[root@localhost node]# ip addr
1: lo: <LOOPBACK,UP,LOWER_UP> mtu 65536 qdisc noqueue state UNKNOWN group default qlen 1000link/loopback 00:00:00:00:00:00 brd 00:00:00:00:00:00inet 127.0.0.1/8 scope host lovalid_lft forever preferred_lft foreverinet6 ::1/128 scope host valid_lft forever preferred_lft forever
2: ens33: <BROADCAST,MULTICAST,UP,LOWER_UP> mtu 1500 qdisc fq_codel state UP group default qlen 1000link/ether 00:0c:29:c3:3d:27 brd ff:ff:ff:ff:ff:ffinet 192.168.0.6/24 brd 192.168.0.255 scope global dynamic noprefixroute ens33valid_lft 160539sec preferred_lft 160539sec

5.修改app.js,重启node,查看修改是否成功
因为修改node项目后,需要重启node,故修改项目中的app.js代码后,需要进入容器,重新启动node才能看见修改变化
app.js修改
var express = require('express');var app=express();app.get('/',function(req,res){res.send('首页update');
})
app.get('/news',function(req,res){res.send('首页');
})//docker做端口映射的时候不要指定ip
app.listen(3000);
重启node
#进入node容器
[root@localhost node]# docker exec -it c28cc83c4ba3 /bin/bash#查看运行的node
root@c28cc83c4ba3:/# ps -aux
USER         PID %CPU %MEM    VSZ   RSS TTY      STAT START   TIME COMMAND
root           1  0.0  0.0   4188   132 pts/0    Ss+  14:17   0:00 /bin/bash
root         209  0.0  2.6 995844 21348 ?        Sl   14:41   0:00 node app.js
root         217  0.2  0.4   4188  3508 pts/1    Ss   14:55   0:00 /bin/bash
root         224  0.0  0.5   8100  4116 pts/1    R+   14:55   0:00 ps -aux#停止node程序
root@c28cc83c4ba3:/# kill -9 209#进入/var/www node项目,重新运行node程序,并后台运行
root@c28cc83c4ba3:/# cd /var/www/
root@c28cc83c4ba3:/var/www# nohup node app.js &
[1] 242
root@c28cc83c4ba3:/var/www# nohup: ignoring input and appending output to 'nohup.out'
二.部署Mysql,远程连接Mysql,Mysql数据持久化
可以到https://hub.docker.com/或者Docker去搜索mysql镜像,然后下载,也可以直接通过docker pull mysql下载镜像,然后用这个mysql镜像启动容器mysql,这样系统就集成了mysql服务了
1.下载 mysql
#下载mysql
[root@localhost zph]# docker pull mysql
Using default tag: latest
latest: Pulling from library/mysql
8e0176adc18c: Pull complete
2d2c52718f65: Pull complete
d88d03ce139b: Pull complete
4a7d7f11aa1e: Pull complete
ce5949193e4c: Pull complete
f7f024dfb329: Pull complete
5fc3c840facc: Pull complete
509068e49488: Pull complete
cbc847bab598: Pull complete
942bef62a146: Pull complete
Digest: sha256:1773f3c7aa9522f0014d0ad2bbdaf597ea3b1643c64c8ccc2123c64afd8b82b1
Status: Downloaded newer image for mysql:latest
docker.io/library/mysql:latest
[root@localhost zph]#
[root@localhost zph]#
[root@localhost zph]#
[root@localhost zph]# #查看是否下载好了mysql镜像:发现下载了mysql镜像
[root@localhost zph]# docker images
REPOSITORY                       TAG                 IMAGE ID       CREATED         SIZE
node                             latest              51bf29046591   2 days ago      1.1GB
nginx                            latest              593aee2afb64   3 days ago      187MB
mysql                            latest              a3b6608898d6   3 days ago      596MB
2.启动mysql容器

#通过mysql镜像,启动一个mysql容器,这里需要映射端口,输入密码
[root@localhost zph]# docker run -it -d --name mymysql -p 3306:3306 -e MYSQL_ROOT_PASSWORD=123456 a3b6608898d6
0f51776fd2edce3d6479a9296a25c8b9b84a35742c9b21171a0860ec4b564e2a
[root@localhost zph]# #查看是否启动mysql容器
[root@localhost zph]# docker ps
CONTAINER ID   IMAGE          COMMAND                  CREATED          STATUS          PORTS                                                  NAMES
0f51776fd2ed   a3b6608898d6   "docker-entrypoint.s…"   14 seconds ago   Up 10 seconds   0.0.0.0:3306->3306/tcp, :::3306->3306/tcp, 33060/tcp   mymysql
3.进入容器
#进入mysql容器
[root@localhost zph]# docker exec -it 0f51776fd2ed /bin/bash#进入mysql,并输入密码
bash-4.4# mysql -u root -p
Enter password:
Welcome to the MySQL monitor.  Commands end with ; or \g.
Your MySQL connection id is 8
Server version: 8.2.0 MySQL Community Server - GPLCopyright (c) 2000, 2023, Oracle and/or its affiliates.Oracle is a registered trademark of Oracle Corporation and/or its
affiliates. Other names may be trademarks of their respective
owners.Type 'help;' or '\h' for help. Type '\c' to clear the current input statement.#输入123456密码后,能够进入mysql数据库,说明容器ok,然后exit退出
mysql> exit
Bye
bash-4.4# exit
exit
4.外部连接mysql
通过外部的Navicat访问mysql容器
(1).查看电脑的ip
通过ip addr 查看ip
[root@localhost zph]# ip addr
1: lo: <LOOPBACK,UP,LOWER_UP> mtu 65536 qdisc noqueue state UNKNOWN group default qlen 1000link/loopback 00:00:00:00:00:00 brd 00:00:00:00:00:00inet 127.0.0.1/8 scope host lovalid_lft forever preferred_lft foreverinet6 ::1/128 scope host valid_lft forever preferred_lft forever
2: ens33: <BROADCAST,MULTICAST,UP,LOWER_UP> mtu 1500 qdisc fq_codel state UP group default qlen 1000link/ether 00:0c:29:c3:3d:27 brd ff:ff:ff:ff:ff:ffinet 192.168.0.6/24 brd 192.168.0.255 scope global dynamic noprefixroute ens33valid_lft 168896sec preferred_lft 168896secinet6 fe80::20c:29ff:fec3:3d27/64 scope link noprefixroute valid_lft forever preferred_lft forever
(2).通过Navicat连接mysql容器

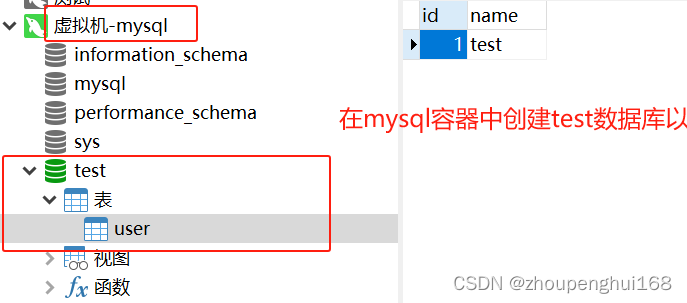
(3).在容器中查看是否创建了数据库
$#进入mysql容器
[root@localhost zph]# docker exec -it 0f51776fd2ed /bin/bash#输入密码,进入mysql数据库
bash-4.4# mysql -u root -p
Enter password:
Welcome to the MySQL monitor.  Commands end with ; or \g.
Your MySQL connection id is 12
Server version: 8.2.0 MySQL Community Server - GPLCopyright (c) 2000, 2023, Oracle and/or its affiliates.Oracle is a registered trademark of Oracle Corporation and/or its
affiliates. Other names may be trademarks of their respective
owners.Type 'help;' or '\h' for help. Type '\c' to clear the current input statement.#查看mysql数据库:发现存在通过Navicat创建的test数据库
mysql> show databases-> ;
+--------------------+
| Database           |
+--------------------+
| information_schema |
| mysql              |
| performance_schema |
| sys                |
| test               |
+--------------------+
5 rows in set (0.06 sec)#进入test数据库
mysql> use test;
Reading table information for completion of table and column names
You can turn off this feature to get a quicker startup with -ADatabase changed#查看test数据库中数据表:发现存在user数据表
mysql> show tables;
+----------------+
| Tables_in_test |
+----------------+
| user           |
+----------------+
1 row in set (0.01 sec)#查看user表里面的的数据:发现和Navicat创建的数据一致,说明了mysql容器没有问题
mysql> select * from user;
+----+------+
| id | name |
+----+------+
|  1 | test |
+----+------+
1 row in set (0.00 sec)mysql>
5.映射端口 , 挂载配置文件目录,挂载数据文件目录,启动mysql
默认数据库的数据是放在容器里面的,这样的话当容器删除会导致数据丢失,如果要实现 当删除容器的时候不删除容器里面的mysql数据 ,这个时候启动容器的时候就可以把 mysql 数据挂载到外部
(1).映射端口,挂载配置文件,数据文件目录,启动mysql容器


这里,需要把mysql的配置文件,以及数据文件映射到容器中的,在linux /var/www/mysql下创建conf.d,data文件夹,用来保存配置文件以及数据文件,这样,当不小心删除了容器,再次启动一个容器时,就可以把配置以及数据映射到容器中,避免数据的丢失
#查看mysql
[root@localhost zph]# docker ps
CONTAINER ID   IMAGE          COMMAND                  CREATED          STATUS          PORTS                                                  NAMES
0f51776fd2ed   a3b6608898d6   "docker-entrypoint.s…"   34 minutes ago   Up 34 minutes   0.0.0.0:3306->3306/tcp, :::3306->3306/tcp, 33060/tcp   mymysql#删除这个mysql容器
[root@localhost zph]# docker rm -f 0f51776fd2ed
0f51776fd2ed#发现已经删除了容器
[root@localhost zph]# docker ps
CONTAINER ID   IMAGE     COMMAND   CREATED   STATUS    PORTS     NAMES#进入/var/www/,创建mysql/conf.d,mysql/data配置文件以及数据文件
[root@localhost zph]# cd /var/www/
[root@localhost www]# mkdir mysql
[root@localhost www]# cd mysql/
[root@localhost mysql]# ll
总用量 0
[root@localhost mysql]# mkdir conf.d
[root@localhost mysql]# mkdir data
[root@localhost mysql]# ll
总用量 0
drwxr-xr-x 2 root root 6 10月 28 07:15 conf.d
drwxr-xr-x 2 root root 6 10月 28 07:15 data
[root@localhost mysql]# pwd
/var/www/mysql#通过镜像启动mysql容器,起一个名字,以及映射端口,传递参数,并映射数据卷(映射配置文件,数据文件)
[root@localhost mysql]# docker run -it -d --name mymysql -p 3306:3306 -e MYSQL_ROOT_PASSWORD=123456 -v /var/www/mysql/conf.d:/etc/mysql/conf.d -v /var/www/mysql/data/:/var/lib/mysql a3b6608898d6
7b133357d04a7c457225fad99d6322b8e1226fa80884596e0a36284abca73e16#查看是否启动容器:发现启动了
[root@localhost mysql]#
[root@localhost mysql]# docker ps
CONTAINER ID   IMAGE          COMMAND                  CREATED         STATUS         PORTS                                                  NAMES
7b133357d04a   a3b6608898d6   "docker-entrypoint.s…"   6 seconds ago   Up 3 seconds   0.0.0.0:3306->3306/tcp, :::3306->3306/tcp, 33060/tcp   mymysql
(2).通过外网连接mysql,并创建数据库数据表,写入数据
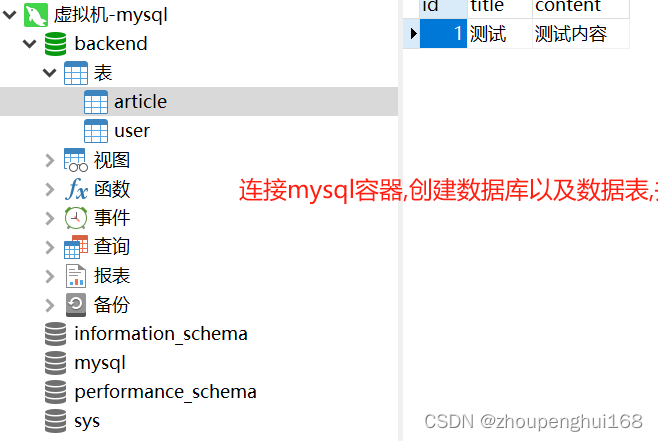
(3).进入容器,查看是否存在数据库以及数据数据
#进入mysql容器
[root@localhost mysql]# docker exec -it 7b133357d04a /bin/bash#进入mysql数据库
bash-4.4# mysql -u root -p
Enter password:
Welcome to the MySQL monitor.  Commands end with ; or \g.
Your MySQL connection id is 9
Server version: 8.2.0 MySQL Community Server - GPLCopyright (c) 2000, 2023, Oracle and/or its affiliates.Oracle is a registered trademark of Oracle Corporation and/or its
affiliates. Other names may be trademarks of their respective
owners.Type 'help;' or '\h' for help. Type '\c' to clear the current input statement.
mysql> show databases;
+--------------------+
| Database           |
+--------------------+
| backend            |
| information_schema |
| mysql              |
| performance_schema |
| sys                |
+--------------------+
5 rows in set (0.18 sec)mysql> use backend;
Reading table information for completion of table and column names
You can turn off this feature to get a quicker startup with -ADatabase changed
mysql> show tables;
+-------------------+
| Tables_in_backend |
+-------------------+
| article           |
| user              |
+-------------------+
2 rows in set (0.00 sec)mysql> select * from article;
+----+-------+---------+
| id | title | content |
+----+-------+---------+
|  1 | ??    | ????    |
+----+-------+---------+
1 row in set (0.01 sec)mysql> exit
Bye
bash-4.4# exit
exit
[root@localhost mysql]# ll
总用量 4
drwxr-xr-x 2 root             root    6 10月 28 07:15 conf.d
drwxr-xr-x 8 systemd-coredump root 4096 10月 28 07:18 data
[root@localhost mysql]# cd data/#查看data中是否存在数据:发现存在数据,说明数据映射没问题
[root@localhost data]# ll
总用量 100708
-rw-r----- 1 systemd-coredump input     1737 10月 28 07:16  7b133357d04a.err
-rw-r----- 1 systemd-coredump input       56 10月 28 07:16  auto.cnf
drwxr-x--- 2 systemd-coredump input       41 10月 28 07:19  backend
-rw-r----- 1 systemd-coredump input  3039831 10月 28 07:16  binlog.000001
-rw-r----- 1 systemd-coredump input     1643 10月 28 07:19  binlog.000002
-rw-r----- 1 systemd-coredump input       32 10月 28 07:16  binlog.index
-rw------- 1 systemd-coredump input     1680 10月 28 07:16  ca-key.pem
-rw-r--r-- 1 systemd-coredump input     1108 10月 28 07:16  ca.pem
-rw-r--r-- 1 systemd-coredump input     1108 10月 28 07:16  client-cert.pem
-rw------- 1 systemd-coredump input     1680 10月 28 07:16  client-key.pem
-rw-r----- 1 systemd-coredump input   196608 10月 28 07:20 '#ib_16384_0.dblwr'
-rw-r----- 1 systemd-coredump input  8585216 10月 28 07:16 '#ib_16384_1.dblwr'
-rw-r----- 1 systemd-coredump input     5460 10月 28 07:16  ib_buffer_pool
-rw-r----- 1 systemd-coredump input 12582912 10月 28 07:19  ibdata1
-rw-r----- 1 systemd-coredump input 12582912 10月 28 07:16  ibtmp1
drwxr-x--- 2 systemd-coredump input     4096 10月 28 07:16 '#innodb_redo'
drwxr-x--- 2 systemd-coredump input      187 10月 28 07:16 '#innodb_temp'
drwxr-x--- 2 systemd-coredump input      143 10月 28 07:16  mysql
-rw-r----- 1 systemd-coredump input 32505856 10月 28 07:19  mysql.ibd
lrwxrwxrwx 1 systemd-coredump input       27 10月 28 07:16  mysql.sock -> /var/run/mysqld/mysqld.sock
drwxr-x--- 2 systemd-coredump input     8192 10月 28 07:16  performance_schema
-rw------- 1 systemd-coredump input     1676 10月 28 07:16  private_key.pem
-rw-r--r-- 1 systemd-coredump input      452 10月 28 07:16  public_key.pem
-rw-r--r-- 1 systemd-coredump input     1108 10月 28 07:16  server-cert.pem
-rw------- 1 systemd-coredump input     1676 10月 28 07:16  server-key.pem
drwxr-x--- 2 systemd-coredump input       28 10月 28 07:16  sys
-rw-r----- 1 systemd-coredump input 16777216 10月 28 07:19  undo_001
-rw-r----- 1 systemd-coredump input 16777216 10月 28 07:20  undo_002
(4).删除容器,重启启动一个容器,查看数据是否保存
$查看当前运行中的容器
[root@localhost data]# docker ps
CONTAINER ID   IMAGE          COMMAND                  CREATED          STATUS          PORTS                                                  NAMES
7b133357d04a   a3b6608898d6   "docker-entrypoint.s…"   13 minutes ago   Up 13 minutes   0.0.0.0:3306->3306/tcp, :::3306->3306/tcp, 33060/tcp   mymysql#删除mysql容器:这时外网连接不上mysql容器了,数据保存在/var/www/mysql/中
[root@localhost data]# docker rm -f 7b133357d04a
7b133357d04a#查看删除是否成功
[root@localhost data]# docker ps
CONTAINER ID   IMAGE     COMMAND   CREATED   STATUS    PORTS     NAMES#重新创建一个mysql容器
[root@localhost data]# docker run -it -d --name mymysql_bak -p 3306:3306 -e MYSQL_ROOT_PASSWORD=123456 -v /var/www/mysql/conf.d:/etc/mysql/conf.d -v /var/www/mysql/data/:/var/lib/mysql a3b6608898d6
a54a9c659b12c8c2a329a22f4a59994e2ccbf9f72470e2ba6ba4b5bc66d9d328#mysql容器创建成功
[root@localhost data]# docker ps
CONTAINER ID   IMAGE          COMMAND                  CREATED              STATUS              PORTS                                                  NAMES
a54a9c659b12   a3b6608898d6   "docker-entrypoint.s…"   About a minute ago   Up About a minute   0.0.0.0:3306->3306/tcp, :::3306->3306/tcp, 33060/tcp   mymysql_bak
[root@localhost data]#
再次连接mysql,能够连接,说明数据保存在本地,没问题,当删除容器后,数据没有丢失
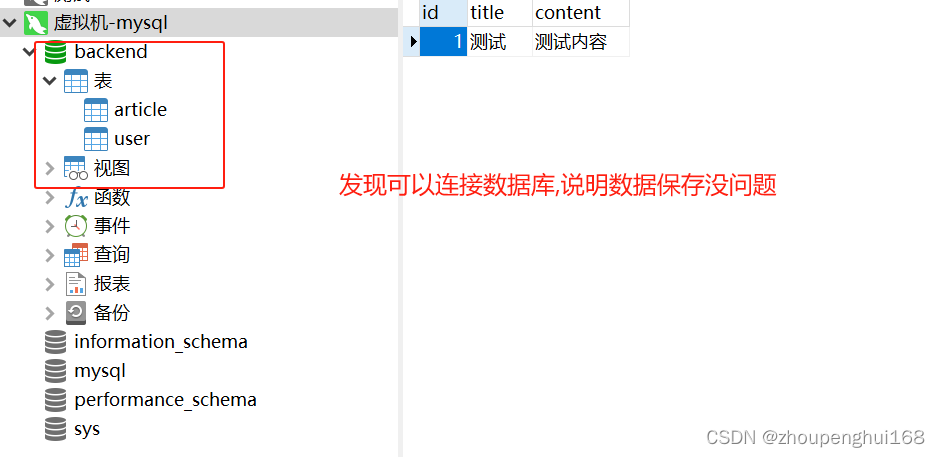
三.部署Redis,远程连接Redis,启动容器配置密码
可以到https://hub.docker.com/或者Docker去搜索redis镜像,然后下载,也可以直接通过docker pull redis下载镜像,然后用这个redis镜像启动容器redis,这样系统就集成了redis服务了
1.下载redis镜像并启动容器,然后本地连接
#下载redis
[root@localhost zph]# docker pull redis
Using default tag: latest
latest: Pulling from library/redis
a378f10b3218: Already exists
b266cd8112a6: Pull complete
7ba86e6448de: Pull complete
3aeb7c9e9a5f: Pull complete
de3be2a98bda: Pull complete
4f4fb700ef54: Pull complete
98e18d21aa3b: Pull complete
Digest: sha256:1f1bd4adf5dabf173b235ba373faef55f3ad53394791d1473763bf5a2181780d
Status: Downloaded newer image for redis:latest
docker.io/library/redis:latest#查看是否下载了redis镜像
[root@localhost zph]# docker images
REPOSITORY                       TAG                 IMAGE ID       CREATED         SIZE
redis                            latest              e579380d4317   12 days ago     138MB#通过镜像启动一个redis容器
[root@localhost zph]# docker run -it -d --name -p 2379:2379 myredis1 e579380d4317
41d9fd8b87d365d94cf1262a612b8af04c39ccb71a49f07b9cf353a381cb5e56#查看是否启动了redis容器
[root@localhost zph]# docker ps
CONTAINER ID   IMAGE          COMMAND                  CREATED         STATUS         PORTS      NAMES
41d9fd8b87d3   e579380d4317   "docker-entrypoint.s…"   5 seconds ago   Up 3 seconds   6379/tcp   myredis1
#进入reids容器
[root@localhost zph]# docker exec -it 41d9fd8b87d3 /bin/bash#连接redis
root@41d9fd8b87d3:/data# redis-cli #设置数据key=>value
127.0.0.1:6379> set username zhangsan
OK
127.0.0.1:6379> set age 10
OK#获取数据:说明redis容器ok
127.0.0.1:6379> get username
"zhangsan"
127.0.0.1:6379> get age
"10"
2.远程连接
如果需要在远程 redis 服务上执行命令,同样使用的也是 redis-cli 命令,语法:
#-h 服务器地址 -p 端口号
redis-cli -h host -p port
C:\Users\zph>redis-cli -h 192.168.0.6 -p 6379
192.168.0.6:6379> get username
"zhangsan"
192.168.0.6:6379>3.启动redis容器,配置密码
配置密码后,访问redis时就需要输入密码,这样安全性就高了,通过 --requirepass 可以配置密码
#启动redis容器,并配置访问密码
[root@localhost zph]# docker run -it -d --name myredis3 -p 2379:2379 e579380d4317 --requirepass "123456"
804b873aa59c00acbba1dd77fdbcb3d1a7e52db1b93b9b9693bd775608ca83ba#查看是否启动了redis
[root@localhost zph]# docker ps
CONTAINER ID   IMAGE          COMMAND                  CREATED         STATUS         PORTS                                                 NAMES
804b873aa59c   e579380d4317   "docker-entrypoint.s…"   5 seconds ago   Up 4 seconds   0.0.0.0:2379->2379/tcp, :::2379->2379/tcp, 6379/tcp   myredis3
[root@localhost zph]# #进入redis容器
[root@localhost zph]# docker exec -it 804b873aa59c /bin/bash#启动redis客户端
root@804b873aa59c:/data# redis-cli#获取数据:提示没得权限
127.0.0.1:6379> get *
(error) NOAUTH Authentication required.#授权访问:输入密码
127.0.0.1:6379> auth 123456
OK#设置数据并访问,操作成功
127.0.0.1:6379> set username zhangsan
OK
127.0.0.1:6379> get username
"zhangsan"
127.0.0.1:6379>
4.远程连接(有密码的redis)
#注意映射的端口: -p 的端口
C:\Users\zph>redis-cli -h 192.168.0.6 -p 6379
192.168.241.0.6> auth 123456
OK
四.部署Mongodb,配置密码 远程连接
可以到https://hub.docker.com/或者Docker去搜索mongodb镜像,然后下载,也可以直接通过docker pull mongodb下载镜像,然后用这个mongodb镜像启动容器mongodb,这样系统就集成了mongodb服务了
1.下载mongodb镜像并启动容器,然后本地连接(不需要密码)


在启动容器的时候,可以先使用-p映射端口,以及-v挂载数据目录,这样就可以数据持久化了
#下载mongo
[root@localhost ~]# docker pull mongo
Using default tag: latest
latest: Pulling from library/mongo
16ec32c2132b: Pull complete
6335cf672677: Pull complete
4b9c6ac629be: Pull complete
4de7437f497e: Pull complete
Digest: sha256:d78c7ace6822297a7e1c7076eb9a7560a81a6ef856ab8d9cde5d18438ca9e8bf
Status: Downloaded newer image for mongo:latest
docker.io/library/mongo:latest#启动容器 映射端口 挂载目录
[root@localhost ~]#docker run --name mymongo -p 27017:27017 -v /var/www/data:/data/db -d mongo#查看是否启动mongo容器
[root@localhost ~]# docker ps -a
CONTAINER ID IMAGE COMMAND CREATED STATUS
PORTS NAMES
f9b5dd026a4e mongo "docker-entrypoint.s…" 12 seconds ago Up 11 seconds
0.0.0.0:27017->27017/tcp, :::27017->27017/tcp mymongo#进入mongo容器
[root@localhost ~]# docker exec -it f9b5dd026a4e /bin/bash
root@f9b5dd026a4e:/# mongo
MongoDB shell version v5.0.1
connecting to: mongodb://127.0.0.1:27017/?compressors=disabled&gssapiServiceName=mong
odb
Implicit session: session { "id" : UUID("d200ae7f-e85c-4a17-8b24-55f4f116e08a") }
MongoDB server version: 5.0.1
================ Warning: the "mongo" shell has been superseded by "mongosh", which delivers improved usability and compatibility.The "mongo" shell has been deprecate
d and will be removed in
an upcoming release. We recommend you begin using "mongosh". For installation instructions, see
https://docs.mongodb.com/mongodb-shell/install/ ================ Welcome to the MongoDB shell. For interactive help, type "help". For more comprehensive documentation, see
https://docs.mongodb.com/
Questions? Try the MongoDB Developer Community Forums
https://community.mongodb.com
--- The server generated these startup warnings when booting:
2021-07-28T04:25:25.178+00:00: Access control is not enabled for the database. Read and write access to data and configuration is unrestricted
2021-07-28T04:25:25.178+00:00: /sys/kernel/mm/transparent_hugepage/enabled is
'always'. We suggest setting it to 'never' ---
--- Enable MongoDB's free cloud-based monitoring service, which will then receive
and display#展示数据库
> show dbs
admin 0.000GB
config 0.000GB
local 0.000GB#创建test数据库并进入
> use test
switched to db test#查看是否创建好了test数据库
> show dbs
admin 0.000GB
config 0.000GB
test 0.000GB
local 0.000GB
>#创建user表并插入数据
> db.user.insert({username:"张三"})
WriteResult({ "nInserted" : 1 })
#查看数据表数据
> db.user.find({})
可以通果docker inspect mongo | grep data查看映射关系
2.远程连接
需要在远程服务器上安装mongo
C:\Users\zph>mongo 192.168.0.6:27017
MongoDB shell version v4.2.5
connecting to: mongodb://192.168.0.6:27017/test?compressors=disabled&gssapiServiceN
ame=mongodb
Implicit session: session { "id" : UUID("2e196a91-5657-4dfb-b9e3-c68491385dc1") }
MongoDB server version: 5.0.1
WARNING: shell and server versions do not match
Server has startup warnings:
{"t":{"$date":"2021-07-28T04:25:25.178+00:00"},"s":"W", "c":"CONTROL", "id":22120, "ct
x":"initandlisten","msg":"Access control is not enabled for the database. Read and write a
ccess to data and configuration is unrestricted","tags":["startupWarnings"]}
{"t":{"$date":"2021-07-28T04:25:25.178+00:00"},"s":"W", "c":"CONTROL", "id":22178, "ct
x":"initandlisten","msg":"/sys/kernel/mm/transparent_hugepage/enabled is 'always'. We sugg
est setting it to 'never'","tags":["startupWarnings"]}
--- Enable MongoDB's free cloud-based monitoring service, which will then receive and displ
ay
metrics about your deployment (disk utilization, CPU, operation statistics, etc). The monitoring data will be available on a MongoDB website with a unique URL accessi
ble to you
and anyone you share the URL with. MongoDB may use this information to make product
improvements and to suggest MongoDB products and deployment options to you. To enable free monitoring, run the following command: db.enableFreeMonitoring()
To permanently disable this reminder, run the following command: db.disableFreeMonitori
ng() --- #展示数据库
> show dbs
admin 0.000GB
config 0.000GB
local 0.000GB#创建test数据库并进入
> use test
switched to db test#创建user表并插入数据
> db.user.insert({username:"张三"})
WriteResult({ "nInserted" : 1 })> show dbs
admin 0.000GB
config 0.000GB
test0.000GB
local 0.000GB
> exit;
3.启动mongo容器,配置密码
配置密码后,访问mongo时就需要输入密码,这样安全性就高了,语法:
docker run -d --name authMongo -e MONGO_INITDB_ROOT_USERNAME=admin -e MONGO_INITDB_ROOT_PASSWORD=123456 -p 27017:27017 -v /var/www/mongo/data:/data/db mongo --auth#通过mongo镜像启动一个mongo容器
[root@localhost ~]#docker run -d --name authMongo -e MONGO_INITDB_ROOT_USERNAME=admin -e MONGO_INITDB_ROOT_PASSWORD=123456 -p 27017:27017 -v /var/www/mongo/data:/data/db mongo --auth#查看是否启动容器
[root@localhost ~]# docker ps
CONTAINER ID IMAGE COMMAND CREATED STATUS
PORTS NAMES
1bae12b5f438 mongo "docker-entrypoint.s…" 3 seconds ago Up 2 seconds
0.0.0.0:27017->27017/tcp, :::27017->27017/tcp authMongo#进入容器:并进入admin数据库
[root@localhost ~]# docker exec -it 1bae12b5f438 mongo admin
MongoDB shell version v5.0.1
connecting to: mongodb://127.0.0.1:27017/admin?compressors=disabled&gssapiServiceName =mongodb
Implicit session: session { "id" : UUID("1c53734c-cc5e-41b1-a92c-d413a2a306e4")#查看数据
> show dbs#授权
> db.auth('admin', '123456')#查看数据
> show dbs
admin 0.000GB
config 0.000GB
teset 0.000GB
local 0.000GB#创建一个账号并授权
db.createUser({ user:'zhangsan',pwd:'123456',roles:[ { role:'userAdminAnyDatabase', db: 'admin'},"readWriteAnyDatabase"]});
> Successfully added user: { "user" : "zhangsan", "roles" : [
{role" : "userAdminAnyDatabase", "db" : "admin"
},"readWriteAnyDatabase"
]
}4.远程连接(有密码)
注意加上数据库表
mongo 192.168.0.6:27017/zhangsanC:\Users\zph>mongo 192.168.0.6:27017/zhangsan
MongoDB shell version v5.0.1
connecting to: mongodb://192.168.241.128:27017/admin?compressors=disabled&gssapiServic
eName=mongodb
Implicit session: session { "id" : UUID("c42d2b91-34ac-4d77-9754-38a826fe78b1") }
MongoDB server version: 5.0.1
================ Warning: the "mongo" shell has been superseded by "mongosh", which delivers improved usability and compatibility.The "mongo" shell has been deprecate
d and will be removed in
an upcoming release. We recommend you begin using "mongosh". For installation instructions, see
https://docs.mongodb.com/mongodb-shell/install/ ================
> db.auth("zhangsan","123456")
1
>[下一节][Docker]三.Docker 部署nginx,以及映射端口,挂载数据卷

