本次试验分为三个部分:
目录
设计译码电路
设计寄存器文件
实现一个32个字的指令存储器
设计译码电路
输入位32bit的一个机器字,按照课本MIPS 指令格式,完成add、sub、lw、sw指令译码,其他指令一律译码成nop指令。输入信号名为Instr_word,对上述四条指令义译码输出信号名为add_op、sub_op、lw_op和sw_op,其余指令一律译码为nop;
给出Chisel设计代码和仿真测试波形,观察输入Instr_word为add R1,R2,R3; sub R0,R5,R6,lw R5,100(R2), sw R5,104(R2)、JAL RA,100(R2)时,对应的输出波形

Decode.scala
import chisel3._class Decoder extends Module {val io = IO(new Bundle {val Instr_word = Input(UInt(32.W))val add_op = Output(Bool())val sub_op = Output(Bool())val lw_op = Output(Bool())val sw_op = Output(Bool())val nop_op = Output(Bool())})// 定义操作码val OPCODE_ADD = "b000000".Uval OPCODE_SUB = "b000000".Uval OPCODE_LW = "b100011".Uval OPCODE_SW = "b101011".U//定义功能码val FUNCT_ADD = "b100000".Uval FUNCT_SUB = "b100010".U// 提取MIPS指令的操作码val opcode = io.Instr_word(31, 26)//提取MIPS指令的功能码val funct = io.Instr_word(5, 0)// 译码io.add_op := opcode === OPCODE_ADD && funct === FUNCT_ADDio.sub_op := opcode === OPCODE_SUB && funct === FUNCT_SUBio.lw_op := opcode === OPCODE_LWio.sw_op := opcode === OPCODE_SWio.nop_op := !(io.add_op || io.sub_op || io.lw_op || io.sw_op)
}object Decoder extends App {(new chisel3.stage.ChiselStage).emitVerilog(new Decoder())
}
DecoderTest.scala
import chiseltest._
import org.scalatest.flatspec.AnyFlatSpec
import chisel3._class DecoderTest extends AnyFlatSpec with ChiselScalatestTester {behavior of "Decoder"it should "correctly decode instructions" in {test(new Decoder).withAnnotations(Seq(WriteVcdAnnotation)) { c =>// Test instructionsval addInstruction = "b000000_00010_00011_00001_00000_100000".Uval subInstruction = "b000000_00101_00110_00000_00000_100010".Uval lwInstruction = "b100011_00010_00101_0000000001100100".Uval swInstruction = "b101011_00010_00101_0000000001101000".Uval jalInstruction = "b000011_00000_00000000000000000000".U// Set the input instruction and evaluate the decoderc.io.Instr_word.poke(addInstruction)c.clock.step()c.io.add_op.expect(true)c.io.sub_op.expect(false)c.io.lw_op.expect(false)c.io.sw_op.expect(false)c.io.nop_op.expect(false)c.io.Instr_word.poke(subInstruction)c.clock.step()c.io.add_op.expect(false)c.io.sub_op.expect(true)c.io.lw_op.expect(false)c.io.sw_op.expect(false)c.io.nop_op.expect(false)c.io.Instr_word.poke(lwInstruction)c.clock.step()c.io.add_op.expect(false)c.io.sub_op.expect(false)c.io.lw_op.expect(true)c.io.sw_op.expect(false)c.io.nop_op.expect(false)c.io.Instr_word.poke(swInstruction)c.clock.step()c.io.add_op.expect(false)c.io.sub_op.expect(false)c.io.lw_op.expect(false)c.io.sw_op.expect(true)c.io.nop_op.expect(false)c.io.Instr_word.poke(jalInstruction)c.clock.step()c.io.add_op.expect(false)c.io.sub_op.expect(false)c.io.lw_op.expect(false)c.io.sw_op.expect(false)c.io.nop_op.expect(true)}}
}
设计寄存器文件
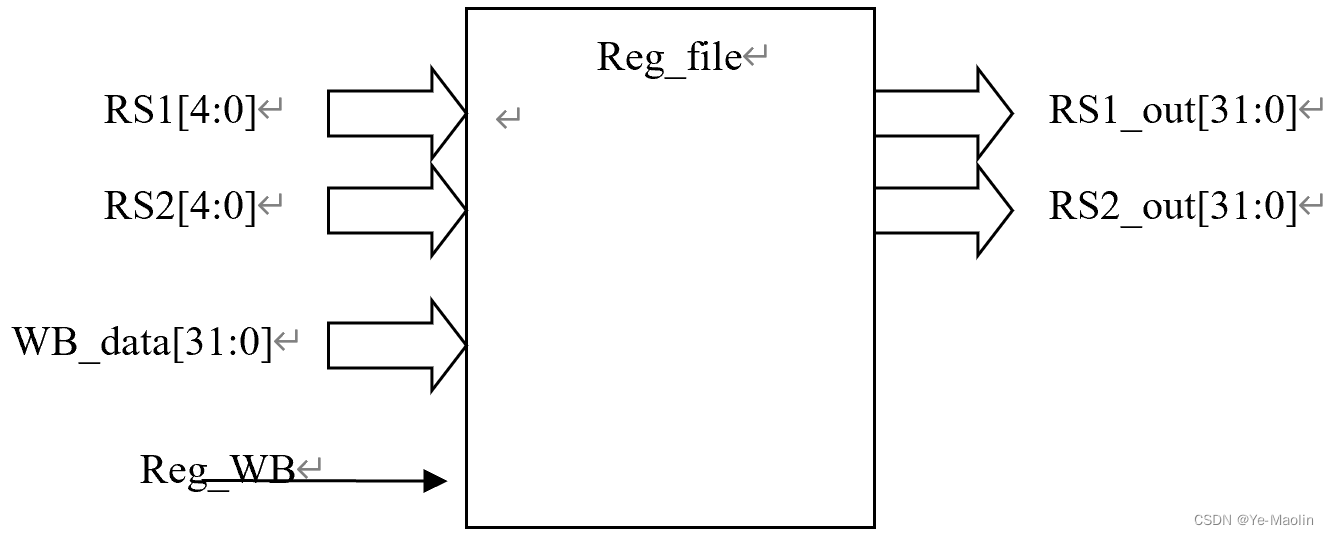
共32个32bit寄存器,允许两读一写,且0号寄存器固定读出位0。四个输入信号为RS1、RS2、WB_data、Reg_WB,寄存器输出RS1_out和RS2_out;寄存器内部保存的初始数值等同于寄存器编号
给出Chisel设计代码和仿真测试波形,观察RS1=5,RS2=8,WB_data=0x1234,Reg_WB=1的输出波形和受影响寄存器的值。
Register.scala
import chisel3._
import chisel3.util._class RegisterFile extends Module {val io = IO(new Bundle {val RS1 = Input(UInt(5.W)) // RS1输入信号,用于选择要读取的寄存器val RS2 = Input(UInt(5.W)) // RS2输入信号,用于选择要读取的寄存器val WB_data = Input(UInt(32.W)) // 写入数据信号,用于写入寄存器val Reg_WB = Input(UInt(5.W)) // 选择写入数据的寄存器val RS1_out = Output(UInt(32.W)) // RS1输出数据val RS2_out = Output(UInt(32.W)) // RS2输出数据})val registers = RegInit(VecInit((0 until 32).map(_.U(32.W)))) // 32个32位寄存器,初始值等于寄存器编号registers(io.Reg_WB) := io.WB_data // 写入数据到寄存器io.RS1_out := Mux(io.RS1 === 0.U, 0.U, registers(io.RS1)) // RS1输出数据,0号寄存器固定读出位0io.RS2_out := Mux(io.RS2 === 0.U, 0.U, registers(io.RS2)) // RS2输出数据,0号寄存器固定读出位0
}object RegisterFile extends App {(new chisel3.stage.ChiselStage).emitVerilog(new RegisterFile())
}
RegisterTest.scala
import chisel3._
import chiseltest._
import org.scalatest.flatspec.AnyFlatSpec
import chisel3.util._class RegisterFileTest extends AnyFlatSpec with ChiselScalatestTester {behavior of "RegisterFile"it should "correctly update and read registers" in {test(new RegisterFile).withAnnotations(Seq(WriteVcdAnnotation)) { c =>// 设置输入信号c.io.RS1.poke(5.U)c.io.RS2.poke(8.U)c.io.WB_data.poke(0x1234.U)c.io.Reg_WB.poke(1.U)c.clock.step()c.io.RS1_out.expect(5.U)c.io.RS2_out.expect(8.U)}}
}
实现一个32个字的指令存储器
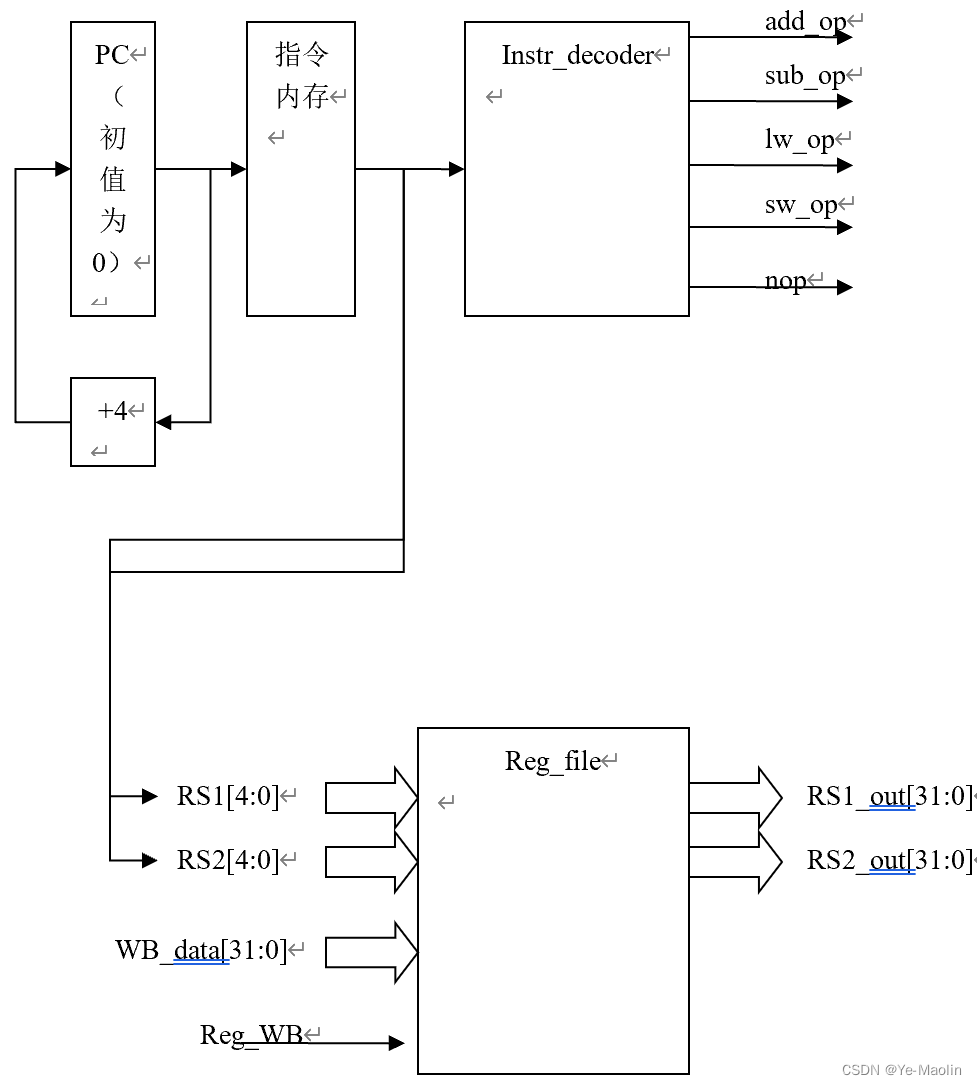
从0地址分别存储4条指令add R1,R2,R3; sub R0,R5,R6,lw R5,100(R2), sw R5,104(R2)。然后组合指令存储器、寄存器文件、译码电路,并结合PC更新电路(PC初值为0)、WB_data和Reg_WB信号产生电路,最终让电路能逐条指令取出、译码(不需要完成指令执行)。
给出Chisel设计代码和仿真测试波形,观察四条指令的执行过程波形,记录并解释其含义。
InstructionMemory.scala
import chisel3._class InstructionMemory extends Module {val io = IO(new Bundle {val address = Input(UInt(5.W)) // 32个字,需要5位地址val instruction = Output(UInt(32.W))})// 创建一个32个字的指令存储器val mem = Mem(32, UInt(32.W))// 初始化存储器,存储MIPS指令mem.write(0.U, "b000000_00010_00011_00001_00000_100000".U) // add R1, R2, R3mem.write(1.U, "b000000_00101_00110_00000_00000_100010".U) // sub R0, R5, R6mem.write(2.U, "b100011_00010_00101_0000000001100100".U) // lw R5, 100(R2)mem.write(3.U, "b101011_00010_00101_0000000001101000".U) // sw R5, 104(R2)// 从存储器中读取指令io.instruction := mem.read(io.address)
}
Circuit.scala
import chisel3._
import chisel3.util._class Circuit extends Module {val io = IO(new Bundle {// 寄存器的输入输出val WB_data = Input(UInt(32.W)) // 写入数据信号,用于写入寄存器val Reg_WB = Input(UInt(5.W)) // 选择写入数据的寄存器val RS1_out = Output(UInt(32.W))val RS2_out = Output(UInt(32.W))// 译码val add_op = Output(Bool())val sub_op = Output(Bool())val lw_op = Output(Bool())val sw_op = Output(Bool())val nop_op = Output(Bool())})val instructionMemory = Module(new InstructionMemory)val registerFile = Module(new RegisterFile)val decoder = Module(new Decoder)val pc = RegInit(0.U(5.W))// 根据pc的值取出指令寄存器相应指令instructionMemory.io.address := pcdecoder.io.Instr_word := instructionMemory.io.instructionregisterFile.io.RS1 := instructionMemory.io.instruction(25, 21)registerFile.io.RS2 := instructionMemory.io.instruction(20, 16)registerFile.io.WB_data := (0.U(32.W))registerFile.io.Reg_WB := (0.U(5.W))// 更新输出io.RS1_out := registerFile.io.RS1_outio.RS2_out := registerFile.io.RS2_outio.add_op := decoder.io.add_opio.sub_op := decoder.io.sub_opio.lw_op := decoder.io.lw_opio.sw_op := decoder.io.sw_opio.nop_op := decoder.io.nop_op// 更新PCpc := pc + 1.U
}object Circuit extends App {(new chisel3.stage.ChiselStage).emitVerilog(new Circuit())
}
Circuit.scala
import chiseltest._
import org.scalatest.flatspec.AnyFlatSpec
import chisel3._class CircuitTest extends AnyFlatSpec with ChiselScalatestTester {behavior of "Circuit"it should "correct circuit" in {test(new Circuit).withAnnotations(Seq(WriteVcdAnnotation)) { c =>c.clock.step()c.clock.step()c.clock.step()c.clock.step()}}
}
