1. 简述
1.1 重点
1)更好地理解 MVVM 架构
2)更轻松地使用 SwiftUI 框架、对齐、动画和转换
1.2 资源下载地址:
Swiftful-Thinking:![]() https://www.swiftful-thinking.com/downloads
https://www.swiftful-thinking.com/downloads
1.3 项目结构图:

1.4 图片、颜色资源文件图:

1.5 启动图片配置图:

2. Model 层
2.1 创建模拟位置文件 Location.swift
import Foundation
import MapKitstruct Location: Identifiable, Equatable{let name: Stringlet cityName: Stringlet coordinates: CLLocationCoordinate2Dlet description: Stringlet imageNames: [String]let link: String// UUID().uuidString,生产的每个ID都不一样,为了保证有相同可识别的相同模型,使用名称加城市名称var id: String {name + cityName}// Equatable 判断 id 是否一样static func == (lhs: Location, rhs: Location) -> Bool {return lhs.id == rhs.id}
}
3. 数据服务层
3.1 创建模拟位置数据信息服务 LocationsDataSerVice.swift
import Foundation
import MapKitclass LocationsDataService {static let locations: [Location] = [Location(name: "Colosseum",cityName: "Rome",coordinates: CLLocationCoordinate2D(latitude: 41.8902, longitude: 12.4922),description: "The Colosseum is an oval amphitheatre in the centre of the city of Rome, Italy, just east of the Roman Forum. It is the largest ancient amphitheatre ever built, and is still the largest standing amphitheatre in the world today, despite its age.",imageNames: ["rome-colosseum-1","rome-colosseum-2","rome-colosseum-3",],link: "https://en.wikipedia.org/wiki/Colosseum"),Location(name: "Pantheon",cityName: "Rome",coordinates: CLLocationCoordinate2D(latitude: 41.8986, longitude: 12.4769),description: "The Pantheon is a former Roman temple and since the year 609 a Catholic church, in Rome, Italy, on the site of an earlier temple commissioned by Marcus Agrippa during the reign of Augustus.",imageNames: ["rome-pantheon-1","rome-pantheon-2","rome-pantheon-3",],link: "https://en.wikipedia.org/wiki/Pantheon,_Rome"),Location(name: "Trevi Fountain",cityName: "Rome",coordinates: CLLocationCoordinate2D(latitude: 41.9009, longitude: 12.4833),description: "The Trevi Fountain is a fountain in the Trevi district in Rome, Italy, designed by Italian architect Nicola Salvi and completed by Giuseppe Pannini and several others. Standing 26.3 metres high and 49.15 metres wide, it is the largest Baroque fountain in the city and one of the most famous fountains in the world.",imageNames: ["rome-trevifountain-1","rome-trevifountain-2","rome-trevifountain-3",],link: "https://en.wikipedia.org/wiki/Trevi_Fountain"),Location(name: "Eiffel Tower",cityName: "Paris",coordinates: CLLocationCoordinate2D(latitude: 48.8584, longitude: 2.2945),description: "The Eiffel Tower is a wrought-iron lattice tower on the Champ de Mars in Paris, France. It is named after the engineer Gustave Eiffel, whose company designed and built the tower. Locally nicknamed 'La dame de fer', it was constructed from 1887 to 1889 as the centerpiece of the 1889 World's Fair and was initially criticized by some of France's leading artists and intellectuals for its design, but it has become a global cultural icon of France and one of the most recognizable structures in the world.",imageNames: ["paris-eiffeltower-1","paris-eiffeltower-2",],link: "https://en.wikipedia.org/wiki/Eiffel_Tower"),Location(name: "Louvre Museum",cityName: "Paris",coordinates: CLLocationCoordinate2D(latitude: 48.8606, longitude: 2.3376),description: "The Louvre, or the Louvre Museum, is the world's most-visited museum and a historic monument in Paris, France. It is the home of some of the best-known works of art, including the Mona Lisa and the Venus de Milo. A central landmark of the city, it is located on the Right Bank of the Seine in the city's 1st arrondissement.",imageNames: ["paris-louvre-1","paris-louvre-2","paris-louvre-3",],link: "https://en.wikipedia.org/wiki/Louvre"),]
}
4. ViewModel 层
4.1 创建位置信息的 ViewModel LocationsViewModel.swift
import Foundation
import MapKit
import SwiftUIclass LocationsViewModel: ObservableObject{/// All loaded locations Published@Published var locationes: [Location] = []/// Current location on map@Published var mapLocation: Location {didSet {// 设置地图位置,然后更新地图区域updateMapRegion(location: mapLocation)}}/// Current region on map :  这是地图上的当前区域@Published var mapRegion: MKCoordinateRegion = MKCoordinateRegion()/// 坐标跨度let mapSpan = MKCoordinateSpan(latitudeDelta: 0.1, longitudeDelta: 0.1)/// Show list of locations : 显示位置列表@Published var showLocationsList: Bool = false/// Show location detail via sheet : 显示位置详情信息页面@Published var sheetLocation: Location? = nilinit() {let locations = LocationsDataService.locationsself.locationes = locationsself.mapLocation = locations.first!self.updateMapRegion(location: locations.first!)}/// 更新地图区域private func updateMapRegion(location: Location){withAnimation(.easeInOut) {mapRegion = MKCoordinateRegion(// 中心点: 经纬度 latitude: 纬度  longitude: 经度center: location.coordinates,// 坐标跨度:span: mapSpan)}}/// 位置列表开关func toggleLocationsList(){withAnimation(.easeInOut) {// showLocationsList = !showLocationsListshowLocationsList.toggle()}}/// 显示下一个位置func showNextLocation(location: Location){withAnimation(.easeInOut) {mapLocation = locationshowLocationsList = false}}/// 下一个按钮处理事件func nextButtonPressed(){// Get the current indexguard let currentIndex = locationes.firstIndex(where: { $0 == mapLocation }) else {print("Could not find current index in locations array! Should naver happen.")return}// check if the nextIndex is valid: 检查下一个索引是否有校let nextIndex = currentIndex + 1guard locationes.indices.contains(nextIndex) else {// Next index is NOT avlid// Restart from 0guard let firstLocation = locationes.first else { return }showNextLocation(location: firstLocation)return}// Next index IS validlet nextLocation = locationes[nextIndex]showNextLocation(location: nextLocation)}
}
5. 创建 View 层
5.1 位置列表 View
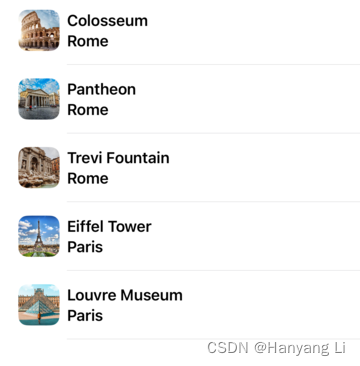
1) 创建实现文件 LocationsListView.swift
import SwiftUI/// 位置列表
struct LocationsListView: View {/// 环境变量中的 ViewModel@EnvironmentObject private var viewMode: LocationsViewModelvar body: some View {List {ForEach(viewMode.locationes) { location inButton {viewMode.showNextLocation(location: location)} label: {listRowView(location: location)}.padding(.vertical, 4).listRowBackground(Color.clear)}}.listStyle(.plain)}
}extension LocationsListView {/// 列表行private func listRowView(location: Location) -> some View{HStack {if let imageName = location.imageNames.first {Image(imageName).resizable().scaledToFill().frame(width: 45, height: 45).cornerRadius(10)}VStack(alignment: .leading) {Text(location.name).font(.headline)Text(location.cityName).font(.headline)}.frame(maxWidth: .infinity, alignment: .leading)}}
}struct LocationsListView_Previews: PreviewProvider {static var previews: some View {LocationsListView().environmentObject(LocationsViewModel())}
}
2) 效果图:
5.2 位置预览 View
1) 创建实现文件 LocationPreviewView.swift
import SwiftUI/// 位置预览视图
struct LocationPreviewView: View {/// 环境变量中配置的 viewModel@EnvironmentObject private var viewModel: LocationsViewModellet location: Locationvar body: some View {HStack(alignment:.bottom, spacing: 0) {VStack(alignment: .leading, spacing: 16) {imageSectiontitleSection}VStack(spacing: 8) {learnMoreButtonnextButton}}.padding(20).background(RoundedRectangle(cornerRadius: 10).fill(.ultraThinMaterial.opacity(0.7)).offset(y: 65)).cornerRadius(10)}
}extension LocationPreviewView {/// 图片部分private var imageSection: some View{ZStack {if let imageImage = location.imageNames.first{Image(imageImage).resizable().scaledToFill().frame(width: 100, height: 100).cornerRadius(10)}}.padding(6).background(Color.white).cornerRadius(10)}/// 标题部分private var titleSection: some View{VStack(alignment: .leading, spacing: 4) {Text(location.name).font(.title2).fontWeight(.bold)Text(location.cityName).font(.subheadline)}.frame(maxWidth: .infinity, alignment: .leading)}/// 了解更多按钮private var learnMoreButton: some View{Button {viewModel.sheetLocation = location} label: {Text("Learn more").font(.headline).frame(width: 125, height: 35)}.buttonStyle(.borderedProminent)}/// 下一个按钮private var nextButton: some View{Button {viewModel.nextButtonPressed()} label: {Text("Next").font(.headline).frame(width: 125, height: 35)}.buttonStyle(.bordered)}
}struct LocationPreviewView_Previews: PreviewProvider {static var previews: some View {ZStack {Color.black.ignoresSafeArea()LocationPreviewView(location: LocationsDataService.locations.first!).padding()}.environmentObject(LocationsViewModel())}
}
2) 效果图:

5.3 位置注释 View
1) 创建实现文件 LocationMapAnnotationView.swift
import SwiftUI/// 位置注释视图
struct LocationMapAnnotationView: View {let accentColor = Color("AccentColor")var body: some View {VStack(spacing: 0) {Image(systemName: "map.circle.fill").resizable().scaledToFill().frame(width: 30, height: 30).font(.headline).foregroundColor(.white).padding(6).background(accentColor)//.cornerRadius(36).clipShape(Circle())Image(systemName: "triangle.fill").resizable().scaledToFill().foregroundColor(accentColor).frame(width: 10, height: 10).rotationEffect(Angle(degrees: 180)).offset(y: -3).padding(.bottom, 35)}}
}#Preview {ZStack{Color.black.ignoresSafeArea()LocationMapAnnotationView()}
}
2) 效果图:

5.4 主页 View
1) 创建实现文件 LocationsView.swift
import SwiftUI
import MapKit/// 主页 View
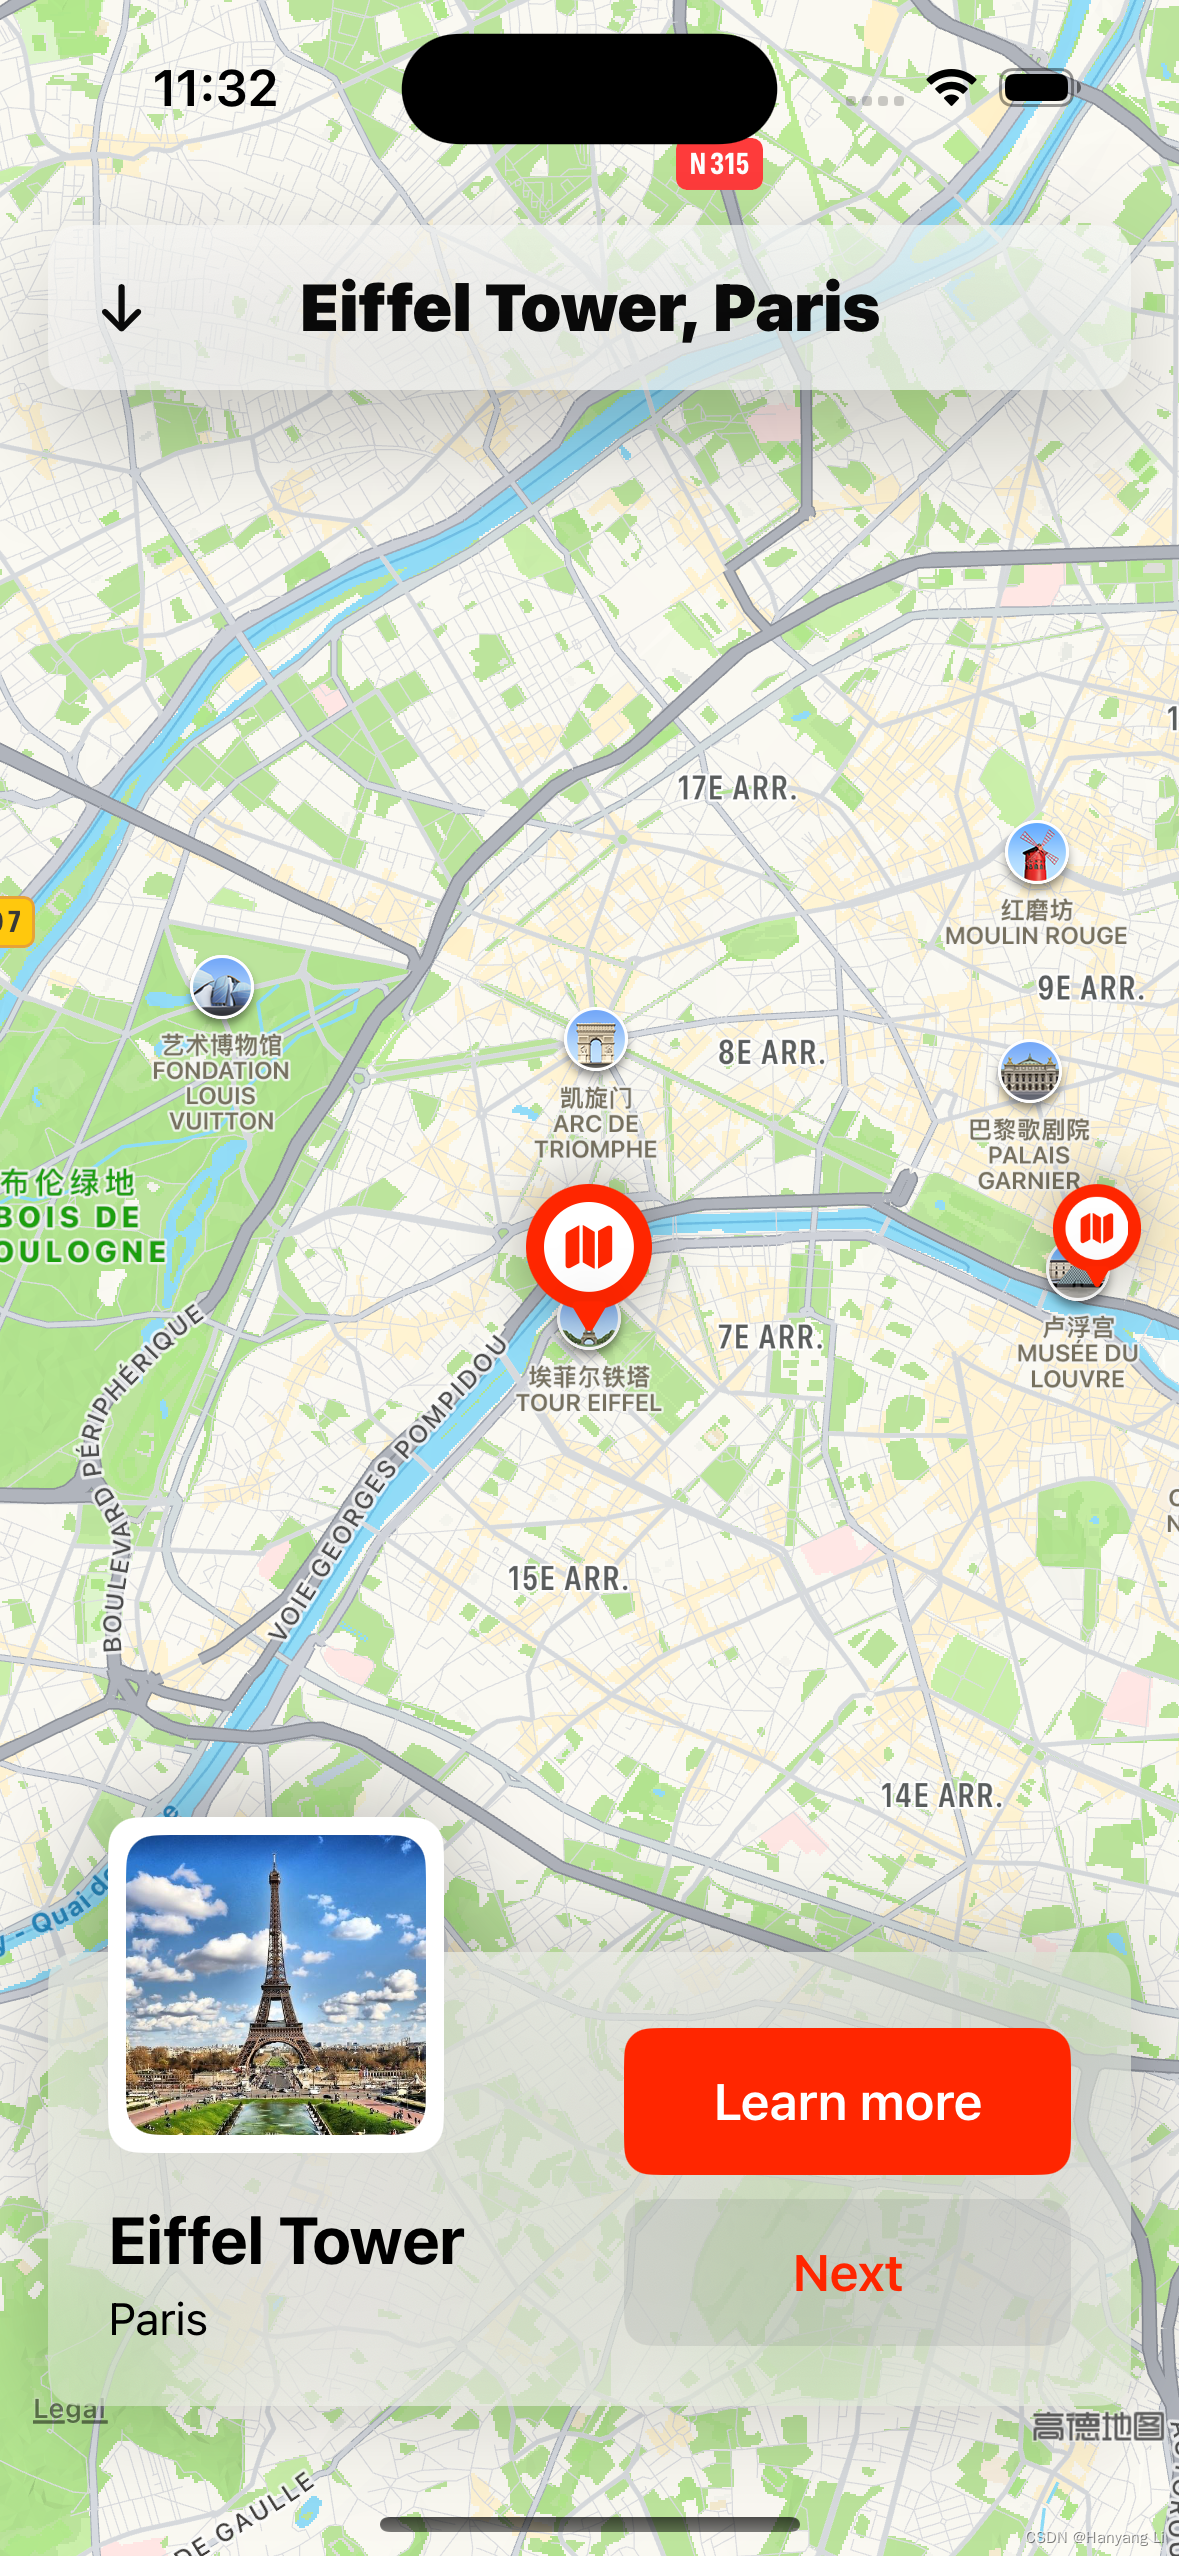
struct LocationsView: View {@EnvironmentObject private var viewModel: LocationsViewModellet maxWidthForIpad: CGFloat = 700var body: some View {ZStack {mapLayer.ignoresSafeArea()VStack(spacing: 0) {header.padding().frame(maxWidth: maxWidthForIpad)Spacer()locationsPreviewStack}}// .fullScreenCover 全屏显示.sheet(item: $viewModel.sheetLocation) { location inLocationDetailView(location: location)}}
}extension LocationsView {/// 头Viewprivate var header: some View{VStack {Button {viewModel.toggleLocationsList()} label: {Text(viewModel.mapLocation.name + ", " + viewModel.mapLocation.cityName).font(.title2).fontWeight(.black).foregroundColor(.primary).frame(height: 55).frame(maxWidth: .infinity).animation(.none, value: viewModel.mapLocation).overlay(alignment: .leading) {Image(systemName: "arrow.down").font(.headline).foregroundColor(.primary).padding().rotationEffect(Angle(degrees: viewModel.showLocationsList ? 180 : 0))}}// 列表if viewModel.showLocationsList{LocationsListView()}}.background(.thickMaterial.opacity(0.7)).cornerRadius(10).shadow(color: Color.black.opacity(0.3), radius: 20, x: 0, y: 15)}/// 地图 Viewprivate var mapLayer: some View{Map(coordinateRegion: $viewModel.mapRegion,annotationItems: viewModel.locationes,annotationContent: { location in// 地图标识颜色// MapMarker(coordinate: location.coordinates, tint: .blue)// 自定义标识MapAnnotation(coordinate: location.coordinates) {LocationMapAnnotationView().scaleEffect(viewModel.mapLocation == location ? 1 : 0.7).shadow(radius: 10).onTapGesture {viewModel.showNextLocation(location: location)}}})}/// 地址预览堆栈private var locationsPreviewStack: some View{ZStack {ForEach(viewModel.locationes) { location in// 显示当前地址if viewModel.mapLocation == location {LocationPreviewView(location: location).shadow(color: Color.black.opacity(0.3), radius: 20).padding().frame(maxWidth: maxWidthForIpad).frame(maxWidth: .infinity)// .opacity// .transition(AnyTransition.scale.animation(.easeInOut))// 添加动画.transition(.asymmetric(insertion: .move(edge: .trailing),removal: .move(edge: .leading)))}}}}
}struct LocationsView_Previews: PreviewProvider {static var previews: some View {LocationsView().environmentObject(LocationsViewModel())}
}
2) 效果图:
5.5 位置详情页 View
1) 创建实现文件 LocationDetailView.swift
import SwiftUI
import MapKit/// 位置详情页视图
struct LocationDetailView: View {// @Environment(\.presentationMode) var presentationMode// @Environment(\.dismiss) var dismiss@EnvironmentObject private var viewModel: LocationsViewModellet location: Locationvar body: some View {ScrollView {VStack {imageSectionVStack(alignment: .leading, spacing: 16){titleSectionDivider()descriptionSectionDivider()mapLayer}.frame(maxWidth: .infinity, alignment: .leading).padding()}}// 安全区.ignoresSafeArea()// 超薄材质,灰白色.background(.ultraThinMaterial)// 添加返回按钮.overlay(alignment: .topLeading) {backButton}}
}extension LocationDetailView{/// 滑动切换图private var imageSection: some View{TabView {ForEach(location.imageNames, id: \.self) {Image($0).resizable().scaledToFill().frame(width: UIDevice.current.userInterfaceIdiom == .pad  ? nil : UIScreen.main.bounds.width).clipped()}}.frame(height: 500).tabViewStyle(.page).shadow(color: .black.opacity(0.3), radius: 20, y: 10)}/// 标题视图private var titleSection: some View{VStack(alignment: .leading, spacing: 8){Text(location.name).font(.largeTitle).fontWeight(.semibold).foregroundStyle(.primary)Text(location.cityName).font(.title3).foregroundStyle(.secondary)}}/// 描述视图private var descriptionSection: some View{VStack(alignment: .leading, spacing: 16){Text(location.description).font(.subheadline).foregroundStyle(.secondary)if let url = URL(string: location.link) {Link("Read more on Wikipedia", destination: url).font(.headline).tint(.blue)}}}/// 地图 Viewprivate var mapLayer: some View{Map(coordinateRegion: .constant(MKCoordinateRegion(center: location.coordinates,span: MKCoordinateSpan(latitudeDelta: 0.01, longitudeDelta: 0.01))),annotationItems: [location]) { location inMapAnnotation(coordinate: location.coordinates){// 自定义标识LocationMapAnnotationView().shadow(radius: 10)}}.allowsHitTesting(false) // 禁止点击.aspectRatio(1, contentMode: .fit) // 纵横比.cornerRadius(30)}/// 返回按钮private var backButton: some View{Button{// dismiss.callAsFunction()viewModel.sheetLocation = nil} label: {Image(systemName: "xmark").font(.headline).padding(16).foregroundColor(.primary).background(.thickMaterial).cornerRadius(10).shadow(radius: 4).padding()}}
}#Preview {LocationDetailView(location: LocationsDataService.locations.first!).environmentObject(LocationsViewModel())
}
2) 效果图:

5.6 启动结构体文件 SwiftfulMapAppApp.swift
import SwiftUI@main
struct SwiftfulMapAppApp: App {@StateObject private var viewModel = LocationsViewModel()var body: some Scene {WindowGroup {LocationsView().environmentObject(viewModel)}}
}
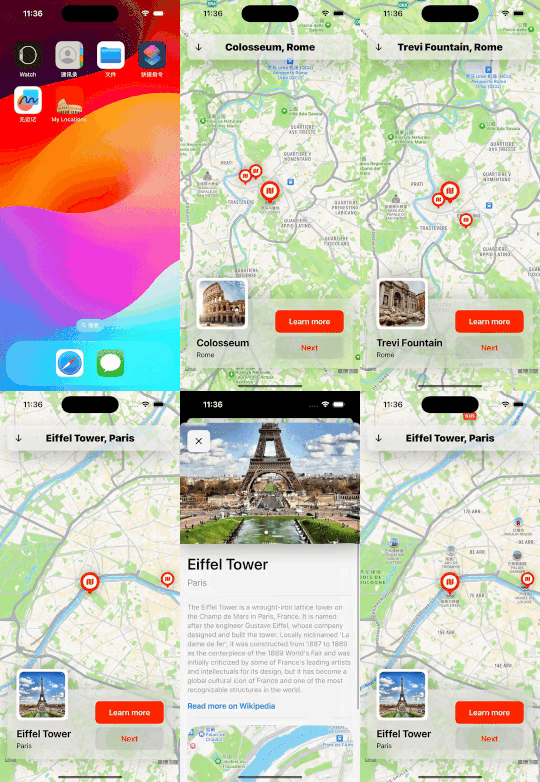
6. 整体效果:
