在flutter中如果要使用线程,需要借助Isolate来实现。
简介
在Flutter中,Isolate是一种轻量级的线程解决方案,用于在应用程序中执行并发任务。Isolate可以被认为是独立于主线程的工作单元,它们可以在后台执行任务而不会阻塞应用程序的用户界面。
Isolate提供了多线程编程的能力,允许开发者在应用程序中同时执行多个任务,从而提高应用程序的性能和响应能力。每个Isolate都有自己独立的内存空间和执行环境,它们之间可以通过消息传递进行通信。
在Flutter中,可以使用dart:isolate库来创建和管理Isolate。通过创建一个Isolate对象,可以指定要执行的任务代码。Isolate可以执行耗时的计算、网络请求、文件操作等任务,而不会阻塞应用程序的主线程。
与其他线程解决方案相比,Isolate的一个重要特点是它们之间的内存是隔离的,这意味着每个Isolate都有自己独立的内存空间,它们之间不能直接共享数据。为了在Isolate之间传递数据,可以使用消息传递机制,即将数据打包成消息发送给目标Isolate,并在接收端解包处理。
使用Isolate可以提高应用程序的性能和响应能力,特别是在处理大量计算密集型任务或需要与外部资源进行交互的场景中。然而,需要注意的是,Isolate的创建和销毁都会带来一定的开销,因此在使用Isolate时需要权衡资源消耗和性能提升之间的平衡。
总而言之,Isolate是Flutter中的一种轻量级线程解决方案,用于在应用程序中执行并发任务。它们可以独立于主线程执行任务,并通过消息传递机制进行通信。使用Isolate可以提高应用程序的性能和响应能力,特别是在处理计算密集型任务或需要与外部资源进行交互的场景中。
基本使用
匿名函数使用
void _incrementCounter() {setState(() {_counter++;});// 匿名线程Isolate.spawn((message) {print("匿名函数线程:$message");}, '哈哈哈');
}
参数会被传递到匿名函数中,并被匿名函数所使用。
普通函数
void _incrementCounter() {setState(() {_counter++;});// 普通线程Isolate.spawn(newThread1, "普通线程");}
// 创建一个额外线程
void newThread1(String message){print(message);
}
这个一定要注意,在flutter中使用时newThread1不能写在主进程所在的类里。否则会提示[ERROR:flutter/runtime/dart_vm_initializer.cc(41)] Unhandled Exception: Invalid argument(s): Illegal argument in isolate message: object is unsendable - Library:'dart:async' Class: _AsyncCompleter@4048458 (see restrictions listed at SendPort.send() documentation for more information)
子线程向主线程通信
// 创建一个额外线程
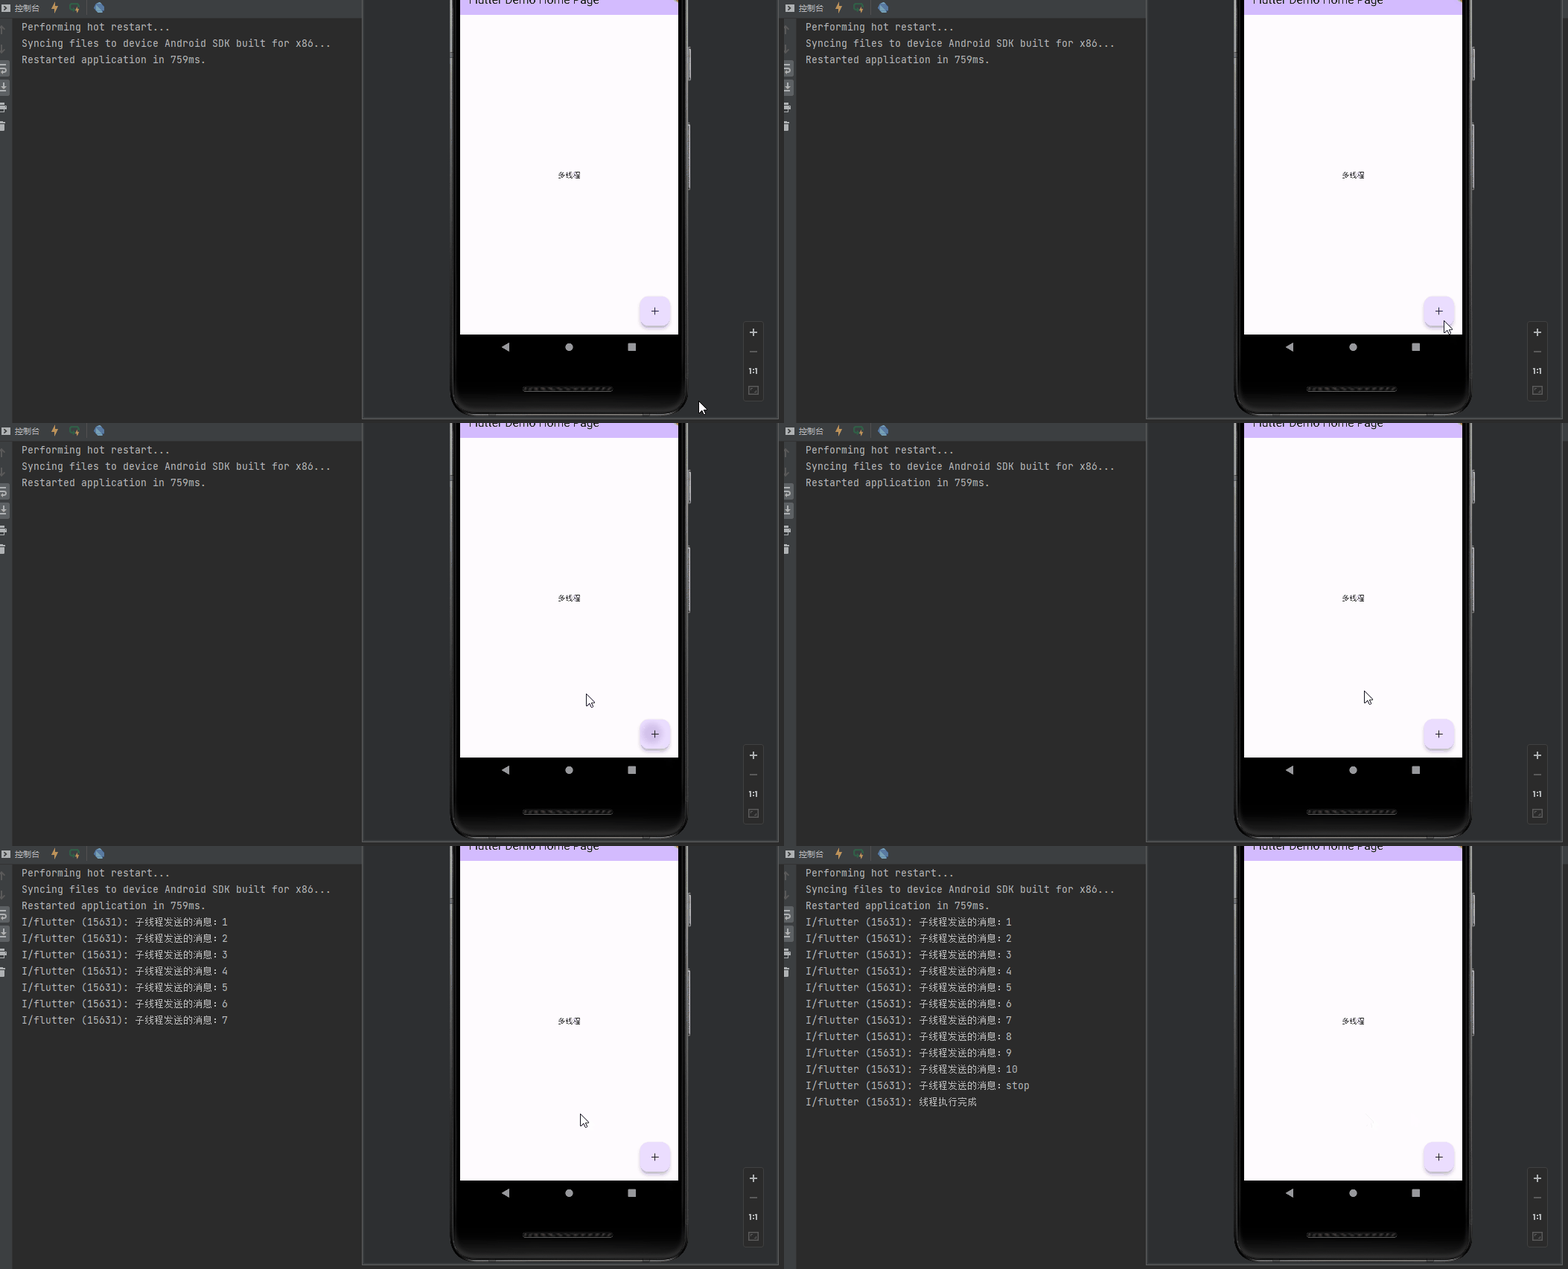
void newThread1(SendPort mainThreadPort) {int num = 0;Timer.periodic(const Duration(seconds: 1), (timer) {// 每隔1秒num加1num += 1;mainThreadPort.send(num);if (num == 10) {// 向主进程发消息执行完成mainThreadPort.send('stop');}});
}class _MyHomePageState extends State<MyHomePage> {final receivePort = ReceivePort();void _incrementCounter() async {// 子线程final isolate = await Isolate.spawn(newThread1, receivePort.sendPort);// 监听子线程发送的消息receivePort.listen((message) {print("子线程发送的消息:$message");if (message == 'stop') {// 执行完成则停止显示print("线程执行完成");isolate.kill(priority: Isolate.immediate);}});}@overrideWidget build(BuildContext context) {return Scaffold(appBar: AppBar(backgroundColor: Theme.of(context).colorScheme.inversePrimary,title: Text(widget.title),),body: const Center(child: Text("多线程")),floatingActionButton: FloatingActionButton(onPressed: _incrementCounter,tooltip: 'Increment',child: const Icon(Icons.add),), // This trailing comma makes auto-formatting nicer for build methods.);}
}
主线程向子线程通信
在子线程执行期间,主线程也可以向子线程进行通信。基于上面的代码,进行简单修改
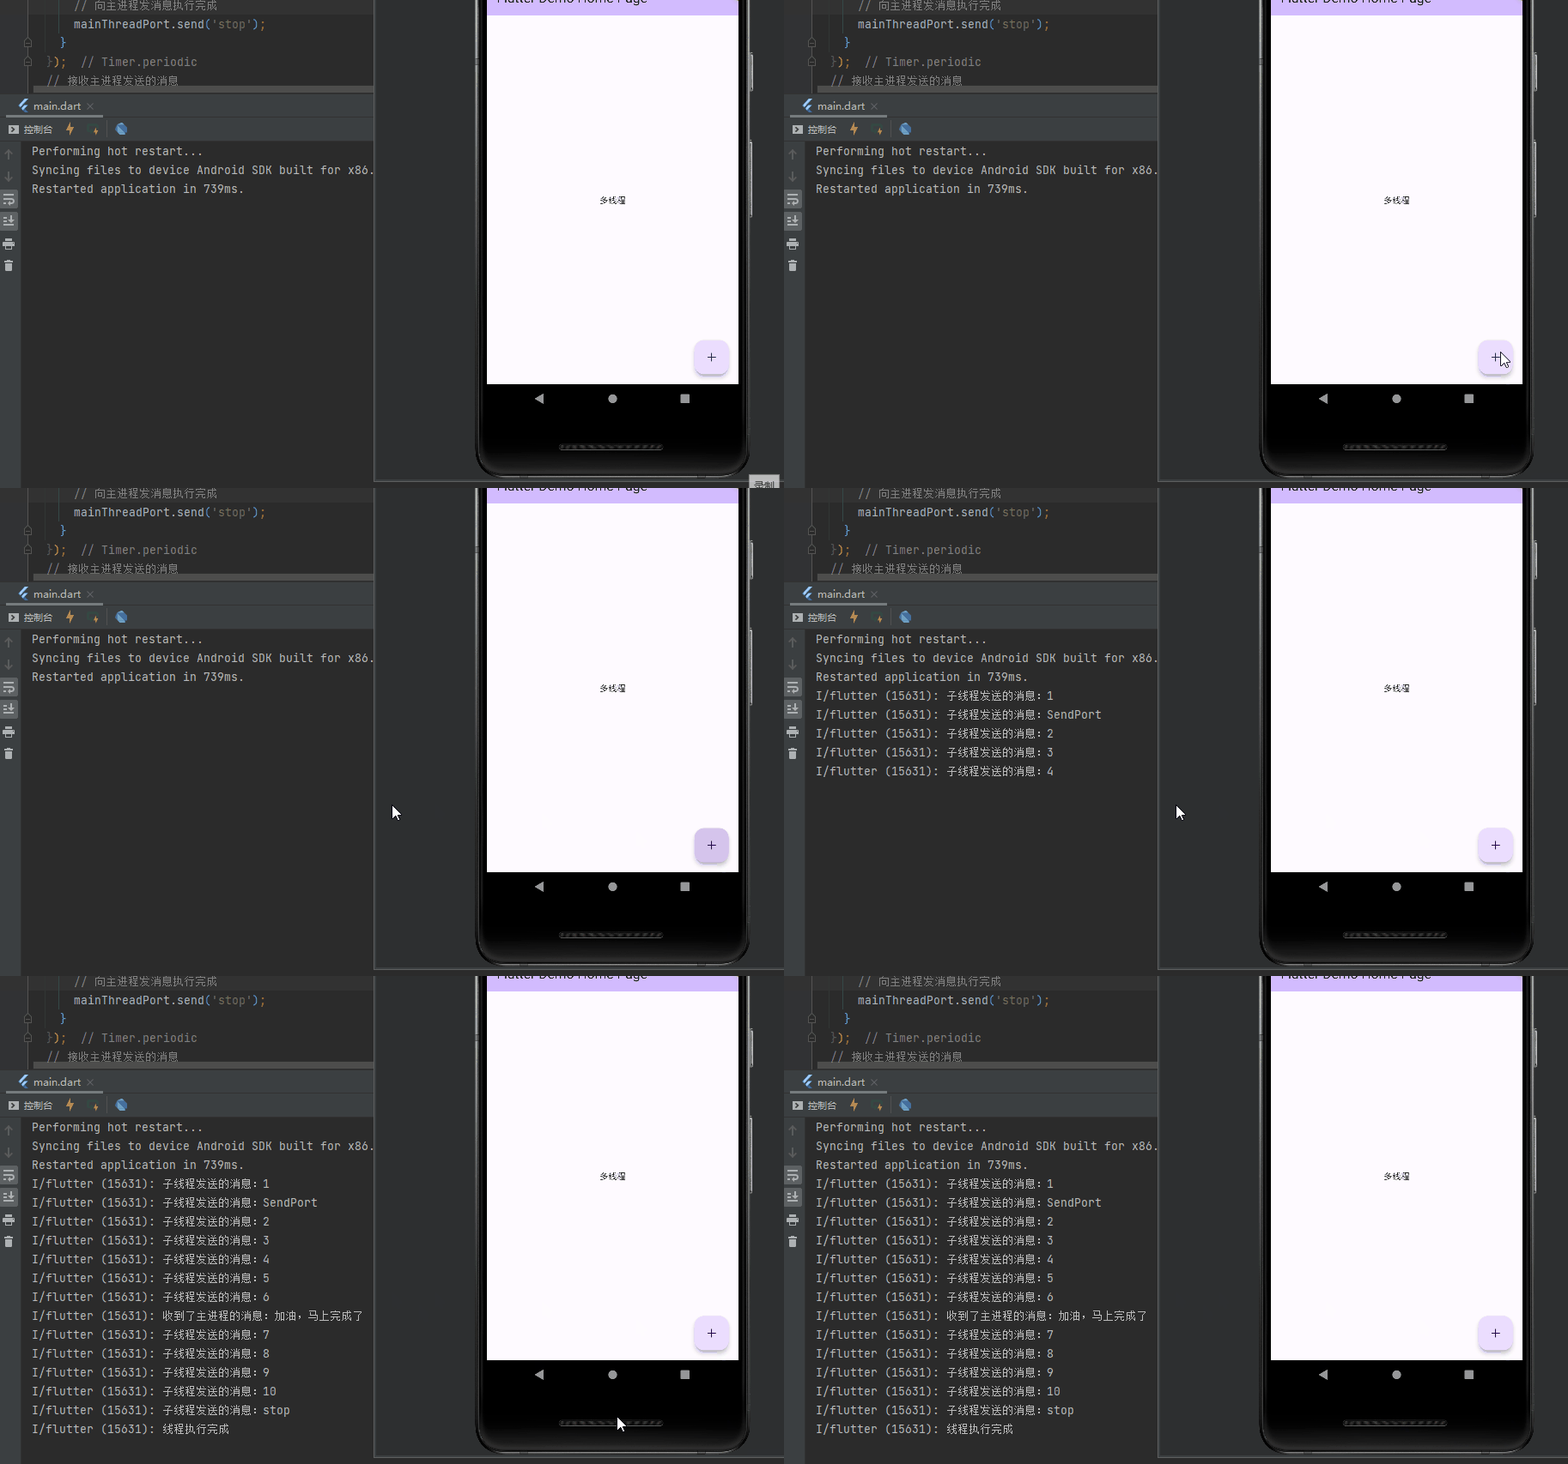
void newThread1(SendPort mainThreadPort) {int num = 0;ReceivePort receivePort = ReceivePort();Timer.periodic(const Duration(seconds: 1), (timer) {// 每隔1秒num加1num += 1;mainThreadPort.send(num);if(num==1){// 跟主进程类似,将receivePort.sendPort传递给主进程,主进程才能向子进程通信mainThreadPort.send(receivePort.sendPort);}if (num == 10) {// 向主进程发消息执行完成mainThreadPort.send('stop');}});// 接收主进程发送的消息receivePort.listen((message) {print("收到了主进程的消息:$message");});
}
void _incrementCounter() async {// 子线程final isolate = await Isolate.spawn(newThread1, receivePort.sendPort);late SendPort childSendPort;// 监听子线程发送的消息receivePort.listen((message) {print("子线程发送的消息:$message");if (message is SendPort) {childSendPort = message;}if (message == 6) {childSendPort.send("加油,马上完成了");}if (message == 'stop') {// 执行完成则停止显示print("线程执行完成");isolate.kill(priority: Isolate.immediate);}});}
怎么理解呢?
可以理解为:我找了一个人干活,我把自己的手机号给他了,但是忘记跟他要手机号了,因此只能他给我打电话,而我不能给他打电话。
当他向我打电话后,我存下了他的手机号,后续我就可以给他打电话了。
也就是下面内容:
子线程要想向主线程通信,需要获取到主线程的receivePort.sendPort,因此在子线程创建时,主线程将自己的receivePort.sendPort传递给子线程。
同理,主线程要想向子线程通信也需要拿到子线程的receivePort.sendPort,因此在子线程向主线程通信后,需要将自己的端口号给主线程。
只有主线程、子线程都拿到对方的receivePort.sendPort 才可以进行互相通信。
线程池
也不知道自己写的这个demo算不算,毕竟没怎么接触过线程池。
简介
线程池是一种管理和重用线程的技术。它由一个线程集合组成,这些线程可以被用来执行多个任务,而不需要为每个任务都创建一个新的线程。
线程池中有一个任务队列,用于存储待执行的任务。当有新的任务到达时,线程池会从任务队列中取出一个线程来执行任务。当任务执行完成后,线程会返回线程池,可以继续执行新的任务。
使用线程池有以下几个优点:
- 提高系统性能:由于线程的创建和销毁开销较大,线程池可以避免频繁地创建和销毁线程,从而提高系统的性能。
- 提高任务执行效率:线程池可以并发地执行多个任务,从而提高任务的执行效率。
- 控制并发度:线程池可以限制同时执行的线程数,从而控制任务的并发度,避免资源过度占用。
案例
这个案例有三个角色:
- 老板,主线程,用于和工头线程进行沟通
- 工头,子线程,根据老板发放的任务来招工、向工人安排工作、与工人沟通
- 工人,若干个子线程,用来干活
工作流程
[{ "taskId":"a1", "number":10},{ "taskId":"a2","number":15},{ "taskId":"a3","number":20},{"taskId":"a4","number":5}]
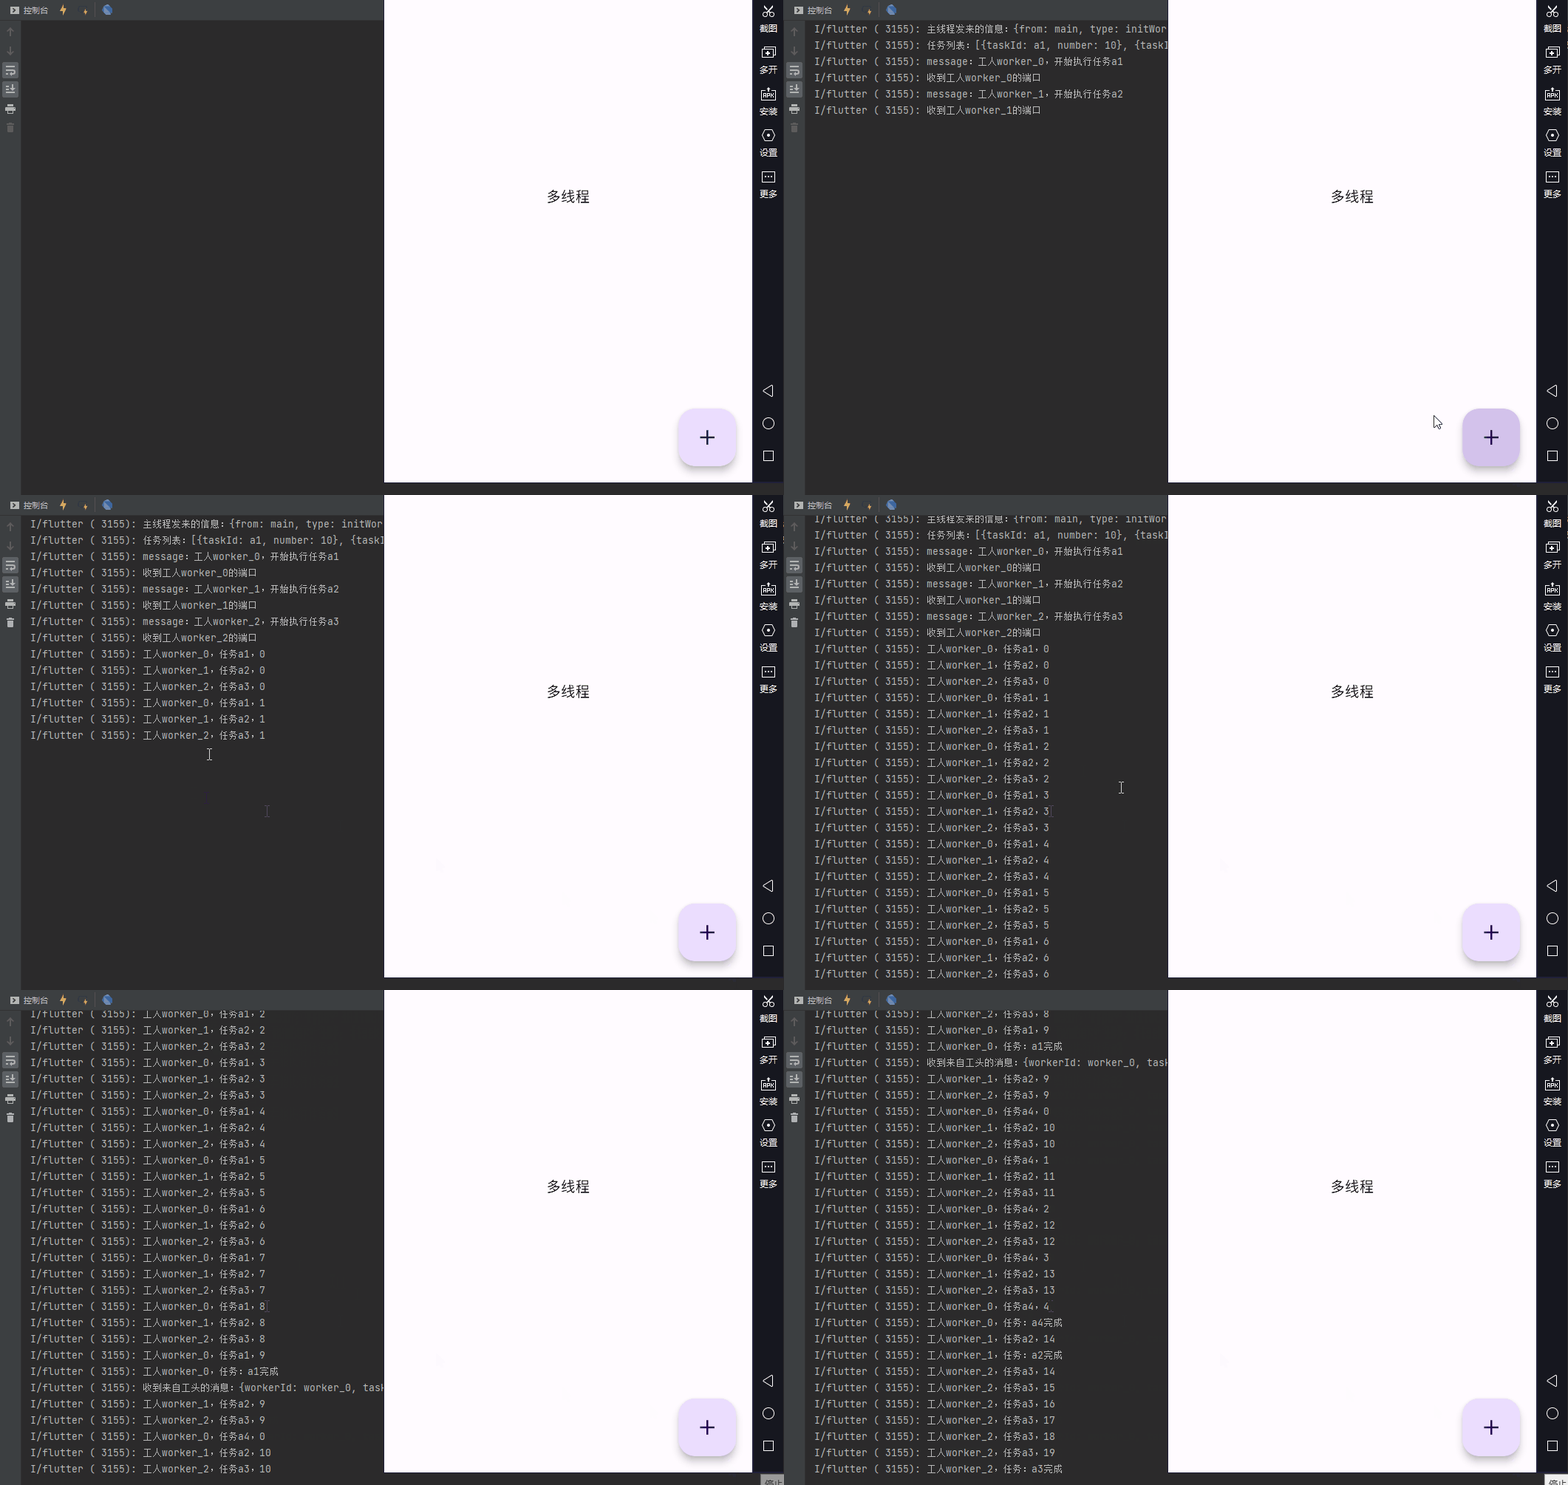
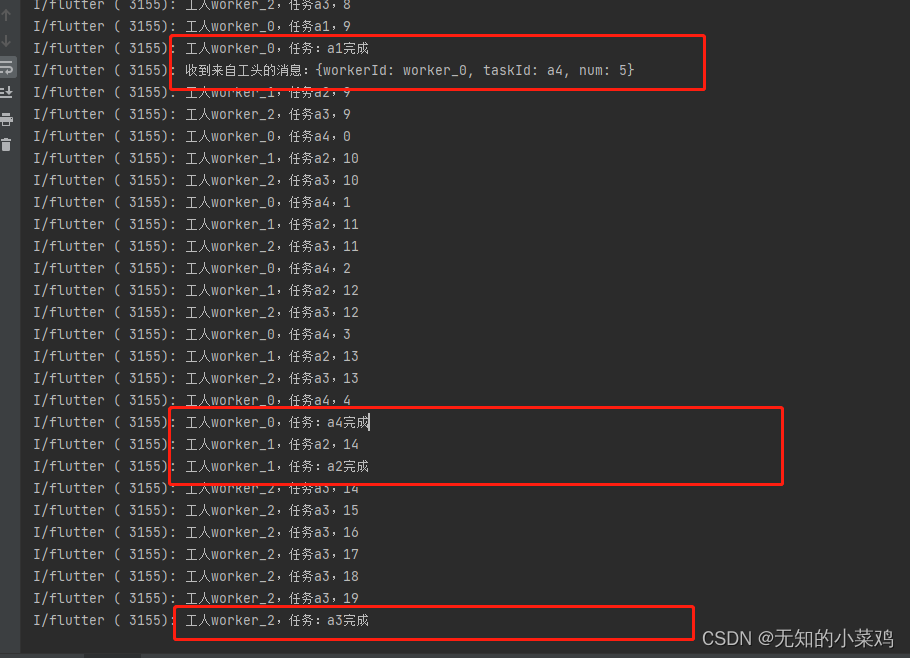
有4个任务,3个工人。工人开始工作(每隔1秒打印一个数字),当完成工作后(打印的数字等于number)工人向工头汇报,工头给完成工作的工人,安排新的工作。
效果图
主进程(老板)
class _MyHomePageState extends State<MyHomePage> {// 主线程本身的端口final receivePort = ReceivePort();// 记录子线程的端口late SendPort foremanPort;late Foreman foreman;@overridevoid initState() {super.initState();// 创建子线程,并将主线程的端口号给子线程Foreman.getInstance(receivePort.sendPort);// 监听子线程传来的消息receivePort.listen((message) {if (message is SendPort) {foremanPort = message;} else {// 普通消息print("子线程发来的消息:$message");}});}void _incrementCounter() async {// 向子线程发消息foremanPort.send({"from":"main",'type':'initWorker','data':[{"taskId":"a1","number":10},{"taskId":"a2","number":15},{"taskId":"a3","number":20},{"taskId":"a4","number":5}]});}@overrideWidget build(BuildContext context) {return Scaffold(appBar: AppBar(backgroundColor: Theme.of(context).colorScheme.inversePrimary,title: Text(widget.title),),body: const Center(child: Text("多线程")),floatingActionButton: FloatingActionButton(onPressed: _incrementCounter,tooltip: 'Increment',child: const Icon(Icons.add),), // This trailing comma makes auto-formatting nicer for build methods.);}
}
子线程(工头和工人)
// 包工头import 'dart:async';
import 'dart:isolate';class Foreman {// 记录主线程的通信端口late SendPort _mainPort;// 包工头本身的通信端口final ReceivePort _foremanPort = ReceivePort();// 任务列表List _tasks = [];// 工人列表final Map _workerMap = {};// 记录当前的任务下标int _taskIndex = 0;// 创建一个私有类型的实例static Foreman? _instance;// 私有化构造函数,避免通过构造函数创建实例Foreman._init();// 获取类的实例static Foreman getInstance(SendPort mainPort) {// 未初始化,则进行初始化_instance ??= Foreman._init();// 记录一下主线程的端口_instance!._mainPort = mainPort;// 向主进程进行通信mainPort.send(_instance!._foremanPort.sendPort);// 监听主进程发来的消息_instance!._foremanPort.listen((message) {if (message['from'] == 'main') {// 收到来自主线程的消息print("主线程发来的信息:$message");// 工头开始招人干活if (message['type'] == 'initWorker') {_instance!._tasks = message['data'];_instance!._initWorker();}}if (message['from'] == 'worker') {// 接收来自工人的端口var worker = _instance!._workerMap[message['workerId']];// 监听来自工人的消息if (message['type'] == 'port') {worker['port'] = message['port'];print("收到工人${message['workerId']}的端口");}if (message['type'] == 'finish') {// 有工人完成工作了,给他安排新工作if (_instance!._taskIndex < _instance!._tasks.length) {var task = _instance!._tasks[_instance!._taskIndex];// 说明还有工作,安排工作worker['port'].send({'workerId': worker['workerId'],'taskId': task["taskId"],'num': task['number']});// 更新任务下标_instance!._taskIndex += 1;}}}});return _instance!;}// 创建工人列表_initWorker() {print("任务列表:$_tasks");// 默认最大3个线程int size = _tasks.length > 3 ? 3 : _tasks.length;// 创建工人线程,将工头的端口给工人for (int i = 0; i < size; i++) {var isolate = Isolate.spawn(work, {"port": _foremanPort.sendPort,"workerId": "worker_$i","taskId": _tasks[i]['taskId'],"num": _tasks[i]['number']});// 记录工人_workerMap["worker_$i"] = {"workerId": "worker_$i", "worker": isolate};}// 记录下标_taskIndex = size;}
}// 工人干活函数
void work(message) {// 记录工头的通信端口SendPort foremanPort = message['port'];// 工人本身的通信端口ReceivePort workerPort = ReceivePort();print("message:工人${message['workerId']},开始执行任务${message['taskId']}");// 向工头发送消息foremanPort.send({"from": "worker","type": 'port',"workerId": message['workerId'],"port": workerPort.sendPort});// 开始干活toDo(message, foremanPort);// 监听来自工头的消息workerPort.listen((newMessage) {print("收到来自工头的消息:$newMessage");toDo(newMessage, foremanPort);});
}// 工人干的活
void toDo(message, foremanPort) {int num = 0;Timer.periodic(const Duration(seconds: 1), (Timer timer) {print("工人${message['workerId']},任务${message['taskId']},$num");num += 1;if (num == message['num']) {timer.cancel();print("工人${message['workerId']},任务:${message['taskId']}完成");// 向工头汇报任务完成foremanPort.send({"from": "worker","type": "finish","workerId": message['workerId'],});}});
}

