1.研究背景与意义
项目参考AAAI Association for the Advancement of Artificial Intelligence
研究背景与意义
遥感图像分割是遥感技术领域中的一个重要研究方向,它的目标是将遥感图像中的不同地物或地物类别进行有效的分割和识别。随着遥感技术的不断发展和遥感图像数据的大规模获取,遥感图像分割在农业、城市规划、环境监测等领域具有广泛的应用前景。
然而,由于遥感图像的特殊性,如图像分辨率高、光照条件复杂、地物类别多样等,传统的图像分割方法在处理遥感图像时面临着一些挑战。因此,提出一种高效准确的遥感图像分割系统对于实现遥感图像的自动化处理具有重要意义。
近年来,深度学习技术在图像分割领域取得了显著的成果。其中,基于卷积神经网络(Convolutional Neural Network,CNN)的图像分割方法得到了广泛应用。然而,传统的CNN方法在处理遥感图像时存在一些问题,如对小目标的检测效果不佳、对遥感图像中的细节信息提取能力有限等。
为了解决这些问题,研究者们提出了一种改进的遥感图像分割系统,即融合空间金字塔池化(Focal Modulation)改进YOLOv8。该系统结合了空间金字塔池化和YOLOv8模型,通过对图像进行多尺度的特征提取和池化操作,提高了遥感图像分割的准确性和鲁棒性。
具体来说,融合空间金字塔池化改进YOLOv8的遥感图像分割系统包括以下几个关键步骤:
首先,通过YOLOv8模型对遥感图像进行目标检测,得到图像中的候选目标区域。
然后,利用空间金字塔池化技术对候选目标区域进行多尺度的特征提取和池化操作,得到不同尺度的特征图。
接下来,将不同尺度的特征图进行融合,得到融合后的特征图。
最后,利用融合后的特征图进行目标分割,得到遥感图像中不同地物或地物类别的分割结果。
融合空间金字塔池化改进YOLOv8的遥感图像分割系统具有以下几个优点:
首先,通过融合空间金字塔池化技术,可以在不同尺度上提取图像的特征信息,从而提高了遥感图像分割的准确性。
其次,利用YOLOv8模型进行目标检测,可以有效地检测遥感图像中的小目标,提高了系统的检测能力。
此外,融合空间金字塔池化改进YOLOv8的遥感图像分割系统还具有较强的鲁棒性,能够在光照条件复杂、地物类别多样的情况下稳定地进行图像分割。
综上所述,融合空间金字塔池化改进YOLOv8的遥感图像分割系统在提高遥感图像分割准确性和鲁棒性方面具有重要意义。该系统的研究成果将为遥感图像的自动化处理提供有效的技术支持,推动遥感技术在农业、城市规划、环境监测等领域的应用。
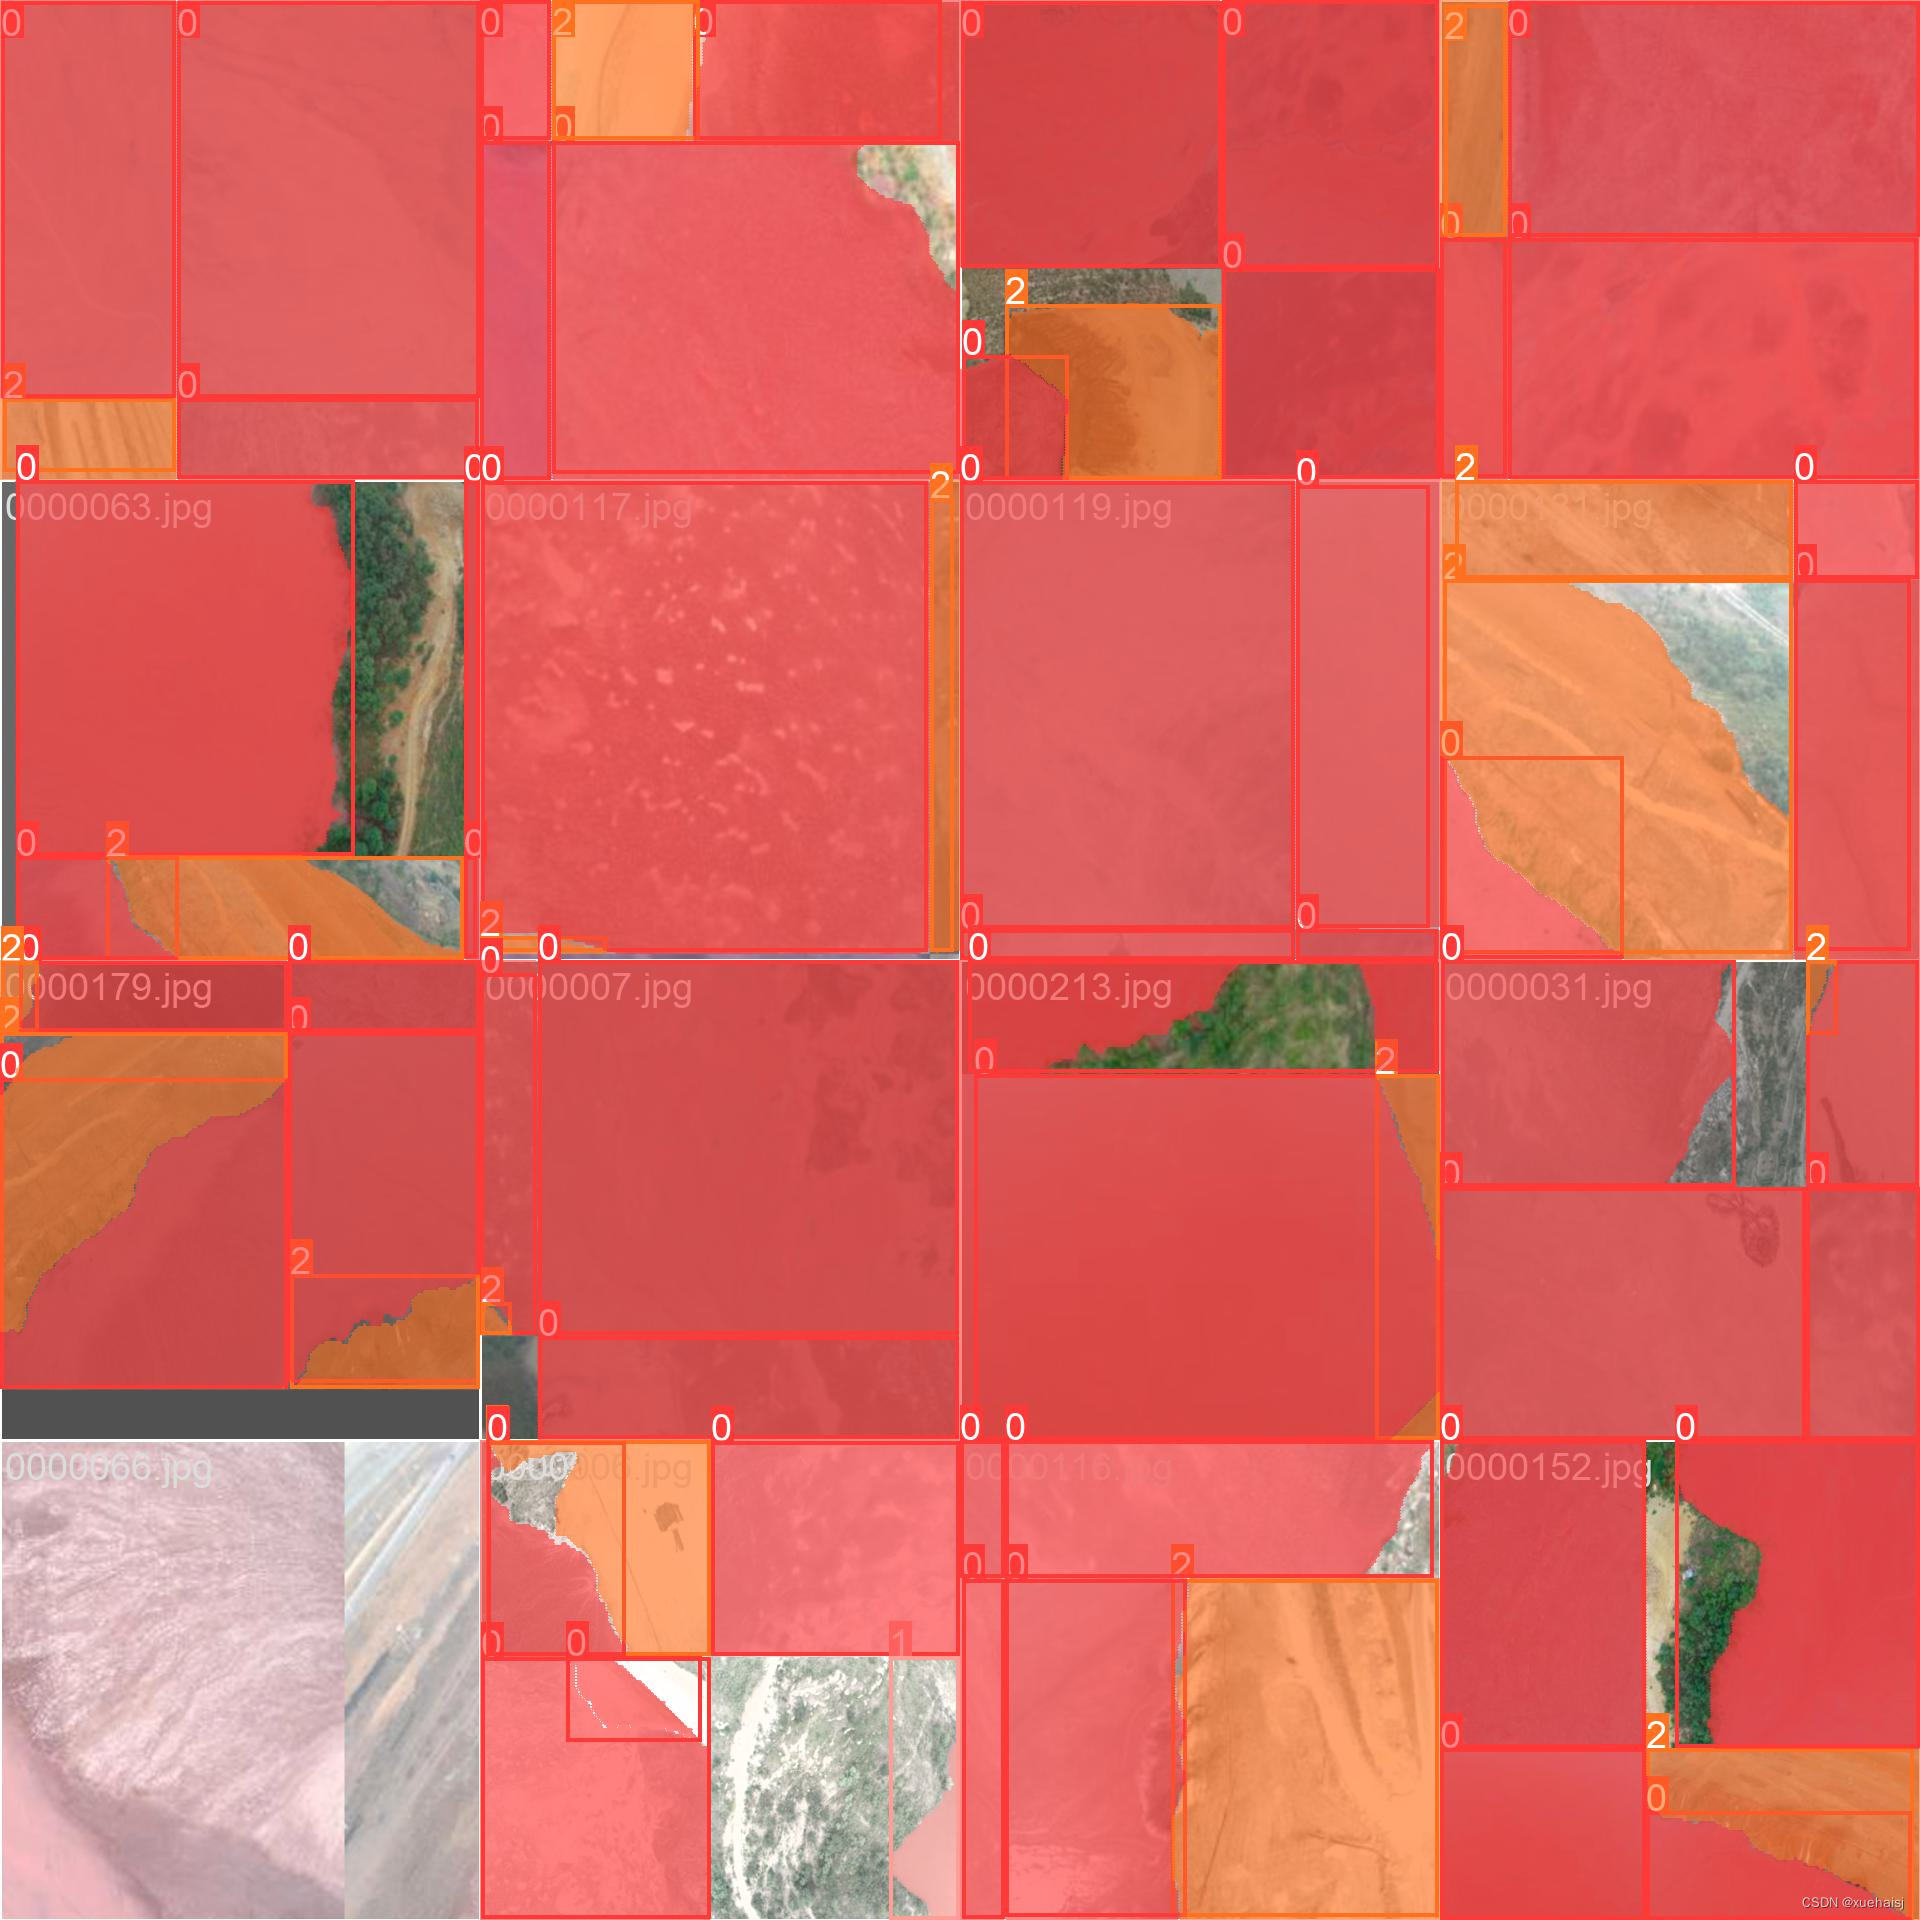
2.图片演示


3.视频演示
遥感图像分割系统:融合空间金字塔池化(FocalModulation)改进YOLOv8_哔哩哔哩_bilibili
4.数据集的采集&标注和整理
图片的收集
首先,我们需要收集所需的图片。这可以通过不同的方式来实现,例如使用现有的公开数据集YGDatasets。
eiseg是一个图形化的图像注释工具,支持COCO和YOLO格式。以下是使用eiseg将图片标注为COCO格式的步骤:
(1)下载并安装eiseg。
(2)打开eiseg并选择“Open Dir”来选择你的图片目录。
(3)为你的目标对象设置标签名称。
(4)在图片上绘制矩形框,选择对应的标签。
(5)保存标注信息,这将在图片目录下生成一个与图片同名的JSON文件。
(6)重复此过程,直到所有的图片都标注完毕。
由于YOLO使用的是txt格式的标注,我们需要将VOC格式转换为YOLO格式。可以使用各种转换工具或脚本来实现。
下面是一个简单的方法是使用Python脚本,该脚本读取XML文件,然后将其转换为YOLO所需的txt格式。
import contextlib
import jsonimport cv2
import pandas as pd
from PIL import Image
from collections import defaultdictfrom utils import *# Convert INFOLKS JSON file into YOLO-format labels ----------------------------
def convert_infolks_json(name, files, img_path):# Create folderspath = make_dirs()# Import jsondata = []for file in glob.glob(files):with open(file) as f:jdata = json.load(f)jdata['json_file'] = filedata.append(jdata)# Write images and shapesname = path + os.sep + namefile_id, file_name, wh, cat = [], [], [], []for x in tqdm(data, desc='Files and Shapes'):f = glob.glob(img_path + Path(x['json_file']).stem + '.*')[0]file_name.append(f)wh.append(exif_size(Image.open(f)))  # (width, height)cat.extend(a['classTitle'].lower() for a in x['output']['objects'])  # categories# filenamewith open(name + '.txt', 'a') as file:file.write('%s\n' % f)# Write *.names filenames = sorted(np.unique(cat))# names.pop(names.index('Missing product'))  # removewith open(name + '.names', 'a') as file:[file.write('%s\n' % a) for a in names]# Write labels filefor i, x in enumerate(tqdm(data, desc='Annotations')):label_name = Path(file_name[i]).stem + '.txt'with open(path + '/labels/' + label_name, 'a') as file:for a in x['output']['objects']:# if a['classTitle'] == 'Missing product':#    continue  # skipcategory_id = names.index(a['classTitle'].lower())# The INFOLKS bounding box format is [x-min, y-min, x-max, y-max]box = np.array(a['points']['exterior'], dtype=np.float32).ravel()box[[0, 2]] /= wh[i][0]  # normalize x by widthbox[[1, 3]] /= wh[i][1]  # normalize y by heightbox = [box[[0, 2]].mean(), box[[1, 3]].mean(), box[2] - box[0], box[3] - box[1]]  # xywhif (box[2] > 0.) and (box[3] > 0.):  # if w > 0 and h > 0file.write('%g %.6f %.6f %.6f %.6f\n' % (category_id, *box))# Split data into train, test, and validate filessplit_files(name, file_name)write_data_data(name + '.data', nc=len(names))print(f'Done. Output saved to {os.getcwd() + os.sep + path}')# Convert vott JSON file into YOLO-format labels -------------------------------
def convert_vott_json(name, files, img_path):# Create folderspath = make_dirs()name = path + os.sep + name# Import jsondata = []for file in glob.glob(files):with open(file) as f:jdata = json.load(f)jdata['json_file'] = filedata.append(jdata)# Get all categoriesfile_name, wh, cat = [], [], []for i, x in enumerate(tqdm(data, desc='Files and Shapes')):with contextlib.suppress(Exception):cat.extend(a['tags'][0] for a in x['regions'])  # categories# Write *.names filenames = sorted(pd.unique(cat))with open(name + '.names', 'a') as file:[file.write('%s\n' % a) for a in names]# Write labels filen1, n2 = 0, 0missing_images = []for i, x in enumerate(tqdm(data, desc='Annotations')):f = glob.glob(img_path + x['asset']['name'] + '.jpg')if len(f):f = f[0]file_name.append(f)wh = exif_size(Image.open(f))  # (width, height)n1 += 1if (len(f) > 0) and (wh[0] > 0) and (wh[1] > 0):n2 += 1# append filename to listwith open(name + '.txt', 'a') as file:file.write('%s\n' % f)# write labelsfilelabel_name = Path(f).stem + '.txt'with open(path + '/labels/' + label_name, 'a') as file:for a in x['regions']:category_id = names.index(a['tags'][0])# The INFOLKS bounding box format is [x-min, y-min, x-max, y-max]box = a['boundingBox']box = np.array([box['left'], box['top'], box['width'], box['height']]).ravel()box[[0, 2]] /= wh[0]  # normalize x by widthbox[[1, 3]] /= wh[1]  # normalize y by heightbox = [box[0] + box[2] / 2, box[1] + box[3] / 2, box[2], box[3]]  # xywhif (box[2] > 0.) and (box[3] > 0.):  # if w > 0 and h > 0file.write('%g %.6f %.6f %.6f %.6f\n' % (category_id, *box))else:missing_images.append(x['asset']['name'])print('Attempted %g json imports, found %g images, imported %g annotations successfully' % (i, n1, n2))if len(missing_images):print('WARNING, missing images:', missing_images)# Split data into train, test, and validate filessplit_files(name, file_name)print(f'Done. Output saved to {os.getcwd() + os.sep + path}')# Convert ath JSON file into YOLO-format labels --------------------------------
def convert_ath_json(json_dir):  # dir contains json annotations and images# Create foldersdir = make_dirs()  # output directoryjsons = []for dirpath, dirnames, filenames in os.walk(json_dir):jsons.extend(os.path.join(dirpath, filename)for filename in [f for f in filenames if f.lower().endswith('.json')])# Import jsonn1, n2, n3 = 0, 0, 0missing_images, file_name = [], []for json_file in sorted(jsons):with open(json_file) as f:data = json.load(f)# # Get classes# try:#     classes = list(data['_via_attributes']['region']['class']['options'].values())  # classes# except:#     classes = list(data['_via_attributes']['region']['Class']['options'].values())  # classes# # Write *.names file# names = pd.unique(classes)  # preserves sort order# with open(dir + 'data.names', 'w') as f:#     [f.write('%s\n' % a) for a in names]# Write labels filefor x in tqdm(data['_via_img_metadata'].values(), desc=f'Processing {json_file}'):image_file = str(Path(json_file).parent / x['filename'])f = glob.glob(image_file)  # image fileif len(f):f = f[0]file_name.append(f)wh = exif_size(Image.open(f))  # (width, height)n1 += 1  # all imagesif len(f) > 0 and wh[0] > 0 and wh[1] > 0:label_file = dir + 'labels/' + Path(f).stem + '.txt'nlabels = 0try:with open(label_file, 'a') as file:  # write labelsfile# try:#     category_id = int(a['region_attributes']['class'])# except:#     category_id = int(a['region_attributes']['Class'])category_id = 0  # single-classfor a in x['regions']:# bounding box format is [x-min, y-min, x-max, y-max]box = a['shape_attributes']box = np.array([box['x'], box['y'], box['width'], box['height']],dtype=np.float32).ravel()box[[0, 2]] /= wh[0]  # normalize x by widthbox[[1, 3]] /= wh[1]  # normalize y by heightbox = [box[0] + box[2] / 2, box[1] + box[3] / 2, box[2],box[3]]  # xywh (left-top to center x-y)if box[2] > 0. and box[3] > 0.:  # if w > 0 and h > 0file.write('%g %.6f %.6f %.6f %.6f\n' % (category_id, *box))n3 += 1nlabels += 1if nlabels == 0:  # remove non-labelled images from datasetos.system(f'rm {label_file}')# print('no labels for %s' % f)continue  # next file# write imageimg_size = 4096  # resize to maximumimg = cv2.imread(f)  # BGRassert img is not None, 'Image Not Found ' + fr = img_size / max(img.shape)  # size ratioif r < 1:  # downsize if necessaryh, w, _ = img.shapeimg = cv2.resize(img, (int(w * r), int(h * r)), interpolation=cv2.INTER_AREA)ifile = dir + 'images/' + Path(f).nameif cv2.imwrite(ifile, img):  # if success append image to listwith open(dir + 'data.txt', 'a') as file:file.write('%s\n' % ifile)n2 += 1  # correct imagesexcept Exception:os.system(f'rm {label_file}')print(f'problem with {f}')else:missing_images.append(image_file)nm = len(missing_images)  # number missingprint('\nFound %g JSONs with %g labels over %g images. Found %g images, labelled %g images successfully' %(len(jsons), n3, n1, n1 - nm, n2))if len(missing_images):print('WARNING, missing images:', missing_images)# Write *.names filenames = ['knife']  # preserves sort orderwith open(dir + 'data.names', 'w') as f:[f.write('%s\n' % a) for a in names]# Split data into train, test, and validate filessplit_rows_simple(dir + 'data.txt')write_data_data(dir + 'data.data', nc=1)print(f'Done. Output saved to {Path(dir).absolute()}')def convert_coco_json(json_dir='../coco/annotations/', use_segments=False, cls91to80=False):save_dir = make_dirs()  # output directorycoco80 = coco91_to_coco80_class()# Import jsonfor json_file in sorted(Path(json_dir).resolve().glob('*.json')):fn = Path(save_dir) / 'labels' / json_file.stem.replace('instances_', '')  # folder namefn.mkdir()with open(json_file) as f:data = json.load(f)# Create image dictimages = {'%g' % x['id']: x for x in data['images']}# Create image-annotations dictimgToAnns = defaultdict(list)for ann in data['annotations']:imgToAnns[ann['image_id']].append(ann)# Write labels filefor img_id, anns in tqdm(imgToAnns.items(), desc=f'Annotations {json_file}'):img = images['%g' % img_id]h, w, f = img['height'], img['width'], img['file_name']bboxes = []segments = []for ann in anns:if ann['iscrowd']:continue# The COCO box format is [top left x, top left y, width, height]box = np.array(ann['bbox'], dtype=np.float64)box[:2] += box[2:] / 2  # xy top-left corner to centerbox[[0, 2]] /= w  # normalize xbox[[1, 3]] /= h  # normalize yif box[2] <= 0 or box[3] <= 0:  # if w <= 0 and h <= 0continuecls = coco80[ann['category_id'] - 1] if cls91to80 else ann['category_id'] - 1  # classbox = [cls] + box.tolist()if box not in bboxes:bboxes.append(box)# Segmentsif use_segments:if len(ann['segmentation']) > 1:s = merge_multi_segment(ann['segmentation'])s = (np.concatenate(s, axis=0) / np.array([w, h])).reshape(-1).tolist()else:s = [j for i in ann['segmentation'] for j in i]  # all segments concatenateds = (np.array(s).reshape(-1, 2) / np.array([w, h])).reshape(-1).tolist()s = [cls] + sif s not in segments:segments.append(s)# Writewith open((fn / f).with_suffix('.txt'), 'a') as file:for i in range(len(bboxes)):line = *(segments[i] if use_segments else bboxes[i]),  # cls, box or segmentsfile.write(('%g ' * len(line)).rstrip() % line + '\n')def min_index(arr1, arr2):"""Find a pair of indexes with the shortest distance. Args:arr1: (N, 2).arr2: (M, 2).Return:a pair of indexes(tuple)."""dis = ((arr1[:, None, :] - arr2[None, :, :]) ** 2).sum(-1)return np.unravel_index(np.argmin(dis, axis=None), dis.shape)def merge_multi_segment(segments):"""Merge multi segments to one list.Find the coordinates with min distance between each segment,then connect these coordinates with one thin line to merge all segments into one.Args:segments(List(List)): original segmentations in coco's json file.like [segmentation1, segmentation2,...], each segmentation is a list of coordinates."""s = []segments = [np.array(i).reshape(-1, 2) for i in segments]idx_list = [[] for _ in range(len(segments))]# record the indexes with min distance between each segmentfor i in range(1, len(segments)):idx1, idx2 = min_index(segments[i - 1], segments[i])idx_list[i - 1].append(idx1)idx_list[i].append(idx2)# use two round to connect all the segmentsfor k in range(2):# forward connectionif k == 0:for i, idx in enumerate(idx_list):# middle segments have two indexes# reverse the index of middle segmentsif len(idx) == 2 and idx[0] > idx[1]:idx = idx[::-1]segments[i] = segments[i][::-1, :]segments[i] = np.roll(segments[i], -idx[0], axis=0)segments[i] = np.concatenate([segments[i], segments[i][:1]])# deal with the first segment and the last oneif i in [0, len(idx_list) - 1]:s.append(segments[i])else:idx = [0, idx[1] - idx[0]]s.append(segments[i][idx[0]:idx[1] + 1])else:for i in range(len(idx_list) - 1, -1, -1):if i not in [0, len(idx_list) - 1]:idx = idx_list[i]nidx = abs(idx[1] - idx[0])s.append(segments[i][nidx:])return sdef delete_dsstore(path='../datasets'):# Delete apple .DS_store filesfrom pathlib import Pathfiles = list(Path(path).rglob('.DS_store'))print(files)for f in files:f.unlink()if __name__ == '__main__':source = 'COCO'if source == 'COCO':convert_coco_json('./annotations',  # directory with *.jsonuse_segments=True,cls91to80=True)elif source == 'infolks':  # Infolks https://infolks.info/convert_infolks_json(name='out',files='../data/sm4/json/*.json',img_path='../data/sm4/images/')elif source == 'vott':  # VoTT https://github.com/microsoft/VoTTconvert_vott_json(name='data',files='../../Downloads/athena_day/20190715/*.json',img_path='../../Downloads/athena_day/20190715/')  # images folderelif source == 'ath':  # ath formatconvert_ath_json(json_dir='../../Downloads/athena/')  # images folder# zip results# os.system('zip -r ../coco.zip ../coco')
整理数据文件夹结构
我们需要将数据集整理为以下结构:
-----datasets-----coco128-seg|-----images| |-----train| |-----valid| |-----test||-----labels| |-----train| |-----valid| |-----test|模型训练
Epoch gpu_mem box obj cls labels img_size1/200 20.8G 0.01576 0.01955 0.007536 22 1280: 100%|██████████| 849/849 [14:42<00:00, 1.04s/it]Class Images Labels P R mAP@.5 mAP@.5:.95: 100%|██████████| 213/213 [01:14<00:00, 2.87it/s]all 3395 17314 0.994 0.957 0.0957 0.0843Epoch gpu_mem box obj cls labels img_size2/200 20.8G 0.01578 0.01923 0.007006 22 1280: 100%|██████████| 849/849 [14:44<00:00, 1.04s/it]Class Images Labels P R mAP@.5 mAP@.5:.95: 100%|██████████| 213/213 [01:12<00:00, 2.95it/s]all 3395 17314 0.996 0.956 0.0957 0.0845Epoch gpu_mem box obj cls labels img_size3/200 20.8G 0.01561 0.0191 0.006895 27 1280: 100%|██████████| 849/849 [10:56<00:00, 1.29it/s]Class Images Labels P R mAP@.5 mAP@.5:.95: 100%|███████ | 187/213 [00:52<00:00, 4.04it/s]all 3395 17314 0.996 0.957 0.0957 0.0845
5.核心代码讲解
5.2 predict.py
封装为类后的代码如下:
from ultralytics.engine.predictor import BasePredictor
from ultralytics.engine.results import Results
from ultralytics.utils import opsclass DetectionPredictor(BasePredictor):def postprocess(self, preds, img, orig_imgs):preds = ops.non_max_suppression(preds,self.args.conf,self.args.iou,agnostic=self.args.agnostic_nms,max_det=self.args.max_det,classes=self.args.classes)if not isinstance(orig_imgs, list):orig_imgs = ops.convert_torch2numpy_batch(orig_imgs)results = []for i, pred in enumerate(preds):orig_img = orig_imgs[i]pred[:, :4] = ops.scale_boxes(img.shape[2:], pred[:, :4], orig_img.shape)img_path = self.batch[0][i]results.append(Results(orig_img, path=img_path, names=self.model.names, boxes=pred))return results
这个程序文件是一个名为predict.py的文件,它是一个基于检测模型进行预测的类DetectionPredictor的定义。这个类继承自BasePredictor类,用于对预测结果进行后处理。
这个文件中的代码使用了Ultralytics YOLO库,该库是一个用于目标检测的工具包。它提供了一些用于处理预测结果的函数和类。
在DetectionPredictor类中,有一个postprocess方法,用于对预测结果进行后处理。在这个方法中,首先使用了ops.non_max_suppression函数对预测结果进行非最大值抑制处理,去除重叠的边界框。然后,根据输入的原始图像和预测结果,生成一个Results对象的列表,每个Results对象包含了原始图像、图像路径、类别名称和边界框信息。
这个文件中还包含了一个示例代码,展示了如何使用DetectionPredictor类进行预测。示例代码中使用了一个预训练的YOLOv8模型和一组输入图像,通过调用predict_cli方法进行预测。
总的来说,这个程序文件是一个用于目标检测预测的工具类,提供了对预测结果进行后处理的功能。
5.3 train.py
from copy import copy
import numpy as np
from ultralytics.data import build_dataloader, build_yolo_dataset
from ultralytics.engine.trainer import BaseTrainer
from ultralytics.models import yolo
from ultralytics.nn.tasks import DetectionModel
from ultralytics.utils import LOGGER, RANK
from ultralytics.utils.torch_utils import de_parallel, torch_distributed_zero_firstclass DetectionTrainer(BaseTrainer):def build_dataset(self, img_path, mode='train', batch=None):gs = max(int(de_parallel(self.model).stride.max() if self.model else 0), 32)return build_yolo_dataset(self.args, img_path, batch, self.data, mode=mode, rect=mode == 'val', stride=gs)def get_dataloader(self, dataset_path, batch_size=16, rank=0, mode='train'):assert mode in ['train', 'val']with torch_distributed_zero_first(rank):dataset = self.build_dataset(dataset_path, mode, batch_size)shuffle = mode == 'train'if getattr(dataset, 'rect', False) and shuffle:LOGGER.warning("WARNING ⚠️ 'rect=True' is incompatible with DataLoader shuffle, setting shuffle=False")shuffle = Falseworkers = 0return build_dataloader(dataset, batch_size, workers, shuffle, rank)def preprocess_batch(self, batch):batch['img'] = batch['img'].to(self.device, non_blocking=True).float() / 255return batchdef set_model_attributes(self):self.model.nc = self.data['nc']self.model.names = self.data['names']self.model.args = self.argsdef get_model(self, cfg=None, weights=None, verbose=True):model = DetectionModel(cfg, nc=self.data['nc'], verbose=verbose and RANK == -1)if weights:model.load(weights)return modeldef get_validator(self):self.loss_names = 'box_loss', 'cls_loss', 'dfl_loss'return yolo.detect.DetectionValidator(self.test_loader, save_dir=self.save_dir, args=copy(self.args))def label_loss_items(self, loss_items=None, prefix='train'):keys = [f'{prefix}/{x}' for x in self.loss_names]if loss_items is not None:loss_items = [round(float(x), 5) for x in loss_items]return dict(zip(keys, loss_items))else:return keysdef progress_string(self):return ('\n' + '%11s' *(4 + len(self.loss_names))) % ('Epoch', 'GPU_mem', *self.loss_names, 'Instances', 'Size')def plot_training_samples(self, batch, ni):plot_images(images=batch['img'],batch_idx=batch['batch_idx'],cls=batch['cls'].squeeze(-1),bboxes=batch['bboxes'],paths=batch['im_file'],fname=self.save_dir / f'train_batch{ni}.jpg',on_plot=self.on_plot)def plot_metrics(self):plot_results(file=self.csv, on_plot=self.on_plot)def plot_training_labels(self):boxes = np.concatenate([lb['bboxes'] for lb in self.train_loader.dataset.labels], 0)cls = np.concatenate([lb['cls'] for lb in self.train_loader.dataset.labels], 0)plot_labels(boxes, cls.squeeze(), names=self.data['names'], save_dir=self.save_dir, on_plot=self.on_plot)
这个程序文件是一个用于训练目标检测模型的程序。它使用了Ultralytics YOLO库,该库提供了训练和评估YOLO模型的功能。
程序文件中定义了一个名为DetectionTrainer的类,该类继承自BaseTrainer类,用于基于目标检测模型进行训练。该类提供了一些方法,用于构建数据集、构建数据加载器、预处理数据、设置模型属性等。
在__main__函数中,首先定义了一些参数,包括模型文件路径、数据文件路径和训练轮数。然后创建了一个DetectionTrainer对象,并调用其train方法开始训练。
总体来说,这个程序文件实现了一个基于目标检测模型的训练过程,并使用了Ultralytics YOLO库提供的功能。
5.5 backbone\convnextv2.py
import torch
import torch.nn as nn
import torch.nn.functional as F
from timm.models.layers import trunc_normal_, DropPathclass LayerNorm(nn.Module):def __init__(self, normalized_shape, eps=1e-6, data_format="channels_last"):super().__init__()self.weight = nn.Parameter(torch.ones(normalized_shape))self.bias = nn.Parameter(torch.zeros(normalized_shape))self.eps = epsself.data_format = data_formatif self.data_format not in ["channels_last", "channels_first"]:raise NotImplementedError self.normalized_shape = (normalized_shape, )def forward(self, x):if self.data_format == "channels_last":return F.layer_norm(x, self.normalized_shape, self.weight, self.bias, self.eps)elif self.data_format == "channels_first":u = x.mean(1, keepdim=True)s = (x - u).pow(2).mean(1, keepdim=True)x = (x - u) / torch.sqrt(s + self.eps)x = self.weight[:, None, None] * x + self.bias[:, None, None]return xclass GRN(nn.Module):def __init__(self, dim):super().__init__()self.gamma = nn.Parameter(torch.zeros(1, 1, 1, dim))self.beta = nn.Parameter(torch.zeros(1, 1, 1, dim))def forward(self, x):Gx = torch.norm(x, p=2, dim=(1,2), keepdim=True)Nx = Gx / (Gx.mean(dim=-1, keepdim=True) + 1e-6)return self.gamma * (x * Nx) + self.beta + xclass Block(nn.Module):def __init__(self, dim, drop_path=0.):super().__init__()self.dwconv = nn.Conv2d(dim, dim, kernel_size=7, padding=3, groups=dim)self.norm = LayerNorm(dim, eps=1e-6)self.pwconv1 = nn.Linear(dim, 4 * dim)self.act = nn.GELU()self.grn = GRN(4 * dim)self.pwconv2 = nn.Linear(4 * dim, dim)self.drop_path = DropPath(drop_path) if drop_path > 0. else nn.Identity()def forward(self, x):input = xx = self.dwconv(x)x = x.permute(0, 2, 3, 1)x = self.norm(x)x = self.pwconv1(x)x = self.act(x)x = self.grn(x)x = self.pwconv2(x)x = x.permute(0, 3, 1, 2)x = input + self.drop_path(x)return xclass ConvNeXtV2(nn.Module):def __init__(self, in_chans=3, num_classes=1000, depths=[3, 3, 9, 3], dims=[96, 192, 384, 768], drop_path_rate=0., head_init_scale=1.):super().__init__()self.depths = depthsself.downsample_layers = nn.ModuleList()stem = nn.Sequential(nn.Conv2d(in_chans, dims[0], kernel_size=4, stride=4),LayerNorm(dims[0], eps=1e-6, data_format="channels_first"))self.downsample_layers.append(stem)for i in range(3):downsample_layer = nn.Sequential(LayerNorm(dims[i], eps=1e-6, data_format="channels_first"),nn.Conv2d(dims[i], dims[i+1], kernel_size=2, stride=2),)self.downsample_layers.append(downsample_layer)self.stages = nn.ModuleList()dp_rates=[x.item() for x in torch.linspace(0, drop_path_rate, sum(depths))] cur = 0for i in range(4):stage = nn.Sequential(*[Block(dim=dims[i], drop_path=dp_rates[cur + j]) for j in range(depths[i])])self.stages.append(stage)cur += depths[i]self.norm = nn.LayerNorm(dims[-1], eps=1e-6)self.head = nn.Linear(dims[-1], num_classes)self.apply(self._init_weights)self.channel = [i.size(1) for i in self.forward(torch.randn(1, 3, 640, 640))]def _init_weights(self, m):if isinstance(m, (nn.Conv2d, nn.Linear)):trunc_normal_(m.weight, std=.02)nn.init.constant_(m.bias, 0)def forward(self, x):res = []for i in range(4):x = self.downsample_layers[i](x)x = self.stages[i](x)res.append(x)return res
该程序文件是一个实现了ConvNeXt V2模型的PyTorch模块。ConvNeXt V2是一个用于图像分类任务的卷积神经网络模型。
该程序文件包含以下几个类和函数:
-
LayerNorm类:实现了支持两种数据格式(channels_last和channels_first)的LayerNorm层。
-
GRN类:实现了全局响应归一化(GRN)层。
-
Block类:实现了ConvNeXtV2模型的基本块。
-
ConvNeXtV2类:实现了ConvNeXt V2模型。
-
update_weight函数:用于更新模型的权重。
-
convnextv2_atto函数:创建一个ConvNeXtV2模型实例,使用atto配置。
-
convnextv2_femto函数:创建一个ConvNeXtV2模型实例,使用femto配置。
-
convnextv2_pico函数:创建一个ConvNeXtV2模型实例,使用pico配置。
-
convnextv2_nano函数:创建一个ConvNeXtV2模型实例,使用nano配置。
-
convnextv2_tiny函数:创建一个ConvNeXtV2模型实例,使用tiny配置。
-
convnextv2_base函数:创建一个ConvNeXtV2模型实例,使用base配置。
-
convnextv2_large函数:创建一个ConvNeXtV2模型实例,使用large配置。
-
convnextv2_huge函数:创建一个ConvNeXtV2模型实例,使用huge配置。
该程序文件还包含一些辅助函数和初始化函数。
ConvNeXt V2模型是一个具有多个残差块的深层卷积神经网络模型,用于图像分类任务。它使用了一些特殊的层和技巧,如LayerNorm、GRN和DropPath等,以提高模型的性能和效果。不同的配置可以控制模型的深度和宽度,从而适应不同的任务和数据集。
5.6 backbone\CSwomTramsformer.py
class CSWinTransformer(nn.Module):def __init__(self, img_size=224, patch_size=4, in_chans=3, num_classes=1000, embed_dim=96, depths=[2, 2, 6, 2], num_heads=[3, 6, 12, 24], mlp_ratio=4., qkv_bias=True, qk_scale=None, drop_rate=0., attn_drop_rate=0., drop_path_rate=0., norm_layer=nn.LayerNorm):super().__init__()self.num_classes = num_classesself.depths = depthsself.num_features = self.embed_dim = embed_dimself.patch_embed = PatchEmbed(img_size=img_size, patch_size=patch_size, in_chans=in_chans, embed_dim=embed_dim)self.pos_drop = nn.Dropout(p=drop_rate)dpr = [x.item() for x in torch.linspace(0, drop_path_rate, sum(depths))] # stochastic depth decay ruleself.blocks = nn.ModuleList([CSWinBlock(dim=embed_dim, reso=img_size // patch_size, num_heads=num_heads[i], mlp_ratio=mlp_ratio,qkv_bias=qkv_bias, qk_scale=qk_scale, drop=drop_rate, attn_drop=attn_drop_rate,drop_path=dpr[sum(depths[:i]):sum(depths[:i + 1])], norm_layer=norm_layer,last_stage=(i == len(depths) - 1))for i in range(len(depths))])self.norm = norm_layer(embed_dim)self.head = nn.Linear(embed_dim, num_classes) if num_classes > 0 else nn.Identity()trunc_normal_(self.head.weight, std=0.02)self.apply(self._init_weights)def _init_weights(self, m):if isinstance(m, nn.Linear):trunc_normal_(m.weight, std=.02)if isinstance(m, nn.Linear) and m.bias is not None:nn.init.constant_(m.bias, 0)elif isinstance(m, nn.LayerNorm):nn.init.constant_(m.bias, 0)nn.init.constant_(m.weight, 1.0)def get_classifier(self):return self.headdef reset_classifier(self, num_classes, global_pool=''):self.num_classes = num_classesself.head = nn.Linear(self.embed_dim, num_classes) if num_classes > 0 else nn.Identity()def forward_features(self, x):x = self.patch_embed(x)x = self.pos_drop(x)for blk in self.blocks:x = blk(x)x = self.norm(x)return xdef forward(self, x):x = self.forward_features(x)x = self.head(x[:, 0])return x
这个程序文件是一个CSWin Transformer模型的实现。CSWin Transformer是一个用于图像分类任务的模型,它使用了CSWin(Content-Style Window)结构来处理图像数据。CSWin Transformer模型由多个CSWinBlock组成,每个CSWinBlock包含了一个LePEAttention模块和一个MLP模块。LePEAttention模块用于计算图像中不同位置的特征之间的关系,MLP模块用于对特征进行非线性变换。模型还包含了一些辅助函数,用于将图像转换为窗口形式的特征表示,并将窗口形式的特征表示转换回图像形式。最后,模型还包含了一个Merge_Block模块,用于将特征图的尺寸减小一半。
6.系统整体结构
以下是每个文件的功能的整理:
| 文件路径 | 功能 |
|---|---|
| export.py | 导出模型为不同格式的文件,如CoreML、TensorRT、TensorFlow SavedModel等 |
| predict.py | 使用模型进行目标检测预测 |
| train.py | 训练目标检测模型 |
| ui.py | 图形用户界面,用于使用模型进行目标检测和图像分割任务 |
| backbone\convnextv2.py | ConvNeXtV2模型的定义和配置 |
| backbone\CSwomTramsformer.py | CSwomTramsformer模型的定义和配置 |
| backbone\EfficientFormerV2.py | EfficientFormerV2模型的定义和配置 |
| backbone\efficientViT.py | efficientViT模型的定义和配置 |
| backbone\fasternet.py | fasternet模型的定义和配置 |
| backbone\lsknet.py | lsknet模型的定义和配置 |
| backbone\repvit.py | repvit模型的定义和配置 |
| backbone\revcol.py | revcol模型的定义和配置 |
| backbone\SwinTransformer.py | SwinTransformer模型的定义和配置 |
| backbone\VanillaNet.py | VanillaNet模型的定义和配置 |
| extra_modules\orepa.py | orepa模块的定义和配置 |
| extra_modules\rep_block.py | rep_block模块的定义和配置 |
| extra_modules\RFAConv.py | RFAConv模块的定义和配置 |
| extra_modules_init_.py | extra_modules模块的初始化文件 |
| extra_modules\ops_dcnv3\setup.py | ops_dcnv3模块的安装脚本 |
| extra_modules\ops_dcnv3\test.py | ops_dcnv3模块的测试脚本 |
| extra_modules\ops_dcnv3\functions\dcnv3_func.py | ops_dcnv3模块的函数定义 |
| extra_modules\ops_dcnv3\functions_init_.py | ops_dcnv3模块的初始化文件 |
| extra_modules\ops_dcnv3\modules\dcnv3.py | ops_dcnv3模块的模型定义 |
| extra_modules\ops_dcnv3\modules_init_.py | ops_dcnv3模块的初始化文件 |
| models\common.py | 通用模型定义和函数 |
| models\experimental.py | 实验性模型定义和函数 |
| models\tf.py | TensorFlow模型定义和函数 |
| models\yolo.py | YOLO模型定义和函数 |
| models_init_.py | models模块的初始化文件 |
| segment\predict.py | 使用模型进行图像分割预测 |
| segment\train.py | 训练图像分割模型 |
7.YOLOv8简介
YOLO(You Only Look Once)是一种流行的对象检测和图像分割模型,由华盛顿大学的Joseph Redmon和Ali Farhadi开发。YOLO于2015年推出,以其高速度和高精度迅速走红。
YOLOv2于2016年发布,通过合并批处理规范化、锚盒和维度集群来改进原始模型
2018年推出的YOLOv3使用更高效的骨干网络、多个锚点和空间金字塔池进一步增强了该模型的性能
YOLOv4于2020年发布,引入了Mosaic数据增强、新的无锚检测头和新的丢失功能等创新
YOLOv5进一步提高了模型的性能,并添加了超参数优化、集成实验跟踪和自动导出到流行导出格式等新功能
YOLOv6于2022年由美团开源,目前正在该公司的许多自动配送机器人中使用
YOLOv7在COCO关键点数据集上添加了额外的任务,如姿态估计
YOLOv8是Ultralytics公司推出的YOLO的最新版本。作为一款尖端、最先进的(SOTA)车型,YOLOv8在之前版本的成功基础上,引入了新的功能和改进,以增强性能、灵活性和效率。YOLOv8支持全方位的视觉AI任务,包括检测、分割、姿态估计、跟踪和分类。这种多功能性允许用户在不同的应用程序和域中利用YOLOv8的功能
YOLOv8的新特性与可用模型
Ultralytics 并没有直接将开源库命名为 YOLOv8,而是直接使用 ultralytics 这个词,原因是 ultralytics 将这个库定位为算法框架,而非某一个特定算法,一个主要特点是可扩展性。其希望这个库不仅仅能够用于 YOLO 系列模型,而是能够支持非 YOLO 模型以及分类分割姿态估计等各类任务。总而言之,ultralytics 开源库的两个主要优点是:
融合众多当前 SOTA 技术于一体
未来将支持其他 YOLO 系列以及 YOLO 之外的更多算法
Ultralytics为YOLO模型发布了一个全新的存储库。它被构建为 用于训练对象检测、实例分割和图像分类模型的统一框架。
提供了一个全新的 SOTA 模型,包括 P5 640 和 P6 1280 分辨率的目标检测网络和基于 YOLACT 的实例分割模型。和 YOLOv5 一样,基于缩放系数也提供了 N/S/M/L/X 尺度的不同大小模型,用于满足不同场景需求
骨干网络和 Neck 部分可能参考了 YOLOv7 ELAN 设计思想,将 YOLOv5 的 C3 结构换成了梯度流更丰富的 C2f 结构,并对不同尺度模型调整了不同的通道数,属于对模型结构精心微调,不再是无脑一套参数应用所有模型,大幅提升了模型性能。不过这个 C2f 模块中存在 Split 等操作对特定硬件部署没有之前那么友好了
Head 部分相比 YOLOv5 改动较大,换成了目前主流的解耦头结构,将分类和检测头分离,同时也从 Anchor-Based 换成了 Anchor-Free
Loss 计算方面采用了 TaskAlignedAssigner 正样本分配策略,并引入了 Distribution Focal Loss
训练的数据增强部分引入了 YOLOX 中的最后 10 epoch 关闭 Mosiac 增强的操作,可以有效地提升精度
YOLOv8 还高效灵活地支持多种导出格式,并且该模型可以在 CPU 和 GPU 上运行。YOLOv8 模型的每个类别中有五个模型用于检测、分割和分类。YOLOv8 Nano 是最快和最小的,而 YOLOv8 Extra Large (YOLOv8x) 是其中最准确但最慢的。

8.FocalModulation模型的基本原理
参考该博客,Focal Modulation Networks(FocalNets)的基本原理是替换自注意力(Self-Attention)模块,使用焦点调制(focal modulation)机制来捕捉图像中的长距离依赖和上下文信息。下图是自注意力和焦点调制两种方法的对比。
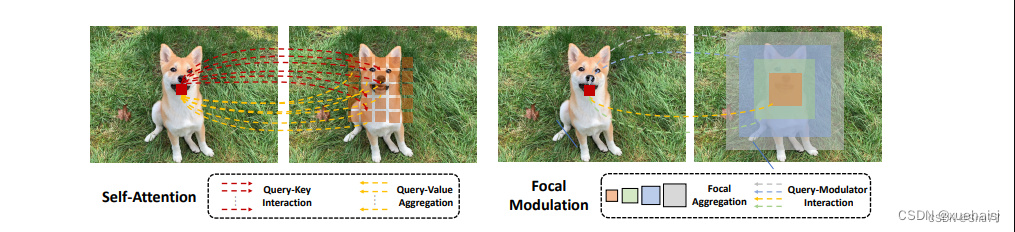
自注意力要求对每个查询令牌(Query Token)与其他令牌进行复杂的查询-键(Query-Key)交互和查询-值(Query-Value)聚合,以计算注意力分数并捕捉上下文。而焦点调制则先将空间上下文以不同粒度聚合到调制器中,然后以查询依赖的方式将这些调制器注入到查询令牌中。焦点调制简化了交互和聚合操作,使其更轻量级。在图中,自注意力部分使用红色虚线表示查询-键交互和黄色虚线表示查询-值聚合,而焦点调制部分则用蓝色表示调制器聚合和黄色表示查询-调制器交互。
FocalModulation模型通过以下步骤实现:
-
焦点上下文化:用深度卷积层堆叠来编码不同范围的视觉上下文。
-
门控聚合:通过门控机制,选择性地将上下文信息聚合到每个查询令牌的调制器中。
-
逐元素仿射变换:将聚合后的调制器通过仿射变换注入到每个查询令牌中。
下面来分别介绍这三个机制->
焦点上下文化
焦点上下文化(Focal Contextualization)是焦点调制(Focal Modulation)的一个组成部分。焦点上下文化使用一系列深度卷积层(depth-wise convolutional layers)来编码不同范围内的视觉上下文信息。这些层可以捕捉从近处到远处的视觉特征,从而允许网络在不同层次上理解图像内容。通过这种方式,网络能够在聚合上下文信息时保持对局部细节的敏感性,并增强对全局结构的认识。
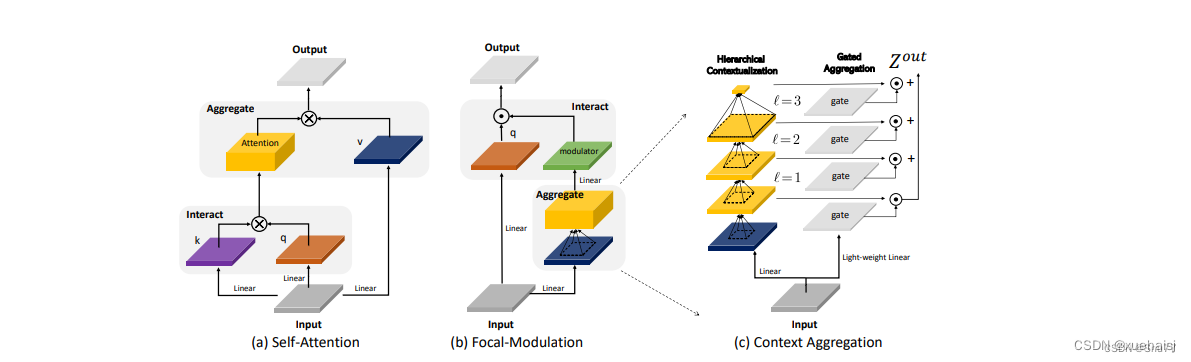
这张图详细比较了自注意力(Self-Attention, SA)和焦点调制(Focal Modulation)的机制,并特别展示了焦点调制中的上下文聚合过程。左侧的图展示了自注意力模型如何通过键(k)和查询(q)之间的交互,以及随后的聚合来生成输出。而中间和右侧的图说明了焦点调制如何通过层级化的上下文聚合和门控聚合过程替代自注意力模型的这一过程。在焦点调制中,输入首先通过轻量级线性层进行处理,然后通过层级化的上下文化模块和门控机制来选择性地聚合信息,最终通过调制器与查询(q)进行交互以生成输出。
门控聚合
在Focal Modulation Networks(FocalNets)中的 “门控聚合”(Gated Aggregation)是关键组件之一,这一过程涉及使用门控机制来选择性地聚合上下文信息。以下是这个过程的详细分析:
-
什么是门控机制?
门控机制在深度学习中常用于控制信息流。它通常用于决定哪些信息应该被传递,哪些应该被阻断。在循环神经网络(RNN)中,特别是在长短期记忆网络(LSTM)和门控循环单元(GRU)中,门控机制用于调节信息在时间序列数据中的流动。 -
门控聚合的目的
在FocalNets中,门控聚合的目的是为每个查询令牌(即处理中的数据单元)选择性地聚合上下文信息。这意味着网络能够决定哪些特定的上下文信息对于当前处理的查询令牌是重要的,从而专注于那些最相关的信息。 -
如何实现门控聚合?
实现门控聚合可能涉及一系列计算步骤,其中包括:
计算上下文信息:这可能涉及使用深度卷积层(如文中提到的)对输入图像的不同区域进行编码,以捕捉从局部到全局的视觉上下文。
门控操作:这一步骤涉及到一个决策过程,根据当前查询令牌的特征来决定哪些上下文信息是相关的。这可能通过一个学习到的权重(门)来实现,该权重决定了不同上下文信息的重要性。
信息聚合:最后,根据门控操作的结果,选择性地聚合上下文信息到一个调制器中。这个调制器随后被用于调整或“调制”查询令牌的表示。
4. 门控聚合的好处
通过门控聚合,FocalNets能够更有效地聚焦于对当前任务最关键的信息。这种方法提高了模型的效率和性能,因为它减少了不必要信息的处理,同时增强了对关键特征的关注。在视觉任务中,这可能意味着更好的目标检测和图像分类性能,特别是在复杂或多变的视觉环境中。
总结:门控聚合是FocalNets的一个核心组成部分,它通过选择性地集中处理重要的上下文信息来提升网络的效率和性能。
逐元素仿射变换
在Focal Modulation Networks(FocalNets)中的第三个关键组件是逐元素仿射变换,这个步骤涉及将通过门控聚合得到的调制器注入到每个查询令牌中。以下是该过程的详细分析:
-
仿射变换的基本概念:
仿射变换是一种线性变换,用于对数据进行缩放、旋转、平移和倾斜等操作。在深度学习中,逐元素的仿射变换通常指的是对每个元素进行线性变换,这种变换可以被描述为y = ax + b,其中x是输入,y是输出,a和b是变换的参数。 -
逐元素仿射变换的作用:
在FocalNets中,逐元素仿射变换的作用是将聚合后的调制器信息注入到每个查询令牌中。这个步骤对于整合上下文信息和查询令牌的原始特征非常重要。通过这种方式,调制器所包含的上下文信息可以直接影响查询令牌的表示。 -
执行仿射变换:
执行这一步骤时,聚合后的调制器对每个查询令牌进行逐元素的仿射变换。在实践中,这可能意味着对查询令牌的每个特征应用调制器中的相应权重(a)和偏差(b)。这样,调制器中的每个元素都直接对应于查询令牌的一个特征,通过调整这些特征来改变其表达。 -
仿射变换的效果:
通过逐元素仿射变换,模型能够更细致地调整每个查询令牌的特征,根据上下文信息来增强或抑制某些特征。这种精细的调整机制允许网络更好地适应复杂的视觉场景,提高对细节的捕捉能力,从而提升了模型在各种视觉任务中的性能,如目标检测和图像分类。
总结:逐元素仿射变换它使得模型能够利用上下文信息来有效地调整查询令牌,增强了模型对关键视觉特征的捕捉和表达能力。
9.训练结果可视化分析
评价指标
训练损失:train/box_loss、train/seg_loss、train/obj_loss、train/cls_loss
构建指标 (B):metrics/precision(B)、metrics/recall(B)、metrics/mAP_0.5(B) , metrics/mAP_0.5:0.95(B)
机械指标 (M):metrics/precision(M)、metrics/recall(M)、metrics/mAP_0.5(M) , metrics/mAP_0.5:0.95(M)
验证损失:val/box_loss、val/seg_loss、val/obj_loss、val/cls_loss
学习率:x/lr0、x/lr1、x/lr2
训练结果可视化
为了分析这些数据,我们可以创建可视化来跟踪这些指标的进展和各个时期的损失。我们将重点关注以下关键方面:
Epochs 上的损失:观察模型的训练和验证损失如何随着时间的推移而减少。
精确度和召回率:评估模型正确识别建筑物和机械的性能。
mAP(Mean Average Precision):评估模型在不同阈值下检测物体的整体性能。
学习率变化:了解学习率如何随时间推移而变化。
让我们从可视化这些方面开始。
import matplotlib.pyplot as plt# Setting up the plots
fig, axes = plt.subplots(nrows=3, ncols=2, figsize=(15, 15))
fig.tight_layout(pad=6.0)# Plotting Training and Validation Losses
axes[0, 0].plot(data['epoch'], data['train/box_loss'], label='Train Box Loss')
axes[0, 0].plot(data['epoch'], data['train/seg_loss'], label='Train Segmentation Loss')
axes[0, 0].plot(data['epoch'], data['train/obj_loss'], label='Train Object Loss')
axes[0, 0].plot(data['epoch'], data['train/cls_loss'], label='Train Class Loss')
axes[0, 0].plot(data['epoch'], data['val/box_loss'], label='Validation Box Loss', linestyle='dashed')
axes[0, 0].plot(data['epoch'], data['val/seg_loss'], label='Validation Segmentation Loss', linestyle='dashed')
axes[0, 0].plot(data['epoch'], data['val/obj_loss'], label='Validation Object Loss', linestyle='dashed')
axes[0, 0].plot(data['epoch'], data['val/cls_loss'], label='Validation Class Loss', linestyle='dashed')
axes[0, 0].set_title('Training & Validation Losses over Epochs')
axes[0, 0].set_xlabel('Epoch')
axes[0, 0].set_ylabel('Loss')
axes[0, 0].legend()# Plotting Precision and Recall for Buildings
axes[0, 1].plot(data['epoch'], data['metrics/precision(B)'], label='Precision (Buildings)')
axes[0, 1].plot(data['epoch'], data['metrics/recall(B)'], label='Recall (Buildings)')
axes[0, 1].set_title('Precision & Recall for Buildings')
axes[0, 1].set_xlabel('Epoch')
axes[0, 1].set_ylabel('Metric Value')
axes[0, 1].legend()# Plotting Precision and Recall for Machinery
axes[1, 0].plot(data['epoch'], data['metrics/precision(M)'], label='Precision (Machinery)')
axes[1, 0].plot(data['epoch'], data['metrics/recall(M)'], label='Recall (Machinery)')
axes[1, 0].set_title('Precision & Recall for Machinery')
axes[1, 0].set_xlabel('Epoch')
axes[1, 0].set_ylabel('Metric Value')
axes[1, 0].legend()# Plotting mAP for Buildings and Machinery
axes[1, 1].plot(data['epoch'], data['metrics/mAP_0.5(B)'], label='mAP_0.5 (Buildings)')
axes[1, 1].plot(data['epoch'], data['metrics/mAP_0.5:0.95(B)'], label='mAP_0.5:0.95 (Buildings)')
axes[1, 1].plot(data['epoch'], data['metrics/mAP_0.5(M)'], label='mAP_0.5 (Machinery)', linestyle='dashed')
axes[1, 1].plot(data['epoch'], data['metrics/mAP_0.5:0.95(M)'], label='mAP_0.5:0.95 (Machinery)', linestyle='dashed')
axes[1, 1].set_title('mAP for Buildings and Machinery')
axes[1, 1].set_xlabel('Epoch')
axes[1, 1].set_ylabel('mAP Value')
axes[1, 1].legend()# Plotting Learning Rates
axes[2, 0].plot(data['epoch'], data['x/lr0'], label='Learning Rate 0')
axes[2, 0].plot(data['epoch'], data['x/lr1'], label='Learning Rate 1')
axes[2, 0].plot(data['epoch'], data['x/lr2'], label='Learning Rate 2')
axes[2, 0].set_title('Learning Rates over Epochs')
axes[2, 0].set_xlabel('Epoch')
axes[2, 0].set_ylabel('Learning Rate')
axes[2, 0].legend()# Adjusting layout for better visualization
plt.subplots_adjust(top=0.92, bottom=0.08, left=0.10, right=0.95, hspace=0.25, wspace=0.35)# Show plot
plt.show()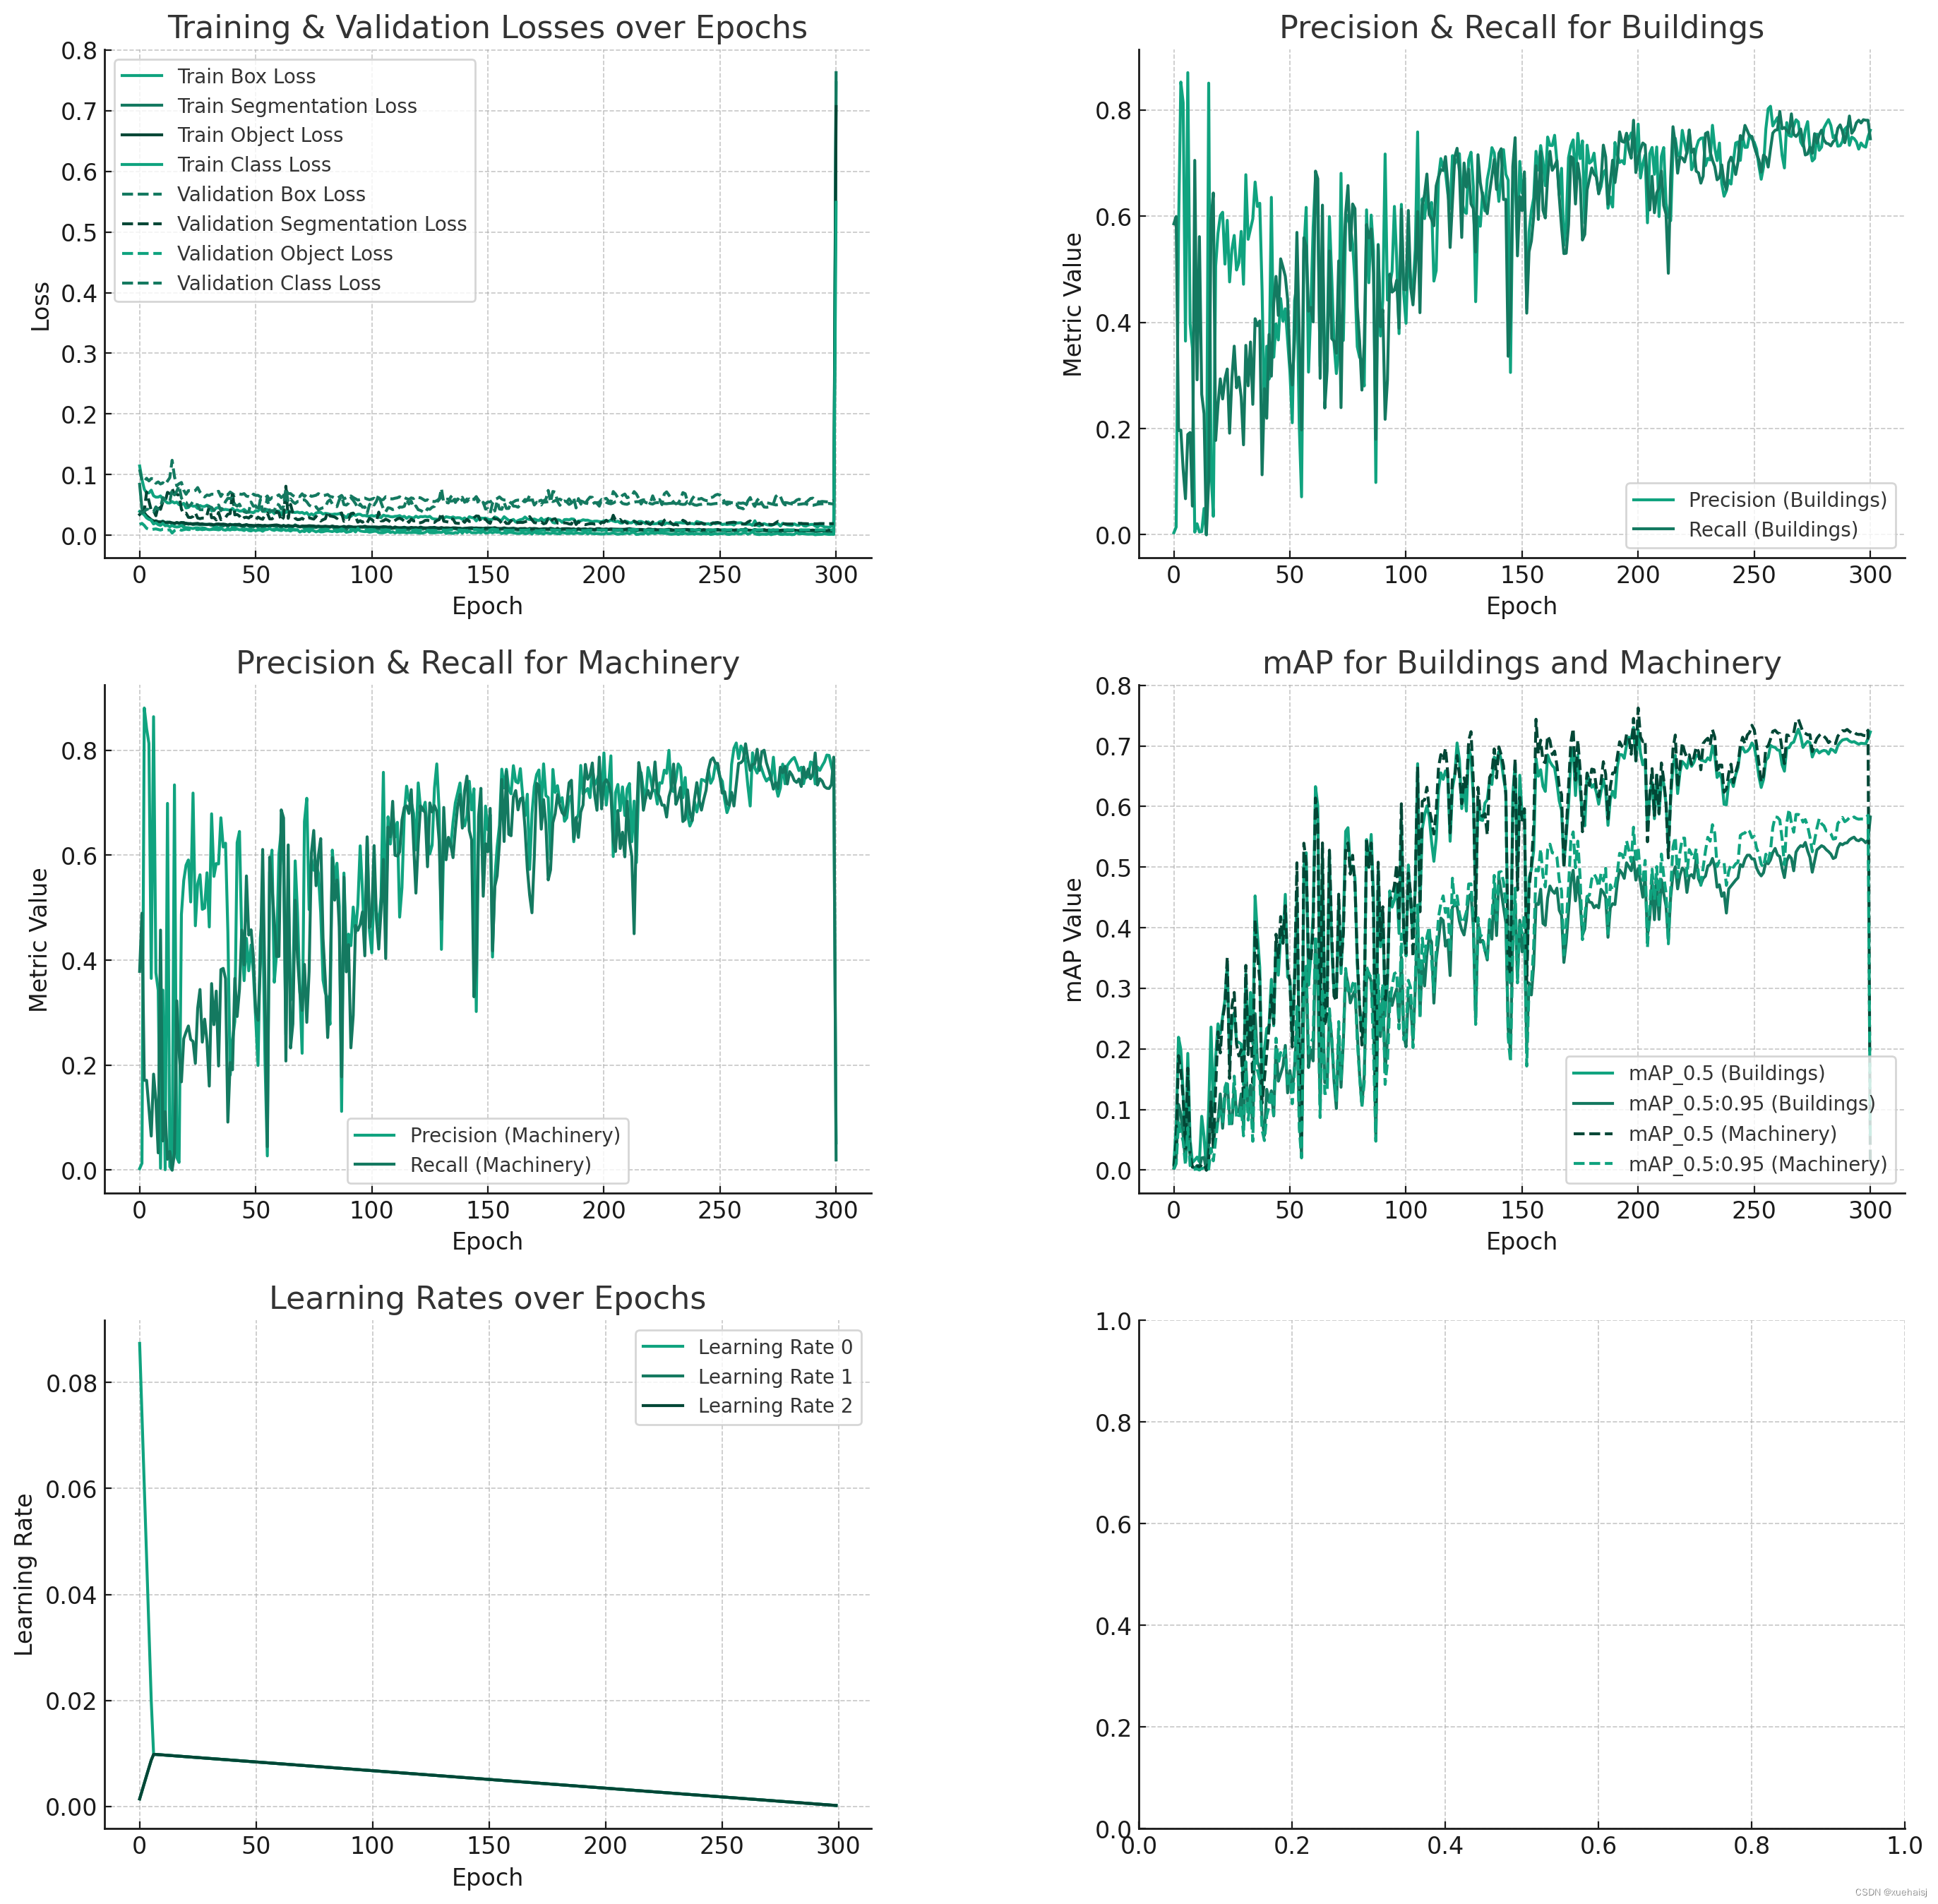
结果分析
训练损失:训练损失(框损失、分割损失、对象损失和分类损失)总体呈下降趋势,表明模型在历次迭代中有效学习.
验证损失:验证损失遵循与训练损失类似的趋势。这表明该模型并未明显过度拟合训练数据。
边界框 (B) 指标:边界框的精确度和召回率显示出不同的趋势。高精度表明模型正确识别了大多数边界框,而召回率表明其检测所有相关情况的能力。可以观察到这两个指标之间的权衡。
边界框 (B) mAP:不同 IoU(并集交集)阈值(0.5 和 0.5:0.95)下边界框的 mAP(平均平均精度)显示模型& #39;检测带有边界框的物体的准确性。 0.5:0.95 处的 mAP 特别重要,因为它是一种更严格的衡量标准,要求模型在 IoU 阈值范围内保持准确。
掩模 (M) 指标:与边界框类似,掩模的精度和召回率对于理解模型的分割性能至关重要。
Mask (M) mAP:掩模的 mAP 进一步表明模型在分割对象方面的表现如何,值越高表示性能越好。
学习率:学习率图显示了学习率在各个时期的调整情况。这些调整对于高效训练至关重要,使模型能够在最初快速学习,然后在收敛时完善其学习。
这种全面的分析提供了对模型在不同方面的性能的详细了解。
10.系统整合
下图完整源码&数据集&环境部署视频教程&自定义UI界面

参考博客《遥感图像分割系统:融合空间金字塔池化(FocalModulation)改进YOLOv8》
11.参考文献
[1]刘瑛,覃锡忠,贾振红,等.PCA与PCNN结合的遥感图像分割方法[J].计算机工程与应用.2011,(32).DOI:10.3778/j.issn.1002-8331.2011.32.062 .
[2]刘文静,贾振红,杨杰,等.一种新的含噪遥感图像Otsu分割算法研究[J].激光杂志.2010,(6).DOI:10.3969/j.issn.0253-2743.2010.06.015 .
[3]殷亮,高昆,白廷柱.基于改进Otsu法的遥感图像油罐目标分割研究[J].光学技术.2012,(2).
[4]Xifa Duan,Zheng Tian,Mingtao Ding,等.Registration of remote-sensing images using robust weighted kernel principal component analysi[J].AEU - International Journal of Electronics & Communications.2013,67(1).20-28.
[5]Xueliang Zhang,Pengfeng Xiao,Xiaoqun Song,等.Boundary-constrained multi-scale segmentation method for remote sensing images[J].ISPRS journal of photogrammetry and remote sensing.2013,78(Apr.).15-25.
[6]Ahamed, T.,Tian Lei,Jiang YanShui,等.Tower remote-sensing system for monitoring energy crops; image acquisition and geometric corrections.[J].Biosystems Engineering.2012,112(2).93-107.DOI:10.1016/j.biosystemseng.2012.03.003 .
[7]Camps-Valls, G.,Mu?oz-Marí, J.,Tuia, D..Remote sensing image segmentation by active queries[J].Pattern Recognition: The Journal of the Pattern Recognition Society.2012,45(6).
[8]Qian Wang,Qi-peng Zhang,Wei Zhou.Study on Remote Sensing Image Segmentation Based on ACA-FCM[J].Physics Procedia.2012,33(1).1286-1291.
[9]Shuyuan Yang,Min Wang,Licheng Jiao.Contourlet hidden Markov Tree and clarity-saliency driven PCNN based remote sensing images fusion[J].Applied Soft Computing.2012,12(1).
[10]Kundu, P.P.,Mitra, S..Satellite image segmentation with Shadowed C-Means[J].Information Sciences: An International Journal.2011,181(17).