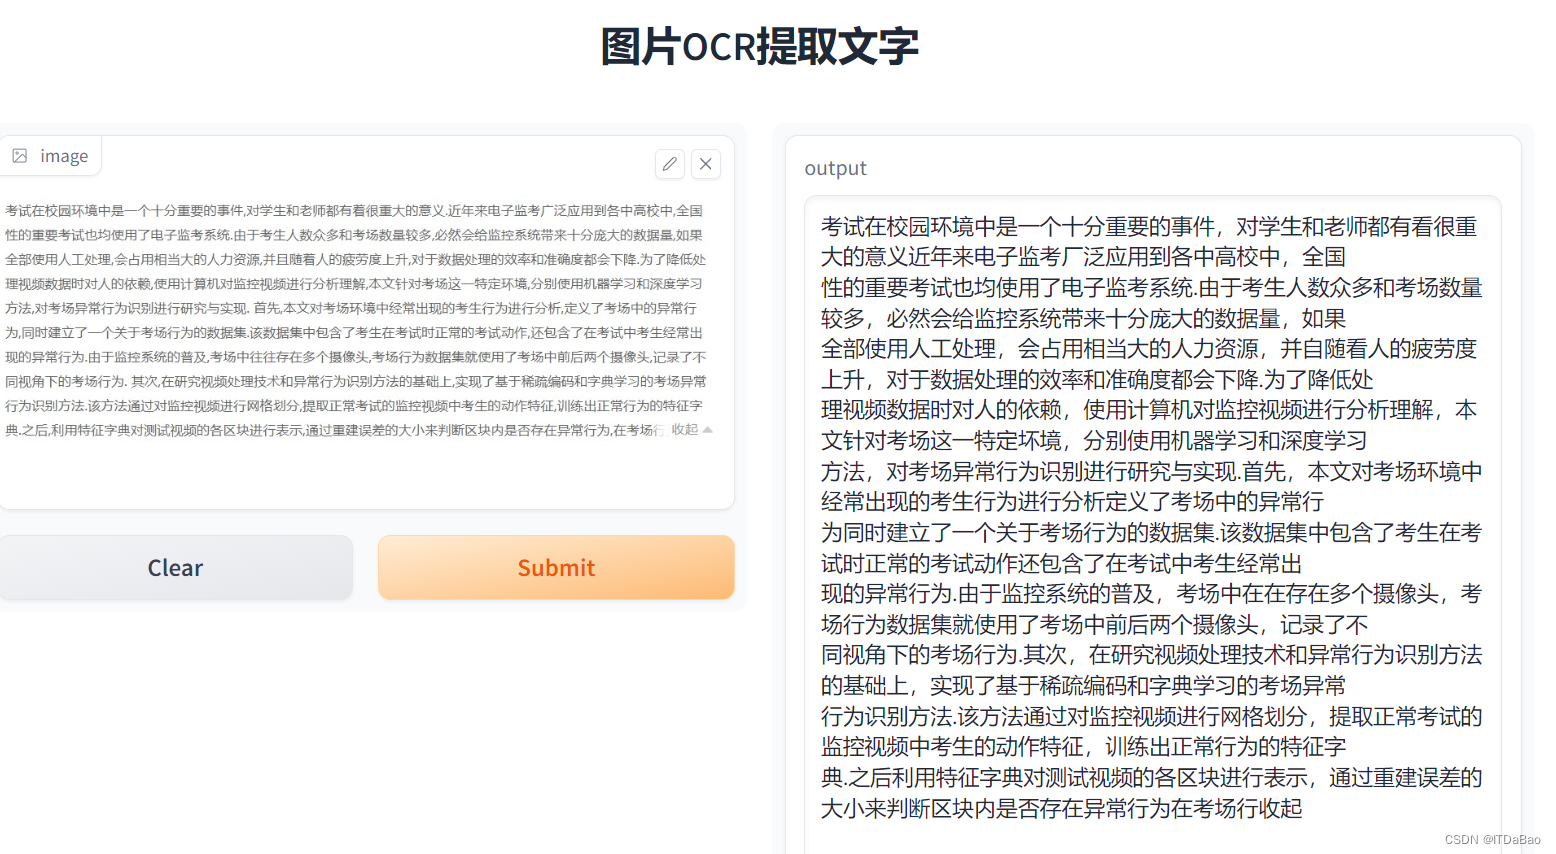
目录
- 前言
- 总体设计
- 系统整体结构图
- 系统流程图
- 运行环境
- 模块实现
- 1. 数据预处理
- 2. 模型构建
- 3. 模型训练及保存
- 1)模型训练
- 2)模型保存
- 4. 模型生成
- 1)模型导入及调用
- 2)相关代码
- (1)布局文件
- (2)主活动类
- 相关其它博客
- 工程源代码下载
- 其它资料下载

前言
本项目采用VGG-16网络模型,使用Kaggle开源数据集,旨在提取图片中的用户特征,最终在移动端实现对不良驾驶行为的识别功能。
首先,通过使用VGG-16网络模型,本项目能够深入学习和理解驾驶场景图像中的特征。VGG-16是一种深度卷积神经网络,特别适用于图像识别任务,通过多层次的卷积和池化层,能够有效地提取图像中的抽象特征。
其次,项目利用Kaggle提供的开源数据集,包括各种驾驶场景图像,覆盖了不同的驾驶行为和条件。这样的数据集是训练模型所需的关键资源。
接下来,利用训练好的VGG-16模型,项目提取图像中的用户特征。包括驾驶行为的姿势、眼神、手部动作等方面的特征,有助于判断是否存在不良驾驶行为。
最后,通过在移动端实现这个模型,可以将不良驾驶行为的识别功能直接部署到车辆或驾驶辅助系统中。这种实时的、移动端的识别方案有望在驾驶安全和监管方面发挥积极的作用。
总的来说,项目结合了深度学习、图像处理和移动端技术,致力于实现对不良驾驶行为的智能化识别,为提升驾驶安全提供了一种创新的解决方案。
总体设计
本部分包括系统整体结构图和系统流程图。
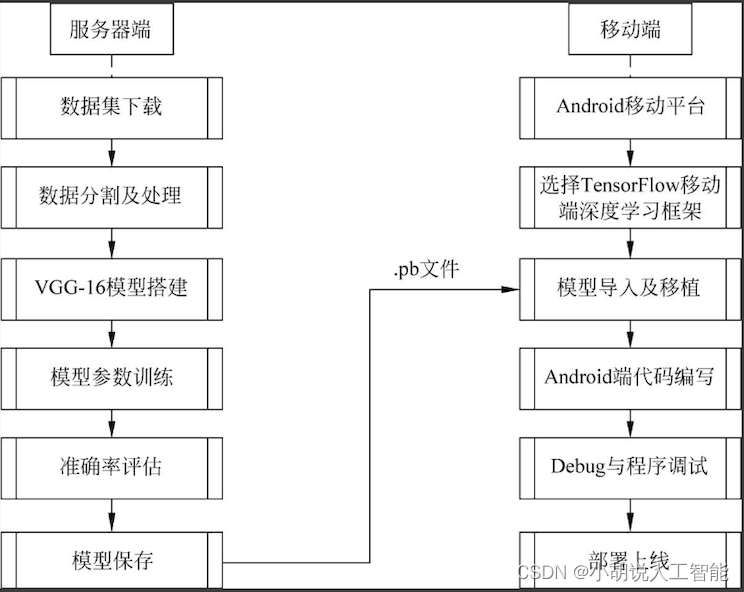
系统整体结构图
系统整体结构如图所示。
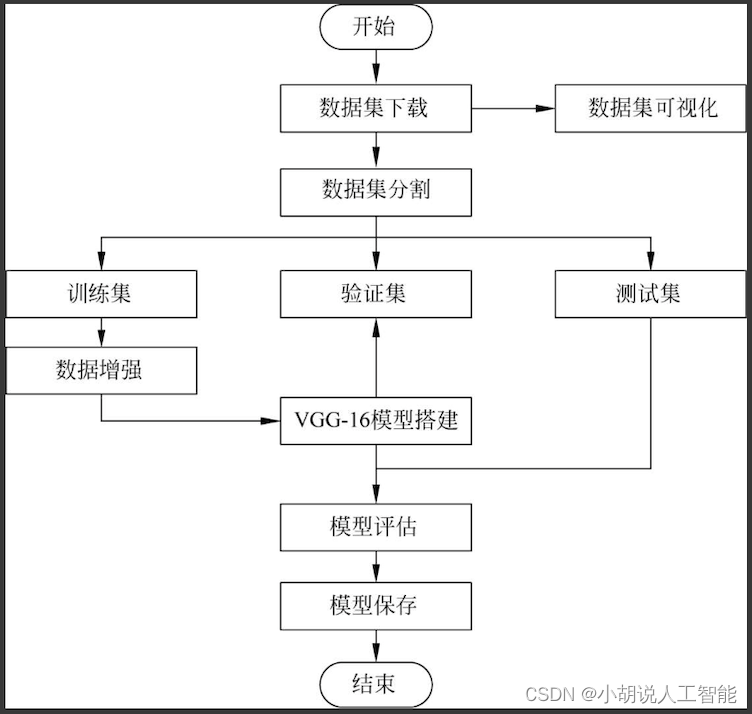
系统流程图
系统流程如图所示。
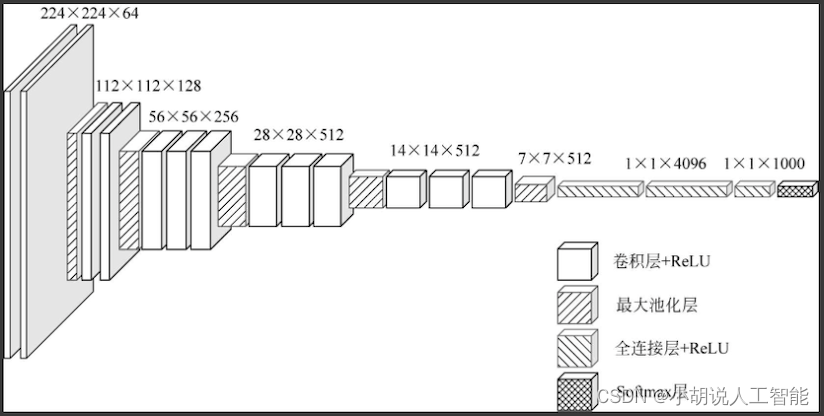
VGG-16网络架构如图所示。
运行环境
本部分包括Python环境、TensorFlow环境、Pycharm环境和Android环境。
详见博客。
模块实现
本项目包括4个模块:数据预处理、模型构建、模型训练及保存、模型生成。下面分别给出各模块的功能介绍及相关代码。
1. 数据预处理
本部分包括数据集来源、内容和预处理。
详见博客。
2. 模型构建
数据加载进模型之后,需要定义模型结构,并优化损失函数。
详见博客。
3. 模型训练及保存
在定义模型架构和编译后,通过训练集训练,使模型可以识别数据集中图像的特征。
1)模型训练
模型训练相关代码如下:
train_generator = train_datagen.flow_from_directory(train_data_dir, target_size=(img_height, img_width), batch_size=32, class_mode='categorical')
#读取训练集
validation_generator = train_datagen.flow_from_directory(validation_data_dir, target_size=(img_height, img_width), batch_size=32, class_mode='categorical')
#读取验证集
model.fit_generator(train_generator, samples_per_epoch=nb_train_samples, epochs=nb_epoch, validation_data=validation_generator, nb_val_samples=nb_validation_samples)
#训练模型
model.save('model+weights.h5')
#保存模型及权重
2)模型保存
上述由Keras库生成的模型及权重文件为.h5格式,为了能够被Android程序读取,需要将.h5文件转换为.pb格式的文件,模型被保存后,可以被重用,也可以移植到其他环境中使用。
def h5_to_pb(h5_model, output_dir, model_name, out_prefix="output_", log_tensorboard=True):#.h5模型文件转换成.pb模型文件if os.path.exists(output_dir) == False:os.mkdir(output_dir)out_nodes = []for i in range(len(h5_model.outputs)):out_nodes.append(out_prefix + str(i + 1))tf.identity(h5_model.output[i], out_prefix + str(i + 1))sess = backend.get_session()from tensorflow.python.framework import graph_util, graph_io#写入.pb模型文件init_graph = sess.graph.as_graph_def()main_graph = graph_util.convert_variables_to_constants(sess, init_graph, out_nodes)graph_io.write_graph(main_graph, output_dir, name=model_name, as_text=False)#输出日志文件if log_tensorboard:from tensorflow.python.tools import import_pb_to_tensorboardimport_pb_to_tensorboard.import_to_tensorboard(os.path.join(output_dir, model_name), output_dir)
4. 模型生成
将图片转化为数据,输入TensorFlow的模型中并获取输出。
1)模型导入及调用
本部分包括模型导入及调用的操作方法。
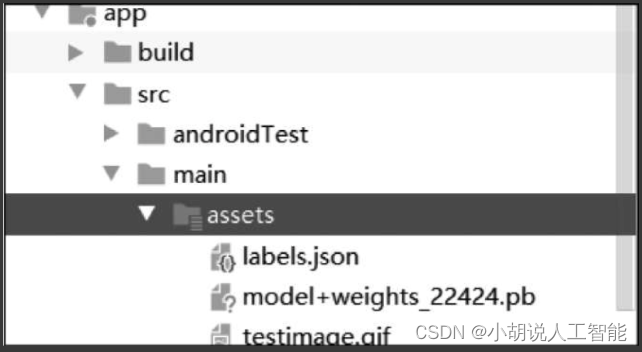
a. 编写代码进行实际预测之前,需要将转换后的模型添加到应用程序的资源文件夹中。在Android Studio中,鼠标右键"项目",跳转至Add Folder(添加文件夹)部分,并选择AssetsFolder(资源文件夹)。在应用程序目录中创建一个资源文件夹,将模型复制到其中,如图所示。
b. 将新的Java类添加到项目的主程序包中,并命名为ImageUtils,ImageUtils为图片工具类,可用于Bitmap、byte、array、Drawable图片类型之间进行转换以及缩放。
相关代码如下:
package com.example.doremi.testkeras2tensorflow;
import android.content.res.AssetManager;
import android.graphics.Bitmap;
import android.graphics.Canvas;
import android.graphics.Matrix;
import android.os.Environment;
import java.io.File;
import java.io.FileOutputStream;
import java.io.InputStream;
import org.json.*;
//用于处理图像的实用程序类
public class ImageUtils {/**返回转换矩阵,处理裁切(如果需要保持宽高比)和旋转*参数srcWidth为源帧的宽度*参数srcHeight为源帧的高度*参数dstWidth为目标帧的宽度*参数dstHeight为目标帧的高度*参数applyRotation为旋转的角度,为90°的整数倍*参数maintainAspectRatio为是否维持缩放比例*返回满足所需要求的转换*/public static Matrix getTransformationMatrix(final int srcWidth,final int srcHeight,final int dstWidth,final int dstHeight,final int applyRotation,final boolean maintainAspectRatio) {final Matrix matrix = new Matrix();if (applyRotation != 0) {//进行平移,使图像中心在原点matrix.postTranslate(-srcWidth / 2.0f, -srcHeight / 2.0f);//绕原点旋转matrix.postRotate(applyRotation);}//考虑已经应用的旋转(如果有),然后确定每个轴需要多少缩放。final boolean transpose = (Math.abs(applyRotation) +90) % 180 == 0;final int inWidth = transpose ? srcHeight : srcWidth;final int inHeight = transpose ? srcWidth : srcHeight;//必要时应用缩放if (inWidth != dstWidth || inHeight != dstHeight) {final float scaleFactorX = dstWidth / (float) inWidth;final float scaleFactorY = dstHeight / (float) inHeight;if (maintainAspectRatio) {//按最小比例缩放,以便在保持宽高比的同时完全填充,某些图像可能会截掉边缘final float scaleFactor = Math.max(scaleFactorX, scaleFactorY);matrix.postScale(scaleFactor, scaleFactor);} else {//精确缩放matrix.postScale(scaleFactorX, scaleFactorY);}}if (applyRotation != 0) {//从以原点为中心的参考转换回目标帧matrix.postTranslate(dstWidth / 2.0f, dstHeight / 2.0f);}return matrix;}public static Bitmap processBitmap(Bitmap source,int size){int image_height = source.getHeight();int image_width = source.getWidth();Bitmap croppedBitmap = Bitmap.createBitmap(size, size, Bitmap.Config.ARGB_8888);Matrix frameToCropTransformations = getTransformationMatrix(image_width,image_height,size,size,0,false);Matrix cropToFrameTransformations = new Matrix();frameToCropTransformations.invert(cropToFrameTransformations);final Canvas canvas = new Canvas(croppedBitmap);canvas.drawBitmap(source, frameToCropTransformations, null);return croppedBitmap;}public static float[] normalizeBitmap(Bitmap source,int size,float mean,float std){float[] output = new float[size * size * 3];int[] intValues = new int[source.getHeight() * source.getWidth()];source.getPixels(intValues, 0, source.getWidth(), 0, 0, source.getWidth(), source.getHeight());for (int i = 0; i < intValues.length; ++i) {final int val = intValues[i];output[i * 3] = (((val >> 16) & 0xFF) - mean)/std;output[i * 3 + 1] = (((val >> 8) & 0xFF) - mean)/std;output[i * 3 + 2] = ((val & 0xFF) - mean)/std;}return output;}public static Object[] argmax(float[] array){int best = -1;float best_confidence = 0.0f;for(int i = 0;i < array.length;i++){float value = array[i];if (value > best_confidence){best_confidence = value;best = i;}}return new Object[]{best,best_confidence};}public static String getLabel( InputStream jsonStream,int index){String label = "";try {byte[] jsonData = new byte[jsonStream.available()];jsonStream.read(jsonData);jsonStream.close();String jsonString = new String(jsonData,"utf-8");JSONObject object = new JSONObject(jsonString);label = object.getString(String.valueOf(index));}catch (Exception e){}return label;}
}
c. 在主活动(main activity)添加代码,被用于显示图像和预测结果。
public void predict(final Bitmap bitmap){//在后台线程中运行预测new AsyncTask<Integer,Integer,Integer>(){@Overrideprotected Integer doInBackground(Integer ...params){//将图像大小调整为150*150Bitmap resized_image = ImageUtils.processBitmap(bitmap,150);//归一化像素floatValues=ImageUtils.normalizeBitmap(resized_image,150,127.5f,1.0f);//将输入传到tensorflowtf.feed(INPUT_NAME,floatValues,1,150,150,3);//计算预测tf.run(new String[]{OUTPUT_NAME});//将输出复制到预测数组中tf.fetch(OUTPUT_NAME,PREDICTIONS);//获得最高预测Object[] results = argmax(PREDICTIONS);int class_index = (Integer) results[0];float confidence = (Float) results[1];try{final String conf = String.valueOf(confidence * 100).substring(0,5);//将预测的类别索引转换为实际的标签名称final String label = ImageUtils.getLabel(getAssets().open("labels.json"),class_index);//展示结果runOnUiThread(new Runnable() {@Overridepublic void run() {progressBar.dismiss();resultView.setText(label + " : " + conf + "%");}});}catch (Exception e){}return 0;}}.execute(0);
}
2)相关代码
本部分包括布局文件和主活动类。
(1)布局文件
布局文件相关代码如下:
/res/layout/activity_main.xml
<?xml version="1.0" encoding="utf-8"?>
<android.support.design.widget.CoordinatorLayout xmlns:android="http://schemas.android.com/apk/res/android"xmlns:app="http://schemas.android.com/apk/res-auto"xmlns:tools="http://schemas.android.com/tools"android:layout_width="match_parent"android:layout_height="match_parent"tools:context=".MainActivity"><android.support.design.widget.AppBarLayoutandroid:layout_width="match_parent"android:layout_height="wrap_content"android:theme="@style/AppTheme.AppBarOverlay"><android.support.v7.widget.Toolbarandroid:id="@+id/toolbar"android:layout_width="match_parent"android:layout_height="?attr/actionBarSize"android:background="?attr/colorPrimary"app:popupTheme="@style/AppTheme.PopupOverlay" /></android.support.design.widget.AppBarLayout><include layout="@layout/content_main" /><android.support.design.widget.FloatingActionButtonandroid:id="@+id/predict"android:layout_width="wrap_content"android:layout_height="wrap_content"android:layout_gravity="bottom|end"android:layout_margin="@dimen/fab_margin"app:srcCompat="@android:drawable/ic_media_play" />
</android.support.design.widget.CoordinatorLayout>
/res/layout/content_main.xml
<?xml version="1.0" encoding="utf-8"?>
<android.support.constraint.ConstraintLayout xmlns:android="http://schemas.android.com/apk/res/android"xmlns:app="http://schemas.android.com/apk/res-auto"xmlns:tools="http://schemas.android.com/tools"android:layout_width="match_parent"android:layout_height="match_parent"app:layout_behavior="@string/appbar_scrolling_view_behavior"tools:context=".MainActivity"tools:showIn="@layout/activity_main"><ScrollViewandroid:layout_width="match_parent"android:layout_height="match_parent"><LinearLayoutandroid:layout_width="match_parent"android:layout_height="wrap_content"android:orientation="vertical"><TextViewandroid:layout_width="match_parent"android:layout_height="wrap_content"android:textSize="30dp"android:layout_marginBottom="30dp"android:text="Click the Red-Colored floating button below to show and predict the image"/><ImageViewandroid:layout_width="match_parent"android:layout_height="wrap_content"android:adjustViewBounds="true"android:scaleType="fitCenter"android:id="@+id/imageview"android:layout_marginBottom="10dp"/><TextViewandroid:layout_width="wrap_content"android:layout_height="wrap_content"android:id="@+id/results"/></LinearLayout></ScrollView>
</android.support.constraint.ConstraintLayout>
(2)主活动类
主活动类相关代码如下:
package com.specpal.mobileai;
import android.graphics.Bitmap;
import android.graphics.BitmapFactory;
import android.os.AsyncTask;
import android.os.Bundle;
import android.renderscript.ScriptGroup;
import android.support.design.widget.FloatingActionButton;
import android.support.design.widget.Snackbar;
import android.support.v7.app.AppCompatActivity;
import android.support.v7.widget.Toolbar;
import android.util.JsonReader;
import android.view.View;
import android.widget.ImageView;
import android.widget.TextView;
import android.widget.Toast;
import org.json.*;
import org.tensorflow.contrib.android.TensorFlowInferenceInterface;
import java.io.FileInputStream;
import java.io.InputStream;
public class MainActivity extends AppCompatActivity {//加载流推理库static {System.loadLibrary("tensorflow_inference");}//模型存放路径和输入/输出节点名称private String MODEL_PATH = "file:///android_asset/model+weights_22424.pb";private String INPUT_NAME = "zero_padding2d_1_input";private String OUTPUT_NAME = "output_1";private TensorFlowInferenceInterface tf;//保存预测的数组和图像数据的浮点值float[] PREDICTIONS = new float[10];private float[] floatValues;private int[] INPUT_SIZE = {150,150,3};ImageView imageView;TextView resultView;Snackbar progressBar;@Overrideprotected void onCreate(Bundle savedInstanceState) {super.onCreate(savedInstanceState);setContentView(R.layout.activity_main);Toolbar toolbar = (Toolbar) findViewById(R.id.toolbar);setSupportActionBar(toolbar);//初始化TensorFlowtf = new TensorFlowInferenceInterface(getAssets(),MODEL_PATH);imageView = (ImageView) findViewById(R.id.imageview);resultView = (TextView) findViewById(R.id.results);progressBar = Snackbar.make(imageView,"PROCESSING IMAGE",Snackbar.LENGTH_INDEFINITE);final FloatingActionButton predict = (FloatingActionButton) findViewById(R.id.predict);predict.setOnClickListener(new View.OnClickListener() {@Overridepublic void onClick(View view) {try{//从ASSETS文件夹读取图片InputStream imageStream = getAssets().open("testimage4.gif");Bitmap bitmap = BitmapFactory.decodeStream(imageStream);imageView.setImageBitmap(bitmap);progressBar.show();predict(bitmap);}catch (Exception e){}}});}//计算最大预测及其置信度的函数public Object[] argmax(float[] array){int best = -1;float best_confidence = 0.0f;for(int i = 0;i < array.length;i++){float value = array[i];if (value > best_confidence){best_confidence = value;best = i;}}return new Object[]{best,best_confidence};}public void predict(final Bitmap bitmap){//在后台线程中运行预测new AsyncTask<Integer,Integer,Integer>(){@Overrideprotected Integer doInBackground(Integer ...params){//将图像大小调整为150 x*150Bitmap resized_image = ImageUtils.processBitmap(bitmap,150);//归一化像素floatValues=ImageUtils.normalizeBitmap(resized_image,150,127.5f,1.0f);//将输入传到TensorFlowtf.feed(INPUT_NAME,floatValues,1,150,150,3);//计算预测tf.run(new String[]{OUTPUT_NAME});//将输出复制到预测数组中tf.fetch(OUTPUT_NAME,PREDICTIONS);//获得最高预测Object[] results = argmax(PREDICTIONS);int class_index = (Integer) results[0];float confidence = (Float) results[1];try{final String conf = String.valueOf(confidence * 100).substring(0,5);//将预测的类别索引转换为实际的标签名称final String label = ImageUtils.getLabel(getAssets().open("labels.json"),class_index);//展示结果runOnUiThread(new Runnable() {@Overridepublic void run() {progressBar.dismiss();resultView.setText(label + " : " + conf + "%");}});}catch (Exception e){}return 0;}}.execute(0);}
}
相关其它博客
基于VGG-16+Android+Python的智能车辆驾驶行为分析—深度学习算法应用(含全部工程源码)+数据集+模型(一)
基于VGG-16+Android+Python的智能车辆驾驶行为分析—深度学习算法应用(含全部工程源码)+数据集+模型(二)
基于VGG-16+Android+Python的智能车辆驾驶行为分析—深度学习算法应用(含全部工程源码)+数据集+模型(四)
工程源代码下载
详见本人博客资源下载页
其它资料下载
如果大家想继续了解人工智能相关学习路线和知识体系,欢迎大家翻阅我的另外一篇博客《重磅 | 完备的人工智能AI 学习——基础知识学习路线,所有资料免关注免套路直接网盘下载》
这篇博客参考了Github知名开源平台,AI技术平台以及相关领域专家:Datawhale,ApacheCN,AI有道和黄海广博士等约有近100G相关资料,希望能帮助到所有小伙伴们。